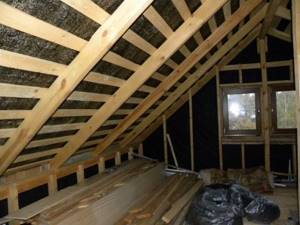
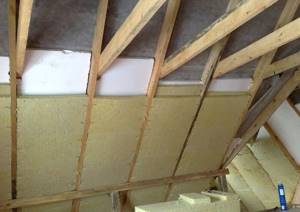
Do-it-yourself installation of mineral wool on rafters
If the width of the thermal insulation material does not allow it to fit into the space between the rafters, its installation will have to be carried out in two stages. One layer of material will be laid according to the technology described above, and the second will be laid on top of the already installed layer. Such insulation of the roof with mineral wool is much more expensive, but the result is of better quality.
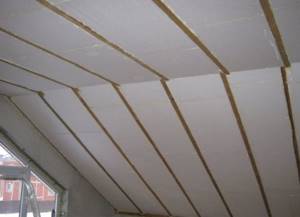
Insulation of the roof with mineral wool along the rafters is carried out according to the following algorithm:
- The first steps exactly repeat the installation algorithm between the rafters - the installation step of the rafter legs is measured, after which the insulation is cut so that it can be mounted by surprise. When using rolled material, you need to let it lie flat for a while.
- During installation, the edges of the slabs are folded inward, and after installing the insulation, they are straightened.
- A vapor barrier is attached to the rafters using a stapler. The rules are still the same: strips of material are laid with a slight overlap so that steam does not pass through the joints.
- Slats are nailed horizontally to the rafters, the thickness of which should exceed the thickness of the insulation by 1-2 cm. The distance between the slats should be sufficient for laying heat-insulating boards.
- Mineral wool is placed between the stuffed slats. When laying, you need to ensure that the joints of the material do not coincide with the joints of the previous layer.
- The final stage is the outer cladding, for which any finishing material can be used.

This roof insulation technology is considered the most effective, therefore, when deciding how to properly insulate a roof with mineral wool, you should give preference to this option.
Conclusion
Insulating the roof from the inside with mineral wool is a fairly effective means of protecting the roof from the cold. Knowledge of the theory and competent implementation of the chosen technology will allow you to create a reliable roof, under which it will be possible to arrange a living space in the future.
Insulation of the U-shaped attic contour
If the roof is high and the area of the house is large, then the attic can be equipped without sloping walls - with a U-shaped contour, the thermal insulation of which will not come into contact with the roof.
In this case, behind the contour of the attic there will be an ordinary cold attic with its own ventilation through the eaves and ridge vents. In essence, this is a technology for insulating a frame house, but inside the attic.
Insulating the attic ceiling:
- Boards or slats of the rough ceiling are hemmed to the top ties, which act as ceiling beams.
- A vapor barrier is installed on the side of the room. The strips are laid overlapping and all joints are glued.
- On the “attic” side of the attic, insulation is laid between the tie beams (if necessary, in two layers).
- A waterproofing membrane is spread over the insulation. It is required if it is not included in the roofing pie. If the roof has waterproofing, but the mineral wool mats are not laminated, then ordinary fiberglass can be laid on them as a wind barrier.
- On the inside, a counter-lattice is attached over the vapor barrier. It is needed to ensure that there is an air gap necessary for the functioning of a vapor barrier with an anti-condensation or reflective surface.
Insulation of attic walls:
- A waterproofing windproof membrane is attached to the outside of the posts.
- If the contour of the attic on the roof side is sheathed with plywood or OSB, counter-lattice bars are nailed to the posts on top of the waterproofing.
- Thermal insulation is laid between the racks.
- A vapor barrier is laid in a continuous layer on the inside of the racks. Tape the junction with the vapor barrier of the ceiling and floor.
- Install the sheathing for the interior lining.
If none of the options suits you, then the roof can be dismantled, and waterproofing and insulation can be carried out using standard technology.
Algorithm for roof insulation, how to lay thermal insulation
Installation of a roof with insulation comes down to the following sequence of actions:
First, the installation step of the rafter legs is measured. The heat-insulating material slabs are cut in accordance with the obtained dimensions, but 1 cm is added to them - this will allow the insulation to stay in place on its own. You can simplify this stage of work when installing a new roof by calculating it so that the distance between the rafters corresponds to the width of the insulation boards. A waterproofing layer must be installed in the space between the rafters and the finishing coating. The membrane must be attached to the rafters so that it envelops them. For fixation, you can use a construction stapler, which attaches the waterproofing to the rafters and sheathing. Waterproofing material must be applied to the eaves so that the collected moisture escapes beyond the roof. The described method of fastening does not allow for proper ventilation, so only a special waterproofing membrane should be used as a material. If waterproofing is already installed under the upper part of the roof, then nails are driven into the rafters every 10 cm so that the distance between them and the membrane is at least 3-5 cm. The driven nails allow you to stretch a cord along the line of which the air gap will pass in the space between waterproofing and thermal insulation material. If the insulation itself is attached using a cord, then the nails will also need to be hammered along the outside of the rafters. When using insulation materials produced in the form of slabs, installation is reduced to inserting them into the space between the rafters (naturally, they will have to be compressed a little so that they fit into the gap). Before properly insulating the roof, more rigid materials must be carefully adjusted to fit the gaps in the rafter system. For maximum efficiency, it is worth installing two-layer insulation. When installing narrow fragments that require joining along one of the planes, you need to make sure that the joints of the first and second layers of thermal insulation do not coincide with each other. The thermal insulation layer should not extend beyond the rafters, and if this happens, then additional timber will have to be placed on the rafters. To attach the insulation, a cord stretched between nails or a lath made of slats can be used. These slats need to be nailed to the rafters at a distance of 30-40 cm from each other. In this case, the vapor barrier layer must be attached before the sheathing is installed - due to the thickness of the slats, an air gap is provided. When installing a vapor barrier, you need to make sure that the material is installed hermetically. To do this, the joints need to be covered with two layers of adhesive tape.
Particular attention should be paid to the points where the material connects to the wall and chimney. When all structural elements are installed, you can proceed to the final stage - installation of the sheathing.
Conclusion
Roof insulation is a very important part of the structure, which allows you to increase the thermal efficiency of the roof. Knowing how to properly install insulation on a roof and high-quality performance of all work will allow you to create a reliable and high-quality structure that will perform its functions throughout the entire period of operation.
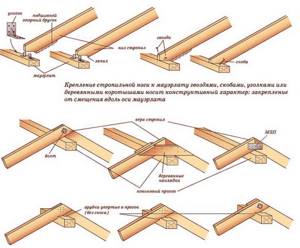
Types of fasteners
There is ongoing debate among experienced roofers as to what is the most effective way to attach rafters to floor beams and mauerlat. However, in most cases the problem is that in these conditions it is more practical to use nails or self-tapping screws. Both of these fasteners have their own advantages and disadvantages:
- Nails are good because all you need to hammer them in is a hammer, which is available in every household. However, some craftsmen complain that hammering them in by hand takes too long. It is worth recalling that special jagged nails are used to fix the rafters, which securely adhere to the wood.
- To assemble the rafter frame, galvanized self-tapping screws are used, which are not afraid of corrosion. Due to the thread, they are firmly screwed into the thickness of the wood, securely fixing the elements together. Screwing them in quickly and conveniently with a portable screwdriver. The disadvantage of this type of fastener is that during dismantling, removing screws from wood is long and tedious.
Most experienced roofers agree that to fix rafter legs it is better to use galvanized rough nails, the length of which is 5-3 mm greater than the thickness of the lumber. Properly selected fasteners are the key to high-quality and long-term fixation of the roof frame, which will not be afraid of either mechanical stress or wind load.
Attic floors
When choosing insulation for the attic floor, you need to take into account its thermal protection, strength and stable qualities in relation to adverse environmental conditions
It is also important to take into account the type of flooring and the material from which it is made. Concrete and wood have their own characteristics
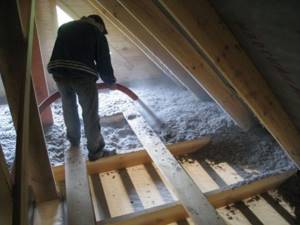
The process of installing insulation depends on the material; if it is mineral wool, then it is better to use thick layers (about 20 cm), but if you want to create increased thermal insulation, you can increase the thickness to 30 cm. The wool is laid only after the vapor barrier has been placed. It is best to lay it under a ceiling made of boards or timber so that they do not absorb moisture and rot. If it was not possible to lay a solid piece of vapor barrier, it needs to be glued with tape.
After this, work begins with the insulation, which is placed in a wooden frame so as to fill all the free spaces. Once the mineral wool has been placed, waterproofing is laid on top, which prevents the wool from absorbing excess wool.
It is especially important to do this if the next step is pouring concrete when the 2nd floor of the building is planned. Instead of concrete, you can make flooring from OSB boards
This is how you can insulate the attic and, if desired, make it a living space.
Main types of insulation
URSA is one of the modern insulating materials that fully meets the requirements.
Its basis is spatula fiber, processed using the proprietary technology of the URSASpannfilz company.
The insulation has such a high level of geometric resistance that it does not require renewal or repair over its entire service life.
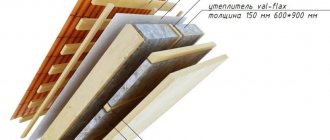
URSA is available in the form of mats measuring 1200 x 4200 mm, the thickness of which is 150 mm. The material is rolled into tight rolls and sealed in film.
Before use, the rolls are opened and allowed to straighten. It only takes a few minutes to reach normal size and restore thickness.
Afterwards the mat needs to be cut. If the pitch between the rafters is 60 cm (standard size), the mat should be cut lengthwise into two parts.
In the case of a different distance between the rafters, the mat is cut transversely into separate slabs, the length of which should be approximately 30 mm greater than the size of the rafter pitch.
After this, the slabs are placed between the rafters (they must be slightly compressed). Due to the high degree of elasticity of the material, the mats hold in place independently, and there is no need for additional fastening
Installation of this insulation is so simple that even one person can do it. URSA is also suitable for broken gable roofs.
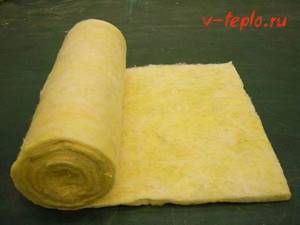
- Glass wool is a material that has been used for a very long time and has not yet lost its popularity.
However, it should be noted that this insulation has a number of serious disadvantages, as a result of which many builders do not recommend using it for thermal insulation of gable roofs:
- glass wool perfectly absorbs moisture and loses its quality characteristics in a short time;
- it can easily be deformed and lose its geometric shape, as a result of which, when using it, it is necessary to significantly complicate the roofing pie to prevent slipping;
- the material does not meet environmental safety requirements.
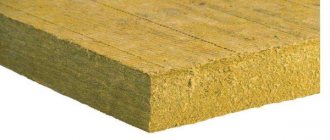
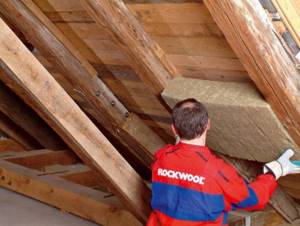
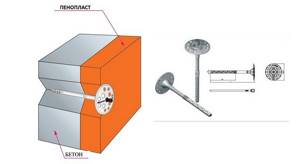
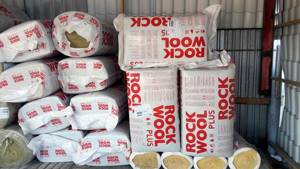
- Mineral wool is a very popular material for insulation. It is obtained as a result of special processing of basalt rocks.
They are exposed to extremely high temperatures, after which the resulting mass is pressed and shaped into tight slabs. As a result of the described actions, a chaotic interweaving of fibers occurs into a very dense micronetwork. Thanks to this structure, the boards do not deform, do not absorb water and moisture, are resistant to temperature fluctuations and the effects of adverse environmental factors,
How to properly install snow guards on the roof.
You can get acquainted with the technology for repairing soft roofs in the article.
In addition, mineral wool does not emit toxic substances and does not burn.
- Spatula insulation - this material is non-hygroscopic and easy to install. There are several types that differ from each other in the degree of density. Therefore, it can be used for internal insulation and external thermal insulation.
To maximize heat retention, a material with a high fiber density is used. It is perfect for gable roofs. Due to its weight, the insulation fits tightly to the slopes, which helps prevent slipping. The material based on spatula fibers meets environmental requirements.
Instructions for insulating the roof from the inside
Next, we’ll look at how to properly insulate a roof. For ease of perception of information, we will divide the procedure into 3 stages. As an example, consider laying basalt wool. Our choice fell on this material, since its installation is more difficult than penoplex (or its analogues).
Stage 1: preparing materials tools
To complete the work you will need the following list of tools (purchase the missing ones):
- Screwdriver (or small hand drill).
- Tape measure, level, pencil - this will be needed for marking.
- Construction ladder. In its absence, you can build scaffolding from unnecessary boards.
- Gasoline or electric saw. You can replace it with a grinder with a wood disc or a circular saw.
- Construction stapler with staples (type 54).
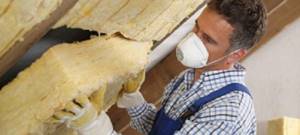
- Personal protective equipment: gloves, respirator.
We also purchase the following list of materials:
- Basalt wool.
- Vapor barrier film.
- Thermal protection membrane.
- Slats for creating sheathing. The thickness should be approximately (plus or minus 1 cm) the same as that of the insulation.
- Self-tapping screws for fastening slats (50-60 mm).
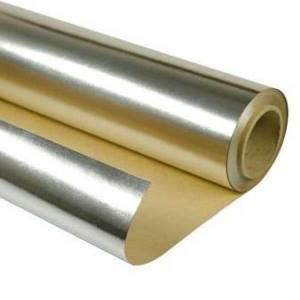
Isover brand vapor barrier film
Stage 2: processing of floors and preparation of sheathing
Before insulating the roof, it is necessary to prepare the original surface. You will need to do the following:
- Check the ceilings for integrity (relevant if the roof was built several years ago). If there are boards with breaks, cracks or a large number of fallen knots, they must be replaced.
- Using a level, check that the guide boards are installed evenly. Adjust if necessary.
- Treat all wooden surfaces with an antiseptic. Any protective impregnation for wood will do. This is an optional procedure, however, it will significantly increase the operational period of the floors.
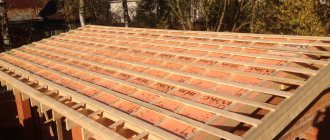
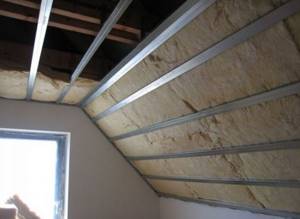
- Place slats along the rafters (i.e. perpendicular to them) to create a sheathing. The distance between them should be 2-3 cm less than the width of the purchased insulation (usually it is 60 or 100 cm). It is also advisable to treat reiki with an antiseptic.
What the sheathing should look like
Stage 3: laying thermal insulation
- To ensure that the insulation of the attic roof from the inside is as effective as possible, the first step is to install a moisture-proof film on the roofing. It is attached “overlapping” using a stapler.
- The joints are taped with construction tape. This measure is necessary to create a tightness - this is the only way to reliably protect the insulation from environmental influences.
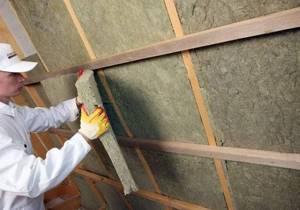
- Thermal insulation is placed in the gap between the guides. It is also attached using a butt-to-butt stapler. When cutting, you must leave a margin of 1-2 cm on each side. This is necessary so that the cotton wool fills the entire space as tightly as possible.
- At the end, a heat-protective membrane is attached to the brackets on top of the insulation. The heat-reflecting layer should be directed indoors.
The process of laying insulation
At this point, the insulation of the roof from the inside with your own hands is completed, you can begin finishing the floors. As you can see, this procedure is not particularly complicated, so with patience, it can be done without the help of specialists.
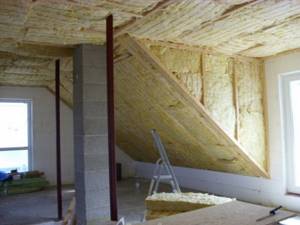
Are you planning to turn the attic into a living room? In this case, you cannot do without insulation of the roof and rafter structure. They can be carried out both during the initial construction of the house, and later - during reconstruction or repair.
Below we discuss how to properly insulate the roof along the rafters and which of the existing technological processes to choose. A well-thought-out plan will avoid unnecessary time and money costs.
How to attach insulation between roof rafters?
Organizing a warm roof for a house includes the mandatory installation of a layer of thermal insulation. Often, the slopes are insulated after the assembly of the rafter system is completed. This work is carried out before installing the roof cladding. This procedure is considered optimal. But sometimes annoying miscalculations occur with a large pitch of rafter legs, and then it is not so easy to fix the insulation between the rafters from the inside.
- Do-it-yourself installation of mineral wool from the inside
- Roof thermal insulation technology
- "Pie" for the roof
- Waterproofing
- The most popular roof insulation materials
- Roof vapor barrier
- Roof ventilation
- Finally
- Video about fixing insulation between rafters
Types of roofs, insulation using roofing coverings
Roofs are classified according to their shape and slope:
- flat;
- single-pitched;
- gable (in the form of a triangle);
- hipped (hip);
- half-hip.
They are covered depending on traditions, economic opportunity and aesthetic preferences: tiles, aluminum or copper profiled sheets, euro slate, corrugated sheets, seam covering, roll materials.
Each type of coating has different heat saving indicators and installation technology. Their choice must correspond to the following roof strength calculations:
- probable seasonal fluctuations in external temperature;
- the influence of air masses that determine the strength of the wind;
- the effects of precipitation, including the thickness of the snow layer and the impact force of hail;
- total weight of the coating;
- roof insulation weight.
Preparation
To carry out insulation procedures, it is important to clearly understand what type of roof you will be working with. By correctly determining the order of work, you can quickly and efficiently insulate the roof
It is also worth considering the materials that will be at hand during work. It is important to clearly understand for yourself what exactly you have to work with and what to do.
If the insulation process has become completely clear, then you can cope with absolutely any roof, be it a rural house or a large villa by the sea
In order to carry out insulation work, it is important to prepare the roof itself for this
There is a specific procedure for this, which includes:
- inspection of the rafter system so that damaged boards can be identified in time and replaced;
- treating wooden structures with an antiseptic;
- checking communications if they are located under the roof. This applies to piping and wiring.
As soon as the roof is ready, you need to check the availability of all the materials that will be used for insulation, prepare the tools, and only after that you can get to work. The work process has its own rules and patterns that you need to know in order not to make mistakes and get a good and high-quality result.
Is it worth it to insulate the roof in a particular house?
The main thing here is to make a fundamental decision - will the attic be used as an “uninsulated” storage room for various small things or is it still planned to make a living room there.
The roof should be insulated along the rafters only in the second case, when arranging the attic. Snow lying on the roof must be insulated from the attic heat, otherwise it will begin to melt and turn into ice, with subsequent damage to the roofing materials.
But in a situation with a non-residential attic, the ceiling between the living rooms in the house and the under-roof space should be insulated. Otherwise, it will cease to perform the functions assigned to it and, plus, corrosion processes may begin on the rafters.
Is it possible to do without insulation?
A private house is usually equipped with roofs with several slopes, which form an attic on top of the main floors. Often the attic space is converted into living space, creating additional square meters in the house. This is very important for large families. If there is no insulation of the attic or attic, as such, then living in such conditions will be physically uncomfortable and impossible, due to the lack of heat necessary for the human body.
An insulated roof saves heating costs
Any roofing material, be it iron or slate, will not be able to protect the interior space from the cold, as a specially designed heat insulator (mineral wool, polystyrene foam, etc.).
If you ignore the installation of insulation or postpone it for an indefinite period, you can soon get not only heat leakage from the house, but also problems with the rafter system. It will be covered with fungus and will gradually rot, creating the danger of destruction of the entire structure. If you insulate the roof, but incorrectly calculate the thickness of the thermal insulation, then instead of a protective function, you will get an inversely proportional one - a destructive one.
Insulation of a sloping roof
Failure to comply with construction and installation standards is fraught with consequences for human safety. When choosing insulation, you need to be guided not only by its physical and chemical characteristics, but also by the possibility of installing it yourself. If you have questions or difficulties in choosing insulation and the method of its installation, it is better to seek help or comprehensive advice from professional roofers.
Poorly designed roof leaks
Choosing thermal insulation material
Many manufacturers offer consumers a variety of thermal insulators, each of which has positive and negative sides. Among all operational characteristics, special attention is paid to the following:
- Level of moisture absorption - the lower this ability of the materials in question, the longer their service life can be counted on
- Thermal conductivity – it should be as low as possible. However, this indicator is relative, since an increase in porosity and importance can significantly worsen it
- Low-density insulation materials have much better thermal insulation properties
Video on material selection
You should also pay attention to such characteristics as environmental friendliness, chemical resistance, flammability and frost resistance.
The most widely used materials for insulating roofs from the inside are mineral wool and glass wool. They have all the necessary characteristics and are relatively easy to use.
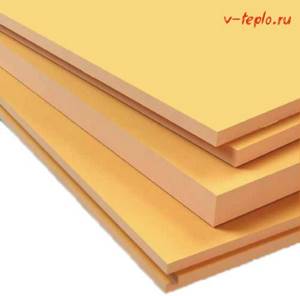
Expanded polystyrene is no less popular. In addition to high thermal insulation properties, it practically does not absorb moisture, is durable and rigid, resistant to high temperatures and open fire. A significant disadvantage is the susceptibility to rodent infestation. That is why it has not become widespread.
Other, less common methods of internal insulation are also possible:
- The use of spraying is one of the most expensive methods, which is recommended to be entrusted to a professional craftsman. If you need to insulate a regular attic rather than an attic, you should choose this method. Material costs will be paid off by performance characteristics
- Insulation with liquid compounds (polyurethane foam or foam concrete) is not very popular, as it requires the use of specialized equipment to carry out the work
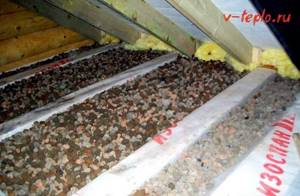
If thermal insulation of a classic attic space is necessary, additional spreading of bulk materials (expanded clay, sawdust, sand, etc.) is done above the ceiling.
Features of a warm roof
If you want to create a high-quality and reliable roof, under the arches of which there will be a warm and cozy attic suitable for all-season living, then take care of forming the correct roofing “pie”, consisting of several insulating layers.
To keep the attic room warm even in winter, it is not enough to create a powerful heating system in the house
It is important to preserve the heat generated by heaters by protecting the walls and roof of the house from loss.
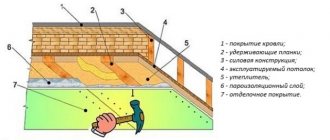
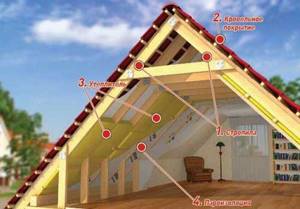
A high-quality roofing “pie” consists of three layers, arranged in a certain order.
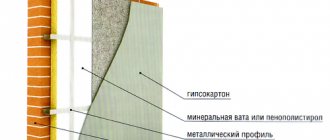
The outer layer, located directly under the roofing material, needs to be laid with waterproofing, then with insulation, and the work is completed by stretching the vapor barrier.
Some builders prefer to supplement the roofing pie with a soundproofing layer.
All layers of the roofing pie can be laid both outside the house and inside it. The first method is preferable for homes located in warm climates.
If there is precipitation outside the window, or work aimed at constructing the roof is carried out in winter or autumn, then it is better to lay the layers of roofing cake from inside the room so as not to wet the thermal insulation.
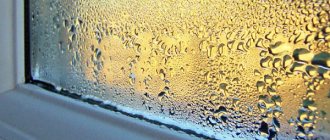
The vast majority of thermal insulation materials are susceptible to moisture, so installing them without using a waterproofing layer is strictly not recommended.
It is necessary to protect thermal insulation from moisture not only from the outside, creating a layer between the insulation and the roofing material, but also from the inside of a wooden building.
It is best to use high-quality vapor barrier membranes, which will protect the insulation from condensation that forms within the room and rises to the roof.
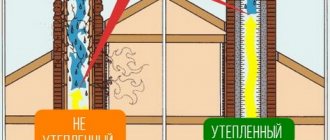
To minimize dampening of thermal insulation, which will lead not only to the destruction of the material, but also to an increase in its thermal conductivity (and therefore to the loss of necessary properties), high-quality forced ventilation should be organized in a wooden house.
Properly laid ventilation ducts will help remove moist air outside the building.
For attics and attic spaces intended not for living but for storing various items, forced ventilation is not required.
How to insulate a roof ceiling ↑
In country houses, the ceiling is usually insulated from the attic side. Firstly, the installation of the structure is greatly facilitated, and secondly, it is possible to save useful space. Work begins with preparing the attic floor area:
- the floor is covered with a vapor-proof film; wooden slats are fastened at such a pitch that the insulation, for example, mineral wool blocks, fits between them; in case of significant heat losses, the heat-insulating material is laid in several layers; its last layer must necessarily cover the beams so that the tree does not become a “cold bridge”; the remaining voids are filled with construction foam; install the second layer of vapor barrier film.
Video tutorial: “How to insulate a roof from the inside”
Is it worth it to insulate the roof in a particular house?
The main thing here is to make a fundamental decision - will the attic be used as an “uninsulated” storage room for various small things or is it still planned to make a living room there.
The roof should be insulated along the rafters only in the second case, when arranging the attic. Snow lying on the roof must be insulated from the attic heat, otherwise it will begin to melt and turn into ice, with subsequent damage to the roofing materials.
But in a situation with a non-residential attic, the ceiling between the living rooms in the house and the under-roof space should be insulated. Otherwise, it will cease to perform the functions assigned to it and, plus, corrosion processes may begin on the rafters.
Material selection
Which is the best thermal insulator to choose? The main requirements for roof insulation are their degree of thermal insulation, density, resistance to extreme temperatures, long service life, and the ability to muffle sounds emanating from the room.
For repair and finishing work, the correct calculation of the thickness of the insulation is no less important.
The choice of thermal insulation should be made taking into account the climatic parameters of the region. Depending on the configuration of the attic where it is being installed, you can either use roll insulation or use blow-in wool. During installation, mineral wool, polystyrene foam, ecowool and foam glass are most often used.
Mineral wool
This material is popular, practical and available for insulating any home. Its thermal insulation characteristics are time-tested, and when exposed to fire, it simply smolders, preventing the flame from penetrating further. The blow-in installation method makes it possible to insulate even hard-to-reach areas of the roof.
The hygroscopicity of mineral wool allows it to easily absorb liquid, and therefore for a high-quality finishing of the roofing pie, an additional layer of waterproofing is required.
Styrofoam
Polystyrene foam derivatives are inexpensive, have good insulating qualities, and also perfectly protect the room from noise and moisture.
The negative side of using polystyrene foam will be its rapid destruction, requiring replacement of the insulation after a short period of time. In addition, the high flammability of this material increases the fire hazard level of the building.
Ecowool
High-quality thermal insulation of the roof can be achieved using ecowool. Despite the fact that this insulation is made from waste paper, it contains fire retardants that provide high fire resistance.
To increase the resistance of cellulose to fungi and mold, it is additionally impregnated with an antiseptic. This technology makes it possible to obtain a lightweight and cheap material with a good degree of thermal insulation.
Foam glass
Glass production residues foamed with carbon are durable, resistant to deformation, retain heat well and are not afraid of microorganisms. These properties make it possible to use foam glass for finishing all types of roofs.
Correct calculation of the amount of material allows you to increase the elasticity of the soft roof, as well as strengthen and level the hard one. Foam glass does not absorb liquid well, and therefore, for better adhesion of the material to the insulated surface, it is necessary to use a special polymer-cement glue.
Expanded clay
This material is often used to insulate the outside of roofs or attic floor slabs. Its embankment, compaction and coating with roofing felt will provide not only high-quality thermal insulation, but will also seriously increase the strength of the building.
The use of expanded clay when arranging a roofing pie is allowed only if the load-bearing floors are sufficiently thick.
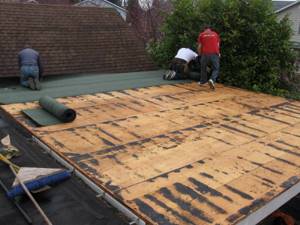
Thermal insulation of flat roofs
The same materials are used to insulate a flat roof. There may be limitations in the use of foam insulation if high fire safety requirements are imposed on the coating. They carry out work both outside and inside. The insulation can be single-layer or multi-layer.
If you plan to insulate a flat roof on both sides, then first install an external roofing pie, and after a season, if there are no leaks, perform internal insulation. Flat roofs can be traditional or used. The choice of material and technology for forming the roofing pie depend on the type of roof.

Traditional and used flat roofs are insulated differently
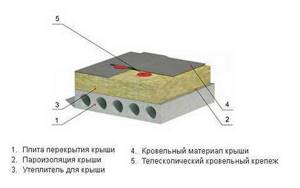
For traditional structures, the roofing pie consists of the following layers:
- Base. This can be a concrete slab or metal profile.
- Vapor barrier layer.
- One or two layers of insulation.
- Waterproofing.
The composition of the pie for an exploited roof:
- Only a concrete slab can act as a load-bearing base.
- Waterproofing film.
- Insulation.
- Drainage geotextiles.
- Crushed stone bedding.
- Finish coating.
Insulation methods: single-layer and double-layer thermal insulation
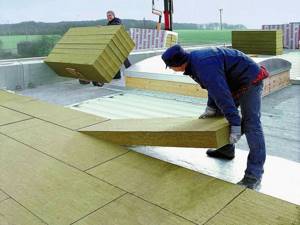
For external insulation, many different materials with a porous structure are used (for example, foam concrete or expanded clay). But the most popular are extruded polymer foams and mineral wool. Due to its low cost, mineral wool is a priority for many craftsmen.
Mineral wool is often used to insulate flat roofs due to its lower cost.
For single-layer insulation, dense material is used. Depending on the type of base, insulation of a flat roof with mineral wool is performed as follows:
- Single-layer insulation on a concrete base is performed with mineral wool with a density of at least 40 kPa.
- First, a vapor barrier is laid. PVC film, roofing felt or bitumen primers are used as a vapor barrier.
Roofing felt can be used to vapor barrier a flat roof. - Insulation is laid on top of it.
Insulation is laid over the laid vapor barrier layer - A prefabricated screed made of flat slate or CSP (cement particle boards) is installed on top. Waterproofing is done over the screed using bitumen.

A two-layer screed made of flat slate or cement-bonded particle boards is placed on top of the insulation. - Insulation on a metal profile is always at least two layers. A waterproofing film is laid under the insulation. The lower panels of mineral wool are taken less dense (from 30 kPa) and 5–20 cm thick, and for the top layer thin panels of 3 cm with a high density (above 60 kPa) are used.
It is allowed to lay mineral wool on a metal profile without a leveling layer using flat slate.
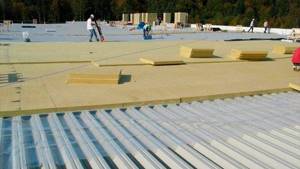
The bottom layer of mineral wool should be thicker and less dense than the top
But in this case, the thickness of the lower insulation should be twice as large as the distance between the extreme points of adjacent profile waves.
Video: how to simultaneously insulate and waterproof a flat roof
Rules for laying foam materials:
- The slabs are laid on the metal profile with their long side across the profile waves.
- The sheets are laid with the seams staggered and the jointing should be similar to brickwork.
- When laying in multiple layers, the top seams should not coincide with the bottom ones.
Methods for attaching slabs to the base
The following methods are used to fix the material:
- When laying on a metal profile, a mechanical method is used. For a wooden base, use self-tapping screws with telescopic plastic “umbrellas”. For concrete bases, anchors with long screws inserted into plastic sleeves are used.
To install insulation into concrete, dowel nails with wide heads are used. - The slabs can be attached to the concrete base with glue. Cold or hot bitumen mastic is used as glue. It will also perform a waterproofing function.
- When installing inversion (operational) roofs, the ballast method is used. In this case, the insulation is pressed down by the weight of the finishing gravel backfill.
Thermal insulation of a flat roof from the inside
If necessary, the flat roof is insulated from the inside. Typically, such work is performed when the roof does not have an attic space. The technology is simple; all the difficulties lie in the need to constantly keep your arms extended upward. But, unlike outdoor work, there is no need to rush, and the work can be done at a moderate pace:
- Thermal insulation material is glued in strips using bitumen mastic to the ceiling surface. It is better to use cold mastics, since after drying they do not emit an odor.
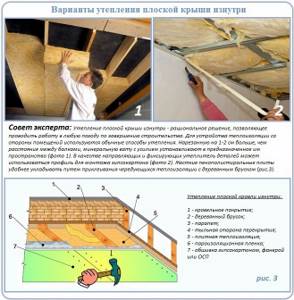
The insulation is placed in a pre-assembled frame or glued to bitumen mastic - Between the strips, a beam equal in thickness to the insulation is screwed to the ceiling. The timber will perform a load-bearing function in relation to finishing materials (plasterboard, lining).
- First, the outermost block is attached to the wall. Then the strip on which the insulation will be glued is coated with mastic. After gluing the strip of mineral wool, the next block is tightly applied to the end of the slabs and secured with dowels. Since the bars are installed after coating the surface with mastic, the waterproofing is continuous, without breaks.
- After filling the entire surface of the ceiling with insulation, a vapor barrier film is attached to the bars with a stapler.
- At the end, the sheathing is screwed to the bars and the finishing material is installed.
High-quality roof insulation largely depends on what material you decide to use. Cotton insulation always requires the installation of ventilation ducts. Extruded foam boards make installation technology easier, but they are more expensive. Over large areas, this difference can result in a significant amount. At the same time, polystyrene or polyurethane foam are ideal for insulation on top of the rafters, and mineral wool fills the cells efficiently when insulating between the rafters. Therefore, before making your final choice, you must carefully weigh all these factors, taking into account your financial capabilities.
Ursoy roof insulation technology
Thermal insulation for pitched roofs requires a special installation technology due to the possibility of condensation penetrating into the material, as well as steam rising from the room. Basically, such insulation is used in conditions where it is necessary to insulate the roof in order to make part of the room under the roof residential.
To carry out the operation of insulating a roof slope with Ursa “Pitched Roof”, you will have to carry out some steps.
Before installing the roof itself, a waterproofing film is laid on top of the rafters. The type of film depends on many factors, such as the characteristics of the insulation, the roofing material and the film itself. The film is laid out across the rafter system with an overlap of 100 mm. The joints of the film are connected using special tape. The material is secured to the rafter system using a stapler or nails with a wide head.
A sheathing of bars with a cross-section of 25x25 mm is mounted on top of the film, although it can be larger, depending on the calculated data. The thickness should be sufficient so that the under-roof space is ventilated very actively. It turns out that there are 2 ventilation gaps between the insulation and the film, as well as between the film and the roof, which prevents condensation from appearing. This means that the sheathing is also installed on the other side of the waterproofing film.
Before insulating the pitched roof, roofing material is laid. It is attached either directly to the sheathing, or to sheets of chipboard or OSB, which are previously mounted on the sheathing.
After this, you can begin laying the Ursa “Pitched Roof”. To begin with, the material is unpacked and left in this state for about 20 minutes so that it straightens out and returns to working condition. After this, the roof insulation is cut into separate sheets of the required size, adding 2-3 cm to the width. In this case, the material will fit tightly into the space between the rafters. To straighten the edges, press lightly on the canvas.
Good to know! In order not to cut the insulation and not waste precious time on this, the distance between the rafters is made slightly less than the width of the insulation by 2-3 cm.
A vapor barrier film is spread on top of the insulation (from inside the attic), which is attached directly to the rafters. After this, the attic space is finished (if necessary). Before finishing, another sheathing of wooden blocks or a classic metal frame for a plasterboard system is installed.
If the attic space is not intended to be used as a living space, then such an insulation scheme is not entirely suitable, since in this case it is necessary to insulate the attic space by laying insulation on the attic floor.
If you buy a finished house where the attic insulation has not been completed, you can resort to some work. Since there is a ready-made pitched roof, the waterproofing film is laid on top of the rafter system, so that it follows the topography of the structure. After this, the insulation is installed in the spaces between the rafters. It turns out that the wooden structure is not protected from leakage, but the insulation is protected.
A similar method of insulating pitched roofs is applicable for any type of mineral or glass wool insulation.
Features of insulation with different materials
Mineral wool. For installation you will need:
- Installation of a frame made of profiles or wood.
- Vapor barrier film to protect cotton wool from moisture.
The vapor barrier material should overlap by 10 cm at the joints. Double-layer thermal insulation should be laid so that the joint lines do not coincide. The main feature of the installation is the complete isolation of mineral wool from moisture. Then the service life and insulation efficiency will be noticeable.
Extruded polystyrene foam is widely used in various construction works. Roof insulation has also become popular. The installation method depends on the type of roof. The slabs are laid on top of the waterproofing film between the rafters. For fastening, special glue, screws and dowels are used. The sheets must fit tightly to each other and to the rafters.
For convenient arrangement of the material, you can make a frame sheathing according to the size of the foam sheets. All cracks after installation must be carefully filled with foam. For greater efficiency, the working surface can be supplemented with foam insulation. The excellent characteristics of the material will provide reliable thermal protection when paired with polystyrene foam. Finishing can be done with plasterboard or plywood.
Insulation of a pitched roof
Thermal insulation of a pitched roof is installed on the rafter system. Before laying insulation on the roof, it is necessary to design it in advance in order to avoid installation errors.
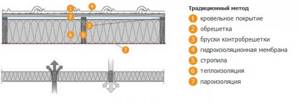
A pitched roof consists of the following elements:
- Roofing;
- Waterproofing layer;
- Thermal insulation;
- Vapor barrier material;
- Interior finishing (optional).
Mineral wool is most often used as a thermal insulation material, which has high performance characteristics and is relatively inexpensive. The main disadvantage of mineral insulation is its ability to absorb moisture, which is why its thermal insulation properties are lost over time. In addition, the presence of moisture under the roof leads to the gradual destruction of wooden parts.
To compensate for the described disadvantage, the structure must be supplemented with ventilation, hydro- and vapor barrier. The insulation itself on the roof of the house is laid on the underside of the roof during its arrangement or repair. If we are talking about repairs, then damaged wooden elements should be replaced, and new ones should be treated with protective compounds before installation.
In addition, for effective insulation and reliability, the roof must be well ventilated, so it is necessary to install ventilation ducts between:
- A layer of waterproofing and finishing coating;
- Thermal insulation and waterproofing layer;
- Vapor barrier material and internal lining.
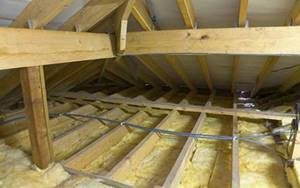
Traditional insulation method. Installing insulation between rafters.
Thermal insulation, usually mineral wool, is installed between beams or rafters, which act as cold bridges.
- the thickness of the rafters must correspond to 4 times the thickness of the insulation (due to the low thermal insulation capacity of the wooden rafters). In fact, the thickness of the rafters does not exceed 150-200 mm. At the same time, the area of such cold bridges in the roof area is 7.7% (with a rafter pitch of 650 mm under slabs of 600 mm).
- complex correct installation of thermal insulation between rafters installed at non-standard spacing.
- Mineral wool at sufficient angles of inclination of the roof can slide and sag over time, forming voids not filled with insulation - a direct path to heat loss
- Fiber thermal insulation needs to be insulated from water vapor so as not to accumulate water.
- Fiber insulation has an irritating effect on the skin of small fibers when working with it, and in a poorly ventilated attic space (for example, when installing insulation from the inside) - on the eyes and respiratory system.
As a result, the roof's thermal insulation barrier is not continuous, which, in addition to increased heating costs, can negatively affect the interior decoration over time.
Classification of insulated flat roofs
The external simplicity of a flat roof can lead to deep bewilderment for home craftsmen who want to quickly erect a roof over private property. Those who consider flat roofing a budget option will also be surprised.
If the roof is built wisely: with the proper number of waterproofing layers, with insulation of the required thickness, with parapets, drainage and its heating, in the end it will cost quite a lot, but also work flawlessly.
Flat roofs of the following categories are subject to insulation:
- Combined, they are also without attics. Their roof structure is combined with the ceiling. Insulation is carried out by laying thermal insulation with accompanying layers on top of the base. The advantage of combined systems is that they practically do not require winter clearing of snow cover. After all, the ceiling is regularly heated from the inside. Minor snow deposits can be easily removed by the natural force of the wind, which is why it is recommended to equip such roofs not with parapets, but with lattice fencing. Disadvantage: the condition of the roof is difficult to monitor. The slightest damage will result in leaks, followed by serious restoration of the roofing pie.
- Attics, which have two subtypes within the category. The attic floor of the first subtype is supplemented with a light superstructure on top. It is clear that in such cases the ceiling should be insulated. In the scheme of the second subtype, the attic superstructure and the ceiling are independent structures. This means that insulation is acceptable for both of them. The advantage of attic structures is the free monitoring of the condition of the roof and the timely detection of impending leaks. Owners can dry out the roofing pie by simply ventilating the attic. Among the significant advantages is the ability to carry out insulation upon completion of roof construction. The disadvantage lies in the impressive cost, which, however, pays off through long-term operation and rare repairs.
The second category of attic roofing systems means that the insulation can be located either within the superstructure or above the ceiling. However, the second option for laying insulation for a flat roof is a priority.
According to the second scheme, an air chamber is formed between the roofing and the thermal insulation system. This is an attic that divides the structure into two parts with different temperature backgrounds.
The difference between the external and internal temperatures of the attic roof will not be as significant as it is with structures without an attic. The temperature change will not be so sharp and destructive. Plus a minimum of condensation, which is the secret to the longevity of attic roofs.
Cost of work
Name
Unit price
Laying vapor barrier film with taping seams
Laying waterproofing film
Laying insulation in 1 layer of 50 mm
Installation of internal sheathing from edged boards (the insulation is supported on it)
If you have a house or building that needs to be insulated, call us at 8, 8-950-834-45-72 (Andrey Aleksandrovich).
We will come and calculate the cost of materials and roof insulation work.
Methods for insulating a roof from the inside
To ensure that your efforts and time are not wasted, you need to know how to properly insulate the roof of a house from the inside. Note that this process is somewhat more complicated than external roof insulation. However, if there is still no other choice, you need to purchase insulating material, a vapor barrier membrane, and consumables (screws and wooden planks). You will also need to prepare a marker, a sharp knife, a stapler and a screwdriver.
Two methods are usually used for internal roof insulation:
- Laying in spaces between rafters. If the thickness of the insulation layer is less than the cross-section of the rafters, the material is laid in the space between them. First, the rolled insulation is cut into pieces that are 2-3 cm wider than the gap between the rafters. The material is placed in the formed niches. The disadvantage of this method is the possibility of cold penetration into the attic through small cracks in the frame.
- Flooring over rafter legs. This method is used in cases where the cross-section of the rafters is not enough to lay insulation of the required thickness. In this case, 2 layers of insulation are installed. The first is mounted in the niches between the rafters, and the second is laid on top of the rafter frame. After this, the double layer of insulation is fixed by stuffing wooden slats or a metal profile perpendicular to the frame. In this case, the effectiveness of roof thermal insulation increases significantly.
Installation between rafters
If the roof insulation is carried out from the inside, then it is most convenient to install thermal insulation material between the rafters of the frame. This method is suitable if the calculated thickness of the insulation layer is less than or equal to the width of the rafters, otherwise combined thermal insulation of the roof slope is performed. The technology for laying thermal insulation material between the rafters is as follows:
- Using a building level, the lower surface of the rafters is measured; it should be located at the same level. If the rafters were made from lumber of different sizes, then they need to be aligned so that they all lie in the same plane.
- Waterproofing for the internal insulation of the roof slope is a film laid on the rafters before the covering is laid. If this was not done during the creation of the roofing pie, then the insulation will have to be left without protection from moisture, hoping that the roofing material will not fail.
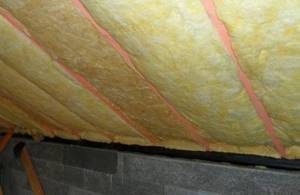
- Rolls and slabs of mineral wool are cut into the required lengths. The insulation is installed by surprise, so the width of the material should be 2-3 cm greater than the pitch between the rafters. If the insulation is carried out in 2 layers, then the slabs are laid staggered so that the joints do not fall on top of each other.
- Vapor barrier membrane sheets are cut. They are attached over thermal insulation to protect the material from the penetration of air saturated with water vapor and from getting wet. The canvases are fixed perpendicular to the rafters along the roof slope, attached using a construction stapler.
- The insulation is covered with plasterboard, plywood, clapboard or edged boards in order to decorate the attic walls on top of them.
Important! If the roof slope has a slight steepness of less than 25 degrees, then insulation boards installed by surprise may fall out of the space between the rafters. To prevent this problem, the thermal insulation is held in place using cross slats or fishing line stretched between the rafters of the frame. Experience shows that on slopes with a slope of 40-45 degrees, the insulation holds well without additional help.
Requirements for materials used
Before choosing a specific option, you need to check whether it meets the basic criteria for this product group:
| Thermal conductivity | The lower this indicator, the better the thermal insulation material. Options with high thermal conductivity provide the required level of heat retention with a layer thickness of 30 centimeters or more, which takes up a very large space. |
| Stability | The material must retain its shape throughout the entire period of operation, otherwise cracks will form through which heat will be lost very much. That is why it is recommended to lay the elements closely so that they fit as closely as possible to the frame. |
| Vapor permeability | It is no secret that wood without access to air begins to deteriorate due to the fact that moisture accumulates in it. To avoid this, you need to choose vapor-permeable materials that do not prevent the evaporation of excess moisture. |
| Density | The weight of the insulation directly depends on this indicator. You should not choose options that are too heavy, as they load the structure; there are quite a lot of options on the market that, with high performance, are light in weight. |
| High performance | This group includes soundproofing properties and fire resistance. As for the second factor, it is better to choose non-flammable options, as this significantly increases the safety of the entire structure. |
In fact, the thermal insulation on the roof is the only barrier to the penetration of cold. After all, there are no wooden partitions here, but only roofing material and interior decoration
What is the best mineral wool for the ceiling?
Which mineral wool is better to choose? First of all, pay attention to the material from which the product is made. Glass or stone is used to make mineral wool. Each of these materials has a number of advantages and disadvantages.
Glass mineral wool is made by melting glass sand. This material has a light yellow tint. It is advisable to use mineral glass wool for insulation of ceilings and floors in wooden buildings.
The advantages of glass wool include:
- Low weight.
- High elasticity.
- Fire resistance.
Stone wool has the worst characteristics, however, it is widespread. This material is used both for insulating ceilings and for insulating pipelines.
A significant advantage of stone wool is its long service life.