Is it possible to insulate an attic with penoplex?
The widespread belief that slabs of extruded polystyrene foam - penoplex - pose a serious threat to human health is erroneous. This is due to the fact that modern manufacturers do not use freon, and the presence of toluene is controlled by special technology. To reduce the degree of flammability of the material, auxiliary components of non-ferrous metal salts are used.
The purpose of extruded polystyrene foam boards is indicated by the markings on the packaging. Important! To avoid the appearance of moisture on the walls in winter, it is necessary to use foil vapor barrier material containing a special coating on the warm side of the insulation - otherwise there is a high probability of deterioration of the microclimate in the living room.
What to choose?
Often, to enhance the thermal insulation properties, both materials are used, mineral wool and polystyrene foam.
When comparing these two materials, I do not want to highlight any clear advantages of one over the other. I just want to note that mineral wool is more suitable for thermal insulation of pitched roofs - it is the most acceptable material for this type of insulation. But in our market there are not many manufacturers with mineral wool that can be used on flat roofs.
I repeat - use proven basalt-based materials to protect yourself from heat loss, installation errors, and subsidence of insulation. and even when using the right insulation, do not forget about the right roofing pie.
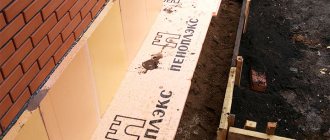
And if we talk about foam plastic slabs, then I consider this material an ideal material for thermal insulation of floors, foundations and blind areas. Where its biggest plus is low water absorption is very necessary.
Pros and cons of insulating the attic floor with penoplex
The demand for the material is explained by the presence of the following positive characteristics:
- low degree of thermal conductivity (0.028-0.034 watts per m per kelvin);
- zero water absorption (0.4%);
- high efficiency;
- long service life (40-50 years);
- resistance to mold fungi;
- ease of installation work;
- speed of insulation;
- sufficient compressive strength;
- the ability to eliminate vapor permeability of structural elements of the room;
- increased level of wear resistance;
- does not apply to flammable products;
- suitable for work at any time of the year;
- the ability to perform installation without the involvement of specialists;
- affordable price.
In terms of thermal insulation capabilities, penoplex is only slightly inferior to mineral wool and polystyrene foam
. Like any other building material, penoplex also has its drawbacks, including:
- release of toxic substances during smoldering;
- the need to use cladding, otherwise it is destroyed under the negative influence of sunlight;
- inability to protect against excess noise.
Penoplex thickness for attic insulation
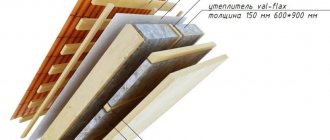
Most often, slabs measuring 600×1200 mm are chosen for thermal insulation work. Such sheets fit perfectly into the spaces between rafters and frame slats. As for the thickness, it is determined based on the existing profile of the building and the location of the walls in relation to the roof slopes. For the arrangement of the attic floor, where the walls are made using lathing on the rafter system, the thickness of the slabs is:
- 100 mm for middle latitudes;
- 150 mm for northern and southern regions.
When building a classic attic, where the walls are vertical, polystyrene foam boards can be selected with a thickness of 75-100 mm. But this is if the installation is carried out with an uninsulated roof. If the attic space is warm, then the walls can be equipped with foam sheets 50-75 mm thick.
Important! To prevent the appearance of cold bridges, as well as to better cover the seams, it is worth using extruded polystyrene foam in 2 layers.
Advantages of penoplex K compared to other insulation materials
- The material does not absorb water, so there is no need to install vapor barrier and windproof films.
- Installation is simplified thanks to the L-shaped edges. The slabs are joined without gaps: already in the single-layer version there are no cold bridges. An additional row is laid with the joints shifted relative to the first layer.
- The slabs form an integral rigid surface - this increases the stability of the roof.
- Insulation can be used not only when building a new roof. Repairing and insulating an old roof is easier without installing insulating films.
Video: Roof insulation with polystyrene foam - Build cannot be rebuilt
How to choose penoplex for insulating an attic roof
Expanded polystyrene boards intended for use in residential premises are marked accordingly. The most famous and affordable in construction is penoplex C. It is used for exterior work without cladding or for thermal insulation of vertical surfaces in non-residential buildings. They can only insulate the gable walls of the attic.
Extruded polystyrene foam should be laid without gaps - this is the only way to obtain reliable thermal protection for the interior space
Penoplex boards marked C are not suitable for insulating the internal space because they contain a high concentration of chromium salts. This option is best used for floor insulation and attic floor ventilation. There is also penoplex grades A and K, where the first type is used in road construction, when arranging the foundation, and the second - for walls and interior space. Penoplex A has a density of 33 kg/m2, heat resistance up to 75 °C. The main feature is the absence of toxic components and additives, as well as good mechanical and thermal insulation characteristics.
Although grade K polystyrene foam can provide a reliable barrier against water vapor, it is still worth using a layer of additional vapor barrier.
How to insulate the under-roof space?
Due to the design features of the roof - the rafters are located at an angle - it is impossible to use bulk and too loose materials for insulation. Therefore, the most popular options are: polystyrene foam (polystyrene), mineral wool in mats, penoplex (extruded polystyrene foam).
- Polystyrene foam is the most attractive in price, so the question of its use is always of interest. It has high heat-insulating properties, it is easy to transport, install and can be processed with any tool (it practically crumbles in your hands). Not all types of polystyrene foam are harmless: when burned and even when heated, it releases very toxic substances, which is why it is not recommended to be used in residential buildings. The situation is complicated by the fact that in addition to official manufacturers, there are also smaller companies where the requirements for production technology and product quality control are not always met.
- Mineral wool is now the most popular material. For insulation, use cotton wool with a density of 35 kg/m3. Despite this, it must be securely fixed between the rafters to prevent subsidence and the formation of voids. In addition, it is necessary to take measures against the insulation getting wet. On both sides, mineral wool is covered with films with varying degrees of vapor permeability. All these installation difficulties, plus the unpredictable properties of films purchased “cheaper”, lead to the opposite result. Instead of a warm roof, you get a weeping ceiling.
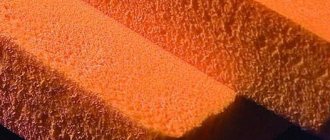
- Penoplex is the most expensive of the insulation materials in terms of cost, but it gets its money’s worth. This “relative” of polystyrene foam, which underwent additional processing, became known as extruded polystyrene foam. After extrusion (whoever wants can study this process in detail), penoplex acquires unique properties that have significantly expanded the scope of its application in construction.
How to prepare an attic for insulation with penoplex
Depending on the layout of the attic floor, a scheme for laying the heat insulator - penoplex - is selected. For example, it is necessary to insulate a living space according to the same principle as the roof. Penoplex slabs are laid in the gap between the rafters and mounted to the sheathing. With vertical walls, slightly different issues arise.
Frame arrangement
The first step is to assemble the base on the vertical side of the wall, where the heat-insulating layer will be fixed and further finishing will be done. Steel profiles or wooden blocks are suitable for production. First you need to secure the horizontal cross member at the level of the top edge. It should be filled from pediment to pediment along the entire length of the slope. Vertical elements are mounted to the crossbar, maintaining a distance of 0.6 m.
To remove water vapor from the space between the roof of the attic floor and the foam slabs, you need to assemble additional sheathing rather than placing it on the rafters
Important! It is necessary to calculate the transverse size of a wooden beam based on the thickness of the first layer of penoplex.
Vapor barrier
The next step in arranging the attic with penoplex slabs is to stretch a vapor barrier sheet over the rafters. In the case of laying foam sheets between the rafters of a cold roof, the frame should be sewn up with boards close to each other, or use moisture-resistant plywood. The vapor barrier is fixed to it using a construction stapler.
It is easy and simple to attach a vapor barrier to a wooden frame using a construction stapler
It is recommended to stretch the material overlapping, and glue the joining places with tape. Thanks to this simple technique, it will be possible to protect the wooden elements of the sheathing from moisture.
Multilayer thermal insulation using 3-4 sheets of extrusion has its positive aspects:
- sufficient level of sound insulation;
- the likelihood of insulation destruction due to heavy water flooding is reduced to zero;
- the formation of cold bridges is excluded.
The sequence of correct installation of penoplex:
- Wooden frame.
- Wind barrier.
- Ventilation gap.
- Three layers of thermal insulation material.
- Vapor barrier film.
- Finishing.
Ceiling insulation scheme
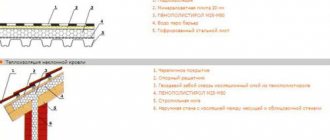
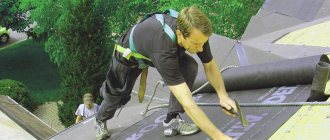
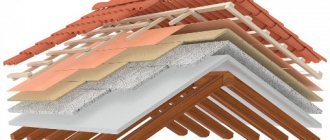
Pitched roof
Optimal insulation for pitched roofs
Thermal insulation of a pitched roof, like other building structures, should have low thermal conductivity and almost zero water absorption, as well as high strength and durability, so that the owner of the house will forget about roof repairs for a long time.
All these characteristics are inherent in high-quality PENOPLEX® boards made of extruded polystyrene foam, the thermal conductivity coefficient of which is a maximum of 0.034 W/m-K. This is one of the lowest rates among thermal insulation materials used in construction today. The material is also characterized by zero water absorption, compressive strength - 15 t/m2 or more, and durability is over 50 years according to test results at the Research Institute of Construction Physics.
In addition, PENOPLEX® is safe for human health. Extruded polystyrene foam is made from general purpose polystyrene. This polymer is widely used for the production of consumer goods - children's toys, packaging for medical products and food products, as well as other products whose production is subject to strict sanitary requirements.
At the same time, PENOPLEX® is characterized by absolute biostability - it prevents the development of fungus and mold, and does not decompose under the influence of bacteria.
In private housing construction, PENOPLEX COMFORT® is widely used for thermal insulation of pitched roofs.
Methods for insulating pitched roofs with PENOPLEX® slabs
Thermal insulation of a pitched roof can be done in two ways:
- outside, on top of the rafters (supporting structures of the pitched roof);
- from the inside, under the rafters.
The first is preferable for new construction, the second is preferable in an existing building if it is necessary to replace insulation during reconstruction or additional insulation.
Installation of a pitched roof with thermal insulation with PENOPLEX® slabs on top of the rafters
We will analyze the installation sequence, and then the features of insulation of a pitched roof in certain areas.
Installation sequence
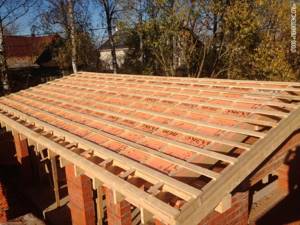
- Installation of the rafter system
- Installation of insulation for pitched roofs
- Installation of counter-lattice
- ∙ Installation of sheathing
For the manufacture of load-bearing elements of the rafter system (mauerlats, purlins, rafters, racks), wood of at least grade 2 quality is used.
First, along the upper perimeter of the load-bearing walls, the lowermost support for the rafter system - the Mauerlat - is installed. For this purpose, straight timber 150x150 or 200x200 is usually used.
The rafters are installed in increments according to the design calculation, usually 0.6-1.0 m.
The connection of load-bearing structures of a pitched roof can be made using brackets, fastening plates and corners made of perforated steel. The brackets are made of 2 mm thick steel with anti-corrosion zinc coating. The fastening plates are attached to the wooden beams and rafters with self-tapping screws, nails or anchor bolts.
To hold the slabs in the lower part of the roof (at the boundary of the thermal contour), using starting profiles, a fixing rail is installed with a height equal to the thickness of the slabs.
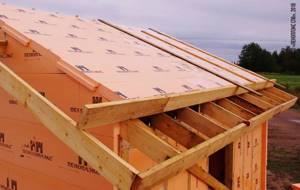
PENOPLEX® slabs are laid out from bottom to top in a checkerboard pattern, starting from the installed rail. The thickness of the slabs is taken depending on the climatic zone and the results of thermal engineering calculations. To ensure greater thermal uniformity, it is recommended to glue the joints between the plates with polyurethane adhesive PENOPLEX® FASTFIX®.
During the installation of PENOPLEX® slabs, you need to make sure that there is a ventilation channel between the waterproofing and thermal insulation - a prerequisite for the normal operation of the roof. As a result, the roof functions without freezing ice and condensation.
The laid PENOPLEX® slabs are secured with upper longitudinal slats. The height of the slats must be at least 30 mm, which is a necessary condition for normal ventilation of the roof above the slabs. Before fastening, holes are drilled in the rail to prevent cracks. The slats are fastened with structural screws at intervals of at least 50 cm.
Lathing is necessary for attaching the final roofing covering (metal tiles, soft tiles, etc.). For its production, wood of at least 3rd grade is used. The lathing may vary depending on the type of finishing coating. For metal or ceramic tiles, longitudinal slats are used, the size and pitch of which are selected based on the convenience of attaching the finishing material to them.
When using rolled waterproofing materials or flexible tiles, solid flooring made of oriented strand boards (OSB) or high-moisture resistant plywood (HRP) is used as a counter-lattice. The joints of the flooring elements should be spaced apart at a distance of 3-4 mm. The differences in height between the base elements should not exceed 2 mm. In winter, when installing the flooring, it is necessary to leave at least 3 mm of gap between the sheets to compensate for linear expansion in the warm season.
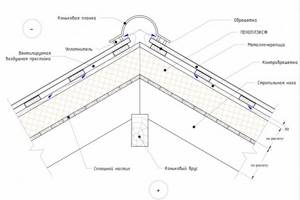
Features of installation of the ridge part
In the ridge part, PENOPLEX® slabs are laid closely.
The gap at the junction of the plates is filled with a polyurethane-based adhesive, for example, PENOPLEX®FASTFIX®, or with polyurethane foam that does not contain organic solvents. When laying tiles (or other roofing material), the required ventilation gap is left and the roof ridge is mechanically secured. When using rolled materials, ridge tiles (flexible tiles) are fused to the main covering. Ridge insulation scheme
Features of valley installation
PENOPLEX COMFORT® insulation boards are laid closely. The gap at the junction of the plates is filled with an adhesive composition based on polyurethane PENOPLEX®FASTFIX®, or with polyurethane foam that does not contain organic solvents. A continuous sheathing is made under the bottom bar. To do this, on both sides of the junction of the slopes, a flooring of boards is installed 30 cm in each direction from the axis of the valley.
Waterproofing is laid on top of the boards. An industrially produced valley carpet can be used as a waterproofing material.
Install the bottom strip. It is attached to the flooring with self-tapping screws in increments of 30 cm. If the valley consists of several parts, they are laid from bottom to top so that the upper edge of the element located below overlaps the lower edge of the element located 15-20 cm higher. All joints are coated with sealant.
A porous sealant is laid between the tiles and the bottom strip.
The tiles are laid 8-10 cm on both sides of the valley axis and attached simultaneously with the bottom strip to the sheathing. The fastening is carried out in the lower wave.
To give the roofing structure a finished look, attach the top strip. It is mounted in the same way as the bottom one - from bottom to top with an overlap of at least 10 cm. No seal is placed between the decorative strip and the roofing material.
Features of connections to walls and protruding parts of a pitched roof (chimneys, hoods, etc.)
The connection of PENOPLEX® slabs to chimneys is prohibited! A fire protection belt made of non-combustible heat-insulating materials is installed around the chimneys at a distance of at least 200 mm from the edge of the chimney. The width of the belt must be at least 150 mm. Entrust the installation of this type of structure to specialized teams. When installing a fire protection belt, use the recommendations of the chimney system manufacturers.
It is not recommended to install a chimney at the intersection with a valley (an internal angle formed by the slopes of a complex roof), since serious complications are inevitable when sealing junctions with the roof.
To ensure that the junction of the tiles with a square or rectangular pipe is airtight, an apron made of galvanized or polymer material is placed around it. The apron is attached with self-tapping screws to the sheathing and the tiles are installed on top.
For connections to places that exclude operation at elevated temperatures (hoods, aerators, etc.), the installation of cutouts made of non-combustible materials is not required. All joints of PENOPLEX® slabs are filled with polyurethane foam or PENOPLEX®FASTFIX® adhesive composition.
The junctions on the pipe walls are tightened with metal clamps in their upper part and treated with sealant.
When adjacent to a wall on multi-level roofs, an apron made of galvanized material is also installed, which is mechanically secured to the sheathing and to the abutment wall using a clamping strip.
The apron is covered from below with decorative elements made of roofing material, and from above the mechanical connections are treated with sealant.
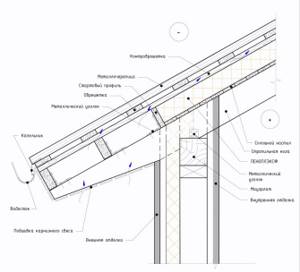
Features of the gable overhang of a pitched roof
Additional thrust bars are installed behind the insulation contour to ensure the specified roof slope. A gable profile is installed on top of the roofing, which is mechanically secured to the rafters and sheathing.
Scheme of a gable overhang on a pitched roof:
The process of installing a pitched roof with insulation above the rafters is clearly illustrated:
Installation of a pitched roof with thermal insulation with PENOPLEX® slabs from the inside, under the rafters
- In the case of insulating the roof from the inside, PENOPLEX® will take on the role of an additional vapor barrier with the function of protecting the roof structure from moisture during the migration of water vapor through their thickness.
- PENOPLEX® slabs are attached to the rafters using disc-shaped rondoles and self-tapping screws.
- Interior finishing can be sheet material (gypsum plasterboard, chipboard, plywood) or board cladding, which is attached to pre-installed guide rails (bars).

- Roof covering
- Rafters
- Lathing
- PENOPLEX®
- Counter brush
- Vapor barrier layer
- Sheet cladding
Read more about insulating a pitched roof under the rafters
How to insulate an attic with penoplex
Initially, you need to mark and adjust the foam sheets to specific sizes. Here it is important to leave an air gap of 50 mm between the first layer of insulation and the wooden frame. The penoplex should be adjusted so that at the end of the installation work it does not bend towards the gap.
Laying penoplex
The extrusion should be placed in the space between the rafters, preferably in a checkerboard pattern. All joints and seams need to be blown out with foam. In order to prevent the heat insulator from bending towards the room under the expanding influence of polyurethane foam, it is necessary to temporarily fix it using strips.
Temporary fixation of insulation boards prevents them from bending
Completion of installation work
Before laying the last layer of penoplex, the ends of the rafter system must be cleared of foam. It wouldn't hurt to stretch some extra fabric. At this stage, it is recommended to lay the sheets in a horizontal direction. The joints of the foam boards need to be glued with polyurethane foam. The sheets are fixed to the rafters using conventional mounting umbrellas.
The finishing finishing material is sewn onto a frame made of dry wooden blocks
Nuances of performing work
1. The roof thermal insulation scheme using foam plastic involves a preliminary calculation of the number of blocks. To do this, you need to measure the roof area from the inside and outside, the pitch between the rafters, and the size of one slab. It is recommended to purchase material with a reserve of 8-10 pieces, since during the cutting process there is a risk of deformation and loss of polystyrene foam.
2. There are several mounting methods. This includes installation using an adhesive or mastic mixture, fixation using anchors with wooden slats, laying between sheathing elements and flooring technology. There is a manual for each scheme, and the method of working with foam plastic depends on the design features of the roof.
3. To prevent condensation from forming on wooden beams, it is recommended to use a vapor barrier and a waterproof membrane on top.
4. Expanded polystyrene slabs for roof insulation have a smooth surface, so it is necessary to create a slight roughness for better adhesion. To do this, use a knife, a needle roller or a stiff brush. If the products are embossed, such measures are not necessary.
Before starting work, you need to prepare the following consumables and tools:
- Calculated amount of foam.
- Vapor barrier film.
- Stapler.
- Knife and scissors.
- Wooden slats and bars.
- Fasteners.
- Moisture-proof membrane.
- Glue, foam.
Advice from professionals
Whether the attic floor will become warm after thermal insulation work has been carried out will depend on how effectively it was done and whether the technology was followed. The installation of waterproofing deserves special attention, since the drying of materials that have absorbed moisture provokes the appearance of cold in the premises.
In order to prevent negative consequences in the future, you should adhere to the following recommendations for insulating an attic roof with penoplex foam with or without mineral wool:
- Before you begin insulation work, you need to find out the angle of the roof. If it is no more than 13°, then precipitation will linger on it, which will cause rust and leaks. As a result, damage to the thermal insulation layer occurs.
- To obtain the most positive result, it is worth insulating not only the walls and roof, but also the windows.
- The presence of a gap of 2-3 cm between the penoplex and the roof allows the former to be better ventilated and dry out if it accidentally gets wet.
- Ignoring such important layers as vapor and waterproofing reduces all efforts to nothing.
- If the thickness of the rafters is insufficient in relation to the foam boards, their height can be increased by stuffing additional slats.
- At the final stage, the surface can be plastered or lined with sheets of plywood or plasterboard. The option with plaster and liquid wallpaper on the wall and ceiling of the attic is not the best, since they are tightly connected to the rafter system, after some time this finish begins to crack and peel off.
- Not only the locks, but also the surface of the penoplex should be glued with foam.
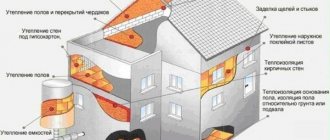
Advantages and disadvantages of foam materials for roof insulation
You need to approach the choice of insulation extremely responsibly. If everything is done correctly, then your house will always be warm and cozy, condensation will not settle on the roof parts and destroy them, and much less gas or wood and coal will be spent on heating.
Nowadays, roofs and ceilings are insulated with the following materials, both modern and time-tested:
- loose expanded clay (with excellent water and fire resistance), which is covered with a layer of about 15 centimeters;
- so-called adobe - clay mixed with finely chopped straw, it is a very dense and elastic heat insulator with excellent fire resistance;
- sawdust - with excellent thermal insulation properties, but a high fire hazard;
- sawdust with cement or sawdust with clay - with a much lower fire hazard;
- foam concrete, which is poured onto the ceiling (it has good thermal insulation properties, but is very hygroscopic);
- mineral and basalt wool in the form of mats and slabs.
Roofs of wooden houses are often insulated with slab mineral wool
But what about the inner and outer surfaces of the roof itself? It is necessary to install insulation in a complex roof configuration, often under the roof, which is why polystyrene foam (expanded polystyrene), penoplex and spraying polyurethane foam have come into use.
- they are much lighter than all the materials described above;
- retain heat much better;
- practically do not rot;
- have good hydrophobicity.
- they are not heat-resistant - they shrink from high temperatures, releasing harmful substances;
- very fire hazardous.
The choice of insulation from these three materials depends on many factors:
- depending on the type of roof;
- depending on whether the attic is residential;
- on the frequency of use of the house: constantly or only in the summer season;
- on geographic latitude;
- from the budget.