Incorrect hydro- and vapor barrier is one of the most common technological mistakes when installing siding. It can lead to mold and mildew underneath the trim, which homeowners unknowingly blame on their siding.
How to properly protect walls and insulation from steam and moisture? How is vapor barrier different from waterproofing? And in what cases are they needed, and in what cases can you save money and do without insulating films and membranes? Let's find out!
Wood moisture and harmful fungi
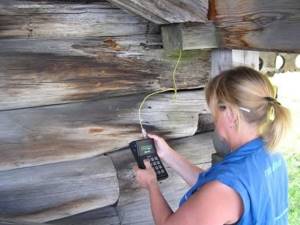
We all know how quickly wood that is constantly in a damp state is affected by mold fungi. The loss of strength of the material occurs in a matter of months, and in a year or two a log, in the thickness of which favorable conditions have been created for the life of fungi, can turn into dust. The main condition for mold growth is a sufficient amount of moisture. Accordingly, in order to preserve a wooden house for many years, its walls and other structures must be protected from waterlogging. The absolute humidity (the ratio of the mass of water to the weight of absolutely dry wood) of a freshly cut coniferous forest reaches 90%, of a log house before installation - 25-35%, of a wooden house, which has stood for a year under normal conditions - 10-20%, depending on the season. At the same time, fungal infection of wood begins to develop at a moisture level of 22%, which is only slightly higher than the natural state of the log house. By the way, these same conditions are suitable for wood-boring beetles to settle in logs.
It is important to know: under no circumstances should wood be allowed to become over-moistened - the main cause of its destruction.
Over-watering wood causes it to rot.
Insulating the walls of a frame house
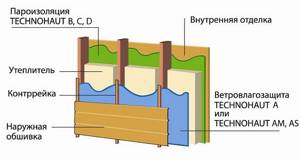
This is a type of prefabricated construction. A special feature of the building is the absence of a rigid foundation, that is, a wall. Thermal insulating material is located between the racks and other elements. The walls are like this “pie”:
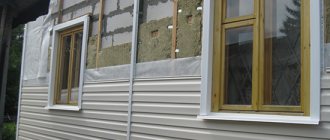
- Exterior finishing. It can be made of siding, lining, OSB board.
- The waterproofing layer is a membrane or film that protects against contact with water. It is necessary to provide a ventilation gap between the cladding and the waterproofing, the presence of which promotes natural evaporation.
- Directly frame with insulation. The thermal insulation layer is 70%.
- Vapor barrier prevents moisture penetration from the inside.
- Finishing from the inside.
Vapor barrier of frame walls is a mandatory step. A large amount of heat insulator quickly absorbs liquid and also soon loses its quality characteristics. Under the influence of water, it moves away from the racks, which contributes to the formation of cracks. Vapor barrier and insulation of the walls of a prefabricated building play a vital role.
Vapor barrier of wooden house walls
Insulation of a wooden building should begin with the installation of a vapor barrier layer. The natural moisture content of the timber changes during the first year of operation. A change in the indicator entails the appearance of deformations:
- Wall shrinkage, the consequences of which can be completely unpredictable.
- Due to the formation of cracks, quality indicators deteriorate.
- A change in the shape or size of the timber occurs after 5-7 years. Defects lead to a violation of the tightness of joints and grooves. This is especially true for houses built from ordinary sawn logs or hand-processed wood.
Any of the listed defects allows steam to penetrate into the thermal insulation, which leads to premature deterioration and the appearance of fungus and mold. Proper vapor barrier of wooden walls from the inside is the key to successful and long-term operation of the constructed structure.
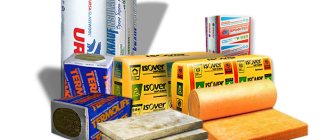
Insulating walls from steam and moisture can be made from the following materials:
- Aluminium foil.
- Diffusion membranes.
- Polypropylene and polyethylene film.
The installation scheme for vapor barrier in a wooden house is similar to installation in any other residential building.
| Related articles: |
termogurus.ru
Where does moisture get into wood?
There is an opinion that moisture enters the walls of a wooden house from the outside with slanting rain, fog and snow. Precipitation actually moistens the walls. But wet weather does not last so long; the sun and especially the wind help to quickly remove excess moisture. An attentive reader will tell you: the average annual air humidity outside is 78% (data for the Moscow region), and in the house it fluctuates between 40-70% - which means there is more moisture outside and it should penetrate from outside to inside.
But actually it is not. The fact is that climatologists operate with relative humidity, this is the ratio of the proportion of water vapor to the maximum possible, taking into account the temperature. And the colder the air, the less moisture it can contain. To understand the real moisture content in the air, absolute humidity values are used in building physics. In the summer, when the temperature outside and inside the house is approximately the same, the humidity is similar. But in winter and in the off-season the picture is completely different. For example, at an outside temperature of -20 ºС and a relative humidity of 80%, the absolute value will be 0.6 g/m3, and inside the house at 20 ºС and a relative humidity of 60%, the absolute value will be 10.4 g/m3. Accordingly, the actual moisture content in the air inside the house is 17 times higher. It is not surprising that wood, like a pump, absorbs moisture from the inside and releases it to the outside through micropores and joints between logs filled with flax, moss, jute or other “breathable” inter-crown insulation.
It is important to know: most of the year, with the exception of the warm period, water vapor penetrates the wood from inside the house and tends to escape outside, the greater the quantity, the colder it is outside and the warmer it is in the house.
Ventilation – vapor barrier – wind protection
We found out that a prerequisite for maintaining a log house and a healthy microclimate in it is that the insulation of the walls of a wooden house under the siding should not prevent the free escape of water vapor to the outside.
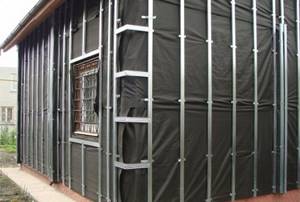
Modern designs in wooden (and not only) house building involve the widespread use of vapor barrier and windproof films. The first ones are absolutely sealed and do not allow air or steam to pass through. The latter repel water droplets, but do not prevent the penetration of water vapor. In frame houses, the inside of the wall is covered with a vapor barrier, thereby preventing the penetration of moisture from the premises into the insulation and wooden structures. From the outside, the walls are “wrapped” with wind insulation: it counteracts the blowing of the insulation, prevents drops of water from the outside from getting inside (condensation can form on the inner surface of the siding), while water vapor freely escapes outside. Since the insulation is covered with finishing material (in our case it is siding), there must be a ventilation gap between the insulation and the finishing so that excess moisture can leave the wall structure.
It is important to know: the ventilation gap is a mandatory element of the insulation design for siding and other cladding materials.
Many shabashniks, Internet sources, managers of construction companies and even professional builders claim that the same should be done when insulating a house made of solid wood. That is, the first layer, along the logs, is a vapor barrier, then insulation, on top of which is wind protection, the design is completed by a ventilation gap and finishing material, siding in our case. This does not take into account that moisture rushing out will encounter the vapor barrier, the humidity in the area adjacent to the vapor barrier will increase, and condensation will form when the dew point occurs. Conditions will be created for the germination of fungal spores, and from the inside we will not notice the beginning of wood destruction for a long time.

The windproof film (diffusion membrane) has many micro-holes, due to which steam passes through, while at the same time drops of water roll off the material
Do-it-yourself vapor barrier installation: step-by-step instructions
The technology for laying a vapor barrier layer into the walls of a wooden house depends on its design:
In addition, there are features of laying the material indoors and outdoors. Since in the latter case it makes sense to protect the house from cold winds, a layer is almost always installed that protects against them. And waterproofing is installed in cases where the house is quite old and the walls need to be protected from the destructive effects of moisture.
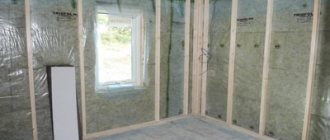
Vapor barrier from inside
When laying a layer of waterproofing inside the walls, you must take into account that water, evaporating on the surface of the material, must drain somewhere. Thus, the layer should not be in too tight contact with the insulation - a small gap is necessary.
The sequence of actions is as follows:
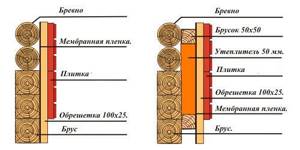
- If the house is built from a cylindrical beam, then due to its natural rounding it creates a sufficient gap for moisture removal - in this case, the membrane is attached directly to the logs using a stapler.
- Next comes the sheathing and internal finishing material (lining, drywall, etc.).
- In the case of houses made of rectangular timber, as well as when installing insulation (in cold winter conditions), the membrane is attached to a counter-lattice, which is mounted to the main beam through small wooden beams of the same size. They are located at a certain interval and hold the insulation, on top of which a vapor barrier is placed. The same technology is proposed for a frame wooden house.
A visual representation of the installation method for internal vapor barrier can be seen here.
Possible errors that are important to take into account immediately when laying the layer are presented in the video.
NOTE. The layers of material are overlapped by at least 15-20 cm and securely fastened with joints.
Vapor barrier outside
In this case, the film or membrane should lie immediately under the sheathing layer (for example, siding) and fit tightly to the insulation.
Space for the accumulation and natural removal of condensate must also be present.
- On a round log, the vapor barrier is also attached using a construction stapler.
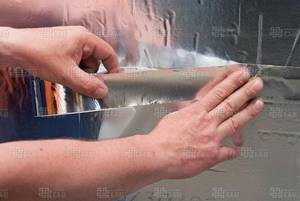
- All joint surfaces are fixed using construction tape (if a foil membrane is used, using metallized tape).
Features of the technology are shown in the video.
The external vapor barrier membrane must allow air to pass through well. The use of polyethylene, polypropylene and other films in this case is unacceptable, since the moisture leaving the house will encounter a barrier and will not be able to go outside - it will settle on the walls and insulation, which is why they will begin to rot.
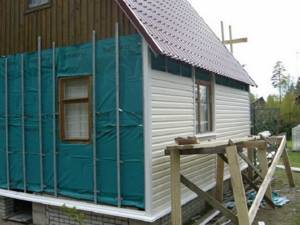
Vapor barrier and waterproofing under siding: when and why is it needed
Studying the recommendations of insulation manufacturers for the installation of ventilation systems, you can see that most of them recommend protecting the insulation with a vapor barrier on the wall side, and moisture and wind protection between the insulation and the curtain wall.
Many homeowners who insulate their homes on their own want to save on expensive films, so it’s worth understanding what vapor barriers, waterproofing, moisture-windproof membranes are, and when and how to use these materials.
What is vapor barrier
Any design is carried out in accordance with regulatory documents, now these are SP - building rules, each of which has a section “Terms and Definitions”. From the point of view of building codes, a vapor barrier is a layer of rolled or mastic material that prevents the passage of water vapor through it.
Many vapor barrier materials have been developed for wall insulation, most of them are 2…3-layer films made of non-woven material or special polyethylenes.
ATTENTION! Ordinary polyethylene is not suitable for vapor barrier.
What is waterproofing
Waterproofing is building materials (roll, mastic, plaster) that prevent the structure from getting wet under the influence of wastewater. These materials are usually used in floors, underground structures, and structures located in aquatic environments.
Regarding insulation systems, it is more correct to use the term moisture and wind protection, since the heat insulation should not come into direct contact with water in the insulation system, but rainwater or snow can get into the cracks of the cladding in strong winds, and therefore thermal insulation needs protection from water, water vapor and wind.
Diffusion membranes are used as waterproofing in insulation systems, a feature of which is the ability to release water vapor to the outside, preventing it from penetrating inside. As a rule, these are 3...4-layer films with markings of the location of the sides relative to the insulation (inner and outer layer).
Why do you need a vapor barrier in general?
Water vapor can be of atmospheric origin or operational. Any building material has vapor permeability, for some it tends to zero (extruded polystyrene foam - 0.013, metals, glass - 0.0) for others it is much higher (wood across the grain - 0.03, mineral wool - 0.06).
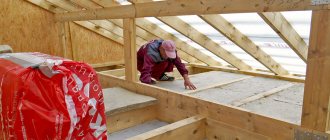
Installation of insulation
The insulation installation stage begins with choosing the type of insulation.
Choice of thermal insulation
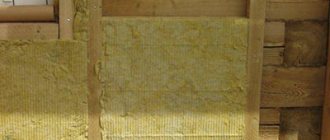
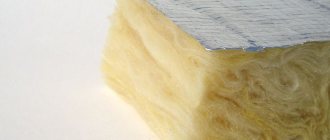
Basalt insulation and glass wool can be used to insulate walls. Despite the similarity of the technical characteristics of these materials for insulation (for example, their thermal conductivity is actually the same) , there are certain and quite significant differences between them.
Basalt insulation has greater density and elasticity, so it is held more tightly between honey bars. This material prevents the spread of fire, that is, it has fire protection properties. The leader of the Russian basalt wool market, Rockwool, recommends Rockwool Light Butts ( Rockwool Light ) insulation for insulating walls under siding. Thanks to the use of Flexi technology in the production process of Rockwool Light, one edge of the slab has the property of springing, so the installation of Rockwool Light Butts is simple and convenient. The ability of the material to compress and expand not only ensures a tight fit of the insulation to the bars and the wall surface, but also compensates for possible uneven pitch or non-parallelism of the bars up to 5 cm.
Insulation with glass wool is more economical: glass wool itself is usually cheaper than mineral wool, in addition, during packaging the material is compacted four times, thus significantly reducing transportation costs. Glass wool is a more flexible and elastic insulation material, thanks to which it adheres more tightly to the wall surface. This is most important when it is necessary to insulate walls with an uneven surface such as brickwork.
One of the leaders in the domestic glass wool market, the URSA company offers the following URSA insulation products for this purpose: URSA Glasswool “Universal Plates” and URSA Glasswool P-15.
Glass wool has significantly greater vapor permeability than basalt insulation , but this should not be considered as an advantage, since the vapor permeability of basalt wool is sufficient. However, due to this vapor permeability, if necessary, glass wool can be used together with basalt wool as an outer layer. Both materials do not require high-precision sizing; They fit together well, leaving no gaps.
Installation of insulation
The space between the guide bars is filled with insulation boards completely without gaps. If the first vertical layer of insulation was not enough, then a second horizontal row of guide bars with the same pitch is installed on top of it and the second layer of insulation is mounted.
It is recommended to use galvanized or anodized steel self-tapping screws and nails with a large diameter flat head. The length of the facade dowel is selected in accordance with the thickness of the thermal insulation. The insulation should not be allowed to compact at the point of its attachment, as this reduces the effectiveness of thermal insulation in this place.
Installation of wind_waterproofing
Modern wind-waterproofing (diffusion membrane) is laid directly on the insulation. The canvases are usually rolled out horizontally and mounted from bottom to top, overlapping with an overlap of 10-15 cm, after which they are pre-attached to the frame using galvanized staples or nails. The film is finally secured with wooden counter-battens, to which the siding is subsequently attached.
Wind protection for siding – panels
During restoration work, it is safe to say that wind protection under the siding is necessary. Its presence will help protect the quality properties of the thermal insulation layer.
If the insulating layer fully performs its functions, then the following indicators are immediately visible:
- while maintaining the quality properties of the insulation, there is no need to constantly heat the premises in the building;
- the atmosphere inside the room cools down more slowly, which makes it much easier to maintain a certain temperature inside the room;
- if you have a high-quality insulating layer, you will protect the walls from possible freezing at low temperatures;
- among other things, remarkable sound insulation properties are revealed.
Mineral wool is most often used as insulation for external walls. This insulation has remarkable properties, but its use requires high-quality waterproofing. Since open penetration of moisture has a detrimental effect on the properties of any insulation.
Wind protection scheme for siding panels
Very often, the waterproofing film includes a windproof layer, which eliminates the need to purchase additional material. However, not every waterproofing material has these properties.
When windproofing, it is very important that individual pieces of material are sewn overlapping, and the joints are properly taped using a special tape.
Windproof film has a limited history of use. We can say that this is a new material that was specially developed for new facade materials with high ventilation rates. It’s worth saying right away that in this case, you cannot do without special wind protection, otherwise, with strong gusts of cold wind, the temperature in the room will quickly drop.
Types of windproof film
Currently, there is a great abundance of insulating materials. This nuance does not bypass wind protection, which is available on the modern market in several types, namely:
- Diffuse membranes. Using this material, not only waterproofing is performed, but also reliable protection of the insulation from wind loads. In this case, the material consists of several layers. For better results, it is recommended to use three or four-layer films. It is also worth noting that this material is also used to provide vapor barrier for siding. Diffuse membranes are considered the most popular insulation material today.
- Windproof film. Many companies are engaged in the production of such products. This material is designed to withstand strong wind currents, providing a reliable barrier to cold air. Such a film is characterized by resistance to heavy loads, which is why films with increased density are used as wind protection.
Wind bar
When cladding external walls using siding panels, it is important to pay attention to wind strips. This element allows you to contain loads from sudden gusts of wind. When using these elements, the facade siding wears out significantly less. This material allows you to significantly redistribute the load.
The use of a wind strip will not only significantly extend the service life of the cladding, but will also give a completed look to the façade of the building. It is worth noting that, as in many other cases, the installation of such elements is carried out with precise calculations and in strict sequence. Otherwise, the use of wind bars will not give the desired result.
Methods for fixing vapor barrier film
Materials are fixed using two methods:
- construction stapler;
- special tape (adhesive tape).
Often both methods are combined together. At the same time, the adhesive tapes themselves are made from approximately the same materials as the vapor barrier. They are reinforced using spunbond technology, since it is assumed that they will be subject to constant load. There are several types of adhesive tapes that correspond to the types of waterproofing membranes discussed:
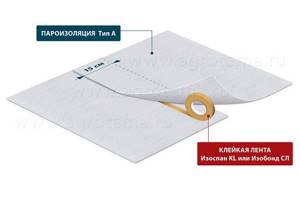
- Izospan KL is used to fix type A fabric. It has great strength, can withstand temperature changes, and is also resistant to moisture. Serves without complaints for several decades. The canvases should be glued with an allowance of at least 15-20 cm.
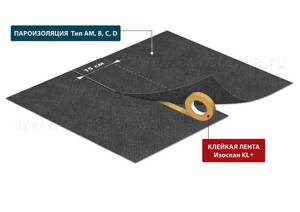
Izospan KL+ has increased mechanical strength due to the two-layer structure of the polymer with reinforcement. It is intended for use in Siberian winters, as it can withstand temperatures down to –50°C. Another advantage is the versatility of this tape: it can be used to fix membranes of all types.
Wind protection and its properties for siding panels
As practice shows, this type of building insulation, such as wind protection, is extremely necessary to create comfortable and cozy conditions inside the building. Very often, it is precisely because of sudden gusts of strong wind that it is impossible to stay in living quarters without warm clothes.
As for siding panels, many people mistakenly believe that air flows do not penetrate through them. This opinion is wrong. As practice shows, air flows pass everywhere. Because of this, simple siding cladding will not be enough, and you will need to install high-quality wind protection.
Windproof film attached to the facade of the house
Wind protection is a kind of membrane that acts as a barrier against harsh cold currents. This membrane is designed to restrain external air flows, but it allows air from inside. In case of installation, the main thing is not to make a mistake and install the film the other way around. Otherwise, it will be impossible to achieve comfortable conditions inside residential premises.
High-quality wind insulation must have the following properties:
- Protection of the structure from possible moisture penetration.
- The windproof layer completely covers the entire surface of the walls, while closing any possible gaps in the insulation.
- The surface of such a material should facilitate the removal of moisture, while preventing moisture from entering.
How does wind protection work?
Windproof film actually performs two functions. Not only does it prevent air masses from penetrating into the insulation when there is wind, but it also acts as a moisture barrier.
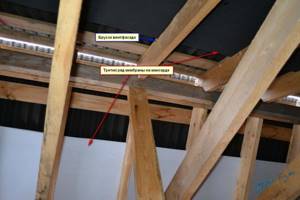
A separate type of film is used for arranging insulated roofs. Such films are often called under-roofing membranes, by the way, for some reason many builders neglect them, as it turns out in vain...
Roofing membrane
The windproof membrane consists of polymer fibers sintered in a special way. The film itself is designed in such a way that on one side it is smooth and does not allow moisture from the street to penetrate into the house, on the other it has a rough surface.
Procedure for insulating a house
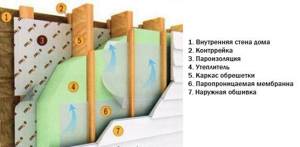
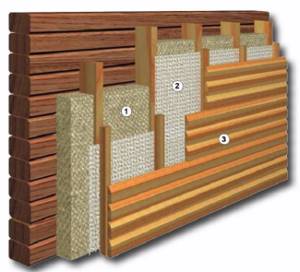
The layer-by-layer ventilated facade insulation system looks like this:
- Wall.
- Vapor barrier.
- Insulation.
- Moisture-proof membrane.
- Ventilated gap.
- Curtain facade made of siding.
The curtain wall is mounted on a frame made of metal if the siding is metal or heavy, for example, fiber cement or ceramic siding for the base. When insulating wooden log houses, most often the supporting frame is made of wood.
TIP: On average, the thickness of the insulation is 100 mm, for northern regions it is more, according to thermal engineering calculations.
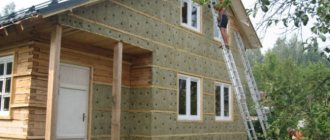
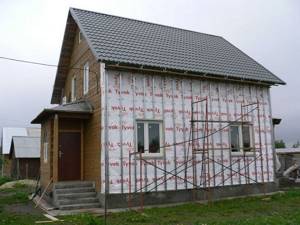
Installation of vapor barrier film on the wall of a house
After preparing the facade - cleaning it from dirt, treating the wood, impregnating it with a fire retardant and antiseptic, we attach a vapor barrier strip or membrane.
The vapor barrier is attached to the wall using a construction stapler. The vapor barrier panels are glued together with vapor-proof double-sided tape with an overlap of 10–15 cm, and all edges are taped with tape. The lower edge of the vapor barrier should lie on the starting (basement) profile.
Installation of insulation over vapor barrier
A frame system made of timber with a thickness equal to the thickness of the insulation layer and a width of 40 mm is mounted on nails or dowel-screws. The pitch of the frame posts is equal to the width of the insulation board minus 5 mm for the expansion. The heat insulator is installed on disc dowel screws with a metal core (fungus) at the rate of 5–6 pcs/m2.
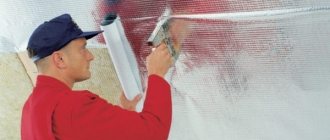
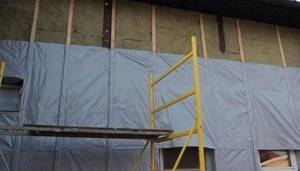
Installation of wind and waterproofing (wind and moisture protection) on top of the insulation
The moisture-windproof membrane is also fastened with a stapler to the insulation and frame posts, with the panels laid overlapping 15 cm and secured with double-sided vapor-tight tape. The lower edge of the membrane is lowered 2 cm below the level of the plinth to drain condensate onto the blind area. All edges are also taped with tape.
Installation of slabs on top of windproofing
A beam with a cross section of 40x40 mm is mounted to form a ventilated gap. If, according to the manufacturer’s instructions, to fasten the siding, a step less (30 cm) is required than that of the frame posts (60–0.5 cm), a horizontal frame is first built, on top of which the posts for installing the siding are attached with a given step.
Installation of siding may vary depending on the manufacturer, type of siding, and direction of the planks. When selling material, official dealers and large chains of building materials always issue proprietary installation instructions for a specific type of material.
Types of mineral wool. Preparing for installation. Lathing design
The main purpose of mineral wool is to use it for sound and thermal insulation of walls, roofs, ceilings and other structures in buildings, structures, pipeline systems and other structures. Mineral wool can combat heat loss and create comfortable living conditions for people. When independently choosing mineral wool as insulation for the outside walls of a wooden house, you should pay attention to the following characteristics:
- composition - basalt (stone) wool is preferable to fiberglass;
- density - the higher this indicator, the better the thermal insulation;
- the dimensions of the slabs directly affect the dimensions between the frame racks.
You should also carefully study the accompanying documents and find out for what specific purposes this insulation serves: for sound insulation, for protection against heat loss, for protection against the spread of fire. Manufacturers often write on the packaging about the place of application of this type of mineral wool: for the facade of a building, for interior walls, for the roof of a house and other works. There are three types of mineral wool:
- stone (basalt) is made from rocks;
- fiberglass – these are the thinnest strands of glass;
- slag is produced from slag waste.
All types of mineral wool are non-flammable - this is its undoubted advantage, especially in combination with flammable wood.
It is better to use mineral wool insulation in the form of standard rectangular slabs, with an optimal thickness of 50 and 100 mm. The main guideline when choosing thickness is climate. Mineral wool slabs are convenient to place and attach externally to the wall with your own hands, if you correctly mark and secure the bars for attaching them to the facade of a wooden house. Stone mineral wool is best suited as insulation for wooden walls under siding. This insulation has many unique properties:
- low thermal conductivity (0.035-0.045 W/m), which makes it possible to maintain a comfortable microclimate in residential premises;
- non-flammable (can withstand high heat up to 700 degrees and open fire);
- good sound insulation;
- high temperature resistance (from –180 degrees to +700 degrees Celsius);
- resistance to shrinkage and warping in any conditions;
- durability;
- resistance to moisture (water absorption level is only 0.5%);
- good vapor permeability;
- environmentally friendly (does not emit harmful substances, so mineral wool is absolutely harmless to the human body; resistant to various chemicals; fungi and sinkers do not like it);
- ease of use (not scratchy);
- does not require qualifications and is easy to install with your own hands.
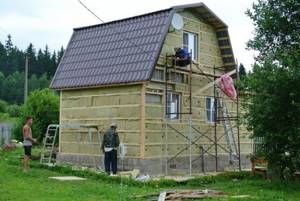
The process of laying mineral wool sheets with your own hands on the outside walls of a wooden house is quite simple, but you still need to follow the recommendations of the instructions and have experience in construction work. The main requirement: the slabs must be laid evenly, without leaving gaps. To do this, you need to be able to cut them or supplement them with pieces of a certain configuration. Particular care must be taken when marking the sheathing to avoid gaps at the joints of the slabs and their contact with the bars. The outer surface must be prepared before insulation and installation of siding. Drainpipes, lanterns, shutters and other elements are removed from it. It is thoroughly cleaned of any contaminants.
The frame on which the siding will be attached with your own hands must be made of smooth, antiseptic wooden blocks. Metal profiles are not desirable, as they collect condensation, which freezes in winter. Typically, wooden blocks with a cross-section of 50x50mm are used, which corresponds to the thickness of mineral wool sheets. You need to prepare for laying mineral wool. It is especially important to take this into account when the work is done with your own hands. Insulation made from sheets has a decent weight, so for reliable fixation they use special glue and reinforcement with dowels. Stability of mineral wool sheets is given by friction with bars, glue and dowels. A special film is applied over the insulation. It has specific properties: waterproof on the outside, but permeable to steam from the inside. It is attached to the bars using staples using a construction stapler.
First, the insulation sheathing is done. The bars are positioned horizontally. Their thickness should be equal to the thickness of the mineral wool slabs. All bars are leveled. On top of this lathing, a counter-lattice for siding is attached with self-tapping screws in increments of 40-50 cm. In it, the bars are arranged vertically. This design provides a ventilated gap between the insulation sheets and the siding, and also reliably fixes the mineral wool sheets.
Installation of a windproof layer
When installing a windproof film, as in the case of a waterproofing layer, the film is overlapped. All joints that are formed must be glued using a special waterproofing tape. In this case, it is necessary to use just such a tape, this will protect the structure from the penetration of cold air.
When choosing a tape, do not forget that this material must have good vapor permeability. There should be no difficulty in purchasing such products, since such a building element is usually produced by the same manufacturer as the wind and waterproof film.
As for the overlap, to achieve the best performance, it is recommended to do it at least 15 centimeters.
The film material is sewn onto the finished frame, which makes an indentation of 2 - 3 centimeters from the insulation. This gap is necessary for ventilation.
Basic rules for waterproofing ↑
When installing a waterproofing film, certain rules must be followed:
- When laying the film, the joining of the edges should be done with an overlap of at least 150 mm, gluing the joint with tape. In this case, it is necessary to check that there are no areas not covered with waterproofing to avoid the insulation getting wet.
- The film should be attached in such a way that it cannot be damaged when installing the siding.
- The film is secured using galvanized nails with a wide head or staples using a mechanical stapler.
- A gap of about 30 mm is required between the film and the siding to allow natural ventilation. In addition, when installing some types of films, it is necessary to leave a gap between them and the insulation: this requirement must be specified in the instructions from the manufacturer.
- It is necessary to ensure the correct orientation of the film: if it is laid on the wrong side, the material will not function correctly.
Why do you need wind protection for siding?
Installation of wind insulation is necessary to protect buildings subject to high wind loads. At the same time, maintaining heat in a building is only half the battle, because the most important thing is to protect the insulation under the siding from premature soaking and destruction. Thus, wind insulation is also a necessary layer of protection for walls from moisture and steam penetration.
Wind protection performs the following functions:
- Protection of walls and insulation from exposure to steam and moisture.
- Reducing the likelihood of fungi and mold appearing on the inner surface of the walls.
It is important to adhere to the main rules for installing wind and vapor protection. The vapor barrier is placed under the insulation, and the windproof membrane is placed on top of the insulation. On top, all materials are decorated with siding.
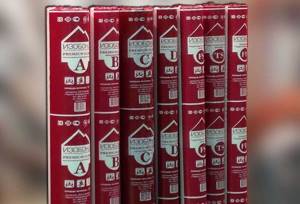
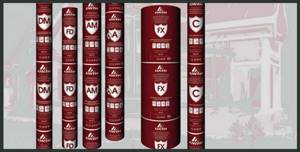
Types of Isospan
Let's start with what Izospan is. This is the trademark under which the Tver company Hexa produces non-woven building materials - films and membranes for various purposes. In short, there are vapor barrier, windproof and waterproofing roll materials. There are a lot of materials, so the names, applications and features are summarized in a table. It's easier to navigate this way.
Instructions for use of Izospan depend on the area of its application
| Name | Purpose | Application area | Structural features | Properties |
| Izospan AQ proff | Vapor-permeable hydro-wind protection | Sloping roof (insulated and non-insulated), frame walls, wall insulation, ventilated facade, attic and interfloor ceilings | Three-layer reinforced membrane | Protects from wind, allows steam to pass through, but retains moisture |
| Izospan AQ 150 proff | Vapor-permeable hydro-wind protection | Sloping insulated roof, frame walls, wall insulation, ventilated facade, attic and interfloor ceilings | Three-layer membrane | -//- |
| Izospan AS 130 | Vapor-permeable hydro-wind protection | Sloping insulated roof, frame walls, wall insulation, ventilated facade, attic and interfloor ceilings | Membrane | -//- |
| Izospan AS | Vapor-permeable hydro-wind protection | Sloping insulated roof, frame walls, wall insulation, ventilated facade, attic and interfloor ceilings | Three-layer membrane | -//- |
| Izospan AM | Vapor-permeable hydro-wind protection | Sloping insulated roof, frame walls, wall insulation, ventilated facade, attic and interfloor ceilings, internal walls | Three-layer membrane | -//- |
| Izospan A base | Windproof membrane with vapor permeability | Basement over ventilated subfloor | Windproof membrane | Protects from wind, allows steam and moisture to escape |
| Izospan A with OZD | Vapor-permeable hydro-wind protection with increased fire resistance | Ventilated facades | Membrane with fireproof impregnation | Protects from wind, allows steam to pass through, but retains moisture and reduces the risk of fire |
| Izospan AF+ | Non-flammable wind protection and waterproofing does not prevent the release of vapors | Ventilated facades | Non-flammable membrane | Reduces blowing heat, releases steam, protects against moisture, does not burn or support combustion |
| Izospan B | Vapor barrier, waterproofing | Sloping insulated roofing, frame walls, wall insulation, attic, basement and interfloor ceilings | Two-layer material (smooth on one side, rough on the other) | Does not allow steam, moisture, or insulation particles to pass through |
| Izospan RS | Vapor barrier, waterproofing | Sloping insulated and flat roofing, frame and internal walls, attic, basement and interfloor ceilings, floors on concrete bases | Three-layer reinforced material | Does not conduct moisture in liquid or vapor state |
| Izospan B fix | Vapor barrier, waterproofing | Sloping insulated roofing, frame walls, wall insulation, attic, basement and interfloor ceilings | Izospan B with two adhesive strips for easier fixation of panels | Does not allow steam, moisture, or insulation particles to pass through |
| Izospan C | Vapor barrier, waterproofing | Sloping insulated roofing, frame and internal walls, attic, basement and interfloor ceilings, floors on concrete bases | Two-layer material (smooth on one side, rough on the other) | Does not allow steam, moisture, or insulation particles to pass through |
| Izospan RM | Reinforced vapor-hydro-insulation | Flat roofs, floors on concrete bases | Three-layer material with an additional reinforcing layer | Does not allow steam or liquid moisture to pass through |
| Izospan D | High-strength vapor-waterproofing | Flat roofs, non-insulated sloping roofs, floors on concrete bases | Two-layer material based on woven polypropylene fabric | High resistance to steam and moisture, increased mechanical strength |
| Izospan D fix | High-strength vapor-waterproofing | Flat roofs, non-insulated sloping roofs, floors on concrete bases | Izospan D with two adhesive strips for easier fixation of panels | High resistance to steam and moisture, increased mechanical strength |
| Izospan DM | High-strength vapor-waterproofing with anti-condensation surface | Sloping insulated and non-insulated roofs, all types of floors, frame walls | Izospan D with anti-condensation properties | High resistance to steam and moisture, increased mechanical strength, no condensation |
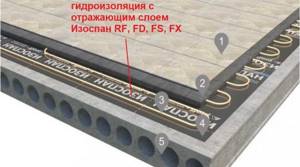
| Izospan RF | Reflective vapor barrier, high strength waterproofing | Insulated pitched roofs, all types of floors, frame walls, heated floors | Multilayer material based on non-woven fabric with a reflective (shiny) layer | Reflects thermal radiation, retains moisture in any condition |
| Izospan FD | Reflective vapor barrier, high strength waterproofing | Insulated pitched roofs, all types of floors, frame walls, heated floors | Multilayer material based on woven fabric with a reflective (shiny) layer | Reflects thermal radiation, retains moisture in any condition |
| Izospan FS | Reflective vapor barrier, waterproofing | Insulated pitched roofs, all types of floors, frame walls, heated floors | Non-woven fabric+metalized film | Reflects thermal radiation, retains moisture in any condition |
| Izospan FB | Reflective vapor barrier, waterproofing for saunas and baths | Saunas and baths | Kraft paper with metallized surface | Reflects thermal radiation, retains moisture in any condition, tolerates high temperatures |
| Izospan FX | Reflective vapor barrier, waterproofing | Insulated pitched roofs, all types of floors, frame walls, heated floors, parquet and laminate flooring | Foamed polyethylene + metallized layer | Reflects thermal radiation, retains moisture in any condition, has thermal insulating properties |
| Izospan KL | Double-sided adhesive tape | Sealing vapor barrier connections | Adhesive layer - acrylic | Width 15 mm, tape length per roll 50 m |
| Izospan KL+ | Double-sided adhesive tape | Sealing of material joints, fastening them to building materials (concrete, plastic, wood, metal) | Adhesive layer - acrylate | Width 25 mm, length 25 m |
| Izospan SL | Double Sided Joint Tape | Sealing joints of materials, fastening them to rough surfaces (stone, brick) | Butyl rubber tape | Width 15 mm, tape length per roll 25 m |
| Izospan SL proff | Double-sided high-adhesion bonding tape | For reliable fastening and sealing of junctions with other materials | Butyl rubber tape | Width 15 mm, tape length per roll 22 m |
| Izospan FL | Metallized Joint Tape | To connect the vapor barrier to the reflective layer | Polypropylene with metallized layer | Width 50 mm, length 50 m |
| Izospan FL Termo | Metallized connection tape with increased heat resistance | For connecting vapor barrier with a reflective layer in baths and saunas | Aluminum tape with adhesive layer | Width 50 mm, length 40 m |
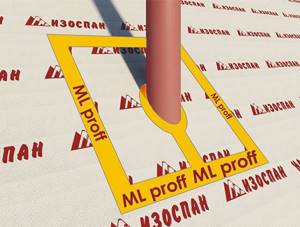
| Izospan ML proff | High Strength Single Sided Adhesive Tape | For gluing materials to building materials | Acrylate | Width 50 mm, length 50 m |
| Self Adhesive Sealing Tape (SAL) | Foamed polyethylene with adhesive layer | Protection against leakage at the junctions of materials with rafters on roofs | Foamed polyethylene | Width 50 mm, length 30 m |
As you can see, all Izospan materials can be divided into three groups:
- Wind protection. This is a group of Izospan A materials and varieties. These are materials that protect the insulation from blowing, retaining heat. At the same time, they remain permeable to steam, but do not conduct/permeate moisture.
- Steam-waterproofing materials. These are Izospan B, C, R and several of their varieties. They do not allow moisture to pass through in any form.
- Energy-saving vapor-waterproofing Izospan F. It is distinguished by the presence of a metallized layer; it does not allow moisture to pass through in any form - neither steam nor liquid.
There are also connecting materials - single- and double-sided connecting tapes on different bases. They are needed during installation and allow you to avoid deterioration of performance at joints. Some allow you to achieve tight connections.
How to distinguish by name
The name of the materials contains a key letter, by which the group and main properties can be determined. So Izospan A with all other indices means a vapor-permeable membrane. Izospan V, D, C - hydro-vapor barrier. The difference between the films of this group and the first is that these materials (B, C, D) do not allow steam to pass through. The materials of the first group (A) conduct it (steam) and retain only water. The exception is Izospan A base. It does not retain water and conducts steam.
Instructions for use depend on the type of material
The third group is also hydro-vapor barrier. It differs in that it has a metallized coating. The names of materials in this group contain the letter F: FD, FX, FS, FB, RF. They are used to more effectively retain heat, since heat rays are reflected from the shiny coating. But reflection is only possible if there is an air gap in front of the film of 3.5 cm (or more).
After the first letter in the Izospan marking there is often a second one. It describes the special properties of a material. It can also be an abbreviation or short word. For example, the presence of the letter M or S indicates the presence of reinforcement. The fix prefix means that strips of glue are applied along the edges, so there is no need to use tape.
How to properly protect your home from moisture and steam?
In most regions of Russia, the house needs insulation, and therefore a vapor barrier. The correct moisture protection technology in this case resembles a layer cake and looks like this:
Layer 1. Vapor barrier.
The vapor barrier film is attached directly to the wall of the house. To ensure high-quality protection of the insulation, it is mounted with an overlap. By the way, modern vapor barrier films are made according to the membrane principle: steam does not penetrate into the insulation, but at the same time can be removed from it. When using such material, it is important to lay it on the correct side.
Layer 2. Insulation.
Insulation is installed on the vapor barrier film. Detailed technology for installing it with siding sheathing can be found in the instructions on our website. We especially note that it is important to avoid cold bridges.
Layer 3. Wind and hydro protection.
To protect the insulation from moisture during rains and snowfalls, wind and moisture protection is installed on top of it.
Layer 4. Ventilation gap.
To prevent moisture from stagnating under the finish, there must be a ventilation gap between the panels and the insulation. Freely circulating air promotes moisture evaporation and prevents the formation of fungi.
Layer 5. Siding or facade panels.
The final stage is the installation of siding or facade panels. The technology for their installation is described in detail in the instructions. By the way, if you have not yet chosen which siding to use to decorate your home, take a look at our catalog. In it you will find a huge selection of finishing materials. You can try them on for your home in the Alta-Planner online program. It's easy to do - the results are very clear!
The pie is ready. The insulation is protected from moisture on all sides and will retain heat even in harsh winters.
How the protective layer “works” ↑
The task of waterproofing materials is to create a barrier to moisture in the form of precipitation and vapor contained in the air. Snow that accumulates under the roof ridge subsequently melts and flows over the surface of the waterproofing film onto the foundation ebb, and from there into the drainage system. In the absence of this film, moisture would get into the thermal insulation material.
The same problems arise with walls. Despite the fact that the siding panels are mounted overlapping, in strong winds rainwater still gets under the cladding through the cracks. If waterproofing is present, moisture flows down without causing damage to the structure. Therefore, the exterior decoration of the building requires a ventilation gap of 20-30 mm for laying insulating material.
The main difference between a high-quality waterproofing film is its ability to retain moisture, but not interfere with the natural ventilation of the walls: the film is a membrane and therefore steam can freely pass through the walls to the outside, which means the house will “breathe”.
When choosing an insulating material, it is worth paying attention to the fact that the moisture resistance of each type of film is different: it is assessed by the ability of a unit area to withstand a certain volume of water without leaking, as well as by the amount of steam passed through during the day. The cost of films is also different: it depends on their quality and basic characteristics. The larger the column of water the film can withstand (and allow a large volume of steam to pass through), the more expensive it will be. This is explained by the multi-layer nature of this material, but a cheaper option is sufficient for installation under siding.
Insulation for siding - the best options
Thermal insulation material is selected depending on the climate, the purpose of the house (for periodic or permanent residence), the presence of constant winds, and the level of humidity.
The following main types of insulation can be distinguished:
- Rolled materials have a small thickness - up to 20 mm, are attached directly to the wall with adhesives, and are used in warm climates.
- The basis of mineral wool insulation is basalt, silicate fibers or fibers of other rocks. One of the varieties of such heat insulators is glass wool. Plates and mats made from such fibers are produced soft, semi-rigid, and hard. The materials have excellent heat-saving and sound-proofing characteristics, but a fairly high coefficient of water absorption. Such insulation requires a vapor barrier to be installed on the wall before installation.
For buildings constructed from completely vapor-tight materials, a vapor barrier under the siding is not required. But in this case, internal insulation is contraindicated, since the thermal insulation will certainly get wet.
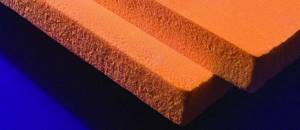
- Polystyrene foam and extruded polystyrene foam have lower absorption compared to mineral wool.
Characteristics of polystyrene foam insulation
Styrofoam
Polystyrene foam has very low hygroscopicity, in which it is significantly superior to fiber insulation. Walls lined with foam plastic also do not require additional wind protection. This is one of the most budget-friendly insulation options, although not the most effective. Due to the vapor permeability of the material, it is necessary to regularly ventilate the room to prevent condensation from accumulating on the walls.
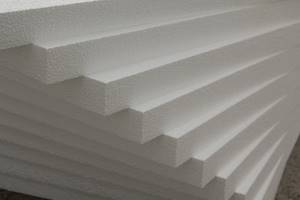
Styrofoam
Pros of polystyrene foam:
- affordable price;
- low thermal conductivity;
- light weight;
- ease of installation.
Minuses:
- In terms of sound absorption, foam plastic is inferior to other types of insulation;
- sheets of material break easily, so care is required during transportation and installation;
- foam is damaged by rodents;
- It is a flammable material and produces toxic smoke when burned.
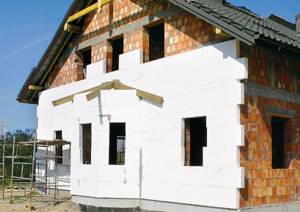
Insulation of facades with foam plastic
EPS (extruded polystyrene foam)
This material has characteristics similar to polystyrene foam, but in all respects it is much better. EPS is widely used in industrial and private construction; its installation does not require much effort or special skills.
Extruded polystyrene foam
Pros:
- high density and strength of the material;
- almost zero hygroscopicity;
- excellent thermal insulation properties;
- good noise absorption performance;
- long service life;
- relatively light weight.
Minuses:
- the cost of EPS is approximately 20-30% higher than that of polystyrene foam;
- does not allow the walls to “breathe”;
- can be damaged by rodents;
- refers to flammable materials.
| Options | Styrofoam | EPPS |
| Thermal conductivity | 0.035 W/(m K) | 0.028 – 0.032 W/(m K) |
| Water absorption | 0,5 – 1% | 0,1 – 0,4% |
| Density | 11-35 kg/m3 | 30-40 kg/m3 |
| Flammability degree | G1 – G4 | G1 – G4 |
| Thickness | 20-100 mm | 40-100 mm |
| Dimensions | 500x500 mm, 600x1200 mm, 1000x1000 mm | 580x1180 mm, 600x1200 mm |
Prices for foam plastic
Styrofoam
Assortment and calculation of materials
To determine the amount of materials, you first need to choose the type of finish. How to install siding with your own hands with insulation of a wooden house, consider an example of installing the system, since their fastening system is universal
When choosing a finishing style, pay attention to the area of the panels
We recommend making a sketch of the future cladding with dimensions. It will allow you to calculate the area and number of joints. You will know the number of panels accurate to one or two pieces.
The rich assortment can be an example of a skillful combination of profiles and fasteners.
- Vertical panels S7 have a useful area of 0.55 m², length - 3050 mm.
- Horizontal panels D4.5 “Ship timber” (S - 0.85 m², L - 3660 mm).
- "Blockhaus" (S - 0.88 m², L - 3660 mm.).
- D5C “Herringbone” (S - 0.78 m², L - 3050 mm.).
“Hurricane-proof” lock (high-strength) ensures that the panels will not come apart even in the strongest gust of wind. The finishing of window and door openings is done with complete profiles: slopes, platbands, near-window profiles. Corner elements, starting and finishing strips, moldings and an H-shaped profile allow you to fix the ends of the panels.
The calculation of the lathing is made taking into account the distance between the slats - 20 cm. The thickness of the bars should be no less than the thickness of the insulating materials by 0.5 cm, and the width should be 3-4 cm. If you want to increase the space between the plastic and the insulation to 2-3 cm, you will need a thin lath (2-3 cm) the same width as the bar. It is sewn onto each batten over the waterproofing. A small space will make air circulation with water vapor more active, which is useful for mineral mats.
The bars must be dried to 15-20% humidity and treated two to three times with protection against rotting and fire. Nails should be 3 times longer than the thickness of the bar. To fasten siding and other elements, purchase galvanized screws with a wide flat head (length 25 - 35 mm, head up to 0.8 cm). Starting and corner elements are fastened after 20 cm, and the main casing can be screwed after 40 cm, but we recommend purchasing 20% more fasteners.
Wind bar
Of no small importance when installing siding panels is the wind board or wind strip. It helps to restrain gusts of loads from the wind. Standard versions of boards or planks, like most additional elements, are created with the purpose of redistributing any loads. The wind strip, or additional board for finishing siding panels, is a kind of retainer that takes significant loads from gusts of wind. The absence of a wind strip accelerates the wear of the siding finish and reduces the durability of the facing structure.
Wind strips under siding panels not only carry a functional and protective load, but also give the facade of the structure a finished look. The correct selection and installation of the wind strip is very important. It is performed in accordance with the basic calculations of the components.
Wind strips under siding panels not only carry a functional and protective load, but also give the facade of the building a finished look
Please note that all strips used when installing windbreaks under siding panels must strictly comply with quality criteria and be used in accordance with their intended purpose.
We also recommend that you read the article in which we talk about the characteristics and features of choosing siding for exterior decoration.
housefasad.ru
Siding characteristics, manufacturers
Canadian and North American sidings are considered the best, but limited imports make them rare guests on our walls. “Mitten” (Canada), “Variform” (USA), “Vytec” (Canada) have been on the market for more than 40 years and have earned all the awards that a finishing material could receive. But their prices are high, and the color range is poor. They do not like bright colors; they prefer light pastel and brown tones.
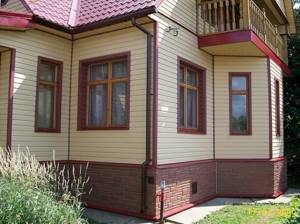
In our country there are manufacturers that can compete with overseas finishing. The German concern Döcke Extrusion has built a plant in Moscow that produces the entire range. Good quality and plastic quality guarantee for 50 years. produces siding and facade panels (the fastening is the same, but a different shape). The price is quite affordable, and the Economy series is not inferior in quality to Canadians. Petersburgskaya confidently takes third place.
Each manufacturer has exclusive offers (unique panel profiles, colors, shapes and textures, own fastening system).
Siding installation from preparation to the last batten
Clean the surface of the walls from all protruding objects. Remove all nails and remove gutters and cornices. Paint the walls with a primer, and treat them twice with substances that protect against fire and mold. The sheathing is attached to the wall vertically (plumb) 20 cm between the axes - the centers from the base to the very top. A horizontal row of bars is nailed along the perimeter to attach moldings, starting and finishing elements. Their horizontal fastening is done using a level and twine from corner to corner, without deviations or sagging. It is recommended to skip two bars on top.
Thermal insulation mats fit together without gaps. For hydro- and vapor barriers, Deke has produced several types of D-folie films and membranes. Place them according to the instructions. Nail a thin lath over the battens. It is recommended to use sealant to treat places through which water can penetrate inside: window and door openings, entrances of all highways.
Installation of panels begins with openings. A U-shaped profile is attached closely to the surface of the frames of windows and doors, slopes and window profiles are fixed into it, and the second joint is covered with a platband. Adjustment in width and length is made with scissors and a saw. The corners of the casing are filed on a miter box, the joints are very smooth.
The ebb is attached along the bottom block, and above it, 3-4 mm apart, is the starting rail. If the ebb joins, then overlap by 2 cm. Between the starting slats you need to make a gap of 5-8 mm. The heat causes the plastic to expand and the rail can bend when the ends touch each other. Finishing profiles are mounted according to the same scheme. The starting rail is leveled, and straightness can be checked with twine.
Corner elements are mounted with fastening every 20 cm. Screw the screws in the center of the holes and do not tighten until completely fixed, leave 1 mm for free movement of the panel. Once all the corner pieces and openings have been installed, you can begin to cover the main surfaces. When you've finished building up the wall to the very last panel at the top, cut it to length and secure it with finishing strip or molding. To ensure the strength of this lock, hooks are made with a punch in the plane of the panel.
The soffits under the roof are the last to be closed. Ventilation through the holes will improve the removal of fumes from under the plastic.
Manufacturers provide guarantees for their products for decades. And all this time, to care for the surface of the plastic, it is recommended to wash it with warm water and detergents.
Vapor barrier with reflective layer Izospan F
The third group of materials is vapor barrier films with the effect of heat reflection. They differ in that the outer layer is a metallized film (lavsan or polypropylene). They can be used instead of similar materials (vapor barriers) in all of the above structures. If there is an air gap, the material is able to reflect thermal radiation back into the room.
| Name | Type of metallized film | Maximum elongation in transverse/longitudinal direction N/50 mm | Vapor permeability | Withstands water pressure, mm.water.st. | Withstands ultraviolet radiation (without protective coatings) for at least months |
| Izospan RF | polypropylene | 450/300 | No | 1200 | 3-4 |
| Izospan FD | polypropylene | 800/700 | No | 1200 | 3-4 |
| Izospan FS | polypropylene | 300/330 | No | 1200 | 3-4 |
| Izospan FB | lavsan | 350/340 | No | 1200 | 3-4 |
| Izospan FX | lavsan | 176/207 | No | 1200 | 3-4 |
Energy-efficient vapor barrier Izospan F is installed on the side of the room. When installing, turn the shiny side toward the room. The use of this group of materials can reduce heating costs by about 10%, but there is still debate about this: not everyone believes in it.
Metallized vapor barrier Izospan
The second area of application for Izospan F is the underlay for finishing floor coverings. Under laminate, parquet boards, and film heated floors, it is recommended to use Izospan FX. This is foamed polyethylene 2-5 mm thick with a metallized film glued. In addition to reflecting heat, it also acts as thermal insulation. Any other material of this group can be placed under all other coatings.
Using Izospan F in a heated floor system
When laying a heated floor system in a screed, the cake remains the same. Only a pipe or cable is added. But they need to be laid according to a certain pattern, so a metal mesh is also needed. Water heated floor pipes or an electric heating cable are tied to it.
Which Izospan to use under heated floors
In order not to heat the ceiling of the neighbors below, it is advisable to direct the heat as high as possible. To solve this problem, insulation is laid on the slab, and waterproofing with a heat-reflecting effect is placed on it. In this case, the material does not allow water to enter the slab and reduces heat loss during operation. For heated floors, it is recommended to use Izospan RF, FX, FD, FS.
Siding fastening
After completing all the preparatory work, it’s time to start calculating the required amount of material, if it was not purchased in advance. It is advisable to first find out how much the selected material costs.
In no case should you buy siding “by eye”, since, most likely, the result will be more material than needed, or vice versa, not enough. Despite the fact that everyone wants to save money and not spend extra money, the calculation should be made according to the rules.
The number of siding panels is obtained in this way:
- calculate the total area of the walls;
- divide the resulting figure by the length and width of the panels.
The required number of final and initial slats is obtained as follows:
- calculate the perimeter of the building
- divide the perimeter by the length of one rail.
The siding is attached in the following order:
- We draw an installation line and, stepping back about 5 centimeters from it, drive in nails at its opposite ends. We stretch the thread between them and check its parallelism with the installation line using a building level.
- Then, strictly along the second line, the second installation line is drawn. The top edge of the starting rail will be cut along this line.
- When installing the initial planks, it is necessary to leave a gap of about 50 mm between them so that they are not damaged by future expansion, for example from exposure to heat.
- We install corner strips at the corners. A distinction must be made between internal and external strips.
- When joining corner strips, it is recommended to trim the edges that have holes by 20-30 mm. There is no need to touch the inner bar.
- The upper strip should cover the lower one, with a gap of about 20 mm.
- In stores you can purchase special window trims for doors and windows.
- When installing the planks, they are not nailed tightly to each other, but compensation gaps of 1-1.5 millimeters are left.
- Nails or screws are attached in the middle of the holes, evenly, without pressing the edges of the panels. Siding must be able to freely expand and contract during use.
Keep in mind that siding should only be cut with a fine-toothed saw or sharp knife. A saw with large teeth will crumble the material. The last panel is mounted as follows. First, the end rail is fixed at the wall level, then the panel is closed in the remaining space, where it enters with a characteristic crunch or click. The top panel is installed in the same way.
When covering a house with siding, it is necessary to strictly follow the technology and be sure to leave an air gap under it. Thanks to it, air masses moving along the walls will be able to maintain the same level of humidity, which will avoid the appearance of condensation and destruction of the material.
In addition, such a gap will allow the insulation to dry quickly if it gets wet. And in hot weather, the air gap will prevent the transfer of heat from the siding to the walls of the house. It should be remembered that the insulation should not be covered with roofing felt, otherwise the material and the wall may simply rot. How long the siding will last depends on the quality of the work performed, the attentiveness of the craftsman and compliance with step-by-step instructions and installation rules.
Methods for laying waterproofing material
Rolled vapor and waterproofing materials can be installed in two ways.
The first method is to unwind the roll and position the film horizontally. At the same time, it is fastened. The first row is fixed at the very bottom of the facade. The second one is placed higher with an overlap of 150 mm over the lower one. Scotch tape is used to seal the edges. This option is the most preferable because it provides sufficient tightness.
It is convenient to carry out work on unwinding the roll using a pole. A limiter is attached to its lower part to prevent the roll from slipping.
The second method is to vertically lay steam and hydrobarriers.
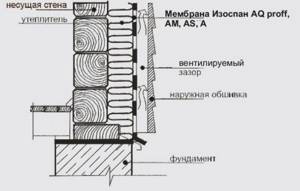
With any installation method, the waterproofing material used for the roof must extend with its lower edge on top of the film laid on the walls.
We invite you to continue the topic of waterproofing under siding and post your comments and suggestions.
GD Star Rating loading…
Waterproofing for siding - materials and stages of work, 4.4 out of 5 based on 14 ratings
The term “waterproofing” implies a set of measures to protect building structure elements from external moisture. Waterproofing also refers to the materials used for this purpose, intended to create waterproof barriers. The choice of waterproofing depends on the design of the walls of the house: in particular, waterproofing under siding involves the use of vapor and waterproofing films.
- Video instructions for installing siding
- Why is waterproofing performed?
- How does the protective layer work?
- Basic rules for waterproofing
- A few words about vapor barrier
- Installation of hydro- and vapor barrier
- This is important to know
Video instructions for installing siding ↑
Why is waterproofing performed ↑
Before covering the walls with siding, the sheathing is installed. A waterproofing film is attached to it from the inside.
A free space is formed between the wall and the siding, which is usually filled with insulation. Despite the fact that vinyl (the material from which siding is made) is waterproof, the cladding is not airtight: air freely penetrates between the panels and the moisture contained in it saturates the insulation. Mineral wool and glass wool, which are most often used to fill the walls, are not afraid of open fire, have a low specific gravity and do an excellent job of their main function as insulation. But, when saturated with moisture, they lose their qualities and become deformed. Wall materials also suffer: drywall swells, wallpaper becomes moldy. This creates a threat to the safe operation of electrical networks.
The waterproofing film is attached to the inside of the sheathing
How the protective layer “works” ↑
The task of waterproofing materials is to create a barrier to moisture in the form of precipitation and vapor contained in the air. Snow that accumulates under the roof ridge subsequently melts and flows over the surface of the waterproofing film onto the foundation ebb, and from there into the drainage system. In the absence of this film, moisture would get into the thermal insulation material.
The same problems arise with walls. Despite the fact that the siding panels are mounted overlapping, in strong winds rainwater still gets under the cladding through the cracks. If waterproofing is present, moisture flows down without causing damage to the structure. Therefore, the exterior decoration of the building requires a ventilation gap of 20-30 mm for laying insulating material.
The main difference between a high-quality waterproofing film is its ability to retain moisture, but not interfere with the natural ventilation of the walls: the film is a membrane and therefore steam can freely pass through the walls to the outside, which means the house will “breathe”.
Waterproofing the building is necessary, since the siding protects the walls of the house well from rain, but the panels are not airtight. Air passes through them freely, the house “breathes”, and moisture comes in with the air.
When choosing an insulating material, it is worth paying attention to the fact that the moisture resistance of each type of film is different: it is assessed by the ability of a unit area to withstand a certain volume of water without leaking, as well as by the amount of steam passed through during the day. The cost of films is also different: it depends on their quality and basic characteristics. The larger the column of water the film can withstand (and allow a large volume of steam to pass through), the more expensive it will be. This is explained by the multi-layer nature of this material, but a cheaper option is sufficient for installation under siding.
Basic rules for waterproofing ↑
When installing a waterproofing film, certain rules must be followed:
- When laying the film, the joining of the edges should be done with an overlap of at least 150 mm, gluing the joint with tape. In this case, it is necessary to check that there are no areas not covered with waterproofing to avoid the insulation getting wet.
- The film should be attached in such a way that it cannot be damaged when installing the siding.
- The film is secured using galvanized nails with a wide head or staples using a mechanical stapler.
- A gap of about 30 mm is required between the film and the siding to allow natural ventilation. In addition, when installing some types of films, it is necessary to leave a gap between them and the insulation: this requirement must be specified in the instructions from the manufacturer.
- It is necessary to ensure the correct orientation of the film: if it is laid on the wrong side, the material will not function correctly.
There is a ventilation gap between the siding and the waterproofing. Without it, the insulation will gain moisture
A few words about vapor barrier ↑
A vapor barrier film is laid on the back side of the insulation: it protects the material from the inside. This is necessary because inside the room, as a result of natural processes, steam is formed in quite large quantities, which can deteriorate the quality of thermal insulation. Therefore, the vapor barrier film should not allow moisture and steam to pass through.
Installation of hydro- and vapor barrier ↑
Rolled materials are first released from packaging, after which they are laid on top of the mounted sheathing on its inner side. There are two ways to do this. The first is more preferable, since it ensures tightness to a greater extent. This method consists of unwinding a roll around the perimeter of the house and simultaneously fastening the material. It is laid from bottom to top: the first row is attached at the very bottom, and the next one is installed higher, overlapping the bottom one. In this case, the joints are taped with adhesive tape.
The waterproofing film is laid in horizontal rows with overlap
For ease of use, a pole with a round stop at the bottom is used to prevent the film from slipping. A roll of film is placed on the pole: this device simplifies the unwinding of the waterproofing.
The second method is to unwind the rolls from the top level of the building downwards: the material is laid in vertical parallel rows. In this case, you should also observe the overlap and glue the places where the rows join.
Roof waterproofing, carried out using a similar material, must extend its lower edge over the film laid on the walls: this is necessary so that the moisture from above drains from the outside of the material. The vapor barrier material is attached from the inside in a similar way, but only after installing the thermal insulation boards.
After completing the installation of the hydro- and vapor barrier film, you can begin cladding the walls of the building with siding: the entry points of the self-tapping screws will not break the seal, since they are screwed in from the outside.
After installing the waterproofing, you can begin cladding the walls with siding.
This is important to know ↑
Proper implementation of hydro- and vapor barrier is an important condition for creating normal microclimatic conditions in the home. These materials are necessary to ensure high-quality wall insulation. Violations of installation rules will lead to heat loss, dampness and mold. Expensive repairs and replacement of finishing materials will be required. To prevent this, you should seek help from a specialized company whose specialists have sufficient experience.