Purpose
A capillary thermostat is used to control the temperature. Used as a relay in household appliances, industry, to ensure safety in case of fire.
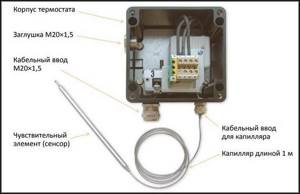
This device can be used as a double-acting thermostat. In the first case, the element can shut down various systems in the event of an increase in temperature. In the second case, he is able to turn off running systems, switching to ensuring the operation of other systems. For example, when the temperature rises, it can turn off appliances, heating elements and turn on the air conditioner or fan to cool the room. Also capable of triggering an alarm in case of fire. This element has many purposes, the main thing is how it is connected to the electrical circuit.
How to connect a capillary thermostat
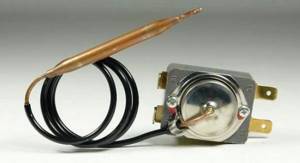
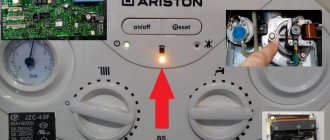
The thermostat for a water heater is an important element of the boiler design. The main task of the device is to maintain the specified temperature regime of the heated liquid, and for some models it must be maintained during an emergency shutdown of the electrical appliance in the event of a malfunction. Recommendations regarding the selection and installation of such a device will be discussed in this article.
Principle of operation
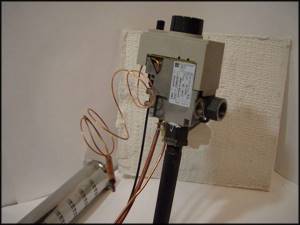
The operating principle of a capillary thermostat is very simple. First you need to understand what it is and what the device consists of. The element consists of the following parts:
- Capillary flask made of copper or brass.
- Tubes made of the same materials.
- Diaphragm regulator with electrical contacts.
- Gas or liquid in a flask.
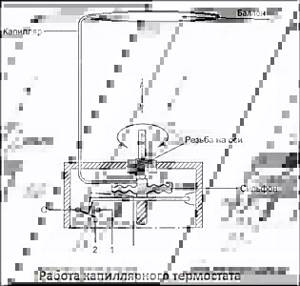
A capillary tube thermostat operates using the principle of pressure from an expanding fluid. The sealed flask contains a liquid whose density is less than that of ordinary water. The flask is soldered to a tube, which in turn is attached to a membrane on the mechanical part of the capillary thermostat. When the temperature increases above 3 degrees, the liquid begins to expand, creating pressure on the surface of the adjustable membrane. After overcoming the elasticity value, the membrane is activated, opening the electrical contacts of the regulator. Depending on the settings, the regulator can operate at temperatures from + 3 to +40 degrees. It all depends on where the capillary thermostat is used.
Varieties
There are 2 main types of temperature controller. Mechanical devices have manual adjustment of the response temperature. They are among the simplest devices.
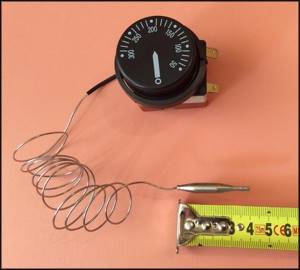
There are electronic regulators. They can be adjusted remotely via a computer or Wi-Fi network.
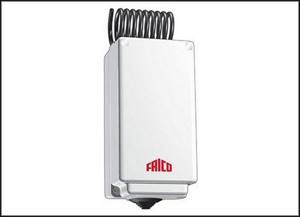
Non-adjustable sensors are increasingly appearing on the market. Such options cannot be configured at the moment of operation; they have a very narrow scope of application.
Scope of application
The capillary thermostat is a very common temperature sensor. It is often used in:
- Household instrument making. The element is installed in air conditioners, furnaces, water heating boilers, washing and dishwashing appliances, and ventilation systems of “Smart” homes.
- In industry, this mechanism is used to control the temperature of gases and liquids. Used for ventilation of rooms. There are devices for monitoring the temperature of electric motors that are operated without human supervision.
- Before the invention of fire and smoke detectors, thermostats with a capillary system were used as temperature controllers in warehouses and unguarded premises.
As mentioned earlier, this mechanism can be included in the electrical circuit of almost any device.
Examination
Despite their simplicity and reliability, capillary thermostats fail. This is due to the following factors:
- Carbon deposits on electrical contacts. Fixing this malfunction is very simple if the mechanism is suitable for disassembly. Carbon deposits are removed by cleaning the contact group with fine sandpaper. As a result of sticking, dents may form on the surface of the contacts. Cleaning is carried out until the surface is completely leveled.
- Loss of membrane elasticity. For collapsible devices, this problem is solved by leveling the surface. For those that cannot be repaired, the defect cannot be eliminated.
- Breakdown of the tube or flask of the capillary system. The only solution is to completely replace the device. In some workshops, the flask is filled with liquid and sealed. But the cost of repair is often higher than the new original.
To determine the operability of an element, you can only check the contact group. Often, regulators for household use are equipped with 3–4 contacts, 2 of which are in the closed (working position), and the next 2 contacts close when the mechanism is activated. To check you need:
- Set the tester to dialing mode with sound notification.
- Connect one probe to the first contact of the element.
- The second one is to find the contact with which the first one is closed. The tester's audio alert will indicate it.
- Next, the flask must be brought to a heating device or open flame without disconnecting the tester probes.
- When the response temperature is reached, the membrane will open the contacts, thereby interrupting the tester's notification.
- Now you need to ring contact 3 of the mechanism. To do this, attach one probe to a contact that has not been tested, and with the second probe find a circuit from the tested terminals. An audible alert will indicate that the circuit is closed and the correct terminal has been found.
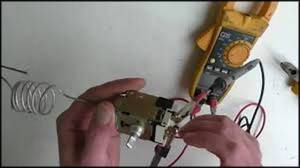
Successful testing of all terminals is a sign of complete serviceability of the regulator.
A full check can be carried out in the same way, only with an increase in the trigger moment.
Common thermostat problems
Any device, even the most reliable and expensive, fails over time, which is facilitated by many different factors, both internal and external. Breakdowns that require close attention:
If you do not have knowledge and skills in working with thermostats and connecting them, then it is better to entrust this issue to specialists
. This will, on the one hand, relieve you of unnecessary doubts and worries, and on the other hand, ensure the correct operation of the unit and the safety of others.
The thermostat for a water heater works on the principle of a thermometer - it measures the temperature. Why this is necessary and what the risk of element failure is, read in our publication.
Connection
It is very easy to connect the capillary thermostat yourself. Before starting work, you need to study the electrical circuit diagram on the device body. If it is not there, then you will have to dial the entire contact group. It is worth considering that the connection of any device is carried out strictly from the source of electrical energy consumption, through the thermostat to the device that must work through it. There are 2 schemes for connecting the mechanism.
Direct connection
Below is an example of direct connection of an incandescent lamp through a capillary thermostat. The thermostat will be used as a switch.
- 2 wires are connected to the lamp socket contacts.
- The “1” end of the wire is directly connected to one core of the power source, for example, to the “-” battery.
- End “2” of the wire is connected to output “2” on the regulator terminal block.
- “+” from the power source is supplied to the “1” terminal of the regulator unit.
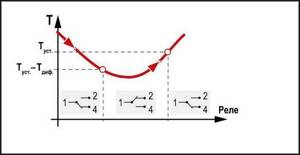
With this connection diagram, the lamp will light. If you heat the thermostat bulb, the contacts open and the lamp goes out. This connection diagram is used in heating boilers. The water does not have time to boil, the thermostat turns off the boiler when the set temperature is reached, which prevents the formation of steam and high pressure.
Reverse connection
An example of reverse connection with the same incandescent lamp. The thermostat is now used as a switch.
- Connect both ends of the wire to the incandescent lamp socket.
- Connect the “1” end of the wire directly to the “-” terminal of the battery.
- Connect the “2” end to terminal “3” on the thermostat block.
- Apply “+” from the battery to terminal “1” of the thermostat input.
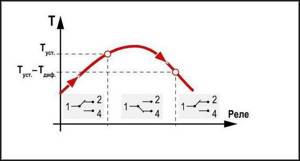
When testing the regulator terminals, it was determined that contacts “1” and “3” are closed when input contacts “1” and “2” are opened. In the assembled circuit, the incandescent lamp does not light because it does not receive electrical energy. When the capillary flask is heated, contact “1” will open, closing the circuit with contact “3”. In this position, voltage is transferred from one terminal to another. The incandescent lamp is now lit. This connection diagram is used in ventilation and air conditioning systems. The appliances do not turn on until the room temperature rises. As soon as the sensor is triggered, the devices turn on to cool the room.
Using the contact group of a capillary thermostat, you can distribute the operating torque of several devices or devices. The main thing is to know the exact circuit for switching on and off the contact group.
In heating boilers, a three-contact thermostat is used to operate the device and an active warning relay. Until it opens, the thermostat works in conjunction with the boiler. After exceeding the response threshold, the contacts open the circuit, turning off the boiler. This closes the secondary contact, turning on the light bulb or warning signal that the operation has stopped.
Video
If you have an infrared heater at home, then a thermostat is a must. The thermostat is capable of controlling and maintaining set temperature values for a long time. In addition, it will allow you to warm up the rooms in advance, reduce the risk of fire and make the atmosphere in your home as comfortable as possible. To understand the intricacies of connecting a thermostat to an infrared heater, we will first look at the principle of its operation, the mechanism of operation and highlight the main types of thermostats.
Typically, the thermostat operates cyclically
, in this case the electrical network opens and closes. At this time, the temperature sensor sends signals and thereby regulates the temperature.
If the temperature rises, the resistance of the internal sensor decreases. If the resistance rises again, the desired temperature is reached, the thermostat starts and the electrical circuit opens. When the temperature drops and the sensor cools down, the reverse process occurs: the resistance increases, the thermostat turns on again, but this time the circuit shorts. Next, the thermostat is connected directly to the infrared heater and the room temperature is set automatically
.
The thermostat controls the climate in the room and the main heat source. It turns itself on and off when necessary.
- As a rule, a micathermic heater is connected to a standard outlet or using a dedicated line from a machine on the electrical panel. The thermostat is built into the network between the heater and the machine.
- Pay attention to the design of the thermostat. It has four terminals: two at the input and, accordingly, the same number at the output.
- If one heater is connected, then two wires extend from the electrical panel to the terminals of the device. Two wires are connected to the terminals located at the output (positive and negative). It is important to consider polarity. The terminals are connected directly to the micathermic heater.
- If two heaters are installed, then a pair of wires are again connected from the machine to the regulator: neutral and phase, and the wiring from the regulator is already made to a pair of heaters. The connection type is parallel.
Sometimes infrared heaters with a thermostat require more complex connections. To perform each step correctly, it is better to follow the recommendations of the video, where everything is clearly shown and supplemented with comments. It all depends on the design of the thermostat and the IR heater itself:
- The thermostat is connected to the machine on the electrical panel.
- The output terminals (+ and -) are connected to the magnetic starter.
- The contacts of the starter are connected directly to the infrared heating device.
It is worth noting that this algorithm is also suitable for the controller of industrial heating devices.
Infrared heaters with a thermostat require compliance with safety rules. When working with a thermostat, be aware of grounding
. The grounding loop of your climate control device must have conductors of a certain thickness and with low resistance.
It is best to place thermostats on the wall. One regulator is enough for one room. It is not advisable to cover the device with anything: fabric, curtains, interior items.
Installation features
At its core, a capillary temperature controller is a very fragile element. When installing it, the following rules must be observed:
- The capillary flask should be located next to the heated device. If the design provides for a radiator, then directly on the fins of the radiator. If the flask is located in the air duct box, then the location should be strictly along the path of the air flow.
- The flask should be installed with its end down. The liquid will not respond to temperature changes if it flows to the other end of the system.
- Do not bend the capillary tube at a right angle. This will disrupt the effect of fluid pressure on the membrane.
- The length of the tube can only be shortened by bending it into rings.
- For household devices, the length of the tube should not exceed 35 centimeters.
- It is prohibited to impact the membrane with foreign objects.
- If the regulator has an open housing, it is necessary to periodically clean it with a stream of air to remove accumulated dust and insects.
- It is worth taking seriously the connection of the thermostat to the electrical circuit. Poor contact can cause the terminals to melt, heating the membrane. When heated, the metal of the membrane loses its properties, due to which the elasticity coefficient is lost.
- When replacing a faulty element, it is necessary to select its exact analogue. This is especially important for devices that heat water. Deceleration in breaking the electrical circuit can lead to the formation of steam, followed by depressurization of the housing.
Full compliance with the rules of installation and operation of the capillary thermostat will significantly extend its service life.
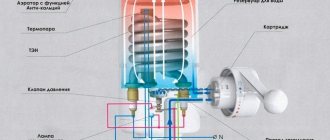
Thermostat for water heater
The thermostat ensures safe operation of the water heater. This process is explained as follows: when the water temperature rises, the pressure inside the tank, which is sealed, increases.
When the pressure increase is not controlled, the entire structure will explode
, which is dangerous not only for equipment and surrounding objects, but also for human health if a person is nearby during the explosion.
The thermostat allows you to maintain the temperature at the required level. Bottom line: the temperature regulator protects against explosion and overheating
, damage to equipment and property, ensures the safety of people.
Most manufacturers try to equip the boiler with a thermostat, because it is the one that controls water heating
at the moment when the device is connected, and for timely blocking of the heating element.
a wide range of models on the market
, but the principle of operation is the same for all of them. At the moment when you need to connect the device to the network, you need to immediately adjust the water heating level, which is done using the control panel, which is located on the body.
Next you need to adjust the water heating. The relay that is installed on the thermostat will be responsible for opening the contacts of the heating element. When the tank has completely cooled down, the temperature will drop and become lower than normal. At this moment the contacts will close
The heating element of the relay, due to which the system will start again and the liquid in the tank will begin to heat up again.
Advantages and disadvantages
A capillary thermostat is an element of many electrical appliances. The main advantages of the device include:
- Simplicity of design and small dimensions.
- High frequency of response to increased temperature.
- Wide range of applications.
- Possibility of connecting several devices at once.
- High reliability when used correctly.
- Relatively low price.
The only disadvantage of this element is its unsuitability for repair. It is impossible to replace melted contacts or a membrane that has lost its elasticity. Thermostats used in industry are large in size. Depending on the design, some models are repairable.
How to do DIY repairs
If possible, the element can be repaired or a new one installed.
How to remove the thermostat:
In the case of a mechanical model, you can clean the bimetallic plates from oxidation . To do this, soak a piece of cloth in alcohol and wipe the plates. If the oxidation has spread greatly, then clean it with fine sandpaper.
You need to do this carefully so as not to touch the sensor contacts.
Due to power surges, the break contact could become stuck. To adjust, carefully remove it from the body and clean the problem area. Normally, the contact should fit into the socket automatically.
How to repair a contact if it does not work:
Model overview
Capillary thermostats for domestic use must be reliable, durable, and have a simple connection diagram. Next, a description of the 3 most suitable thermostats for domestic use will be given.
AZT-6
Mechanical thermostat. Main purpose: temperature control of water heaters. The device is equipped only with a knob for adjusting the operating temperature. Operates in modes - 15 + 85 degrees C.

Among the advantages:
- Easy to connect.
- Fast cut-off.
- Miniature appearance.
- Low price.
AZT-6 is an excellent assistant for monitoring air temperature changes in the house.
Ballu BMT-2
Temperature controller for heaters and ventilation systems. Operating range +5–35 °C. The device is used to switch between heating devices and ventilation systems. Has a built-in notification about changing the operating mode. Can be used to connect 4 devices at once into a common system, with their subsequent division according to temperature conditions.

Pros:
- High reliability.
- Ease of Management.
- Multiple connection pairs.
- Not a high price.
The Ballu BMT-2 regulator can be trusted to control the temperature in the house with an electrical load of more than 10 amperes.
Terneo EG
The device is designed to control the temperature in the incubator. The model is completely electronic. Has an additional socket on the body. Working in incubators is not the only purpose of this model. It can be used for work in warehouses and basements.
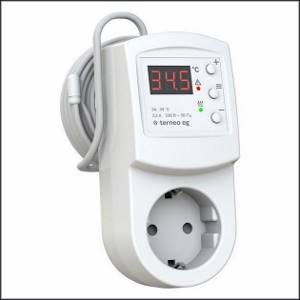
Pros:
- Easy setup of parameters.
- Easy to read display.
- Availability of sound notification about operation.
- Additional socket.
Terneo EG is very reliable. Through this device, you can connect several devices and set the response temperature for each device.
