In what areas do leaks most often occur?
The most vulnerable places in the heating system are:
- Outdated boilers, radiators, expansion tanks due to wear of gaskets, corrosion, and mechanical damage.
- Couplings, bends, bends and connection points for steel heating pipes.
- Compression couplings of a metal-plastic pipeline as a result of self-screwing.
- A sheet of plastic pipes at rupture.
Steel pipes, plumbing fittings and new appliances leak less often.
Such measures include:
- Protection of pipes from electrochemical corrosion. To do this, cathodic protection is performed and anti-corrosion agents are applied.
- High-quality water treatment. To slow down pipeline corrosion, the amount of oxygen dissolved in water is reduced.
- Periodic assessment of the residual life of pipes. Thanks to this, it is possible to promptly identify sections of the pipeline that need to be replaced. This can significantly reduce the risk of accidents and, as a result, reduce water losses.
Reasons for depressurization
Knowing the cause of a coolant leak, the home owner will be able to effectively eliminate the consequences. Among the negative factors affecting the condition of the heating main are:
- depressurization of joints (relevant for outdated systems);
- expansion of materials under the influence of high temperatures and the formation of leaks after they cool;
- corrosion of pipes and radiators, which provokes thinning of the fabric and the formation of fistulas;
- improper installation of equipment;
- low quality materials and equipment;
- overheating of the coolant and other violations of operating rules.
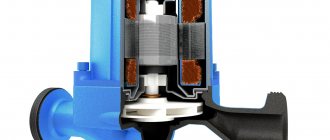
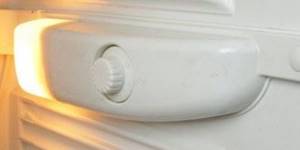
The refrigerator is leaking due to a faulty thermostat
Depending on the model, the thermostat may be located inside the refrigerator compartment or outside the refrigerator.
Operating principle of the thermostat:
- The end of the capillary tube is attached to the evaporator.
- The tube is filled with freon refrigerant.
- As the temperature inside the refrigeration chamber increases, the pressure in the tube increases. As a result, the relay contacts close and the compressor turns on.
- When the temperature drops, the pressure in the tube drops, the contacts open, and the compressor turns off.
Replacing a faulty refrigerator evaporator heater:
| If the thermostat fails, the compressor stops turning on. Accordingly, the temperature in the refrigerator chamber rises, moisture forms due to defrosting and the refrigerator leaks. To troubleshoot the problem, it is recommended to contact a specialist. |
Having considered the main reasons why a refrigerator leaks, you must first familiarize yourself with the operating rules of the device. Many cases of leaks are associated with simple negligence (clogged drains, warped doors). If you discover a refrigerator malfunction, do not delay repairs. Take action immediately, call a specialist, or, if the problem is insignificant, fix it yourself.
Perhaps the most indispensable of all household appliances in the family is the refrigerator. Neither an avid bachelor, nor a businesswoman who is rarely at home, nor a lonely girl watching her figure can do without it.
The appearance of water in or near the refrigerator can be a sign of either minor or serious damage.
Before calling service, you need to carefully inspect the device; in some cases, the malfunction can be easily fixed yourself.
Heating system diagnostics
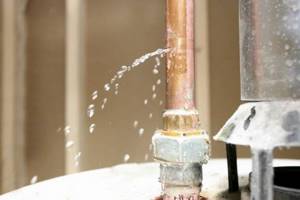
The easiest way to detect a leak is in an open pipeline. Wet marks on the floor and walls indicate the location of depressurization. When using antifreeze, the stains will be colored. To detect a leak, turn off the riser and inspect all sections of the line. Use a napkin or piece of paper to find damp spots.
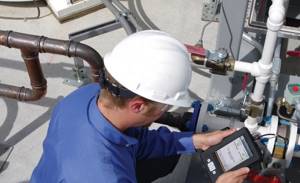
It is more difficult to detect damage in the screed and underground. To do this you will need special measuring equipment.
- The thermal imager is designed for diagnostics in shallow pipelines. It can determine the location of a hot coolant leak. On the monitor, the damaged area will appear as a blurred spot of bright red color.
- The moisture meter is suitable for scanning walls and heated floors. The leakage point is characterized by high humidity, which the device will record. It is not recommended to use a moisture meter to check underground and street communications, where the humidity level depends on groundwater and precipitation.
- A phonendoscope is an acoustic device for diagnosing sounds. Suitable for checking walls and screeds for noise sources.
To save time and money, you can rent measuring equipment or contact specialists.
What are the main troubles of a hidden water leak in a heating system?
If the supply or return pipelines of traditional water heating or heat exchanger radiators (batteries) have leaked, then immediately finding a water leak in the heating system and locating the location of the leak is not particularly difficult. External visual inspection will help you do this quickly. It is much more difficult to do this in a heating system in the form of heated floors or heated walls.
- Reasonable prices with high quality
- Same day departure
- We work all over Russia
- Full cycle of work from searching and determining the location of the leak to restoration and installation work on a turnkey basis
- Use of advanced technologies and equipment
- Experts have more than 10 years of experience
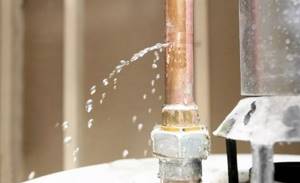
A powerful jet of hot coolant gushing from the floor will cause a lot of trouble, but it is easy and quick to detect. Much more unpleasant is a small leak in a wall or in a warm floor, closed with a concrete screed. If there is high-quality waterproofing in the form of a “trough” under the screed, then until it is filled with water, you will not know about it. The “man-made lake” of warm water in your floor will eventually overflow. The water will find a gap and begin to flow out little by little. As a result, the ceiling or wall under the heated floor on the lower floor will freeze, and this process will continue until mold appears and the building structures gradually collapse from the corrosive action of water, enhanced by heat.
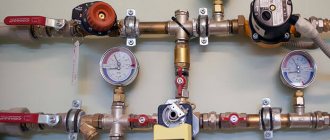
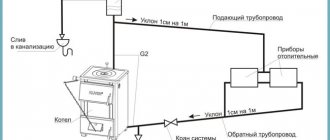
There is a way to detect the presence of a leak in an underfloor heating system. Typically, a pressure gauge is installed on the heating boiler in such a system to measure pressure. And if, when the floor or wall warms up, the pressure according to the pressure gauge begins to drop, then a small leak is present.
Attention! Important! If the expansion tank of the heating system is not sealed, then pressure may drop through it. It can also fall through Mayevsky’s taps, i.e. automatic air vents.
It is necessary to check all open parts of pipelines and joints. But if the water is hot enough, the puddle of water that has leaked through the joint and formed on the floor can quickly evaporate without you seeing any results.
Leak in an apartment building
If a leak occurs in one of the sections of the highway, residents should contact the management company for help. As part of the surgical intervention, they can perform several simple steps:
- Shut off the heating riser. Other residents of the apartment building will remain without heat, but this will help prevent coolant leakage.
- Cover the damaged area with a blanket to avoid burns.
- Call emergency services.
Do not try to fix the leak yourself. Report any damage to the heating system to the management company.
How to detect if a heated floor is leaking?
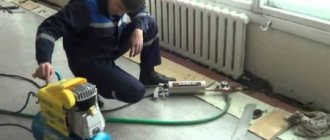
First of all, you need to find out exactly where the pipe is leaking. The easiest way to do this is to use a thermal imager. This is a device that allows you to see radiation from heat, converting it into a color display of recorded data. I wouldn't like to disappoint you, but this is the only accurate method for determining a leak. All other ways to solve this problem are quite inaccurate.

We run hot coolant into the heated floor system and as a result, in the places where it leaks, we see approximately the following pictures.
Once an experienced master told me, so to speak, a “folk remedy.” To do this, you need to take transparent polyethylene and place it on the floor where you think the pipe is leaking. We release the maximum temperature into the pipes and wait. After an hour or a little more, there will be droplets of water on the film inside, and after a while a clear, large spot of condensation will appear just above the leakage site. This method, of course, works, but there are a lot of nuances and conditions. This experience took place in front of me at one of the facilities. There was only a concrete screed on the floor, since the completion of the project was far away. The thickness of the screed was very small, but it also had to be removed, and this is about one square meter. If there are tiles in your room and the floor is waterproofed, then this method is unlikely to show anything.
Preventing leaks in a country house
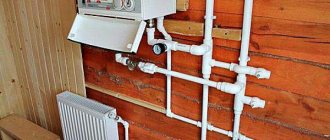
Owners of private houses eliminate leaks themselves. Depending on the complexity of the breakdown, the damaged element is restored or replaced with a new one. Before starting work, the heating riser is shut off and the system is de-energized.
- Crack in the pipe. When the pressure increases, the pipe may burst at the weld. To eliminate leaks, use homemade or factory-made clamps, rubber seals and bolts. The leak area is cleaned of paint, treated with sealant, wrapped in a rubber gasket and tightened with a clamp.
- Leaking under the locknut. The cause of coolant leakage is improper installation of the locknut, mechanical damage, or corrosion. Before starting work, you need to shut off the riser and drain the water from the system. The nut is removed, inspected for damage and rust, and if necessary, replaced with a new one. The thread is covered with a thick layer of sealant, linen or paint, after which the part is tightened into its original place. The joints are also treated with sealant. After starting the system, you need to check the condition of the locknut. If a leak is detected again, the part is dismantled and the thread on the pipe is increased by 5 turns.
- Battery depressurization. In radiators, cracks form both on the plate itself and at the sectional joints. If the blade is damaged, it is recommended to replace the battery with a new one. To repair joints you will need sandpaper, alcohol and cold welding. The leak area is cleaned of paint, degreased and covered with sealant. The area around the crack is also treated with cold welding within a radius of 3-4 cm.
If a large fistula is detected, the battery is dismantled and the nipples are tightened tightly. The element is installed in place and the heating system is started.
High-quality consumables and equipment, correct installation, as well as timely technical inspection and compliance with operating rules will help prevent leaks and increase the service life of pipelines.
Devices for detecting leaks in walls and floors
There are a few such devices:
- Thermal imager. Records a temperature rise of several degrees. But:
- the water may be lukewarm;
- the leak site may be hidden by a thick layer of concrete;
- the location may be inaccessible to the device.
- Surface moisture meter - allows you to measure the high humidity of the wall surface.
The method provides low accuracy and requires a lot of time. It is better to duplicate it with a thermal imager showing a large problem area, and then look for it with a moisture meter.
- An acoustic device, an analogue of a hospital phonendoscope. Allows you to hear the sounds of a “trickle” flowing in the wall and find a leak.
- searching for leaks and localizing these places;
- we find the location of hidden water supply and heating pipelines;
- We diagnose the condition of pipelines;
- We inspect the premises and find places of heat loss using a thermal imager;
- we localize and completely eliminate leaks in hot and cold water pipes;
- We can find places where thermal insulation is damaged, and much more.
Our company can eliminate almost all problems associated with leaks in heating systems, both in private homes and in Moscow enterprises.
We provide the following types of services:
If problems arise, call our specialists at any time of the day. Departure of specialists within Moscow occurs free of charge and promptly on the day of application.
Water leakage is a phenomenon that sooner or later faces any homeowner whose home has a steam heating system. Finding it is quite simple if the pipes are not laid in the thickness of the walls or floor. But eliminating a leak in a heating system is a more difficult task and even critically dangerous if boiling water is gushing from a broken pipe. It is better not to lead to such a situation and take measures to eliminate coolant leaks at the first sign.
Causes of leaks

Among the reasons why a coolant leak occurs (any kind, not just water), there are three main ones:
- Corrosion;
- Violations in system installation technology;
- Illiterate operation.
Metal corrosion is caused by two types of chemical reactions: oxidation under the influence of oxygen and an electrochemical reaction that occurs when metals combine with different numbers of negative and positive ions in the atomic structure of the substance.
Technological violations during installation of the system that lead to coolant leakage include, for example, the use of electrodes of the wrong brand and the occurrence of local foci of electrochemical corrosion at welding seams. The most sensitive to violations in installation technology are metal-plastic pipes connected with threaded fittings. Such a leak is practically irreparable and requires a complete replacement of the pipeline section along with the fitting.
Advice! There is no need to drain the water from the system at the end of the heating season unless it is required for repairs. When installing the system, it is recommended to use pipes made of steel of the same grade; it is strictly forbidden to join ferrous and non-ferrous metals (including pipes with zinc or other coating), as well as those with alloying additives.
Incorrect work and selection of materials
Illiterate operation of the heating system also leads to water leaks from pipes. For example, boiling of the coolant and the accompanying hydrodynamic shock lead to damage to sealing gaskets and even destruction of threaded connections. If you decide to change the type of coolant, replacing water with antifreeze, then you need to be prepared for the threaded connections to leak. This is especially true for those devices that were installed twenty years ago and tow, oil paint, rubber and other inexpensive auxiliary materials were used to seal them.
Causes of leakage
It is important not only to detect a coolant leak in the heating system, but also to understand why it occurred. Situations in which the pressure gauge on the boiler may indicate low pressure are as follows:
- violation of the tightness of connections as a result of corrosion of pipes, wear of gaskets or loosening of threaded connections,
- thermal expansion and contraction of fittings. When the coolant reaches a certain temperature, the metal parts expand, but as soon as the water cools down, the metal of the fittings narrows and begins to let liquid through,
- changing the coolant in the pipes. If water was first used, and then you decided to pour antifreeze into the system, the seals may expand, then dry out,
- excess pressure in the heating system due to the expansion tank being too small. This can lead to cracks in the pipes.
In addition, leakage occurs as a result of improper installation or operation. This is especially true for metal-plastic lines, which are more sensitive to any violations of installation technology.
Finding and eliminating coolant leaks
It’s easy to find where water is leaking from puddles on the floor. But if you inadvertently brought things to this point, then you can consider yourself to be on the verge of a local communal catastrophe. Therefore, you need to pay attention to the details - the appearance of rusty streaks in the places of threaded connections, swelling on the surface of metal-plastic pipes, their loss of shape and strength. If the heating pipes are laid deep in the walls or a “warm floor” system in a concrete screed is installed on a separate circuit, then leaks can only be found using special instruments.
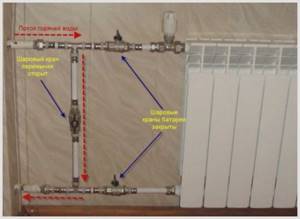
A weak (drip) leak can be eliminated without draining the water and without stopping the heating of the house. Elimination of flows of different intensity is possible only on dry and cooled pipes. Therefore, it would be useful to install bypass lines (bypasses), divide the system into several circuits and independent sections using installed ball valves.
Repair of metal pipes and their connections
Even metal pipes that are heavily damaged by corrosion have a high residual strength, so during repairs, significant compressive forces can be applied to them and clamps tightened with bolts can be used. For their urgent repairs you may need:
- Heat-resistant (red) silicone sealant;
- Rubber elastic bandage (sold in pharmacies);
- Two-component epoxy compounds with metal filler (cold welding);
- Metal clamps, tightened with bolts;
- Thin fiberglass or old women's tights.
If there is a slight leak in the threaded connections, it is enough to unscrew the lock nut (if there is one) a quarter turn to create a gap of 0.5 mm. Silicone sealant is squeezed into it and distributed evenly over the entire circumference. After 30 seconds, when the sealant begins to polymerize, the nut is tightened.
If there is no lock nut, then you need to clean the joint from old paint, scale, rust and degrease it. In case of a weak leak, you need to knead a piece of “cold welding”, as described in the instructions for it, and distribute it evenly over the entire circumference of the joint, especially carefully coating the edges of the joints. For larger flows, you can apply silicone sealant or a two-component metal-filled compound to the joint and press it with fiberglass tape or a piece of women's tights.
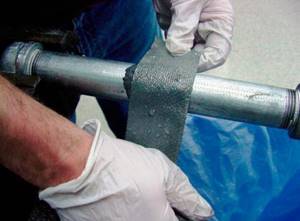
A crack or fistula in a pipe can be wrapped with a rubber elastic bandage, covering half of the previous one with each subsequent turn. The length of the winding should be twice as long as the damaged area. You need to make 2-3 layers of winding and secure it with clamps. A good result is obtained by wrapping it with a hemostatic tourniquet from a car first aid kit, which can be secured with a standard latch. A crack in a pipe can also be repaired using an epoxy compound in combination with a reinforcing material - elastane or fiberglass. But in this case you will have to strip down to the metal and degrease the entire area on which the bandage will be applied.
Advice! Recently, polymerizing tape “Boa constrictor” has appeared on sale, which sinteres into a monolith upon contact with air. It is very convenient for sealing leaks in heating systems.
Repair of metal-plastic pipes
Despite all the positive qualities, these pipes have a fatal drawback generated by their design - a large coefficient of linear expansion. This leads to the fact that threaded fitting connections regularly become loose and need to be tightened to eliminate leaks. Typically, when installing, up to 3 turns of thread are left on the fitting. Any drops from it, if the fitting is mounted correctly, are eliminated by tightening it 1/8 turn. If this cannot be done, then the leak can only be eliminated with silicone sealant in combination with a reinforcing material. Moreover, you need to understand that this is a temporary measure, and the fitting and pipe must be replaced.
You cannot use crimping clamps and bandages to repair metal-plastic pipes due to their low strength. Two-part metal-filled epoxy compounds are also ineffective because they have poor adhesion to plastic, and the ferrous filler metal in contact with the internal aluminum pipe provokes galvanic corrosion.
Advice! If a metal-plastic pipe is damaged, it is better to drain the water from the system and find a replacement.
Fixing leaks in the heating system yourself
If the leak is severe, turn off the heating supply to the riser. In the event of a minor malfunction (if the water barely drips), you can immediately begin to eliminate it. Let's look at how best to repair the heating system.
Option #1: when the pipe is leaking
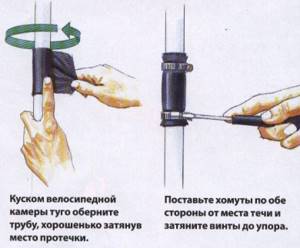
If a section of a steel pipe without a thread leaks, then the problem is a poor-quality weld. A clamp will be needed to repair the damage. You can buy it at a hardware store or make it yourself from a metal strip. A gasket or a piece of a bicycle tube is used as a seal.
The pipe is cleaned of paint deposits, a thick rubber gasket is placed on top, then a clamp. Bolts are provided to secure the clamp. They are tightened as tightly as possible. Sometimes the damage is additionally treated with sealant. This is a great way to permanently seal a hole in a pipe. There will be no more leaks here.
Option #2: leakage under the locknut
If the locknut is initially secured correctly, a leak may occur as a result of mechanical damage or corrosion. You need to shut off the riser and drain the water. After this, the nut is unscrewed, sealed with flax, paint or a special compound and tightened again. Plumbing flax and other sealants are wound clockwise.
When the work is completed, you need to open the riser valve again and check the tightness of the connection. If water still leaks out, repeat the procedure again, adding 5-6 new threads on the pipe.
Option #3: if the radiator is leaking
The radiator plate or the joint between sections may leak. In the first case, it is better to immediately replace the damaged element. If this is not possible, then a small leak can be dealt with using cold welding. It can be bought at any hardware store. Instructions for use should be on the packaging.
To repair the radiator, close the riser, clean, degrease the damaged area, and then apply a sealing compound to the hole itself and the area around it. The weld should close approximately 3-4 cm of the pipe around the fistula. The composition hardens quickly. After complete drying, you can start heating.
If there is a leak between the sections, then the radiator is dismantled and the nipple connection is tightened tightly. When securing the nipple, you need to use maximum effort. It is almost impossible to break, so there is no need to be afraid. Upon completion of the work, the radiator is installed in its old place and the coolant supply is turned on.
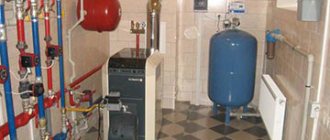
How to find a leak
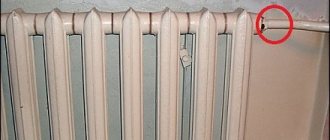
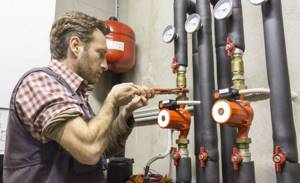
Before eliminating a leak in a heating pipe , you need to make sure that pressure drops occur due to a leak. You need to check the expansion tank. This is a red cylinder that compensates for the rapid expansion of the coolant. If it is not set correctly, pressure drops may occur.
After making sure that everything is in order with the expansion tank, you can proceed to inspecting the circuit. If you manage to visually determine the location of the leak, then this is, one might say, luck. If you are unlucky twice: the first time when it turned out that the circuit is leaking, and the second time when it was not possible to visually determine the location of the leak, then you will have to look for it more carefully. For this you will need a partner. Before sealing a leak in a heating pipe, diagnostics is carried out in several stages:
- wait for the water in the circuit to cool and, using make-up, increase the pressure.
What immediate measures are taken if a leak occurs?
The appearance of a leak in the heating system requires an immediate response. The first measures depend on the nature of the problem and the location where it occurred.
A leak in a private house can be fixed on your own, but in an apartment you should be careful not to flood the neighbors living below. Another nuance is that during the renovation the entire riser will have to be shut off, which means that all the apartments it connects will be without heat.
You can try to fix a small leak yourself using improvised means. If the problem is serious, then shut off access to the coolant and call specialists.
Hot water splashing in all directions can cause injury, so before turning off the water supply, you must throw a thick blanket over the pipe or radiator. Valves for shutting off hot water can be located directly in the apartment, but most often they are located in the basement of the entrance. You'll have to go down there, find the right tap and turn it off.
How to fix a leak in a pipe
So, the location of the leak has been identified and you need to make a decision on how to repair the leak in the heating pipe. In this case, the options of placing a cloth or placing a basin are not suitable. Even a minor leak can result in a serious accident. You should also understand that sealing leaks is a temporary measure that only delays mandatory major repairs until a convenient time. Agree that stopping the heating in winter and replacing a section of pipe or connecting unit is not the most pleasant prospect.
Clamp for sealing leaks
A leak found in a pipe can occur in any area, primarily at the joints. Most often you just need to squeeze some knot. Less often, replacing it, which is extremely difficult without the help of a specialist. Cracks in pipe bodies are not as common, but they do happen. Options for how to fix leaking heating pipes:
- wrap a rubber band around the leak.
Then wrap the rubber tightly with wire. At the same time, you need to control the process; it is better not to overpress than to overpress. Too much force can cause even more damage. If you have metal clamps on hand that can be clamped with a screwdriver, they will simplify the task, as they tighten the rubber around the pipe evenly. There are also factory models of clamps with a rubber insert, the best option, since their main purpose is to clean up leaks in the heating system; a narrow profile is always better;
- use two-component adhesives such as cold welding.
The name may differ from one manufacturer to another, but all sellers call it that way. The principle of its operation is that the individual components of cold welding resemble plasticine. Once thoroughly mixed, it will set in minutes. After final hardening, you can process it with a grinder. With this plasticine you need to seal the leak area and smooth it out thoroughly;
- use soaked cloth.
As impregnation, you can use adhesives that are resistant to high temperature and moisture. Cement is also widely used. To do this, you need to wrap the leak area with material soaked in gypsum solution. A cement bandage is applied over the plaster cast; the manufacturing method is similar.
If the heating riser is leaking, call a repairman immediately, and before he arrives, take measures to eliminate or reduce the leak.
What areas and elements can leak?
Leaks are most common in metal pipes. Elements that may be subject to destruction are the following:
- joints of pipes, adapters and seams;
- solid pipe;
- radiator;
- under the locknut;
- in the heated floor circuit;
- space between battery sections.
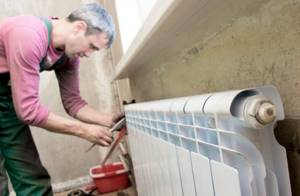
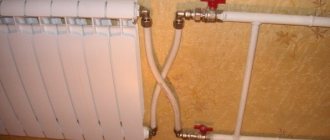
Leaks in the heating system often occur in radiators.
Most often, cheap polymer pipes are susceptible to damage. They break, leak, swell. Metal-plastic pipes are also susceptible to leaks if they were incorrectly selected. There are special products for heating systems. If pipes for cold water are installed in it, then under the influence of high temperatures they become deformed and burst.
How to fix a battery leak
It’s not uncommon for a heating battery to leak, what should you do in this case? Of course, it depends on the location of the leak. A heating radiator leak appears:
- at the junction of the battery and the general circuit;
- between sections;
- in the case.
To seal a leak in the heating battery housing, you need to use a two-component metal adhesive. It may also be a good idea to wrap everything in rubber and seal it with wire. If a leak occurs in the area of the threaded connection, it will be easier to wrap everything with a cloth soaked in alabaster or cement.
It is better to avoid using sealants. A very common case is when a heating radiator leaks at the joints of sections. What to do, this is the result of wear of the gaskets and repairs will be limited only to disassembling the radiator and replacing the gasket. Before this, you can try to rewind it with rubber or soaked cloth. It is important that all repair work begins with cutting off the battery from the circuit. In this case, the temperature of the coolant in the radiator should be room temperature.
Simple ways to detect the problem
Craftsmen suggest using a liquid designed for car glass care. The presence of dyes in its composition makes it easier to find the problem area - it will be visible on the floor surface. After it is poured into the system, the circuit is subjected to air injection, and under pressure the liquid is gradually forced out of the pipes. The colored mixture will quickly get into the vulnerable area and, due to the impact, will tend to seep out.
The second method is to supply air into the freed pipeline, and the circuits should be processed one by one. At points where there are defects, an air stream will actively burst out, thereby indicating the presence of a leak.
When the contour is hidden under the screed, a wet spot on the floor signals the location of the breakthrough only in case of serious damage that threatens to flood the neighbors below. And if the pipes are leaking only slightly, it is much more difficult to find the weak connection yourself.
If diagrams of communications located under concrete are not available, the first step will be to determine the principle of placement of branches and their exact location. For this purpose, you need to start the underfloor heating system, moreover, it is advisable to activate maximum heating, and the concrete screed must be thoroughly wetted. Next, you need to carefully observe where the liquid disappears most quickly: it evaporates most strongly directly above the turns of the circuit. Drier and lighter areas of the coating will gradually appear.
As they are discovered, these zones must be outlined with a pencil, and the speed of their drying must be monitored. Most likely, a pipe break is where the wet spot lasts longer. This method does not provide a 100% guarantee of detecting a leak, because only an intense loss of coolant will appear. But its obvious advantage is the ability to draw up a pipe layout.
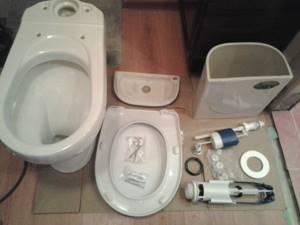
Repairing and stopping leaks - how to fix and eliminate if water runs in the toilet
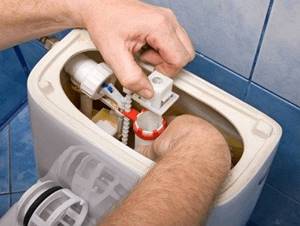
What to do if a malfunction is detected? First you need to inspect the float for any malfunctions. If the float lever is skewed, water will not linger in the tank (it will accumulate, overflow and immediately flow out). If distortions and leaks are detected, you should open the lid and simply adjust the lever: install it horizontally, 2.5 cm lower from the entrance of the pipe to the tank.
The float itself should be level and empty. There shouldn't be any water inside. If water is detected inside the float:
- Take it out and drain the water.
- Remove the hole through which water enters (heat the plastic or wrap the float in a plastic bag).
- Attach the float back and watch it (if water gets inside).
Such measures are temporary. At the first opportunity, you should buy and install a new float.
Instructions for repairing heating pipes
Among modern compounds for eliminating heating system leaks, sealants deserve special attention. These are special waterproof products. They will not save you if a large fistula appears, but they are quite suitable for eliminating minor damage in heating and water supply systems. Plumbing silicone sealant can last for years. It is advisable to buy it and cold welding just in case before the start of the heating season. Such tools will be useful in every home.
Describe your question in as much detail as possible and our expert will answer it
External damage
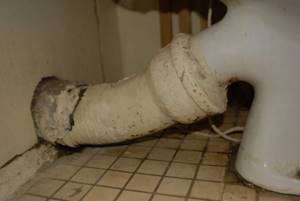
Violation of tightness. If the toilet is installed on cement mortar, then in the place where it is connected to the sewer pipe, the cement crumbles, cracks appear and it begins to leak. Sometimes this occurs because the toilet was used shortly after it was installed.
It is not recommended to use the toilet for 24 hours after installation. Clean the joint area from old cement. Do this with a screwdriver, chisel or knife. Prepare a new solution by mixing cement and silicone-based sealant. Do not add sand to cement. Leave for a day until completely dry.
Crack in the base of the toilet
It often happens when a large amount of boiling water is suddenly poured into the toilet. Earthenware cannot withstand sudden changes in temperature and bursts. Two holes are drilled at the ends of the crack.
The crack and holes are cleaned with sandpaper to remove irregularities and burrs. Apply epoxy resin to the leak site. Do not use the toilet until the epoxy resin is completely dry. If the epoxy resin does not help, then you need to replace the toilet with a new one.

The fasteners are not tightened tightly enough
It is possible that the nuts were not tightened tightly when installing the toilet. Or the studs on which the toilet is installed are loose at the base. It is necessary to tighten the fastening nuts. If the studs become loose, you need to remove the toilet completely and re-fasten them.
The tank leaks from the sides or from the bottom to the floor
Quite often, a tank leak is confused with the presence of condensation on its surface. Filling a container with cold water in a room at normal room temperature automatically causes dew drops to appear on the outer walls.
It’s another matter when marks characteristic of a constant flow are visible on the sides. Rusty or calcareous marks left after water flow indicate a defect in the internal mechanism or cracks in the ceramic bowl itself.
Problems associated with the presence of traces of leaks can be classified as follows:
- presence of traces of water jets from technological holes;
- traces starting below the holes, appearing in places of microcracks;
- presence of traces at the bottom of the tank.
In the first case, when water simply overflows through the technological holes, the cause of the defect may be a malfunction of the overflow mechanism or the absence of a special hose attached to the filler pipe.
A fallen tube on the inlet pipe of the valve is not a critical malfunction; simply, under the pressure of water, a large amount of splashes with an unpredictable trajectory is formed in a confined space, as a result of which a certain amount of water simply splashes out. Flaw correction method:
- Shut off the water supply.
- Remove the cover.
- Place the fallen pipe onto the pipe and secure it with a clamp.
If the ceramic or plastic bowl of the tank is mechanically damaged, a leak may occur on the walls at the fracture site. It is useless to repair visible cracks that threaten the integrity of the structure; the constant process of filling and draining water systematically affects the walls and breaks the seam, no matter how strong it may be. In this case, you just need to replace the tank.
If no visible cracks are visible, but water seepage still occurs, it is recommended:
- Shut off the water supply.
- Drain the water from the tank.
- Mark places where water leaks.
- Dry the tank outside and inside.
- Using silicone sealant or silicate glue, treat microcracks inside and outside the walls.
- After finishing the treatment, fill the tank with water.
Filling microcracks with sealing compounds will ensure sealing of the walls for a fairly long period, but this is provided that the walls are not subject to mechanical stress that can turn microcracks into real faults.
Tanks with bottom hose connections most often leak at the hose connection. The defect can be eliminated by tightening the hose nut on the fitting or removing the hose and reinstalling it using fum tape or tow.
The toilet bowl burst
You may have stepped on the toilet or placed too much weight on it. Here you need to replace the toilet completely.
The cuff or corrugation is worn out
The rubber gasket became less elastic over time and cracked. To fix the problem, you need to remove the toilet from the base. Remove the old cuff. Install a new cuff on the sealant.
If it is not possible to buy a new gasket, then the old gasket is bent upward around the circumference and sealant is thickly applied into the resulting space. Most problems can be solved with sealant, glue or a new gasket. In the most severe cases, you need to buy a new toilet and call a specialist to install it.
How to identify a damaged area
If the leak is slight, and the location of the leak in the heating system is not obvious at first glance, then it can be determined after turning off the coolant supply. They only check the cold system, because... Water evaporates quickly from heated surfaces. A piece of ordinary toilet paper or a dry white napkin will help with this.
When the system has cooled, slowly rub a piece of paper over the suspected leak site. Connections and joints are examined especially carefully. The place where the paper gets wet needs to be inspected and the hole found. The task becomes more complicated if the pipes are disguised under finishing materials, are located under the floor or in the ground.
When the cooler leaks, it is useful to refer to the instructions
In most cases, when a cooler leaks, the cause can be found and eliminated yourself. To do this, just carefully study the operating instructions for the device. It describes almost all the reasons why a cooler may leak. It also describes precise action algorithms for troubleshooting. For example, the drain plug may not be tightly closed, and the problem will be resolved by simply tightening it.
Therefore, all office employees or household members should be instructed in advance on how to properly handle the cooler. If treated with care, this device will serve for many years without breakdowns. In public places, it makes sense to leave some kind of message near the cooler for careful handling of publicly accessible equipment.