Here you will learn:
- What is a heat pump
- Advantages of heat pumps
- Principle of operation
- Types of heat pumps: nuances of operation of the freon-water heat exchanger
- Pros and cons of homemade equipment
- Heat pump from air conditioner
- How to make a DIY heat pump from an old refrigerator
- Manufacturing of geothermal installation
You can make a heat pump for heating your home from an old refrigerator or air conditioner. We offer simple instructions for assembling and installing heat pumps.
What is a heat pump
It is easiest to use the natural heat of the earth to heat your home if there are geothermal waters in the region (as is done in Iceland). But such conditions are very rare.
And at the same time, thermal energy is everywhere - you just need to extract it and put it to work. This is what a heat pump is used for. What it does:
- takes energy from low-temperature natural sources;
- accumulates it, that is, raises the temperature to high values;
- gives it to the heating system coolant.
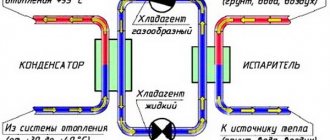
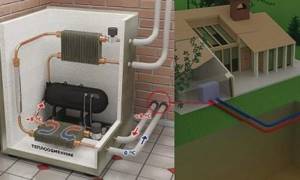
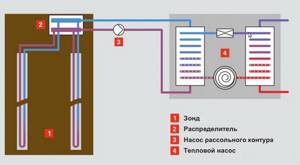
In principle, the standard compressor refrigerator circuit is used, but “vice versa”. Natural coolant circulates in the primary circuit. It is closed to a heat exchanger, which acts as an evaporator for the second circuit.
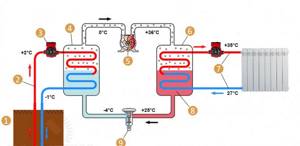
1 - earth;
2 — brine circulation; 3 - circulation pump; 4 - evaporator; 5 - compressor; 6 - capacitor; 7 - heating system; 8 - refrigerant; 9 - throttle The second circuit is the heat pump itself, inside of which there is freon. The heat pump cycle consists of the following stages:
- In the evaporator, freon is heated to boiling temperature. It depends on the type of freon and the pressure in this part of the system (usually up to 5 atmospheres).
- In a gaseous state, freon enters the compressor and is compressed to 25 atmospheres, while its temperature rises (the greater the compression, the higher the temperature). This is the phase of heat accumulation - from a large volume with a low temperature to a small volume with a high temperature.
- The gas heated by pressure enters the condenser, in which heat is transferred to the coolant of the heating system.
- After cooling, the freon enters the throttle (also known as a flow regulator or thermostatic valve). The pressure in it drops, the freon condenses and returns as a liquid to the evaporator.
What is the unit
This device can be called a completely acceptable replacement for any heating boiler. In it, water is heated due to cavitation, during which free spaces are formed in the liquid and filled with bubbles. It occurs due to a decrease in pressure resulting from an increase in the speed of passage of the acoustic wave. However, there are other explanations for the origin. From a physical point of view, this process can be compared to the boiling of water, but the difference is the fact that the pressure drop is local.
We watch the video, the scope of application of the equipment:
The scope of use of cavitation generators today is not limited only to heating. They are used to clean deposits inside heat exchangers. It is simpler and more convenient than mechanical or other methods.
Heating and purification of water in swimming pools can also be carried out using a heat pump. This occurs due to the cavitation process that occurs during the operation of the equipment.
Such devices are also popular in the industrial sector. Here, using such water, concrete is produced, which differs from that produced in the usual way by better performance characteristics.
Advantages of heat pumps
The advantages of heating systems with heat pumps include the following:
- Economic efficiency. By spending 1 kW of electrical energy, you can get 3-4 kW of heat. These are average indicators, because... The heat conversion coefficient depends on the type of equipment and design features.
- Environmental Safety. When the thermal unit operates, combustion products or other potentially hazardous substances do not enter the environment. The equipment is ozone safe. Its use allows you to obtain heat without the slightest harm to the environment.
- Versatility of use. When installing heating systems powered by traditional energy sources, the home owner becomes dependent on monopolists. Solar panels and wind generators are not always cost-effective. But heat pumps can be installed anywhere. The main thing is to choose the right type of system.
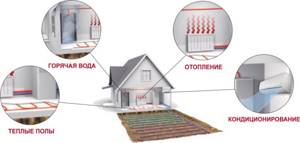
- Multifunctionality. In the cold season, the installations heat the house, and in the summer heat they can operate in air conditioning mode. The equipment is used in hot water supply systems and is connected to underfloor heating circuits.
- Operational safety. Heat pumps do not require fuel, their operation does not emit toxic substances, and the maximum temperature of equipment components does not exceed 90 degrees. These heating systems are no more dangerous than refrigerators.
There are no ideal devices. Heat pumps are reliable, durable and safe, but their cost directly depends on their power.
High-quality equipment for complete heating and hot water supply to a house of 80 sq. m. will cost approximately 8000-10000 euros. Homemade products are low-power, they can be used for heating individual rooms or utility rooms.
The efficiency of the installation depends on the heat loss of the house. It makes sense to install the equipment only in those buildings where a high level of insulation is provided and heat loss rates are not higher than 100 W/sq.m.
Heat pumps can last 30 years or more. Their use is especially cost-effective for hot water supply, as well as in combined heating systems that include heated floors.
The equipment is reliable and rarely breaks down. If it is homemade, then it is important to choose a high-quality compressor, preferably from a refrigerator or air conditioner of a trusted brand.
Principle of operation
All the space around us is energy - we just need to be able to use it. For a heat pump, the ambient temperature must be greater than 1C°. Here it should be said that even the ground in winter under snow or at some depth retains heat. The operation of a geothermal or any other heat pump is based on transporting heat from its source using a coolant to the heating circuit of the house.
Scheme of the device operation point by point:
- a heat carrier (water, soil, air) fills the pipeline located under the ground and heats it;
- then the coolant is transported to the heat exchanger (evaporator) with subsequent heat transfer to the internal circuit;
- in the external circuit there is a refrigerant - a liquid with a low boiling point under low pressure. For example, freon, water with alcohol, glycol mixture. Inside the evaporator, this substance is heated and becomes a gas;
- The refrigerant gas is sent to the compressor, compressed under high pressure and heated;
- hot gas enters the condenser and there its thermal energy passes to the coolant of the home heating system;
- The cycle ends with the transformation of the refrigerant into liquid, and due to heat loss, it returns back to the system.
The same principle is used for refrigerators, so home heat pumps can be used like air conditioners to cool a room. Simply put, a heat pump is a refrigerator with reverse action: instead of cold, heat is generated.
Types of heat pumps: nuances of operation of the freon-water heat exchanger
The natural energy source can be a borehole, ground or reservoir type system. Each option is unique. The operating principle and installation differ.
When the source of energy is a well, it is necessary to drill a corresponding hole in the ground. In 1 m of the source you can extract 50-60 W of energy. For normal operation of the heat pump, 20 m is required.
Features of obtaining energy from a well:
- The main advantages are compactness and high heat transfer;
- The downside is the difficulty of drilling a well.
When the heat source is soil, the pipe lies at a depth below the freezing level of the ground. To lay the pipe, you can dig a pit or trench.
Extracting energy from the ground is a rather difficult process that requires a large area that will not be available for exploitation.
If there are bodies of water nearby, you can place the pipe in the water source. The main requirement is sufficient depth. In 1 square meter of water you can get 30 watts of energy. To fix the pipes at depth, a weight is attached to them.
In some cases, air is used as the source. This pump contains refrigerant. In this case, freon from the refrigerator is suitable. The substance takes heat from the air and releases it to the room.
All components of a solar battery are available and not expensive. And you can assemble the structure yourself.
Application
A self-assembled heat pump is suitable for the following cases:
- if you want to save on fuel to heat your home;
- if it is impossible to supply gas to the house or it is too troublesome, then buying bottled gas is not a solution to the situation;
- there is no desire or ability to heat with coal, wood, electricity, or other fuel;
- if the owner of the house is a supporter of the use of environmentally friendly alternative energy. The device is quite practical even if it has the ability to use other energy sources.
A do-it-yourself heat pump is made for the home, based on technologies for collecting heat from the ground, water, and air. It is used for heating, water heating and even indoor air conditioning.
Pros and cons of homemade equipment
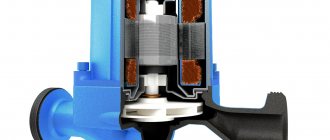
A heat pump is a device that does not produce heat, but moves it from one place to another, increasing the temperature through compression. This process proceeds according to the principle of the Carnot cycle, which consists in the movement of the working fluid (refrigerant) through a closed system. When its state changes from liquid to gaseous and vice versa, a large amount of energy is released or absorbed. This principle is used in the design of refrigerators, but the mechanism of action of a heat pump is to absorb heat from outside and transfer it to the room.
Stages of the Carnot cycle:
- liquid freon flows through the tube into the evaporator;
- interacting with the coolant, which is water, air or soil, the refrigerant evaporates, taking on a gaseous state;
- the working fluid passes through the compressor and is compressed under pressure, which increases its temperature
- then it enters the condenser, which acts as a heat exchanger;
- transfers the resulting heat to the coolant and again takes the form of a liquid;
- in this form, freon enters the expansion valve, where at low pressure it again moves to the evaporator.
An industrial production device is expensive, the payback period is on average 5-7 years. The popularity of a heat pump from an old refrigerator is due to minimal material investments in the manufacture of the unit and the possibility of saving energy costs during its operation.
Attention! To obtain 3-4 kW of thermal energy, an average of 1 kW of electricity is consumed.
Additionally, the following advantages of using homemade equipment are highlighted:
- absence of noise, foreign odors;
- no installation of auxiliary structures or chimney required;
- the operation of the equipment does not harm the environment, since it does not involve the release of combustion products into the atmosphere;
- the ability to install the system in a convenient location;
- multifunctionality. In winter the device is used as a heater, and in summer as an air conditioner;
- safety. Operation does not involve the use of fuel, and the maximum temperature of the unit components does not exceed 90 0C;
- durability, reliability. The service life of the unit when using high-quality components is 30 years or more.
The main disadvantage of homemade devices is their low productivity, so they are often used as an additional option for heating individual rooms in the house. It is recommended to assemble such a system in rooms with good thermal insulation and a heat loss level of no more than 100 W/m2.
Heat pump from air conditioner
Modern split systems, especially the inverter type, successfully perform the functions of the same air-to-air heat pump. Their problem is that their operating efficiency drops along with the outside temperature; even the so-called winter kit cannot help.
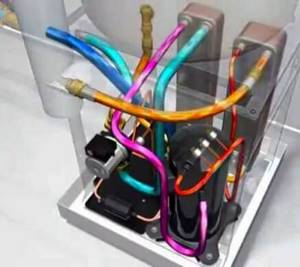
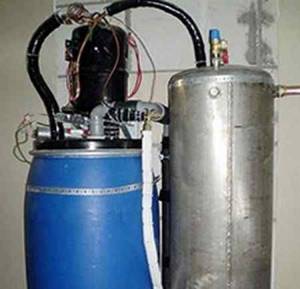
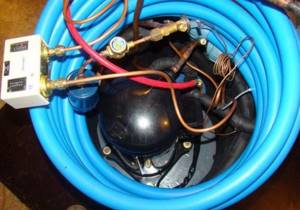
Home craftsmen approached the issue differently: they assembled a homemade heat pump from an air conditioner, which takes the heat of running water from a well. In fact, only a compressor is used from the air conditioner, sometimes an internal unit that plays the role of a fan coil unit.
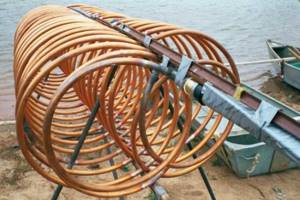
By and large, the compressor can be purchased separately. You will need to make a heat exchanger for heating water (condenser) for it. A copper tube with a wall thickness of 1-1.2 mm, 35 m long, is wound to give the shape of a coil onto a pipe with a diameter of 350-400 mm or a cylinder. After which the coils are fixed with a perforated angle, and then the entire structure is placed in a steel container with water pipes.

The compressor from the split system is connected to the lower inlet to the condenser, and the control valve is connected to the upper inlet. The evaporator is made in the same way; an ordinary plastic barrel will do for it. By the way, instead of homemade capacitive heat exchangers, you can use factory plate heat exchangers, but this will not be cheap.
Assembling the pump itself is not too complicated, but it is important to be able to solder the connections of copper pipes correctly and efficiently. Also, to fill the system with freon, you will need the services of a specialist; you will not specifically buy additional equipment. Next is the stage of setting up and starting up the heat pump, which does not always go well. You may have to tinker a lot to achieve results.
How to dismantle the pump?
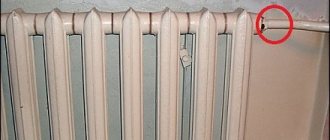
Thanks to the circulation pump, the movement of hot water through the network will be uniform, and the room will warm up completely and quickly. But everything goes wrong someday. You can read about replacing heating radiators here. But if heating efficiency begins to decrease, there is likely a problem with the pump. Maybe the unit is clogged or some of its parts are worn out. To fix the breakdown, you need to know how to disassemble the heating circulation pump without creating additional problems.
To dismantle the pump, you must first de-energize it. Close the bypass and open the tap on the pipeline. After this, the product can begin to be disassembled.
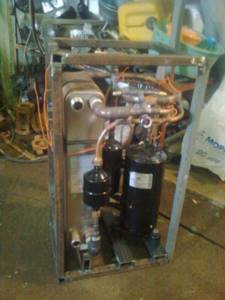
How to make a DIY heat pump from an old refrigerator
Before you begin manufacturing a heat pump, you need to select a heat source and resolve the issue with the installation’s operating diagram. In addition to the compressor, you will need other equipment and tools.
Execution of diagrams and drawings. To install a heat pump, you need to make a well because the energy source must be underground. The depth of the well should be such that the ground temperature is at least 5 degrees. Any body of water is also suitable for this purpose.
The designs of heat pumps are similar, so regardless of what the heat source is, you can use almost any circuit found on the network. When the scheme is selected, it is necessary to make drawings and indicate in them the dimensions and joint locations of the nodes.
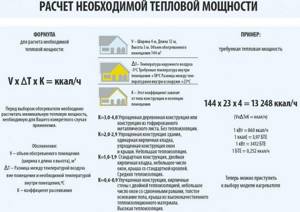
Since it is quite difficult to calculate the power of an installation, you can use average values. For example, for a residential area with low heat loss, a heating system with a power of 25 W per square meter will be required. meter. For a building that is well insulated, this value will be 45 W per square meter. meter. If the house has sufficiently high heat losses, the installation power should be at least 70 W per square meter. meter.
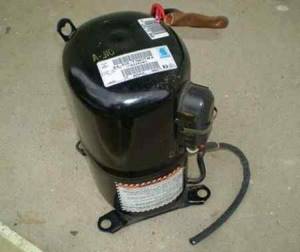
Selecting the required parts. If the compressor removed from the refrigerator is broken, then it is preferable to purchase a new one. It is not recommended to repair an old compressor, as this may negatively affect the operation of the heat pump in the future.
A thermostatic valve and 30 cm L-shaped brackets will also be needed to make the device.
Additionally, you will need to purchase the following parts:
- sealed stainless steel container with a volume of 120 liters;
- plastic container with a volume of 90 liters;
- three copper pipes of different diameters;
- metal-plastic pipes.
To work with metal parts you will need a welding machine and a grinder.
Assembling components and installing a heat pump
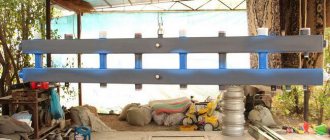
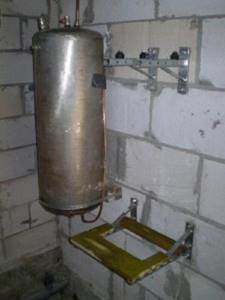
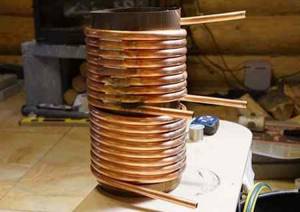
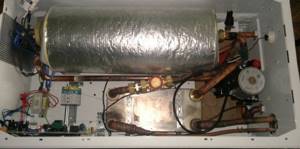
First of all, you should install the compressor on the wall using brackets. The next step is working with the capacitor. The stainless steel tank must be divided into two parts using a grinder. A copper coil is mounted in one of the halves, then the container must be welded and threaded holes made in it.
To make a heat exchanger, you need to wind a copper pipe around a stainless steel container and secure the ends of the turns with slats. Attach plumbing transitions to the terminals.
It is also necessary to attach a coil to the plastic tank - it will act as an evaporator. Then secure it to a section of the wall using brackets.
As soon as the work with the components is completed, you need to select a thermostatic valve. The structure should be assembled and the system should be filled with freon (grade R-22 or R-422 is suitable for this purpose).
Connection to the intake device. The type of device and the nuances of connecting to it will depend on the circuit:
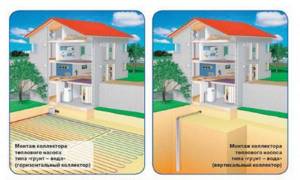
- "Water-earth". The collector should be installed below the ground frost line. It is necessary that the pipes are at the same level.
- "Water-air". Such a system is easier to install, since there is no need to drill wells. The collector is mounted anywhere near the house.
- " Water-water." The collector is made of metal-plastic pipes, and then placed in a reservoir.
You can also install a combined heating system to heat your home. In such a system, the heat pump operates simultaneously with the electric boiler and is used as an additional heating source.
It is quite possible to assemble a heat pump for heating a house yourself. Unlike purchasing a ready-made installation, this will not require large financial costs, and the result will definitely please you.
Vertical collector calculation
At a depth of over 15 m, the ground temperature remains stable at +10 degrees all year round. Therefore, the efficiency of a vertical collector is higher - on average, up to 50 W of heat can be removed from a meter-long area. To calculate the length of the heat exchanger, the type of medium must also be taken into account. So, from 1 meter of pipe it is possible to obtain the following thermal power:
- 20 W – when immersed in sedimentary soil (dry);
- 50 W – in rocky or wet sedimentary soil;
- 70 W – hard rocks (stone);
- 80 W – groundwater.
Application of vertical probe for heat pump
When constructing wells, the following condition must be observed: the distance between them must be at least 5 m.
To operate the heat pump from the above example, you will need a collector with a length of L = 5200 / 50 = 140 m.
Consequently, to equip the reservoir, it will be necessary to drill two wells with a depth of 70 m. In each of them, two U-shaped loops will need to be installed, for which it will be necessary to purchase 4x140 = 560 m of pipes.
Manufacturing of geothermal installation
It is quite possible to make a geothermal installation with your own hands. In this case, the thermal energy of the earth is used to heat the home. Of course, this is a labor-intensive process, but the benefits are significant.
Calculation of the pump circuit and heat exchangers
The circuit area for HP is calculated at the rate of 30 m² per kilowatt. A living space of 100 m² requires about 8 kilowatt/hour of energy. This means the contour area will be 240 m².
The heat exchanger can be made from a copper tube. Inlet temperature 60 degrees, outlet 30 degrees, thermal power 8 kilowatt/hour. The heat exchange area should be 1.1 m². Copper tube with a diameter of 10 millimeters, safety factor 1.2.
Circumference in meters: l = 10 × 3.14 / 1000 = 0.0314 m.
Quantity of copper tube in meters: L = 1.1 × 1.2 / 0.0314 = 42 m.
Necessary equipment and materials
In many ways, success in the manufacture of heat pumps depends on the level of preparedness and knowledge of the contractor himself, as well as on the availability and quality of everything necessary for installing a heat pump.
Before starting work, you need to purchase equipment and materials:
- compressor;
- capacitor;
- controller;
- polyethylene fittings intended for assembling manifolds;
- pipe to the earth circuit;
- circulation pumps;
- water hose or HDPE pipe;
- pressure gauges, thermometers;
- copper tube with a diameter of 10 millimeters;
- insulation for pipelines;
- set of seals for sealing.
How to assemble a heat exchange block
The heat exchange block consists of two components. The evaporator must be assembled according to the “pipe-in-pipe” principle. The inner copper tube is filled with freon or other rapidly boiling liquid. Water from the well circulates through the outside.
Before assembling the capacitor, it is necessary to wind the copper tube in the form of a spiral and place it in a metal barrel with a capacity of at least 0.2 m³. The copper tube is filled with freon, and the barrel of water is connected to the home heating system.
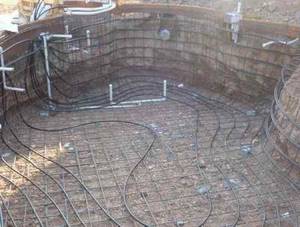
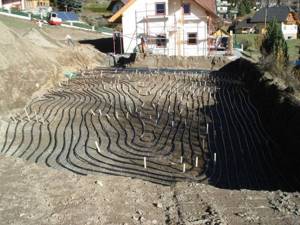
Construction of the soil contour
In order to prepare the required area for the soil contour, a large amount of excavation work is required, which should preferably be carried out mechanized.
You can use 2 methods:
- With the first method, it is necessary to remove the top layer of soil to a depth below its freezing. At the bottom of the resulting pit, lay the free part of the outer pipe of the evaporator in a snake and reclaim the soil.
- In the second method, you first need to dig a trench across the entire planned area. The pipe is laid in it.
Then you need to check the tightness of all connections and fill the pipe with water. If there are no leaks, you can fill the structure with earth.
Refueling and first start
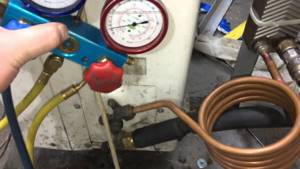
After installation is completed, the system must be filled with refrigerant. It is best to entrust this work to a specialist, because special devices are used to fill the internal circuit with freon. When filling, you need to measure the pressure and temperature at the compressor inlet and outlet.
After refueling is completed, you need to turn on both circulation pumps at the lowest speed, then start the compressor and monitor the operation of the entire system using thermometers. When the line warms up, frosting is possible, but after the system is completely warmed up, the frosting should melt.
Installation stages
You can make your own heat pump entirely from old spare parts, taken, for example, from a non-working air conditioner.
Costs, payback, power
A factory device costs about 4,000 euros and more. A homemade pump for heating 100 m² of area will pay for itself after approximately 2 years. For houses with not very good thermal insulation, the power should be 75 W/m², with good thermal insulation, 50 W/m² is enough, and when using modern thermal insulation materials, 30 W/m² is enough.
The ideal option would be when the pump is included in a project for heating a house with heated floors and tiled flooring.
Process of creation
First you need to get a compressor from a non-working air conditioner, not necessarily a new one. It will be cheaper to purchase it at refrigerator repair shops. The compressor is attached to the wall with brackets (L-300 is suitable).
To make a condenser, a stainless steel tank with a capacity of 100–120 liters is suitable. It is cut in half and a coil is installed inside. You can make the coil yourself from a plumbing copper pipe or from a refrigerator. Here you need thick walls - from 1 mm and more. The tube is wound onto a regular cylinder (gas, oxygen) with a uniform distance between the turns and is fixed in this position with a perforated aluminum corner (it is used to form the corners under the putty). It is wound onto the coil so that each turn is located opposite the hole in the corner.
The result will be an even pitch of turns and structural strength. After creating the coil, the halves of the container are welded. Threaded connections are also welded. Then the evaporator is created. A regular plastic container of 60–80 liters may be suitable for it. with a coil made of ¾-inch diameter pipe mounted inside. Simple water pipes are used to transport water.
The evaporator is mounted on the wall with an L-bracket. But the injection of freon should be done by a refrigeration equipment specialist: he will weld the tubes and pump freon into them. After which the structure is connected to the heating system inside the house, and then to the external circuit.
Features for each type
A vertical ground-water heating pump requires the creation of a 50–150 m well. Geothermal probes are placed in it and connected to the pump. The probes take heat from the ground, which is transferred with non-freezing water to the pump, and from there to the heating system. Probes are suitable for small areas, and a horizontal collector for large areas.
For a horizontal ground-water apparatus, you need to create a collector from a pipe system. It is located below the freezing level (1–1.5 m) and it looks like a kind of coil underground. The soil layer is removed, pipes are laid and the soil is backfilled. You can lay the pipes in separate trenches.
For a water-to-water unit, it is assembled from HDPE pipes, which are filled with a heat carrier and then transferred to a reservoir. The pipes look like a large coil at the bottom of the reservoir. It is advisable to place them in its center.
The air-to-water apparatus does not require labor-intensive excavation work. A place is selected near the house or on its roof, where a homemade heat pump is connected to the in-house heating system. Heat is extracted by fans and evaporator.