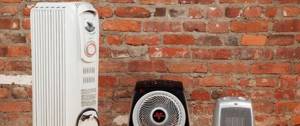
Today, many heating systems have been developed that can create a comfortable microclimate in rooms for various purposes.
However, most of them give the desired effect only when used at home, since the ability to maintain the required temperature is limited by the area of the room.
When using alternative heating sources in large areas of industrial premises, there is an excessively high level of fuel or electricity consumption.
Original heating systems, called water fan heaters, were developed especially for industrial enterprises
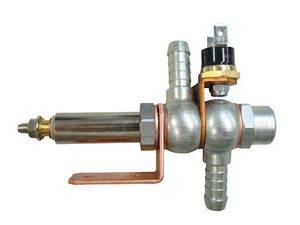
Water circuit
— heat guns with such power supply are actually heating radiators, supplemented with fans to ensure air circulation. The heating source in such devices is a heat exchanger through which hot water from a heating boiler or other energy source passes. Thus, models with a water circuit, unlike other types (electric, gas, diesel), are poorly suited for frequent movements and are mainly designed for permanent installation in one place. In particular, such a unit can be an ideal option for large rooms that are heated occasionally, but the space needs to be warmed up quickly when the heating is turned on. At the same time, the key advantage of water heat guns is minimal energy consumption: in fact, they do not consume energy, but only effectively distribute the heat that would otherwise be used for heating.
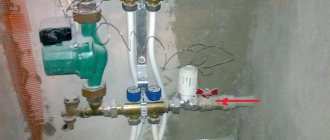
Work on connecting fan heaters
So, we lay two cable lines for the fan heater control circuit. We take into account the sufficient length of the cable ends to make connections conveniently.
In each room where the fan heater is installed, you need to install a remote temperature sensor.
The sensor must be installed in a place where it will not fall under the direct flow of air heated by the fan heater. In this case, it will respond to the temperature of the air in the room, and not the flow of heated air.
The connection diagram for temperature sensors is not complicated. All sensors are connected in series into one circuit.
The electric motor speed control circuit is connected, unlike temperature sensors, in parallel. This makes it possible to control the speed of all fans through the command controller.
The power supply to the fan heaters themselves, as well as to the controller, is supplied directly to each device separately.
So, I think there is no point in describing how to lay an electrical cable, so I’ll go straight to connecting the devices.
The used fan heater models (Veher EC-30) have a type of motor (electronically commutated fans with Green Tech technology), which allows you to adjust the speed without using transformers. In addition, they are much more economical. Let me explain so that there are no questions about why this or that equipment is not used.
Since there were differences in the connection diagram specified in the instructions and in fact, it was decided to first assemble a test circuit, connecting one fan heater and a command controller.
As you can see in the photo above, the cable for connecting the power supply to the fan heater has a slightly larger number of wires than shown in the diagram in the instructions. Fortunately, the colors of the wires still corresponded to the instructions.
We connect to the black and blue wires, two wires from a 220 V power supply. If there is a ground line, then connect the two-color wire to it.
We connect the wire to the blue and yellow wires, the fan heater control circuit, as shown in the photo below.
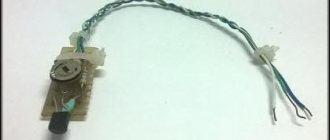
Now you need to connect the necessary wires to the controller
To do this, you need to carefully (using a flat screwdriver, for example), pry the latches of the controller case and carefully, slowly open the cover
You need to open it carefully so as not to damage the cable connecting the control buttons to the board. We connect the wires as indicated in the instructions for connecting the command controller
We connect power, a remote temperature sensor (not necessary for one fan heater, since the controller has its own built-in), control circuit to the appropriate terminals
We connect the wires as indicated in the instructions for connecting the command controller. We connect power, a remote temperature sensor (not necessarily for one fan heater, since the controller has its own built-in), and a control circuit to the appropriate terminals.
Above, in the photo, you can see how the remote temperature sensor is connected.
We connect the fan heater and controller to the network.
And, it’s done! The controller displays the parameters, the fan heater starts and starts supplying air.
All that remains to be done now is, according to the already proven scheme, to connect, instead of the temporary hut, the wiring of the control circuit and remote sensors throughout the premises. Carefully securing the wires, we connect them to the controller, which we first fix on the wall, in a convenient place we selected earlier.
It is best to connect the automation at the last stage. When the heating system has already been assembled, tested and checked for functionality. So, we immediately adjust the necessary parameters of the controller, and we are sure that water (coolant) will not get into the automation.
In our case this was the case. The only thing I swapped the description of the boiler piping with the connection of the fan heaters.
As you understand, the final material on this topic will be a description of the piping of a long-burning solid fuel boiler.
All the best, see you in new material. Vladimir Voinarovsky was with you.
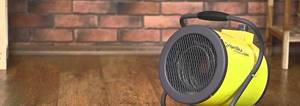
The fan heater can be used as additional electric heating for home and garden. If your system cannot cope or the central heating in the apartment has not yet been turned on, such heaters can come to the rescue. But what should you do if after summer the fan heater does not turn on or blows but does not heat? In this case, you can try to repair it yourself, which is actually not very difficult. Next, we will provide the most common causes of breakdowns and DIY repair methods.
Requirements for a homemade device
Most of those who want to try their hand at making a heater themselves are unlikely to strive for too difficult a job.
And the purchase of a large number of different technical elements and components, whose cost is quite comparable to the price of the finished product, is hardly economically justified. Thus, the future device should be:
- easy to install;
- productive;
- economical in energy consumption;
- safe;
- profitable, that is, the costs of its production should be minimal;
- convenient;
- compact.
Considering existing heaters produced by industry, we can conclude that all these requirements are met by devices operating on the principle of infrared radiation. More precisely, the so-called thermal films. The material generates thermal energy that is transferred to objects, which, in turn, heat the environment. This heating method is considered the most effective, since the generated heat is not wasted. Accordingly, the efficiency of such a device is very high.
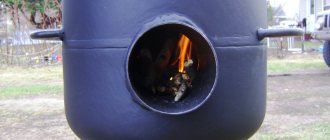
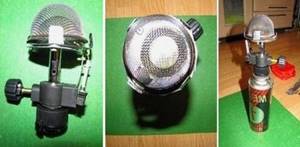
Homemade gas heater
The main advantage of this model is that its production requires a minimum of parts, which can always be found in the household of any craftsman.
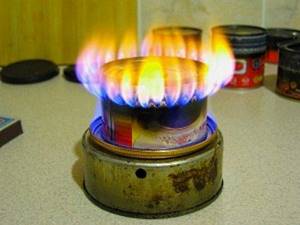
This economical source of heating is not too expensive; the costs of its production and maintenance are completely absorbed during operation
The only disadvantage of a gas heater is the need to provide sufficient ventilation.
Preparation of materials and components
To make a gas heater for the garage, you need to prepare in advance:
- burner with valve;
- tin sheet;
- metal scissors;
- drill with a thin drill bit;
- rivets;
- riveter.
To make the grille, you will need a piece of fine-mesh metal mesh. It’s great if you have a regular wire colander sieve on hand, it will act as a protective grid.

The main element of the device is a gas-filled collet cartridge with a capacity of 450 milliliters, used for refilling lighters
Collet cylinders are convenient because when using them, you don’t have to use up all the contents at once. The presence of shut-off valves allows the devices to be used repeatedly.
If desired, the heating structure can be made using not only disposable cans used for refilling lighters, but also using a small refilled cylinder.
Cutting blanks and assembling the structure
When making the structure, the first thing to do is fix the heater to the burner.
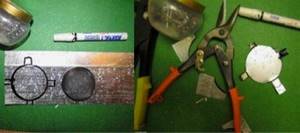
The selected household sieve of the appropriate diameter is applied to the galvanized sheet and outlined along the contour with a marker
Four rectangular ears are added in the direction of the four sides of the workpiece applied to the galvanized sheet. One of the ears should be made twice as long as the others. The blanks are cut along the intended contour, trying to make smooth, burr-free cuts.
The burner is screwed to the cut-out tin blank using bolts. The ears located on four sides of the workpiece are bent in the opposite direction and used to fix the strainer.
The strainer attached using the ears of a tin circle has a dome shape, thanks to which it will perfectly dissipate heat to the sides
To attach the second protective mesh, take another piece of sheet metal and cut out a circle of exactly the same size from it. Elongated ears are added to the workpiece, necessary for attaching the mesh.
Stepping back half a centimeter from the edge of the circle, drill 10 through holes along the circumference. A strip is cut from a piece of fine-mesh metal mesh, the length of which corresponds to the diameter of the cut tin blank.
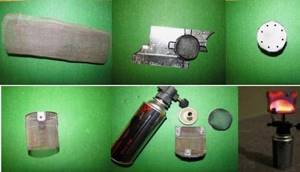
The ears located on four sides are bent and used to fix the wide side of the fine mesh strip, the second piece is fixed on the opposite side
The bent ears of round tin blanks are fixed to opposite sides of the mesh strip using a riveter and rivets. When assembled, you should get a cylinder with mesh walls and tin ends.
The design, which includes two meshes, is advantageous in that it has an increased heating surface and is equipped with additional protection.
At the final stage, all that remains is to turn on the gas water heater and check its performance. The heat produced by this small device is enough to heat a small room or garage.
Water duct heaters
Water duct heaters are used to heat air in rectangular ducts. The device body is made of galvanized steel, and the battery is made of a set of copper tubes with aluminum fins. The fin pitch is 2.5 millimeters. At the outlet of the device there is a pipe for mounting an immersion temperature sensor for the frost protection system. The operating temperature is 150 degrees Celsius at a pressure of 1.0 MPa or 100 degrees at a pressure of 1.6 MPa. All duct heaters are carefully tested for leaks by pressure testing.
Duct heaters can be installed in any position that allows the heated air to be removed from the heat exchanger circuit. When using water as the main coolant, duct heaters should be installed only in rooms with a positive temperature. The distance from the damper (channel bend) to the heater must be at least one diameter of the heater. To control the power of water duct heaters, it is recommended to use valves and controllers.
In our store you can buy high-quality duct heaters at an affordable price, and our specialists will help you make your choice.
Types of heaters
Depending on the method of heat transfer, electric and water heaters are distinguished.
Electric heater
The design of such a device implies the presence of steel filaments or spirals of metal wire. When current passes, metal elements offer a certain resistance to it, which leads to the conversion of electrical energy into thermal energy.
Among the advantages of electric heaters we note:
- Ease of calculating the required power of the device.
- Availability and relatively low cost.
- Easy to install and connect.
- Small pressure drops.
There are also a number of disadvantages. Thus, a large inertia is created in hot metal threads. This can lead to overheating of the device and even its failure. Improper handling of the device often causes a fire. To counter this phenomenon, electric heaters are equipped with additional protection against overheating.
Another negative point is low efficiency. The operating costs of electric heaters are an order of magnitude higher than those for water devices, in which electricity consumption is minimized.
Water heater
Due to numerous advantages, heaters of this type have become much more widespread than electric ones.
The obvious advantages of water heaters include:
- Fast heating of room air.
- Availability of structural elements.
- Possibility of assembling and installing the device on your own.
- Ease of repair and maintenance.
- Environmental friendliness of the device.
- Long service life.
- Economical.
It is important! If there is a possibility that the ambient temperature will drop towards negative values, the heater must be provided with an additional frost protection system. Otherwise, there is a high probability that frozen water will rupture metal pipes.
Water heaters include the following parts and components:
- fan;
- heat exchanger;
- circulation pump (not required when connected to a central heating system);
- three-way valve;
- Control block.
A mandatory element of the design of a water heater is the piping unit, which is responsible for supplying hot water to the heat exchanger.
In addition, air heaters differ in form factor. The shape of the duct can be round or rectangular. This does not have any serious impact on the performance and cost of the device. The main condition is that the heater must be optimally integrated into the system.
Types of water fan heaters
Let's consider what are the specifics of household and industrial models.
Water fan heater for home
These devices can only be considered as a domestic heating method if we are talking about a fairly spacious room. For small, cramped apartments, the thermal power will be too high. If you are buying a water fan heater for a garage, cottage, private house, or country house, you can consider models with low power. This way you will get efficient and durable heating equipment with low energy consumption.
Industrial water fan heaters
First of all, this type of heating equipment is aimed at operation for commercial purposes. Water fan heaters are connected in office and warehouse premises, production workshops, sales areas, offices, parking complexes, etc. This is due to the high thermal output: the equipment is designed for large spaces. Due to its design, it can work for a long time without interruption.
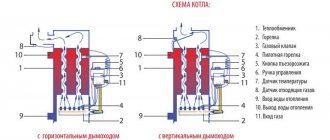
1
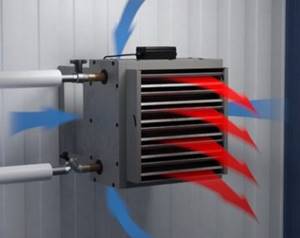
Design and principle of operation
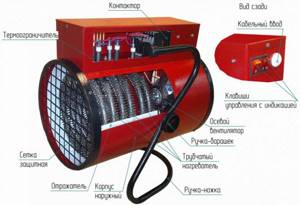
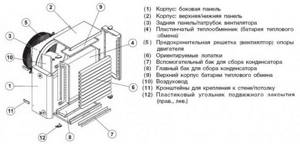
The main function of water heaters is to heat a large volume of air. Additionally, they heat the supply jet, allowing you to retain the existing heat. This happens thanks to the special design of the device, including:
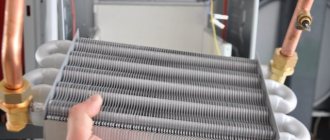
- Heater. Made in the form of a steel tube with a diameter of 16 mm. There are aluminum ribs on it, which form a heat-transfer surface. The large dimensions of this surface make it possible to avoid heat loss even with intense airflow. The outer diameter of the heater together with the fins is less than 4 cm, so the risk of it becoming clogged with dust, dirt or other objects that reduce heat transfer is minimal.
- Tubes They are arranged in several rows to ensure maximum heat transfer. Through them, heated air currents enter the air.
- Fan. Provides uniform movement of air masses. Can be axial or radial.
- Blinds. Installed in the front part of the heater. They deflect air, facilitating the passage of heated flows to a certain point.
- Electrical engine. Needed for fan operation. With a heating power reaching 115 kW, the engine power is only 0.1−0.5 kW.
- Frame. It is made of steel with anti-corrosion coating or plastic. It has several mounting holes that allow you to mount the device on a wall or ceiling.
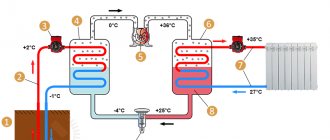
To regulate the air heating temperature in the room, two-way or three-way valves are installed on the supply line to which the water heater with a fan is connected. During operation, the device heats the air to 70-100 degrees. This happens according to the following scheme:
- 1. From the central system, water enters the heat exchanger.
- 2. Air flows are heated as they pass through hot tubes.
- 3. With the help of a fan, heated air is released into the atmosphere, and cooled air is released back into the heater.
The thermal power of a water-type heating device can be changed using a mixer with a two- or three-way valve. The decrease in water temperature occurs due to the mixing of hot liquid entering the heater and cold liquid leaving the heat exchanger. Thanks to this system, it is possible to significantly reduce heating costs for large rooms.
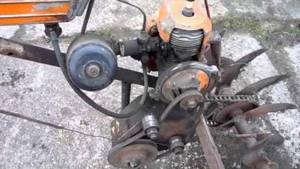
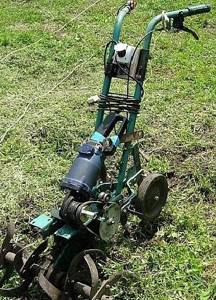
Homemade electric walk-behind tractor
To make an electric walk-behind tractor with your own hands, you will need some materials that are available to owners of personal plots. The manufacturing process of such a device can be divided into several technical operations:
1.
The supporting frame is one of the main elements of the equipment. To make it you will need a channel and a corner. The width of the frame must correspond to the dimensions of the engine and gearbox. You can use pieces of pipe of the required size as handles. The pipes should be welded to both sides of the metal frame. After this, you need to screw a bronze insert to the pipes with screws, which will serve as an axis.
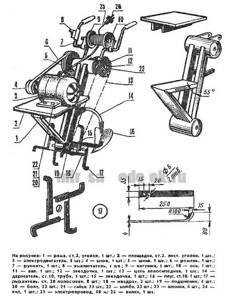
2.
For the sliding effect, you can use ball bearings that are selected with the appropriate diameter. To fix the handles to the pipe, you need to weld special brackets. In order to secure the cultivator and the plow holder, you need to weld the bracket in the middle part of the pipe. Using screws, you need to install a platform on the frame body in special slots in the side ribs. To mount the electric motor, special holes should be made in the platform.
3.
By means of a belt, the pulley on the bronze axis is connected to the same element on the electric motor. Using a chain, the movement is transmitted to a sprocket located slightly lower. For these purposes, you can use a regular bicycle chain.
4.
The movement of the walk-behind tractor will be carried out due to the working device, which directly cultivates the soil. Curved knives need to be secured to a square plate, and they will be held in place thanks to a key located on the lower axis. When the shaft rotates, the soil will be loosened and the entire module will move. Reduction is created through the relationship of pulleys and sprockets.
5.
The movement is controlled by a switch that must be placed on the handle of the holder. You can connect the motor to the network using a wire wound on a reel.
In general, making a homemade electric walk-behind tractor does not require special technical qualifications. When manufacturing it, basic ergonomics and safety rules for the owner of such agricultural equipment should be observed.
Properties
The floor convector with fan consists of:
- heat exchanger made of copper (pipes) and highly thermally conductive aluminum (fins);
- casing made of galvanized or stainless steel;
- lattice covering the structure, serving as a decorative and protective element.
The duct convector with a fan is fixed to the floor with fastenings, after which a concrete screed is poured onto which the floor covering is laid. The device can be powered by electricity or connected to a centralized/closed heating system.
A convector with forced convection works very simply: cool air penetrating through the grille to the heating element is warmed up, and then, with the help of a fan, rises upward (circulation occurs continuously).
In order for the forced convector, as it is called in everyday life, to fit into the interior concept, you can choose a grille that suits the style. It comes in different shapes, textures and colors, and is also made from different materials (aluminum, wood, etc.).
Water convector with fan is very popular in the market today. This is an ergonomic and functional device. For more comfortable operation, it can be equipped with a wall regulator with a control panel (to reduce/increase the speed of rotation of the blades) and a thermal valve (to control the flow of coolant into the device).
What components and materials are needed to assemble a fan heater?
Before making a fan heater, you should definitely carefully study the design of such devices and consider what they consist of.
The device consists of three main elements:
- Frame. As a rule, its shape resembles a fragment of a duct air duct. Housings are made from heat-resistant dielectric, that is, pipes with a round cross-section.
- Fan. Direct or synchronous current is used in such devices. AC power of 220 W is supplied from the network or from a power supply.
- A heating element. It is a spiral that is placed in a pipe and is powered by AC voltage. A household charge is quite enough to heat a small room, garage or workshop with such a device in winter.
In order to make a fan heater with your own hands, you will need the following tools, parts and materials:
- Asbestos-cement or asbestos pipe 50-60 cm long with a cross-section of 150 mm and a wall thickness of 10 mm. You will also need an old door handle to transport the device.
- Nichrome wire with a diameter of 0.5 mm and a length of 6 m. If you increase the diameter of the wire, then, accordingly, the heating power will increase.
- Two wooden blocks, a bench vice. A handle made by hand from a steel rod for winding a spiral with a hole or slot in it for threading the ends of the wire.
- Heat-resistant micanite insulation film 2 m long and 0.5 m wide.
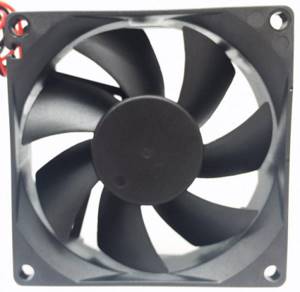
- An ordinary 220 W axial fan or from a computer cooler with a voltage of 12 W. The ribs of the body flange should have a size of 6 to 12 cm.
- Pliers, hacksaw, soldering iron, wire cutters, citric acid, rosin, regular tin-lead solder POS 60 or POS 40.
- Twin-core wire with a cross-section of 0.5 mm, length 5 m. Ceramic heat-resistant adapter pads - 3 pcs. Switch and plug designed for household current. Fasteners.
- Ready diode assembly, capacitance, capacitor.
Types of fan heaters
Axial.
This is a fairly
common type in which blades spin to create a warm current.
A rather primitive design of this type is inexpensive and can heat medium-sized living rooms.
Radial.
It is a circle with blades located along its outer diameter. The air flow is directed perpendicular to the axis of rotation of the blades.
Tangential.
It has the shape of a cylinder, its diameter is less than its length, and the blades are also located in the outer circle.
The air flow is also directed perpendicular to the axis of rotation of the blades.
It is effective because it has significant air flow and low noise levels.
So, fan heaters differ in their structure, power and performance.
The design of the unit will affect the temperature in your room and the cost of the unit. Fan heaters with blades are designed for vertical installation, while radial and tangential modifications are available both horizontal and vertical.
Operating principle of water heaters
similar to the functioning of a heat gun. In water variations, the heating source is pipes with hot water. These options are characterized by low energy consumption.
We have selected ten excellent water fan heaters for you in terms of price and quality
, the selection took into account real user reviews of specific models. The ranking includes:
1. Volcano VR Mini AC –
Find out where it’s cheapest >>>
2. Teplomash KEV-25T3W2 –
Find out where is the cheapest >>>
3. Volcano VR1 AC –
Find out where it’s cheapest >>>
4. Ballu BHP W3-20-S –
Find out where it’s cheapest >>>
5. Ballu BHP-W3-15-LN –
Find out where is the cheapest >>>
6. Volcano VR2 AC –
Find out where it’s cheapest >>>
7. SONNIGER Heater one –
Find out where it’s cheapest >>>
8. Teplomash KEV-16M3W1 –
Find out where it’s cheapest >>>
9. Teplomash KEV-100M5W2 –
Find out where it’s cheapest >>>
10. Volcano VR3 AC –
Find out where it’s cheapest >>>
Popular models
Water fan heaters are made by many manufacturers. of the company Teplomash , which has developed a line of KEV models with a thermal power of 3–120 kW, are in greatest demand among Russian consumers
by Volcano , are in no less demand on the Russian market .
They manufacture various equipment for heating rooms , including water fan heaters. The company supplies several series of fan heaters to Russia with different thermal outputs.
If we compare the models of water fan heaters from these companies, choosing those that are similar in thermal power, we get the following results (see Table 1.)
Table 1. Technical characteristics of water fan heaters
| Water fan heater model | Teplomash KEV 25T3 W2 | Volcano V25 |
| Power | 3.1-7.6 kW | 3-20 kW |
| Installation in premises of: | 31-76 m2 | 80-200 m 2 |
| Air flow | 600-1200 m 3 /h | 4000 3 /h |
| Installation | wall | wall |
| Remote control | There is | There is |
Precautionary measures
An ordinary furnace cannot be converted into a gas generator. Such manipulations will only lead to smoke in the building. In order to fully use a gas generator device, it is necessary to take into account its disadvantages.
Cold gas is formed at the outlet of such equipment. If the chimney is not properly insulated, condensation occurs. The moisture will flow back into the device. Therefore, experts recommend the use of insulated sandwich structures. They consist of 2 pipes nested inside each other, between which the insulation is located.
In order for the gas generator to operate as efficiently as possible, it is necessary to install an economizer (additional equipment).
Assembly features of some types of fan heaters
There are several types of fan heaters, each of them, quite naturally, has its own characteristic pros and cons. Before you start assembling the fan yourself, you should familiarize yourself with some of the features of the device.
Fan heater
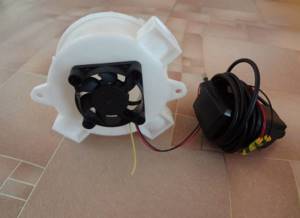
Assembling a simple heat fan with your own hands is not difficult for a home craftsman. Some of the necessary parts can be found in stocks of old equipment stored in a closet or garage. You can assemble a heater with your own hands using an old computer system unit. For this you will need:
- Textolite sheet measuring 20x30 cm.
- A couple of meters of nichrome wire with a diameter of 0.2-0.3 mm.
- System unit (parts, except the cooler, are removed from the unit).
- Power supply 12V.
- Thermal fuse for the heater is designed to turn off at temperatures above 70°C.
- Cable, regulators, switches, fasteners, electrical tape or heat shrink tubing.
The design of the heater is very simple and assembling it yourself is not difficult.
- Parts are cut out of fiberglass to make a frame with slots for installing a shadow (nichrome spiral).
- The nichrome thread is twisted into a spiral (for these purposes, use a drill or screwdriver operating at slow speeds, with a fixed rod with a diameter of 2-3 mm).
- The spiral is installed in the frame and secured, power is connected to the points where the ends of the spiral are attached, and a thermal fuse is mounted into the gap in the power wire.
- The frame with the spiral is installed in the system unit.
- The 12V power supply is connected to the cooler.
- The housing is closed, installed on a stand made of dielectric material, and the operation of the heater is checked.
An economical option is a water fan heater. In this case, the heating element is a heat exchanger made independently from a copper pipe or a used car radiator. The coolant to the heat exchanger comes from central heating or individual heating pipes, and electricity is consumed only to ensure the operation of the fan. It is recommended to install such a fan heater in the heating system on the return pipe. When installed on the supply side, a running fan greatly cools the pipe and the coolant enters the heating radiators below the required temperature.
Heat gun
Making a heat gun with your own hands is quite simple. A heater of this type is used for quickly heating and drying walls, floors, damp cellars and during certain types of construction work. To make a mini gun, you can use some parts of unusable household appliances, and buy the missing ones.
You will need the following list of materials:
- Motor and impeller (suitable for a broken vacuum cleaner or kitchen hood).
- A spiral from an unnecessary electric stove is used as a heating element.
- A pipe with a diameter of 150 mm and a wall thickness of 3-5 mm can be made independently from sheet metal.
- Thermal relay that opens the circuit when overheating, switch,
- Asbestos sheet.
- Metal grate.
- Cable and fastening materials (rivets or bolts with nuts).
Assembly is carried out in several stages:
- The electric motor and fan are attached at the end of the pipe.
- Strips are cut out of asbestos and a grid is assembled onto which a heating coil is attached (ceramic insulators can be used for these purposes).
- The resulting heating element is attached to the end of the pipe opposite to the fan.
- The motor and coil are connected to the switch. The scheme provides for a separate connection.
- Metal protective grilles are installed at both ends of the pipe.
- A mobile or stationary stand is made from available materials that are resistant to temperature influences.
Electric fireplace
A homemade fan heater is used as a heat source for an electric fireplace. It’s easy to make a portal for a fireplace with your own hands from plasterboard. To do this, install a frame from a metal profile of the required configuration and cover it with sheets of plasterboard, after which the outer surface is decorated using facing materials. A structure is installed inside the portal that simulates the burning of wood or coal (finished products are equipped with lighting)
It is important to provide a hole in the structure in advance for laying the cable
How does a water fan heater work and how does it work?
The water fan heater consists of a housing (box), a copper-aluminum radiator-heat exchanger and a powerful fan. The heat exchanger and fan are installed inside the box. There are blinds on the outside of the box through which warm air comes out. The opening angle of the blinds can be adjusted, thus directing the flow of warm air to the desired sector of the room.
The operating principle of a water fan heater is similar to the operating principle of a conventional electric fan heater or heat gun. Warm air currents are distributed throughout the room thanks to the operation of the built-in fan. Only the heat is generated not by an electric heating element, but by hot water, which enters the heat exchanger directly from the heating system.
Thus, the entire heating function relies on water from the central heating system. Additional costs are incurred only by the operation of the fan, but they are not so significant. In essence, a water fan heater is a heating battery equipped with a fan. Everything is extremely simple, and the effect exceeds all expectations. The room is heated quickly, efficiently and evenly with the lowest possible financial costs.
Features of the device and principle of operation
A standard heater, regardless of the method of heat transfer, necessarily consists of two elements:
The operating principle of any air heater is based on the fact that the coolant is characterized by greater heat transfer than the surrounding air flows. Accordingly, passing along the heater body, the air masses pumped by the fan blades are able to heat up or cool down.
To increase the efficiency of the device, the useful area of the heat exchanger is increased. This is achieved by welding additional metal ribs to the pipes.
The use of homemade fan heaters
Electric models can heat small areas, while their water counterpart is used to heat large spaces, but you may need several devices to distribute the heat evenly.
Homemade devices can be used for drying things, which is important in winter, as well as car seats after washing a car or small rugs.
If, upon arrival at the dacha, you need to immediately heat one of its rooms, then fan heaters will cope with this task faster than other heating devices. It can also be used for heating basements and ground floors, those rooms where there is high humidity. Homemade devices can significantly reduce its level and maintain a stable temperature in the room for the required period of time.
How the device works
A water fan heater consists of a housing in which a heat exchanger and a fan are installed.

The fan, thanks to its blades, creates an air flow that, going around the heat exchanger with circulating hot water, heats up and, accordingly, increases the temperature in the room. The main advantage of this device is low power consumption, with fairly high efficiency, ease of maintenance and the absence of parts, except for the fan, that can break. The highest fire safety makes the water fan heater an indispensable heating device for use in areas of increased explosion and fire hazard, and in places where it is not economically feasible to install other heating systems, for example, at a service station, gas station or car wash.
How to repair a fan heater?
If it is necessary to repair the electrical part of a water fan heater, usually no special difficulties arise. Most often, the causes of malfunctions are loss of contact in one of the parts of the electrical circuit. Such damage can be corrected by anyone with sufficient knowledge in the field of electrical engineering.
The operating instructions for the water fan heater must include a diagram of its connection. Depending on the model, the connection can be single-phase or three-phase. Using a tester, you should check all sections of the circuit according to the diagram, including contacts in each position.
The single-phase connection diagram for a water fan heater is shown below.
If necessary, the contacts should be cleaned and adjusted . If a malfunction is detected in the fan used to pump air, it should be replaced with a similar device.
Attention! All work to check the condition of the electrical circuit of the water fan heater can be carried out only after it is completely disconnected from the power supply.
In water fan heaters, another malfunction may occur related to the condition of the heat exchanger. Most often, a leak appears in it due to non-compliance with its operating conditions. In some cases, the functionality of the device can be restored, but only specialists can .
Initially, it is necessary to accurately determine the location of damage to the heat exchanger. To do this, it is crimped . Most often, a leak is found in the coils, copper half-rings connecting the coil tubes. They are either soldered or replaced with new parts. After the repair is completed, the heat exchanger is again pressurized and installed in place.
Difficult choice
To answer the question of which diesel engine preheater is best to purchase, you need to take into account various nuances. This includes the frequency of use of the vehicle, the characteristics of the vehicle itself, as well as the conditions of its operation and the service life of the engine.
If the climatic conditions are satisfactory, then there is no particular need for the device. Also, if the car is in a heated garage most of the time, then a heater is unlikely to be needed. It’s another matter if the car is operated in a harsh climate, where winters are usually long and frosty. Then the preheater will be truly in demand.
Naturally, a modern new car will easily start even in cold weather, but the wear of its engine parts will accelerate, since they are subjected to additional and heavy load. Therefore, those car enthusiasts who want their vehicle to last as long as possible should take care of it and purchase a diesel engine pre-heater.
Reviews from those who already use the device are mostly positive. Some people prefer domestically produced models, while others choose only imported ones. Both have their advantages and disadvantages.
Let's look at the brands that are most in demand among car enthusiasts.
Order
You can buy a convector with a tangential fan at a favorable price now in the Home-heat.ru online store. If you have any questions, contact our specialists at the indicated phone numbers. Delivery is made to all cities of Russia, as well as to the CIS countries.
- Providing information by the Client:
1.1.
When registering on the website home-heat.ru (hereinafter referred to as the “Site”), the Client provides the following information: Last name, First name, email address. When placing an Order, the Client can provide the following information: last name, first name, patronymic of the recipient of the Order, address for delivery of the Order, contact phone number.
1.2. By providing his personal data, the Client agrees to their processing (up to the Client’s withdrawal of his consent to the processing of his personal data) by ECON LLC (hereinafter referred to as the “Seller”), in order for the Seller and/or its partners to fulfill their obligations to the client, sales goods and provision of services, provision of reference information, as well as for the purpose of promoting goods, works and services, and also agrees to receive advertising and informational messages and service messages. When processing the Client’s personal data, the Seller is guided by the Federal Law “On Personal Data”, the Federal Law “On Advertising” and local regulatory documents.
1.2.1. If the Client wishes to clarify his personal data, block or destroy it if the personal data is incomplete, outdated, inaccurate, illegally obtained or is not necessary for the stated purpose of processing, or if the client wishes to withdraw his consent to the processing of personal data or eliminate unlawful actions of EKON LLC in relation to his personal data, then he must send an official request to the Seller in the manner prescribed by the EKON LLC Policy regarding the processing of personal data.
If the Client wishes to delete his account on the Site, the Client contacts us at the following address with a corresponding request. This action does not imply the withdrawal of the Client’s consent to the processing of his personal data, which, according to current legislation, occurs in the manner provided for in paragraph 1 of this paragraph.
1.3. Use of information provided by the Client and received by the Seller.
1.3.1 The Seller uses the data provided by the Client during the entire period of the Client’s registration on the Site for the purposes of:
- registration/authorization of the Client on the Site;
- processing the Client's Orders and to fulfill its obligations to the Client;
- to carry out activities to promote goods and services;
- assessment and analysis of the Site’s operation;
- determining the winner in promotions conducted by the Seller;
- analyzing the Client’s purchasing characteristics and providing personal recommendations;
- informing the client about promotions, discounts and special offers through electronic and SMS newsletters.
1.3.2. The Seller has the right to send advertising and informational messages to the Client. If the Client does not wish to receive advertising and informational messages from the Seller, he must change the appropriate subscription settings in the appropriate section of his Personal Account. From the moment the specified settings are changed, receiving the Seller’s mailings is possible within 3 days, which is due to the peculiarities of the operation and interaction of information systems, as well as the terms of agreements with contractors who send advertising and informational messages in the interests of the Seller. The Client’s refusal to receive service messages is impossible for technical reasons. Service messages are sent to the email address specified when registering on the Site, as well as via SMS messages and/or push notifications and through the Customer Service Service to the phone number specified during registration and/or when placing an Order, about the status Order, items in the Client’s basket and/or added by the Client to “Favorites”, as well as the Seller’s request to leave a review of the purchased Product.
- Provision and transfer of information received by the Seller:
2.1. The Seller undertakes not to transfer information received from the Client to third parties. It is not considered a violation for the Seller to provide information to agents and third parties acting on the basis of an agreement with the Seller to fulfill obligations to the Client and only within the framework of the agreements. The transfer by the Seller to third parties of data about the Client in an impersonal form for the purpose of assessing and analyzing the operation of the Site, analyzing the Client’s purchasing characteristics and providing personal recommendations is not considered a violation of this clause.
2.2. The transfer of information in accordance with reasonable and applicable requirements of the legislation of the Russian Federation is not considered a violation of obligations.
2.3. The seller has the right to use “cookies” technology. “Cookies” do not contain confidential information and are not transferred to third parties.
2.4. The Seller receives information about the IP address of the visitor to the Website www.home-heat.ru and information about the link from which Internet site the visitor came from. This information is not used to identify the visitor.
2.5. The Seller is not responsible for the information provided by the Client on the Site in a publicly accessible form.
2.6. When processing personal data, the Seller takes necessary and sufficient organizational and technical measures to protect personal data from unauthorized access to it, as well as from other unlawful actions in relation to personal data.
2.7. More complete information about the policy of ECON LLC regarding the processing of personal data is provided here.
- Storage and use of information by the Client
3.1. The Client undertakes not to disclose to third parties the login and password used by him for identification in the home-heat.ru online store.
3.2. The Client undertakes to ensure due diligence when storing and using the login and password (including, but not limited to: using licensed anti-virus programs, using complex alphanumeric combinations when creating a password, not making a computer or other equipment with information entered on it available to third parties). Client login and password, etc.)
3.3. If the Seller has suspicions regarding the use of the Client’s account by a third party or malicious software, the Seller has the right to unilaterally change the Client’s password.
How to make a fan from a plastic bottle
Crazy Hands' favorite raw material is plastic bottles - almost ideal for creating your own fan. The top of a standard round bottle works well for the propeller. You need to cut off the part with the cork just above the pasted label.
The part of the bottle with the cork will be the blades. To do this, you need to cut the plastic down to the cork so that you get several different petals. After one, the petals are cut off at the base. The remaining ones are future propeller blades.
Fan blades made from a plastic bottle
- You can use a candle or lighter to shape the blades and twist them a little. The main thing is not to overdo it, because the plastic is soft and can catch fire. The goal is to warm it up a little, not set it on fire.
- The plug will be the base of the propeller. A hole is made in it according to the dimensions of the motor axis. To keep the connection firmly, you can put it on glue.
- Now is the time to think about the foundation. The rest of a plastic bottle will also work for this. A hole is cut in it to rigidly place the plug with the blades at a right angle. You must remember to weigh down the base - with nuts, bolts or any other metal objects.
- A hole is made on the base for the button and the chain is assembled. There is also enough space for a power supply.
The field for imagination when working with a plastic bottle is vast. You can use several bottles at once. One will become a propeller (more precisely, part of it), and the second will become a solid foundation. But then additional materials will be needed. For example, ordinary drinking straws.
Simple and lightweight bottle fan
First stage
Before you build a paint booth with your own hands, you should imagine what it will look like and prepare everything you need. Draw a project on paper that shows the future paint booth along with all its components to scale:
- premises;
- heat generator;
- heat gun;
- ventilation system.
These are the main points, each of which includes many smaller elements - doors, thermal insulation, lighting system, etc.
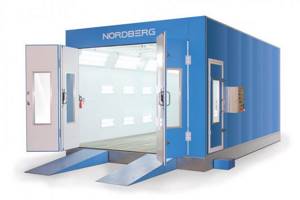
Spray booth room
See also:
Do-it-yourself powder coating of rims
Homemade #2 - mini heater made of foil and glass
The following homemade device works on a similar principle to the previous one. To make it you will need:
- two pieces of glass of the same size;
- aluminium foil;
- sealant;
- regular paraffin candle;
- wire with a plug at the end;
- epoxy adhesive.
A device for holding the candle while working, cotton swabs for removing soot, and a cloth for cleaning glass will also come in handy.
The inner surface of the glass is coated with soot to create a conductive layer
Let's start assembling:
- We thoroughly clean the glass of all kinds of contaminants: traces of paint, dust, grease, etc.
- We form a conductive surface. To do this, using a candle, we evenly apply soot to one side of each glass blank, which will act as a conductor. To facilitate the process, it is better to cool the glass before the operation - this way the soot will settle more evenly.
- Using a cotton swab, carefully remove excess soot from the edges of the workpiece so that you get a transparent edge about half a centimeter wide.
- We cut out two strips of aluminum foil, the width of which corresponds to the size of the conductive surface. They are designed to perform the function of electrodes.
- We lay the workpiece soot-covered side up and apply epoxy glue to it. We place the foil electrodes along the edges so that their edges extend beyond the workpiece.
- We cover the part with a second sheet, directed with the smoked layer inward, carefully press and glue. All connections are well sealed.
We carry out tests and measure the resistance of the conductive layer. Now you can calculate the power of the device, which will be equal to the product of the surface resistance and the square of the current. If the obtained value is within the limits permitted by regulatory documentation, the device can be plugged into a power outlet. If not, you will have to reassemble it. It should be taken into account that the wider the soot layer, the lower the resistance of the device and, accordingly, the higher the heating temperature of the glass.
Model of a homemade glass plate heater
Another simple homemade device works on the principle of using infrared radiation, which can be assembled in a few minutes. This device consists of a sheet of aluminum foil mounted on a radiator and oriented towards the room. The heat emanating from the radiator is collected by the foil mirror and reflected into the room, without unnecessary losses in heating the walls.
There are many ways to make a heater with your own hands. You can choose different principles of operation of devices and the materials from which they will be made. The main thing is not to forget that the devices must be safe. There is no need to be lazy, measure the resistance and calculate the power in order to determine whether it is permissible to plug the homemade product into an outlet or not. All device contacts, wires, and conductive parts must be carefully insulated. A safe, efficient and practical heater will delight you with its impeccable service for many years.
DIY fan heater made from trash (video)
In the video you will clearly see how a fan heater is made from various elements that may remain from components of household appliances that are no longer working.
For the fan heater model in question you will need:
- Cover with cooler from the power supply;
- Broken hair dryer;
- Plastic grille for ventilation;
- Iron cord with plug;
- Textolite;
- Pieces of plywood.
Step by step guide:
- Installing the heating element
. A frame is made from narrow strips of textolite, and a spiral, which was removed from a hair dryer, is wound onto it in a zigzag. Holes are prepared in the textolite structure and wire is inserted into them. A spiral is attached to it so that it does not touch the frame material. As a result, the spiral plays the role of a large variable resistor. - Fan connection
. On the created frame with a spiral, using a voltage meter, find the area with the lowest alternating voltage. You need to solder the diode to the plus, and connect the wiring from the cooler to the minus. This circuit completely replaces the power supply. - Execution of the body
. The side walls are screwed to the cooler lid, and a grille is inserted into the remaining empty wall and fixed with glue from a hot-melt gun.
The resulting device consumes little electricity, operates silently and can easily heat certain places in the room. For example, if your feet get cold while working in the workshop, you can install a fan heater under the table and it will warm them.
If you need to ensure high-quality heating of the room before turning on the central heating or after its completion, during a period when there are particularly cold days, then you can’t imagine a better homemade fan heater. It is compact, economical and productive, it can be created from available materials
Cooler fan
This is the easiest way to make a home fan. To make it we will need a cooler from an old computer. This part itself is already operational; all we have to do is connect it to the wire correctly.
If the future fan will be located in close proximity to the computer, then a standard USB cable will be suitable as a wire. We cut off the unnecessary edge of the cord with a small connector and strip the wires. We clean the wires at the cooler in the same way.
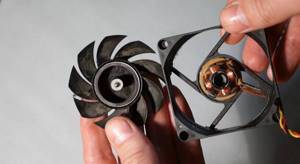
Sometimes there are more than two wires in the cooler and USB cable, remember, we need the black and red color of two wires in one and the other element. We don't need the rest.
After stripping, we connect the red wire to the red, the black to the black, the connections must be properly insulated. After insulation, the fan is already fully functional; all that remains is to come up with an original stand for it to suit your taste and glue it to the cooler. All! The device is ready!
Reviews of water fan heaters
Sergey, Chelyabinsk:
“I installed Volcano mini at a car wash. I chose the unit for reliability and durability. The fan heater has been running for over a year. The case looks like new, the quality of the material is excellent. It works quite quietly and heats up the box quickly . I'm happy with the purchase."
Valentin, Kaliningrad:
“To heat the supermarket, we purchased water fan heaters from Teplomash. During continuous operation, it maintains indoor climate All the fasteners were included, so there were no difficulties with installation.”
Anton, Michurinsk:
“I’m lucky that my garage is in a complex connected to heating. Only the room is spacious and cool in winter. I was advised to connect a homemade water fan heater . I turn it on as soon as I get to the garage. After half an hour I feel comfortable.”
We make a water fan heater with our own hands by watching the video:
How to easily increase battery efficiency, watch the video:
Find out about industrial water fan heaters from the Teplomash plant from the video:
Finding a motor for a fan
One YouTube video suggested using a 3 volt DC motor from a hardware store. Tops a USB cord, works by rotating the laser disc blade. Useful invention? If you're tired of the extra port, this will help you survive the heat. It’s easier to take a processor cooler and power it from the system unit. The yellow wire goes to 12 volts (red to 5). The black pair is earth. You can assemble it from an old computer. Citizens of the Russian Federation are simply too lazy to invent, so we throw interesting equipment into a landfill.
Asynchronous fan motors operate without a starting capacitor... The peculiarity of fan motors is that they come directly with a winding. A couple of tips to help you get an engine:
- The blender is noisy; there is usually a commutator motor inside. If the device has lost its relevance, we managed to get a new one, which will serve perfectly as a fan.
- The best duct fan is a vacuum cleaner. The engine is placed in a sealed housing and equipped with an impeller. Install the good in the channel, good air flow from the room is ensured.
- In a refrigerator, the compressor is often in working order; the device is supposed to be thrown into a landfill. There is a chance to get a working asynchronous motor along with a start-protection relay. We believe that if you remove the motor, the starting conditions will change; we invite readers to practice on their own. The shaft rotation may be a little slow...use a gearbox. The start-up relay will supply voltage to the starting winding, then turn it off. The principle of operation is based on a bimetallic plate heated by current, which breaks the auxiliary winding at the right moment. As for protection, it works flawlessly. A better circuit is one that turns on an asynchronous motor through a capacitor.
- Many people guessed that an air fryer is just a noisy, wonderful fan blowing on a quartz lamp. Since the filament element is a consumable item, it is easier to replace it with a steamed turnip. It is better to remove it in case the temperature regulator is not working properly. Most air fryers are controlled by a timer; you will have to cock the mechanism every hour. It's easier to stop. Chewing gum is not suitable, use tape. No thanks needed. The VashTechnic portal is happy to help.
- In washing machines, the engine is capable of revving. Commutator motors are used; asynchronous motors do not develop good torque at the start. Inside the speed controller is a thyristor, the circuit operates on the cutoff principle. You'll figure out where to look: the engine is powered through the key. Belt or direct drive – the difference is zero.
- You can make asynchronous motors with your own hands. Place a round magnet on the shaft, place one coil on the side - chances are you can make the device work. True, you will have to start it manually, remember the first airplanes and cars.
Options for a homemade heating element
Before you start making a homemade fan heater, it is important to choose the right heating element for your device. Let's look at which options are suitable for these purposes.
The following can be used as such a heater:
- metal spiral;
- heating element;
- ceramic device.
You can make a spiral coiled from wire yourself without any problems. This limits the advantages of metal spirals as heaters. When the device operates for a long time, there is too little moisture and oxygen in the surrounding air.
Therefore, the room will have to be ventilated frequently, well ventilated, and also take care of air humidification.
The heating element is a metal pipe containing sand inside, which accumulates heat well and then gradually releases it to the air flow.
Heating elements do not dry the air and do not require oxygen, so they are much safer than coils. The heating element for the fan heater can be removed from an old household appliance, for example, from an electric stove.
We recommend looking at more information about the types of heating elements for heating and the features of choosing the appropriate option in this article.
A heating element - one of the heater options for a fan heater - may look different. It is considered an effective and safe heating element option
Ceramic heaters are complex and expensive elements, but extremely safe and effective. They are a complex of plates with an uneven surface, similar to a honeycomb.
Such elements do not heat up too much; the effect of their influence is achieved due to the large area of contact of the heaters with the air.
The likelihood of getting burned on a ceramic heater is much lower than when using a metal coil. But in home-made devices, it is spirals that are most often used, since they are simple and affordable.