The productivity of a boiler, heating or sauna stove can be increased by installing a simple and at the same time effective device on the pipe - a heat exchanger. However, for its productive operation, you need to know the design features and manufacturing rules of the device. Do you agree?
We will tell you how to make a heat exchanger for a chimney with your own hands. We will list which modifications are suitable for self-installation and explain how the air model differs from the water model. Taking into account our recommendations, you can significantly increase the heat transfer of heating units.
Step-by-step guide to making heat exchangers with your own hands
The heat exchanger is the heart of the heating system, designed to transfer heat through media and heat the room.
The medium in the system can be liquid, vapor or gaseous. A simple device is considered to be a room radiator with a water heat source. The degree of heat conductivity depends on the intermediate material in the system, that is, the heat exchanger; silver and copper have the best conductivity indicators. Copper is naturally used more often. Its heat transfer is almost 8 times higher than, for example, steel; plastic is many times even worse.
Advantages and disadvantages
The obvious advantages of the heat exchanger include:
- simplicity of its manufacture and installation;
- heating can be combined; in addition to heating, a water heating system can be installed;
- fuel for the device can be varied: solid, gas - liquid;
- The devices are beautiful in appearance; you can give the interior a national style.
The heat exchanger has two disadvantages:
- there is no automatic control over media heating;
- The efficiency is not too high.
Heat exchanger using tube sheet
What is it and what is it for?
Heat exchanger is a device for transferring heat from a heated medium to a colder one. One principle, many designs. A heat exchanger for a chimney allows you to select part of the energy of the exhaust gases and use it to heat an adjacent room or heat hot water.
The gases coming from modern gas and pellet boilers are not hot – about 200 °C, so you won’t be able to get a lot of heat from the chimney. Solid fuel boilers emit hotter gases - up to 600 °C, and the recuperator allows you to obtain a fairly significant amount of heat for heating or heating water.
The maximum amount of heat from exhaust gases can be obtained by using not very modern traditional stoves, fireplaces, and homemade potbelly stoves. The efficiency of these heating devices is low, the temperature of the flue gases is high, so a considerable part of the wasted heat can be captured using a heat sink. The use of heat collectors on the chimney of a homemade potbelly stove allows you to capture up to 30-40% additional energy.
The main reason for installing a heat exchanger is that it allows you to maximize the use of fuel combustion energy and save on heating costs. In addition, sometimes when heating small houses it is not economically feasible to purchase a heating device with a heat exchanger and install a heating system.
A modern fireplace or stove heats well houses with an area of up to 70 m² and even more; only some rooms need heating - bathrooms or back bedrooms, second floor rooms or attics, so for their heating you can use the heat from the recuperator for the chimney. Sometimes a chimney heat exchanger is used to heat water.
Types of heat exchangers
Heat exchangers, depending on their purpose, are cooling and heating:
- The cooling device comes into contact with liquid or cold gas, while cooling the hot coolant.
- A heating device with heated gas or liquid gives off heat to circulating flows of cold liquid or gas, and an exchange occurs.
Structurally, heat exchangers are:
- surface, when media contact through an intermediate surface;
- regenerative, when either cold or hot water is supplied to the nozzle, the temperature regime is regulated and maintained due to heating and cooling;
- mixing, supplying media from one to another by mixing them.
Surface heat exchangers can have different shapes, they are:
- lamellar, consisting of many plates with liquid passing through their labyrinths;
- in the form of coils, thin tubes twisted into a spiral;
- a pipe in a pipe, consisting of two tubes of different diameters and placed one inside the other.
Design features and operating principle of a potbelly stove
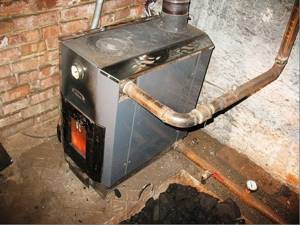
In essence, a potbelly stove with a liquid coolant circuit is a mini water boiler that operates on the principle of heat transfer of thermal energy from flue gases through a heat exchanger to a water heating circuit. In such a design, due to the developed heating surface, the heat removal is increased, that is, the flue gases most fully transfer heat to the water, and the presence of a large volume of coolant allows the duration of heating the room to be increased. A well-designed device of this type, due to the water jacket and installed radiators, can heat not only a garage and a car repair shop, but also a small country house or cottage.
Potbelly stove with water circuit and heat production technology:
- Loading wood fuel.
- Lighting the fire.
- Release and ignition of flammable substances.
- An open fire heats the internal coil of the recuperator, a regular heating circuit water tank or a hot water supply tank.
- The flue gases, which have given up their energy to the water, are released through the chimney into the atmosphere.
- The remains of burnt firewood in the form of ash accumulations end up in the ash pan of a potbelly stove with a water circuit.
The main components of a potbelly stove:
- Firebox or firebox. It is located approximately in the middle 1/3 of the stove and is equipped with a combustion door for fuel supply.
- An ash pan that collects fuel residues after combustion. Its bottom is made of 5 mm steel sheet, there is a door for removing ash.
- Grate bars are made of cast iron structures of a special shape with holes. They separate the firebox from the ash pan, hold the fuel during combustion and allow its residues to pass into the ash pan.
- Sealed water tank for the heating circuit with inlet/outlet pipes.
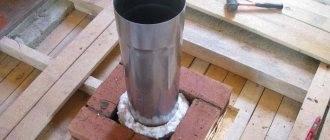
- A chimney of at least 150 mm to remove flue gases into the atmosphere, with outlet through the wall ceiling.
- Support structure made of metal legs. Their task is to provide stability to the potbelly stove with a water circuit. For fire safety, it will be necessary to ensure a minimum gap between the stove and the flooring of at least 250 mm. A protective metal sheet and an asbestos backing are installed under the stove.
How to make an exchanger with your own hands
- For a heat exchanger with a container, you will need a tank and a pair of copper tubes. You can use sheet steel 2.5-3 mm thick and weld it into a tank of the required volume.
- Place the container at least 1 meter from the floor and at least 3 meters from the stove.
- Make two holes on the right, closer to the structure, and on the left, at the top.
- Bring the lower outlet to the stove, at an angle of 2-3 degrees.
- Connect the upper outlet at an angle of 20 degrees, only in the opposite direction.
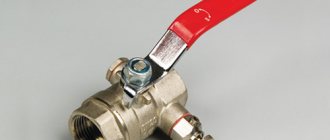
- Install a tap into the lower outlet outlet to drain water from the tank.
- Below is another tap to drain water from the entire system.
- Check the structure, it should be sealed, you can fill it with water and, under light pressure, identify leaks and eliminate them.
Conclusion
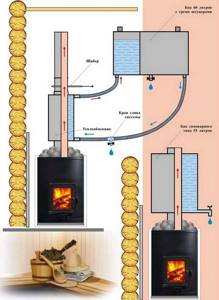
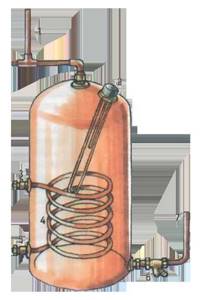
Installing a heat exchanger on a sauna stove does not require much work. To do this, just follow the instructions above. The main principle is compliance with slopes. Photo No. 1 shows one of the heat exchanger options for a bath and its installation. Otherwise, problems will arise with the pressure. When organizing water heating, you should adhere to the following rules:
- The length of the forward and return pipes should not exceed three meters.
- The remote tank is placed at such a height that the slopes are maintained. The excess must be at least 100 mm.
- Pipes for the heat exchanger of a sauna stove for heating water must be made of stainless steel or copper.
- The water in the system must not be allowed to freeze; it must be drained after each use of the steam room. A special valve is provided for this. It also serves as an emergency drain if an accident occurs.
- The power should be selected so that the device heats the required amount of water to +70C in 2 hours. The liquid in the system should not boil. Scale quickly damages the device.
- The diameter of the pipelines should not be less than 24 mm.
By following these simple rules, you will always have hot water and save money on installing an electric boiler.
Necessary materials, tools, drawings
For the heat exchanger it is worth choosing:
- Capacity 90 -110 liters.
- Anode.
- Copper tube up to 400 cm long for a thermal heater. If there is no copper pipe, you can use aluminum or plastic, as long as it bends well.
- Power regulator for regulating heat supply.
There is no need to make a coil from steel, the material is bad for heat transfer, it doesn’t matter how it bends, the air heats up thanks to copper many times faster. When using steel, you will additionally need a pipe bender.
Step by step guide
Manufacturing of a ductless heat exchanger
- Prepare a container, preferably metal, plastic will take longer to heat up.
- Place the tank at the beginning of the heating system.
- Make 2 holes in the container for exits. One is at the top, through which hot water will be discharged. The second is at the bottom, cold liquid will flow from the system pipes.
- Place the outlets correctly; the rate of heat transfer will depend on this.
- Seal the holes hermetically so that the air temperature is not wasted on the battery, and the room is evenly heated.
- Use copper for the tube; it should bend well and transfer maximum heat into the room.
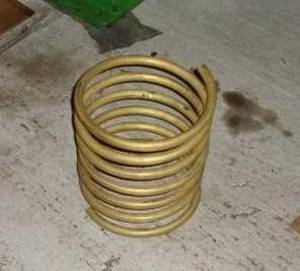
- Bend the tube into a spiral shape to create a coil.
- Place the spiral in the tank, the ends of the tube need to be brought out, and secure them well.
- Connect a threaded fitting to the ends of the parts.
- Connect a power regulator to the pipe; you can buy it in a store, it’s inexpensive, so you shouldn’t get hung up on making it yourself.
- The system will work properly without a regulator, but it is needed to regulate power and save energy. The power can be set at your discretion.
- Connect the terminals to the thermostat, and then the power wires.
- To prevent the tank from wearing out due to temperature changes, install an anode.
- Close all elements hermetically.
- Fill the tank with water, the heat exchanger is ready.
Care and maintenance of the potbelly stove
A potbelly stove, despite its small dimensions, is a device with an increased fire hazard. They are subject to special rules regarding fire and sanitary safety. Compliance by users with such operating rules will protect their health from the possibility of carbon monoxide poisoning and protect property from fire.
For efficient and fire-safe operation of this stove design, you need to know and follow several important recommendations:
- The chimney pipe for removing hot flue gases must be vented outside the building through its wall or ceiling.
- Connecting gas exhaust pipes to the ventilation systems of the building is not permitted.
- The exit points of hot chimneys must be insulated with fireproof building materials.
- The condensate collector installed on the chimney to remove condensate formed during cooling of flue gases must be opened once a week to drain the acidic liquid.
- A stove equipped with an internal water circuit must have protection against overheating of the coolant and high pressure of the medium, as well as an air vent, a sump and an expansion tank on the heating system.
- On the eve of the start of the autumn-winter heating period, the smoke exhaust system must be cleaned of soot deposits.
- During the operation of the potbelly stove, all metal structural components must be checked for leaks in order to protect others from the penetration of carbon monoxide into the heated room.
- It is periodically required to monitor the condition of the forced and natural ventilation systems.
- When placing the stove, it is necessary to maintain minimum distances from the hot surfaces of the device to the nearby walls of the heating object. The smallest permitted distance should be 500 mm, but the most optimal size is 1000 mm.
- To quickly eliminate the source of fire, a box of sand and a fire extinguisher are placed in close proximity to the stove.
- Cleaning the stove from ash deposits must be done carefully. Scattered hot ash can be a source of ignition.
Manufacturing different types of heat exchanger
Water
The device has two sectors that heat each other. Water circulation at high power occurs in a closed circuit in the heating system tank, where it heats up to 180 degrees. After flowing around the installed tubes, the water is directed to the main system, where the heating temperature increases.
To make a water heat exchanger, prepare:
- Container in the form of a steel tank. Install it to the beginning of the system. For water circulation, 2 pipe branches are needed, the lower one for cold water inlet, the upper one for hot water inlet.
- Check the tank for leaks.
- Place copper tubular spirals inside the tank; 4 meters of pipe per 100 liters of tank is enough.
- Connect the power regulator to the copper tube.
- To prevent pressure and temperature changes from destroying the container, install the anode closer to the heating element.
- Seal the tank hermetically.
- Fill with water.
- Check the system in operation.
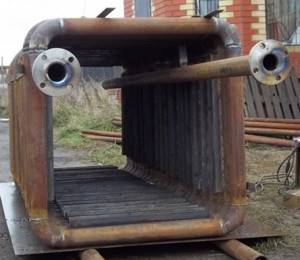
Lamellar
The one-piece design block consists of alternately placed plates with hot and cold media. There is no mixing of media, since the seal is rubber and multi-layered. Plate types are difficult to make by hand; the tightness of the internal plates is important, and this requires special equipment.
Pipe in pipe
The exchanger consists of a large pipe and a smaller one inserted inside. The media moves through a smaller pipe and is supplied to the outer pipe for cooling. Design:
- easy to manufacture;
- easy to clean;
- durable;
- applicable to any coolant;
- unlike a plate pipe, it can operate under pressure;
- By changing the size of the pipes, you can select the optimal speed for the movement of the liquid.
To prevent pipes from costing you a pretty penny, carefully calculate the material consumption.
To make the structure, select two copper tubes in diameter, one larger than the other by 4 mm for a gap:
- Side weld the tee to both sides of the outer pipe.
- Insert a smaller diameter tube, weld the ends of the large tube, fix the position of the smaller pipe.
- weld short tubes to the tees at the outlet, liquid will move through them.
- When using steel material, increase the surface area, assemble the battery from exchangers separately.
- Connect the tubes in segments, weld them alternately to both tees to form a snake.
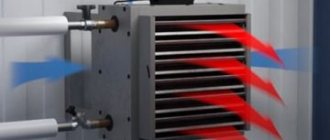
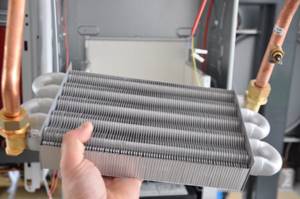
Air
The air heat exchanger consists of a radiator and a fan. The fan cools the air flows and disperses them throughout the ventilation system. These types of exchangers are installed in administration buildings for public purposes.
DIY heat exchanger
Air convector
There is not always enough finance to purchase a ready-made heat exchanger. In principle, it is not difficult to make a heat exchanger for a heating furnace. For this, copper and aluminum are used; if desired, you can completely do without welding. With proper preparation and accurate calculations, the budget is significantly saved.
First, a location is selected, parameters are calculated, and you need to decide what material to choose to make the heat exchanger. You can build a structure from an old cast iron radiator, a radiator from a car. The main thing is to take into account the conductivity of heat. It is also important to think over a set of tools, prepare everything in advance, each detail makes installation much easier.
Assembly must begin with drawing up a drawing taking into account the dimensions. If the stove is weak, a disproportionately large heat exchanger will do harm. When using copper for the coil, its length is maximum 3 m. The speed of heating depends on the length of the pipe and the number of curls. It is important to remember that distortions reduce the life of the equipment.
Air convector equipment
To twist the pipes into a spiral, a template is required. This is any available part in the shape of a cylinder. Its diameter must fit into the size of the firebox.
The sequence of actions is as follows:
- bend the pipe, wind it around the workpiece to form a spiral;
- keep the dimensions to fit the coil;
- the average design power of the heat exchanger is 1 kW per 10 m2.
How to make a booster for flushing a heat exchanger
The booster consists of a reservoir, a pump for water circulation and an electric heating element. There is no need to disassemble the heating boiler for flushing, just disconnect the pipes, connect a hose to one of them and pump a chemical solution through it into the unit. The solution will pour out through the other pipe, but you also need to connect a hose to it.
Cleaning the heat exchanger is not difficult, but it is necessary to follow safety precautions, that is, first disconnect the device from the power source, be it gas, water, or electricity. Dismantling must be done carefully; a damaged seal can lead to leakage of the structure, and the equipment will quickly fail.
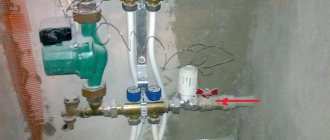
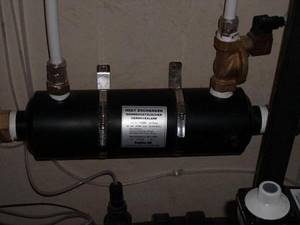
Installation features
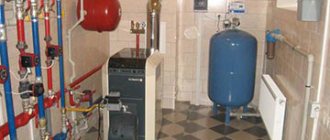
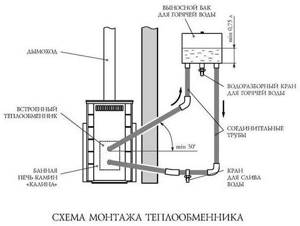
For a heat exchanger for a chimney with your own hands, the structure was disassembled in the paragraph above. Now let’s look at how the heat exchanger is installed next to the boiler. Such a device would include:
- The body, that is, roughly speaking, the lining of a furnace or boiler.
- Direct storage.
- Cold and hot supply pipes.
- Heat exchanger drain valves.
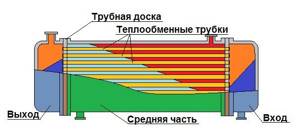
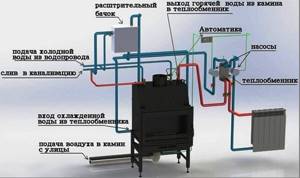
Connection diagram
The design system is shown in detail in the picture. Installing a heat exchanger on a chimney pipe will be a little more difficult technically. But, in this case, more heating and circulation of water occurs, and accordingly more heat is transferred to the room.
Tips and tricks
- It is important to design a heat exchanger correctly , calculate economic efficiency, the percentage of hydraulics, indicate heat losses, calculate the design according to the geometric parameters of the unit and its components, and calculate the thermal insulation of the device.
- simpler design for making it yourself
- You can connect the heat exchanger to the system using fittings , place one at the bottom for cold water inlet, the second at the top for hot water inlet.
- When installing the exchanger, install the pipes at a slope according to the diagram.
- When installing the unit to a furnace and using coal for combustion as a material for the exchanger, it is better to choose cast iron; it is durable and fireproof.
- To make an exchanger with your own hands, take any model as an example and follow its parameters.
- When using the stove for heating and water supply purposes, the exchanger should absorb no more than a tenth of the heat generated.
- Pellets are good fuel and cheap in price, they do not emit soot, which is very important for cleanliness.
- Check the seams at the exchanger , you must not allow them to leak; under pressure or high temperatures, the entire structure can become unusable.
- Make the calculations correctly , otherwise your work will cost you dearly.
- A heat exchanger of the pipe-in-pipe type is easy to clean , lasts a long time, is simple to manufacture, and can operate under pressure. It is considered the most acceptable option for making it yourself.
As you can see, making a heat exchanger yourself is not difficult. For a simple design, a tank, two copper tubes of different diameters, a coil and a fan are enough. Thanks to the device, you can not only heat the room, but also cool it.
Principle of operation
Modern heat exchangers may differ from each other in the principle of heating water, on the basis of which they can be divided into several types:
- Coil installed inside the heater;
- An external heat exchanger, made in the form of a rectangular tank, the heating of which is ensured by contact with the walls of the furnace;
- An external water circuit whose high heating temperature is maintained by flue gases.
You can also find models on sale in which a stainless steel water tank is already installed in the design. However, this type of heat exchanger works in the same way as a coil.
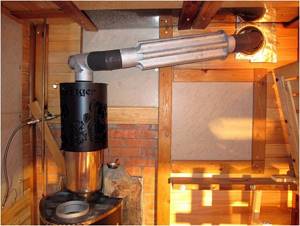
Coil
The first type of air heat exchanger for the chimney is a steel coil, which is installed directly in the firebox. It is positioned in such a way as to avoid direct contact of the pipe with the flame. In other words, it is installed at some distance from the highest temperature zone. It is best when this element is located in the path of waste products of fuel combustion. In this case, you won’t have to worry about its possible burnout, and this is a guarantee of its long service life. The built-in coil has connections at the outlet that allow you to connect pipes leading to an external storage tank.
The advantage of heat exchangers of this type is the minimum time for heating water. However, their performance is not impressive.
- For heating, heat taken from the firebox is used, and this leads to a decrease in the heater power. As a result, the heating time of the steam room increases, and this increases fuel consumption.
- The main problem remains unresolved - the hot flue gases will continue to fly out into the chimney in the same way, without bringing any benefit. Because of this, the efficiency of the unit is at a rather low level, which does not exceed 50%.
True, all of the above does not apply to brick sauna stoves equipped with a heat exchanger and several flue gas passages, which serve to maintain a comfortable temperature in the dressing room and washing room.
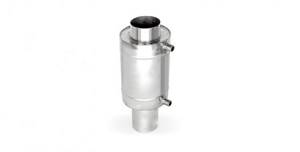
Outdoor heat exchanger
Another type of chimney heat exchanger, which allows the heat of the stove to be transferred to water, is an external hanging tank made of stainless steel. As a rule, it is installed on one of the side walls of the firebox, and heating is provided by the infrared radiation emitted by it. The advantage of this option is ease of installation, but using such a heat exchanger is not very convenient. Here the disadvantage inherent in the first type of heat exchanger manifests itself, namely, straight-line heat extraction, and in addition to this, cold water has to be constantly added to the hanging tank.
Do-it-yourself water-water heat exchanger: saving on heating
A heat exchanger is a device designed for the exchange of energy between media that do not have their own source of energy supply. For example, a fireplace in a house will not be a heat exchanger, but batteries are a clear representative of them. These devices are widely used in everyday life. They can heat a home, heat water, ventilate and condition indoor air. Therefore, everyone who likes to independently arrange a comfortable home is interested in how and where you can make a heat exchanger with your own hands and what is needed for this.
Types of heat exchangers
It will be difficult for a person inexperienced in engineering, and even without welding skills, to understand the professional systematization of heat exchangers, so let’s analyze their simpler classification.
- Water-water. Perhaps, a personal water heat exchanger can be created with your own hands, not in an industrial environment. This device consists of two sectors, one of which heats the other. In a heating tank with high power, water circulates through a fairly short and closed circuit, the temperature of which is up to 180°C. It flows around installed tubes filled with central coolant and increases the temperature of the water in the main system.
How to make a water-to-water heat exchanger from a copper tube?
- Capacity. It's essentially a steel tank. The shape of the tank is not particularly important for the efficiency of the device. It should be installed near the beginning of the heating system. It should have two tubular branches for water circulation. The entrance for cold is located at the bottom, and the entrance for hot is at the top. Of course, the tank must be sealed.
- Copper tube. Spiral blocks of copper tube are placed inside the tank. Why is copper tube used? The answer is simple - copper has the best thermal conductivity. For a hundred-liter tank, 4 meters of such pipe is enough.
- Power regulator. There are power regulators with a heating element. These are the ones you should use when making a heat exchanger with your own hands for heating a room. The regulator is connected to a copper tube.
- Anode. Temperature changes and possible pressure changes destroy the container. To protect it, an anode is most often installed near the heating element. After the above parts of the copper tube heat exchanger are securely installed, the tank is hermetically sealed and filled with water. The system can be checked.
Related articles:
Electric heated towel rail: how to choose the right one
After finishing a bathroom renovation, any owner thinks about how to fully equip it. Plumbing, furniture, washing machine –…
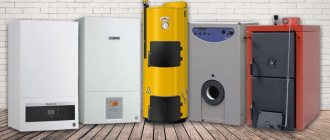
Criteria for choosing a gas boiler for your home
More modern double-circuit heating devices have now become quite popular for heating a home. They can be purchased…
How else can you heat a private house?
A private house is heated in three standard ways: either gas heating is used, or water heating is used, when hot water is run through pipes.…
Silencers for ventilation
There are no absolutely silent ventilation systems. It is impossible to completely get rid of noise, but reduce it to the level where it...
How to choose a gas boiler for your home
Despite the increase in gas costs, this type of fuel remains the most economical. When using it, the heating fee is significantly...
We use corrugation
This heat exchanger option is the simplest and requires the minimum amount of material costs. To do this, use a long corrugated pipe. It needs to be wrapped around the chimney.
Application of corrugated pipes for the manufacture of heat exchangers
The air inside the corrugation will heat up very quickly. It is enough to simply redirect it to the next room. To increase heat transfer, wrap food foil around the corrugation.
For safe operation of a heating system using heat exchangers of different configurations, it is necessary to constantly check the connections to the chimney. If you detect the slightest gaps, immediately restore the tightness of the seams.
Number of blocks: 15 | Total number of characters: 27842 Number of donors used: 4 Information on each donor:
- https://InfoTruby.ru/primenenie/teploobmennik-na-trubu-dymohoda: 3 blocks out of 5 were used, number of characters 6454 (23%)
- https://vseotrube.ru/ventilyatsiya-i-dymohod/teploobmennik: 4 blocks out of 9 used, number of characters 9918 (36%)
- https://PechnoeDelo.com/dymohod/teploobmennik-svoimi-rukami.html: 1 blocks out of 2 were used, number of characters 7327 (26%)
- https://kaminyn.ru/dyimohod/teploobmennik-dyimohoda.html: 5 blocks out of 9 used, number of characters 4143 (15%)
Related Posts
- Manufacturing and connecting a sauna stove with a water heat exchanger
- Do-it-yourself gas heater: options for the best homemade products
- Disadvantages of polypropylene pipes in home heating
- Features of analyzing water from a well: when is it necessary and what is the cost?
- A supply of hot water that is always at hand: how does an electric water heater for heating work?
- Flushing the heat exchanger of a gas boiler: cleaning methods and means of removing mineral deposits
- Which pipes are best to choose for a water well?
- Differences between gas boiler heat exchangers
- How to make water filters with your own hands?
- Which pipes for heated floors to choose: characteristics and installation methods
- Online calculation of the capacity of round and rectangular profile pipes
- Hydraulic accumulator selection and principle of operation
- How to choose high-quality pipes for water supply in an apartment
- What is a boiler for heating water: types, applications and some nuances of operation
- DIY bailer drawings and photographs: general principle of bailer operation
- What sizes of sandwich pipes are best to use for a chimney?
- Rules for laying sewer pipes
- Benefits of using a duct extension for radiators
- Hand pump for water from a well
- How to assemble a simple stainless steel chimney
- Sewage check valve
- Categories and groups of classification of water supply systems
- Do-it-yourself organization of an autonomous water supply system for a private home and cottage
- How to determine water flow by pipe diameter and pressure?
- Toilet flush cistern
Read with this
- Manufacturing and connecting a sauna stove with a water heat exchanger
- Do-it-yourself gas heater: options for the best homemade products
- Disadvantages of polypropylene pipes in home heating
- Features of analyzing water from a well: when is it necessary and what is the cost?
- A supply of hot water that is always at hand: how does an electric water heater for heating work?
- Flushing the heat exchanger of a gas boiler: cleaning methods and means of removing mineral deposits
- Which pipes are best to choose for a water well?
- Differences between gas boiler heat exchangers
- How to make water filters with your own hands?
- Which pipes for heated floors to choose: characteristics and installation methods
Types of coil heat exchangers
A heated towel rail is also a coil heat exchanger.
You can make a coil with your own hands of different designs and from several types of metal (steel, copper, aluminum, cast iron). Aluminum and cast iron products are stamped in factories, since the required conditions for working with these metals can only be achieved in production conditions. Without this, you can only work with steel or copper. It is best to use copper as it is malleable and has a high degree of thermal conductivity. There are two schemes for making a coil:
A helical pattern implies the arrangement of spiral turns along a helical line. The coolant in such heat exchangers moves in one direction. If necessary, to increase the thermal power, you can combine several spirals using the “pipe-in-pipe” principle.
To reduce heat loss as much as possible, you need to choose which insulation is best to insulate the house from the outside. It also depends on the material of the walls.
The choice of insulation for a wooden house should be made based on the vapor permeability of the insulation.
In a parallel circuit, the coolant constantly changes the direction of its movement. Such a heat exchanger is made of straight pipes connected by an elbow rotated 180 degrees. In some cases, for example, for the manufacture of a heating register, swivel elbows may not be used. Instead, a direct bypass is installed, which can be located at one or both ends of the pipe.
Review of furnaces with heat exchanger
There are built-in models of heat exchangers. Below we will look at the popular ones.
Sauna stove with boiler
Let's start with how justified such a decision is from an economic point of view. Installation of this device increases the efficiency of the equipment used. With it, exhaust gases not only fly away uselessly into the atmosphere, but also simultaneously heats water, which can then be used for bathing or other household needs. Therefore, it repeatedly justifies the fact of its installation in the long term.
Vesuvius Skif 16 VChT
Powerful and fast, with a right- or left-side location of the water heater, equipped with a mesh. It boasts a steel firebox with thick walls (8 mm), thanks to which it is not afraid of even constant exposure to high temperatures.
Tornado 20M2
Productive, heavy (125 kg). Equipped with a cast iron door, built-in heat exchanger and a spacious side casing designed for 240 kg of stones. Must be installed on a reinforced foundation. But the efficiency is impressive.
Harvia 20SL Boiler
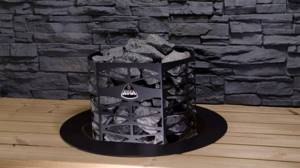
A heater from a Finnish manufacturer, weighing 75 kg, with 40 kg of stones. Modern, with a recuperator in the form of a tank, with a remote structure and a built-in condenser, designed for a steam room with an area of up to 20 m3. It has stable legs and a stainless frame, has smooth shapes and an attractive design.
Where are coil heat exchangers installed?
The heat transfer method depends on where the coil is installed:
The boiler contains coils with fins.
In the boiler, the flame heats the water in the coil, and then it disperses throughout the entire system, releasing thermal energy into the room by convection through heating radiators. Some of them also fall into the category of coil heat exchangers. For example, heated towel rails and heating registers made of round or profile pipes.
Contact with an open flame imposes certain requirements on the performance of the metal used in production. The emphasis is on reliability and durability. Therefore, steel and cast iron are most often used. The latter is considered the best option.
In a boiler and heat accumulator, heat transfer rate and corrosion resistance are of priority. In this case, there is nothing better than copper. The main thing is that it does not come into contact with aluminum. A reaction occurs between these metals, which leads to chemical corrosion.
Options for connecting structures
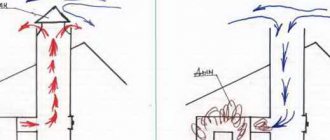
The heat exchanger on the chimney can operate in two main modes. And each of them has its own process of heat transfer from smoke to the inner pipe of the heat exchanger.
So, in the first mode, we connect a remote tank with cold water to the heat exchanger. Then water condenses on the inner pipe, causing the heat exchanger itself to heat up solely due to the heat of condensation of water vapor from the flue gases. In this case, the temperature on the pipe wall will not exceed 100°C. And the water in the tank will take a long time to heat up.
In the second mode, condensation of water vapor on the inner wall of the heat exchanger does not occur. Here the heat flow through the pipe is more significant, and the water heats up quickly. To more fully understand this process, conduct this experiment: place a pan of cold water on a gas burner. It will be clearly visible how condensation will appear on the walls of the pan and it will begin to drip onto the stove. And despite the flame being 100°C, this state will continue for a long time until the water in the pan itself warms up. Therefore, if you use a heat exchanger on a pipe as a register for heating water, then give preference to small designs with thick walls of the inner pipe - this way there will be much less condensation.
Pipe on tin - simple and durable!
This option is simple, practical and convenient. In fact, here the chimney is simply wrapped around a metal or copper pipe, it is constantly heated, and the air distilled through it quickly becomes warm.
You can weld the spiral to your chimney using an argon torch or semi-automatic welding. You can also solder with tin - if only you degrease it with phosphoric acid in advance. The heat exchanger will hold on to it especially tightly - after all, samovars are soldered with tin and last a really long time.
Corrugation - cheap and cheerful
This is the simplest and lowest-budget option. We take three aluminum corrugations and wrap them around the chimney in the attic or second floor. The air will be heated in the pipes from the chimney walls, and it can be redirected to any other room. Even a fairly large room will be heated to hot temperatures while you heat the steam room stove. To make heat removal more efficient, wrap the corrugated spirals with regular food foil.
Heat exchanger-hood - for warming up the attic
Also, in the chimney section in the attic room, you can install a heat exchanger that would work on the principle of a bell-type stove - this is when hot air rises up, and cools down slowly. This design has its own huge advantage - an ordinary metal chimney on the second floor usually becomes so hot that it cannot be touched, and such a heat exchanger will significantly reduce the risk of fire or accidental burns.
Some craftsmen also cover such heat exchangers with a mesh with stones to accumulate heat and decorate the heat exchanger stand. In this case, the attic becomes even more comfortable and can be used as a living space. After all, based on practice, the temperature of the sauna stove pipe does not exceed 160-170 °C if there is a heat exchanger on it. And the highest temperature will already be located only in the gate area. Warm and safe!
How to calculate a heat exchanger
It is necessary to make a calculation of the coil heat exchanger, otherwise its thermal power may not be enough to heat the room. The heating system is designed to compensate for heat loss. Accordingly, we can only find out the exact amount of thermal energy required based on the heat loss of the building. It is quite difficult to make a calculation, so on average they take 100 W per 1 sq. m. with a ceiling height of 2.7 m.
There must be a gap between the turns.
The following values will also be required for the calculation:
To determine the length of the pipe, you need to divide the total thermal power in W by the product of the above factors. Let's look at the example of a copper heat exchanger with a required thermal power of 3 kW - that's 3000 W.
3000/ 3.14 (Pi)*401 (thermal conductivity lambda)*20 (temperature delta)*0.01 (pipe diameter in meters)
From this calculation, it turns out that you will need 11.91 m of copper pipe with a diameter of 10 mm for the thermal power of the coil to be 3 kW.
Factors that are important to consider when installing a hydraulic circuit
Each bathhouse with equipment is individual, usually designed for the needs of each family. Making all the calculations correctly is very important for the quality of the entire bath system, the efficient operation of the stove and accompanying equipment, and achieving the optimal level of device efficiency.
When designing or selecting a heat exchanger for bath equipment, the following parameters must be taken into account:
- total area of the steam room
- type and power of sauna stove
- capacity, tank displacement based on the number of persons
- type of fuel used to light the stove
- location of the stove (in the steam room or dressing room)
- location of the liquid tank
- length and diameter of the pipeline
Attention! The water circuit for a sauna or home stove is a complex piece of equipment. Independent design and installation of a heat exchanger is highly not recommended. When calculating all technical parameters of a future water heating system, engineering knowledge and taking into account various standards, fire and operational safety rules are required. It is recommended that design and installation of the heat exchanger and related devices be carried out only by industry specialists.
How to make a screw coil
After you have made the calculation of the heat exchanger coil, you can proceed directly to manufacturing. The screw design is quite simple to make. The diameter of the loop must be selected based on the size of the tank into which installation will be carried out. It is necessary that the pipes do not touch the body.
Today, the cheapest insulation for walls is mineral wool. At the same time, it is also one of the best options.
Having compared the characteristics of insulation, the superiority of polymers becomes obvious.
You need to wind the turns onto a round blank. Copper bends easily, so no additional tools are needed. It is advisable to maintain a small space between the turns so that the coolant is in contact with the pipe on all sides. This will increase the heat exchange area, which will allow us to achieve the maximum thermal power that we calculated.
How to make a calculation
The calculation for the DHW heat exchanger is made through rather complex calculations that require special training. A detailed calculation requires drawing up a heat balance, taking into account heat transfer devices, calculating the average temperature difference, etc.
All these operations require knowledge in the field of heating engineering, which not everyone has, and the probability of error is very high even for a specialist.
A way out of this situation can be found on the Internet - online calculators, available in sufficient quantities on the websites of heating equipment manufacturers, allow you to obtain the necessary data simply and quite reliably. To check, the calculation should be duplicated several times, the results should be compared to select the most correct one.
How to make a heat exchanger from straight pipes
To make a coil using a parallel circuit, you need to have metal welding skills. For such work, steel pipes are used, which are very problematic to bend, although with a good pipe bender it is still possible. But in most cases you have to resort to welding.
Steel coil made of round pipes.
- cut straight sections of steel pipes;
- lay them parallel on a flat surface;
- connect them with elbows rotated 180 degrees - if there are no such elbows, then you can weld two corners 90 degrees each;
- Weld plugs with a pipe for connection to the heating system into the lower and upper ends.
In addition, you can install a plug in the lower part, in the center of which a hole is cut. Then a nut is welded into this hole. Its internal diameter should be suitable for a standard electric heating element. In this case, it will be possible to use a homemade heat exchanger as an electric heater.