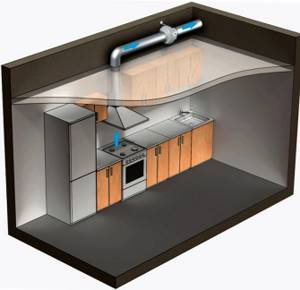
Installation of an exhaust device or ventilation pipe is simply necessary in food preparation areas. The hood helps get rid of foreign odors, which over time can become embedded in the surface or material. Also, the exhaust system will eliminate excessive amounts of steam in the kitchen, which also adversely affects furniture or finishing materials.
In order for the device or ventilation to function properly, the air ducts must be accurately calculated and the pipeline must be installed reliably.
Varieties
An air duct for a kitchen hood is a pipe-shaped structure through which air flows are transported from one point to another. These products may differ in several characteristics:
- by material of manufacture: plastic and corrugated;
- by section size;
- by section shapes: rectangular, round, flat;
- in terms of flexibility.
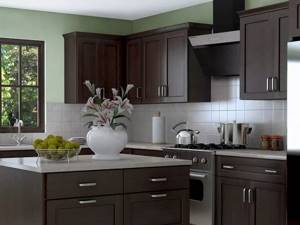
Hood with ventilation outlet: parameters and selection criteria
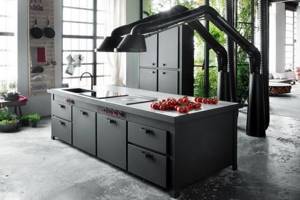
Having decided on the design of the device and the design style of the room, we proceed to the most important stage - selecting a kitchen hood. When choosing a household unit, it is important to consider the location of the gas or electric stove in the kitchen. As for the selection criteria taking into account the technical characteristics and parameters of the device, this issue is worth dwelling on in more detail.
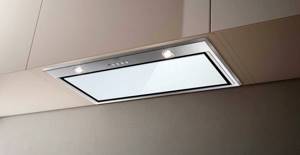
Modern hood in the kitchen interior
Performance
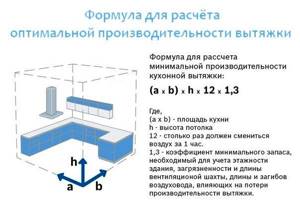
Performance is one of the main characteristics of the device, by which its ability to remove a given volume of air per unit of time (in 1 hour) is assessed.
This parameter is easy to calculate independently: the area of the room is multiplied by the height of the room and the final value is multiplied by 10. Based on the resulting figure, the need for hourly oxygen renewal is judged.
For studio apartments, it is better to purchase units with a power reserve
Experienced experts recommend multiplying the calculated value by 1.3. Using the specified coefficient, a more accurate performance of the unit is obtained, where the presence of contaminants and the length of the air channel are already taken into account. Obviously, it is better to purchase a model with a 15-20% performance reserve, because... A device that constantly operates at the limit of its capabilities quickly exhausts its intended resource and makes a lot of noise.
Kitchen hood with ventilation outlet - dimensions
In the case under consideration, they are guided by a simple relationship - the area of the working area of the hood must correspond to (and sometimes slightly exceed) the area of the stove or hob. Everything is obvious here - a small hood does not have enough power to remove the entire volume of polluted air. As a result, the kitchen will always be filled with steam from cooking food, particles of fat, and a sticky layer will certainly form on the furniture.
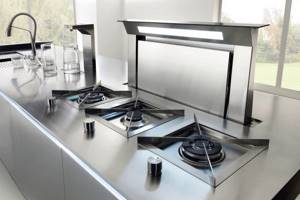
Kitchen hood with retractable work surface
Noise level during operation
Each household appliance makes a certain noise when operating. It is measured in special units - dB (decibels). Each person has an individual sound sensitivity, and therefore each person has their own reaction to noise. Values in the range from 35 to 50 dB are considered comfortable.
A quiet conversation between 2 people is audibly within 40-45 dB, taking into account a distance of 2-3 meters. If you approach the source of acoustic waves by 1 meter, the value will increase to 60-65 dB.
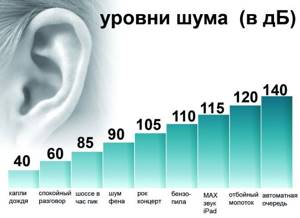
Noise levels
The limit value is 70 dB at maximum fan speed. Almost all modern devices equipped with reliable electric motors have the appropriate technical data. Despite their higher cost, this is the case when the price is completely justified. However, if noise is not important, then it is better to take a closer look at more affordable units.
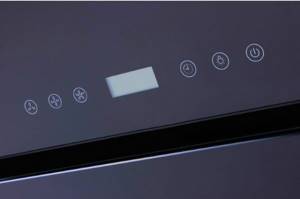
Control Panel
The ease of working with a household device also depends on the control panel. In the case of a hood, this is either a push-button control or a touch panel. Modern models are equipped with a number of sensors that monitor humidity and temperature in the working area. Taking into account the received data, the device automatically switches to the optimal operating mode, which is very convenient and practical.
Kitchen hood with touch control
When purchasing a unit with mechanical control, we recommend that you evaluate the convenience of placing controls and buttons on the front panel of the device. The main criterion is to be in line of sight, which will allow you not to be distracted from preparing dishes every 2-3 minutes.
In terms of ease of use, systems with programmable electronic control are unrivaled. Having installed the program and adjusted its operation just once, in the future it will be enough to simply select it from the available list.

Island hood with ventilation outlet
Housing materials
Hoods with bodies made of 3 main materials are available for sale. Budget models are equipped with metal structures decorated with enamels. These solutions are durable and look beautiful, but they require careful maintenance and careful operation.
The most expensive and elegant are devices made of polished stainless steel. They are distinguished by their structural lightness and ease of maintenance.
The hood is formed from modules built into the ceiling and connected to a remote filter
The main material for the housing of type 3 devices is tempered glass. This option can be safely recommended to owners with refined taste. Such devices look stylish, but cleaning them requires time and certain skills, because... marks and stains remain on the glass surface.
Before purchasing, it is important to decide on the main parameters of the device, to distinguish among them the primary and secondary ones. It is necessary that a household appliance combine functionality and an appearance that matches the interior.
Plastic
Plastic pipes can have a rectangular or round cross-section. Rectangular products are considered the best option for the kitchen interior. However, according to experts, round air ducts are the most productive because they have the lowest air resistance.
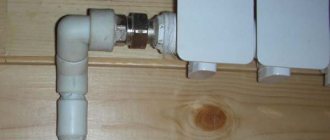
No matter what type of duct you choose, you will need to purchase several types of adapters. Take a closer look at the adapters that are installed on the exhaust outlet from the air duct and on the adapters attached to the ventilation outlet. To ensure that the adapters fit tightly, use a simple sealant.
Plastic pipes can be cut using a hacksaw. For most buyers, connecting the nodes during installation does not cause any particular difficulties.
Advantages of plastic pipes:
- in such pipes there is a low noise level from the operation of the ventilation system;
- grease, soot and dirt do not accumulate due to the smooth surface;
- product service life is more than 10 years;
- plastic pipes do not require additional care;
- Due to the light weight of the structure, no auxiliary load is created on the exhaust device.
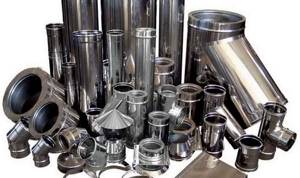
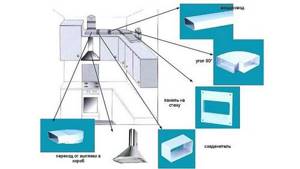
Classification of ventilation pipes for exhaust hoods
The modern market offers a wide selection of ventilation systems and their components necessary for installation. At the same time, there is a certain classification of air ducts. Exhaust pipes in a private house or apartment intended for domestic ventilation are conventionally divided into the following groups:

Pipes for ventilation can be round, square and rectangular
- Depending on the material of manufacture, there may be aluminum or plastic pipes for ventilation, as well as those made of galvanized steel.
- According to the shape of the air duct, square, rectangular or round pipes are distinguished.
- Taking into account the degree of flexibility, two types of products are distinguished - flexible and rigid boxes.
Flexible air ducts are usually made from corrugated aluminum or galvanized steel. Nowadays, rigid metal pipes are not used, since their installation is quite complicated, as is the manufacturing process itself. Such pipes should have a diameter of 100-150 mm. Aluminum products are much more expensive, although they do not have any special qualities or advantages. Therefore, they are not used when installing kitchen hoods.
Plastic air ducts have a round, square or rectangular shape. Their surface can be either rough or smooth. Most often they are white, although they are often painted in other colors, which makes it possible to choose a plastic air duct for a kitchen hood that will harmoniously fit into the interior.
We will talk in more detail about each specific type of air duct below, list their advantages and disadvantages, and also dwell on the installation features.
In addition, hood pipes can be rigid or flexible
Helpful advice! Plastic ventilation pipes are considered the most practical, since their smooth surface makes them easy to clean, and much less grease and soot accumulates inside. The smoothness of the walls also helps reduce air resistance, resulting in reduced vibration and noise.
Materials for the manufacture of ventilation plastic pipes
Plastic pipes for hoods can be made of different types of material, the main ones are the following:
- polyvinyl chloride;
- polyurethane;
- polypropylene;
- polyethylene.
The most practical and common are polyvinyl chloride pipes. Among the advantages are lightness, affordable price, and ease of installation. In addition, they provide good strength and tightness of the plastic hood box.
It is worth noting certain limitations in the use of these pipes. In particular, their use is not permitted at temperatures above 120 °C, since when heated, toxic chlorine is released, which can cause irreparable harm to health. Pipes of this type can be installed in the kitchen, bathroom and toilet, but their installation in rooms with elevated temperatures, for example, in a sauna or in a room with a fireplace, is unacceptable.
PVC pipes have an affordable price and positive performance qualities
At temperatures below 5 °C, the efficiency of pipes is lost, polyvinyl chloride becomes more fragile, so this material is not suitable for installation in premises intended for seasonal living.
Polypropylene is an excellent dielectric, has low hygroscopicity and high resistance to aggressive chemical environments. A plastic ventilation duct made of polypropylene is approximately 4 times stronger than pipes made of high-density polyethylene. However, it can be used at temperatures that do not exceed 90 °C, with the exception of the fire-resistant model with fire retardant additives - PPS.
Polyurethane is similar in properties to PVC pipes, but can withstand higher temperatures - up to 280 ° C. The most durable material for making plastic pipes is vinyl urethane, which is reinforced with a steel spiral. It should be noted that with proper use, plastic pipes will last more than 10 years.
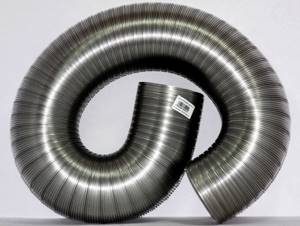
Metal air ducts and corrugations for exhaust hoods
Among metal pipes for hoods, the most popular are aluminum corrugations for ventilation with a round cross-section. They are practical and easy to install, as they can take almost any shape. No turning parts are needed for installation; just bend the pipe. In addition, aluminum ducts are durable.
Metal ventilation pipes are easy to install
The main disadvantage is that due to the corrugated surface, it is problematic to remove settled fat and soot from them. In addition, the corrugation creates a certain air resistance, which leads to the formation of additional noise.
The corrugation of the hood can be made of galvanized steel. These pipes are rigid and strong, and easy to install (like aluminum corrugated pipes), but the rigidity makes the process a little more difficult. At the same time, it should be noted that in places where the zinc coating is damaged, the pipe is subject to corrosion.
Helpful advice! Aluminum corrugation is considered more flexible, since it can be easily bent, stretched or compressed. This type of duct is recommended for use in places with turns and differences.
Aluminum and galvanized metal air ducts have common advantages:
- no additional adapters or corners are needed for installation;
- it is smooth bends, rather than sharp turns, that increase the efficiency of ventilation;
- the ability to stretch and shrink greatly simplifies the installation process;
- low cost.

Aluminum corrugations are the most popular option for installation
Made from flexible corrugated aluminum pipe
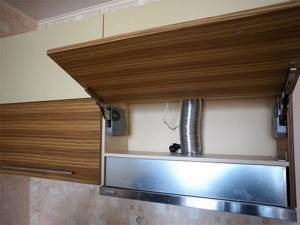
These pipes are made from thin aluminum. One of the disadvantages is the appearance of the structure. Not every buyer will like the fact that there is a metal pipe in his kitchen. In this regard, the installation of a corrugated pipe is combined with camouflage of the structure.
The advantages of the products include:
- ease of installation. Corrugated pipes are easy to cut, they bend at any angle and are secured with special clamps;
- there is no resonant hum in such a pipe;
- these products have a low price when compared with plastic construction;
- Due to the fact that there are no sharp bends in the design, the performance of the ventilation system increases.
- The corrugated pipe is produced in the form of a small piece that can stretch to a considerable length.
Requirements for hoods in houses and apartments
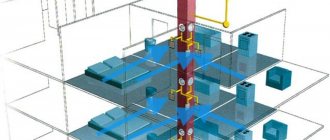
In apartment buildings, ventilation shafts are installed that provide air exchange in the apartment. Outputs to this system are necessarily present in a multi-story building. For the private sector, when designing a residential building, it is also necessary to provide for the location of ventilation ducts in the kitchen, boiler room, and bathroom. The hood can be connected to ventilation ducts or taken outside.
There are requirements that must be observed when installing the hood:
- The performance of the device must correspond to the throughput of the ventilation shaft.
- The air intake part should not be less than the width of the hob.
- The horizontal distance from the hob to the appliance is determined by the type of stove.
- For operation, it is necessary to provide a separate electrical outlet. Power from extension cords is not acceptable from a safety point of view.
- The power supply should be located far from the heating surface to avoid fire of wires and sockets.
- Connecting the device to the air duct should not have unnecessary angles or turns. Their presence can make work difficult and cause noise.
- The efficiency of the system is ensured by a constant flow of air.
Compliance with sanitary and hygienic requirements will allow you to operate the electrical appliance with maximum efficiency. Correct installation also increases safety when using hobs.
Steel
Steel air ducts are made from galvanized and stainless steel. Galvanized pipes have become very popular as kitchen products. It is worth noting that this type of pipe is becoming less popular every year.
Among the advantages, the following qualities can be noted:
- surface smoothness. Thanks to this, dirt and soot do not get stuck in the pipes, and the air flow does not slow down when moving through the pipes;
- products can withstand high temperatures;
- low price.
If we talk about the disadvantages of steel pipes, these include:
- heavy weight. Additional fasteners will be required during installation;
- in order to seal the channels, it is necessary to additionally purchase special solutions;
- if your air duct has a complex shape, pipe cutting will be required;
- loud noise when working.

Kitchen hoods with ventilation outlet: advantages, disadvantages
Cooking in a clean kitchen with fresh air is always pleasant
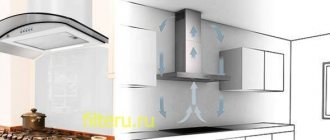
There are 2 ways to clean polluted indoor air - “drive” it through a filter system or remove it outside, replacing it with clean air. Systems made according to the first principle operate in a closed circle: intake - cleaning with filters - output. For the second case, kitchen hoods with a ventilation outlet are used, removing air masses to the outside space, to the street.
A kitchen hood with ventilation outlet is preferable to a device with similar functionality, but without an air duct. The main advantage of the installations under consideration is that contaminated air masses are quickly and effectively removed from the room, which allows for 100% renewal. For large rooms there are powerful units with 2 motors.
A kitchen hood with ventilation outlet is economical in terms of operation, because... it does not require regular filter replacement. The devices under consideration are equipped with 2 types of solutions - metal grease traps (mesh) or acrylic cleaners. The latter require periodic replacement.
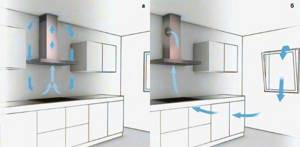
Movement of air flows with filtration and exhaust ventilation
As for the disadvantages:
- the operation of the installation is accompanied by loud noise;
- Only a specialist can perform competent installation of the air duct;
- Difficulty in installing/replacing the device yourself.
Kitchen hoods without an air vent are much easier to install; even an inexperienced owner can easily handle the installation. But these devices are not very powerful, and the high cost of replacement filters reduces the economic benefit of purchasing them to zero.
Dimensions
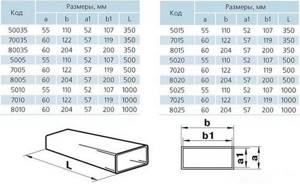
A variety of rectangular air ducts include flat products. They attract with their compact size, making them easy to hide. There are three standard sizes:
- 110x55 mm. This size is used to work with a hood whose productivity is no more than 300 m3/hour;
- 120x60mm. This design can allow more air to pass through, but not more than 350 m3/hour;
- 206x60 mm. These products are the largest. They are installed in a high-performance hood when a high level of air purification from odor is required.
It is best to choose an air duct with a similar or larger diameter than the exhaust outlet parameters. When using a pipe of smaller diameter, ventilation performance deteriorates. At the same time, the noise level will increase, and the exhaust motor will operate in enhanced mode. These components will lead to rapid wear of the equipment.
There should be a minimum number of bends throughout the duct. If they are present, it is necessary to maintain an angle of no more than 90 degrees, since each angle reduces productivity by 10%.

The total length of the air duct should not exceed three meters. Each meter reduces the efficiency of the ventilation system by 10%.
Air duct installation rules
Before installing air ducts for ventilation in a private home, it is important to carry out calculations.
The diameter of the structures depends on:
- Gas water heater power;
- Exhaust air volumes at maximum power;
- Differences in outside temperature and exhaust air temperature;
- Duct heights.
The height of the structure depends on the type of gas system. Before installation, the location where it is best to install the air duct is determined.
If a private house has a fireplace or other systems with chimneys, it will be convenient to connect the air duct to them. If there is no fireplace, an exit is made where an asbestos structure with a diameter of 120 mm or more is mounted.
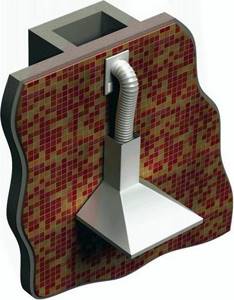
Rectangular exhaust pipe
The degree of draft depends on the height of the duct. It is better if the structure is one meter higher than the roof (at least). To ensure safety, the duct is mounted high on the wall in the house. Before installation, holes are made for fastenings, then the device is mounted to the wall using self-tapping screws. 90 degree turns are possible. They are performed using the knees. However, this reduces traction.
Ventilation pipes intended for exhaust hoods are produced in an assortment, so you can definitely buy the option you need. The correct choice of ventilation designs and high-quality installation have a positive effect on both the performance and long service life of the system.
What is the difference between a hood and ventilation?
For residential premises, there are certain sanitary standards that determine the air exchange in the room. To meet these requirements, every home must have a ventilation system that will be responsible for air circulation. It is worth noting that this system is not suitable for eliminating strong odors and smoke because it operates on the basis of natural air exchange.
Only a kitchen hood can provide local air removal. This design is installed in a room where there is an increased accumulation of unpleasant odors. Such equipment removes steam that rises from the surface of the stove and, using an air duct, takes it into the exhaust duct from the general ventilation system. This is the difference between a hood and a ventilation system.
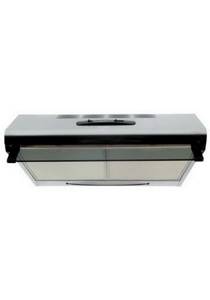
Today, hoods are divided into several types:
- flat;
- built-in;
- dome
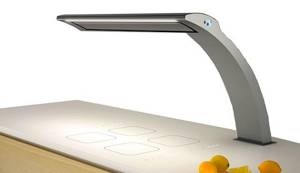
A flat hanging hood is installed under hanging cabinets or above the kitchen stove. Outwardly, they are similar to previously existing Russian air purifiers. Most manufacturers install a grease filter in this equipment, which is made of acrylic fabric. Such filters are disposable and need to be changed periodically. Such hoods are gradually becoming a thing of the past, being replaced by modern devices with cleaning filters.
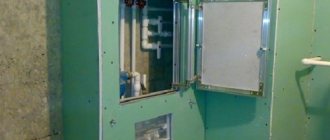
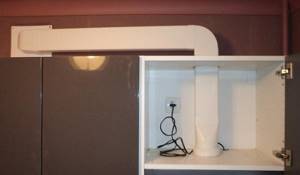
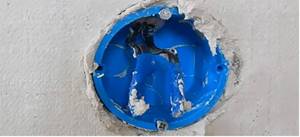
Installing an outlet with wiring inside the wall
From the tools you will need:
- Hammer;
- Wires;
- Socket;
- Screwdriver;
- Socket box;
- Insulating tape.
The best place for installation is the top of the headset, just above the level of the cabinet lid. A round hole is drilled in this area, with a diameter slightly larger than the socket box. The approximate hole size is 72 mm.
Electricity in the kitchen is completely turned off in the switchboard. The wires are first inserted into a hole in the wall, then threaded into the socket box body itself. Use a screwdriver to tighten the spacer screws.
Inserting a socket box and installing wiring inside it
The wires are attached to the contacts by tightly screwing the contact bolts; open areas are insulated with electrical tape. The socket is installed in the cradle, its body is screwed to the protective housing so that it does not play and is completely motionless.
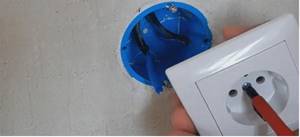
Installation of a socket in a socket box
After this, turn on the power. At the testing stage, the hood is connected to the power supply through a new socket, air draft and lighting are checked.
Connection rules
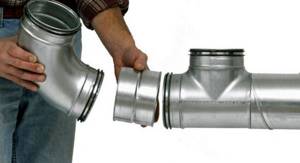
Before you begin assembling the air duct, you need to determine the dimensions of the future structure. To make the optimal selection of boxes, several requirements must be met:
- The number of turns of the duct should be minimal, because each bend reduces the efficiency of the kitchen hood by 10%. Experts recommend installing no more than three elbows.
- Make the air duct collapsible, as it needs to be cleaned periodically.
- When installing a corrugated box, you can use ordinary clamps as fastenings.
- You cannot use a blind type of fastening of the air duct to the ventilation grille. If the box becomes a tight fit, then during the period when the ventilation system is turned off, natural circulation is disrupted. To avoid this, it is necessary to install a special ventilation grille with a hole and a built-in check valve.
- Do not use channels of different sizes. You will need special adapters, which reduce the performance of the system as a whole.
- Rectangular boxes have the most attractive appearance.
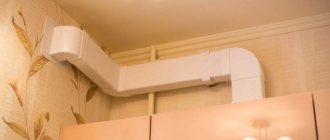
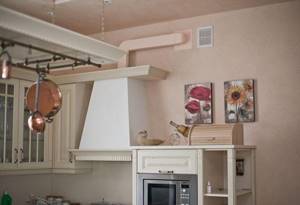
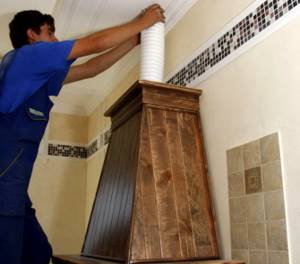
If you are thinking about how to combine the air duct with the interior of the kitchen in the most harmonious way, you will need to properly hide the structure. There are several ways to do this:
- The simplest way is to place the pipes behind a wall cabinet. You can also place the structure behind or above furniture. This method is the most accessible.
- If your kitchen has a two-level ceiling, you can install an air duct between the levels. If there is a suspended ceiling, it is better to place the structure above it. In this case, the air path will not be visible.
- To hide the pipes, you can use a special type of rectangular box. By experimenting with colors in the interior and installing pendant lamps, you can significantly transform the kitchen. At the same time, you will maintain quick access to the pipe if system repair is necessary.
- Simple painting of pipes in a color that most harmoniously fits into the overall interior is also popular. Using modern materials, you can fit the air duct into the interior of your kitchen.
Other methods:
- using camouflage over a suspended ceiling. If you have such a ceiling, you can easily hide all horizontal pipes. A special casing is put on vertical products, which is covered with material similar to the ceiling;
- use a decorative box. Today, there are a large number of types of casings in stores, which differ in shape, color and design. You can dilute the box with spotlights;
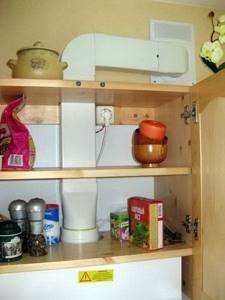
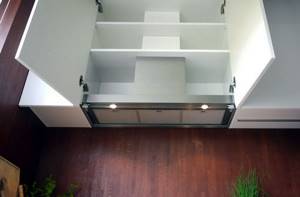
- if you are installing an air duct at the same time as purchasing furniture for the kitchen, you can install pipes inside the cabinets;
- Some owners make their own plasterboard boxes. Based on the interior of the kitchen, the entire structure is painted in the required color or covered with wallpaper.
These methods will help to effectively hide the pipes from view, thereby harmoniously fitting the design into the interior of the kitchen.
How to properly install a kitchen hood for all types of pipes: general recommendations
First of all, it is necessary to ensure thorough sealing of joints in all possible points of connection between the pipe and transition parts. In this case, the number of adapters should be minimal, as should the number of turns and narrowings. All these factors entail a decrease in the efficiency of the hood.
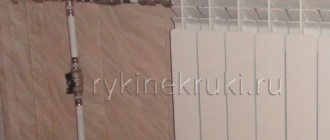
The box must be securely attached to the wall and ceiling. For this purpose, special clamps are used. If the air duct is movable, then vibration will occur in the system, which will lead to an increase in the noise level and a violation of the seal.
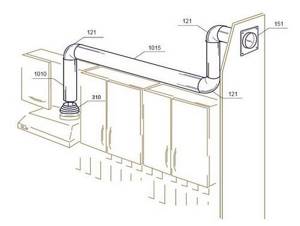
In order to learn how to properly install a hood, you should first study the rules for installing an air duct, that is, laying a pipe from the hood to the opening of the ventilation shaft. To do this, you need to choose the shortest possible path. In the case where the length of the structure exceeds 3 m, it is worth considering another air outlet option, for example, directly to the street.
The system itself should consist of a minimum number of turns, since each 90° turn of the box reduces the efficiency of the hood by approximately 10%. Such losses can be avoided by organizing a smooth rotation of the pipe using two 135° bends or elbows with different angles.
The most important thing is to carefully seal all joints
Important! Under no circumstances should the duct be turned at an acute angle - such an incorrect step will lead to a complete stop of air movement in the pipeline.
In the case where the length of the air duct is excessively large, it is better to seek the help of specialists who will help calculate the expected power losses in the pipe and the required fan power.
How to lay a plastic ventilation duct with your own hands
The process of installing air exhaust pipes from the hood to the ventilation duct is not a difficult task, so you can do it yourself, without any experience. To do this, just follow the tips below. First you need to prepare tools and materials, which should include:
- box;
- corners, adapters of a certain section;
- bends;
- return valve;
- grid for connecting ducts to the ventilation shaft;
- drill;
- hacksaw;
- Bulgarian;
- screwdriver;
- sealant.

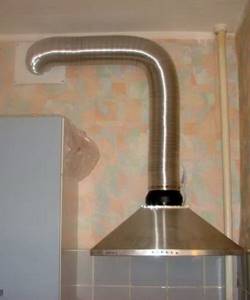
Detailed diagram of the assembly of a plastic air duct for exhaust hood
In order to install an air duct for a kitchen hood indoors, you should carefully measure the entire air route. The grate located at the entrance to the shaft must be dismantled. The channel itself must be cleaned of dust, fumes and cobwebs. After installing the hood, it is necessary to connect the box with the exhaust pipe. In this case, all joints should be coated with sealant. In this case, a heat-resistant agent is not needed, since the temperature of the air that is removed is low.
Next, the system is installed sequentially. To do this, one element is inserted into the other one by one, and the pipes are shortened to the required size, cutting off the remains with a grinder or a hacksaw. Then the box is fixed to the wall using special fasteners or clamps. The distance between them should not exceed 500 mm.
The grating is installed on the shaft wall using dowels. A grille with a hole for a pipe and for natural ventilation is considered more practical. The system should also be equipped with a check valve, which will prevent air from the ventilation shaft from flowing back into the room if the hood fails.
Testing the system, thermal insulation of pipes and masking of the hood box
The system must be tested before use. If a leak is detected, the defective areas are lubricated with sealant. In case of rattling in places where the air duct comes into contact with other structures, a pad made of polystyrene foam or polyethylene foam should be placed.

There are many interesting ways to disguise ductwork pipes.
If the system is installed in the attic, then it is necessary to insulate the ventilation pipe. It is also necessary to exclude the possibility of water getting into the air duct, as this will lead to rapid failure of the fan. Thermal insulation will help to avoid such consequences. For this purpose, it is sufficient to use slabs of polyurethane foam or mineral wool. The insulation layer should be covered with roofing felt or fiberglass, securing everything with wire.
Helpful advice! For effective installation of the air duct, it is necessary to use pipes, adapters and adapters for exhaust hood only of industrial production. The modern market offers a wide selection of these products for both round hoods and square and rectangular boxes.
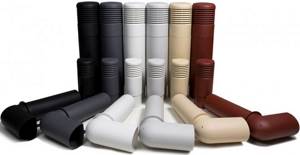
In order to disguise the air duct, you can use different methods:
- decorative screen;
- imitation kitchen hanging cabinet;
- sewing the structure into the suspended ceiling;
- painting or decorating pipes to match the walls and ceiling;
- installation of decorative boxes.
Exhaust pipes can be placed above the suspended ceiling
Masking with a screen that imitates a wall is the most popular and budget option. For this you can use simple drywall. If the boxes are installed behind a false wall or under a suspended ceiling, it is necessary to take into account the fact that disassembling the structure in the future will be problematic.
How to properly make a kitchen hood without a duct and other ways to organize an air duct
Circulation hoods constitute a special category. They are more compact and easier to install, since they do not require installation of an air duct. A hood without pipes is simply fixed to the wall or attached to the ceiling if the stove is located in the middle of the kitchen.
In addition to the traditional method of diverting the air duct into the ventilation duct, as well as installing hoods without pipes, there are other options for air exhaust. You can simultaneously connect one or two air outlet points to the channel or simply take the pipe outside. Whatever method you choose, the main thing is that general ventilation is installed in the kitchen.
If the kitchen is designed in a loft style, then the air duct can become part of the interior and does not need to be disguised
If you plan to install one intake point, then when connected to the ventilation system, natural ventilation should remain possible. If there are two ventilation ducts in the kitchen, then you need to connect the hood to one of them, and leave a passage in the other shaft for natural air exchange.
When there is only one shaft, a tee is installed at the entrance of the exhaust pipe to the ventilation shaft with the option of switching between the forced exhaust system and natural ventilation. If you need to connect two air intakes to one ventilation system at once, then check valves must be installed between the tee and the fans. Otherwise, the fans will simply interfere with each other.
The hood itself, the methods of air removal, and the air duct play a significant role in the efficiency of the ventilation system in the kitchen. When choosing pipes for exhaust, it is necessary to take into account the material of manufacture, their shape and the dimensions of the ventilation duct. If everything is chosen correctly, then, following the tips given in the article, you can easily connect the hood in the kitchen yourself.
Installation features taking into account the type of fastening
Watch the video: how to install it in the kitchen yourself
Wall-mounted devices are mounted on metal corners. The body rests on a frame, which is attached to the wall with screws. Self-tapping screws - studs - are used if there is a gas pipe running along the kitchen wall. The body is fixed to the stud with a nut at the required distance. If necessary, the distance is increased with wooden blocks.
Built-in hoods are located in a wall cabinet above the stove or on a shelf in your kitchen. For fitting, the body is placed in a cabinet. They measure the distances, check the level, in the center. If the fitting was successful, mark the holes. The cabinet is removed, passages are drilled in it to lead to ventilation.
Island devices for creating traction are fixed to the ceiling. If the air duct does not reach the ventilation, you can install a circulation exhaust device yourself. With any type of equipment, it is important to create a direct path to the shaft without kinks.
And if the installation of equipment is carried out with your own hands, then at this moment you need to pay special attention.
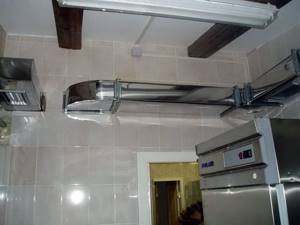
How to connect to a ventilation duct with your own hands
You will need a corrugation (box), a grille, a valve, and tools. With a direct connection, the corrugated air duct is combined with the ventilation duct. For a clear connection, a round grille is installed. A corrugated pipe can disrupt the appearance of the kitchen. It is masked in a plasterboard box or box.
Watch the video: how to install an exhaust hood in the kitchen yourself
PVC structures are assembled from pipes; if there are turns and bends, then it is necessary to connect the corresponding corners, then the resulting structure is brought to the ventilation hole. It is advisable to prepare a diagram in advance. There should be a minimum of turns.
Kitchen hood with ventilation outlet photo
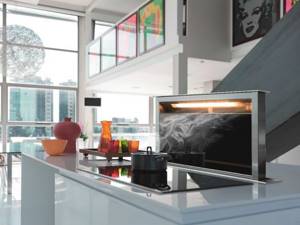
Kitchen hood with ventilation outlet
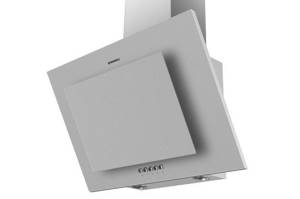
High-tech style hood with ventilation outlet
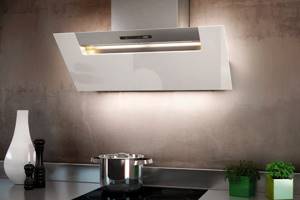
Inclined kitchen hood
Corner hoods
Choosing a suitable hood with an outlet is not as difficult as it might seem at first glance. The main condition is a responsible approach to the issue. Let your kitchen always remain cozy and the air in it clean!