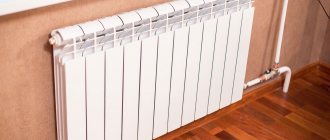
What is needed for installation
Installation of heating radiators of any type requires devices and consumables. The set of necessary materials is almost the same, but for cast iron batteries, for example, the plugs are large, and they do not install a Mayevsky valve, but instead, somewhere at the highest point of the system, they install an automatic air vent. But the installation of aluminum and bimetallic heating radiators is absolutely the same.
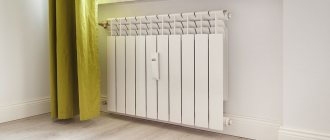
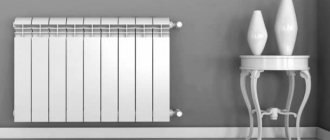
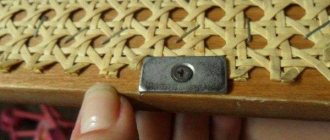
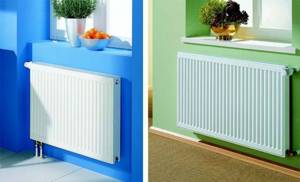
Steel panel ones also have some differences, but only in terms of hanging - they come with brackets, and on the back panel there are special arms cast from metal, with which the heater clings to the hooks of the brackets.
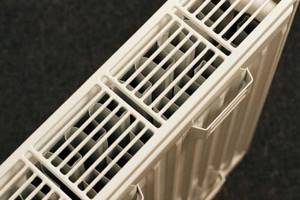
These are the arms that hook the hooks
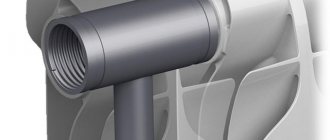
Mayevsky crane or automatic air vent
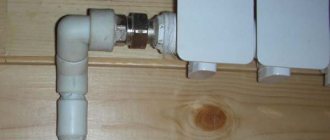
This is a small device for releasing air that may accumulate in the radiator. Placed on the free upper outlet (collector). It must be on every heating device when installing aluminum and bimetallic radiators. The size of this device is significantly smaller than the diameter of the manifold, so you will also need an adapter, but Mayevsky taps usually come complete with adapters, you just need to know the diameter of the manifold (connection dimensions).
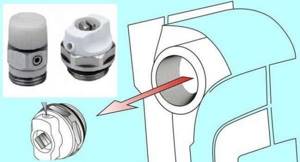
Mayevsky crane and method of its installation
In addition to the Mayevsky crane, there are also automatic air vents. They can also be installed on radiators, but they are slightly larger in size and for some reason are only available in a brass or nickel-plated case. Not in white enamel. In general, the picture is unattractive and, although they deflate automatically, they are rarely installed.
This is what a compact automatic air vent looks like (there are more bulky models)
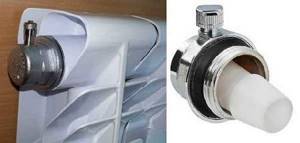
Stub
The side-connected radiator has four outputs. Two of them are occupied by the supply and return pipelines, on the third they install a Mayevsky valve. The fourth entrance is closed with a plug. It, like most modern batteries, is most often painted with white enamel and does not spoil the appearance at all.
Where to install the Mayevsky plug and tap for different connection methods
Shut-off valves
You will need two more ball valves or shut-off valves that can be adjusted. They are placed on each battery at the input and output. If these are ordinary ball valves, they are needed so that, if necessary, you can turn off the radiator and remove it (emergency repairs, replacement during the heating season). In this case, even if something happens to the radiator, you will cut it off, and the rest of the system will work. The advantage of this solution is the low price of ball valves, the disadvantage is the impossibility of adjusting heat transfer.
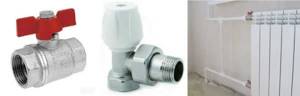
Radiator taps
Almost the same tasks, but with the ability to change the intensity of the coolant flow, are performed by shut-off control valves. They are more expensive, but they also allow you to adjust the heat transfer (make it less), and they look better externally; they are available in straight and angular versions, so the piping itself is more accurate.
If desired, you can install a thermostat on the coolant supply after the ball valve. This is a relatively small device that allows you to change the heat output of a heating device. If the radiator does not heat well, you cannot install them - it will be even worse, since they can only reduce the flow. There are different thermostats for batteries - automatic electronic ones, but more often they use the simplest one - mechanical.
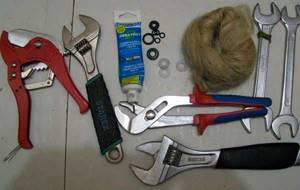
Related materials and tools
You will also need hooks or brackets for hanging on walls. Their number depends on the size of the batteries:
- if there are no more than 8 sections or the length of the radiator is no more than 1.2 m, two mounting points on top and one on the bottom are sufficient;
- For every next 50 cm or 5-6 sections, add one fastener at the top and bottom.
You also need fum tape or linen winding and plumbing paste to seal the joints. You will also need a drill with drills, a level (preferably a level, but a regular bubble one will do), and a number of dowels. You will also need equipment for connecting pipes and fittings, but it depends on the type of pipes. That's all.
Heating system type
Single pipe systems can be routed vertically or horizontally. The latter option is most suitable for low-rise dwellings: usually we are talking about one- or two-story houses. Three-story buildings are rarely equipped with horizontal wiring. Vertical wiring is usually used in high-rise buildings. This scheme consists of a pipe coming out of the flow, going to the radiator, and then to the floor. This picture can be observed in all (or almost all) rooms. Sometimes there are cases where two radiators are powered from one riser at once. However, it is not at all necessary that they be in the same room.
The strengths of this scheme are the low installation costs and stability of operation (it is quite difficult to unbalance it). However, if significant changes in the parameters of batteries and pipes occur, this can significantly affect the hydraulic resistance. As a result, only the first two sections turn out to be warm, and the rest of the device remains cold.
Single-pipe wiring is characterized by a gradual decrease in the temperature of the coolant as it moves away from the boiler. The efficiency of heating the battery of the neighbor above (with top supply) is inversely proportional to the heating of the radiator on the floor below. To avoid such situations, a law on common ownership of the heating system was adopted. Now, in order to replace a pipe or heating device, you need to obtain the appropriate permits. High-rise buildings are not so often equipped with two-pipe wiring. This is explained by the large consumption of pipes for its organization. In addition, the large dimensions complicate the balancing of the circuit.
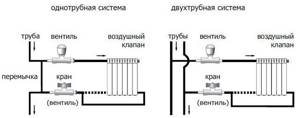
A two-pipe system in a multi-story building has the following diagram:
- Two pipes are brought into the room.
- The hotter part serves to supply coolant to the battery.
- The second removes the coolant that has cooled down after the radiator further.
Thanks to this scheme, the temperature of the coolant supplied to all heating devices is identical. It is important to remember that if there is a change in hydraulic resistance in just one radiator, the entire system can be completely unbalanced. A very small resistance will provoke the passage of almost the entire volume of coolant through this section. Therefore, in the presence of such wiring, installation of control valves is mandatory. Most often these are manual control valves or thermostats.
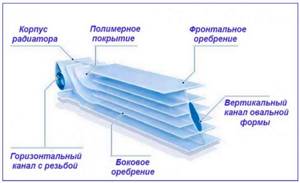
Bimetallic battery design
It should be noted that the design of bimetallic heating radiators is quite simple.
The structure consists of the radiators themselves, as well as steel pipes adjacent to them. Connection areas are processed using spot welding. The radiator is a metal pipe. There is iron inside. This is an ideal material that fits perfectly with a metal heating system. Because it holds pressure more effectively. The top of the pipe is covered with an aluminum layer. Which improves thermal conductivity characteristics. And since two metals are used in the production of the battery, it is called bimetallic. Using bimetal, heating radiators become more durable and have high performance characteristics. You can read more about the technical characteristics of bimetallic radiators here.
Bimetallic radiators can be of two types:
- with reinforced channels;
- based on a steel frame. Such devices are better protected. Since contact of water with aluminum is excluded. In addition, they are not afraid of corrosion and are much stronger than options with reinforced channels.
It is recommended to install bimetal batteries in apartments with a central water heating system based on iron and steel. It should be noted that the cost of bimetallic heating radiators is quite acceptable and depends on the power characteristics of the model and the size of the equipment.
In order for the radiator installation to be correct, it is important to accurately calculate the number of sections.
The problem of choosing radiators
There is no universal solution today.
Different problems require different solutions. For example, using aluminum radiators in apartments designed for centralized heating is a bad idea:
- Aluminum is a soft metal and may simply not withstand large differences in coolant pressure.
- The steel from which the pipes are made for passing coolant through them to the batteries gradually reacts with hot water under high pressure. The resulting salt solution interacts intensely with aluminum.
- Aluminum itself is not an inert material at all. At the point of contact with steel, noticeable corrosion reactions occur. The fact is that aluminum and unalloyed steel make up a so-called galvanic couple, that is, damage at the point of contact of these two metals is only a matter of time.
Bimetallic batteries are free from all of the following disadvantages:
- Their strength is such that radiators are guaranteed to withstand five times the coolant pressure of 10 atmospheres typical for centralized networks.
- Excellent appearance and a wide variety of shapes and sizes.
- Mounting bimetallic radiators will be more difficult than aluminum ones, but not much - with comparable dimensions, a bimetallic radiator will be about one and a half times heavier than a pure aluminum one.
Today, bimetallic radiators are used, made using two technologies:
- Steel frame - the coolant circulates through steel pipes and does not come into contact with aluminum. The “aviation” metal only covers the steel pipes to improve convection and the appearance of the batteries.
- Reinforced channels - uses the principle of reinforced concrete (two materials complement and reinforce each other). Using this technology, aluminum pipes are reinforced with steel inserts in critical areas. You should be aware that if installed incorrectly, these inserts can block the lumen of the pipe.
A peculiarity of the operation of bimetallic radiators is the characteristic tapping sound when heating and cooling the batteries (read: “Bimetallic heating radiators: which ones are better to choose”). The fact is that aluminum and steel expand differently, so there are stresses at the point of contact.
Determining the number of sections
Radiators differ in height
To ensure a comfortable temperature in the room, and the boiler does not work at the limit of its capabilities, you need to perform simple calculations, thanks to which you can find out how many sections are required for each room. You need to find out the area of the room and the power of a separate section of the heating device.
- We find out the area of the room by multiplying 3 sides - width, length and height.
- The radiator power is indicated in the product data sheet.
Requirements for devices
First, bimetallic heating batteries must be efficient and practical to use.
Secondly, the appearance of bimetallic radiators should attract the buyer and not spoil the living space itself. They should fit into the room and become a pleasant addition to it.
The third requirement for this heating device is strength. This technical requirement is considered the main one when choosing a bimetallic battery. If the strength of such a device is good, it means that it will withstand high pressure in heating during operation.
According to the passport data of the heating radiator, it is able to withstand pressure of twenty to forty atmospheres. In apartment buildings, heating pressure does not exceed the level of ten atmospheres. However, an extra margin of safety will not hurt. Bimetallic heating radiators are made of two types of metal, therefore, they have the best qualities of one and the other.
If you look at this device in section, then under the outer aluminum layer you can see the internal steel collector, and the vertical channels that conduct heat are steel.
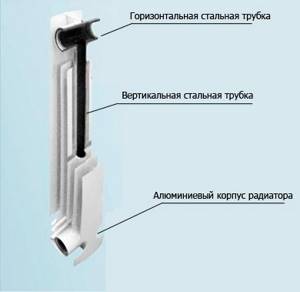
Bimetallic battery in section
Calculation example

Let's do the counting
- For example, a room has dimensions of 3x4x2.6 m. Multiplying these numbers, we get 31.2 m3.
- Conventionally, we will assume that each section of the bimetallic radiator has a power of 200 W.
- For ease of calculation, let's divide the power by 100: 200/100=2.
- Now we divide the area of the room by the resulting figure: 31.2/2 = 15.6.
- The resulting figure is the result, which reflects the number of sections required for installation in the room.
- Since it is unrealistic to purchase 15.6 sections, we round the figure up. The result was 16 sections.
The above calculation of the number of sections for a room assumes that the walls are warm and the windows are not ventilated. Otherwise, the number of radiator sections will have to be increased.
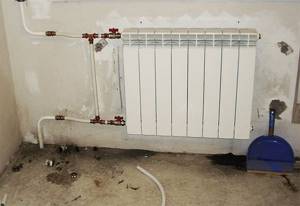
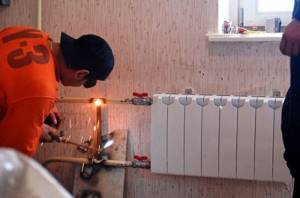
Nuances of equipment installation
An example of installing a radiator depending on external factors.
The assembly of bimetallic batteries begins with turning off the heating system. It is necessary to drain the water and rinse the communication system with non-alkaline solutions. To avoid coolant leakage, it is strictly forbidden to clean the contact surfaces of connections with abrasive materials.
On the eve of work, it is worth carefully considering the diagram according to which the radiators should be connected. A properly installed pipe should bypass the radiator. That is, during installation of one battery, the functioning of the others must be maintained. One of the best ways to connect is the diagonal method. It provides hot water supply through the top hole of the radiator. The return flow of coolant is carried out in the lower part of the radiator.
Before installing new radiators, you should remove the old battery from its hinges, having first cut it off from the system. Metal pipes must be cut at equal distances. Next, they are threaded for the fastening nuts. It should be borne in mind that the thread used on modern radiators can be left-handed or right-handed. This feature sometimes confuses residential owners who decide to carry out such work themselves. The next stage involves marking the mounting location of the brackets for bimetallic radiators. The brackets are fastened with dowels (the use of cement mortar is also possible). They must be installed in such a way that the horizontal sections of the heads in the sections lie directly on the brackets.
http:
Bimetallic radiators are installed at a distance of 5 cm from the wall. To improve convection, a gap of 15-20 cm is made between the floor and the radiator, and the gap to the window sill should be at least 12 cm. The existing protective film is removed only upon completion of the installation work. In this way, damage to the surface of the installed equipment is prevented.
A special role during installation work should be given to connecting sections. The assembly of threaded connections is carried out very carefully. All of them must be extremely tightened (but in no case overtightened). Plumbing fittings are used to seal connections. A heat-resistant sealant or a special Tangit thread must be used.
Installation of the radiator is accompanied by the adjustment of an automatic or manual valve, which is designed to eliminate air accumulated in the system. The valve can be adjusted using multi-start threads. The tightening force should not exceed 12 kg. To protect the valve working area from contamination, special filters should be installed on the supply risers of the system.
http:
The installation of heating batteries ends with their trial connection. Plumbing taps should open as smoothly as possible. Otherwise, the flowing internal section of the pipes may become clogged from the old system. In addition, sudden opening of taps can cause water hammer.
How to calculate the number of sections?
In order to get an accurate calculation, it is better, of course, to entrust this work to specialists.
If you decide to install a bimetallic radiator yourself, then you should know the calculation features. You will need two indicators: the area of the living space and the power level of the selected battery model. Manufacturers indicate the power of bimetallic heating radiators in the device passport. The size of the area must be divided by 10. This is necessary to calculate 1 kW per 10 sq.m. The resulting number should be divided by the power of the bimetallic heating device. The number obtained as a result of division must be rounded to whole numbers (up). This allows you to obtain information about the required number of sections.
Installation procedure
Work on installing bimetallic batteries must be carried out in a certain sequence:
- mark places for installing brackets on the wall;
- We secure the brackets with dowels and cement mortar (if we are talking about a reinforced concrete or brick wall) or double-sided fastening (if it is a plasterboard partition);
- We place the battery strictly horizontally on the already installed brackets;
- connect the radiator to the pipes, install a faucet or thermostatic valve;
- We put the air valve at the top of the radiator.
Note!
An air valve (preferably an automatic one) must be installed, since a small formation of gases occurs inside the device Date: September 25, 2021
Methods for connecting bimetallic radiators
Depending on the number of pipes in the circuit, heating is of two types: one-pipe and two-pipe. The diagram and connection option for the battery depend on this. In addition, the type of construction is also taken into account: one-story or multi-story building.
Connecting bimetallic heating radiators with a single-pipe system
The single-pipe system is considered the most economically profitable. More often, such wiring is used for high-rise buildings, but it is also found in private houses where there is a closed type of heating with forced circulation. Bimetallic devices in a one-pipe system are connected in series. During circulation, the coolant passes through each radiator in turn.
In a one-pipe system, all radiators are connected to one pipe, which acts as supply and return
The weakness of a single-pipe system is the temperature difference. Due to the sequential passage of the coolant, the bimetallic outer batteries on the circuit are always colder. The second disadvantage is the inability to equalize the heating of each heating device. If a regulator is installed on a bimetallic battery, due to the serial connection, during regulation, the heating temperature will still change throughout the entire system.
Connecting bimetallic heating radiators with a two-pipe system
From the name it is already clear that the system involves the use of two pipes: supply and return. Each bimetallic device is connected in parallel. This scheme ensures that the coolant passes at the same temperature through all batteries. In addition, each radiator can be equipped with a regulator to set optimal heating.
In a two-pipe system, bimetallic heating devices are connected in parallel
The downside is the need to use more pipes. However, the efficiency of such heating is better. In addition, a two-pipe system in a private house is capable of operating with natural circulation without a pump. You just need to maintain the slopes of the pipeline and radiators relative to the location of the boiler.
Connection methods and diagrams
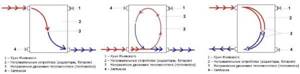
There are three methods for installing radiators:
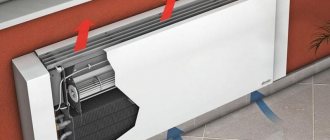
Lateral: the supply is connected to the top of the battery, and the return to the bottom, and on one side. This option is effective if the number of sections does not exceed 10. Otherwise, the remote part will heat up poorly, which will reduce the efficiency. This connection scheme is most common in apartment buildings.
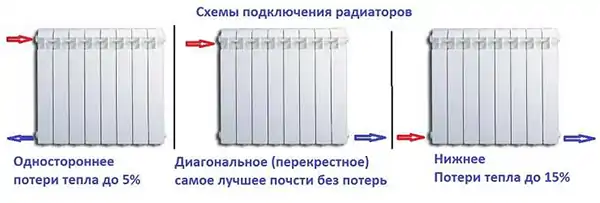
Photo 1. Three common connection diagrams for bimetallic heating radiators and their approximate heat loss.
- Bottom: both pipes are brought in from one edge, horizontally, which helps to hide the piping and create a beautiful interior. It is used in well-heated rooms or in combination with warm floors. This is due to weak heating of the radiators, through which the water must rise to the top.
- Diagonal: the supply is mounted to the top of the battery, and the return to the bottom, but on the other side. The coolant easily spreads throughout the entire volume, which makes this scheme the most effective.
When installing a new device in an apartment building, you need to choose the same option as planned by the engineers. In a private building, you should focus on personal preferences and calculations.
How to properly connect a bimetallic heating radiator in an apartment
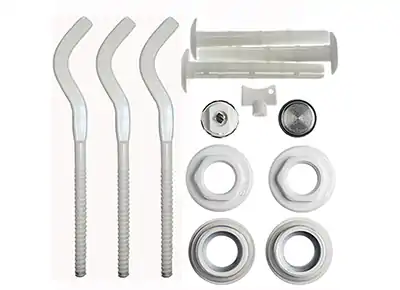
Having decided on the diagram, prepare the details:
- battery;
- pipes;
- taps;
- air release valve;
- adapters;
- shut-off valves;
- brackets;
- gaskets
Reference! Most parts come with the radiator. If some components are missing, they must be purchased in addition.
The process itself consists of 6 steps:
- Dismantling the old device. It begins at the preparatory stage by draining the water from the current battery. To do this, close the valve on the supply and open on the return. This is followed by the removal of sections of pipes adjacent to the main line. Usually they are simply unscrewed. If the connections do not have threads, use heating devices.
- Marking the battery mounting points. To do this, the radiator is applied to the intended installation location. You will need at least two people: while one holds, the second marks with a pencil (or another object, depending on the coating). It should be remembered that the pipes must be joined, and use a building level for alignment.
- Installation and fixation of fasteners. At the designated points, holes are made for fasteners. To do this you will need a hammer drill and dowels. The latter are often included in the kit.
For radiators of three sections, one fastening is enough, for radiators of 4–6 - two, for radiators of 7–9 - three, in other cases - four.
Five or more are required when installing very long structures, the use of which is impractical due to a decrease in efficiency.
- Radiator installation. The device is placed on mounts so that the horizontal collector is suspended. It should be taken into account that bimetallic radiators must be connected and tested in the original packaging. This helps when problems are detected: after unsuccessful testing, the battery can be easily dismantled and returned to the manufacturer for troubleshooting or replacement with a new one. The working device is secured by screwing into the thread. Sometimes pipes are simply welded, which depends on the specific piping.
- Installation of Mayevsky crane. The device is always included with the radiator. It is placed at any point of the battery accessible for maintenance, tightened with a torque wrench. This method of strengthening will help to avoid tension exceeding the norm. Then the shut-off valves and temperature controller are installed, if the latter is used.
- Connection to a heat-conducting heating system. Bimetallic radiators cannot be cleaned with emery or files, as the casing will deteriorate. This will lead to leaks, which in rare cases turn into a breakthrough.
Features of connecting batteries in a private house
During installation, you must follow the principles described above. Consistent placement of components and careful control over the process will create a system that can operate for a long time from the boiler without additional maintenance.
Important! When choosing a site, you should choose areas with easy access. This will make possible repairs more convenient
And it will also make it easier to turn off the taps if pressure testing is necessary.
Fundamentally, the schemes are no different from those used in apartments. Installing a bimetallic radiator is quite simple, but to maintain accuracy it would be wise to invite a specialist.
Types and features of heating radiators
In the retail chain, the buyer is offered a wide range of heat exchange radiators made from various materials in various shapes to choose from. Based on the materials used, they are all divided into the following groups.
Cast iron
Cast iron batteries are classified as classic; unlike their predecessors, modern products are painted in different colors and give them an aesthetic appearance. Cast iron radiators received a second life as decorative elements to emphasize the designer's retro style.
The molded battery sections have a pattern, are installed on legs and painted in colors that match the color scheme of the room or style.
Features of cast iron radiators are their heavy weight, high thermal capacity, and the ability to change the number of sections connected to each other by nipples. Cast iron has fairly high corrosion resistance and can be used for about 50 years; it can withstand pressures of up to 50 bar (low-grade Chinese can burst at 20 - 30 bars) and high temperatures of liquid or vapor coolant up to + 120 ° C. Due to the relatively low thermal conductivity, the thermal power of one cast iron section is 140 - 150 Watts.
The most famous manufacturers of cast iron batteries: the Russian company Nova (produces budget options), companies Viadrus, Konner, Bohemia with higher prices for their products.
Rice. 2 Designer batteries made of cast iron
Aluminum
Heat exchangers made of aluminum, or more precisely its alloy with silicon (silumin), today occupy a leading position in use in any heating systems. They are manufactured in the form of separate aluminum sections, inside of which passage channels are created for coolant circulation.
Methods of industrial production of aluminum radiators - casting and extrusion.
The main physical and operational characteristics of aluminum heat exchangers: light weight, heat transfer of one standard section 80 by 80 mm - about 180 W, maximum coolant pressure 10 - 15 bar for cheap products and up to 50 bar for expensive Italian ones, working environment temperature no more than 115 ° WITH. Due to their high thermal conductivity and low thermal capacity, they can quickly warm up a room.
The disadvantages of radiator heat exchangers made of aluminum include low strength characteristics for certain operating conditions (silumin, unlike pure aluminum, is a brittle alloy). Also, aluminum radiators have low corrosion resistance when used in a working environment with a high or too low pH value.
If the pH of the coolant exceeds the range of 7–8 units, either increasing or decreasing, the protective Al2O3 oxide film on the metal surface, which gives it anti-corrosion resistance, is destroyed.
Rice. 3 Construction of an aluminum radiator section
The metal constantly forms a new protective film to replace the destroyed one, while its layer gradually becomes thinner until a fistula forms. Also, the process of the appearance of a new oxide is accompanied by the release of hydrogen H2, which further accelerates the destruction of aluminum.
If a consumer leaves water in the radiators of an aluminum heat exchanger for the summer, the appearance of hydrogen from the formation of an oxide film and the activity of bacteria can even lead to rupture of sections of a closed battery.
Aluminum heat exchangers are not recommended for installation in a central heating system due to the inability to control pH.
The best manufacturers of such radiators are Italian companies Green, Sira, Group, Fondital.
Bimetallic
As the name bimetals suggests, radiators of this type use two types of metals - steel and aluminum.
A bimetallic radiator consists of sections, each of which is a steel pipe channel placed in an aluminum heat exchanger.
Despite the heavier weight compared to aluminum ones, the introduction of an internal steel collector into the design made it possible to increase the strength and temperature characteristics of bimetallic batteries. They can withstand a coolant pressure of 50–100 bar (depending on the manufacturer) at temperatures up to 135 °C. In this case, the hydrogen index of the working environment does not play a significant role. The heat output of bimetallic radiators is about 160 - 170 W.

Rice. 4 Design of bimetallic heat exchangers
Steel
Inexpensive, simple and reliable radiators made of steel come in two types - panel (Fig. 5) and tubular.
The simplest tubular convection radiator consists of two front metal sheets, between which there is a pipeline with heat exchange plates through which the coolant circulates. Heating of rooms occurs due to convection of air masses.
On top, the outer metal panels are covered with a protective layer of varnish, applying it using high-temperature firing in ovens.
Steel heat exchangers are produced using spot welding technology; they are not sectional or collapsible.
The maximum operating fluid pressure thresholds for tubular products are 9 - 15 bar, for panel products 5 - 11 bar, the heat transfer of one battery ranges from 1200 to 1650 watts. Steel radiators can withstand operating environment temperatures up to 115 °C. The hydrogen index is not significant for steel and can deviate from the neutral value of 7 units by several points in one direction or another.
However, the problem of corrosion is urgent for steel, that is, the high oxygen content in water leads to its rapid destruction.
Therefore, it is not recommended to install steel radiators in communal apartments and supply coolant to them through pipes that are not protected from oxygen diffusion.
Also, steel panel heat exchangers are sensitive to pressure changes and often cannot withstand water hammer, which in centralized heating networks reaches values of the order of 35 - 40 bar.
Installation of bimetallic radiators with your own hands in an apartment, video, diagram
Do-it-yourself bimetallic radiators
We live in a place in the world where climate conditions simply force us to heat our own homes when it’s cold outside. And therefore, the issue of operating heating systems is one of the first places among all housing and communal problems.
Sometimes the situation forces owners to update old heating units, which requires a complete or partial replacement of heating devices in the apartment. In this case, most residents like to replace old cast iron radiators with more modern ones - bimetallic ones. And it’s not surprising, because such heating elements not only have a high level of heat transfer and corrosion resistance, but also look very beautiful.
But how to install new heating units? Is it possible to do this kind of work yourself? Let's talk about how to install bimetallic radiators in an apartment with your own hands, you can also watch a detailed video of installing bimetallic heating radiators with your own hands from a specialist!
- First you need to determine the parameters of the installation work. In this case, the heating grille should be placed at a distance of 5 cm from the floor, which will subsequently ensure free air flow. 5 cm is removed from the window sill for the outflow of air mass. The battery will need to be moved 3-5 cm away from the wall surface.
- Having made the housing office employees popular, you can begin the process of installing the body kit of the heating device. To do this, you will need 3 pass-through plugs, thanks to which 2 American inputs will be connected, as well as an air vent (with its help, air is removed from the system).
- After completing the assembly of the battery body kit, we will move on to work on the riser. First of all, we remove the outdated heating device with an angle grinder, cutting off the component in the area of the riser. Then we make a thread on the sections, onto which we subsequently install a tee with taps and an American one. After this, we place a bimetallic battery in place of the removed heating element.
- Having made the necessary markings on the wall surface, we set up the spider fasteners and hang the heating device in a strictly horizontal position. We combine it with the heating system.
- The last step is to sand and paint the pipes.
Now installing a bimetal radiator with your own hands can be completed! We are confident that, following our recommendations, you will be able to easily replace old heating elements with new and modern batteries.
DIY installation
Bimetallic batteries do not belong to the category of complex heating equipment. However, due to the specific features of installation, it is recommended to entrust the work to specialists in this field. The cost of installing bimetallic heating batteries differs in different regions, the average price is from 3,500 rubles. If the owner of the house decides to install a bimetallic heating radiator with his own hands, then it is necessary to become familiar with the rules and features of connecting devices.
Installation recommendations
Before starting work, you must read the technical documentation for your specific radiator model. It is worth paying special attention to the features of the device, operating and installation requirements. Next, you need to decide on the list of necessary materials and tools.
Main stages of preparation for installation:
- Assemble the radiator according to the manufacturer's instructions and check its configuration for the presence of all elements.
- Turn off the heating system and make sure there is no water in the pipeline.
- Familiarize yourself with all SNiP requirements that must be complied with.
- Select connection diagram.
To carry out installation, you must have the skills to carry out plumbing work; if necessary, consult with specialists. The use of abrasive tools must be avoided.

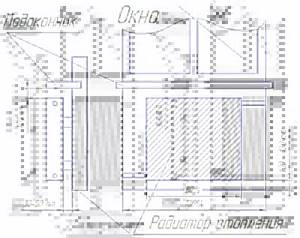
Installation and location rules
Installation of bimetallic devices must be carried out in accordance with the instructions contained in SNiP. Each heating system must comply with certain standards and requirements. Deviations, inconsistencies or non-compliance with regulations can result in serious accidents, damage and ineffective operation of equipment.
For efficient operation of devices and air circulation, it is necessary to follow recommendations for the location of batteries and dimensional elements of the room.
Requirements:
- The vertical axis passing through the center of the battery must coincide with the middle of the window. The permissible deviation from the norm is 2 cm in one direction or another. The battery should be approximately 20% narrower than the window opening.
- Excessively wide window sills are not allowed. The permissible excess should not be more than 30–50%.
- The distance from the floor to the bottom edge of the radiator should be at least 12–14 cm, and from the top of the radiator to the window sill - 10 cm.
- The distance between the rear plane of the heater and the surface of the wall on which it is installed should be within 3–5 cm. The exception is walls with heat-reflecting surfaces.
- If there is no radiator under the window, then the cold air descends along the wall and spreads along the floor. Warm air from the installed radiator prevents the penetration of cooled air masses from the window to the floor.
Required materials and tools
Installation of radiators requires the use of conventional and special tools. To mark the location of the brackets you need: tape measure, ruler, level, marker.
To install the brackets, you will need a drill or hammer drill, a corresponding drill of a certain diameter, and dowels. To connect to the heating network, you must have: a set of adjustable and open-end wrenches, universal clamping pliers, fum tape.
Marking places
First, you need to decide on the location of the radiator and the number of suspension points, the number of which depends on the size of the battery. SNiP recommends fixing at least 2 brackets at the top and 1 at the bottom.
Procedure:
- We measure the distance from the top point of the radiator to the mounting location of the bracket. We mark this value on the wall where the device is installed.
- We measure the distance to the second fastening point and put a mark on the wall, using a level.
- If there are more than two attachment points, then we continue measurements to the next attachment points.
- We draw a horizontal line (using a level or level) on which all attachment points should be located, and drill holes.
- We make similar measurements and markings for the bottom row brackets.
Installation
Installation of bimetallic heaters is carried out taking into account all requirements and procedures for carrying out operations.
Instructions:
- Select a suitable connection diagram.
- Mark the location of the brackets in accordance with the above method.
- Drill holes in the marked places and secure the brackets. If there is a plasterboard partition, it is necessary to fasten it on both sides.
- The radiator must be assembled. Do not remove the protective film. Install the radiator on the brackets, first checking their horizontal installation using a level. Reverse battery slope is unacceptable.
- Connect the heating system pipes to the radiator using the necessary tools. During installation, it must be taken into account that bimetallic radiators use left- and right-handed threads.
- To seal joints, you can use flax with sealant, FUM tape or other materials intended for this purpose.
- Install an automatic air vent in accordance with SNiP standards.
After installation is completed, it is necessary to remove the protective film from the devices and smoothly open the valve to allow coolant to flow in. Bleed the system. Inspect the battery for leaks at the connections.
Expansion of additional sections
To independently build up sections, it is enough to have the following tools: a regular installation kit, as well as a radiator, pipe wrench, special nipples from the section kit, and paronite gaskets for joining. Work should begin by draining the coolant from the system, as well as eliminating the possibility of its supply.
Then you need to dismantle the radiator: disconnect the heating system pipes from the battery and remove it from the brackets. The dismantled device must be carefully inspected and cleaned of dust and dirt using special means. Carefully inspect the condition of the threaded part and surfaces that ensure tightness.
If it is necessary to add a large number of sections, then there may be a need for additional fastening. For ease of work, the radiator must be laid on a flat surface, which will help to avoid various types of distortions during connections, which can subsequently affect the strength and tightness of the connections.
Next you need to assemble the battery with additional sections. To do this, move the elements and install gaskets with nipples between them. Before installation, it is necessary to check the quality of gaskets, nipples, and thread condition.
The connection begins with carefully tightening the nipple. It has two types of threads designed for screwing in different directions. When the nipple is tightened, the sections located opposite each other are connected. To carry out this type of work, you cannot do without a special radiator key.
After preliminary connection of all nipples, it is necessary to tighten them tightly, ensuring uniform screwing to avoid distortions and thread breakage. This completes the assembly of the radiator, it is ready to connect to the heating system.

Operating rules and problem solving
All necessary information on use is presented in the technical and operational documentation that comes with the device.
Rules for operating radiators:
- Before the onset of the heating season and at its end, carry out a number of preventive works related to the inspection and cleaning of batteries.
- Do not leave the system without coolant for a long time.
- The shut-off valves must be opened and tightened smoothly.
- Keep the air vent hole clean.
- Ensure unhindered flow of warm air from the battery, avoid covering the surface with any material or box.
- To protect the internal surfaces of the radiator from the effects of low-quality coolant, it is recommended to use filter elements.
Bimetallic devices are reliable in operation, provided that all requirements for use are met. But they are also prone to malfunctions.
The most common are:
- presence of battery leakage;
- complete or partial lack of heating;
- various kinds of noise in the heating system.
Compared to other types of batteries, bimetallic ones are the most resistant to the effects of low-quality coolants. However, their constant influence negatively affects the condition of the radiator walls. Deposits on internal surfaces reduce the cross-sectional dimensions of pipes and reduce the speed of fluid movement, which leads to a decrease in heating temperature.
Installation
If the location for mounting the bimetallic heating radiator is clearly defined, then you can proceed with the actual installation. On the radiator, measure the distance from the top point to the mounting location of the bracket. The point is marked on the wall. Using a tape measure, measure the distance to the second of each subsequent point and draw a horizontal line between them. For the latter, you need to use a level or level so that all the holes are in the same plane. Using a hammer drill, holes are drilled for fastenings for a bimetallic radiator.
The holes are cleaned of dirt and dowels are inserted into them. After this, the brackets for the heating radiator are screwed in. The radiator is placed on a flat, soft surface. Use a clean cloth and cleaning spray to prepare the threads for the additional modules. The Mayevsky valve, plugs and American female ball valves are screwed in. When winding flax, you should not try too hard, and also save money. It should be in moderation so that the joint is reliable. Next, the radiator is placed on the mounted brackets. The heating system pipes are connected to it.

If the replacement is carried out in an apartment where there is central heating and the pipes have already been installed, then you will need to make the correct calculations and go from where the pipes go. In some situations, trimming of elements and cutting of new threads is required. Next, the installation of the cranes is carried out. If expansion is necessary, then it is necessary to use a transition coupling and a piece of pipe of the required diameter. A video on how to install bimetallic heating radiators with your own hands is below.
Heating system connection options
In addition to choosing the radiator itself, during installation you will also need to decide how to connect it to the centralized network. There are several different options available to you, each of which has its own scope of use:
- Diagonal connection. This scheme is the best choice for long multi-section heating batteries. It is distinguished by the fact that the water supply pipe is attached to the pipe from above on one edge of the radiator, and the outlet pipe is attached to the lower pipe on the other side. Among the disadvantages of such a system are difficult repairs in case of problems: the scheme does not imply removing the battery without completely turning off the heating.
Radiator connection options
Important! When supplying water from below, you will lose about 10% of the possible heat. . Bottom connection
This wiring diagram looks the most inconspicuous. It is used if pipes are located inside the floor or hidden under baseboards. The supply and outlet pipes are directed perpendicular to the floor surface. The main disadvantage is that this system involves the greatest possible amount of heat loss. Lateral one-way connection. It is the most common and effective. Maximum heat transfer is ensured by connecting the inlet pipe from above, and the outlet pipe from below on the same side of the battery. When inverted, the heating power is significantly reduced, so it is not recommended to swap pipes.
- Bottom connection. This wiring diagram looks the most inconspicuous. It is used if pipes are located inside the floor or hidden under baseboards. The supply and outlet pipes are directed perpendicular to the floor surface. The main disadvantage is that this system involves the greatest possible amount of heat loss.
- Lateral one-way connection. It is the most common and effective. Maximum heat transfer is ensured by connecting the inlet pipe from above, and the outlet pipe from below on the same side of the battery. When inverted, the heating power is significantly reduced, so it is not recommended to swap pipes.
Important! If the distant sections of the battery are not warmed up enough, a water flow extension is used.
- Parallel connection. It occurs through a heat pipe built into the heating system. The withdrawal is implemented in the same way. This system allows you to replace batteries without turning off the central heating, but the main disadvantage is that if there is insufficient pressure in the system, the batteries do not warm up well.
Important! Connecting a heating radiator with your own hands in this way is quite difficult; it would be better to entrust this work to experienced installers.
- Serial connection. In this case, heat transfer through the system occurs due to air pressure in it. Excess air is drained using a Mayevsky tap. The main disadvantage of such a system is also the impossibility of repairs without shutting down the entire heating system.
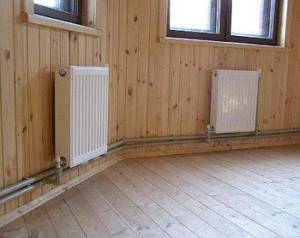
Radiators with bottom connection
You can hide bulky pipes by making heating with a bottom connection. Of course, standard systems are more familiar to understand, when the coolant enters from the top or side and exits downwards. But such a system is rather unaesthetic, and it is difficult to cover it with a screen or somehow improve it.
Bottom connection principle
With a bottom connection, the main part of the pipes is hidden under the floor covering, sometimes causing difficulties during seasonal inspection or preventative repairs. But there are also advantages - there is a minimum of complex bends or joints, which reduces the risk of leaks or accidents.
The connection diagram for heating radiators with a lower type is simple - the return and coolant supply pipes are located nearby, in the lower corner of the radiator. It is also possible to connect pipes from different sides of the radiator. The upper holes (if any) are screwed in with a plug.
The radiator installation kit is identical to the standard one:
For the bottom connection, it is best to use bimetallic radiators. they are strong, durable, and have excellent heat transfer due to heating, radiation and convection. Even when using a lower connection, heat loss will not be more than 15 percent. Thanks to the supply of hot coolant from below, the bottom of the battery heats up and warms up the top by convection.
Selection and installation of radiators
Bimetallic heating radiators are recommended for bottom connections; they are easy to assemble, install and repair. Radiator sections can be removed, added, or replaced if damaged.
When purchasing, it is better to give preference to domestic manufacturers; it is important to check the integrity of the battery and packaging. The documentation must be understandable and written in Russian. Before installation you need to make markings
it is done with a pencil on the wall. In this case, the points where the brackets will be installed are marked. The bottom of the radiator should be at least 7 cm from the floor and 10 cm from the window (if located under the window). Distances are maintained so that the air in the room circulates freely. The distance to the wall should be about 5 cm
Before installation you need to make markings. it is done with a pencil on the wall. In this case, the points where the brackets will be installed are marked. The bottom of the radiator should be at least 7 cm from the floor and 10 cm from the window (if located under the window). Distances are maintained so that the air in the room circulates freely. The distance to the wall should be about 5 cm.
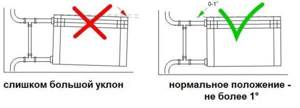
For more efficient coolant circulation, heating radiators are installed with a slight slope. This also eliminates the accumulation of air in the heating system.
When connecting, it is important to follow the markings and not confuse the return and supply. If connected incorrectly, the radiator can be damaged and its efficiency reduced by more than 60 percent. The following types of bottom connection are distinguished:
The following types of bottom connection are distinguished:
- one-sided supply - pipes come out from the corner below and are located side by side, heat loss can be about 20 percent;
- versatile supply – pipes are connected from different sides. such a system has more advantages, since the length of the supply and return lines is shorter, and circulation can occur from different sides, heat loss is up to 12 percent;
A top-down connection is also used. but in this case, it will not be possible to hide all the heating pipes, since the coolant will be supplied in the upper corner, and the outlet will be from the opposite lower corner. If the heating radiator is a short-circuit one, then the return flow will be discharged from the same side, but from the lower corner. In this case, heat loss is reduced to 2 percent.
If you plan to connect heating radiators yourself, it is important to follow installation and safety precautions. The coolant must be drained during installation or repair; the batteries are cold. If in doubt, it is better to call a specialist or use a training video lesson, since with a lower connection it will be difficult to repair areas
It is better to plan a heating system with bottom heating together with the layout of the house
If in doubt, it is better to call a specialist or use a training video lesson, since with a lower connection it will be difficult to repair areas. It is better to plan a heating system with bottom heating together with the layout of the house.
How to install correctly
Now about how to hang the radiator. It is very desirable that the wall behind the radiator is level - this makes it easier to work. Mark the middle of the opening on the wall, draw a horizontal line 10-12 cm below the window sill line. This is the line along which the top edge of the heating device is leveled. The brackets must be installed so that the top edge coincides with the drawn line, that is, it is horizontal. This arrangement is suitable for heating systems with forced circulation (with a pump) or for apartments. For systems with natural circulation, a slight slope is made - 1-1.5% - along the flow of the coolant. You can’t do more - there will be stagnation.
Correct installation of heating radiators
Wall mount
This must be taken into account when installing hooks or brackets for heating radiators. Hooks are installed like dowels - a hole of a suitable diameter is drilled in the wall, a plastic dowel is installed in it, and the hook is screwed into it. The distance from the wall to the heating device is easily adjusted by screwing in and unscrewing the hook body.

Hooks for cast iron batteries are thicker. This is a fastener for aluminum and bimetallic
When installing hooks under heating radiators, keep in mind that the main load falls on the upper fasteners. The lower one serves only to fix it in a given position relative to the wall and is installed 1-1.5 cm lower than the lower collector. Otherwise, you simply will not be able to hang the radiator.
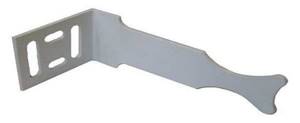
One type of brackets
When installing the brackets, they are applied to the wall in the place where they will be mounted. To do this, first attach the battery to the installation location, see where the bracket “fits,” and mark the location on the wall. After placing the battery, you can attach the bracket to the wall and mark the location of the fasteners on it. In these places, holes are drilled, dowels are inserted, and the bracket is screwed. Having installed all the fasteners, hang the heating device on them.
Floor fixing
Not all walls can support even lightweight aluminum batteries. If the walls are made of lightweight concrete or covered with plasterboard, floor installation is required. Some types of cast iron and steel radiators come directly with legs, but not everyone is satisfied with their appearance or characteristics.
Legs for installing aluminum and bimetallic radiators on the floor
Floor installation of heating radiators made of aluminum and bimetallic is possible. There are special brackets for them. They are attached to the floor, then the heating device is installed, and the lower collector is secured with an arc to the installed legs. Similar legs are available with adjustable height and some with a fixed height. The method of fastening to the floor is standard - with nails or dowels, depending on the material.
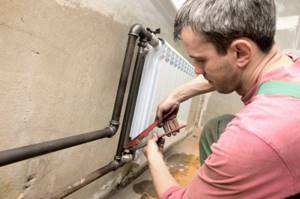
Carrying out installation
Installation of a radiator in an apartment or house is carried out in the following sequence:
- Make the markings with your own hands and install the fasteners. The second procedure is carried out according to a simple scheme: holes are drilled, dowels are inserted, brackets are attached and they are secured with screws. If the mount is floor-mounted, then it is secured to the floor with screws. Sometimes it is fixed on the bottom of the wall.
- Installation of components. They install a device that removes air. It can be automatic or manual. It is placed with your own hands on the upper manifold opposite the hole to which the inlet pipe can be connected. A plug is placed on one of the collectors. These elements are installed according to the battery connection diagram. If the diameters of the collectors and pipes are different, adapters are mounted on the free holes.
- If the heating system of the apartment is single-pipe, then it is necessary to install a bypass - an additional pipe that connects the inlet and outlet pipes. Ball valves must be installed at the ends of the bypass.
- Installation of control and shut-off valves. The control valve is a valve with a thermal head. At this stage, only the valve is screwed in. It is placed on the hole to which the inlet pipe will be connected. The thermal head is set aside. If such a valve is used, a shut-off valve is placed on the outlet hole. A replacement for this pair of fittings are ball valves. Shut-off valves are mounted as follows: fittings with American fittings are screwed into the radiator holes, and the base is fixed to the pipes. If the pipes are metal, tow is wound on the threads.
- Hang the radiator on the brackets. There is no need to remove the protective film from the bimetallic device before or during this process. She will protect the beauty of the product as long as all work continues. It is necessary to tear the film in those places that will come into contact with the fastener.
- Connect the inlet and outlet pipes. They are connected depending on the selected connection scheme. The process involves attaching the base of a tap or valve to a pipe with an American connection and tightening the American connection with your own hands. The connection may be different, because not every shut-off valve has an American connection. It may be that first a shut-off valve is connected to the radiator, and then it is connected to the pipes. In this case, they can be connected by crimping, welding or under pressure.
- The radiator and the entire heating system circuit are pressure tested. In this case, at first the taps are almost completely closed. Then they gradually open. A sudden opening can cause water hammer.
Connection diagram
Any connection method can be used in a one- and two-pipe heating system. In the first type, the batteries are installed so that they form a single chain through which water flows from top to bottom. It is not profitable to install such a heating system in a private house, since the first radiators will heat up very well, but the rest will heat up poorly. This occurs due to the flow of cooled coolant to the last devices.
A two-pipe system is more profitable, since hot water comes from one riser, and cooled water flows into the other. This type of heating network piping is carried out in all private houses, because it allows you to maintain a constant specified thermal regime and makes it possible to control this regime.
Important nuances of installing radiators
Important nuances of installing radiators
All other things being equal, diagonal connection of radiators is the best option. This method is especially suitable in situations where batteries from multiple sections are connected.
The side connection option has no significant differences from the diagonal technology if the installation of a unit consisting of a relatively small number of sections is carried out. The diagonal connection begins to outperform all other options in cases where the unit consists of more than 6-8 sections.
All scratches and other damage must be covered with a similar paint and varnish composition as soon as possible to prevent further expansion of the damage. It is better to buy a suitable finish in advance, so as not to waste time searching for it later, because... Self-installation of the battery rarely goes without damage.
It is strongly recommended that you have the support and assistance of an experienced technician who will ensure that nothing is damaged during the battery connection process. If this is not possible, be extremely careful.
Steel radiators
Heating appliances made of steel are recommended for installation in low-rise residential buildings, where the operating pressure does not exceed 13 atm and the coolant temperature does not exceed 110°C.
Steel radiator designs:
- type 11 is the simplest model, consisting of 2 sheets welded together with stamped recesses and a plate connecting them with U-shaped imprints;
- Type 12 or 21 - devices contain 1 convection row and 2 radiating elements;
- Types 22 and 33 are more complex designs, made of 2 or 3 panels to increase the power of the device.
The thickness of the metal wall is 1.2-2 mm. Panel height 200-900 mm, width 300-4000 mm, depth 60-170 mm. The design of steel radiators is discreet, which allows the installation of radiators in rooms of any style. In addition to white and gray, colored or patterned panels are produced.
Advantages of steel radiators:
- fast heating;
- small volume of coolant;
- high heat transfer, efficiency reaches 75%;
- possibility of temperature control;
- modern design;
- absence of sectional connections subject to periodic leaks;
- affordable price.
Disadvantages - instability to water hammer, limited operating pressure, instability to corrosion. It is recommended to use antifreeze as a coolant to prevent steel oxidation. If the system is filled with water, it should not be left dry for more than 2 weeks per year.
Aluminum radiators
Heating devices are made from duralumin or silumin alloys. They are sectional structures with a lower air intake, where the air passing through the “mine” is heated and moves upward. In each section, garbage trays can be installed at the bottom, where sediment from the coolant falls.
Aluminum radiators can withstand short-term pressure increases of up to 18 atm, are durable, and less susceptible to corrosion than steel ones. The weight of one section should not be less than 1.3 kg. Those that are too light and cheap will not last long, since the thin metal is susceptible to rapid destruction.
Most often, when installing heating radiators in a house, devices with a depth of 80 or 100 mm are used. The number of sections can be different and is determined by calculation of the required power.
Advantages of aluminum batteries:
- high heat transfer;
- ease;
- fast heating;
- economical price.
Disadvantages - corrosion of seams as a result of aggressive action of untreated water or stray currents, accumulation of hydrogen as a product of the reaction of metal with water.
Tips and tricks
It is also important to follow the following recommendations during installation:
Before starting work, you need to drain the water from the heating system or shut off the water supply to the place where the bimetallic battery will be installed. Before connecting the batteries to the pipes, it is important to assemble them. Typically this work is carried out in a factory.
But when carrying out installation on your own, it is important to double-check that all the elements are in place. Also, if necessary, you need to tighten all the joints of the battery. This will help avoid forced modifications when starting the system if it develops a leak. To keep the system airtight, it is not recommended to clean the joints of pipes and radiators with abrasive materials.
The manufacturer can use both left-handed and right-handed threads in the design of their product.
This should be kept in mind when starting work. It is important to choose the right fitting materials. Products that are resistant to high temperatures are considered traditional. Before work, you need to carefully calculate the connection diagram
This will ensure that the heating system operates as efficiently as possible, and will also ensure that the radiators are completely and evenly filled with hot water.
- After completing the installation work, you need to fill the system with water. This should be done smoothly. Opening the tap suddenly can cause water hammer, which will damage the entire system.
- After filling the system, excess air must be removed using special air valves.
- The valve should only be tightened using a torque wrench. This will prevent the thread from being stripped when tightening.
It is also worth remembering that during operation, radiators do not need to be covered with screens and screens or mounted in niches in the wall. This will negatively affect the operation of the radiator, as air circulation will deteriorate, which will lead to an increase in heating bills.
To learn how to install bimetallic radiators with your own hands, see the following video.
Where to start installation work?
The installation of bimetallic radiators must begin with studying the technical data sheet and instructions attached to the device. In general, the installation rules for all devices of this type are identical, but some nuances may vary depending on the model. Installation features that are worth paying attention to are always reflected in the instructions.
The second point is to ensure conditions under which the installation of bimetallic radiators will be carried out correctly . And in particular:
- It is best to place the radiator under the window , and strictly in the center of the window group .
- The battery is always installed in a horizontal position , there are no exceptions.
- If the room requires the installation of several bimetallic radiators, then all devices must be located on the same level .
- The gap between the wall of the room and the radiator should be from 3 to 5 centimeters . If this distance is less, then thermal energy is guaranteed to be distributed unevenly and irrationally.
- If the radiator is mounted under a window sill, then the distance to it should be at least 8-12 centimeters . If the gap is smaller, then the amount of heat flow from the radiator will noticeably decrease.
- The distance between the bottom of the radiator and the floor covering should be about 10 centimeters . Again, if it is less than 10 centimeters, then the efficiency of heat transfer will noticeably decrease. In addition, it will be difficult to clean the floor under the radiator. If the device is located at a much greater distance from the floor, then the temperature in the upper part of the room and in the lower part will vary greatly.
Technology for connecting radiator sections
Manufacturers supply devices in which 10 sections are joined, but the owner can increase or decrease the number of elements. To do this, you need to know how to connect two bimetallic heating radiators to each other and buy a radiator wrench with a 24 mm end blade.
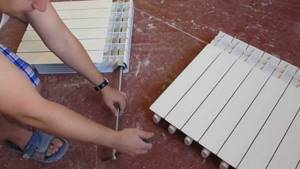
Work algorithm:
- Connect the sections tightly together so that the nipple with the gasket can fit into the gap between the batteries.
- Carefully tighten the nipple, taking into account the versatility of the thread of the element. The nipple has one side with a left-hand thread, the other with a right-hand thread. It turns out that when twisting the sections are attracted to each other at the same time.
- There is no need to immediately tighten the nipples, just grab them and inspect the accuracy of the connection - do not allow the sections to become distorted. After inspection, you can tighten the nipples all the way. A total of 3 turns are required; it is important to tighten all nipples the same number of turns to avoid possible distortions.
And to reduce the number of sections, you should first inspect the threaded connection of the end hole. The direction of the thread is important for turning the key - install the key with the blade so that the blade fits exactly in the joint area between the sections being separated, and turn the key in the direction opposite to the direction of the thread. A click will be heard - the sections have disconnected.