Sooner or later, every owner of an apartment or private house faces the need to replace heating radiators.
In all properties there are different situations for replacing batteries, but it is best to carry out installation work between the heating season. Before moving on to a detailed study of the installation of heating batteries, it is worth dwelling on the technical characteristics of the main types of radiators. The installation process depends on the characteristics of the batteries in many ways. For different versions of heating devices, the installation procedure has its own specifics. Therefore, first, a radiator is selected depending on the area of the room, the operational features of the heating system, installation regulations, SNiPs, standards, etc.
Let's look at the existing types of radiators, and then move on to their design features.
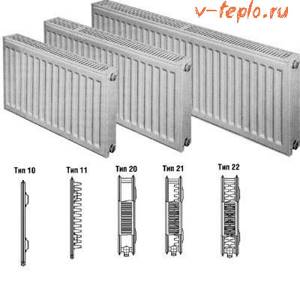
↑ Steel panels
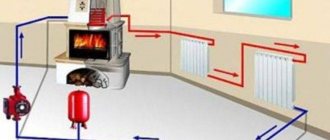
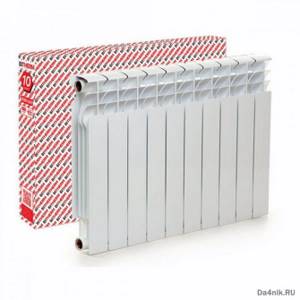
Let's start with panel radiators made of steel. They are called convectors and are characterized by a high rate of thermal output (efficiency - up to 75%.) Inside such structures are built-in heating panels with special ribs that provide the convection effect. Panel radiators are the best solution for country buildings where autonomous heating systems are used.
Their advantages include:
- relatively low inertia, combined with an increased level of thermal output;
- reduced volume of carrier circulating through them;
- low consumption from the heat source and low cost.
They are environmentally friendly (absolutely harmless to humans), which allows them to be installed in school premises, as well as in hospitals and kindergartens.
The disadvantages of this type include increased risks of corrosive destruction due to oxidation of the internal walls and poor resistance to hydraulic shocks. The last drawback is the reason that they are not allowed to be installed in apartments of multi-storey city buildings. The inconveniences of using such systems include heavy dustiness of the insides due to the convection effect.
Production Features
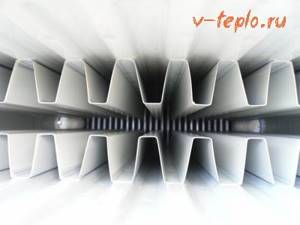
Structurally, steel panel heating radiators consist of channels located vertically or horizontally. The coolant circulates through them, forming a heating panel to which the convection part is welded.
High-strength sheet steel and innovative welding methods are used to manufacture modern panel heating radiators. To improve the quality of manufactured products, the following series of technological operations are carried out:
- Panel stamping
- Welding panels into finished convectors
- Painting
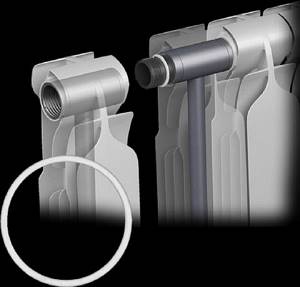
In order for the coolant to circulate inside, recesses and channels are provided. To ensure air circulation, the radiator is supplemented with U-shaped plates (from 1 to 3 pieces).
Panel radiators are characterized by their small size and minimal weight. Thanks to them, the units can be mounted in the desired location and do not require special reinforced fastening.
Product dimensions may vary in the following ranges:
- Width – from 0.3 to 0.4 m
- Height – from 0.3 to 0.9 m
One of the main stages in the production of panel radiators is painting the product. It is carried out with special compounds that increase the anti-corrosion resistance of surfaces. If it is of poor quality, the product will quickly become unusable.
When choosing a panel heating radiator, special attention is paid to the structure of the painted surface. During the production process, the product must be coated with at least three layers:
- Primer
- Thermal hardener
- Outer layer of paint
Many manufacturers, trying to save money, do not pay attention to the inner surface. Layers on all sides must be the same shade and applied evenly, without distortion or smudges.
Another factor that is taken into account when choosing a product is that it is not possible to change the power of the convector during operation. If radiators consisting of fins can easily increase in size by installing additional sections, panel models will have to be replaced with more efficient ones entirely.
↑ Tubular steel
Batteries of this type are made in the form of a set of steel pipes with coolant flowing through them. Their industrial production is more expensive than the previously discussed panel samples, so their price is correspondingly higher.
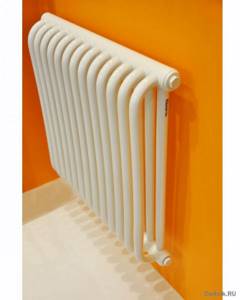
These devices, like all other varieties, have their own inherent disadvantages and advantages. In terms of maximum pressure, they are superior to other steel products, which is their advantage. The disadvantages include the relatively high cost.
Choosing a radiator design
The parameters of the local heating system are an important characteristic when choosing heating. The private home system has the following advantages:
- operated under favorable conditions and low pressure;
- the quality of the coolant is much better than in systems of multi-storey buildings;
- there are no pressure surges, there is no threat of water hammer.
With such characteristics, the choice of radiator models is quite wide. When buying batteries, you should focus on a high efficiency with the right price-quality ratio. Devices made of any material are suitable for a home system.

Heat transfer table for heating radiators
Let's look at different battery designs:
- Panel and sectional radiators are often the most inexpensive. With good heat dissipation they have compact dimensions. They can be installed in the heating system according to different connection schemes.
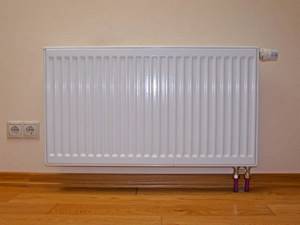
Panel radiator
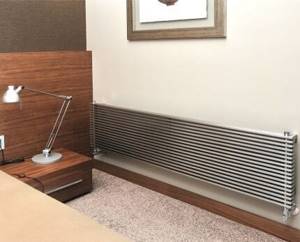
- Tubular batteries are more expensive than previous options, but their technical characteristics are approximately the same. The increased price is due to the more stylish design. They are also convenient for drying things.
Steel tubular radiator
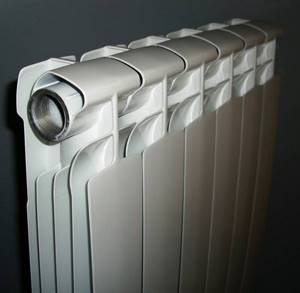
↑ Aluminum products
This type of battery is made entirely of aluminum. There are two types of products - cast and extrusion type. Both of them, as a rule, are used for autonomous heating, not associated with centralized systems. This is explained by their inability to “hold” high pressure and the possibility of destruction upon contact with low-quality coolant in city highways. Cast radiators are manufactured using injection molding technology and are characterized by significant internal capacity and thick walls. Let us separately consider extrusion-type batteries.
↑ Extrusion radiators
According to the production technology, the vertical posts of these products are extruded from a special aluminum alloy using an extruder, and the collector itself is cast using silumin. A finished radiator cannot be increased or decreased in the number of sections. This is one of the disadvantages of aluminum products.
The advantages of this variety include:
- Lightweight and simple installation, eliminating the need to use “powerful” fasteners (brackets).
- Increased level of heat transfer, not inferior in size to steel ones.
- High rate of heating of rooms and efficiency.
- Possibility of adjusting the operating temperature.
They are well-designed and have a modern and attractive appearance. Despite many undoubted advantages, these products also have significant disadvantages. Among them, the following stand out:
- The service life of aluminum radiators is only 15 years or a little more;
- due to its activity, aluminum is destroyed by corrosion when exposed to a coolant with high acidity;
- The high level of gas formation in radiators of this type forces the installation of special vents in them.
Reduced convection and the possibility of leaks between individual sections also do not add advantages to them. In addition, these products are contraindicated for sudden pressure surges in the system and water hammer.
Features of installing various types of radiators
Based on the material used, space heating devices are divided into several types, each of which has its own installation features. Let's list them:
- aluminum;
- steel;
- bimetallic;
- cast iron;
- copper;
- plastic.
Aluminum
Heating aluminum batteries are considered models in the budget line. The bodies of water heaters are made by extrusion, that is, pressing a molten mass of metal into a mold under pressure. The result is lightweight, non-separable, one-piece structures with flow channels inside. The surfaces of the product are subjected to anodic oxidation, which creates a durable protective film on the aluminum.

Features of installing heating radiators include the difficulty of connecting aluminum pipes to a heat supply network consisting of steel pipes.
The fact is that direct contact of aluminum with steel leads to destructive processes in the non-ferrous metal.
To prevent this from happening, the devices are connected by screwing in special adapter couplings for connection to pipes with coolant. Shut-off valves with bronze pipes are also used.
Steel
Heating devices made of steel, having the same heat transfer properties as their cast iron “brothers,” weigh much less and heat up twice as fast. They come in two types - monolithic panels and sectional tubular batteries.
Tubular models “copy” cast iron products in their design. They also consist of sections. The peculiarity of installing steel heating radiators is that you can always increase or decrease the number of registers in one device, or replace a failed cracked or clogged element with a new segment.
Bimetallic
The name of the product indicates that the structure of the case is represented by two metals. The basis of a bimetallic radiator is a steel tubular frame, where two horizontal tubes (collectors) are connected to each other by vertical channels.
The entire structure is wrapped like candy in an aluminum casing. This solution to the radiator structure was caused by the need to use the high thermal characteristics of aluminum as efficiently as possible, preventing its contact with an aggressive coolant.
The installation of bimetallic devices can be done by a home craftsman who follows all the instructions. As a rule, almost all manufacturing companies supply it along with their products. Due to the ease of installation, bimetallic radiators are most often used to replace old heating batteries without changing the location of the hot water supply pipelines. Squeegees or adapters allow you to connect the radiator to the heating circuit pipe without welding.
Cast iron
The first radiators were made of cast iron. Today, this metal has not lost its relevance in the production of heating devices. Modern cast iron radiators have a stylish design; they complement the luxurious interiors of mansions and entertainment establishments.
In Russia, the production of cast iron batteries in their traditional form has been preserved. They are cheap and easy to use. They are installed in production and public premises for various purposes, where the appearance of the devices does not matter.
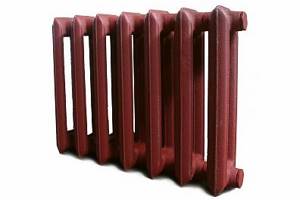
Thanks to the sectional design, the battery can be assembled from a different number of registers, starting from 2 pcs. A section can be removed or added to the radiator. Thus, the performance of heating devices is adjusted or repaired.
Copper
Copper is one of the expensive metals that is an excellent conductor of thermal energy. Copper heat exchangers have no equal in their efficiency among heating radiators made from other materials. The minimum service life of copper appliances is 30 years.
The internal copper surface of the collectors and vertical tubes repels water impurities of the coolant, thereby maintaining the cleanliness of the lumens of the water lines. Non-ferrous metal is absolutely indifferent to corrosion.
Features of the installation of copper heaters include the method of attaching the battery to the pipes of the heating system. To do this, special fittings, bends and adapters are used to avoid direct contact of copper with iron. To connect to polypropylene pipes, a special set of fittings is used.
Plastic
Plastic radiators are new to the Russian heating engineering market. These are trial models with a maximum heating degree of 800 C. There is also a limit on the maximum coolant pressure in the heating system.
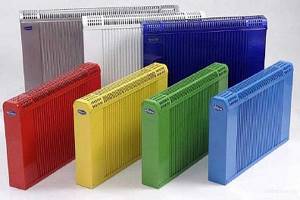
It should not be more than 3 atm. The devices are designed to work with plastic pipes in autonomous heating systems of private houses, country cottages and summer cottages. Radiators are manufactured in a wide range of colors, which makes it possible to give the interior an unusually beautiful flavor.
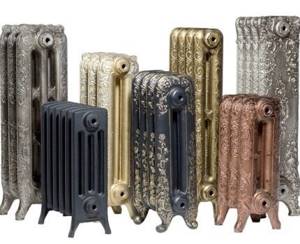
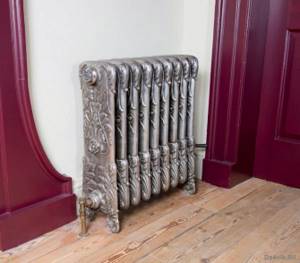
↑ Radiators made of cast iron
Cast iron radiators are among the time-tested types of heating devices. They are distinguished by their simplicity of design, enviable severity of form and well-thought-out design. They heat up slower than their analogues, but they last much longer (up to 50 years). For this reason, many users, when evaluating options, give preference to cast iron samples. The domestic market offers budget models produced by Russian, Ukrainian and Belarusian class=”aligncenter” width=”833″ height=”577″[/img]
Design specifics of heating devices
Structurally, batteries are divided into groups: radiators, convectors and registers.
Review of popular heating devices
Radiator is the most common type. This is a heating device consisting of vertical separate compartments. In classic collapsible products, sections are independent working elements. They are joined in the required quantity using threaded internal connections. This assembly scheme gives the batteries versatility.
Before installing or possibly completing a heating radiator, it is necessary to perform a calculation in accordance with the required thermal power. According to calculations, the number of sections of prefabricated batteries is selected. The horizontal cavities of radiators obtained by connecting sections are called collectors. Top and bottom.
Modern technologies have mastered the production of less versatile, but more reliable non-separable radiators using welding and solid casting methods. They do not have joints and seals characteristic of collapsible radiators. Design - for every taste.
A convector is a one-piece heating device made of a tubular or cavity heat exchanger with rows of heat-removing fins. Convectors are available in the following versions:
- Wall-mounted.
- Floor (duct)
- Skirting.
A register is a non-separable heating device made of straight, smooth horizontal pipes, arranged and combined in a certain way.
Details about the types of radiators
Radiators differ in the material used for their manufacture.
Within one variety there may be different design solutions, sometimes unexpectedly original.
The heating appliance market can offer:
- Radiators are cast iron. The ancestors of the batteries of this group. Relatively inexpensive. Can withstand each operating mode. They serve up to 50 years. The main disadvantage is that they are heavy, which, however, helps retain heat for a long time when the heating is turned off.
- Steel radiators. Such batteries are structures made of steel pipes. They work in any conditions, but are less durable than their cast iron counterparts. They have low heat transfer.
- Aluminum radiators. Made from lightweight, aesthetic material, these batteries dissipate heat better than anyone else. They are resistant to all operating temperatures, but are afraid of water hammer. Aluminum is very demanding on the quality of the coolant.
- Bimetallic radiators. Steel insides clad in aluminum – that says it all. The main characteristics are the same as those of steel, heat transfer is almost like that of aluminum. The price is steep.
- Copper radiators. These are “eternal” heat emitters for any room. Their only and most significant disadvantage is their extremely high cost.
- Radiators are plastic. Innovation in the radiator family. So far they are suitable only for autonomous heating systems of private houses with a coolant heated to no more than 80⁰C.
Aluminum devices are the most sensitive to operating conditions. These radiators reliably serve only 15 years. Their use is only possible in autonomous heating systems.
Externally, popular models of radiators made of different materials are similar:
Image gallery
Photo from
Heating radiator made of cast iron
Heating device made of steel
Lightweight aluminum battery
Heating radiator made of copper
Characteristics of the convector variety
Convectors are significantly inferior in heat transfer to radiators, but in some cases they successfully complement or replace them:
1. Wall convectors. Batteries in this design are usually made of steel, so they are cheap. They are not resistant to water hammer, and their use in centralized heating systems is undesirable.
Convectors designed as panels look like closed radiators, are very attractive, and fit perfectly into any interior design.
But made in the form of pipes bristling with plates, such batteries are only suitable for installation in utility rooms.
2. Floor convectors (duct). An excellent solution for creating a thermal curtain at the door of a balcony or loggia. Made from durable, corrosion-resistant materials, they are unpretentious to operating requirements.
3. Skirting convectors. Capable of operating in all conditions and modes, these batteries are ideal for creating a microclimate where all other heaters would look cumbersome.
The baseboard type is appropriate in bathrooms and storage rooms adjacent to cold street walls and unheated entrances.
Brief description of heating registers
Once upon a time, batteries of this group were made handicraft using conventional welding. Registers can be used in any heating systems, but due to their unsightly appearance they are used mainly in auxiliary rooms: garages, storerooms, basements. Sometimes they can be seen in the entrances of old high-rise buildings.
Modern heating devices for this group.
Shiny chromed metal registers can decorate the design renovation of any living space
Calculation of thermal power of batteries
The stage of preliminary selection of batteries is completed, you can proceed to calculating the thermal power required from them. The calculations are based on a relative power of 100 W for heating 1 m² of standard room.
The full formula includes many correction factors and looks like this:
Q = ( 100 x S ) x R x K x U x T x H x W x G x X x Y x Z,
Where:
S = area of the heated room, where:
R – additional parameter for rooms oriented to the east or north = 1.1;
K – correction for the presence of external walls in the room:
one = 1.0; two = 1.2; three = 1.3; four = 1.4;
U – insulation coefficient of street walls:
low = 1.27 (without insulation); average = 1.0 (plaster, surface thermal insulation); high = 0.85 (insulation performed according to special calculations);
T – weather indicator of the period of lowest temperatures in ⁰С:
up to -10 = 0.7; up to -15 = 0.9; up to -20 = 1.0; up to -25 = 1.1; up to -35 = 1.3; below -35 = 1.5;
H – ceiling height index in meters:
up to 2.7 = 1.0; up to 3 = 1.05; up to 3.5 = 1.1; up to 4 = 1.15;
W – characteristic of the room located on the floor above:
unheated and uninsulated = 1.0 (cold attic); unheated but insulated = 0.9 (attic with insulated roof); heated = 0.8.
G – degree of window quality:
serial wooden frames = 1.27; frames with single glazing = 1.0; frames with double glazing = 0.85;
X – ratio of the area of window openings to the area of the room:
up to 0.1 = 0.8; up to 0.2 = 0.9; up to 0.3 = 1.0; up to 0.4 = 1.1; up to 0.5 = 1.2;
Y – battery surface openness value:
fully open = 0.9; covered with window sill = 1.0; obscured by a horizontal projection of the wall = 1.07; covered with a window sill and front casing = 1.12; blocked on all sides = 1.2;
Z – battery connection efficiency (1.0 ÷ 1.13; for more details, see the section below).
The calculated value must be multiplied by a conditional coefficient of 1.15. It will provide some heat reserve to enable more precise adjustment of devices to operate in low-temperature mode.
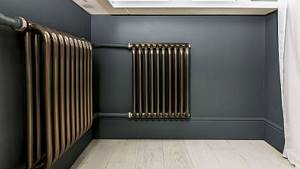
↑ Radiators in retro style
Retro-style cast iron looks elegant and can decorate any living space. However, the cost of such a battery is too high by modern standards. The advantages of these products include long service life combined with resistance to chemically active substances. Let us add that they are capable of retaining the heat stored in the batteries for a long time.
The disadvantages of these products are given below:
- Warming up for too long.
- Significant weight and decent dimensions make it difficult to transport and install these products.
- When installing, they need a “powerful” fastening.
- The capacity of these products is too large.
For their normal functioning, a significant volume of coolant is required.
Since cast iron is a brittle material, water hammer poses a serious threat to it.
Types of materials for making radiators
replace the heating system in the apartment, select heating radiators for the apartment
- Radiators made of cast iron
. The biggest advantage of cast iron is its low cost; moreover, it is highly durable, which will increase its service life for many decades. The features of this design are designed for the purchase of radiators with a large number of sections in order to heat the room quickly and efficiently. - Batteries made of steel
. Such structures are characterized by a high level of heat transfer, and are also able to withstand high loads and corrosion; moreover, they are easy to install indoors and ensure the most efficient operation. - Bimetal batteries
. This type is considered the most innovative and modern, in addition, they are light in weight and have a pleasant appearance. Such a heating system can be installed independently and without the help of specialists, and the combination of two types of metals increases resistance to external and internal influences and ensures maximum heat transfer (read: “The best heating radiators for an apartment: classification”).
↑ Bimetallic radiators
The name of bimetallic products is based on the use of two metal samples in their manufacture: steel and aluminum. The frame itself is made from the first, and the outer shell is made from the second. It is extremely rare, but still there are solid models. Their advantages include the ability to “hold” extreme pressures (up to 100 atmospheres). This can be achieved due to the reinforced steel frame.
The core of bimetallic radiators is installed along the entire length of the product. Thanks to this, they are durable, reliable and are in high demand, despite their high cost. Another type of radiator of this class is known, called pseudo bimetallic. They are characterized by vertical bars reinforced with steel and are therefore cheaper.
The advantages of these products include:
- low inertia with high thermal output;
- the ability to “hold” pressure and resist hydraulic shocks;
- relatively small capacity (internal volume);
- resistance to corrosion.
To this should be added the ease of installation of such radiators, excellent design and attractiveness.
The disadvantages of these products are the relatively high price and low level of thermal output (compared to pure aluminum ones).
Replacing heating radiators in an apartment
Art. 25 Housing Code of the Russian Federation, Russian Federation No. 37 dated 08/04/1998, Central heating radiators
Consequently, moving or replacing heating devices, as well as changing their configuration, does not require changes in the technical passport, and also cannot be considered as a refurbishment of the premises, and, as a result, is a violation of the procedure for using common property.
Coordination
The apartment owner first needs to agree on:
- replacing the original radiators with similar radiators;
- replacing batteries with radiators of a different type, with possible configuration changes;
- transfer of batteries.
In the first case of replacing batteries with similar radiators, it will only be enough to notify the management organization about the upcoming installation.
Subsequently, you need to seek the help of a specialist who will determine the possibility of installing new devices. The examination is paid for by the owner of the apartment.
To select and replace heating devices in your apartment, you need to understand the main stages of work, as well as possible problems that you may encounter during the work process.
Material selection
Bimetallic batteries with a steel core and aluminum fins have 4 important properties:
- high mechanical strength, thanks to the high level - 16 atmospheres - operating pressure and test pressure - up to 30 atmospheres;
- the chemical stability of the core has the ability to form a galvanic couple with copper pipelines;
- high efficiency;
- the modern look is quite presentable.
Cast iron radiators are corrosion resistant
Steel radiators can be sectional or panel. Sectional radiators in appearance resemble cast iron batteries. Steel radiators are able to withstand a working pressure of 16 atmospheres and also have a long service life. The main disadvantage is the risk of damage due to water hammer or external mechanical impact, due to the relatively thin steel - 1.5 mm.
Aluminum radiators are lightweight, so battery installation can be done by one person. The positive qualities of radiators lie in the large number of product options that differ in functionality and form, as well as an immediate response to changes in water temperature. Disadvantages include the need for air removal and unacceptable contact of the coolant with other metals. If this rule is not followed, the radiator may be destroyed by chemical attack.
Calculating the number of sections
To calculate the required number of sections, you can use a simple algorithm: 2 sq. m. area = 1 section
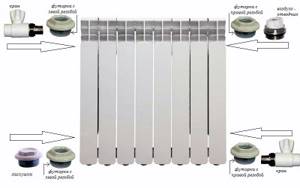
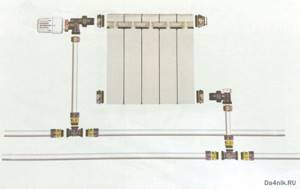
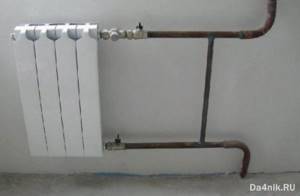
In addition to the throttle or thermostatic head, it is advisable to install the following near each radiator:
- an additional valve on the second line of the supply line, which will completely cut off the radiator and allow, if necessary, to completely disconnect and dismantle the radiator;
- a valve on the jumper, which in the closed position will direct the entire flow of water in the riser through the radiator, otherwise through the bypass.
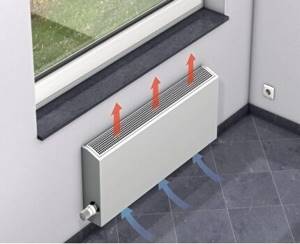
↑ Floor-mounted convectors
A completely new approach to heating arrangement is convector-type radiators mounted directly in the floor. They include the following structural units:
- Heat exchange module.
- Protective box
- Plastic decorative grille.
The pipes of these radiators are copper and the fins are aluminum. There are cheaper models with a tubular core made of the same steel (“Breeze” from KZTO, for example).
Particularly attracting the user's attention are floor radiators that complement walls with panoramic glazing. They are installed in rooms with large free spaces (car showrooms, swimming pools, airports and sports facilities).
Advantages of radiators built into the floor:
- Lightweight and durable design that takes up minimal space.
- Protection from corrosive destruction.
- Stealth.
In addition, when using such radiators, it is possible to achieve uniform heating of the room and almost completely eliminate the possibility of glass fogging. Their disadvantages include the inability to use forced ventilation and not very high thermal output.
Radiator selection
You should start by choosing a radiator, and the main criterion for choosing will be the operating pressure for which the radiator is designed. For a private house with its own heating system, a radiator with a working pressure of 6-7 atmospheres will be sufficient, but if you need to connect a radiator to the central heating system of an apartment building, it must withstand a pressure of at least 10 atmospheres.
Currently, the consumer is offered two options for aluminum radiators - standard or European and reinforced. The latter can operate under pressure reaching 12 atmospheres. When connecting to a central heating system, you must choose among reinforced radiators.
The number of sections plays a big role
Next you need to decide on the required number of sections. To do this, we determine the amount of heat. Necessary for heating the room and divide by the heat transfer of one section of the selected radiator.
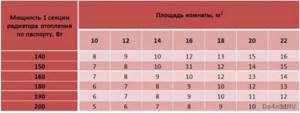
The amount of heat required for a standard room can be taken equal to 1 kW per 10 m 2 of room area. For non-standard premises and more accurate calculations, we will use a ready-made table:
Radiator power table
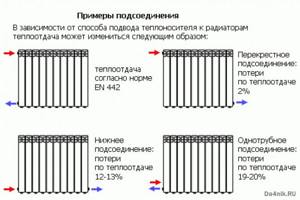
It should be remembered that the connection diagram for a battery of more than 12 sections must be double-sided, diagonal or saddle. With a one-sided battery connection scheme consisting of a large number of sections, a “pocket” of cold water will form on the side of the radiator opposite the pipes. “Extra” sections simply won’t work; we end up with harmful ballast.
Using forced injection, the battery can be expanded to 24 sections, even with one-way supply, but the radiator in this case must be reinforced.
It should be remembered that coolant must be supplied to reinforced radiators under high pressure only through metal pipes. Metal-plastic may not withstand such pressure, and the consequences will be the most dire.
It should also be taken into account that the heat transfer of the radiator indicated in the documentation is relevant only for one-sided or diagonal supply of coolant to the radiator. When using bottom feed, feel free to subtract 10-15 percent.
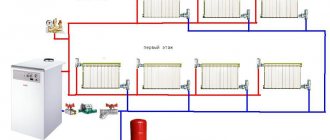
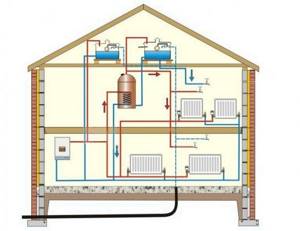
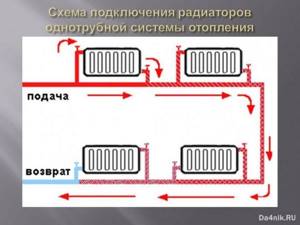
If the heating system is installed in a private house, then it is possible to choose the general heating arrangement yourself - one- or two-pipe.
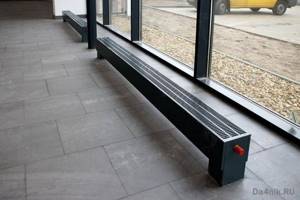
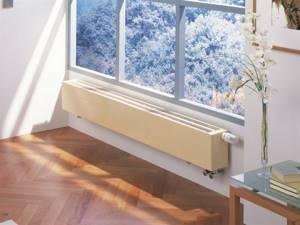
↑ Skirting-type convectors
These heating products of the convection type are made in the form of a strip no more than 20-25 cm high and about 10 cm deep. They are attached directly to the wall in the lower part and are therefore called “warm baseboards”.
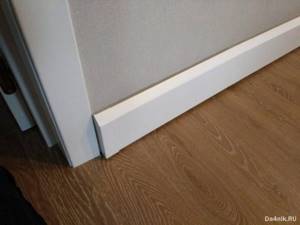
Advantages of baseboard convectors:
- Saving heating energy – up to 40%.
- The presence of a built-in thermostat that protects the system from overheating.
- Easy installation and maintenance.
- Uniformity of heat distribution throughout the heated space.
The disadvantages of such systems include heating of adjacent wall surfaces and their subsequent deformation, as well as the high cost of thermal baseboards.
Radiator assembly
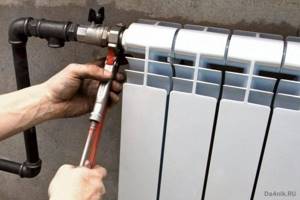
Preparing the radiator
Before installing the radiator, it needs to be assembled. We disconnect the part with the threaded connection and wrap this place with winding. To do this, use tow with oil paint or a more modern option - sealing paste, which can withstand high temperatures. A special fum tape is also used to help seal the pipe joints.
Before winding, apply a wide layer of paste onto the thread and distribute the composition over the joint. The prepared strip of tow is wrapped around the pipe in the direction of the thread.
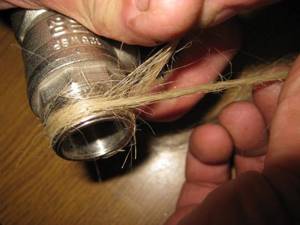
We wind the seal onto the threads of the taps
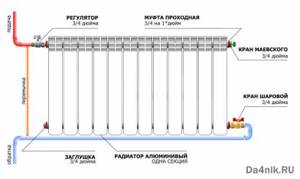
Next, we put the nut from the faucet on the part with the tow and carefully screw the entire structure into the battery plug. We do this first by hand, and then tighten it with a wrench. In the same way we install Mayevsky taps and plugs on inactive pipes.
Advice! Instead of tow windings, you can use standard gaskets.
↑ Components
The components used in piping different models of radiators are, in general, very similar. Slight differences are observed in their sizes and designs. For cast iron products, in particular, large plugs are needed, and the air bleed valve is not used at all (it is replaced by an automatic vent mounted in the upper part).
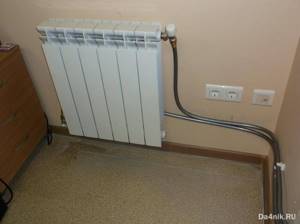
Steel panels are mounted in a special way - to hang them you need brackets included in the delivery kit. For these purposes, special mounting brackets are provided on the back wall.
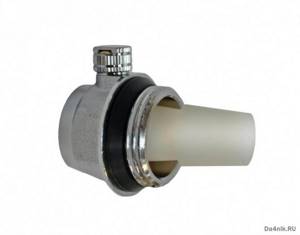
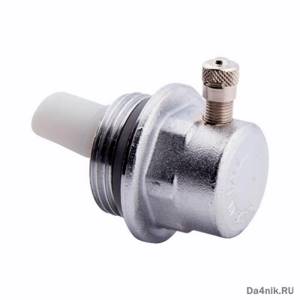
↑ Air vents
Mayevsky taps are mounted on one of the collector outputs on top of the battery. The dimensions of their seat usually do not coincide with the diameter of the collector. Therefore, such valves are usually supplied complete with adapters.
In addition to these elements, automatic air vents are used in heating systems. They are also placed on the radiator manifold, but are characterized by large sizes and are available in a brass (nickel-plated) case.
The photo shows one of the samples of a compact automatic lifter.
↑ Stub
Standard devices with side connections have 4 holes. Two are intended for connecting the supply and return channels (the so-called “return”), and on the third a valve is mounted to remove air. An unoccupied entrance is closed with a special plug. It is most often painted over to match the color of the battery itself and does not spoil its design.
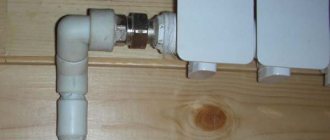
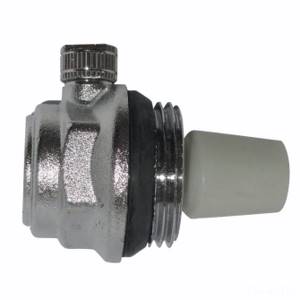
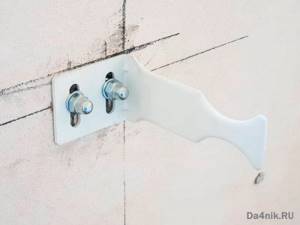
↑ Shut-off valves
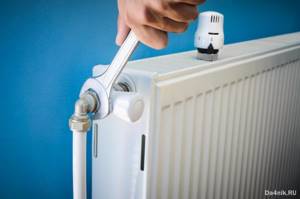
For normal operation of the battery, 2 ball valves are required (they are called “shut-off”). They are mounted at the inlet and outlet of the radiator, regardless of its type, and are used in emergency situations. With their help, it is possible to turn off the radiator and, if necessary, remove it for repair or update. With this approach, the rest of the heating network continues to operate as normal.
Shut-off valves with an adjustment function also serve the same purpose. However, with their help it is additionally possible to change the intensity of coolant circulation. Despite the comparative high cost, these elements are very important for strapping. They allow you to adjust the level of heat transfer and look attractive (products are available in various designs).
Sometimes, at the media supply, immediately after the ball valve, a thermostat is installed - an electronic or mechanical device that allows you to adjust the level of heat transfer from the heating battery.
Step-by-step instructions for installing cast iron batteries in an apartment
The installation of cast iron radiators has a number of distinctive features. First of all, this is due to the heavy weight of the products, which cannot be installed alone.
The method of connecting the battery to the pipe will also differ. If we connect steel and aluminum pipes using threads, then gas welding will be used here. Before you begin installation work, you need to stock up on the necessary set of tools and materials.
| Tools for installing cast iron batteries | |
| Gas welding Level | A set of keys Tape measure and pencil |
Hammer | |
Materials:
- a set of batteries of the required size;
- sealant (flax or FUM tape);
- fittings (plugs, tees);
- Mayevsky crane;
- thermostat;
- fastening elements (brackets).
| Installation instructions for cast iron batteries | |
| Removing the old radiator | We are dismantling the old battery. Using a grinder, we carefully disconnect the cast-iron structure, making sure beforehand that the entire system is turned off and the remaining water is drained from the pipes. |
| Before starting installation, you must mark the battery mounts General layout diagram for radiator brackets | We determine on the wall the location of the battery in the room. By installing the radiator clearly in the center of the window, we will achieve normal and natural air circulation in the room.
|
| We mount the brackets and install the battery on them | We install the brackets into the wall.
|
| Battery connection Bypass | We begin connecting the radiator to the heating system.
Note. If you want to install a tap that bypasses the water supply, you must make a jumper (bypass). Otherwise, you will cut off the heat supply to your neighbors! |
| Final check | We carry out installation testing. Gradually turn off the tap and turn on the water. This must be done slowly, without allowing a powerful flow of water to immediately fill the radiator, in order to avoid water hammer. |
In conclusion, we would like to invite you to familiarize yourself in detail with the video instructions for installing radiators with your own hands, so that you can clearly see some of the installation features.
Correct installation of a radiator in an apartment is the key to efficient operation of the heating system and comfort in the house. Therefore, strictly follow all the rules of this instruction and you will definitely succeed.
↑ Calculation of the number of sections
Having chosen a heating radiator, you also need to correctly calculate its parameters. Even the most efficient radiator will not produce warm air if its dimensions cannot heat the room. The basic indicator when calculating the number of sections and battery sizes is the area of the room.
Let's consider a simplified method for calculating the number of radiator sections. According to the standard, to ensure optimal warmth in a room, you need 100 W per 1 m² of area. The formula is simple:
Q=S x 100, here: Q is the required heat transfer from the radiator, S is the area of the room.
The resulting value will tell you what battery power a particular room should have, provided that the radiator is a one-piece, non-demountable structure.
When sections are additionally expanded, the number of sections is calculated using the following formula:
N=Q/Qс, here N is the required number of radiator sections, Qс is the thermal power (specific) of 1 section.
You don't have to be a great mathematician to do the calculations. You will need a tape measure and measuring the area of the room.
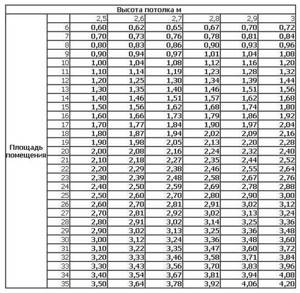
Important! Formulas for rooms with a ceiling surface height of up to 2.7 m. If the ceilings are higher than this value, the number of sections must be multiplied by 1.5.
Where will we place it?
Typically, radiators are placed where the greatest heat loss in the apartment is expected. As a rule, this is the area under the window or on the side of the corner wall of the house. Even if the apartment is located in a well-insulated building and is equipped with double-glazed windows, the window is the place where the air temperature will be the lowest during the cold season.
Choosing the optimal location for the radiator
If you do not place a radiator under the window, then the cold air entering from outside will gradually fall down and spread across the floor. From physics lessons we know that warm air moves upward. This means that, moving away from the battery and rising to the ceiling, it will create a kind of barrier to the cold flow from the street. According to SNiP recommendations, the size of the battery should occupy at least 70% of the window, otherwise the warm air will not create the necessary barrier.
If the batteries are too short, a situation may occur where cold zones form on the sides. As a result, the room temperature will be low even with a powerful radiator. As you can see, it is not always only the battery power that provides a comfortable microclimate in the apartment.
↑ Materials and tools used
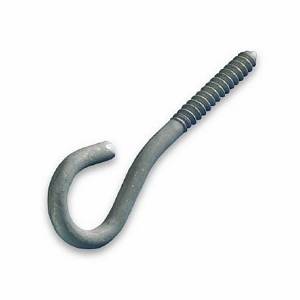
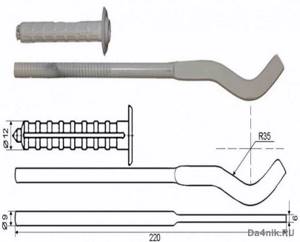
Installation of the radiator is impossible without reliable fastening (brackets with hooks). Their exact number is selected based on the following considerations:
- if the suspended structure has no more than 8 sections 1.2 meters long, 3 fastening points are enough;
- two points are made at the top and one at the bottom;
- For every new 5-6 sections (50 cm) you will have to add additional fasteners.
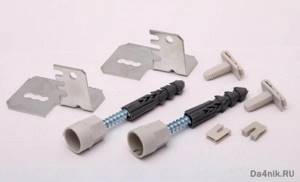
During installation, you will need FUM tape or a linen winding that replaces it, as well as a small number of dowels. You should also prepare plumbing paste, which you cannot do without when sealing connections. The tools you will need are a drill with a set of drills, a bubble level and a special machine for connecting pipes and fittings.
First stage of installation
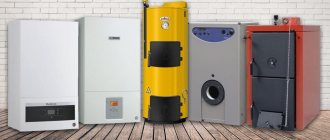
Considering that radiators today are presented in a huge variety, the installation of heating batteries in a private house begins with its choice. There is no ideal heating system - each type of radiator has its pros and cons, and you should choose the option whose disadvantages will allow the system to function as efficiently as possible.
Cast iron
Photo 1 Diagram of a cast iron battery
The main advantage that such radiators have is their durability and long service life; they can be used for up to 50 years. Also, this metal can withstand aggressive conditions, including coolant with various impurities, without damage.
Among the disadvantages of cast iron, the weight of the battery and the lack of aesthetics should be noted.
Aluminum
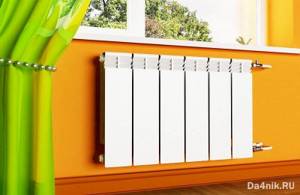
Photo 2 Aluminum radiators
Such batteries are distinguished by their light weight, external design, and high power ratings of approximately 190 W. They are clearly not suitable for apartments in high-rise buildings due to the low quality of the coolant, because aluminum quickly oxidizes due to constant exposure to dirty water, while for a private house such a radiator is the best option due to its high thermal conductivity and low inertia.
Bimetallic
Photo 3 Bimetallic batteries
This type of radiator is the most reliable. Among the main advantages are the following:
- resistance to sudden pressure changes in the system.
- high heat transfer.
- resistance to mechanical damage.
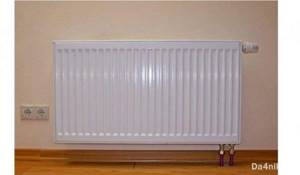
Steel
Photo 4 Steel radiator
These are new batteries for heating, which are still used quite rarely, they have not gained much popularity, but are still sometimes found. The heat dissipation area is high, the size and weight are small, maximum resistance to rust, provided they are always filled.
Which heating radiators to install in a private house can be decided based on the area of the building and its features.
Videos and useful tips
Having chosen a radiator, you should proceed to such a stage as installing heating radiators in a private house, the video of which can be watched below, and right now you can read useful tips.
The initial stage is calculating the battery power. To heat 1 cubic meter of a room in a modern house, built in compliance with building codes, you will need 20 W.
Calculate the volume of the house, multiply the figure by the figure described above, then divide the resulting figure by the power of the section. The resulting figure will be the number of sections.
Video 1 Installation of heating batteries (radiators) in a private house with your own hands
Installation tool
To do everything yourself, you should stock up on the following tools:
- building level;
- drill;
- screwdriver and tape measure;
- a wrench for tightening the pipes and a pencil;
- key for installing sections;
- bypass – when installing radiators in single-pipe heating;
- shut-off valves.
Installation instructions
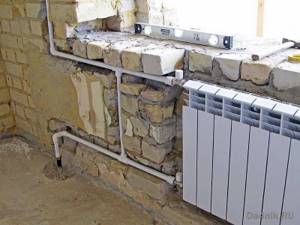
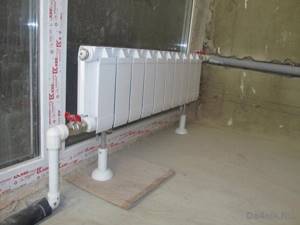
The first thing you need to do is turn off the heating system, drain the water, even use the pump. Next, fix the radiator on the supports and, using a level, check how accurately this was done, after which you perform the following procedure:
- remove all plugs from the device.
- if you are using a single-pipe circuit, then you need to connect a bypass with a valve. Provided that the circuit is two-pipe, the connection is made only with the help of a drive, and a valve is also fixed to it.
- connect the structure to the system using threaded fittings, use special seals to seal the joints, ideally welding.
The rules for installing radiators provide for a process such as crimping, for which it is advisable to invite a professional technician who has the appropriate equipment.
During the installation process, remember that the distance from the radiator to various objects must be maintained as follows:
- from the wall - 5 centimeters or more.
- from the floor - at least 10 centimeters.
- from the bottom of the window sill to the top of the battery - 5-10 cm.
↑ Placement order
Well-known models of heating devices are traditionally installed under the window. This is done so that the warm air emanating from them cuts off the cold air currents. To prevent fogging of the window glass, the initial width of the device is chosen to be at least 70-75% of the same size for the window opening. Experts advise:
- the radiator is placed exactly in the middle with a deviation of no more than 2 cm;
- distance from the bottom cut to the floor – 8-12 cm;
- the removal to the window sill is about 10-12 cm;
- a gap of 2-5 cm is left from the back edge of the product to the wall.
During installation, care must be taken to ensure easy access to the radiator for periodic inspection and maintenance.
Batteries mounted in this way are convenient in rooms with panoramic windows and on verandas in particular, since they create a protective thermal curtain. Other common locations include:
- Window niches.
- Extended spaces between windows.
- Closed walls of corner rooms.
- Bathrooms, separate storage rooms, as well as bathrooms, the partitions of which are combined with the main wall.
Niches under window openings are the most common location for batteries. Compact devices such as “warm baseboards” are mounted under the balcony door or exit to the loggia. Installing radiators in corners and hidden areas can reduce heat loss due to drafts. These devices are also installed in entrances and corridors of the first floors of multi-storey buildings.
How to install a radiator
There are two ways to install radiators for heating rooms. In the wall-mounted version, the batteries are hung on brackets. The shape and design of supports for batteries can be different, the main thing is that they must be securely mounted on the wall and withstand the weight of the heating device.
The fasteners for the brackets are anchor bolts. They are used in concrete, brick walls or masonry made of other materials (cinder blocks, foam blocks, etc.). There are supports that are both anchor bolts and brackets.
There are standards that determine the number of supports for sectional radiators. For cast iron batteries, brackets are installed between each 6-section. In panel devices, the manufacturer provides mounting to the wall from the rear side.
Rules for hanging heating devices
Heating products are installed strictly in certain areas of the premises - these are:
- window sill niches;
- long distances between windows;
- blank walls in corner rooms;
- bathrooms, storage rooms and other utility rooms, adjacent walls, which are external fences;
- interfloor landings of staircases and entrance foyers.
Installation dimensions of the heating device
The gaps between the radiator and the enclosing structures when installing the device are made based on the standard installation dimensions.
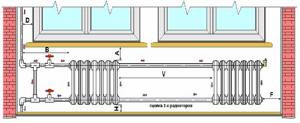
The letters in the photo indicate the installation dimensions. The table below shows the limit values of these parameters.
| Litera | Magnitude | Standard |
| A | 50 mm | SNiP 3.05.01-85 clause 3.20 |
| B | Up to 400 mm | – “- clause 3.24 |
| C | 300, 350, 400, 500, 600 and 800 mm | GOST 8690-94 clause 4.1 |
| D | From 100 mm to 150 mm | SNiP 3.05.01-85 clause 3.24 |
| F | From 100 mm | 2 SNiP 41-01-2003 clause 6.5 |
| L | 25 – 60 mm | SNiP 3.05.01-85 clause 3.20 |
| H | From 60 mm to 100 mm | SNiP 3.05.01-85 clause 3.20 |
| V | No more than 1500 mm | SNiP 2.04.05-91* clause 3.52 |
Installation of underfloor heating devices
It should be noted that along with wall-mounted units, there are floor-standing radiators. These are mainly high cast-iron batteries with decorative finishing and low devices installed under panoramic windows.
In some cases, the legs of these products are secured to the floor to prevent them from accidentally moving.
↑ Installation procedure
The sequence of operations for installing batteries at their place of operation looks like this:
- First, the heating network is completely turned off, after which the water is drained from the pipes.
- In a private house, a pump is used for this, but in a city apartment you will have to contact housing office specialists.
- Important information! Permission to carry out installation work will have to be obtained. When draining water from old batteries, the entire riser is turned off. Independent activity to interfere with the operation of the central heating system faces a large administrative fine.
- After filling out the necessary documentation, a plumber will come at the agreed time and drain the water to the desired floor. It is also important to understand that dismantling and installation of radiators should be carried out between the heating season. If during the heating season, when replacing batteries, the tightness of the heating system in the apartment is broken, this can lead to a breakdown of the entire system. Not only will the entire house be left without heating for a long period of time, but you will also have to pay a fine with impressive figures.
- Then the old radiators are dismantled, after which the remaining dust, dirt and worn-out fasteners are removed from the walls.
Before installing new brackets, the wall is carefully leveled and plastered. Next, the middle is marked on it, after which a horizontal line is drawn, located 10-12 cm below the window sill (the upper cut of the device is aligned along it).
The brackets are mounted along the marked horizontal line. This arrangement is optimal for heating networks with forced circulation of the medium, that is, for city apartments. For contours with gravity flow, a slope along the direction of movement of the carrier cannot be avoided (about 1.5%). If you increase this indicator more, stagnation may form.

After making sure that the brackets are reliable, proceed to hanging the battery. Upon completion of this procedure, shut-off valves are installed with mandatory compliance with the requirements for tightness of threaded connections. Immediately after this, the pipeline is connected.
Additional Information! It is possible to prevent leakage at the interfaces by using special torque wrenches.
The working force of such a wrench when making fastenings should not be more than 12 kg.
Why shouldn't a non-professional try to install the battery?
Installing a heating radiator is a very difficult task and must be done with high precision. The slightest deviation from the standards can lead to a drop in heating efficiency.
In general, someone who does not understand the installation of plumbing equipment can make many mistakes. Here are some of the most common ones, after which installing a radiator will not bring the desired benefit:
- Installation in the wrong location;
- Incorrect connection method;
- Improper handling and care.
Even if the installation of the heating battery was carried out correctly, which is very unlikely for a non-professional to work on, the battery can be placed in a place that reduces heat transfer. For example, if you place the battery in a decorative box, the heat output will drop by 15 or even 20 percent. And if the window sill is very large, then the radiator under it will lose about 10 percent of the heat.
Installing radiators and then connecting them incorrectly can be a waste of money. When the inlet and outlet pipes are connected to the radiator on one side, increasing the number of sections will worsen the condition of the system. In this case, the first section will be heated to the required 80 degrees, and the rest will be much less.
Even if somehow the installation of the heating radiator was successful, it was connected correctly and everything is going well, improper care of the battery can ruin everything. For example, if you paint a radiator in several layers, the heat will be retained by the air gap between the layers of paint, so the heating of the room will deteriorate. If you paint it, then only black, then the heat transfer will increase, but just a little. Also, do not paint the radiator white, this will slightly worsen the heat transfer.
↑ Installation
When making fastenings, hooks are used that are driven into the wall like dowels. First, holes are drilled, after which dowels are driven into them. And only then the hook itself is screwed in there. The gap between the wall plane and the back of the device is very easy to adjust (to do this, just screw the hooks in and out).
When installing them, it is important to take into account that the bulk of the weight of the device will fall on the upper mounting hardware. The lower hooks, screwed in 1.5 meters below, are only necessary to secure it.
Before attaching the brackets, first take the battery and place it in the desired place on the wall. Then mark the points of contact of the loops with the surface. After which a bracket is attached to them, and recesses are made for the holes. At these points, the holes themselves are then drilled into which the dowels are installed. The heating device is then hung onto the installed bracket.
Heating parameters for selecting appliances
An initial knowledge of the modes and operating conditions of heating devices will help you understand what battery designs are needed.
Below is a summary of information about the parameters of heating systems that are important when choosing batteries:
1. Internal pressure. The value required for the correct selection of a device that can withstand the pressure in the heating circuit:
- Private house (autonomous) = 1.5-2 atm.
- Private house (centralized) = 2-4 atm.
- 5-storey building (centralized and autonomous) = 2-4 atm.
- 9-storey building (centralized and autonomous) = 5-7 atm.
- House over 9 floors (autonomous) = 5-7 atm.
- House over 9 floors (centralized) = 7-10 atm.
If the technical capabilities of the battery are lower than the pressure in the heating circuit, there is a possibility of depressurization of the device with other negative consequences.
2. Permissible heating temperature . A characteristic indicating the upper temperature limit, above which the battery may fail:
- Autonomous = up to 90⁰С.
- Centralized with plastic wiring = up to 90⁰С.
- Centralized with steel wiring = up to 95⁰С.
Operation in violation of the temperature regime leads to melting of the seals, deformation and loss of tightness of the device.
3. Degree of coolant contamination. A parameter that is mainly of interest to owners of autonomous heating and water supply systems:
- Autonomous private house = high, medium, low when installing filters.
- Autonomous multi-storey building = high, medium, low when installing a filter system.
- Centralized = low, in rare cases medium.
Water supplied by centralized networks to municipal heating systems undergoes comprehensive purification. The content of sand and clay suspension in water extracted from private wells, wells, and open sources may exceed the permissible limit.
The choice of heating devices must be oriented towards the upcoming operating conditions. It is necessary to find out the characteristics of the heating circuit
↑ Procedure for attaching to the floor
Not all wall surfaces are suitable for mounting relatively heavy batteries. If they are made of plasterboard or lightweight concrete, for example, this is not recommended. The only way out of this situation is floor installation of a mounted radiator. Another option is to place it on special legs that are included with some models. However, their appearance and design are not suitable for all rooms.
To install standard radiator products, special brackets are often used. They are securely fixed to the floor, after which the mounted device is attached to them using bolts using the lower manifold using an arcuate grip. The legs of the devices are of constant height or adjustable in length.
Installing new batteries
Battery installation diagram
Before you begin installing new heating equipment, dismantled products should be removed from the room so that they do not interfere with work. The floors should be covered with dense material so as not to be scratched by the sharp edges of the heaters.
Further work is carried out in the following sequence:
- Applying markings for attaching brackets. Distances are specified in the instructions supplied with the products. Vertical and horizontal are verified using a level.
- Drilling holes. Plastic dowels are inserted into them and holders are screwed in. Here you need to maintain the exact distance to the wall so that the heaters fit accurately and firmly into the grooves.
- Hanging radiators on brackets. If the choice is made in favor of cast iron products, it is better to invite an assistant, since the batteries are very heavy.
- Making wiring. Depending on the selected material, metal welding or a soldering iron for polypropylene is used for this. Before entering the radiator, you must install a ball valve.
- Making squeegees, attaching them to the inlet and outlet openings. After this, the entire system is assembled and looped.
- Installation of Mayevsky crane. This is done on the upper floors, where the riser ends. The replacement part is screwed in place of the plug on the upper part of the battery opposite the insert. The tap is needed to bleed air after powering up the system.
- Attaching the plugs. They are placed in the unused ends of the radiators, making them sealed. To achieve greater reliability, it is worth wrapping tow or FUM tape on the thread.
↑ Tying methods
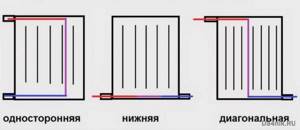
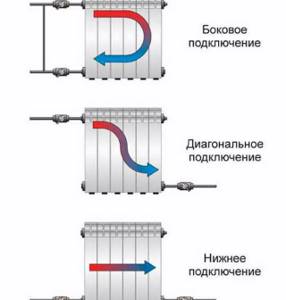
Installation of radiators has as its final goal connection to pipelines (it can be side or bottom). The first of these options is implemented in one of the following ways:
- saddle connection;
- one-sided;
- diagonal mate.
Their appearance is shown in the photo:
With a lower connection, the use of one or another option depends on the selected model of the heating device.
↑ One-way connection
This connection is usually used in city apartments and can be two-pipe or single-pipe. Since steel pipes are still used in modern housing, a standard piping option using bends is chosen. In addition to pipes of a given diameter, you need to prepare:
- Ball valves – 2 pieces.
- A couple of tees and a bypass.
- Drives with threaded ends (photo below).
Important! With a single-pipe network, a bypass will be required, since without it it will be impossible to turn off the radiator without completely stopping the system.
It is also important to note that the tap is never placed in the bypass gap. During the installation process, the threaded connections are reliably sealed with tow and sealant.
↑ Option with welding
In a situation where welding is at hand, the bypass is simply welded.
With a two-pipe scheme, this piping element is not required. The supply pipe is connected to the upper inlet, and the return pipe is connected to the lower inlet (both with taps).
A one-sided circuit with a two-pipe connection is shown in the photo on the right.
For bottom wiring (when pipes are laid on the floor), diagonal wiring will be more convenient.
This type of connection is considered the most advantageous in terms of heat transfer. When using a bottom wiring diagram, this method is implemented quite simply. The supply line is located at the top left, and the return line is connected on the other side at the bottom.
The single-pipe scheme with vertical risers is not so aesthetically pleasing, but its efficiency forces users to put up with this drawback. When supplying media from above with a single-pipe circuit, you cannot do without a bypass.
In the case of bottom media feed, the saddle connection is most convenient. It ensures maximum reliability and inconspicuous connection.
With this method and lower wiring into one pipe, 2 options are possible - with and without bypass. In the second case, taps must be installed, which is very convenient for removing and replacing radiators.
Radiator connection diagrams
Before installing a heating battery in the house, you need to choose the optimal connection diagram for heating devices. The heat transfer of the batteries and the efficiency of the heating system as a whole directly depend on the choice of circuit.
There are the following connection diagrams for heating radiators:
- Diagonal . This option is the most effective. When connected diagonally, the coolant enters the radiator through the upper pipe on one side and exits through the lower pipe on the other side. This is precisely the reason for the name of the connection diagram. Due to the diagonal scheme, the most uniform distribution of coolant throughout the internal cavities of the radiator is achieved.
- Lateral . With a lateral connection, both radiator pipes located on the same side are used. The supply is carried out through the upper pipe, and the return pipe is connected to the lower one. This scheme leads to insufficient heating of different sections of the radiator - areas located closer to the pipeline receive most of the heat. However, for small buildings, lateral connection of radiators is quite suitable, especially if the heating system is equipped with a circulation pump.
- Bottom . The bottom connection is usually used if hidden installation of heating pipelines is planned. Supply and return are connected only to the lower radiator pipes. This connection scheme is characterized by the greatest heat loss, but also the best visual qualities.
Knowing how to properly install a heating radiator is closely related to its connection diagram, because the efficiency of the entire heating system depends on it.
↑ Interface with polypropylene pipes
To connect radiators to propylene pipes, you will have to acquire a specially designed soldering iron. With its help, the connection is made using one of two technologies. In a situation where the valves are also propylene, the connection is formed by soldering with a liner. In this case, the metal “American” is first removed from the tap, after which it is screwed into the radiator casing. After this, the “American” is put on again and carefully tightened with a union nut.
If the valve is made of metal, a split-type coupling with an internal thread is required to mate with a plastic liner. It is somewhat similar to the “American” one, but its union nut is designed for soldering. Using a special fitting, the plastic insert is soldered to the coolant supply pipe. Upon completion of this procedure, the coupling is disassembled, and the steel part with the seal is screwed onto the valve. At the final stage, the coupling is assembled, after which it is carefully tightened with a union nut.
How to wash batteries
Not a single heating system, even the most reliable, is immune from breakdowns. It is difficult to expect that with the quality of the coolant that is in the city heating network, radiators will work flawlessly for years. As a rule, the first sign of why bimetallic radiators do not heat well is their clogging.
To correct the situation, it is enough to clean the system. To do this, you need to know how to wash bimetallic radiators at home. In this simple work, the main thing is to follow the sequence of actions.
- Before removing the battery, you should disconnect it from the system and prepare the area. You need to lay a waterproof cloth on the floor, move the furniture away and remove the curtains from the window. If there is no shut-off valve on the radiator, you will have to drain the water from the entire system.
- Using a pipe wrench, disconnect the battery from the heating network pipe and bend it over the container so that water flows out of it. Only after completely draining the water can you move the radiator or its sections to the bathroom to continue cleaning. The bathroom should first be covered with a cloth; it is even more reliable if you place a wooden pallet in it. This will protect its coating from possible scratches and chips.
- The plugs are removed, into which water is supplied under strong pressure until a clean stream flows from the radiator.
- In the event that there is so much scale that water cannot break through it, you will have to use special chemical solutions intended for such work, for example, “Mole”. The product (you can even use ordinary table vinegar) is poured into the battery and left for several hours. If the scale layer is very dense, then you can leave the radiator to settle overnight.
- After the chemistry dissolves the scale, the “insides” of the battery are thoroughly washed under pressure of water until it becomes clear at the outlet.
- All plugs are put in place, and the reassembly of the bimetallic heating radiators begins. It is not difficult to do such work with your own hands.
↑ Connection to steel liner
With this connection method, a thread is first cut using a die on a pre-prepared section of the liner. The order of subsequent operations looks like this:
- steel supply pipes are cut with a grinder so that the cut is strictly perpendicular to the axis;
- their ends are cleaned of corrosion or paint, after which a chamfer is made on them with a file;
- after this, a special paste is applied to the clamp cutters and the prepared pipe section;
- then the head is installed on the chamfer and carefully centered;
- using a gas wrench, it is then turned clockwise several times.
Note! To form a high-quality connection, the length of the threaded section must be no less than the same parameter for the fitting part.
At the final stage, a special locknut with a coupling is screwed onto the finished thread. After the axes of the ball valve and the connection are aligned, the coupling is moved from the connection to the valve body. Next, a sealing winding is wound onto the coupling thread, and then the lock nut can be driven over. Upon completion of fastening the shut-off valve, it is connected to the fitting using an “American” connection.
How to choose panel heating radiators
Many buyers may think that the panel heating radiators on the market are very similar. In fact, they have quite a few differences. Before making a choice, you should pay due attention to the following features:
- Marking
- Number of panels
- Connection method
- Performance
- Set
Marking
All basic information about panel-type radiators on the market can be found by looking at the markings. It usually contains the following designations:
- The first number is the number of panels
- The second number is the number of planes containing edges
- The first letter of the name (C – Purmo, I – Integral, K – Kompakt, etc.)
- Designation of the type of connection to the pipe line (C – side, V – bottom)
Many manufacturers tend to indicate additional useful information, including the height and length of the panels.
Number of panels
The number of panels is a very important indicator, since it primarily affects the power of the product. Three types of radiators are widespread:
- With one panel (thickness - about 6 cm)
- With two panels (thickness – 10-14 cm)
- With three panels (thickness – 15-18 cm)
General characteristics of the radiator installation process
First of all, it is worth understanding that different types of heating radiators have different requirements for their installation. Aluminum radiators will probably be the easiest to install, but classic cast iron radiators will require the use of specialized equipment - you will have to resort to welding, and this is a very specific area that requires the presence of professionals.
However, modern heating radiators, made from lightweight but at the same time durable materials, are a little more difficult to assemble and install than a children’s construction set, do not require any specific skills and can be placed on almost any surface. They can even be applied to a plasterboard wall.