Necessary tool
Working with siding will require preparing a set of working tools.
Required:
- hammer drill or drill;
- electric (cordless) screwdriver;
- level (laser level is especially convenient);
- roulette.
The tool for cutting finishing material deserves special attention. It is appropriate to use:
- circular saw;
- hacksaw;
- electric jigsaw;
- hand scissors;
- construction knife.
Depending on the type of siding, the circular saw is set up differently: for all types except vinyl, cutting in a straight direction is used.
Vinyl siding is easy to cut with a sharp knife. A groove is marked on the part with a tip, and it is bent along it in different directions several times. This is enough for the soft material to break along the desired line.
A very neat cut is obtained when working with an electric jigsaw. In addition, its use significantly speeds up the process of cutting finishing material.
Important! It is also permissible to use a grinder, but only at low speeds in order to avoid melting of the artificial material.
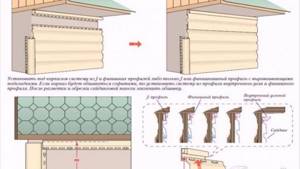
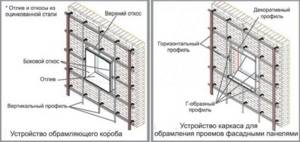
Installation of the pediment
Finishing the gable with siding should also not cause problems. Starting strips need to be installed around the perimeter. Here you can use the remains of the profiles; how to build up parts was discussed above.
Wall panels are installed in the same way as on the wall. But you should definitely control the angle at which you need to cut the part. To do this, we rest one panel against the slope of the roof, and place a small piece of the second panel in the profile. Draw a line along the bottom edge of the piece. This will be the required angle.
All panels are fixed into holes along the perforated edge, taking into account the gap. Only the last part, which is located under the highest point of the roof, is fixed through.
Frame installation
Step-by-step instructions for beginners will help you solve the problem of covering the facade yourself, without involving third-party specialists.
Note!

Chipboard: what is it? Types, application features, photos, sizes, thickness, explanation, manufacturers
DIY houses made from shipping containers step by step: instructions, diagrams, pros and cons, photos, design

Working pressure in the heating system in a private house: what it should be, how to create it, instructions for adjusting it yourself

A careful and thoughtful approach is required at all stages of work, and the key to successfully solving the problem is the arrangement of a high-quality frame for attaching the siding.
Installation of wall panels
Installing the first panel, as well as the starting profile, is a very important step. It depends on him how the process goes further. That’s why we take every step carefully and accurately. You shouldn’t rely on chance and check everything several times:
- The bottom edge is laid in the starting profile.
- The side parts are placed in the side elements.
- Fasteners are placed along the length of the panel in the perforated edge, and the part is fixed.
- The fasteners are not secured all the way.
- After fixing, you need to move the panel from side to side. If this can be done, then everything was done correctly.
- Be sure to check the horizontal level with a building level.
- The following panels are installed according to the same plan.
Preparing the walls
When planning to do the work of covering the facade with siding yourself, you should definitely spend time on preliminary preparation of the surface of the walls.
The base should be as smooth as possible and free of dirt and old finishes.
As part of wall preparation, the following is required:
- dismantle platbands, eastern pipes;
- remove decorative parts (if any);
- clean the walls from dust, dirt, mold;
- perform protective chemical treatment of wooden surfaces.

Preparatory work
Before carrying out installation work on the façade cladding, it is necessary to carry out a number of preparatory works. They include the following stages: choosing the type of panels and sheathing, calculating materials and additional elements, as well as determining the number of thermal and waterproofing layers.
Selecting the type of panels
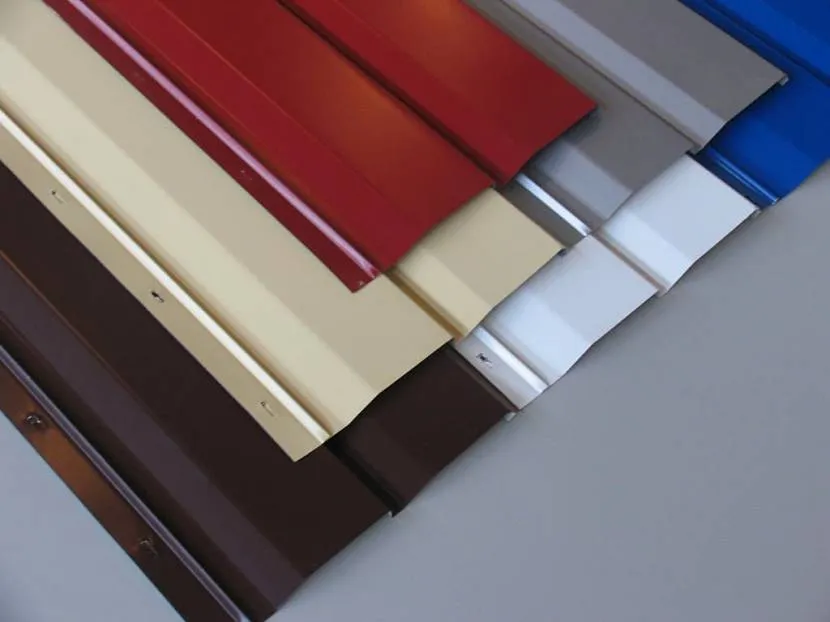
The choice of material for cladding largely determines the service life of the entire structure, strength and performance characteristics. Currently the choice is limited to the following options:
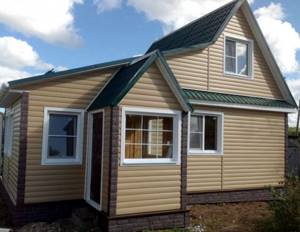
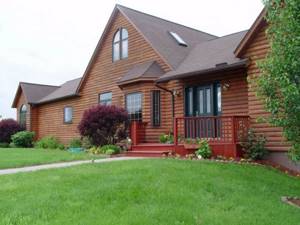
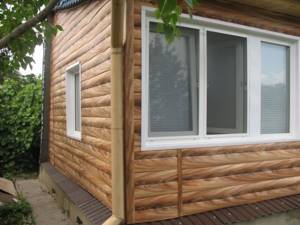
- Wood. It is characterized by a high level of thermal insulation, environmental friendliness and excellent decorative qualities. Its cost is minimal compared to other types of siding. However, it has a short service life (up to 8 years) and requires periodic maintenance (antiseptic treatment and painting).
Appearance of wooden panels
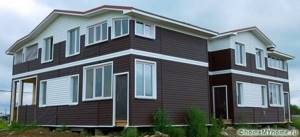
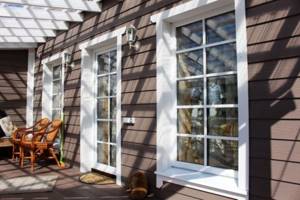
- Metal. It is strong and durable, resistant to mold, mildew and pests, and can withstand significant temperature changes. It is very sensitive to damage, since even a small scratch on the protective layer can lead to the onset of corrosion processes.
Metal panels
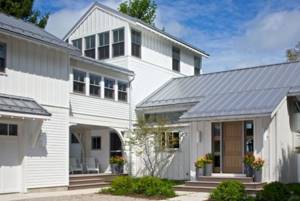
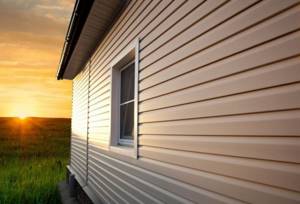
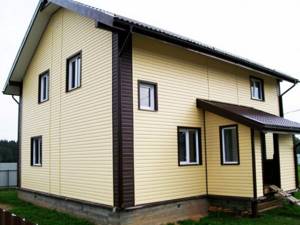
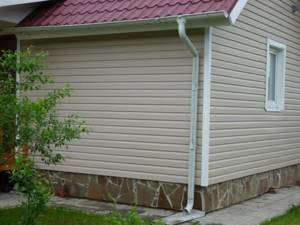
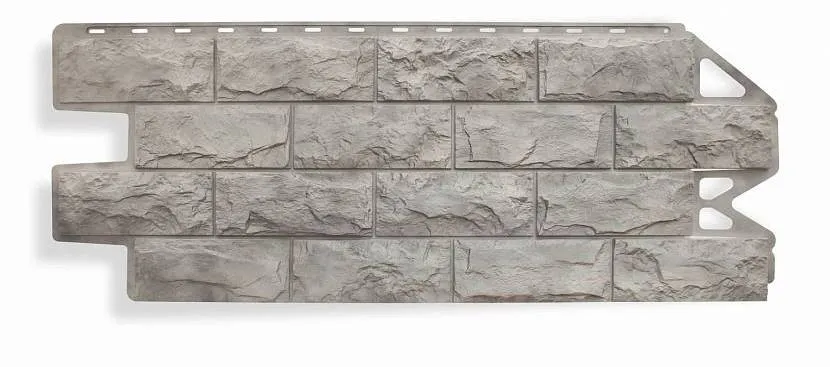
- Vinyl. It is the most profitable option, as it is free from all the disadvantages of wood and metal siding. It has minimal weight, is resistant to any precipitation, is environmentally friendly, and has a maximum service life of up to 50 years. It is distinguished by the presence of a wide range of colors. With such advantages, the cost of this material is relatively low, which is why experts recommend choosing it. A video of installing vinyl siding with your own hands will allow you to appreciate all the advantages of this material.
Vinyl panels
Calculation of the quantity of materials
The amount of material can be calculated quite simply if you have a building design in hand. Otherwise, you will have to measure the length and width of each wall, as well as window and door openings. Based on the data obtained, a sketch or drawing should be made. After this, the amount of material that will be used to create the sheathing is determined, taking into account the uniform arrangement of vertical or horizontal guides with an interval of 40-50 cm and fastenings along the guides with the same interval.
Helpful information! You can use a building design for calculations only if it was erected no later than 2-3 years. This is due to the possible appearance of defects on the walls (for example, cracks caused by subsidence of the foundation), which, after elimination, can cause the walls to widen by several centimeters. When installing the cladding of the facade of a building, this is critical because you will have to find a way out of the situation already during the installation process.
After calculating the amount of materials for the sheathing, you need to calculate the number of panels. This can be done quite simply by dividing the total area of the walls, minus the area of the openings, by the dimensions of one panel. It is recommended to add a margin of approximately 10-15% to the obtained value, which will take into account possible damage during delivery or installation.
It is recommended to create a list of additional elements indicating their quantity, so as not to forget to purchase them at the same time as the facing panels.
Calculator for calculating the quantity and cost of siding per house
List of required tools
For installation work you will need the following tools:
- Metal scissors for cutting facing strips or guides.
- Bubble or laser level to check the correct position of the panels.
- A screwdriver with a set of bits for self-tapping screws for fastening the sheathing.
- Chalk or marker for marking.
- Construction corner for obtaining even corners.
- A plumb line and rope for adjusting the position of the guides when installing the sheathing.
Tools for work
Preparing walls for installation
First you need to dismantle the roofing, window and door parts that protrude beyond the plane of the wall: skirting boards, ebbs, drainage pipes with fastenings from the roof, etc. This will allow you to gain unhindered access to the walls. If any finishing layers have been installed or applied, it is also recommended to strip them down to the main wall material.
A thorough inspection of the strength and reliability of supporting structures will ensure that there are no problems during the operation of the siding that are associated with its complete or partial dismantling. If cracks, irregularities or other defects are found, they will need to be repaired.
Installation of guides
The siding installation instructions provide for its horizontal placement. Accordingly, the profile or beam of the sheathing must be fixed vertically to the base.
Note!
- How to seal a stove so it doesn’t crack from the heat, what solution: review of the most effective methods + instructions
Why the bottom of the battery is cold and the top is hot - let's look at the reasons. Review of recommendations on what to do and how to fix it
How to insulate a dog house for the winter with your own hands and inexpensively - step-by-step instructions with photos and descriptions of all stages
Self-tapping screws or ordinary nails are used as fasteners, depending on the material of the frame and walls. Facades made of brick or concrete blocks will require the use of dowels, which are placed in pre-drilled holes.
The guides are carefully aligned using a level.
You should know that when adding additional insulation to a façade, the insulation is first installed. A frame is also installed for it. In this case, the guides of both frames are mounted parallel to each other.
Installation of the selected sheathing
In order for the siding installation to be done as beautifully and correctly as possible, it is necessary to first mount the frame. Moreover, at this stage it is necessary to do everything strictly according to the instructions. The slightest deviations from the horizontal or vertical will lead to a violation of the design and a decrease in the strength of the structure.
Material selection
The frame is made of wood or metal. Let’s find out now whether there is a fundamental difference in quality and strength. Let's start with the wooden sheathing:
- cheaper option;
- short service life;
- susceptible to moisture and mold;
- requires antiseptic impregnation and treatment with fire retardants;
- when purchasing material, you need to carefully inspect the details - there should not be any defects;
- It is difficult to correct differences on the wall.
As for the metal profile, there are some nuances:
- Costs more.
- Lasts longer.
- Withstands even the heaviest cladding.
- Easy to install on walls even with large differences.
- You can hide all the shortcomings of the structure.
- Does not require additional protective treatments.
Both the first and second options have both advantages and disadvantages, so everyone is guided by their own preferences or advice from experts.
Preparing the base, how to do it yourself?
Before laying siding with your own hands, study the issue of preparing the base. Once the façade is covered with panels, it is difficult to reach the outer wall of the house. Therefore we do the following:
- We fill the cracks with plaster mortar or polyurethane foam;
- for wooden sheathing, the base should have minimal differences, so it should be covered with plaster. It’s not worth doing this under a metal frame;
- the wall is cleaned of dust, grease stains, traces of mold, mildew or insect activity;
- All hanging structures are removed - sills, drainpipes, antennas, trim on doors and windows.
Only after this they begin to install brackets and guides.

Installation of guides
Please note that siding in most cases does not have thermal insulation properties, therefore it is necessary to additionally insulate the external walls. Foam plastic or penoplex is laid under the siding, but you can also use mineral wool. For foam plastic there is no need to install an additional frame, but cotton wool needs it.
Therefore they do the following:
- Create a horizontal sheathing for cotton wool.
- Fill the space with insulation.
- Install a vertical frame for siding.
If insulation is performed using foam plastic, then the insulation is first fixed, and then the frame is installed on top.
Lathing installation steps:
- marking. The distance from the corners is 15 cm. The distance between the guides is 50 cm.
- fixing brackets under a metal profile using dowels;
- installation of level guides.
It is necessary to install additional sheathing around door or window openings, since in these places the load on the frame increases.
Attaching starting profiles
This is an important stage of facade cladding, since the result of the work directly depends on it. This is where the work of installing siding with your own hands begins.
- You need to find the bottom point on the frame, move up 0.5 cm from it, and screw in the self-tapping screw. The point is looked for using a level.
- Similarly, marks are placed in the sheathing slats along the entire perimeter of the building, as well as in the corners.
- The tags are connected using a cord.
- The corner profile is applied, the boundaries are marked at each corner.
- It is necessary to deviate 0.6 cm from the corner marks; this is where the starting guide is attached to the sheathing.
- While continuing to fasten the guides, you should leave a gap of 1 cm between them for temperature deformations.
It is important to align the starting profiles horizontally as accurately as possible. Their position is additionally checked before installing the siding. Otherwise, the entire facade will be skewed.
Main section
Installation of sheathing
To install siding as correctly and beautifully as possible, you need to make a frame in advance. At the same time, at this stage, everything should be carried out according to the instructions and not deviate. At the slightest inaccuracy vertically or horizontally, the pattern will be disrupted and the strength of the structure will decrease.
Selection of material
The frame is made of metal or wood. Is there a difference in strength and quality? We’ll find out further.
Let's start with the wood sheathing:
- This option is cheaper.

Short service life.- Susceptible to mold and moisture.
- Impregnation with antiseptics and fire retardants is required.
- Upon purchase, a thorough inspection will be required to ensure that there are no flaws.
- Difficulties in correcting differences on the wall.
As for the metal sheathing , there are certain nuances here:
- The cost is higher than that of wood.
- Longer service life.
- Withstands even heavy cladding perfectly.
- Easy to install on walls with large differences.
- It's easy to hide all the imperfections in your home.
- There is no need to treat with fire retardants and antiseptics.
Both options have both advantages and disadvantages. Everyone is guided by the preferences or recommendations of specialists for their specific case.
Foundation preparation stage
Siding installation technology has a point about preparation, and this includes preparation of the base. After you cover the façade with panels, it will be more difficult to reach the outer wall of the building.
For this reason, you need to do the following:
- Cracks should be filled with plaster solution or foam.
- When using wooden lathing, it is necessary to make a base such that it has minimal differences, so plaster will be required. This is not required for a metal frame.
- The wall should be cleaned of dust, traces of mold, grease stains, insects and fungi.
- Remove all hinged structures - ebbs, antennas, drainpipes, trim on windows and doors.
Only after completing these 4 steps can you begin to install the brackets and guides.
Installation of guides
It should be noted that in most cases, siding does not have thermal insulation properties, so additional insulation of external walls will be required. Penoplex or polystyrene foam should be laid under the siding, but mineral wool can be used. When using polystyrene foam, there is no need to install an additional frame, but when using cotton wool this is extremely important.
For this reason, we suggest doing the following:
- We make a horizontal sheathing for cotton wool.
- We fill the space with insulation.
- We install a vertical frame under the siding.
If you insulated the house using polystyrene foam, you should first fix the insulation, and then install the frame on top of it.
Lathing installation steps:
- Marking - you need to make 15 cm indents from the corners, and the distance between the guides should be 0.5 meters.
- Fixation – the brackets should be fixed under the metal profile using dowels.
- Installation - all that remains is to install the guides according to the level.
It is necessary to install additional sheathing around window or door openings, since it is in these places that the load on the frame increases.
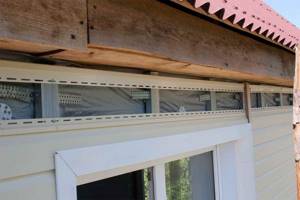
J-profile installation
It is important not only to secure the initial profile well, but also to do it accurately horizontally. The wall panels must rest against the J-profile, and if you do this at an angle, the structure will simply warp.
Work progress:
You should step back 5 cm from the border with the foundation or plinth and put a mark. It is at this height that the starting bar will be fixed.- Afterwards you should make markings throughout the house.
- Now attach the corner profile to the wall (to the corner) and retreat 0.5 cm. This gap is required so that the element can move freely under the influence of high temperatures - a small gap for expansion.
- We install the profile on the sheathing.
- The fasteners should not be fixed all the way, but should also leave a gap of 0.1-0.2 cm.
- Then you need to check how well the element has been installed horizontally using a level. If there are any shortcomings, they should be corrected immediately.
- The next profile must be installed at a distance of 0.5 to 0.6 cm from the first - expansion gap.
In this sequence we carry out work along the entire perimeter of the building.
How to install internal/external corner profiles
When installing siding with your own hands, it will be important to install the elements using the same technology. There shouldn’t be any difficulties here, the main thing is that everything is done according to the instructions :
- First, we outline the location of the spotlights.
- Step back from the first mark 0.5-0.6 cm.
- Fix the corner profile at the top. In this case, the fasteners should be tightened until they stop.
- The bottom edge of the profile should be lowered 0.5 cm below the initial one.
- Check the verticality of the element and secure the edge at the bottom. Don't forget to leave a gap.
- Fasteners should be placed along the entire length in increments of 0.4 meters and gaps should be left.
Features of extending panels
It is believed that the length of the corner profile may not be enough if the house is tall. In this case, competent joining of elements will be required. There are no special parts for the profile, but for the wall panels an H-profile was invented, which we will talk about a little later, but for now we are talking about the planks.
To ensure the tightness of the structure (so that the wind does not blow and moisture does not get in), it is better to overlap everything. In addition, the joining should be carried out at the same height on all sides of the house.
- Measure two pieces to the required length, allowing for an overlap of 2.5 cm.
- Place the top piece on top of the bottom piece.
- On the bottom you need to cut off the perforated edge 2.5 cm from the edge.
- The lower part must be fixed, and then the upper part, taking into account all installation rules.
This extension method is also suitable for wall panels.
Installation of H-shaped profile
The element is used if the length of the panel is not enough to cover one wall or the decor is made of two shades. The H-profile is installed in the same way as corner elements.
The only point that distinguishes both processes from each other is that the H-profile is installed on the wall in a certain place (shifted to the side or in the center, depending on the idea).
- Step back 0.5 cm from the soffit.
- The gap from the profile should be 0.5 cm.
- The bottom edge should be lowered 0.5 cm from the J-profile.
- In the H-profile, the upper edge is tightly fixed, and the lower edge is made with a gap.
- Check the vertical.
- Place fasteners along the entire length.
Installing a doorway frame
Before you start installing siding according to the DIY instructions, you should think about window and door openings. First, let's look at the doorways. Usually the door runs on the same plane as the walls, so you will need to buy a special frame for framing.
- You will need 4 pieces - two on the sides, and two on the bottom and top.
- In the part that will be on top, you should make an incision a couple of centimeters deep and bend the tongue inward. Cut off the perforated edge.
- Make the same cuts in the lower part.
- Thanks to the “tongues” the structure will be airtight and moisture will be evacuated.
- Secure the elements around the opening to the sheathing.
In this case, the wall panels will be installed with one side in the platband, and the other in the H-profile or in the corner. If necessary, trim the wall panel above the opening and install the trim.
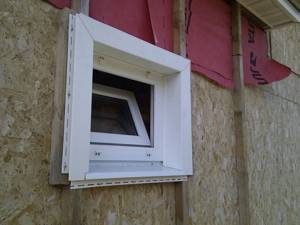
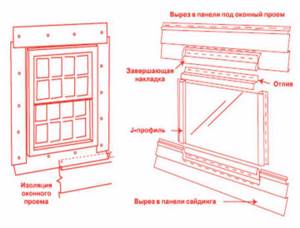
How to bypass windows
Regarding windows, there are two options:
- If the window is in the same plane, use similar trims as in the case of the doorway.
- If the window is recessed into the wall, i.e. in a niche - use slopes.
In the first option, everything is exactly the same as when framing the wall, so do everything according to the principle described above. There is nothing complicated in the second option either. Measure 4 pieces of the required length - 2 vertical, 2 horizontal. The top element must overlap the side elements, and the side parts must descend to the part located below.
From the inside of the slope located on top, make cuts and bend it inward. Such cuts should also be made on the side parts. Then water will not enter the structure. The parts must be attached to the sheathing. Wall panels are inserted into the platband with one edge, and into the profile with the other.
Installation of wall panels
When laying siding, installing the first panel is just as important as installing the starting profile. The further process will depend on this, so we take each step accurately and carefully. You don’t need to rely on chance every time, double-check everything.
- The bottom edge must be placed in the starting profile.
- The side parts are placed in the side elements.
- Along the length of the panel, fasteners are made in the perforated edge and the part is secured.
- There is no need to tighten the fasteners all the way.
- After fixing, move the panel to the sides. If this works, then everything was done correctly.
- Be sure to check the horizontal level with a building level.
- Install the remaining panels using the same principle.
Features of laying the finishing strip
The finishing profile should be installed before fixing the last wall panel.
This way you will achieve maximum tightness:
- Step back 0.5 cm from the corner profile.
- Make an indent from the soffit mark, which will be equal to the width of the starting profile + 0.5 cm.
- Point the perforated edge down.
- Secure the part.
- If you need to use a pair of finishing strips in one area, do not forget to leave a gap for expansion.
- Then install the last panel.
- If necessary, you can cut off the excess width.
- Insert the bottom edge into the lock of the previous panel, the top into the finishing strip.
Rules for mounting on a plinth
Siding for the plinth is available in slightly different sizes, and therefore the installation differs from the standard one. For base panels, horizontal lathing is used, and the use of insulation will be a prerequisite.
Required:
- Starting bar.
- Elements for corners.
- Fixing the panels.
- Fasteners should be placed on the sides and top of the siding.
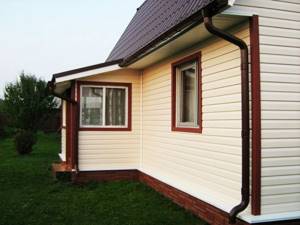
- Installation of ebb tides.
Fastening external profiles at corners
A certain sequence of work must be followed. Before laying siding on the walls, it is necessary to decorate the outer corners of the building.
- At the initial stage, the soffits are marked so that the edges of these parts are then visible.
- The guide is placed on the corner of the sheathing, leaving a gap of 0.3 cm from the soffit or the edge of the roof. Self-tapping screws are used to secure the part.
- Having specified the vertical position of the corner element, it is firmly fixed along its entire height.
It is important to know that fasteners should not be placed too close to each other in the corners. If the building is tall, then the profile is mounted with an overlap, leaving 2-2.5 cm in reserve. The joining of corner parts is carried out strictly at the same level in all corners of the building!
Installation of H-profile
This element is used if the length of the panel is not enough to cover one wall, or the decor consists of two colors. H-profiles are installed according to the same principle as the corner element.
The only thing that distinguishes these two processes is that the H-profile is mounted in a certain place on the wall (in the center or shifted to the side, depending on the planned decor).
- Retreat from the soffit 5–6 mm.
- The gap from the starting profile is 5–6 mm.
- The lower edge is lowered 5–6 mm from the J-profile.
- The upper edge of the H-profile is fixed tightly, and the lower edge with a gap.
- Check the vertical.
- Place fasteners along the entire length of the profile.
Fastening internal profiles at corners
In general, the principle of how to install siding in internal corners differs little from working with external corners.

At the top, they retreat 0.3 cm from the edge of the roof or soffit; at the bottom, the part is lowered 0.6 cm below the level of the starting strip. If there are protrusions on the base, 0.6 cm should be removed from it. In no case should the corner profile rest tightly against the protrusion of the base.
There are three options for designing internal corners. The method depends on the configuration of the corner parts.
Extension of panels
It happens that the length of the corner profile is not enough because the house is higher. Then you need to connect the elements correctly. There is no special part for joining profiles, but manufacturers have invented H-profiles for wall panels. We'll talk about it a little lower, but now let's get back to the planks.
To ensure that the structure is airtight and moisture does not get under the cladding, it is better to do this with an overlap. In addition, the joining is carried out at the same height on each side of the house.
- Measure two parts of the required length, taking into account an overlap of 2.5 cm.
- Place the top piece on top of the bottom piece.
- On the lower element, cut off the perforated edge 2.5 cm from the edge.
- Fix the lower part, then the upper one, taking into account all the rules for installing corner profiles.
The same extension method is also suitable for wall panels.
Design of openings
Craftsmen without experience are advised to study in detail how siding is attached to door and window openings.
The procedure depends on the location of the opening relative to the plane of the facade.
- If the opening and the wall do not have a difference at the junction, then waterproofing work is carried out first. The next step will be fixing the platbands or J-profiles. Then the profiles are connected so that the moisture goes down.
- If the opening is recessed relative to the plane of the wall, then slats are used to create the sheathing. A special window profile and finishing strips are attached to them.
In any case, it is important to treat the cladding joints so that atmospheric moisture does not penetrate inside the structure.
It is easy to study in detail the order of design of window and door openings if you watch a video on this topic.
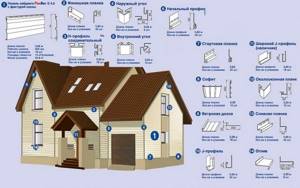
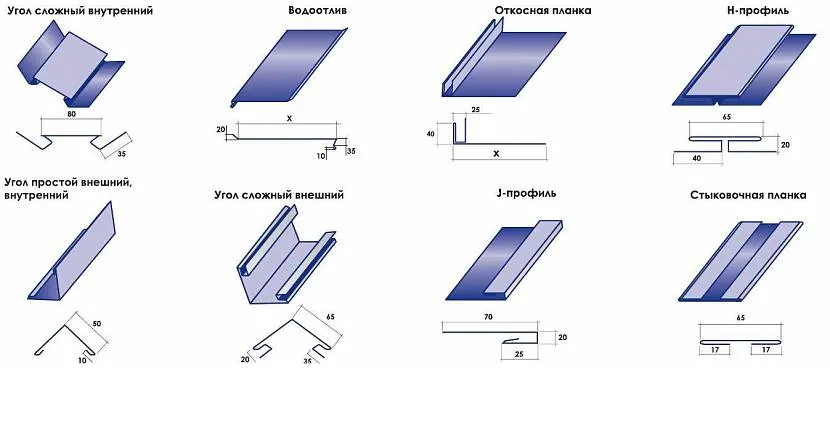
Types of additional components
In order to simplify the installation of façade cladding, many additional components are produced to ensure a tight fit to various elements of the house, installation of surfaces of complex shapes, as well as reliable engagement with the main wall. The components are designed to ensure rigidity and stability of the structure, as well as prevent the formation of moisture on the inside material.

Types of additional structural elements
Important information! The material of the components must match the siding in order to ensure uniform thermal characteristics and prevent deformation due to differences in thermal expansion coefficients. Therefore, it is recommended to use only original additional and fastening elements.
List of additional components:
- The starting and finishing strip allows you to avoid distortions and other installation errors, as well as improve the decorative properties of the finish.
- Corner elements. Designed to decorate the corners of a building and hide the sheathing. Protects against dust and moisture getting on the inner surface of the panels.
- Window and door frames are intended for finishing the junctions of the corresponding openings. J-profiles can also be used for these purposes, but they have worse aesthetic properties.
- Window and door profiles are used for finishing and protecting slopes from the external environment. Due to their use, slopes look natural and aesthetically pleasing.
- J-profile. Used for fastening row panels to the side. It has versatility, so it is also used instead of platbands, finishing and corner profiles, even though there are specialized elements.
- J-chamfer. A special element designed to be installed as a cornice. It is a specialized replacement for the J-profile when installing an abutment to the roof.
- Low tides. They are used to remove moisture from the roof, as well as to design window and door openings.
- Ceiling soffits. Designed for finishing ceilings of open structures: verandas, terraces, summer kitchens, etc. They can be made solid or perforated. They perform not only decorative functions, but also provide ventilation of the space between the wall and the siding along the sheathing, and also protect internal structures from pests.
- Moldings. Serve to connect horizontal and vertical planes of panels.
- H-profile. Used to extend panels lengthwise.

Without these elements, it will not be possible to sheathe a house efficiently and beautifully.
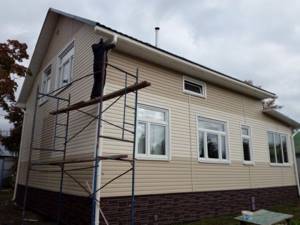
Facade works
It makes sense to start covering the wall of the building that is most hidden from prying eyes. This will allow you to master working techniques and mask possible errors.
- The first cladding panel must be inserted into the corner guide and locking connection of the starting strip. In this case, we should not forget about the required temperature gap of 0.6 cm.
- The sheathing part is firmly fixed to the sheathing. When installing vinyl siding, it is recommended to fasten the screws at a distance of 25-30 cm.
- To build up parts, use overlapping or H-profile installation.
In a similar manner, the entire façade of the building is covered with panels, regularly checking the position of the parts using a level.
At door and window openings, excess material is removed, and a punch is used to fasten the panels.
How to lay and place the finishing strip?
The finishing profile is installed before the last wall panel is fixed. Thus, maximum tightness is created.
- 5-6mm retreat from the corner profile;
- We also make an indent from the mark for the soffit, which corresponds to the width of the starting profile plus the gap for expansion;
- the perforated edge points downwards;
- fix the part;
- if it is necessary to use two finishing strips in one area, then do not forget about the expansion gap;
- then install the last wall panel;
- if necessary, cut off excess width;
- the bottom edge is placed in the lock of the previous panel, and the top edge is placed in the finishing strip.
Installation procedure under the roof
- A J-profile should be fixed along the roof.
- Then carefully measure the width of the gap between the last attached panel and the finishing element.
- If necessary, trim the finishing panel to the required width and secure it using pre-made undercut hooks.
The cuts are made at a distance of 20 cm, the work is done carefully, carefully snapping the parts together.
The pediment is covered with siding around the perimeter, and the upper fastening element is fixed in the upper part of the hole. For cladding, you can use starting strips or corner pieces.
It is important to ensure a strong connection at the joints to prevent moisture from penetrating under the siding.
Recommendations from experts
Those who professionally install siding know some nuances :
- You should always buy all the material from one manufacturer and batch. Even in trusted companies it is not always possible to make the panels the same color and size.
- Do not use additional parts from other manufacturers.
- When installing in winter, the gaps should be 0.9 cm rather than 0.5 cm.
- You can use 2 starting profiles instead of one corner profile. This will help reduce costs, but the structure will be less airtight.
- J-profile can also be used to frame elements such as doors and windows.
If you think that you are not able to use siding, use the services of craftsmen or a team.
Features of the design of the base
At the stage of preparation for installing basement siding with your own hands, you need to take into account several important points.
- This material is thicker and slightly heavier than regular siding.
- The panel sizes exceed the standard sizes of siding finishing elements.
- Basement siding is characterized by increased wear resistance and aesthetic appearance.
- When choosing the type of panels, you must take into account their own weight.
The work will require a certain sequence.
- The base is cleaned of dirt and treated with a protective solution against mold and mildew.
- The frame is being installed. It is recommended to give preference to metal sheathing.
- Installation of the panels begins from the bottom, the parts are secured using grooves.
- Before installing the last row, you will need to attach the finishing strip. With its help, the outer panels are connected.
Decorating the facade and basement of a building using siding is a simple procedure. The key to success is accuracy, proper alignment of parts using a level, and preparation of a high-quality frame.

The advantages of using siding include the ease of working with it and the absence of the need to purchase specialized tools.
Siding Installation Basics
Below is a plan of work that will need to be done to cover a house with siding:
Preparatory work
The first step is to dismantle all protruding parts: doors, trim, grilles, etc. Next, you should seal all the cracks using foam or cement mortar.
The walls should also be cleaned of all contaminants. A wooden house must be treated with an antiseptic and antipyretic; foam concrete walls are treated with a primer.
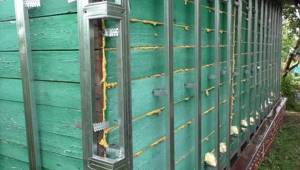
Sheathing installation work
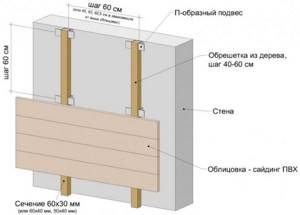
Since siding is not attached to the walls, sheathing must be installed. To do this, use a metal profile or wooden slats. For walls made of concrete and brick, galvanized profiles are used.
You can use a CD profile for drywall. When cladding a frame or wooden house, you can use wooden slats 60 by 40 mm, having a residual moisture content of 15-20%. Before using the slats, they should be treated with an antiseptic. Using a tape measure and a level, make a straight line marking of the walls until a closed contour is obtained.
Now, the distance from the marking to the foundation is measured at the corners, after which another contour is drawn according to the minimum value. The next stage is the installation of vertical guides. They must fit snugly against the walls; to achieve this, you can use pieces of wood or dense foam. The guides should be located at a distance of 30-40 cm from each other.

In areas of additional load, for example, at corners and near windows, additional guides will be required. There should be no connections between the vertical guides. This is done to provide ventilation, which prevents the growth of fungi.
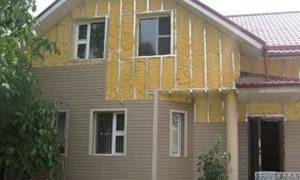
Thermal and moisture insulation
Waterproofing must be done, unlike insulation.
For this purpose, a moisture- and wind-proof membrane is used. If thermal insulation is performed, the lathing must be done in two layers.
Installation of guide elements
Installation begins with drainage. It is a rigid structure, so it is easy to attach. After that, corner profiles are attached using self-tapping screws. The next stage is fastening the starting strip to the drainage along the markings. Along the perimeter of the windows, window strips or J-profiles are fastened so that the location of the outer lower edge is slightly lower than the inner one.
The doorway is edged using J-profiles. When H-profiles are installed vertically in previously determined locations, use a level. Here you need to leave a gap of 5-6 mm to the foundation to avoid bending of the planks over time. The top edge of the siding is covered with a finishing strip.
Panel installation work
After installing all the guide elements, you can begin installing the panels. The first row is fastened to the starting bar.
All other panels are fastened in the same way, up to the window or roof. The panels should not be overtightened or tightly secured; they should move a little to the sides. The top row of siding is finished using a finishing strip.
The siding can be connected along its length using a special H-rail. When using it, the panels are installed in the H-rail, and you do not have to deal with the so-called “running” - i.e. make sure that the joints are not located along one vertical line.
It goes without saying that the H-rails will be visible from the outside of the building, which can negatively affect the design. This problem can be solved simply - either the H-rails are matched to the color of the siding, or the siding is installed “overlapping”. As already mentioned, this kind of finishing requires a “run-up” so that the seam line is not so noticeable. Usually, they try to direct the visible part of the joints to the side from which the house is viewed less often.
This helps improve the visual perception of the building. Do not forget that using H-rails, you lose in terms of efficiency, due to the greater number of trims. Of course, all this is relevant only when the siding strip is shorter than the length of the wall.
Do not cut the siding ahead of time. It is more convenient to trim during the installation process.
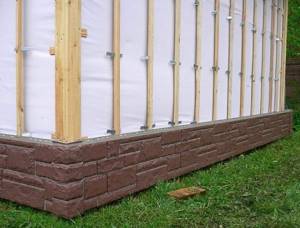
Base finishing
Base siding differs from wall siding in its greater thickness and strength, as well as shape: these are not long lamellas, but wide and short panels with jagged vertical joints that repeat the spacing of the elements on the front surface. The facade panels are connected to each other vertically “tooth-tooth”, the ends are hidden in the grooves of the corner elements.
Base siding panel Source torgbest.ru
Due to its large width, the basement siding noticeably expands not only in length, but also in height, so it must be provided with free movement in all directions, leaving a small gap between the rows.
As usual, installation of basement siding begins with attaching the starting profile and corners. Installation is carried out in rows from left to right. The first panel is cut off from the left edge, the next one is joined to it. The last element ends on the right edge; its length should not be less than 20 cm.
Features of metal siding installation
Installation of metal siding is completely identical to vinyl, but there are nuances associated with the difference in the properties of these materials. And first of all, with the coefficient of thermal expansion, which for metal is several times less than for plastic. Therefore, it is not necessary to leave gaps between elements, unless this is caused by the need to simplify installation:
- Panels can only be cut with metal scissors - regular or electric. A grinder with an abrasive wheel leads to strong heating of the surface and damage to the protective polymer coating.
Metal panels are coated with polymer paint to protect against corrosion and give a decorative appearance Source montazh-saidinga.ru
- When taking measurements and markings, you need to use a plastic square and a tape measure with a rubber backing so as not to scratch the paint on the front surface.
Advice! When purchasing siding, purchase special repair paint in a color to hide accidental damage.
- Self-tapping screws and nails used for installation must be galvanized. When fastening panels or extensions through, use self-tapping screws with a rubber gasket and a head painted in the color of the coating.
- If the panels are covered with a protective film, it must be removed before installation, otherwise under the rays of the sun it will “stick” to the surface.
Another nuance concerns additional corner and connecting elements. They can be complex, with locking channels, or simple, mounted on top of the finished cladding by drilling with self-tapping screws.
Add-ons for metal siding Source i2.wp.com
Preliminary work
Before buying material, you need to decide not only the color and relief of the finishing panels. It is necessary to take all measurements and decide exactly how the facade will be faced: vertically or horizontally, with a highlight of the plinth or a solid canvas, how the openings, eaves overhangs and other elements of the building will be designed. In addition, the need to insulate walls and install sheathing is taken into account.
Before covering an old house, it is advisable to remove the previous wooden paneling, if any, or make sure that it is in good condition: there are no rotten, fungal or cracked boards, replace them, foam the seams. This is done if it is decided to install metal siding or vinyl panels directly on the wall without insulation and creating sheathing. But the walls must be treated with antiseptic and water-repellent agents.
It would be more correct to first cover them with moisture-resistant plywood or OSB boards, or even better - to mount a frame for fastening the cladding, which will become a reliable load-bearing base and create a ventilated space under the siding.
Frame made of metal profile Source the-master.ru
The sheathing is attached in a direction perpendicular to the panels: standing up if the siding will be mounted horizontally, and lying down if vertically. The step between elements is at least 40 cm.
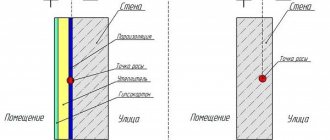
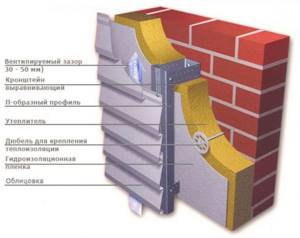
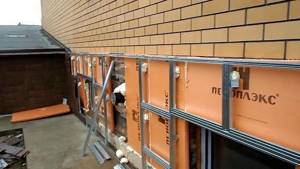
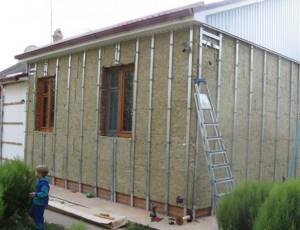
However, insulating the walls will require changes to this scheme. First, a frame is made for the thermal insulation material, taking into account the width of the roll or insulation boards. And after fastening it and installing a wind-hydroprotective membrane on top of it, a load-bearing frame is created in the chosen direction and with the required pitch.
Sheathing diagram with insulation Source files.builderclub.com
Advice! If the pitch of the first and second battens does not coincide, the first (for insulation) can be fixed perpendicular to the main (bearing) one.
All existing openings must be framed around the perimeter, taking into account the angle of the slopes. As a result, the installed sheathing should level the walls and create even vertical planes on which the siding will be laid.