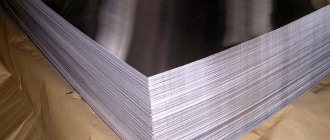
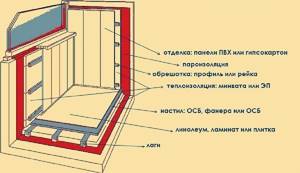
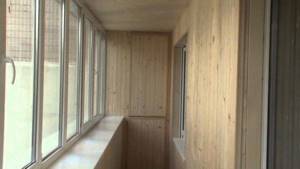
It is impossible to turn a balcony into a living space without appropriate insulation and finishing. For this purpose, they mainly use wooden lining, MDF, plastic, as well as some sheet materials. To achieve the desired effect, these materials must be mounted on a specially prepared frame - lathing. How to correctly select, calculate and install this important element will be discussed further.
Types of sheathing
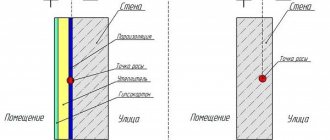
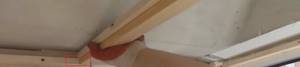
Lathing scheme for panels or lining
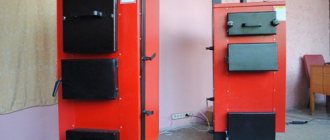
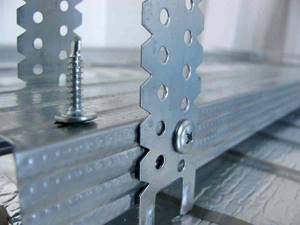
The material and method of assembling the lathing directly depends on the finishing and on the structural features of the insulated balcony. The frame is assembled either from wooden blocks and slats, or from galvanized profile , which is often used for plasterboard structures.
Metal profile lathing
In addition, there is also a plastic profile, but due to its high price and low strength indicators, it is used quite rarely (most often, it is ceiling lathing).
Wood is a natural and warm material; condensation does not form on it, unlike metal, and it is easier to work with. For a balcony, this is a more preferable option, but with some reservations. It should be remembered that under certain conditions wood is subject to deformation; therefore, when choosing bars for sheathing, it is necessary to pay close attention to their quality.
Excessively high humidity of the wood can lead to the fact that when it dries, it will lead, and with it, possibly, the entire structure. The ideal option is dry planed timber of coniferous species (pine, spruce, larch).
Planed dry lath 20x40mm 3 m long will cost 50 rubles.
This will cost 2-3 times more than conventional scaffolding, which is also applicable (if you have the opportunity to choose and confidence in your own competence to make the right choice). In any case, it would be a good idea to treat it with an antiseptic solution before starting to assemble the frame.
To prevent the bars from moving, we foam the cracks!
A structure made from galvanized profiles will cost more than from scaffolding, but cheaper than from dry joinery. The main disadvantage is the high thermal conductivity of the metal, up to freezing in winter when located close to the street.
Assembly method
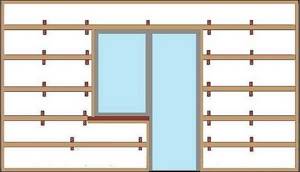
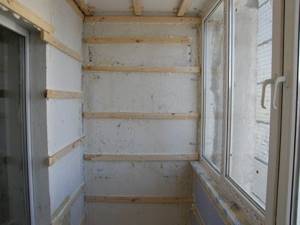
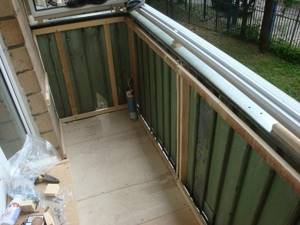
There are two options - either a horizontal arrangement of load-bearing elements or a vertical one.
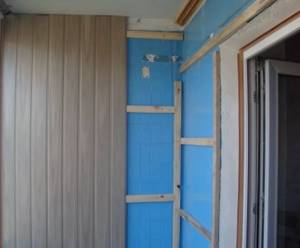
Vertical arrangement of the sheathing
As a rule, various types of lining, including MDF and PVC, are mounted vertically, which implies a horizontal arrangement of the wall sheathing.
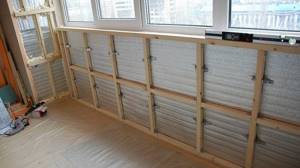
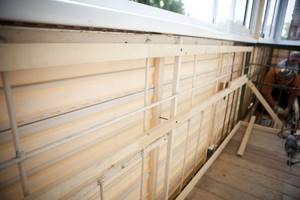
Horizontal arrangement of sheathing with vapor barrier
In the case of sheet finishing materials (plasterboard, OSB), there is no fundamental difference. The main thing is that the rail is located along the entire perimeter of the sheet being screwed, and the internal space is filled with sufficient frequency.
Popular materials
The type of frame and the method of its assembly depend on the size, area of the room, and type of future finishing.
Among the main materials:
- wooden beam;
- metal carcass.
Each of them has advantages that affect the installation and insulation of the loggia. Construction work begins with choosing the type of foundation, in accordance with the design and style of the apartment.
Wooden beam base
Cladding with wooden blocks is a classic choice for upgrading a balcony room. The wooden structure has an attractive design, ease of installation, accessibility, small cross-section of timber, and lightness.
Advantages of wooden formwork:
- wood is cheaper than other cladding components;
- easy installation method;
- wood retains heat and does not allow moisture to pass through;
- the timber is laid in a room of limited size;
- wood can be easily laid on a rigid concrete base;
- Cladding sheets of various types (PVC, corrugated sheets, etc.) can be attached to wood without any problems;
- the tree tolerates high loads well and rarely deforms under a ready-made frame.
Disadvantages include susceptibility to deformation due to moisture absorption and the risk of structure subsidence. To protect the finished building, the boards are covered with a layer of antibacterial impregnation, hydrophobic paint, and an antiseptic solution that prevents damage, deformation, and subsidence of the wood.
Metal base
The metal is used for laying plasterboard and other facing sheets.
Metal bases are characterized by:
- high level of protection against moisture;
- not susceptible to leakage or leakage of dampness;
- high strength, reliability;
- withstands heavy loads;
- does not deform or change shape;
- the risk of subsidence is eliminated;
- fire protection.
The metal profile has more disadvantages. Galvanized metal is more expensive than wooden boards, it is heavier, retains cold, is susceptible to corrosion, and it is more difficult to install a metal base. The standard size of a metal profile is large for a loggia, so it must first be cut to the size of the room.
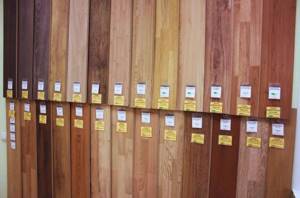
Choosing wooden lining
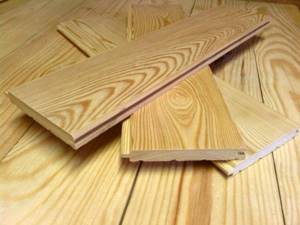
The practical qualities and high characteristics of the material have long been known. When choosing lamellas, you should give preference to classes A, B. Extra is expensive, and class C is not distinguished by aesthetics and durability; such dies are good for arranging a rough coating, but are not suitable for finishing. As for the grade, you should prefer lining made of coniferous wood. Resinous compounds protect the lamellas from rapid deterioration and darkening, and the material is rarely chewed by bugs and mice.
Advice! If you line a loggia or balcony with larch slats, you don’t have to worry about water-repellent impregnations - the wood is not exposed to moisture, does not crack during climate changes and retains its original appearance for a long time.
Advance paynemt
Before finishing the balcony ceiling with clapboard begins, you will have to calculate the required amount of material. You will need guide rails for the frame, let them be rectangular sections of 20*40 mm. Mineral wool has proven itself well as insulation, and the thickness of the guides is selected based on it.
Advice! Most often, the lining is laid vertically on the ceiling. The vertical step between the horizontal guides is calculated within 0.4-0.6 m.
The height of the balcony determines the number of horizontal guides. The calculation is as follows: multiply the size of the perimeter by the number of guides, add the perimeter indicators of door and window openings and the final figure is the footage of the guide rails on the ceiling.
The slats need to be fastened to dowels in increments of up to 0.8 m. But the amount of material is calculated depending on the selected type of product, that is, the length of the slats. Having made simple calculations on the ceiling area, determine the required amount of lining and add 10% for defects.
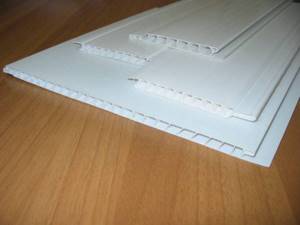
How to choose PVC panels for a balcony ceiling
The service life of the material is 10 years or more, and in order for the decor to serve properly, it is important to pay attention to the following factors:
- Connections. A simple combination of parts will help determine the quality: the density of the lamellas without play or cracks along the entire length of the joint will indicate that the manufacturer strictly followed the manufacturing technology. The joint error is no more than 0.2 mm per 1 lm.
- Evenness of the plane. If low-quality or recycled raw materials are used, stiffening ribs will be visible on the surface of the lamella.
- Ribs thickness. See the parameter in the product specifications: the thicker the stiffeners, the stronger the lamella itself.
And now about how to calculate the required amount of material: first you need to decide on the layout (lengthwise or crosswise). Then divide the ceiling area by the area of one element, add 10% to the final figure and this will be the required purchase volume
It is important to consider the width of the dies. If the length parameter is 3 m, laying across with a ceiling width of 140-150 cm, one lamella is divided in half without waste
The most popular dies lengths: 150; 200; 300 cm.
Preparatory work
Before finishing the ceiling of a balcony or loggia, it is necessary to clean the surface of the ceiling slab from the old coating, seal the joints between the window frame and the ceiling, eliminate cracks, carry out waterproofing and insulation.
Removing old finishes
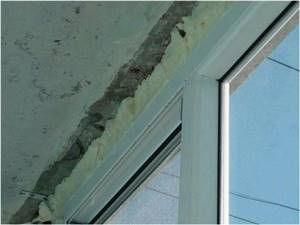
Sealing the joints of the window frame and ceiling
If the balcony is on the top floor, then waterproofing is done from the outside and inside, while external waterproofing must be entrusted to professionals.
Preparing the balcony for finishing with plastic panels
PVC panels have long been considered a popular finishing product. This is due to their advantages, such as:
- good level of additional insulation;
- resistance to moisture and temperature changes;
- ease of care;
- excellent appearance.
Material selection
Types of plastic panels for finishing
When pre-selecting a material, you should not focus on the cheapest PVC panels. They will not have all the properties listed above. You need to start considering materials from the middle price category. They have a very wide range of colors; some models can have almost two hundred different shades.
To understand that plastic panels are truly of high quality, you need to pay attention to the following factors:
- a large number of stiffeners;
- high-quality material is uniform in color and has no foreign inclusions;
- the design of the front surface should not have unpainted areas;
- during the process of joining the panels to each other, a characteristic click should be heard;
- no deformation on the front panel.
If these conditions are fully met, we can say that the selected panels belong to a truly high-quality product. This material should be used when finishing balconies or loggias.
What is sheathing and why is it needed?
Lathing is a lattice structure made of profile materials of rectangular or square cross-section, designed for installation of cladding, laying and holding insulation, insulating films and roll insulators. Most often, the grille is made of materials, the main requirements for which are strength and ease of fixation of finishing elements.
Lathing on a balcony or loggia is usually used in the following cases:
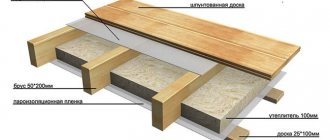
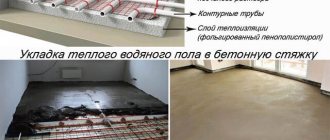
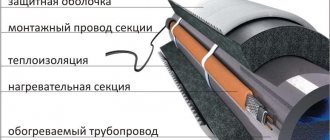
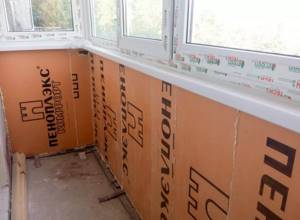
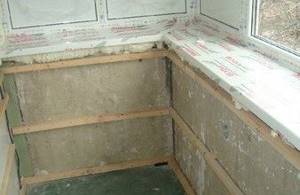
- Installation and insulation of the floor . Thermal insulation of the floor from a concrete slab is one of the important stages of insulating a balcony room after it has been installed with warm glazing made of a metal-plastic profile with multi-chamber double-glazed windows. Typically, the floor sheathing on a balcony is mounted from timber, the cells of which are filled with insulation made of mineral wool, extruded (Penoplex) or ordinary polystyrene foam (foam). In this case, the balcony floor is raised to a user-friendly height by laying joists in one or two rows or using rectangular elements with the required height.
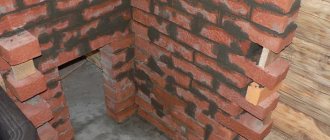
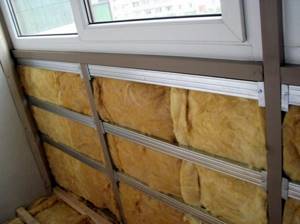
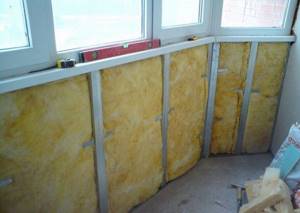
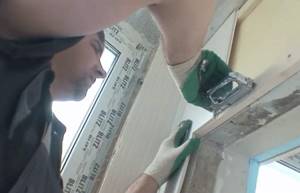
- Insulation and sheathing of the parapet . In order to retain heat in the balcony room, after installing heat-saving glazing with multi-dimensional double-glazed windows, the inner walls of the parapet are finished with heat insulators. To fix the insulation, a metal or wooden frame is placed on the surface of the parapet, into which the insulation is inserted, after which it is covered with various types of sheathing.
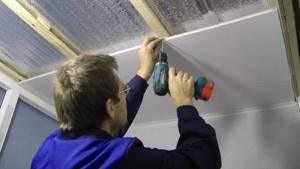
- Thermal insulation and ceiling finishing . Lathing is often used for laying insulation on the ceiling and then attaching finishing building materials and spotlights to it.
- For wall decoration. Often the walls of balconies are sheathed with plastic slats or clapboard; for laying panels and boards according to the instructions, a lattice frame made of wood is used as a base.
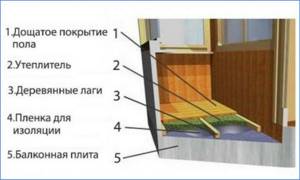
Rice. 2 Scheme for laying the balcony floor
How to make lathing on a balcony - instructions for work
Most owners rarely leave the balconies of modern apartments in their original condition to increase comfort, decorative exterior and interior appearance, and expand functionality.
The balcony space is glazed to protect it from precipitation, insulated against the penetration of cold, lined with finishing materials inside and outside to give an aesthetic appearance, and when carrying out many works, balcony sheathing is used to secure the cladding. The use of balcony sheathing is due to the fact that attaching finishing materials to concrete slabs, from which walls and parapets are often made, is difficult and impractical, and if the balcony is separated from the street only by a fence made of steel reinforcement, a lattice frame is the only option for installing any building materials on metal rods.
When carrying out repair and construction work with your own hands, it is useful to know the process of installing lathing on various bases for the most commonly installed types of cladding, the tools used, the building materials used, components and fastening fittings to hold the elements on the surface.
What is it and why is it needed?
Sheathing a balcony or loggia is used to insulate the floor and protect the walls and ceiling from cold penetration into the room connected to this area of the apartment in the winter. Thermal insulation of the flooring from the concrete floors is the main stage after installing multilayer double-glazed windows on the balcony. The floor sheathing uses solid wood beams as a supporting structure. The cells of the timber are filled with insulating padding, for example, mineral wool, polystyrene foam or foam filler. The floor is raised by laying lags in 1-2 layers.
An alternative to logs is a cellular structure with rectangular height spans, for example, a threshold between a room and a balcony (or loggia).
To retain heat, the apartment owner, having installed heat-efficient double-glazed windows, trims the inner walls of the balcony railings with a heat-insulating layer. To fix the insulating layer on the parapet, use a metal profile or solid wood in the form of a frame base. In turn, pieces of insulation are placed in it. Having installed the insulating layer, the sheathing is covered with sheathing building material, for example, plywood.
To finish the ceiling, it is possible to use the same sheathing with insulation. After installing the outer sheathing layer, lighting equipment is installed on the updated ceiling.
The walls of the balcony compartment are sheathed using plastic spacers or lining. Wooden sheathing is used as the main part.
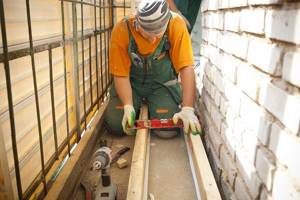
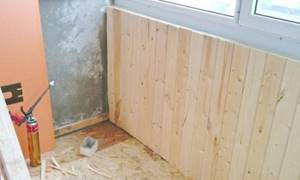
Assembling the floor sheathing
The installation of the sheathing should begin with the floor (if you plan to insulate it), after which they proceed to the ceiling and only then to the fence and walls.
The timber, pre-treated with an antiseptic, is cut to size. The length of the blanks depends on the direction of the finishing material and the configuration of the balcony.
Logs with a minimum cross-section of 40x40 are attached along the bottom slab of the balcony (parallel to the fence). An 80 mm long anchor with a diameter of 8-10 mm is used as fasteners.
We level the logs with each other
Fastening frequency – not less than 50 cm; drilling depth – 50 mm.
Range
Based on size and design, panels can be divided into types:
- Narrow white lining - elements 3000-6000 long, 100 wide and 10 mm thick. This is the most budget material without any finishing.
Laminated lining - with a decorative film coating. They can be plain colored or with a pattern, for example, imitation wood.
Wide white ones - their width is 250 or 375 mm, thickness 5, 10 mm. Standard lengths are 2.7 and 3 m. Color white, surface glossy or matte. Most often used for covering ceilings.
Two-section “gold”, “chrome” - refined white panels with a spectacular finish. A beautiful metallic sheen gives the finished surface an expensive look.
With thermal printing - the design is applied using an ink roller, then heat treatment is carried out. The process is completed by creating a protective layer. Finishes with thermal printing realistically imitate marble, stone, brickwork, and silk fabric.
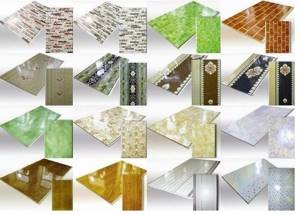
Offset printing is a more complex way of creating a pattern, but with improved image quality. The design on plastic treated in this way is more resistant to scratches and fading. Using offset printing, multi-color ornaments and holographic prints are created.
In order for the finishing to have a complete look, components are used - starting, connecting and F-profiles, corners, baseboards. They are produced in a wide color palette according to the color of the base material.
We carry out installation. Step-by-step instruction
Installation of panels using an adhesive base is carried out in case of saving useful space in the room.
This method has the disadvantages of not being able to install a heat-insulating layer. Wall leveling is required before installation. Sealing the lamellas with glue eliminates the possibility of repairing a separate fragment of the fabric. During installation, a wooden frame is often made, which, with high-quality insulation installed, is not subject to deformation.
Preparing the walls and ceiling
Before installing the casing, it is necessary to first inspect the surface and eliminate defects. To do this, it is recommended to use equipment that can be used to widen the crack and seal it with a special composition that is resistant to moisture.
After this, the surface is coated with a primer using antiseptic and sealing components. Such mixtures are available in an assortment on the construction market. At this stage it is recommended to carry out glazing.
We install the sheathing from a wooden beam or a metal profile
The material for the frame is selected taking into account the level of humidity in the room. Wooden beams are often used for lathing, but if the balcony or loggia is damp, then metal elements can be used.
Installing a metal balcony sheathing under plastic panels requires skill, but such a frame is durable and practical. The presence of the lathing allows you to replace the facing material at any time.
Before installation, the ceiling and walls are marked, fasteners are cut to size. Wooden slats are treated with an antiseptic composition. For this purpose, PVA putty and motor oil are used.
According to building codes, the distance between the base elements should be 40-50 cm. The frame should be filled at knee and shoulder level. This subtlety of installation is determined by operating conditions. At this level, the plastic sheet can often be subject to mechanical stress.
About insulation
Installation of a layer of insulating materials is carried out subject to the installation of metal-plastic window structures. It is advisable to carry out insulation in the case of connecting a loggia to a living space, equipping a recreation room, or a winter garden.
If you are finishing the balcony with plastic, then it is better to lay a layer of foam insulation. This material does not weigh down the structure, is characterized by low cost, and is resistant to high humidity.
Extruded polystyrene foam can be used as insulation. The material has different technical characteristics, but has a high price. It is not recommended to use mineral wool, the installation of which requires additional waterproofing. When exposed to moisture, this material loses its insulating properties.
Installation of foam boards is simple. The material is placed tightly between the guides, and the cracks are sealed with polyurethane foam. It is not recommended to use glue for installation, because the plastic sheet will tightly press the foam. In regions with warm climates, penofol can be used for insulation.
We mount the panels
Installing the slats requires securing the guide strips. According to configuration and purpose, they are distinguished:
- initial profile;
- fastening elements for extending a short strip;
- details hiding the cavity between the plank and the surface;
- skirting boards for finishing seams.
It is better to fasten the guide parts using nails and self-tapping screws. It is recommended to start installation from a remote corner. To do this, the lamella is installed in the profile and the vertical position is adjusted using a level. Finishing the loggia with panels involves sequential installation of the cladding with control of the location of the lamellas in the grooves.
To cut crosswise, it is better to use a hacksaw, and along the length this can be done using a knife. When installing lamellas diagonally, greater consumption of materials is provided. To ensure air convection, holes are drilled at the bottom of the doorway.
Separately about the covering of openings
Installation of plastic panels requires registration of joints. To seal the seams in the corners after installing the cladding, it is recommended to use a sealant. The shade of the material should be in harmony with the color of the lamellas.
https://youtube.com/watch?v=4CQEkS-S0Pg
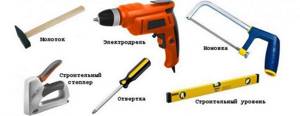
Required materials and tools
Installation of lathing does not require expensive equipment or any high qualifications in the field of construction. In most cases you will need the following:
- Tape measure, pencil (marker);
- When working with wood, you need a tool for end cutting (hacksaw, jigsaw or power saw);
- Hammer drill, screwdriver, electric drill (as a last resort, you can get by with one impact drill with a set of necessary drills and bits);
- Metal scissors or a grinder for cutting galvanized profiles (if the sheathing is made of it);
- Fasteners (dowels, screws, anchors);
- Installation of insulation and waterproofing elements will require polyurethane foam and a stapler with staples.
- For wooden sheathing: timber 40x40 and lath 20x40;
- For metal: rack profile and guide;
- Insulation (mineral wool, expanded polystyrene);
- Waterproofing (vapor barrier).
Material calculation
The amount of timber or profile depends on the size and configuration of the insulated balcony. Let's consider a complex option with load-bearing vertical posts and a horizontal rail that will be attached to them.
The distance between the vertical beams should not exceed 1 m, while the height on the balcony parapet corresponds to the distance from the floor to the window sill. On blind elements (for example, side partitions and walls) - from the floor to the intended ceiling. Thus, for a 4-meter loggia with a meter parapet, you will need 5 bars of 1000x40x40 mm (2 along the edges and 3 between them, at equal intervals). If you plan to insulate the partitions, you need to add 4 more bars of the appropriate length (approximately 2.5 m).
A batten with an approximate pitch of 40 cm is attached to the verticals. For the loggia described above, in the case of finishing with wooden lining or MDF panels, three rows of battens will be required (2 on top and bottom, 1 in the middle) - a total of 12 m. If you plan to sheathe it with plastic, it is better add another row in the middle, that is, in total you get 16 m of slats with a cross section of 20x40 mm. To this value it is necessary to add the dimensions of the door and window openings (2 lengths, 1 width and depth), and also make the appropriate calculations for the adjacent walls, if they are planned to be sheathed.
Fasteners for various surfaces
The wooden elements are fastened together using ordinary wood screws of suitable length. At the same time, in some cases (in order not to split the dry lath, thickness more than 30 mm, hard rocks), it is better to drill a hole for the screw. For example, to screw a 20 mm thick rail to a 40x40 block, you will need fasteners 55 mm long.
Fixation to concrete is carried out using plastic dowels (6-8 mm), which are inserted into pre-drilled holes, and self-tapping screws.
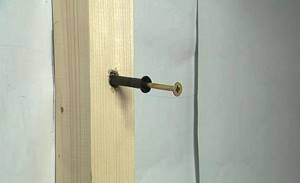
So, to secure a vertical beam into a concrete floor using a metal angle, you will need 6x40 mm dowels and 40 mm self-tapping screws. It is advisable to anchor particularly loaded elements (for example, a backfill under a dryer) into the concrete with anchors. Diameter – 8-10 mm; length – thickness of the fixed beam + 40-60 mm.
For an 8 mm anchor bolt, the hole needs to be drilled with a diameter of 10 mm!
Materials for lathing a balcony
The building material for the sheathing should be easily mounted on a solid concrete or brick base, metal fencing, be resistant to the influence of the external environment, and cladding should be easily laid on it. These requirements are fully met by only two types of materials: wooden beams of various sections and a metal profile for drywall. Each of the materials has its own advantages and disadvantages; wooden lathing has the following features:
- The cost of wood lathing in comparison with metal profiles for plasterboard sheets is much lower; one linear meter of a bar with a cross section of 50x50 mm will cost the consumer approximately 25 rubles.
- Since the timber is produced in different sections, it is convenient to use it on balconies and loggias with a small area for wall cladding - in this case, the loss of balcony space after finishing will be minimal.
- Timber is a universal material - it can be used to attach plastic slats, lining, drywall for painting and wallpapering, particle boards and fibreboards, plastic siding and corrugated sheets.
- A wooden frame is easy to install on rigid, solid bases, and it is also much easier to attach finishing sheathing to it. To secure boards or slats, you can use a wide range of elements: self-tapping screws, screws, nails, staples, clamps; when carrying out sheathing work, you do not need a special power tool - a screwdriver.
- The disadvantages of wood include low resistance to moisture; to combat this feature, special water-repellent impregnations made from hydrophobic components are used.
- Wood is also subject to deformation under constant humidity, so it is most rational to use it inside a dry heated space - an insulated balcony or loggia.

Rice.
3 Types of timber A metal profile made of thin galvanized steel for fastening plasterboard sheets is the second most popular material for installing cladding, and has the following features:
- The average price of one linear meter of a standard 60x27 mm ceiling or 50x50 mm rack profile (not Knauf), from which the frame is mounted, is 35 rubles. and 50 rub. accordingly, which is almost twice the cost of a similar wood product.
- The metal profile is difficult to install and requires certain skills; attaching the cladding to it is possible only in one way - with self-tapping screws using a screwdriver.
- Due to the insufficient rigidity of the profile guides, they are not used for flooring due to the high load.
- The minimum width of a metal profile is 27 mm; in many situations this is too high a parameter when covering walls in comparison with wood slats, the thickness of which can be selected from 10 mm.
- Galvanized metal profiles are not affected by moisture and, accordingly, corrode for a long time, do not change their shape, so it is practical to make external and internal parapet sheathing from it, as well as completely use it on the walls and ceilings of a cold balcony.
Rice. 4 Profile for drywall
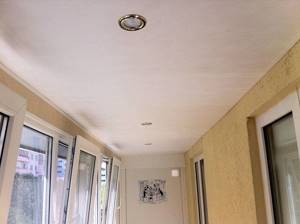
Ceiling made of PVC plastic panels
Advantages of this material:
- resistance to temperature changes;
- durability, products made from PVC panels will last at least 10 years;
- easy to maintain, just wipe the panels with a damp cloth from time to time;
- ease of installation;
- PVC panels have an excellent appearance and a large selection of colors;
- affordable price.
There are practically no disadvantages, the only recommendation is to choose white plastic, since the pattern may fade under direct sunlight.
How to cover the ceiling on a balcony with plastic panels - step-by-step instructions:
This example shows how to make a suspended ceiling from PVC panels; if there is no need for a suspended ceiling, then the installation of the sheathing slats will be carried out directly under the ceiling according to the same scheme as in the instructions below, otherwise the installation method remains unchanged.
- Installation of sheathing. The first beam is placed above the frame and attached to it with self-tapping screws.
- We attach the second beam to the inner wall in the same way. It is important that these two beams are at the same distance from the ceiling.
- Next, we place the slats in parallel inside the sheathing in increments of 50 cm. The timber is connected to the sheathing frame with self-tapping screws.
- The gap between the sheathing and the slopes is filled with a layer of polyurethane foam. It is applied in an even layer and provides additional sealing.
- Installation of the last slats according to src=»https://balkonoved.ru/wp-content/uploads/2019/08/x6.jpg» class=»aligncenter» width=»660″ height=»202″[/img]
- To secure the rail in this place, you can use a metal corner with holes for self-tapping screws.
- Next, we fasten the U-bar along the entire perimeter of the sheathing using staples. The fastening step is 10-20 cm.
- We cut the panels to the required length and proceed to installation. The panel is placed inside the U-planks and moves to the side wall. The panels are connected to each other by a locking mechanism, and secured to the sheathing with staples. If spotlights will be used on the balcony, then it is necessary to make holes for them using a crown. The remaining part of the ceiling is sheathed using a similar technology. If the last panel does not fit in width, then it must be trimmed.
- The ceiling is ready.
In addition to the text version of the instructions, we recommend that you read the instructions in video format, where the installation is shown in more detail with an explanation of the nuances.
Required Tools
The lathing is made of wooden guides or a metal profile; to install the beam on hard hard surfaces made of brick or concrete, the following tool is needed:
- metal building level;
- tape measure with a simple pencil;
- hammer drill with pobedit drill for concrete;
- metal corners for fastening vertical and horizontal lattice links together; in some cases they are used for alternative fastening of bars to walls, floors or ceilings.
- fasteners for connection to concrete slabs and brickwork - self-tapping screws with dowels, anchors or special screws for screwing into concrete channels.
- a screwdriver or a Phillips screwdriver, it should be borne in mind that it is unlikely that you will be able to screw a screw into concrete by hand, and carrying out all the work with a simple screwdriver will take a lot of time and physical effort.
- A thin cord to check the placement of vertical or horizontal guides, plastic wedges or pieces of plywood (wood) to align the slats.
- Polyurethane foam for sealing gaps between joists and adjacent wall or floor surfaces.
When installing a metal profile, you will need a similar tool; instead of a wood saw, use a grinder or scissors to cut the guides to size. Self-tapping screws are used to connect profile sections together and screw the cladding elements together; the profile is also attached to self-tapping screws with dowels.

Rice. 10 Frame installation tool
Stage 2 - surface preparation
Lime mortar is an excellent antiseptic.
Balcony lathing for plastic panels, like any other, requires certain preparation of the walls:
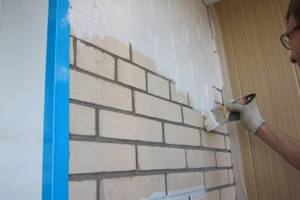
- if the wall is made of brick, then it is enough to simply cover it with antibacterial impregnation so that fungus and mold do not appear under the insulation. Simple lime milk is quite suitable as an impregnation;
- walls made of reinforced concrete must be primed, and ideally plastered with a layer of 1-2 centimeters.
In any case, it is necessary to level out significant unevenness, holes and putty all the cracks and cracks in the wall. Ordinary cement mortar or Ceresit adhesive mixture will do.
Don't forget to prime all the wooden parts that will remain under the finish.
Installation of lathing for different materials
Under the lining
Lining is a thin layer of wood, wooden panels, easy to install, adding a stylish finish to the room. The formwork for the lining is made of wood, secured using clips and self-tapping screws. It is attached to the concrete surface with screws. The reinforced concrete wall is pre-treated with antibacterial impregnation.
To protect against moisture, a layer of vapor barrier film is placed between the walls.
Under plastic panels
PVC panels for balconies are an affordable and durable material that is easy to install. Panels made of plastic or PVC are attached to wooden boards, less often - to a metal base. Beams, unlike galvanized slats, are fastened with ordinary staples, nails or self-tapping screws; a metal frame requires fastening with dowels or screws.
The plastic lays flat on a wooden base, does not deform, does not form cracks or gaps.
Under plywood
Sheets of chipboard, OSB or plywood are less often installed in the walls of balcony rooms. This is a standard material for laying floors on a balcony if it is not possible to lay wooden logs. High humidity and the risk of deformation, displacement, and subsidence limit the possibilities of plywood and chipboard sheets for cladding loggia walls.
If the sheets are nevertheless selected, they are secured with similar wooden slats, screws or dowels. The beams are strong, resistant, hold the sheets and do not deform them.
Under drywall
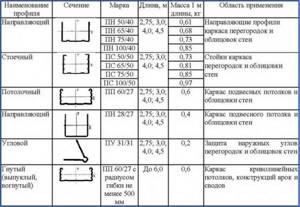
Sheets of plasterboard are laid on a metal profile. Galvanized panels are durable, can withstand heavy weight, and protect against leaks, dampness, and moisture. The standard size of a metal frame for plasterboard is 600x600 mm, with fastening with a 27 mm thick profile.
When laying a thick insulating or insulating layer, the thickness of the panels is 65, 75 or 100 mm.
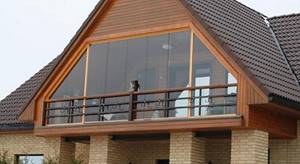
Bay windows
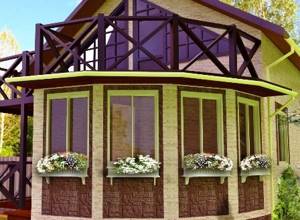
They are multi-section windows that typically extend outward from the exterior wall of the home. Although they can be used and are commonly found in all styles of home, they are most often found in Victorian or other traditionally decorated homes. Bay windows are popular for many reasons, but mainly because their large size and unique shape have the ability to fill a room with natural light and create a slight expansion of space.
Bay windows are usually three-sided, consisting of three or more windows. One window is parallel to the wall of the house, while the other two face outwards towards the interior wall, forming a trapezoidal shape. Typically, bay windows will add length and width of two to three meters, but this depends on the size of the structure installed.
Bay windows are very popular due to their aesthetic appeal. For this reason, adding a bay window to your home tends to be a very good investment if you ever sell your home in the future. Buyers often pay extra for improved natural light, and panoramic windows only increase this amount. In addition to providing better lighting, bay windows will help improve air flow in your home. They also add extra storage and furniture space, making them a popular choice for small bedrooms, living rooms or reading areas.
Installation
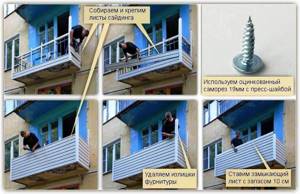
Let's look at how to finish the exterior of a balcony with siding. You should start working with your own hands with preparation.
Preparatory stage
Before you start finishing, you need to do some serious preparation. Work order:
- the room is cleared of all things;
- structures are inspected and their condition is assessed;
- if cracks and other damage are found, they are expanded and sealed with mortar;
- If the metal fences are in good condition, then they need to be cleaned and covered with soil. If the grille is skewed or rusted, it needs to be replaced.
Frame assembly
To cover the surface with siding, you need to assemble a frame on which the panels will be attached. The frame consists of an upper and lower belt. The lower one runs along the edge of the concrete slab, the upper one is located at the level of the railing.
- the timber is cut into pieces of the required length, soaked in an antiseptic solution, and covered with drying oil in two or three layers;
- to assemble the lower chord, two beams are connected, since the width of this part is at least 80 mm;
- the beams are attached to the slab with dowel-nails and connected to each other with self-tapping screws;
- the gaps formed between the slab and the frame are filled with polyurethane foam;
- the beam is connected to the balcony grill using clamps;
- On the lower belt you need to secure the fasteners for installing the outer corners. To do this, use sections of window sill strips;
- the upper part of the structure is assembled in the same way;
- The belts are connected to each other by vertical jumpers, the spacing of the jumpers is about 50 cm. Additional jumpers need to be installed in the corners;
- if subsequent glazing is planned, then additional horizontal beams must be installed.
Carrying out the cladding
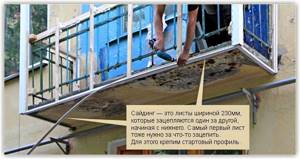
The sheathing begins with fastening the starting strip; it must be fixed at the level of the upper edge of the lower belt.
To make it convenient to attach the bar, you must first hang it on 3-4 pieces of fishing line, which are threaded into the mounting holes of the bar. It is necessary to prepare sections of fishing line in advance. One edge of the fishing line is secured to the upper belt, and brackets are attached to the lower edge, which are threaded through the mounting holes.
After installing and fastening the starting strip, install corner profiles in the corners of the balcony, they are fastened into “nests” made in advance from window sill strips. Now you can begin to attach the siding itself, starting with the sheathing from the bottom up. Fastening is carried out by screwing in self-tapping screws.
The mounting holes in the panels are made oblong, but the hardware must be screwed in exactly in the center. This is necessary in order to compensate for temperature changes in the linear dimensions of the panels. In addition, it is recommended to not tighten the self-tapping screw completely; it is necessary to leave a gap between the head and the base about 1 mm wide.
When installing panels, it is necessary to insert each subsequent part into the groove of the previous one (when installing the first panel, it is inserted into the groove of the starting strip) and push it all the way (this can be determined by clicking).
At the last stage you need to install the trim and finishing strip. Exterior finishing can be considered complete. Now you can begin sealing joints, performing insulation, waterproofing, glazing and interior decoration.
Vinyl siding can also be used for interior decoration, but you can also choose other material, for example, plastic panels. They are less durable than siding, but are quite suitable for interior work.
So, covering the outside of a balcony with siding is one of the most popular finishing options. This material is practical, it looks attractive and lasts a long time. It is entirely possible to carry out the finishing work yourself; you just need to carefully study the instructions and take a serious approach to ensuring the safety of the work.
Clapboard finishing
In order to give the balcony coziness, warmth and beauty, it is often lined with clapboard made of natural wood. A big plus for her is the instant insulation of the balcony, which will help keep warm in the winter. Finishing with such material yourself will not be difficult, but the amount of work is quite large.
The term lining often refers to a product made of wood. But sometimes plastic PVC panels can be called clapboard. Before choosing a given material, it is often based on its cost and practical considerations. In different regions, natural wood costs differently.
Most often they prefer to choose wood, as it is a natural material. In practice, of course, PVC is better because: it is easy to wash, practically does not require maintenance or treatment, and retains its presentable appearance for a long time.
Lining made of wood is more difficult to use: before installation it must be coated with a protective impregnation. Also, if desired, the lining should be painted or varnished, but only after complete installation. But, despite the difficulties in maintaining wood, it is popular for finishing balconies.
The best material for a balcony
Of course, you can simply cover the room from the street with the profile and stop there. Starting a balcony renovation is not a task for the lazy. But the interior decoration with clapboard will transform the concrete walls, making them elegant and well-groomed. How nice it is to drink tea on such a balcony in the summer!
Cladding with clapboard will require some skills and costs, while many of the works can be done with your own hands and, in fact, it does not take that long. First of all, you should choose the finishing material, the rest will depend on it. Any slats for cladding are called lining (because carriages were lined with wooden slats for cheapness). Today it is a common name for PVC panels (“plastic” lining) and wood.
Plastic is not so difficult to install, it is light and easy to clean, resistant to temperature changes, humidity, and household chemicals. It is better to choose light panels that hardly fade over time (this is true if the loggia faces the sunny side). The cost of PVC and wood differs in different regions, this can also influence the decision to purchase a particular material. For some reason, plastic lining does not impress compatriots; many find the most budget-friendly wooden lining more interesting. Although there are many more difficulties with its preparation, installation and maintenance.
7 photos
If you want to cover the loggia with wooden lining, then be prepared for the following:
- Before installation, the wood must be treated with special compounds;
- If you plan to paint or varnish the panels, then this is done after installation;
- Wood is afraid of water and should not be wetted, washed with rough sponges or abrasive chemicals;
- After a few years, it will be necessary to remove the protective layer (coating) and again treat the lining with compounds.
There are no fewer people wanting to cover different rooms with natural lining, so advice on choosing will be useful.
Concrete
The advantages of concrete balconies - their durability, fire resistance and appearance - make them an attractive addition to any private cottage. Many people take advantage of the flexibility and durability of these balconies and often decorate them with carpets, tiles, furniture, and plants.
However, all external concrete balconies are susceptible to deterioration, although this may not be obvious to the owner. Cracks, peeling of concrete, corrosion of reinforcement are signs of deformation. Small cracks in a concrete surface may look harmless, but the gaps provide a place for moisture to enter.
Throughout its life, a concrete floor is subject to numerous freeze-thaw cycles that affect both the surface of the concrete and the potential structure. Scaling (also known as spalling) is localized spalling of surface mortar caused primarily by hydraulic pressure from freeze-thaw cycles affecting the concrete at the surface. As a rule, it begins with localized small cracks, which can later merge and expand. Remember that concrete balconies can be severely damaged by frost. Regular frozen water expands by about 8%, but water with salts can expand up to 16%.
Installation technology using a frame
If during renovation work it is planned to insulate the walls of the balcony, the installation of the plastic covering must be carried out only on the frame. This technology provides additional heat and sound insulation of the loggia, and also helps to hide uneven walls.
Required tools and materials
Before starting facing work, you need to take care of consumables and working tools.
For installation you will need:
- self-tapping screws;
- electric drill;
- construction stapler and staples;
- screwdriver;
- roulette;
- construction knife or jigsaw;
- level;
- guides.
If you are going to build a wooden sheathing, you will need special protective compounds with sealing and antiseptic properties.
Preparing the walls
Surface preparation is carried out in the traditional way. Usually the process includes only 2 stages: complete cleaning of the surfaces to be coated from old finishing materials and thorough priming of the entire surface planned for finishing.
After the primer has completely dried, you can proceed to installing a metal or wooden profile. Beginners are recommended to first carefully study the step-by-step instructions.
Fastening the sheathing
Installing the sheathing requires special responsibility, since if the frame is installed incorrectly, the entire sheathing may turn out crooked.
Installation of a metal profile is usually carried out in the following order:
- Markings are applied to determine the location of the brackets. The distance between horizontal profiles is usually no more than 50 cm.
- According to the measurements taken, the brackets are fixed.
- The profile is mounted on the installed fasteners. It is recommended to align its elements using rules or guides fixed on the wall or ceiling.
If wooden slats are used for the sheathing, then before installation they must be treated with special antiseptic compounds. Otherwise, the process of installing a wooden profile is carried out according to the same principle as installing a metal sheathing.
Insulation
Finishing the balcony with plastic panels allows for additional heat and sound insulation of the room. For loggias, rolled mineral wool or foam boards are most often used.
As a rule, these materials have fairly high heat-saving rates, in contrast to their thinner foam-based counterparts. To fix the heat insulator in the desired position, it must be installed in the free space between the frame slats.
Installation of panels
Covering a loggia with PVC panels is done quite quickly.
Algorithm of actions:
According to the instructions, facing work begins from the farthest wall
First of all, using a building level, a starting profile is constructed around the perimeter. Next, the first panel is carefully fixed to the profile on one side, and to the sheathing on the other. The next panel is first carefully joined to the previous one, and then carefully leveled and also fixed with a self-tapping screw or bracket to the sheathing. The entire planned area is covered using the method described above.
The last panel is first carefully cut to the required dimensions, and then also fixed with self-tapping screws to the sheathing
Using the method described above, the entire planned area is covered. The last panel is first carefully cut to the required dimensions, and then also fixed to the sheathing with self-tapping screws.
Covering openings
During the installation process, it is recommended to pay special attention to the lining of the openings. This operation is recommended to be carried out after almost the entire area of the balcony has been covered.
The last panel, installed above or below the opening, is first carefully cut to the required dimensions, and then tightly joined with other nearby products. If cracks appear during installation, they can be easily masked using PVC plinth glued to mounting adhesive.
Exterior cladding
You can sheathe a balcony with plastic panels not only from the inside, but also from the outside. However, for cladding external walls, it is recommended to purchase more durable material with increased resistance to UV rays.
As a rule, all plastic products are highly resistant to moisture, but the joints are still their weakness, so for additional waterproofing it is recommended to use polyethylene film or other materials with similar properties. Foam boards or penoplex can be used as insulation.
Kinds
A house project may involve very different design and construction solutions. The choice depends on the facade architecture and the purposes that they must fulfill. The article lists the most popular balconies in a private house - photos and detailed explanations.
Open
There are several benefits to having an outdoor balcony. One of the biggest is the ability to increase living space connected to the outside world. Another benefit is that an open plan above a home's porch provides more privacy than a porch or deck on the first floor. This is a good place to grow plants, as there is a lot of sun and oxygen at altitude.
It is convenient for those who want to enjoy the view without visual obstacles. Many people like to dine on their loggias. If there is enough free space, the open type will provide a good grilling area. There are many things you can add there - flower pots, flags, hanging toys, other accessories. This will enhance the personality of your property. There are many architectural designs that you can use to plan the layout of your outdoor space.
The balcony project in a confined space looks compressed and suffocating. There is little space for lighting and fresh air. It will save a huge amount of your time that you spend walking. This will ultimately benefit your health. You can get vitamin D, which is important for your productivity. There are always railings there to make outdoor recreation safer.
Closed
A closed balcony will create additional space for placing new furniture in the living room. This insulated space is suitable for storing items that should not be exposed to the elements. When you plan to enclose a loggia, you may gain additional storage space or additional usable area. However, an enclosed type will also destroy the space for comfort, as it pushes you away from the outside world of the street.
A home that has a high-quality enclosed loggia will bring you profits compared to a property without one. This is because the gallery property will look more aesthetically pleasing. Buyers always want a balcony with a stylish design that will provide them with more space. This type is safer than the open version. The height of the railing is not standard in relation to human height, so it becomes risky and unsafe to use. While the panel glass walls of a closed balcony will completely protect you and your child from falling. However, the closed type has a number of significant disadvantages:
- When you close the balcony, you have less space in the room for ventilation
- A covered balcony can prevent direct sunlight from entering the cottage. This may not be pleasant, especially during the winter season. A covered balcony is only necessary when you receive excess sunlight in your home.
- A house design with a beautiful balcony connects the homeowner with the outside world. The closed type blocks the view from the house. If your house has a park or/any open green area in front, then this balcony cover idea will disappoint you.
Stages of work
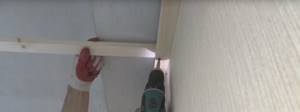
Installation of sheathing
The spacing of the sheathing strips should be no more than 40 cm from each other. Wooden sheathing bars must be treated with antiseptic mixtures to prevent the appearance of mold and mildew.
When decorating the upper part of the sheathing, special attention is paid to its fastening to the wall. To do this, it is better to use small metal rods, which are fastened with self-tapping screws on one side to the wall, and on the other to a wooden beam.
The thickness of the sheathing should not be less than the insulation layer.
Installing sheathing for lining the balcony with siding
Insulation boards are laid under the frame, and utility lines can be laid (if necessary). If desired, you can make a metal frame for finishing. In this case, the frame is mounted according to a similar principle, but an additional layer of insulation will be required. You can use mineral wool or other more modern insulation.
A layer of protective membrane must be laid on top of the insulation, which is secured with self-tapping screws. If the balcony base is concrete, then the lower part of the sheathing is secured with a special construction adhesive, and it is attached to the rods with clamps.
Sheathing: installation of the lower horizontal chord
Laying concrete beams on the balcony slab. The side beams are nailed to the facade. You can use a tenon joint if you have a woodworking tool.
The bottom beam is glued to the concrete with silicone-based glue, and the balcony is blown from the inside with polyurethane foam. You can attach the timber with dowel nails if you are sure that the edges of the balcony panel are strong enough.
The height of the lower belt of the bars is from 76 mm. 1-2 rows of beams are nailed onto the lower beam to obtain a total height of 80-90 mm.
Installation of the lower horizontal belt
Sheathing: installation of the upper horizontal chord
First, the required number of siding strips is calculated. 1-3 rows of beams are attached to the railing of the fence, so that the upper part is 1 cm higher than the top edge of the cladding. The first beam is fastened with countersunk screws or self-tapping screws through the holes where the cladding was previously attached. The remaining beams are nailed on top.
Decoration of cladding corners
Fittings are usually sold complete with siding covering. To install the corner parts, take a piece of the platband and cut out triangles in the middle of its short side - these are the thrust bearings.
The platband is heated and bent at an angle of 90 degrees to form shelves with short sides. The lower edges of the corner part will be installed on them.
The thrust bearing is attached to the beams of the lower chord with screws at the corner joint.
The corner for decorating the outer corner is placed on its shelves. The thrust bearing is screwed to the bars of the upper and lower chords with screws.
Installing Connectors
Installation of siding strips
A starting strip is installed, which is attached to the lower belt of the grille with the lock down, nailed or screwed. Elongated grooves are made in the parts so that the siding does not stand rigidly, otherwise it may swell or break off the fastening.
Attaching the starting profile
Using a nail or a metal marking pencil, a recess is made in the middle of the groove for a screw, which is driven in with a drill or screwdriver.
Then the screw is turned out a quarter turn to loosen the strip of siding slightly. When the starting bar is secured, the bottom panel is lowered until the lock clicks.
Then it is pulled up until the entire hook enters the lock. Make marks along the top edge of the panel on the fencing bars.
The strip of siding is disengaged, removed, and the second belt of sheathing beams is attached according to the marks made. Holes are made in the fencing bars, and the beams are secured through them with bolts or self-tapping screws.
When the second chord is installed, the siding strip is again lowered along the grooves of the corner pieces until the lock of the starting strip snaps into place. There are already holes for the screws, the fastening is made again in the middle of the mounting groove, the screw is screwed in and turned a quarter turn.
The remaining belts are attached in the same way.
The upper belt is combined with the installation of the platband. To strengthen the structure, vertical bars can be installed.
Installation of siding strips
How to make lathing for plastic panels yourself?
Mounting plastic panels on the surface of a wall or ceiling is quite simple. You just need to know how to make a sheathing for plastic panels. Lathing is a structure made of wooden slats, metal or plastic profiles. It is attached to the surface using dowels or nails. You can level the walls and fill the voids with soundproofing material and insulation by installing sheathing.
Wooden sheathing on the balcony
Balcony sheathing – to insulate or not to insulate an apartment
Sheathing is a lattice structure made of building or profile materials that serves as the frame for future cladding. The sheathing on the balcony is the basis for the cladding, on which PVC sheets, lining, and panels are laid.
Other design features include:
- insulation of the floor on the balcony - the floor is laid from boards with insulation, the floor is raised to the required height, and retains heat well in the room;
- insulation of the parapet - to retain heat inside the balcony room after glazing, the inner walls of the parapet are covered with a heat-insulating layer, a wooden frame, and a warm sheathing on top;
- wall finishing work - covering the balcony on the inside with clapboard (for more details, see the article “lining the balcony with clapboard”) or plastic panels (for more details, “finishing the balcony with plastic panels”) holds a layer of insulation, preventing the penetration of dampness into the room.
Sheathing is the final stage of loggia repair. It is laid on the sheathing - a structure made of horizontal, vertical guide beams, on which the sheathing sheet is laid. Therefore, a frame is needed to decorate the loggia and insulate it. It is possible to install using your own efforts, subject to scrupulous adherence to installation technologies.
Fastening with clamps
Plastic strips can be installed using clamps. These are fastening elements in the form of brackets, one side of which is fixed to the sheathing, and the mounting edges of the panels are inserted into the other.
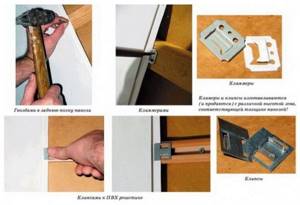
Clips are widely used for hidden fastening, since there are no visible parts from the outside. They securely hold the sheathing on the sheathing, but subject to its light weight and stable geometry. For cladding balconies, galvanized fasteners must be used. The use of special plastic clamps is allowed, since the load from the coating is small.
Installation technique:
- The first panel is attached to the sheathing with self-tapping screws.
- The second is inserted with a tenon into the groove.
- A clamp is put on the edge.
- The mounting bracket is screwed to the rail.
- The remaining panels, except the last one, are assembled using clamps.
- The latter is fixed rigidly - with nails or self-tapping screws.
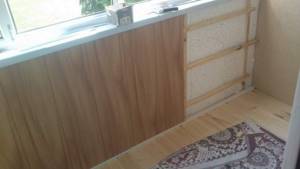
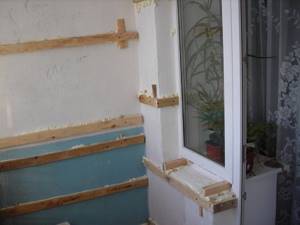
Installing sheathing on walls
Installation work depends on the material and design of the balcony parapet (fencing). If it is brickwork, which is quite rare, it is enough to screw bars of the appropriate section to it with dowels (the height depends on the intended insulation). For leveling, just like on the ceiling, you should use spacers or secure them with galvanized hangers.

In case of large differences, we attach them to drywall hangers
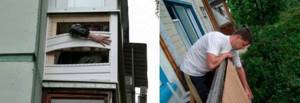
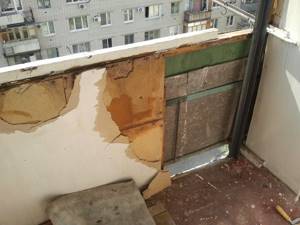
A more common situation is when a welded metal structure is installed as a fence, insulated with glass wool and sheathed on the outside with flat slate (built during the USSR). In such cases it is necessary:
- Partially disassemble the fence (remove insulation, sheathing and cut off some metal elements with a grinder);
- Install vertical bars. Fixation is carried out using metal corners, which are attached from below - with self-tapping screws - to the concrete (via a dowel) and to the beam, and from above - to the window sill.
- Cover the outside of the fence. For this, galvanized steel sheets can be used, onto which a mounting beam is pre-attached. After the preparatory work, the assembled structure is screwed with self-tapping screws to the previously installed vertical blanks on the inside of the balcony.
- Next, the horizontal elements of the sheathing are mounted (20x40 lath). The distance between the slats is no more than 40 cm, while a gap of 1 cm should be left between the bottom rail and the floor.
It is not always necessary to disassemble the outer casing; in such cases, installation work will be limited to points 2 and 4.
If there are door or window openings to be lined, the sheathing should be installed along their entire perimeter (except for the floor), as well as on slopes.
Installation of galvanized profile sheathing
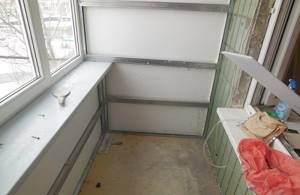
On the side of the walls, at the corners of the balcony and on the door/window openings, U-shaped guides are mounted vertically. A rack profile is inserted into these guides (thus it is fixed at the edges). The profile is fastened along its entire length on mounting hangers using special self-tapping screws at intervals of 40-50 cm.
For more tips on installing beam sheathing, watch our video:
Subscribe
Installation
After the lathing is done, the plastic panels themselves are installed. Most likely, during installation you will have to cut some of the plates, so it is better to immediately acquire a hacksaw for metal, a pencil for marking and a construction knife.
When cutting the plates, it is better to place them face up. Even if you get small nicks when cutting out places for lamps or when cutting off excess parts, they will be invisible.
You should start installing a plastic ceiling on the balcony from the corner closest to the window. When choosing this installation method, gaps and errors will be least visible. The first panel is secured with self-tapping screws. The following parts are installed in the groove of the previous one and attached to the frame using self-tapping screws. The last panel can be installed in several ways, for example, making the panel width 2 mm less than necessary - this will make the installation process easier.
The final step is to install skirting boards; they will help hide the seams and give a finished look to the balcony.
How to decorate a balcony with your own hands: step-by-step instructions
Decorating a PVC balcony with your own hands correctly is very simple. Even someone who has never taken on such work and does not have special skills can do such work. The most important thing in this work is to have perseverance, thoroughness, prepare all the tools, and read the instructions that are presented below.
It is very important to prepare all the tools and materials so that there is no need to stop the work process and run to the store. The following tools may be needed for work:
The following tools may be needed for work:
- Screwdriver with magnetic attachment;
- Drill;
- Construction foam for installation;
- Level;
- Set of plastic corners;
- Window sill profile;
- Insulation material;
- Suspensions;
- Metal profiles;
- Self-tapping screws.
The most important stage is the sheathing; it is performed after the waterproofing has been carried out and before the sheathing itself is carried out. The sheathing is the part on which the entire structure will be supported, so it should be given as much attention as possible. After this, the profiles are attached to the wall, their interval should be at least 50 cm. After finishing work with the lathing, you can begin finishing the ceiling. Finishing the entire loggia with panels begins with decorating the ceiling.
After the metal frame is installed, work should be carried out as follows:
- Galvanized metal profiles are fixed around the entire perimeter;
- Using a drill, holes are made in the walls and dowels are inserted. The structure is attached to the wall using a screwdriver.
- A profile is attached in the middle of the ceiling using iron hangers. If the loggia is large, you may need several profiles. If the width of the loggia is no more than 1.2 m, then one profile is sufficient.
- Profiles for plastic panels are attached to the profile, which is central;
- We are working on the wiring that will provide lighting in the future; to do this, we stretch it around the perimeter;
- We insert the first panel into the profile and fasten it with self-tapping screws. We do the same with the remaining panels until the very last one.
- Cut the last panel to the appropriate size. It should extend 6 mm beyond the profile.
- The last and penultimate panels are swapped. This is done to avoid unsightly gaps.
If there is a need during the work, you can use moldings to adjust the length of the skin. After the work with the ceiling has been completed, we sheathe the walls. Basically, interior wall cladding begins from the place under the windows. In this work, most of the actions are similar to the previous ones.
Step-by-step actions are as follows:
- The metal profile is attached to the bottom of the window sill.
- The location of the profiles located on the side is checked using it; for this you need to use a building level;
- Next, the profile is attached, which is located at floor level and in the middle of the wall;
- Metal hangers are installed, their distance should not be less than 50cm;
- The void between them is filled with insulation, and the resulting gaps must be lined with construction foam;
- A metal profile is attached to the hangers;
- The panels are installed on the installed profiles; they need to be fastened with self-tapping screws;
- The gaps that remain between the floor, window sills and panels are covered with special skirting boards.
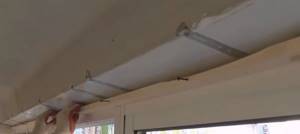
Ceiling lathing and what to do if there is no balcony above
The sheathing of the ceiling of a balcony or loggia is assembled from pre-prepared enlarged parts and leveled to a horizontal plane using a water level. And in this case, it is very useful to first agree with the neighbor on the top floor to attach the ceiling frame to his slab from below using screws and dowels. Otherwise, in order to avoid unacceptable deflections of the ceiling, it will be necessary to use more rigid transverse elements and reinforced attachment points to the vertical posts, which can later be hidden under an imitation light ceiling in the form of an arch. You can also use various braces, inclined supports and brackets, which later become part of the decorative design of the interior space.
Advantages of finishing a balcony with exterior siding
There are a large number of materials that can be used to cover the outside of a balcony, from PVC panels and metal sheets to lining and slate. But siding is considered the best option. It has several significant advantages that make it the No. 1 material for exterior decoration of balconies, most buildings and temporary structures:
- Resistant to sunlight and UV radiation. This material is made from 2 panels, which are glued together during the production process. The outer part of the insulation (occupies ¼ of the thickness of the entire sheet) has absolute resistance to ultraviolet radiation and temperatures, as well as increased tightness (does not allow precipitation to pass through). It consists of a primer, zinc coating and polymer layers. The inner layer of steel has increased load-bearing capacity; it makes the sheet durable and flexible.
- Long service life. External finishing of a balcony with siding is not done for a year or two. The service life of the material is on average 50 years. The material does not scratch, does not “swell” at high temperatures, and does not deform when hit by branches and other not too heavy objects. Withstands temperatures from -50C to +75C. Unpretentious to moisture, strong winds, droughts. Withstands defrosting cycles well after winter.
- Maximum corrosion resistance. External material should not be exposed to fungi, insects or rot. This is exactly what siding is. It is made from a material that is protected from all known types of corrosion, automatically reducing the cost of subsequent surface repairs.
- External finishing of the balcony with siding will help save money. The cost of 1 m2 of siding ranges from 120 rubles to 500, depending on the manufacturer, the thickness of the material and its appearance. On average, when decorating a balcony with siding, a master spends 230-260 rubles per 1 m2, including wooden logs. This is 2-3 times cheaper than finishing the surface with any other building material with the same physical and mechanical properties.
- Siding safety. Decorating the outside of the balcony with siding is used if the main goal is to create an “eco-house” where only environmentally friendly materials will be present. The siding does not contain dangerous resins, toxins, paints and varnishes with increased volatility of particles, and it does not cause allergies. High resistance to ignition: does not spread fire, produces very little smoke upon contact with fire.
- Modern material with a wide variety of colors. You can create a unique balcony that your neighbors won’t have. You can combine several colors, make different lamella widths and try many other options. There is no limit to imagination!
- The material is easy to use. Finishing the outside of the balcony with siding will allow you to remove from it in a few minutes all the dirt and dust that accumulates over several months. Keeping your balcony clean with a rag and any cleaning product is very easy.
In terms of price and quality, siding is the best option for finishing a balcony outside
It is very easy to install it with your own hands, which is also important for a novice builder. Just a few hours and your balcony will become beautiful, stylish and protected from wind and precipitation
Let's take a closer look at how to decorate a balcony with siding without the help of specialists.
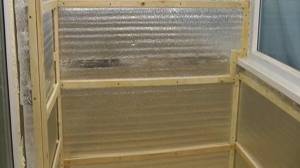
Insulation and waterproofing
Lathing under PVC panels on the balcony requires additional insulation and waterproofing. Foil materials are used for work. They are easy to install and practical. Attached to the base before installing the frame. Mineral wool or expanded polystyrene are also used for insulation. In this case, the sheathing is first made, and then the protective material is fixed.
Mineral wool is more in demand among builders. It has a low cost, is easy to install, provides reliable thermal insulation, is resistant to fire, quickly dies out when smoldering and does not release substances harmful to health into the space.
The waterproofing is fixed on top of the insulation. Staples are used for fastening. It is important to install the film so that there are no cracks or tears in it. Otherwise, even minor damage may seep in moisture. The waterproofing material is attached with an overlap of 10 cm. The joints between the sheets are taped.
Balcony lathing helps secure the facing material and insulation. In this way you can make the room more comfortable. It is quite possible to carry out all the installation work yourself, but you must strictly observe the installation nuances depending on the chosen material. You should also not forget about preparing the elements and bases. Step-by-step instructions will make installation quick and easy.
Cladding the balcony with plastic panels
Plastic panels, despite their low weight, are quite durable.
There are a lot of different facing materials on the current market. A good option is to use plastic panels for covering a loggia or balcony. They are light in weight and yet quite durable. A variety of colors and shades will allow you to create a beautiful and unique interior. In addition, plastic panels are quite easy to install; you can install them yourself without the involvement of professional builders, which will significantly save money.
Plastic panels do not require special care, and their surface is quite resistant to the negative effects of sunlight, which increases their service life.
In order to complete the internal cladding of the balcony with your own hands, you need to stock up on the appropriate tools and materials.
Scheme of covering a balcony with plastic panels.
Tools you will need:
- measuring instruments (tape measure, metal ruler, building level, plumb line);
- drill;
- screwdriver;
- construction stapler;
- hammer;
- saw with small teeth;
- knife-cutter
Necessary materials:
- wood slats or galvanized profile;
- plastic panels;
- outer and inner corner;
- window F-shaped profile;
- starting and connecting profile;
- ceiling plinth;
- insulation material;
- screws or nails.
The procedure for constructing the sheathing
Lathing is done by attaching slats of wood to the surface to be finished.
According to the instructions for covering surfaces, covering a balcony or loggia begins with the construction of sheathing, by attaching slats of wood or galvanized profile to the surface to be finished. It is to them that the plastic panels will be attached. In order for the finished balcony wall to have a perfectly flat surface, when constructing the sheathing, it is necessary to carefully check the levels using appropriate tools. If it is necessary to set the required level, it is possible to seal the gaps between the rough surface and the profile.
The pitch with which the guides are attached should be approximately 400 mm. It should be taken into account that by significantly increasing this distance, when you touch the plastic wall, it will “play”. After you have installed the metal or wooden base for attaching the plastic, you need to lay the insulation material.
The timber for the sheathing should be smooth, and the number of knots on it should be kept to a minimum.
When using wooden beams for the construction of sheathing, be sure to check its geometry before installation. The timber or slats should be straight and level, and the number of knots should be kept to a minimum. Otherwise, you will need to put a lot of effort into perfectly leveling the base for attaching the plastic panels. It is because of this that experts recommend using metal profiles to create the sheathing. This could be a CD profile for gypsum boards. It is quite durable, lightweight and very easy to install.
After constructing the sheathing and carrying out work on insulating the walls of the loggia or balcony, you can begin attaching the plastic panels. This process is simplified by special grooves that the panels have. With their help, strips of this facing material are mounted quite tightly and absolutely without visible joints.
Installation technology of plastic panels
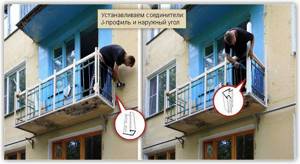
Installation of plastic should begin from the corner adjacent to the window. First of all, it is necessary to secure the starting profile and the internal corner end-to-end, as shown in Fig. 2.
After this, we install the plastic sheet with the narrow side into the groove of the profile. Next, when using metal sheathing, we secure the panel strip using self-tapping screws. If the sheathing is made of wooden beams, then we use staples or nails. Subsequently, each subsequent strip of facing material is inserted all the way into the previous panel. In order to avoid the formation of cracks in the joints, experts recommend using a wooden batten and a mallet very carefully. By tapping along the edges of the plastic strips, we achieve maximum compaction between them.
Having completed this procedure, the process is repeated again: we fasten the edge of the PVC strip and install a new strip into it. If the panel is not long enough, a connecting profile is used to connect the plastic. The technology for covering the ceiling surface is completely similar - the only difference is that to join the PVC panels between the wall and the ceiling, you need to use a ceiling plinth.
Sheathing a balcony or loggia: both for lining and siding!
- Lathing the floor of a balcony or loggia
- Ceiling sheathing: a “bookmark” for the dryer, and what to do if there is no balcony on top?
- Sheathing the side walls of a balcony or loggia
- Some nuances to remember
Have you started insulating your balcony?
Have you decided to decorate the inside of the loggia with an attractive, environmentally friendly material? Regardless of what you choose for the internal cladding of the balcony: clapboard, siding, plywood, drywall, any decorative panels - in any case, these materials should be attached to a pre-installed frame. Which is called lathing. Since installing the sheathing is a rather complex and important part of the work, on which both the quality of the insulation as a whole and its durability depend, let us dwell on this operation in more detail.
Sheathing process
To work you will need:
- hammer drill or drill;
- hacksaw or circular saw, jigsaw (for neat cutting of lining);
- building level or tape measure, pencil (for marking the sheathing and level installation of the first boards);
- hammer, screwdriver, nails and screws (fasteners must be made of stainless materials);
- brush or roller (for applying antiseptic, varnish);
- safety glasses, gloves (neglect of safety precautions sometimes leads to unpleasant household injuries);
Work should begin from the corner (we recommend from the most problematic one). We install the first panel level - the slightest distortion and the entire wall will have to be redone.

First step.
You can secure the lining using nails or self-tapping screws (driving them flush). The lining connected with special clamps is very carefully removed. But working with them requires certain skills.
Important: First, novice craftsmen want to figure out how to properly upholster a balcony with clapboard. Everything comes with experience, and nowadays also with the Internet. Our portal has numerous videos with visual examples of work.
But let’s consider one more thing that is unexpected for beginners. It happens that after going through the entire wall, the last board may be wider than the remaining space. Don’t be alarmed - measure the required distance from the beginning of the ridge, and the small gap will be closed with a plinth or decorative trim. The photo clearly demonstrates this situation.
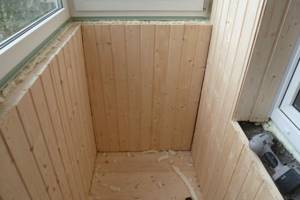
Here the gaps will be closed with a decorative strip.
Installation methods
The loggia lathing is mounted in two main ways: horizontal and vertical.
Installed vertically:
- PVC sheet;
- MDF (more details: covering a balcony with MDF panels);
- lining;
- wooden panels.
The upholstery is installed horizontally:
- plasterboard sheets;
- OSB;
- corrugated sheeting
The fundamental difference between the methods is the direction of the supporting beams.
In both cases, it is necessary to ensure that the structure lath is located along the perimeter of the sheathing sheet, while the space inside must be filled with sufficient frequency.