Good day, dear guest!
The first sheet with galvanic coating came off the assembly line of one of the British factories back in 1867. True, at that time the metal was covered exclusively with gold and silver. But before the First World War, the production of parts with a protective layer of zinc began to be produced, and since then they have been incredibly popular.
This is not surprising - zinc extends the life of iron by 20-30 times. Products made of galvanized steel are durable, do not rust, and behave in everyday life no worse than stainless steel, although they are much cheaper.
In today’s article, I propose to pay more attention to this modest material and tell you how to make a galvanized pipe with your own hands.
Advantages and disadvantages of such a pipe
Galvanization is primarily steel, a material that has many undeniable advantages.
These include:
- Strength;
- Ability to withstand high temperatures;
- Excellent thermal conductivity;
- Low cost compared to other materials.
But without a protective coating, ferrous metal is susceptible to corrosion, quickly rusts and becomes unusable. Galvanizing successfully solved this problem. And, despite the fact that galvanized and steel pipes are the same in shape, the galvanized product has a number of advantages.
Additional advantages of galvanized products:
- Corrosion resistance, the ability to withstand negative environmental influences;
- Increased service life;
- Increased strength;
- Wide operating temperature range;
- High resistance to mechanical stress;
- Galvanized pipe can withstand high internal and external pressure;
- Simplicity and ease of installation;
- High resistance to fire;
- Zinc kills all pathogenic microorganisms;
- Galvanization is practically not inferior in quality to low-alloy stainless steel, but costs an order of magnitude less.
But, like any engineering solution, a galvanized iron pipeline is not ideal.
Disadvantages of the product:
- Not very attractive design;
- Expensive compared to conventional steel;
- Zinc complicates the welding process;
- Unlike plastic, if there are protrusions on the walls, it is almost impossible to ensure a smooth transition into structures made of galvanized pipes.
Galvanization and polymer coating: what are the differences?
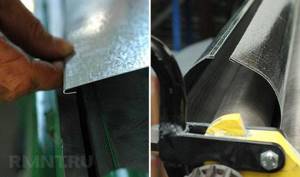
For most modern machines, it makes no difference what type of sheet metal is bent on it. But there are some difficulties in working with metal coated with a polymer composition. It’s easier with galvanizing, because its protective layer is more resistant to abrasion and damage. Therefore, nothing prevents you from bending galvanized steel with blows or sliding it along a rusty template - the main thing is that there are no deep scratches.

The coating with special paint has less mechanical strength, it is thinner and peels off relatively easily. It would not be the best solution to bend rolled polymer on old sheet bending machines with defective rolls, rotary beams or loose hinges, and even more so, such metal should not be processed with a mallet. Likewise, you should not use any available devices that can damage the anti-corrosion film.
Selection tips and approximate price
As usual, let's start with the price. A finished pipe with a diameter of 100 mm and a length of 3 meters will cost you and me about 500 rubles.
The cost of the material in this case is 150 rubles, the rest is labor costs and the seller’s markup.

What if you plan to organize an entire drainage system? You can see for yourself that you will have to overpay for finished products by 2.5-3 times. Making your own pipes will greatly ease the financial burden.
In addition, factory products have strictly defined dimensions, and sometimes it is difficult to choose the right one for your system. And the thickness of the finished pipe usually does not exceed 1 mm.
You should definitely remember that any factory-made product, unlike a home-made one, undergoes strict quality control control, has a perfectly round surface and a precision weld.
Whether a home master will be able to ensure compliance with all these conditions is far from certain.
Funnel making technique
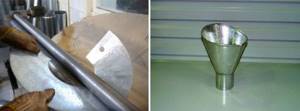
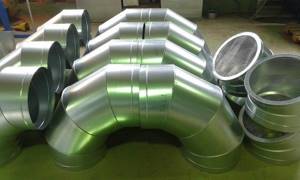
If you understand that a seam connection is the essence of almost any tin product, you can give free rein to your imagination and assemble complex products from several simpler ones. An example of this is all kinds of funnels, tees and corner bends.

The funnel consists of two short pieces of pipe of a larger and smaller diameter. They are assembled like regular pipes, only their edges are flared outward by 8–12 mm. Subsequently, these bent sides are used for further production of folds, or, if there are no complaints about tightness, the hard edges are folded and fastened together with a cutter.
The riveting technique for different products may differ significantly, but in reality this is not as important as the correct drawing up of the pattern. All blanks should be cut only according to the template
For example, for the central part of a funnel - a truncated cone - the pattern is a ring segment, where the length of the inner arc is determined by the diameter of the drain, and the outer arc by the diameter of the receiving socket.
Unfortunately, the equipment for the production of such products has a very narrow specialization, and therefore is not available due to both its high price and low prevalence. However, all products made of tin and sheet metal, be it a bucket, a tank or an ordinary skate, can be made manually; machines only facilitate some operations.
You can buy galvanized pipes freely, but the cost of such products can be quite high, so the desire to make a galvanized pipe with your own hands is dictated, first of all, by considerations of economy.
At the same time, the production of galvanized pipes does not require the use of special efforts, special expensive devices and tools and any professional knowledge, so any home craftsman who has a set of standard carpentry tools can cope with this.
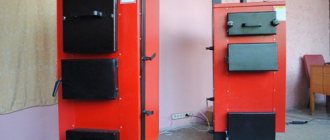
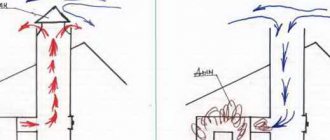
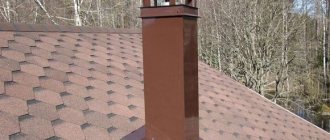
Pipes made of galvanized metal are used to equip chimneys; they are popular due to their light weight and, accordingly, ease of installation. Galvanized chimneys do not require the construction of a foundation, and this significantly reduces the cost of chimney equipment.
Such pipes meet fire safety standards, withstanding temperatures up to 900°, so they can even be used for smoke removal from solid fuel heating boilers and furnaces.
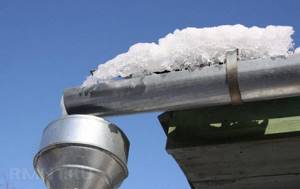
Galvanized pipes are also used in home construction to equip drains. Such pipes are already quite affordable in cost, but the process can be made even cheaper by using hand-made products.
Material characteristics
Thin sheet steel coated with zinc in the factory must comply with GOST 14918-80. Main characteristics that you should pay attention to when choosing:
- Sheet thickness
The most common galvanizing thicknesses are from 0.35 to 3mm. The thinner the sheet, the easier it is to process, which is important for making products at home. But don’t forget – less thickness means less strength.
- Zinc coating thickness
There are 3 classes of material, in accordance with the thickness of the zinc coating layer. Let's summarize the data in a table for convenience.
| Steel class based on zinc layer thickness | Weight of protective layer on both sides (g) | Coating thickness (µm) |
| P (Increased) | 570 — 855 | 40-60 |
| I | 258-570 | 18-40 |
| II | 142.5-258 | 10-18 |
GOST allows some deviations in thickness and the presence of some defects
Marking:
- NR – normal thickness variation;
- UR – reduced thickness variation.
Sheet appearance options:
- KR – With crystallization patterns (some cracks and darkening);
- MT - without patterns.
An important characteristic for the manufacture of pipes is the ability of the metal sheet to be drawn:
- N – normal hood;
- G – deep drawing;
- VG – very deep drawing.
Steels marked VG have the highest ductility, N - correspondingly the lowest.
How to bend metal correctly
Roofing elements, as a rule, are hidden from the eyes of passers-by and no decorative claims are made against them. This makes it possible to manually produce parts using templates, but you have to constantly straighten the product with a mallet.
This is not the best approach: the fold lines and the entire product as a whole turn out wavy, and work on one part can take a long time. For piece products this is quite tolerable, but if you have to surround the entire house with drainage, you should get the necessary equipment and devices at your disposal.
Today, sheet bending machines occupy their own segment in the professional tool market and are available everywhere. Their price is quite high, but only with our own, proven equipment can we produce parts of excellent quality. Renting a sheet bending machine is also an option, but a machine that passes from hand to hand will not have the necessary accuracy and reliability.
What you need for work
After purchasing a sheet with the necessary characteristics, you should stock up on the necessary equipment.

Required tools:
- Metal scissors. Choose a convenient tool for cutting a wide sheet of metal;
- A hand jackhammer (also known as a mallet) with a rubber or wooden tip. The mallet should be hard, heavy, but without sharp edges;
- Steel pipe blank for molding the pipe body (“gun”). Its length is at least 1 meter, its diameter depends on the required diameter of the finished product;
- Ruler;
- Tool for marking galvanized steel (sharp metal rod);
- Crafting table. At the corner of the workbench there should be a metal corner, at least 1 m long. It will be used to bend the edges of the pipe, so it must be fastened very securely;
- Pliers.
Installation
Do-it-yourself chimney installation is done as follows:
- All necessary measurements are taken.
- A laying diagram is drawn up.
- Surfaces are prepared for installation work.
- The necessary materials are being purchased.
- Brackets are fixed to the wall at intervals of every 40-60 cm.
- The chimney elements are installed in stages.
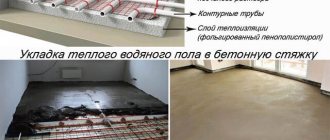
- In places where floor and roof slabs pass, heat-insulating and non-combustible material is attached.
- Inspection wells for maintenance are installed.
- The build quality and draft are checked, and the heating equipment is started.
Installation rules:
- turns of moves are performed at an angle of 45°;
- joints must be sealed with hot glue or clamps;
- It is better to abandon horizontal sections or minimize their number;
- inspection windows must be installed at all corners or turns;
- an umbrella and a net must be installed on the top;
- the height of the galvanized product above the roof should be 2 m higher;
- assembly is carried out using the condensate method (the upper part is inserted inside the lower one) or along the smoke path (the next part is inserted on top of the previous one).
What you need for work
To install galvanized chimney pipes, you will need the following tools:
- metal scissors;
- roulette;
- level;
- marker;
- pliers;
- tools for creating holes in ceilings or walls.
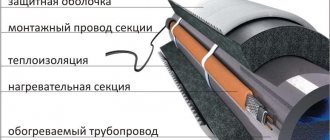
How and with what to insulate a galvanized chimney
A galvanized steel chimney must be insulated with loose or mineral wool roll insulation material. To protect it from moisture (condensation), you need to wrap it with a foil layer. All seams and joints must be taped with a special metallized tape to prevent contact of the insulation with the external environment.
For increased wind loads, it is recommended to additionally tie the insulated layer with wire or clamps at intervals of 40-60 cm.
To insulate, you must do the following:
- Clean the surface of the chimney from dirt, scale and rust.
- Wrap it in mineral wool.
- Secure the layer by tying it with steel wire or mesh.
- Place a steel casing on top or wrap it with a foil layer.
- Paint the casing with special heat-resistant paint.
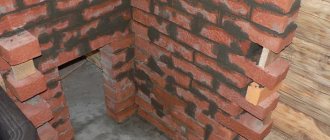
To insulate mine chimneys, the pipe is first insulated, then it is lowered into a brick structure and connected to an underwater pipe. Broken bricks, expanded clay, and slag are poured into the resulting space. It is recommended that all these actions be performed initially during construction in order to lay the bulk material more densely.
Chimney insulation
Is it possible to paint a galvanized chimney?
Galvanized chimneys lose their aesthetic properties during long-term use, so it becomes necessary to apply a decorative layer. It is necessary to use powder paints for finishing steel roofing sheets.
Conventional enamels are not suitable for these purposes, since with sudden temperature changes they begin to crack and peel off.
Step-by-step instructions for making a galvanized pipe with your own hands
Size calculation
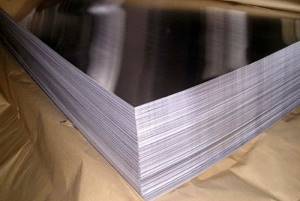
A standard galvanized sheet sheet has dimensions of 1000x2000mm, or 1250x2500mm, although other cuts can be found.
The width of the workpiece is calculated using the formula:
L (circumference, also known as the width of the workpiece) = 2*3.14*R (R is the required pipe radius, mm).
Thus, to make a pipe with a diameter of 100 mm, you will need a blank with a width
2x3.14x50mm = 314mm.
To the resulting finishing length we add a bend of 15mm and get the required value for cutting -300mm.
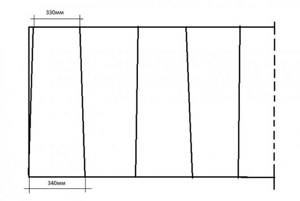
An important point is that the width of the workpiece is not a constant value. On one side it is 330mm, on the other 340 (for a pipe with a diameter of 100mm). This is done for the convenience of subsequent installation of pipes with each other or with other elements of the system.
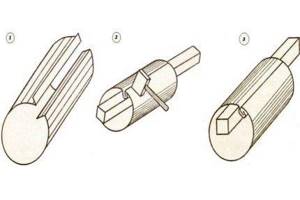
Drawing and diagram
Rice. 1. Pattern of a sheet for a pipe with a diameter of 100 mm.
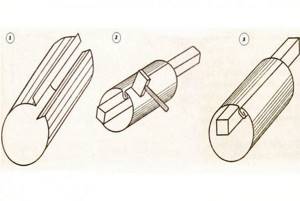
The fold formation pattern is as follows:
Rice. 2
Cutting out the workpiece
After calculating the required dimensions, a blank for the future product is cut out. For this:
- A sheet of tin is laid out on a horizontal surface, markings are applied in straight lines, strictly according to the dimensions of the semi-finished product.
For a pipe with a diameter of 100 mm, along one edge of the sheet, sections of 340 and 330 mm are measured one after another (see Fig. 1). The same segments, but in the opposite sequence, are marked on the opposite side. All perpendicular lines should be drawn using a square.
Don't forget to add 15-20mm to the width of the product on the bend!
- The tin is cut into rectangles according to the drawing.
Formation of a profile
The resulting rectangular blanks must be “transformed” into a pipe. To do this, we will create her profile.
Stages of profile formation:
- Along the entire length of the workpiece, with an indent of 5 mm on one edge and 10 mm on the other, two lines are drawn. These lines are the boundaries of the folds.
In our case, a seam or a seam lock means a type of connection between the edges of a pipe;
- We bend the edges along the marked line, strictly at an angle of 900. For this we use a metal corner, aligning the fold line with the edge of the corner. We start with pliers, continue with a mallet;
- We pass the hammer along the entire length, gradually forming the future seam;
- On a 10mm wide bend we make another bend in the shape of the letter G. The width of the top bar is 5mm, the location is strictly parallel to the workpiece;
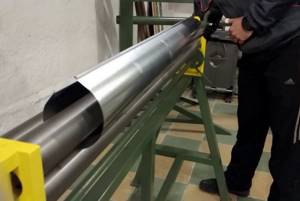
- After forming the folds, we move on to the pipe body. We place the workpiece on the gun and use a hammer to give the sheet a round shape.
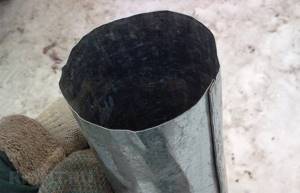
Processing the butt seam
The final stage is processing (crimping) the butt seam. To do this, bend the upper part of the L-shaped fold down, wrapping it around the opposite edge. The result is a fold of several layers of metal, which must be pressed against the pipe along its entire length.
In the factory, additional strength is added to the seam using special metal rivets.
For handmade products, no additional processing is required.
How to roll a sheet into a tube
What if we aim to produce even more complex elements: hoppers and pipes? Of course, it’s better to practice in segments first, but otherwise these skills are quite understandable.
Products with a closed surface, such as pipes, tanks and funnels, are assembled using so-called seam joints. A fold, for simplicity, is a lock that can be used to connect the edges quite firmly and even hermetically. A regular (single) fold is made as a fold at the edge with two bends. On different sides of the connection, the folds are directed in the opposite direction.
Typically, folds for drainpipes are made with a fold width of 4 to 10 mm. The edges of the strip are beaten on a steel angle, then the sheet is folded, the folds are interlocked and pressed tightly with a hammer when the pipe is put on the mandrel.
There is only one difficulty in the manufacture of pipes - to ensure the possibility of joining them with each other. Therefore, before twisting the sheet, its short edge is straightened on a platform with a small threshold so that one end of the pipe is thinned by a couple of millimeters. Also, pipes can be connected using seams, but they cannot be fastened in place in this way: a large segment of the drain is assembled at the bottom, and then assembled as an assembly.
Of course, bending equipment manufacturers have something to offer in this regard. To make locks, there are folding carriages, and the metal is rolled into a pipe on a longitudinal roller bending machine. For edge thinning, crimping machines or separate pairs of rolling rolls can also be used.
How to make a socket on a galvanized metal pipe
A bell is a technological extension designed for the convenience of installing communication elements with each other and inserting them into a plane. The socket on the finished pipe is made along a wide edge, using the method of flaring the edge to a depth of 15-20mm. In the factory, a special tool is used for flaring - a rolling cone.
At home, you can expand the edge of the pipe yourself using pliers. Ideally, install special rings—stiffening ribs—at the ends of the workpiece.
Fig.3. Flaring diagram:
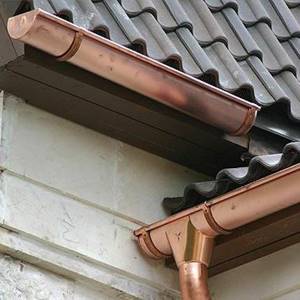
Handmade: how to bend a gutter segment
To make parts with a radius profile from tin, you should prepare a template in advance; it is not realistic to carry out such work “on your knees”.
Take an inch tube and weld two reinforcement rods at its ends as drive handles. Make a cut along the seam of the tube with a grinder, then sand the edges well, you can even cover it with a silicone hose unraveled in two.
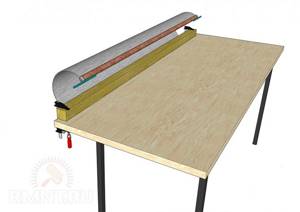
Clamp the strip of roofing iron on the edge of the table, insert the end into the cut and rotate the tube 360º so that the “straight” petal in the center of the twist is parallel to the rest of the sheet.
You can form the tray using a rack pipe bender, or you can use a loose 200 mm pipe. We bend the smooth edge of the workpiece at 90º, press the edge against the table with the wall of the pipe and straighten the iron with a mallet. We finish the twisted edge with our hands, bending it slightly inside the arc. Remove the workpiece from the template and press the rectangular fold.
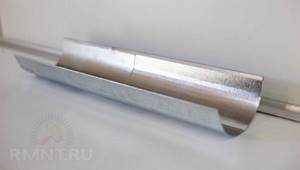
This molding can be made in segments of 1–1.5 meters, which are then easily joined at the installation site and secured with a cutter. The presence of two stiffening ribs will prevent the tray from bending between the fastenings under the weight of the ice, and a hidden groove will allow you to further strengthen the drain on specially shaped hooks.
Features of working with tin
Galvanized sheet metal is an inexpensive and reliable material. Its main feature is its small thickness (most often at home, a sheet with a thickness of 0.3 to 1 mm is used) and plasticity. Thanks to its softness, it is convenient to work with galvanizing and making the desired product yourself will not present much difficulty even for a novice tinsmith.
At the same time, despite the softness of the steel, the resulting seam seam is very reliable and can withstand significant mechanical stress.
Homemade drain pipes made of tin
To make a straight drain pipe from tin, measure a piece of galvanized sheet to the length and width and cut it with scissors along the marked lines.
Using a file, carefully clean the edges from burrs and process them until they are smooth. Along the long side, bend both edges of the sheet in one direction to a width of 10-15 mm.
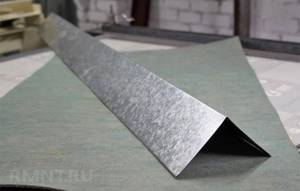
Sequence of work in the process of creating a straight pipe for a drainage system made of galvanized steel (copper) with your own hands. The main tool is a wooden tinsmith's hammer
A galvanized sheet is tapped on a rigidly fixed pipe of a suitable diameter until it is given a round shape. Then the previously folded edges are placed on top of each other.
Using a wooden hammer and a metal rectangular block, “wrap” the edges into a lock. Carefully tap with a hammer along the seam until a securely pressed joint is obtained. Align the shape of the product on the blank pipe, trying to obtain a cylinder close to an ideal circle.
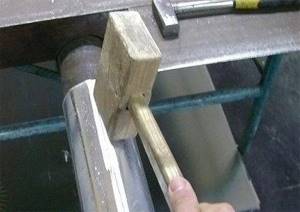
An example of making a straight drain pipe from galvanized metal sheet. Editing for a round shape is carried out using a regular metal pipe of suitable diameter
Having the skills to manufacture straight drain pipes from galvanized steel, it is not difficult to master the technology for producing inlet funnels and other parts of the system. With the same success, self-taught craftsmen make brackets for metal gutters and for attaching drainpipes.
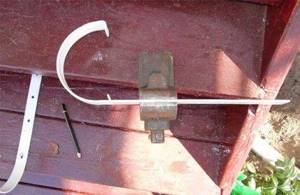
This is how they make brackets for metal drainage systems with their own hands. For round gutters and pipes, a metal strip thickness of 1.5 mm is sufficient. For square gutters 3-4 mm
Manufacturing technology of steel (copper) bracket:
- Cut a piece of steel strip 300 mm long.
- File the end parts.
- Step back 10 mm from either end and make a 90º bend.
- Consistently moving the strip and fixing it in a vice, bend it in an arc to the size of the radius of the gutter.
- On the remaining straight part of the strip, drill holes for the clamp and fasteners.
Brackets for drainpipes are made in the same way, but in the form of a clamp consisting of two oval-shaped strips, the curved end edges of which are supplemented with holes for tie bolts.
There are several articles on our website with detailed instructions on making roof gutters, we recommend that you read:
- Do-it-yourself roof gutters: instructions for making your own drainage system
- How to make roof drains: do-it-yourself recommendations for arranging drainage
Rectangular ducts
Pipes that are made in the form of a rectangular or square section of various cross-sectional areas are called rectangular ducts. They are connected by a flange press fit onto the busbar using a sealed gasket. Along the perimeter of the channel, ridges are made at a distance of 250-350 mm from each other or diagonal bends are made to create rigidity of the air path. Zig is a ring-shaped connecting scar that is made on rolling seam units.
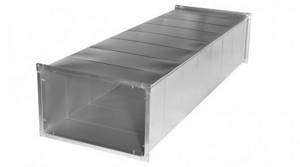
A rectangular air duct made of galvanized steel is mounted using clamps and traverses. Fastening elements are made of striped metal, loaded cross-arms are made of angle iron. With a flange connection, the sides are riveted to avoid long-term subsidence.
What is better and where is it used?
The versatility of design solutions allows the use of steel products for the interior and exterior of buildings.
Galvanized pipelines are used for:
- ventilation systems (natural air flow and forced);
- chimneys to the roof;
- air conditioning complexes;
- aspiration systems, because allow you to remove dust particles from the air;
- organizing a complex for the removal of gases and combustion products;
- transportation of gases, mixtures for air purification and humidification.
When selecting steel products, it is necessary to take into account the functional purpose and location of the air duct. Pipes with a rectangular configuration are recommended for residential and public buildings.
For structures that run outside buildings, and are also laid to move gas compositions and perform aspiration in industrial production, air ducts with a round cross-section and welded seams are optimal. Design solutions must ensure high speed of air mass transportation and maximum tightness.
Features of the use of galvanized round air ducts
This type of ventilation product is versatile, so such air ducts can be used with duct fans:
- At industrial facilities;
- In residential premises;
- In administrative buildings.
Among the features of using galvanized round pipes it is worth noting:
- When connected to round fans and creating a forced ventilation system, round air ducts ensure minimal loss of air masses;
- The product is connected in only one place (weld), which increases its strength;
- The special design and compatibility with duct fan outlets facilitates the installation and operation of round ducts.
Materials for the production of galvanized steel air ducts
Depending on the characteristics of the object and operating conditions, the following materials can be used:
Thin-sheet cold-rolled steel 0.5-1 mm thick. This material complies with GOST 14918-80 (one-sided galvanizing of the surface, the consumption of which is 200-420 g of zinc per 1 m² of sheet). It is suitable for use under normal conditions and low environmental aggressiveness. The maximum permissible temperature of transported air is 80 °C (short-term - no more than 200 °C) with humidity up to 60%.
Thin-sheet cold-rolled steel 1–2 mm thick. It can be used to produce metal air ducts for ventilation designed for constant air temperatures up to 200 °C. For more severe operating conditions, it is recommended to use products made of galvanized steel.
Round tracks
Round pipes are manufactured with different diameters and wall thicknesses. Such air ducts are designed for higher pressure than rectangular ones, and their use reduces operating noise. Round channels are more practical and are used more often. The sections are connected using the nipple method using a coupling.
The edges are secured with rivets and self-tapping screws using an internal or external connecting piece. The flange connections in the structure are hermetically sealed and reduce air loss during transportation. This connection is made using a special spring device or screws. The use of springs speeds up installation and increases the degree of tightness. If factory parts have fastening flanges at the ends, then the connection is made without additional fixation.
Sometimes round pipes are connected using a bandage. This device is placed on the flanged edges of the air duct. A simple method provides high tightness, but increases the cost of work. The connection using the method of different diameters is used - when the outer diameter of one piece is equal to the inner diameter of the other section. The ends are inserted into one another and screwed with self-tapping screws. Advantages of round air ducts:
- lower resistance to air flow;
- shape without corners saves up to 15% of material;
- cleaning of the internal surface is not required;
- There is no turbulence zone inside the outlets when transporting flows.
Spiral wound method
For production, a solid galvanized strip is used, which is formed into a spiral of the required diameter. Connecting the side joints results in a pipe with a continuous surface. The advantages of such a product are increased strength, since the joints give rigidity to the channel. The length of the produced sections increases.
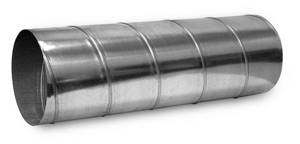
Air ducts are produced on automated lines, which help increase productivity. Galvanized steel spiral ducts require constant cleaning. The inner surface is corrugated, so dust is deposited on it.
Straight seam method
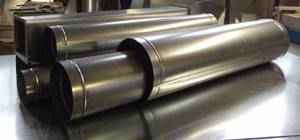
Channels are produced by rolling a whole sheet into a pipe of the required dimensions. The seam is secured with a flange connection and riveted. An air duct made from such pipes has lower aerodynamic resistance. The price list of the elements is less than that of spiral-wound sections, which significantly reduces the price of long-distance ventilation.
Connecting sections to each other requires a large number of standardized inserts if straight-seam channels are used in small rooms and are limited in length. Ventilation is installed in the form of small systems; these types of pipes are not used in critical industries.