Knowledge of the design of stoves and fireplaces, combined with competent installation and proper operation, will help save money that could have been spent on hiring specialists. Before installing a fireplace yourself, you should study the recommendations that have been proven over the years, and then the result of the work done yourself will surprise not only loved ones, but also stove professionals.
Peculiarities
If you decide to install a fireplace in your home, it is important to understand the destructive capabilities of the unit, since the safety of the device will depend on this. The beauty of a fireplace flame is only a small part of a complex system. A fireplace stove includes many elements that are invisible to the eye. Its parts can be conditionally divided into external (scenery) and internal, responsible for functional suitability.
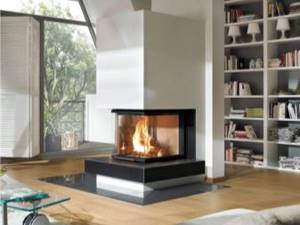
According to the shape of the fireplace, such devices can be angular, trapezoidal or oval. The type is selected in accordance with the effect that the owner wants to give to the interior.
Functional parts include:
- firebox;
- chimney or smoke collector;
- body, chimney duct.
Each part of the fireplace determines its energy efficiency, as well as its thermal output and service life. To assemble the fireplace, separate parts purchased in the store or created with your own hands from suitable building materials are suitable.
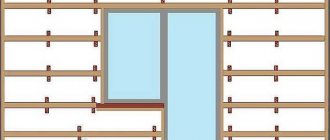
During assembly, it is important to pay attention to the insulation of the firebox. This stage is especially important if the house is built of timber or logs. Do not allow hot fireplace elements to come into contact with the wood; this rule applies to the floor, walls, and ceilings. If the rules are followed, the warmth of a fireplace will add comfort to a wooden house without the risk of fire.
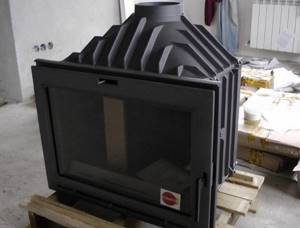
If the fireplace insert is purchased for production, it is usually made of cast iron or steel. Do-it-yourself masonry is possible using heat-resistant bricks. This is a reliable heat-resistant material. A fireplace with a cast iron firebox is additionally protected with fireclay bricks inside. This rule must be followed if the fireplace insert is steel.
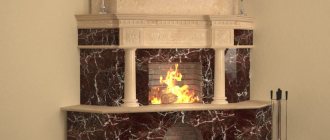
For beauty in the home
If there is no need to heat your home, you just want to decorate it with an original stove, you can choose a decorative fireplace for this purpose. It does not require either a chimney or a complex internal structure; in fact, it is simply a portal inside which an artistic composition or an electrical imitation of smoldering coals is installed. At the same time, it’s easy to make a portal with your own hands, even for those who have never in their life thought about how to build a fireplace.
You can install it directly on the floor, without any foundation; the frame is made of wood or metal profiles, and covered with plasterboard on top.
A corner decorative stove will fit even in a small room, decorating it and creating an additional surface - a mantelpiece. An antique-style living room will greatly benefit from such decoration. An openwork fireplace grate will complement the composition.
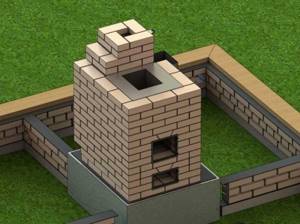
You can draw fireplace designs yourself or enlist the help of specialists. This is what a project for a decorative stove for home decoration looks like.
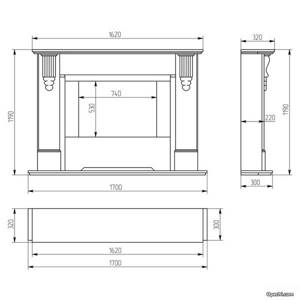
Decorative fireplace project

Decorative stove project
Functional purpose of individual parts
Fuel is loaded into the firebox and ignited. The combustion activity and intensity of heat release are directly related to the damper - with a larger opening, maximum air enters the firebox and the wood burns better. If the design involves an open firebox, the intensity of the fire does not need to be adjusted.
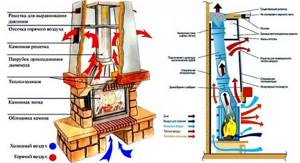
To regulate the air supply you need a grate. An important point is the timely removal of ash, which collects through the grate into the ash pan. Usually it is raked out or shaken out, depending on the presence of a built-in or retractable system.
The fireplace chimney removes the accumulated combustion products to the street. To prevent gases from spreading inside the house, the chimney is often equipped with forced draft force. It is a fan. For the construction of a chimney, it is allowed to use only heat-resistant bases: brick, ceramics, heat-resistant steel.
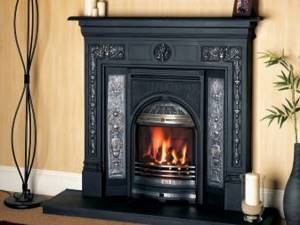
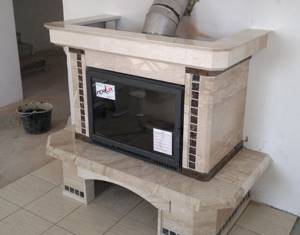
Cladding the fireplace allows you to fit the product into the desired interior style. The portal can be stone, brick, marble. A special box is often built over a part of the pipe located within the room, which serves as an interior decoration.
There are many designs and varieties of fireplaces, but different systems differ only in details and proportions. The most famous varieties are French, German and English fireplaces.
French fireplaces are distinguished by their exquisite shapes, elegance and charm. Such a fireplace not only emphasized wealth and luxury, but was also an individual means of heating. French classic fireplaces are ideal for homes with high ceilings. Usually the design is equipped with a high and deep wall shelf. It is specially moved forward to emphasize the massiveness of the structure.
German versions are distinguished by the absence of a thermal dome. Typically, the system involves leading the pipe into the wall, and then into the chimney. A characteristic feature of modern German fireplaces is that they are equipped with a remote control. Fireplaces can be equipped with a cassette-type gas system, but there is also an electric firebox.
A classic English fireplace is usually equipped with a sloping back wall; this is necessary to reflect heat in front of the portal. In the firebox, the side mirrors serve as reflectors. It is believed that the trapezoidal shape of the structure allows heat rays to be more fully reflected into the room.
The Flemish fireplace is less common. It is an open area where fuel is ignited. The smoke from combustion is collected in a special smoke collector, with a cap hanging above the device.
Choosing the optimal material
Having a drawing of the future design in hand, you need to pay attention to choosing the optimal building material. The efficiency of the future fireplace depends on how competently this issue is resolved.
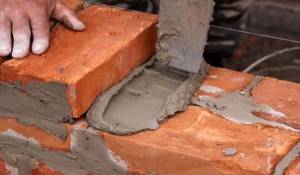
It is customary to build structures from high-quality bricks. During fuel combustion, the temperature in the furnace can reach critical values of 900°C. For this reason, exclusively solid bricks are used to organize a fireplace. It can belong to one of two types:
- red;
- fireclay.
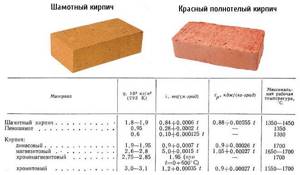
Red brick can withstand temperatures up to 1000°C. This building material is considered energy-intensive. It provides efficient accumulation and distribution of large amounts of thermal energy. For the construction of fireplaces, bricks of a grade not lower than M200 of standard dimensions are used. You can evaluate the quality of the material by hitting it with a hammer. The sound should be clear and ringing.
As for fireclay solid bricks, it is used in those structures that are subject to excessive heating. This material is not subject to destruction in case of direct contact with an open flame. The fireboxes of modern fireplaces are lined with this brick to ensure their long service life.
Manufacturers produce fireclay bricks of various sizes and shapes, which allows you to choose the optimal standard size of the building material to solve the problem.
In conclusion, we recommend watching the video where you will learn that not only people love to bask by the fireplace, but animals too.
Installation Rules
The rules for installing any fireplace require choosing a good location. For example, an essential detail for corner options is the presence of a quarter meter indentation from the fireplace wall. This space should be left for free circulation of oxygen. Although you will need quite a lot of space, installing this particular type of fireplace will significantly improve heat exchange.
The rules require an accurate calculation of the dimensions of the furnace unit. The heating part must correspond to the heat losses of the room.
In most options, the calculations assumed by SNiP must take into account:
- number of window openings;
- type of glazing;
- characteristics of the insulation used;
- number of storeys of the building;
- thickness and material of the walls.
The installation rules assume that one stove is used to heat a room no larger than 40 square meters. m. You should not expect to heat 100 square meters with one fireplace. m in a townhouse. The option with one fireplace on several floors is also undesirable. In this case, it is impossible to ensure uniform heating, since warm air rises. It is better to build different fireplaces on several floors, albeit smaller ones.
A significantly reduced size of the fireplace in relation to the dimensions of the room will lead to large temperature fluctuations in the room. A greatly increased size of the fireplace will lead to stuffiness in the rooms, as well as to excessive consumption of firewood.
The rules for choosing the size of a stove for a specific room require precise manipulation of numbers and indicators. The heat loss of the room is calculated from the heat loss of one cubic meter of room - 21 kcal/hour. For calculations, it is enough to multiply the external dimensions of the room by 21. For example, in a wooden house these indicators can be 5.5 meters wide, 6.5 meters long and 3 meters high. The conditional volume of heat losses is 107.25*21=2252.25 kcal/hour.
It is known that 1 cu. m of fireplace produces an average of 300 kcal/hour. This means that the heat loss of the room must be divided by 300. 2252.25/300 = 7.5075 cubic meters. m. The permissible height of the fireplace in the room is up to 2 meters. If you divide 7.5 by 2, you get a stove area of 3.75 square meters. m.
The optimal dimensions of the heating device will allow you to retain heat in the room with a one-time daily heating. If the fireplace insert is purchased, as a rule, the heat output is indicated in the standard design. The pipe cross-section is selected in accordance with the power of the furnace. If there is a purchased design, all the components of the fireplace are selected in accordance with the dimensions of the device.

Installation requirements: safe installation of the fireplace
Before deciding how to install a classic fireplace in a wooden house, you need to make sure that all installation safety requirements can be met. An open hearth should be a source of heat, not problems.
There are special requirements for the installation of fire hazardous appliances in wooden houses.
General safety rules for installing fireplaces in wooden houses
Those who decide to build a real brick fireplace will have to check the project’s compliance with 10 basic requirements for fireplaces in a wooden house:
- At least 12 months must pass from the date of construction of the house.
- The optimal interval between the completion of construction and the installation of a stove or fireplace is 36 months - this is how much time should pass for wooden structures to become stable and natural shrinkage to complete.
- Installation of open fireboxes on upper floors and attics is prohibited.
- The structure cannot be installed on a wooden floor.
- The foundation for the fireplace must be poured in isolation from the foundation of the house.
- Construction of a chimney is mandatory.
- All wooden surfaces located near the stove or fireplace must be insulated from overheating and sparks.
- You cannot install fireboxes near windows with curtains or drapes, or place upholstered furniture or textile decor near the fireplace.
- The firebox must be equipped with a removable screen.
- There must be a working fire extinguisher in the room at all times.
Can't meet all the requirements? Give preference to safe electric fireplaces, especially if you plan to install them in the attic, on the second floor of a house with a wooden floor.
Beautiful and safe: an alternative to standard stoves
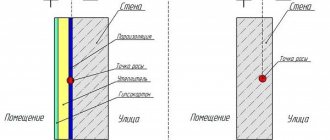
Surface insulation: how to protect wood from fire
Those who decide to build a classic brick fireplace will have to take care of protecting wooden surfaces. The main tasks are to prevent heating of the walls and ceilings, to protect the floor and walls from sparks that could fly out of the firebox.
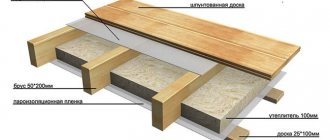
Wall insulation scheme
Basic insulating materials for wooden walls:
Basalt wool.
Plates of different thicknesses
Mineral sheet insulation with a heat-reflecting screen - sold in sheets.
Rolled non-flammable insulation.
Heat-resistant synthetic foil insulation
Brickwork: instead of sheathing with sheets, you can lay out part of the wall with half-brick masonry.
You can protect the floor made of parquet or deck boards with steel sheets or stainless steel, or line the area in front of the stove with porcelain stoneware, ceramic tiles or facing stones.
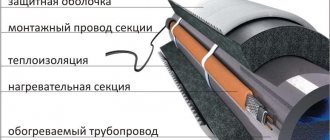
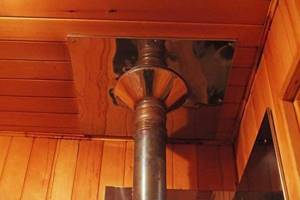
The chimney passing through the ceiling is insulated with rolled fire-resistant wool with foil film.
Adviсe
To construct a fireplace, you should not use aerated concrete or sand-lime brick, which is unstable to high temperatures. Please note that clay mortar will not stick to poor quality bricks at all or will stick extremely poorly. When laying bricks, it is recommended to moisten them with water. This is necessary for better adhesion to the solution.
The minimum thickness of the screed is 10-15 mm. Rigidity is achieved by reinforcement with metal rods or mesh. The thickness of the pedestal plaster should not exceed 1.5 cm.
There must be a hole in the fireplace for air movement. As a rule, oxygen is supplied directly from the street. To do this, prepare a hole in the wall or ceiling.
Carry out chimney installation work in accordance with fire safety regulations. For example, there are generally accepted standards for the possible deviation of a pipe from a vertical position. The angular deviation for a length of five meters should not exceed 45 degrees. The longer the chimney, the lower the deviation.
If the device is wall-mounted, consider the distance to the wall. In a house with wooden walls it should be at least 50 cm, in a house with concrete walls - at least 10 cm.
Choose the safest closed-type fireboxes for your fireplace device. A special screen made of fire-resistant glass will slow down the burning of firewood in the hearth, while the heat from the combustion of firewood will still get inside the room. Exhaust gases will be eliminated from the chamber into the chimney.
Choose protective screens for fireboxes in accordance with the main characteristics, which are based on their weight and size, as well as the provided combustion duration.
Please note that if you select the elements incorrectly and violate the rules for installation work, there may be a risk of fire. Observe the slightest details of installing a fireplace at all stages of the necessary work.
To learn how to install a fireplace in a country house yourself, watch the following video.
In order to make the interior of a private home cozy and aesthetically pleasing, one of the solutions that can help with this is installing a fireplace insert. This element will not only give any room an elegant appearance, but also, if necessary, provide additional heating to the home.
One of the difficulties that often arises during this work is the installation of a fireplace insert, since installation work in this case requires serious effort and, if possible, special construction skills. However, after studying additional photo and video materials that can help with installation, as well as detailed instructions for performing all activities, you can install the fireplace insert yourself.
Types of fireplaces and methods of their placement
Fireplaces are classified according to three parameters - shape, type of portal and size of the firebox. With a portal width of less than 51 cm, the fireplace is considered small, from 51 to 63 – medium, and all other devices are considered large.
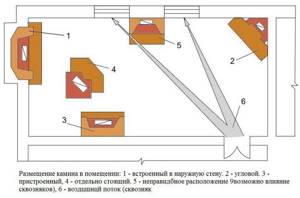
Before you make a fireplace with your own hands, you need to think about its placement, which can be done as follows:
- Central location . Quite an interesting, but not very popular option. Of course, a fireplace installed directly in the center of the room with your own hands looks interesting and quite unusual, but the design will impede free movement and take up a significant part of the free space. However, the desire to maximize the heat from the fireplace and create an interesting interior may well outweigh the obvious disadvantages.
- Placement near the wall . The most popular fireplace layout. The advantages of such a scheme include good heat transfer, saving of free space and the possibility of visually separating the recreation area from the rest of the room. The only drawback is that when installing a wall-mounted fireplace, you will have to pay maximum attention to the thermal insulation of the walls.
- Corner placement . Quite a convenient option for small rooms - a corner fireplace requires very little space. Despite its apparent modesty, a fireplace located in the corner will be a very good addition to the interior of the room. In addition, the arrangement of such a fireplace is very simple, and its angular placement allows you to hide minor errors made during installation. Proper execution of finishing work will only contribute to the creation of a pleasant interior.
The following can be said about the decoration of the fireplace - the appearance of the structure is purely individual, and the materials for it are selected depending on personal preferences. Ceramic tiles, stone, artificial marble, etc. can be used for cladding. Sometimes a plasterboard box covered with decorative tiles on the outside is used as finishing.
When deciding how to properly build a fireplace in a house in terms of its placement, you should consider the following recommendations:
- It is highly undesirable to install a fireplace directly opposite the front door - cold air entering through it will interfere with the normal circulation of heated air;
- If there is a constant draft near the fireplace, then it is better to look for another place to install the structure.
Features and types of fireplace inserts
It is important to remember that the fireplace insert will work as efficiently as possible if certain conditions are met:
- the chimney must work reliably;
- the fuel used to light the fireplace must be of high quality and not contain any harmful impurities;
- Skill in operating a fireplace is welcome.
High-quality operation of the chimney is extremely important so that the draft is continuous, and all harmful combustion products formed during the combustion of fuel are freely discharged outside. Therefore, the installation of a chimney for a fireplace must be performed impeccably.
The chimney is also subject to certain requirements due to the fact that during the operation of the firebox the following features of the chimney must be taken into account:
- the height of the chimney is directly proportional to the draft forces, therefore, in order to strengthen this parameter, a longer chimney system should be equipped;
- A decrease in draft is facilitated by many small nuances that are not always immediately noticeable: various cracks and chips in the pipe body, structural elements that do not fit well together, an open fire door, etc.
If we talk about the types of fireboxes, it is customary to distinguish between two main categories: the most common open fireboxes and closed fireboxes. Each of these designs has both its advantages and disadvantages, which should be discussed in more detail.
A fireplace with an open firebox is distinguished by the fact that the owners can easily see the fire burning in it, which is often quite impressive.
According to the type of construction, such a firebox is a niche in the surface of the wall, for the arrangement of which it is first necessary to strengthen the fireplace foundation. Fireplaces with a closed firebox have a higher heat output compared to units with an open firebox, since the heated air does not escape outside as much as it does in models without a door, but the aesthetic indicators are certainly higher for an open fireplace.
A fireplace with a closed firebox has a number of undeniable advantages:
- the entire structure is very easy to use due to its compactness;
- installation of such equipment does not involve any difficulty;
- it is much easier to regulate the fuel combustion process in such a design than with open-type systems;
- thanks to the heat-resistant glass included in the design of such a firebox, any fire due to the emission of sparks and other unpleasant situations is excluded;
- The performance of fireplaces with a closed firebox is very high (as a rule, the efficiency is more than 80%).
Stages of constructing a foundation for a fireplace
Construction of a fireplace can begin in two stages:
At the stage of construction of a new house.
The most optimal and simplest way to build a fireplace. In this case, the foundation for the fireplace is designed and poured at the stage of laying the entire foundation for the house. In this case, all the rough work can be done during the construction of the frame of the house and the roof can be installed immediately, taking into account the presence of a chimney. This is the most economical and fastest option for building a fireplace.
foundation for a fireplace at the stage of building a house
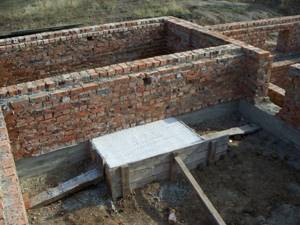
At the stage when the house is already in operation.
In this case, a lot of additional work arises to dismantle floors, roofs, possibly walls and interfloor ceilings. If your house does not stand on a reinforced concrete slab foundation, then you will have to dismantle the floors, dig a pit under the fireplace foundation and lay the foundation, while the fireplace foundation should not weaken the foundation of the house. Under the chimney, you will have to dismantle a section of the roof, and if the house is two-story, then the ceiling between the floors will have to be dismantled. All dismantling and restoration work requires additional financial and labor costs, unlike the first option, when the fireplace is installed at the stage of constructing the frame of the house. Therefore, in an already built house, it is more expedient to install a ready-made factory-made stove-fireplace made of cast iron or other metal, simply by installing a fire-resistant stone platform and a niche under it.
in an already residential building, building a stone foundation is quite labor-intensive
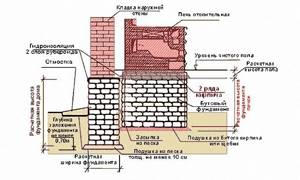
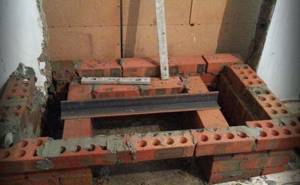
We will consider the process of arranging the foundation in a house that has already been put into operation, since at the stage of building the box, laying the foundation for the fireplace is carried out together with laying the base of the tape and is not such a problematic process. Before laying, you need to decide what type of foundation you will lay. A rubble concrete foundation, both with and without reinforcement, as well as a monolithic reinforced concrete foundation are well suited for a fireplace. There is approximately one preparatory pie for each foundation and consists of the following layers.
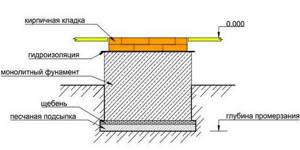
standard diagram of foundation layers for a fireplace
Dismantling works
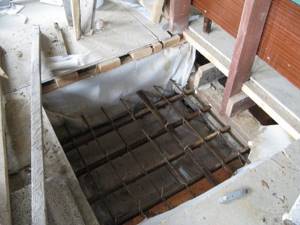
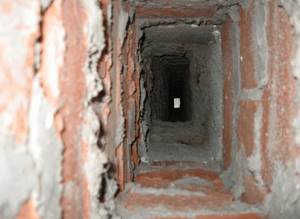
Having determined the location of the fireplace, you can begin dismantling the flooring. It is necessary to remove the facing and subfloor layers approximately 1 meter more from the area of the fireplace foundation, in order to make it easier to carry out work on selecting soil for the foundation. It is recommended to construct an opening for the chimney in the ceiling and roof after the construction of the foundation and the main body of the fireplace.

To install a foundation for the fireplace, it is necessary to dismantle part of the subfloor
Preparing a pit for the foundation
The distance between the foundation pit and the foundation of the house should be as large as possible, and be at least 10 cm. So that possible movement of the fireplace foundation during shrinkage does not affect the uniform distribution of the load of the supporting structures and the strength of the foundation of the house.
The soil in the hole for the foundation must be well compacted and with the geometry as even as possible before laying. This is necessary both for ease of laying and to avoid subsidence and ensure uniform load distribution. The proportionality of the foundation plays an important role. Since the operation of the fireplace constantly creates extreme temperature changes, namely: by heating the soil underneath, the stove does not allow the foundation to completely freeze and test its resistance to cold in the winter season. Conversely, without using the fireplace for a long time, poorly compacted soil along with the foundation can freeze unusually strongly and shrink when thawed.
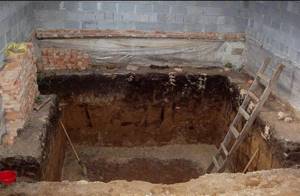
the foundation pit for the fireplace must have a smooth geometry and not crumble
Installation of formwork for the foundation
Having compacted the soil, it is necessary to knock down proportionally even and strong formwork from boards or strong panels. There should be a distance of 15 cm or more between the formwork and the edges of the pit, for the convenience of further waterproofing the foundation and installing sand backfill.
Waterproofing
It is recommended to waterproof the base of the pit and the walls of the formwork using roofing material and bitumen mastic. This is especially necessary if the site has a high level of groundwater.
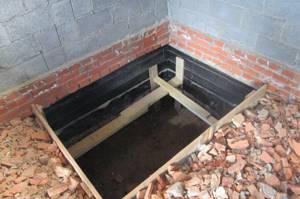
Foundation formwork must be waterproofed
Sand or sand-gravel bed
It is poured to a height of 10 to 25 cm, depending on the softness of the soil, and compacted tightly at the bottom. The more rocky the soil, the smaller this layer can be made. It is necessary for leveling the base and is especially necessary if there is loam in the soil. This ensures the stability of the heaving soil. It is recommended for both rubble and monolithic reinforced concrete foundations. The sand and gravel cushion is poured on top with liquid cement mortar for strengthening, in a ratio of 1:3 (where 1 is the part of cement and 3 is the proportion of sand)
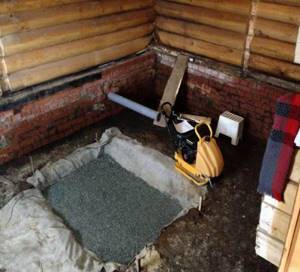
gravel and sand cushion for the fireplace foundation
Foundation reinforcement
Reinforcement is performed over the entire area and height of the foundation to maintain its strength and integrity when exposed to heavy loads. A reinforced mesh with a cell of 10-15 cm is mounted, corrugated reinforcement with a diameter of 10-12 mm is used . If you use large rubble stone for laying, then the reinforced mesh does not need to be knitted, but its presence is always an additional guarantee of the strength of the structure.
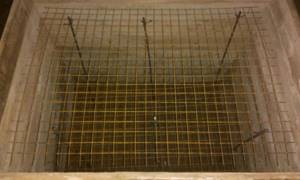
reinforcement of the foundation for the fireplace
First and second foundation layers
Approximately half of the foundation trench is filled with rubble stone, the dimensions of which must pass through the mesh cell of the reinforcement. Next, the pit is filled to the entire height of the backfill with concrete mortar in a prepared ratio of 1:3. If you lay a reinforced concrete foundation without using stone, then the pit is poured to approximately half its depth. The entire foundation is not poured at one time so that the bottom layer has time to quickly gain strength and dry out better. After about 2 days, depending on the rate of strength gain and its dryness, you can, in the same way, begin laying the top layer of the foundation, up to the height of the future fireplace masonry.
approximate diagram of the foundation for the fireplace
fireplace foundation
The next stage of constructing a fireplace is the actual laying of the fireplace body itself, which we will discuss in the next article.
Laying a foundation for a fireplace is a process practically no different from laying a regular foundation for a house and can be done by anyone. In order for the foundation to last throughout the entire period of use of the fireplace, so that cracks do not form in it and severe shrinkage does not occur, it is necessary to comply with basic requirements for its installation, proportions in the solution, and waterproofing.
Rules for installing a fireplace insert
The quality of the fireplace's operation largely depends on how correctly all instructions were followed during installation.
Thus, professional craftsmen recommend following the following rules:
- when determining the location where the fireplace will be located, it is important to ensure that the adjacent walls and ceiling surface can withstand high temperatures;
- the arrangement of the fireplace requires the presence of a smooth stone or ceramic base;
- as a safety measure, the base of the firebox should be equipped with a sheet of steel, the thickness of which should be more than 2 mm;
- The role of thermal insulation material will be perfectly fulfilled by basalt-based cotton wool, which must be laid between the surfaces of the floor and ceiling. This type of cotton wool is highly heat resistant (heating to 900°C will not cause any harm to it);
- one of the features of laying the firebox is the need for its gradual rounding, for which each of the subsequent bricks must be laid 6 cm closer to the beginning of the previous brick;
- the remaining mortar mixture formed after laying a row of bricks must be removed with a sponge;
- speaking about such a parameter as the thickness of the firebox walls, it should be remembered that at the side walls this parameter should be 20 cm, and at the rear edge - 10 cm;
- provided that if the fireplace is installed in a structure made of stone, then its arrangement can be done near any desired wall. But if the main structural element of the house is wood, then before installation it is necessary to build a special layer of protection. For these purposes, you can use either standard bricks or building blocks;
- the diameter of the gratings mounted in the decompression chamber must correspond to the power of the firebox used;
- in order to prevent the surface from being damaged during the operation of the fireplace, it is important to extend the chimney pipe beyond the roof by at least 1 meter;
- those sections of the chimney that cross the attic must be treated with a layer of thermal insulation;
- the joint between the fireplace insert and the chimney pipe must be completely sealed;
- in order for the air necessary for ventilation to flow to the gas outlet channel, a gap of 5 cm must be provided at the fireplace outlet area;
- the minimum height of the firebox above the floor surface is 20 cm;
- control over the air supply to the firebox will be improved by installing a special throttle-type damper mounted in the ashpit;
- Excess condensate can harm the system, so it is important to provide for the possibility of its drainage from the pipe.
How to correctly calculate the main dimensions of a fireplace
Be sure to record all calculations and measurements on paper, or better yet, sketch them out schematically. 1. On paper, draw to scale the room where the fireplace will be located. 2. Calculate the parameters of the firebox. Its dimensions should not be less than a fiftieth of the total area of the room. 3. The depth of the portal is determined as the ratio of the length and width parameters. So the depth can be 2:3 or 1:2. 4. Determine the parameters of the chimney. The average figures are: length - 6 meters, and pipe diameter -100 mm.
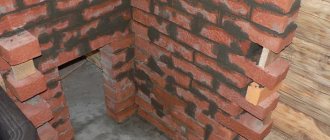
Corner and regular brick fireplace
Necessary materials for laying a fireplace 1. Fireproof brick. Calculate the quantity according to predetermined dimensions, taking into account 10-15% for fit and tear of the material. 2. River sand (fraction from 0.2 to 1.5 mm). 3. Construction cement. 4. Crushed stone. 5. Fittings.
How to pour a foundation for a fireplace
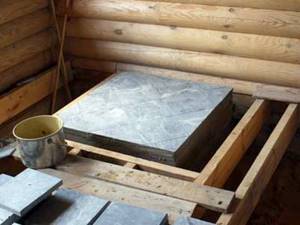
A fireplace, like a house, has its own foundation. To equip it, you need to carry out a number of activities: - Preparing the foundation for the foundation. To do this, fill the pit, the dimensions of which are slightly larger than the dimensions of the future fireplace, with crushed stone and compact it;
— We install the formwork. Its height should correspond to the height of the future foundation; — Pour in the cement-sand mixture; — After pouring, the base is carefully leveled, covered with polyethylene and left completely alone until dry.
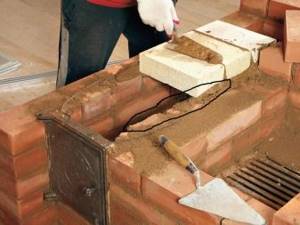
Step-by-step instructions for bricklaying a fireplace
Before you begin laying bricks with your own hands, you must sort them, select those that are perfectly smooth and intact, and soak them in water for several days before starting work. The work of laying a fireplace is not so much technically complex as it requires accuracy and patience.
Each layer is laid on a roofing felt backing. The quality of work is checked by the level. After the first three rows of the fireplace are completed, the fittings are laid, which in the future will become the basis for the fireplace grate. Laying out row by row, check with the pre-drawn diagram.
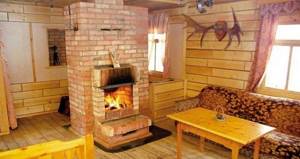
Photo of a brick fireplace
After the work is completed, the seams between the bricks are treated with special colored compounds, which give the work a finished look and add a decorative effect to the brickwork.
Interesting article: Do-it-yourself imitation of a fireplace in an apartment. Photo
Watch the video: Laying and arranging the fireplace
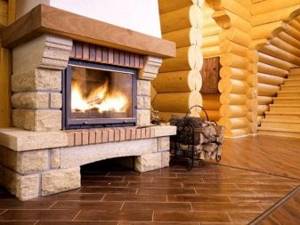
A fireplace stove in a private home will become not just a decoration, but also an additional source of heat. Wood burning is environmentally friendly and more budget-friendly, so once you have a fireplace in your home, you can save a lot of money.
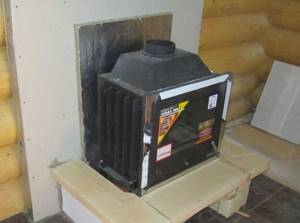
Preparatory work for installing a fireplace insert
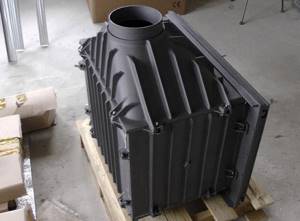
Before talking about the process of installing a fireplace insert, you should initially consider which design would be most appropriate to give preference to. Despite the prevailing stereotype regarding the old-fashioned nature of cast iron, many experts recommend choosing this material, since its reliability indicators are ideal for arranging a firebox. Having purchased the desired model, you should take care of the so-called foundation and equip a high-quality base for the fireplace.
It is best to carry out all the preparatory activities while building the house, but you can carry out the installation in an already finished structure. Here you need to remember that when installing a closed firebox, the floor under it must be equipped with a reliable coating and a heat-insulating layer must be laid.
Both fireplace inserts with a heat exchanger and any other systems require that the base be non-flammable, since high temperatures certainly carry a certain risk. The structure of the foundation for the fireplace must be strong, so it should be filled with a cement-based screed so that the final layer thickness is 15 mm. The base itself may include heat-resistant bricks or aerated concrete blocks - both of these materials withstand temperature influences and last a very long time.
Rules for arranging a fireplace with your own hands
Before assembling the fireplace correctly so that it is as reliable and durable as possible, you need to take into account a number of rules aimed at achieving these goals:
- When installing a brick fireplace, you need to create a separate foundation for it;
- The working part of the firebox can only be made of fireclay bricks, which should not be in contact with ordinary bricks;
- When installing the door and ash pan, you need to lay an asbestos cord and leave a small gap necessary for the thermal expansion of the metal elements;
- The interior of the firebox does not require plaster;
- It is advisable to place the rear wall of the fireboxes at a slight angle.
A separate point is the fire safety rules, compliance with which reduces the risk of fire to a minimum:
- Along the entire length of the smoke exhaust duct, special cuttings must be installed to increase the degree of fire safety;
- When placing a fireplace in close proximity to a wall, it is imperative to lay a layer of refractory material between them with a thickness of at least 20-25 mm;
- When installing a fireplace on a wooden floor, it is necessary to lay a metal sheet or ceramic coating under the structure so that it protrudes beyond the perimeter of the fireplace by at least 30-35 mm;
- At the point where the pipe passes through the interfloor floor or ceiling, a 15-cm layer of heat-insulating, heat-resistant material must be installed;
- A fireplace can only have one of its own chimneys.
The operation of the fireplace is also carried out according to certain rules:
- It is strongly not recommended to heat the fireplace to extreme temperatures;
- For normal operation, the fireplace must be regularly cleaned of soot deposits and ash;
- All flammable objects must be kept at least 70 cm away from the fireplace;
- You can only use the type of fuel in the fireplace for which the design was designed.
Furnace lining process
Heat supply and removal are very important aspects in the operation of any fireplace, so it is important to remember that in cast iron samples, about 30% of the heated air leaves through the base, and the rest leaves the firebox through the walls of the body. To equalize all indicators, a special pipe should be connected to the firebox, designed to remove air.
For these purposes, a pipe made of PVC with a minimum cross-section of 150 mm is quite suitable. Next, the firebox must be equipped with a door on the back side of the entire structure for more convenient access to the fireplace and removal of combustion products. Upon completion of installation of the combustion chamber, it is necessary to take a responsible approach to the installation of the chimney.
Chimney and draft provision
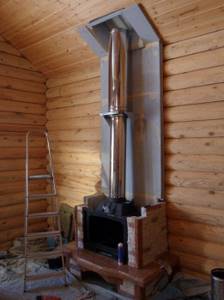
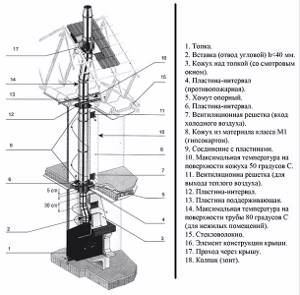
Fireplace chimney design using galvanized steel sandwich pipe
Chimneys can be divided into several types based on their design.
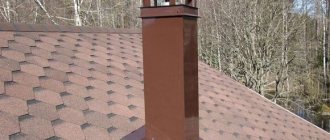
- Direct view. Because of its simplicity and versatility, it is used in most cases. Its installation is possible only during the construction of the main building, otherwise the ceilings will have to be broken to install a direct chimney.
- Oblique view. This type of chimney is used in a country house that has undergone reconstruction, or indoors when constructing a fireplace. The design of the chimney allows it to be connected to already installed chimney channels or wells for ventilation or hoods.
To achieve traction efficiency, maintaining the height of the structure is very important. Unlike the chimneys of conventional stoves, its height should be greater
In addition, the hydraulic resistance in the structure will need to be reduced to minimum values.
This is achieved by selecting the right design. The most successful option is to use a round pipe; it does not contain corners and has a smooth surface. These qualities avoid the formation of soot, which can delay the movement of smoke. Therefore, the chimney may be square and made of brick, but the chimney is made of pipe.
Fireplace and chimney. Scheme 1
Dimensions and design of the future fireplace
In addition to the height of the chimney, it is necessary to take into account the cross-section of the pipe; it must be proportional to the size of the combustion opening. The optimal match is considered to be a proportion of 1:10 or 1:12.
To reduce heat loss, you need to take care of the materials used and their thickness. Typically refractory or hollow bricks are used. Based on the location of the chimney, the type of masonry is selected, for example, for a structure near the outer wall, 1 brick is used, and for devices located inside the ceilings, the ½ brick construction method is used.
The construction of the chimney must be accompanied by tightness of the seams; inattention to this process can lead to air entering through the cracks of the structure, resulting in a decrease in the draft of the fireplace.
In addition to the listed factors, the pipe head can affect the reduction in draft. To avoid this, you need to purchase the simplest designs, without additional design elements. In addition, when installing it, it is necessary to take into account the width of its walls above the roof level; the optimal width should be at least 1 brick.
To protect the chimney from the influence of climatic conditions, use a special nozzle, which is installed above the head.
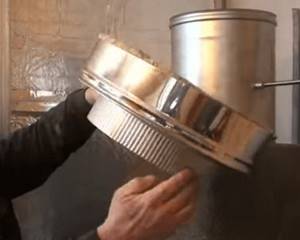
Installing a chimney for a fireplace
Equipping them with layers of thermal insulation will help extend the service life of these materials. Absolutely all connection elements must be located inside the pipe to avoid the negative impact of condensate that periodically occurs in the system.
Experts do not recommend making the chimney straight and advise placing its components at an angle of about 5 cm. To protect yourself from potentially uneven installation, you can place bars under the fireplace firebox to level it, which can be removed after all work is completed.
Tips for installing a fireplace chimney
Chimneys for a fireplace are easier to install than chimneys for stoves. Typically, this is an almost straight vertical pipe that runs from the fireplace insert to the roof. If you need to make a branch or tie-in into a common chimney, then the elbow is mounted at an angle of no more than 45º.
The diagrams of all fireplace chimneys are similar, since the system works on the same principle.
Brick chimneys are not practical, since more soot settles on these chimneys and the draft is worse.
At the moment, stainless steel sandwich pipes with a thermal insulation layer are used to install the chimney. Installing a chimney from such pipes is much cheaper, plus any home craftsman can do it.
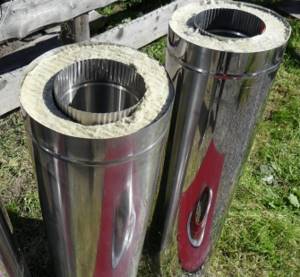
The basalt layer in sandwich pipes protects the chimney channel from condensation.
A sector of a regular (not insulated) pipe is installed directly above the fireplace insert; in advanced models, this sector can be equipped with an adjustable smoke damper. An insulated pipe is already installed on top of it.
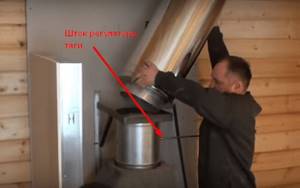
A draft regulator is necessary in any chimney.
To connect the insulated and non-insulated parts of the chimney, a special adapter is used; it prevents the basalt layer from “sliding” down and ensures the tightness of the system.
It is impossible to assemble an insulated chimney without a transition washer.
Remember - all joints and connections in the chimney must be coated with heat-resistant sealants, and where this is provided, the pipe is also secured with a metal clamp.
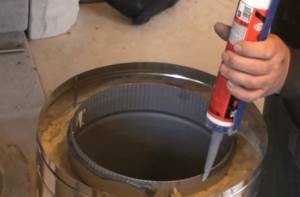
All connections in the chimney must be sealed.
The box for the chimney pipe, which we mounted directly above the firebox, is not only made for beauty; with the help of this thermally insulated chamber, you can easily redirect the flow of warm air to neighboring rooms or to the general ventilation system.
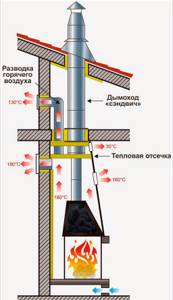
Scheme of heat redistribution in the fireplace.
In order to ensure good draft in the chimney, the pipe must be correctly mounted on the roof. The higher the chimney, the better the draft, but it is not always possible to install a high pipe; for such cases there are minimum requirements, which are reflected in the diagram below, the data is indicated in millimeters.
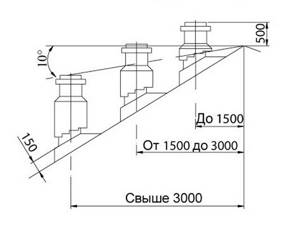
To ensure good draft, the chimney on the roof is installed according to certain rules.