Is it possible to insulate a balcony with penoplex?
As for the general issue of insulation, this can be done under one condition. The loggia must first be glazed, otherwise the entire process of laying thermal insulation does not make sense. If we talk specifically about penoplex, then this is a modern type of insulation. It has replaced the popular foam plastic and is gradually displacing it from the construction market. The popularity of penoplex is explained by its improved characteristics. First of all, the material is more resistant to mechanical stress.
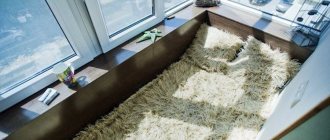
Penoplex is considered a good material for thermal insulation of a loggia.
We can say with confidence that thermal insulation boards are ideal for balconies. Typically, the loggia is insulated with penoplex under lining, drywall, plaster or other finishing material. The slabs can be laid on the floor or sheathed on the ceiling. Penoplex is attached to the walls both inside and outside the balcony. Here you can choose according to your wishes. However, slabs of a certain density are used for each element of the building. The material is resistant to large temperature fluctuations and is equally suitable for use in southern and northern regions.
Important! Penoplex is a trademark, not the name of the material. In fact, the insulation is made from extruded polystyrene foam boards.
Choosing a penoplex brand
In the technical aspect, this substance is a derivative substance from the extrusion (melt) of polystyrene foam - a more advanced type of polystyrene foam, because it contains special improvers (antistatic agents, antioxidants, substances that increase fire resistance).
There are many brands of penoplex available on the building materials market. Their choice depends on:
- material class properties;
- functional purpose of the balcony;
- layer thickness;
- installation technology.
The marking of heat insulators is reflected by a symbolic-numeric code. The classification by brand is as follows:
- 31 and 31C - these types of insulators are characterized by low density (up to 30.5 kg/m³) and strength, suitable for static objects - engineering and communication systems (not recommended for insulating balconies);
- 35 is a universal material with a compressive strength of 83 kPa and a volume density of 28-38 kg/m³. Features a wide range of uses.
- 45 and 45C. These brands have the following density - 35-40 kg/m³. This indicator is sufficient for insulating foundations and industrial facilities (suitable for balconies if it is planned to use a screed on the floor).
Penoplex is also produced in series:
- “C” (“Wall”) - suitable for insulating external walls, including facades;
- “K” (“Roof”) - for attics and roofs;
- “F” (“Foundation”) - for plinths and foundations;
- “K” (“Comfort”) - for interior work, including on balconies and loggias.
Advice! The best choice is with the letter “C” in the marking. And pay attention to the impregnation with fire retardants. These substances prevent the spread of flame.
Pros and cons of insulating a loggia with penoplex
The main advantage of insulation is the fact that the balcony can be used as a living space. If we consider individual points, they are closely related to the negative and positive qualities of the material itself.
After insulation, the balcony can be used as a living room
Pros:
- Penoplex is an improved type of foam. Instead of compressed white balls, polystyrene foam has a cellular structure. The size of each cell does not exceed 0.2 mm, and they are sealed. Hence, increased strength indicators and lower thermal conductivity.
- Like polystyrene foam, insulation is easy to install. However, penoplex does not have the property of crumbling and breaking easily when folded.
- The low moisture absorption rate makes it possible to use penoplex to insulate damp balconies located on the north side of the building and shaded by trees.
- The material can withstand an operating temperature range from - 50 °C to + 75 °C. If you insulate the loggia parapet with penoplex in the north or south, the material will last the same long time, maintaining its properties.
- Lightweight slabs do not exert much pressure on the balcony slab and are considered fireproof.
One of the disadvantages is the instability of polystyrene foam to sunlight. However, the thermal insulation on the balcony is hidden under the finishing, which protects it from destruction by ultraviolet radiation. Fire safety is also conditional. Penoplex does not support combustion, but smolders when exposed to an open source of fire, releasing acrid, choking smoke.
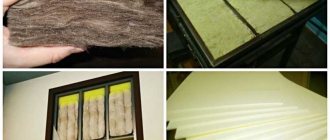
Penoplex or extruded polystyrene foam
Produced from polystyrene by extrusion. The insulation is resistant to mechanical loads, heat-intensive, and does not accumulate moisture. Penoplex is environmentally friendly and has a long service life. To insulate a home, sheets 4-6 centimeters thick are used. In terms of insulation efficiency, they are superior to mineral wool and polystyrene foam.
Main advantages:
- Due to the structure of many closed cells with air, this insulation has low thermal conductivity (mineral wool and polystyrene foam are less stable);
- The level of efficiency and optimal dimensions of the tiles allow you to economically use the balcony area while creating a reliable structure. This effect is of particular importance in small apartments;
- Eco-friendly composition (safer than alternative insulation options);
- The structural features ensure maximum moisture resistance - about 100%. This condition explains the absence of rotting and long service life (50 years or more). The material is successfully used in areas with high humidity;
- Low weight with high strength. The slabs are able to withstand significant compressive loads without deforming;
- Possibility of self-installation. The slabs are easy to work with during preparation (cutting) and installation;
Fire safety is one of the important indicators that you need to pay attention to when purchasing. The marking must contain the letter C. This designation indicates the presence of flame retardants that resist fire.
Flaws:
- The material is not resistant to sunlight, so penoplex is not used to insulate the outer part of the balcony;
- When interacting with petroleum products and solvents, the slabs are destroyed. Carefully study the components of construction foam and installation adhesive before purchasing;
- The cost of penoplex is higher than traditional insulation. You can save money by installing it yourself.
Important points:
- The slabs are installed along the entire perimeter of the room, including the walls, ceiling and floor surfaces. If you lay the material only on the walls, then the costs will be ineffective - the room will remain cold. This circumstance plays a big role when combining the balcony part with the apartment;
- To install penoplex, you do not need to build a sheathing frame. This design promotes heat loss through cold bridges in the structure.
How to prepare a balcony for insulation with penoplex
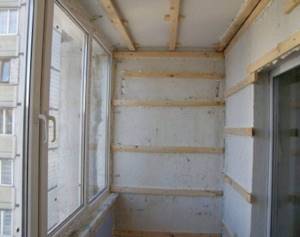
The insulation process always begins with preparing the loggia. It is important to understand that thermal insulation must be installed on all elements of the balcony: floor, walls and ceiling. If one of the areas is not insulated, there will be no benefit from the process itself. For this reason, it is necessary to prepare all elements of the loggia structure at the same time.
To freely carry out work, the balcony is cleared of unnecessary things
The preparatory process consists of the following steps:
- There is not enough space on the balcony. It will not be possible to insulate each section of it by rearranging things. Everything unnecessary is taken out, leaving free space.
- Lighting fixtures, hooks, hangers, and other elements are removed from the walls and ceiling.
- All old finishing is removed. If the walls have durable cement plaster, then you can leave it. The finishing coating is removed from the floor to the balcony slab.
- If the loggia is not yet glazed, install energy-saving double-glazed windows with two or three glasses.
- Wiring is laid on the walls, sockets and a switch are installed. All wires are placed in a corrugated pipe or special channels.
- The loggia is completely cleaned of dust. To prevent the formation of fungus in the form of black spots in the future, the step-by-step instructions for insulating a balcony with penoplex with your own hands includes a mandatory preparation item. All brick and concrete structures are treated with a primer with antifungal components.
To install penoplex, you will need a simple set of tools.
While the balcony dries after treatment with a primer, prepare materials and tools. First of all, you will need insulation boards, waterproofing, polyurethane foam, glue, self-tapping screws, and umbrella dowels. Depending on the method of insulating the floor, you need timber for the logs with a cross-section of 50×50 mm or cement for arranging the screed.
The simplest tool is prepared: a knife for cutting slabs, a level, a tape measure. If the balcony floor is wooden, you will need a saw, plane, hammer, and ax.
Advice! It is optimal to use foiled polyethylene foam as waterproofing and additional insulation. It can be attached to a wooden base using staplers.
Do-it-yourself ceiling insulation
You should start insulating a loggia or balcony from the ceiling.
Stages of work:
- The first foam board is placed in the corner of the balcony, then the next sheet of insulation is inserted tightly into its groove.
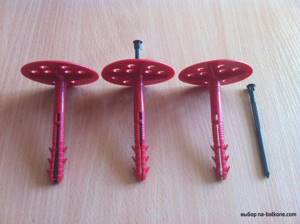
- If decorative panels or drywall will be installed on top of the insulation, then the foam sheets should be secured using dowels in the form of mushrooms.
- To attach panels using dowels, a hole is drilled into them and only then a nail is driven in. Five dowels are taken per sheet.
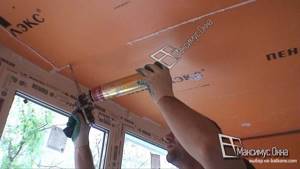
- If putty will be applied to the installed penoplex, it should be mounted first with glue and then with dowels. To do this, the sheet is treated with an adhesive composition, pressed tightly against the ceiling and screwed with dowels.
If the slabs need to be cut, then it should be done with a construction knife, cutting them along the entire length and breaking them with your hands.
What type of penoplex is needed to insulate a loggia?
Thermal insulation boards vary in size and thickness, but these are not the most important parameters. Penoplex under different labels differs in physical and mechanical properties. It is based on these parameters that the appropriate material is first selected.
Penoplex slabs under different markings differ in physical and mechanical properties
Expanded polystyrene with the marking 31C is considered the softest. This type of penoplex is used to insulate a loggia under plaster or other finishing coating. Moreover, the slabs will go not only to the walls, but also to the ceiling. There is no pressure in these areas of the loggia, but the floor needs stronger material. Here they use penoplex with marking 35. The density of the material is enough to withstand the pressure of the furniture installed on the balcony.
How much to buy penoplex
Standard dimensions of penoplex: width 60 cm, length 120 cm. To find out the area of one sheet, you need to multiply these values (0.6 m X 1.2 m = 0.72 m2). Therefore, the area of one sheet of penoplex is 0.72 m2.
Now the area of the walls that will be covered with insulation is measured, and the result is divided by 0.72. The resulting number is the number of sheets that need to be purchased. If, when dividing, the number turns out to have a remainder (and this always happens), you need to buy material with a reserve.
An example of insulation calculation. Wall area 12.5 m2. We divide this figure by the square footage of one sheet and find out how much penoplex to buy: 12.5: 0.72 = 17.36. This means that you should buy not 17, but 18 sheets of insulation. The principle of calculating the amount of material is the same for insulation on the outside and inside of the balcony.
If the insulation is installed in two layers, it is natural that you need to buy twice as much material.
What thickness of penoplex is needed to insulate a balcony?
Penoplex slabs are produced in thicknesses from 20 to 100 mm. The thinnest material comes with smooth edges. The manufacturer equips expanded polystyrene with a thickness of more than 20 mm with a locking connection for ease of installation. The thicker the slab, the warmer the balcony will be. However, it must be taken into account that insulation from the inside takes up free space.
The thickness of penoplex, depending on the brand, varies from 20 to 100 mm
Material 50 mm thick is suitable for walls and ceilings. If this is not enough, then the walls of the loggia can be additionally insulated from the street side. The thickness of the thermal insulation for the floor is selected individually. Taking into account all the above layers and the finishing coating, the floor plane of the loggia should not be higher than the threshold. It is optimal when the floor of the balcony and the adjacent room are on the same level.
Insulation inside or outside, which is better?
Two insulation technologies are used for balconies: inside and outside. Internal insulation is less effective, since the outer walls of the balcony freeze in severe frosts, and condensation forms between the insulation and the wall surface. The only advantage of this method is that you can do it yourself and save on paying hired workers.
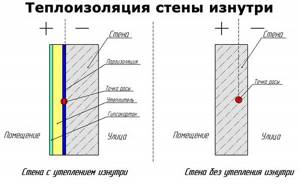
When insulating from the outside, the wall is protected from freezing by insulating material, which contributes to better heat retention. Although external insulation technology is more effective, it cannot always be applied. You can carry out work on the 1st and 2nd floors from the ground or using a stepladder, but if the balcony is located above the second floor, it is very difficult to do the work yourself. Also, after gluing the penoplex, it is necessary to finish the surface, so another issue is being resolved - the decorative design of the balcony from the street.
How to properly insulate a balcony with penoplex
There are two ways of insulation: from the inside and from the outside. The best option is considered to be a combined method, but it is reasonable to use it for northern regions with cold climates. In any case, the interior work is done first.
How to properly insulate a balcony with penoplex from the inside
Preliminary preparation of the loggia is not sufficient to begin insulation work. The surface of the walls, floor and ceiling is inspected. If cracks are detected, putty is applied. If the balcony slab is severely damaged, fill in a leveling screed.
Before insulation begins, all cracks and potholes are puttied.
The simplest and most fashionable solution is to insulate the balcony with penoplex and cover it with PVC panels or other finishing material. You can use plaster as a finishing touch, but such work is more difficult and requires experience.
Wall cladding begins at the corner of the glazed facade and moves towards the blank wall of the building. First, waterproofing is installed. The next layer is optimally to fix the foamed polyethylene with the foil side on the wall.
It is optimal to place foil-foamed polyethylene under the penoplex
After taking measurements, cut the slabs of the required size with a knife or hacksaw. Foam glue is applied to the fragments one by one on one side and pressed tightly against the wall. Each tile is drilled through, making a hole in the wall for a plastic dowel-umbrella. Fasteners provide additional fixation.
After insulating all sections of the loggia walls, the remaining cracks are filled with foam. It is best to seal the joints of the plates with foil tape. In the future, if plaster is chosen as the final finish, the walls are primed, puttied using reinforced mesh, and beacons are installed. When the lining is not satisfactory, and there is no experience in applying plaster, insulating the loggia with penoplex and plasterboard is an excellent alternative. To attach gypsum boards to the walls, a lathing made of slats or profiles is installed. The thermal insulation is covered with a vapor barrier.
The technology of ceiling insulation is similar to the method of wall insulation
A further scheme for insulating a balcony with penoplex involves working on the ceiling. The insulation is attached exactly as it was done on the walls, but there are small nuances. They are related to the height of the ceiling and the selected finishing material.
Sheathing with plasterboard or clapboard requires the creation of sheathing. The pie thickens significantly. If the ceiling of the loggia is low to the upper lintel of the doorway, the finishing cladding will protrude beyond its boundaries and will interfere. To reduce the thickness of the pie, the sheathing elements are attached not on top of the foam, but directly to the balcony slab. Thermal insulation is placed between the guides so that it fits tightly without gaps. Next comes the standard procedure: laying a vapor barrier, installing the sheathing.
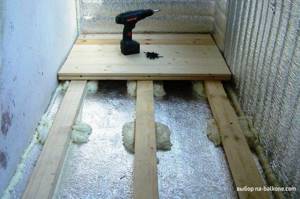
The loggia floor is insulated with or without joists under a screed
There are two main ways to insulate a loggia floor:
- According to the lags. The technology is based on arranging a wooden floor. First, the balcony slab is covered with waterproofing, and leveled timber logs are secured with anchors. Penoplex is mounted on glue between the elements. The cracks are filled with polyurethane foam. Boards or particle boards are laid on the logs.
- Under the screed. In this method, the balcony is first insulated with penoplex foam using adhesive foam, that is, the slabs are glued to the balcony slab without using logs. Waterproofing needs to be done. A “warm floor” system can be laid on top of the penoplex. In this situation, a concrete screed with a thickness of at least 7 cm is poured. If the floor is simply not heated, the screed is poured with a thickness of at least 4 cm.
Advice! If desired, insulation of the floor on the loggia can be done without screeds or joists. To do this, glue the thermal insulation with foam. Plywood or particle boards are laid on top, laminate, linoleum or other finishing coating is laid.
In the video, the insulation of the loggia with penoplex:
How to insulate a balcony with penoplex from the outside
The difficulty of external insulation lies in carrying out work at heights. Additional devices will be required that are available only to specialized teams. Only the walls of the loggia are insulated from the outside. Penoplex is attached in a similar way: glue is glued with foam, fixed with dowels-umbrellas.
Due to the complexity of work at height, it is better to trust external insulation of a loggia to specialists
There are two options for cladding: plaster or siding. In the first option, the “bark beetle” is considered popular. Decorative plaster is applied directly to the thermal insulation. After drying, paint with facade paint.
Siding involves the arrangement of a ventilated facade. Lathing is attached to the walls. Penoplex is covered with a windproof membrane. Siding panels are fixed to the sheathing elements.
Practical tips for thermal insulation of balconies
In theory, everything seems clear, but in practice it is always more difficult. You learned how to properly insulate a balcony with penoplex yourself from our instructions. And finally, we offer you a few secrets for more effective thermal insulation:
- To insulate the ceiling, one layer of foam foam 2 cm thick is enough. A thin layer is easier to decorate.
- It is better to attach thermal insulation using a construction stapler.
- In areas with a cold climate, choose penoplex with a thickness of at least 40 mm or 2 layers of 20 mm each. Cover the seams of the bottom layer with separate slabs.
- Do not buy polyurethane foam that contains toluene. This substance destroys the structure of penoplex.
Everything done according to the instructions is doomed to success. Carry out all the steps efficiently, follow the proposed technologies - and everything will work out. The balcony will be warm, and its space will be functional and as comfortable as possible.
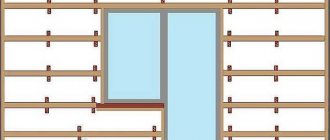
Assembling the sheathing
First, we fasten the beam under the window sill, leaving a gap of 1-1.5 cm at the top. We cut the beam 1.5-2 cm shorter than the length of the parapet, place the beam against the wall and drill holes with a diameter of 8 mm with a hammer drill for dowel nails in increments of 50-70 cm.
Having previously unscrewed the nails, we hammer the dowels into the timber so that they fit into the holes in the wall. We tighten the nails with a screwdriver. The beam is fixed. We fasten the lower beam in the same way, retreating from the floor by 1-2 cm.
After we have secured the upper and lower beams, we proceed to fastening the cross beams using the same method. The distance between the transverse bars should be 60 cm. If the balcony is often exposed to wind loads, reduce the step of fastening the transverse bars to 40 cm.
Every 2.5 meters two beams are attached in a row. This is done so that we can then attach a sheet of drywall to them!
Correct installation of insulation in stages
1. The room should be cleared of unnecessary items before starting the insulation process.
2. The enclosing surfaces are leveled - they should be free of screws and cracks.
3. Using fasteners (dowels), the slabs are fixed (the sheets are cut with a knife if necessary).
A disc-shaped dowel used for mounting sheets on walls (“umbrella” or “mushroom”).
The sheets can also be secured using a special mounting adhesive if the surface is pre-leveled.
The adhesive composition should be applied to the surface in dots (5-7 pieces per 1 sq. m) or in a zigzag. The walls should be coated with a primer for better adhesion.
4. After joining the plates, we fill the gaps with special foam to create an airtight structure.
The excess part of the polyurethane foam is cut off after drying. Avoid using the winter version of foam sealant containing toluene.
5. In order to smooth the joints, you can use tape. The result will be a smooth surface;
6. The high moisture resistance of the material allows for the absence of special vapor barrier. However, if you decide to organize an additional layer, it can be made of polyethylene film covered with foil (penofol). Thus, the balcony room will be protected to the maximum from moisture. The foam layer should be oriented with the foil facing outward.
Polyethylene foam with metal tape operates on the principle of a thermos, additionally insulating the room;
Metallic tape for joining polyethylene foam film.
7. Another way to provide vapor barrier is to cover the surface with special plaster and plasterboard;
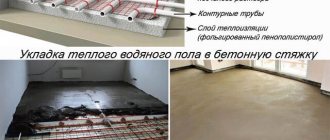
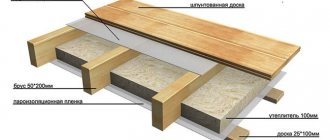
Creating a warm floor structure
Ceiling insulation
If you are planning to insulate a balcony with your own hands, then it is best to start from the ceiling and move further from top to bottom. Of course, if the ceiling of your loggia is the floor of your neighbors, then the process of protecting the room from frost and wind is much simpler. However, if the roof is independent, then a little effort should be made to insulate it.
To best protect your balcony from cold and wind, we recommend performing the work in the following sequence:
- Spraying or special film for sound insulation.
- Waterproofing the ceiling on the balcony. In this case, the most popular materials are polyvinyl chloride or polyester.
- A special membrane that protects from wind. It freely allows steam to pass through, which is released from the insulation, but helps to completely isolate the ceiling from wind and drops that can enter the room along with it.
- Anti-condensation material that protects the insulation from the formation of water droplets.
- Frame (metal or wood of your choice). The sheathing is an optional element. The insulation can be installed using special glue. The main thing is to make sure that the mixture does not contain toluene. For greater reliability when fastening sheets, use dowels.
- Insulation for balcony ceiling. We recommend that you use polystyrene foam, polystyrene foam or mineral wool. They provide good protection from the cold and are easy to install, which is especially important when insulating a balcony ceiling.
- Vapor barrier for insulation. It does not allow water vapor to pass inside, which significantly increases the thermal insulation properties of the material.
First option: KNOW HOW from DEVI
This is the “Devicell Dry” system - it allows you to dry install a heating cable under a specialized laminated parquet board. This system has huge advantages, namely:
- You can start using heated floors immediately after installation, rather than waiting a whole month, as in the version with a screed;
- the load on the loggia floor (floor) is lightened by 2-3 times (depending on the covered floor area of the loggia);
- installation is carried out within one working day;
- installation can be carried out at any negative ambient temperature, which cannot be allowed in the version with a screed.
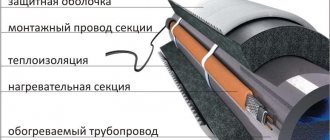
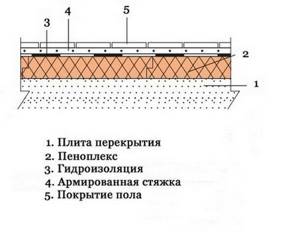
Insulation scheme for a balcony/loggia
- Glazing of a balcony/loggia
- Balcony/loggia wall
- Thermal insulation PENOPLEX COMFORT
- Vapor barrier
- Lathing
- Finishing the walls (plastic panels or moisture-resistant plasterboard)
- Fastening element
- Screed for finishing the floor
- Finishing the floor
- Floor of the balcony/loggia.
The sequence of insulating a loggia using PENOPLEX COMFORT
- Window units are being installed. The optimal means of sealing seams is PENOPLEXFASTFIX polyurethane foam.
- PENOPLEX COMFORT boards are attached with polyurethane adhesive PENOPLEXFASTFIX, which is also used to process joints between structures.
- The vapor barrier is attached - foil-coated polyethylene film - using double-sided tape. The vapor barrier is installed end-to-end, and the joint between the panels and the structures is glued with metal tape.
- We install the balcony floor.
In the photo - insulation of the loggia with PENOPLEX slabs in the apartment of actress Marina Dyuzheva
The following bases can be laid on PENOPLEX thermal insulation:
— Cement-sand screed (thickness 4 cm). It is necessary to leave a temperature gap of 1 cm between the vertical wall and the screed. To do this, before pouring the screed, it is enough to install a 1 cm thick strip of foamed PE around the perimeter. After the screed has hardened, the finishing finishing layer is laid.
- DSP screed with electric heating - based on the technology of installing a heated floor system.
- Solid flooring made of gypsum fiber sheets (gypsum fiber sheets) - installed in two layers with the obligatory overlap of joints.
- The sheathing on the walls, ceiling and parapet is made of dry wooden slats (treated with antiseptic) and is aligned at vertical and horizontal levels. Attaches directly to concrete using dowels and self-tapping screws. The slats can be 40x20 mm in size.
- The finishing trim is attached to the sheathing. Usually these are plastic panels 25 cm wide or moisture-resistant plasterboard. When using drywall, additional finishing work is required, namely: priming, puttying, corner processing, leveling, wallpapering or painting.
- Electric heaters, lighting, etc. can be installed on the loggia. Electrical wiring is installed before the interior finishing in non-combustible boxes.
Recommendations for insulation
Insulating a balcony with penoplex inside is a simple task, but even here you can make certain mistakes.
If you install a vapor barrier on the cold side, that is, directly on the wall, condensation will form.
If a wooden guide is mounted inside the slab, then over time the main thermal insulation layer may deteriorate and a “cold bridge” will form.
Many installers who are faced with the installation of these slabs note that the work is similar to the installation of foam plastic. But there are still differences. After all, foam plastic cannot be attached to the surface with an ordinary self-tapping screw - the material will simply break. And if you use polystyrene foam as insulation, you will have to additionally protect it from external influences. For example, if moisture gets on it, it begins to lose its shape and properties. In this case, the best option when choosing insulation is penoplex.
Insulation under the screed
Insulating the loggia floor with penoplex under the screed is an excellent solution when organizing a heated floor system. This insulation is done as follows:
- After removing the old coating, a thin leveling cement screed is made. Without a perfectly level floor, foam sheets can be damaged.
- A film is laid for vapor and waterproofing, the joints are taped.
- Penoplex sheets with a thickness of 40–60 mm are laid. The joints are sealed using polyurethane foam or sealant.
- A second layer of vapor barrier is placed.
- The foil heat reflector is laid with the foil facing up.
- A “warm floor” system of the selected type is installed.
- The screed is poured. When installing a heating system, its thickness should be at least 7 cm, without it - at least 4 cm.
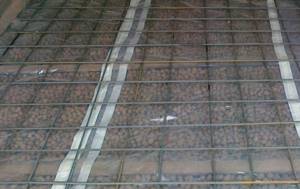
Thermal insulation of the loggia floor with foam plastic is done in a similar way, but in this case the screed is reinforced:
- After pouring the first layer 2–5 cm thick along the beacons, a reinforcing mesh is installed.
- The final screed is made with a thickness of 4 cm.
If we insulate the floor with expanded clay, before pouring the screed, the surface is leveled and a grid of metal reinforcement is laid on it, as in the following photo.
If you want to make your balcony or loggia warm, this guide will help you. After completing the insulation work, all you have to do is think over the design of the loggia: turn it into a cozy corner where you can retire, or expand the space of the living room or kitchen using it.
Required materials and tools
We will need foam sheets, their quantity is calculated using the following method. The area of one sheet is 0.72 m2. We calculate the area of the walls that require insulation and divide them by 0.72 and round them. This is how we get the number of sheets needed to insulate the room.
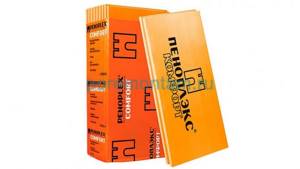
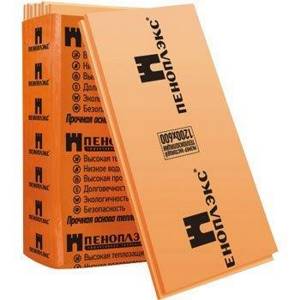
Penoplex slabs (sheets). For insulation I use the “COMFORT” marking
We also need wooden blocks to make the sheathing. The cross-section of the bars should be exactly the same as the thickness of the penoplex. Bars 3 meters long are available for sale.
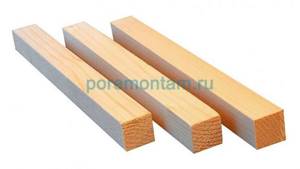
Wooden blocks for insulation are used with a section of 3x3 or 5x5 cm
Foil penofol (foiled polyethylene foam) - performs the function of vapor barrier. Temperature changes between the cold walls and the warm air of the balcony lead to the appearance of condensation in the form of moisture. Which leads to the appearance of fungus and mold. Penofol serves as a vapor barrier, preventing the formation of condensation and mold.
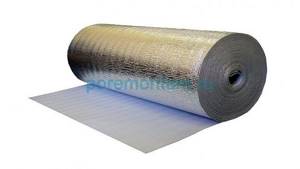
Foil penofol
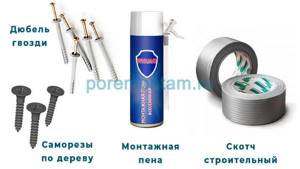
Dowel nails for fastening the sheathing. For bars with a cross-section of 5x5, a dowel 10-12 cm long is suitable, for a cross-section of 3x3 cm, 8 cm. For a standard balcony you will need 70-100 pieces
Wood screws 3.5x35 or 3.5x45 mm. It will take about 100-200 pieces
Polyurethane foam - for sealing gaps between sheets of insulation and sheathing. 2-3 cans of foam are quite enough.
Construction tape
Moisture-resistant plasterboard - 12 mm thick. The area of a standard sheet is 3 m2, we divide the area of the insulated walls by 3, we get the number of sheets we need.
Among the tools we will need: Hammer drill (you will need a drill with a diameter of 8 mm) Screwdriver Utility knife for cutting insulation Jigsaw or hacksaw for cutting bars Tape measure Pencil or marker Hammer Construction stapler - for fixing penofol
Now you can start insulating!