Features of heated water floors
Experts say that the main advantage of this design is the comfort of its operation.
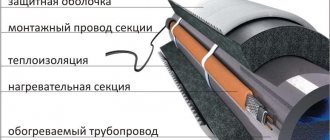
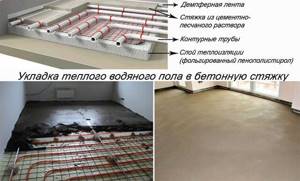
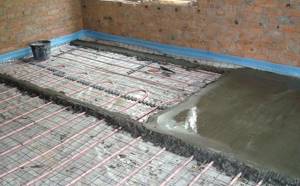
The principle of its installation is to lay heated floor pipes under the surface, and it is through them that hot water, which is the main source of heating the temperature in the room, must continuously circulate. This system includes the following elements:
- heating part (thin flexible copper tube);
- diagram of connecting a heated floor to a heating system, represented by a manifold.
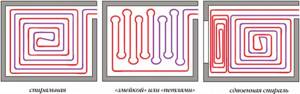
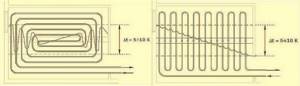
The installation of heated floors follows the principle of installing pipes using a system that is popularly called a “snail” or “snake”.
The main advantage of this method of laying water heated floors is the simplicity of its design, so this option has become very widespread, both in the domestic market and abroad. The temperature distribution in this design is uniform, which is due to the alternate arrangement of hot water pipes and return pipes. Perhaps the main disadvantage of this method of arrangement is the length of time it takes to install such a structure, as well as the need for careful design.
However, the “snail” certainly has more advantages, which is why this type of heated floor is used in many homes nowadays.
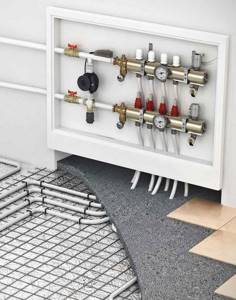
Unit #2 - collector
The collector is a device responsible for distributing hot water through heating circuits, as well as setting up and adjusting heated floors. The device must have a sufficient number of terminals to connect all circuits to them.
The simplest models are equipped only with shut-off valves. They are extremely cheap, but do not provide even a minimal opportunity to customize the system. Devices with control valves allow you to adjust the water flow for each circuit, which allows you to adjust the heated floor for the most uniform heating of the premises.
The manifold of any model must be equipped with a drain outlet and a special air vent valve. The most convenient to use are devices with servo drives on valves, equipped with pre-mixers that mix the heated water supplied to the system with the cooled water returning and thereby regulate its temperature.
Such a device fully automates the functioning of a heated floor, but its cost is very high.
Manifold with servomotors on valves and pre-mixer. Necessary system adjustments are made automatically
Technical characteristics of heated floors powered by electricity
When wondering how to install a heated floor of this type, it is worth noting that its installation is more complex compared to a water system.
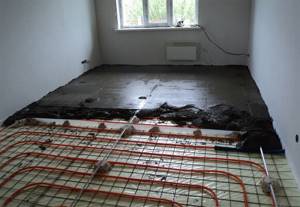
But it is impossible not to mention that the installation of such a structure can be carried out under absolutely any surface, including tiles, laminate, carpet, etc. There are several options for installing a heated floor under tiles, and one of the weighty arguments in favor of an electric heated floor is that there is no need to install it along the entire perimeter of the room, it is enough to just equip with it those areas along which the residents of the apartment move. This will significantly contribute to more economical consumption of both energy and materials used for installation (more details: “Economical heated floor: accessible to everyone”).
Before you begin equipping the floor with an electrical system, it is important to bring its surface into proper shape, removing all visual defects such as depressions and bumps in order to achieve the most even space possible. The use of cement screed can help with this.
Equipment for electric flooring can be represented by the more common heating cable or carbon mats, which must be laid on a smooth and dry surface.
When installing an electrical cable, experts recommend laying a layer of heat-reflecting material underneath it.
One of the most popular samples is polystyrene foam, equipped with a special film. Such measures will increase the heat transfer of the floor by about 30 - 40%, in addition, the financial expenditure on the heating process itself will also be significantly reduced.
Types of heated floors
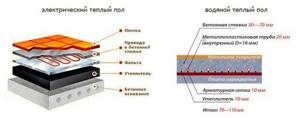
Various types of heated floors have been developed. The most common are water and electric. Water ones are connected to the main heating circuit, which operates in the room. That is, there is no need to install a source of thermal energy separately. If we talk about savings during operation, then this is the best option.
The water system also has disadvantages:
- They can only be installed in private households. You can’t do this in an apartment; the law doesn’t allow it. When connected to a central system, the heating level of the coolant is automatically reduced, since the power of heating boilers is designed for a certain volume, which was laid down during the construction of an apartment building. That is, it will become colder in your neighbors’ apartments. It is not possible to obtain permission to connect. Violation of the law entails heavy fines and dismantling of the system.
- Since high pressure is created in the pipes, there is a risk of leaks. And this entails expensive repairs, not only of the water circuit itself, but also of the entire floor covering. If the water circuit on the second floor breaks down, the ceiling below will also suffer. That is, the risk of repair costs exceeds the savings in operating costs.
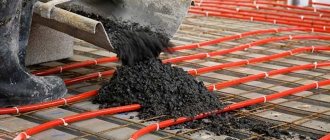
With the electric heating method, heating cables are installed under the finished floor, in a concrete screed. Its thickness is from 3 to 5 cm.
Among the disadvantages of cable floors are long-term installation, expensive operation, that is, increased energy consumption. Installing a thermostatic unit partially solves this problem.
The undoubted advantages are high heat transfer (efficiency is close to 100 percent), the ability to install both in an apartment and in a house.
The principle of arranging a heated floor under a laminate
To understand how to lay a heated floor under a laminate, you first need to carefully study all the possible difficulties in installing this structure. Thus, this flooring should not be installed without a backing if the base of the floor is concrete or cement. In addition, the laminate cannot be fixed firmly enough, which, in turn, can cause unnecessary noise. The use of a substrate will solve the problem associated with shock absorption and correct unevenness of the subfloor, while at the same time acting as sound insulation.
It is also important to remember that the installation of such a heating system must take place under the condition that the quality of the floor covering is good. You should also not forget about such an indicator as power. So, this parameter for heating elements installed under the laminate should not have a value greater than 110 W per 1 m².
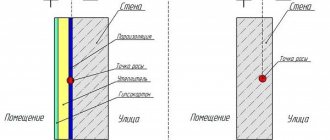
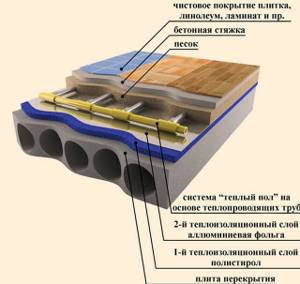
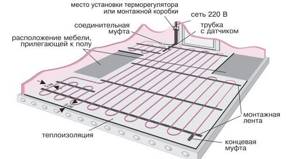
System design features
A water heated floor is a complex structure consisting of the following layers:
- base;
- hydro and heat layers;
- reinforcing elements;
- pipes;
- concrete screed.
The finishing floor covering is laid on the top concrete screed.
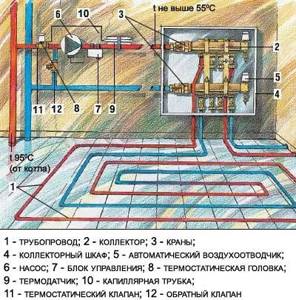
The coolant is supplied to the pipes from a gas boiler. It is also possible to connect pipes to a solid fuel boiler, but economically this option will be less profitable. Purified water or antifreeze is used as a coolant. In addition to pipes in the floor, radiators are installed in the room. But in most cases, with high-quality thermal insulation of the house, they are rarely used.
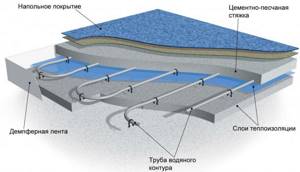
General diagram of a water heated floor
A distribution unit is connected to the boiler, which consists of a circulation pump, a mixing unit and a manifold group. It “routes” various heating circuits and allows you to regulate their heating.
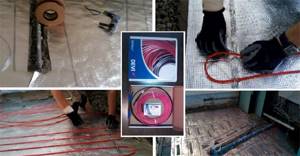
Self-installation of heated floors on an electric basis
The instructions for laying heated floors provide several options for this work.
The main ones are the following:
- a heated floor can be laid under the screed, and then the entire system on top should be covered with tiles;
- the second option involves installing a warm electric floor on a screed with further placement of ceramic tiles on top of it (about
Aftercare
Immediately after laying the finishing coating, you cannot walk on the floor; you need to wait a while. The same can be said about heavy household appliances - you can’t put them out right away. During the operation of the heated floor, structural repairs may be required. It is advisable to hire a qualified specialist for this work. Subsequent maintenance of the system is simple ; it is enough to keep the floor covering clean and operate it in accordance with the manufacturer’s instructions.
How to care for heated floors
Prices for pipes for heated floors Rehau
Pipes for heated floors Rehau
Preparatory activities
Before laying a heated floor, it is extremely important to remove all dust and other debris from the surface of the area being developed, thereby preparing a clean and smooth surface. After this, it is recommended to treat the entire perimeter of the concrete base with a primer. This is done, first of all, to increase the adhesive properties of the floor.
Next, you should decide which areas do not require heating (usually the space under furniture, under the bathtub and other plumbing fixtures in the house).
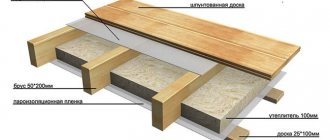
Flooring
You can glue tiles and other floor coverings onto the finished concrete base.
In this case, glue intended for heated floors is used. If the tile falls on an expansion joint, then one part of it must be glued, and the second must be placed on silicone. Silicone adhesive absorbs thermal movements of the base, and the tile will not crack from overstress.
Installation of heating mats
First of all, make sure to insulate the base of the floor so that the heated air rises freely.
The material in this case can be polystyrene foam, penofol or mineral wool. Next, a special reinforcing mesh is placed on the thermal insulation, but you can do without it by first adding a special plasticizer containing microfiber to the solution. Next comes the actual work of installing the heating system. All heating elements must be laid freely on the floor, that is, so that they do not touch each other or intersect.
Before laying a heated floor, it is important to determine its parameters, that is, to adjust the entire structure to the size of the room. This can be achieved by cutting off excess mesh in the right areas, but in no case touching the electrical cables. If the humidity level in the room being equipped is high, the reinforcing element to the regulator should be grounded.
It should also be mentioned that when installing a heated floor, it is extremely necessary to maintain a distance from the walls of 5 cm, and if there are stationary heating devices in the room (radiators, heating pipes), this parameter should be at least 10 cm.
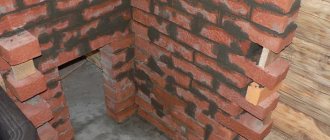
Fastening connections for water heating pipes
Pipe fasteners are installed on the thermal insulation.
Its purpose is to secure adjacent pipe branches and position it along the floor in strict accordance with the preliminary plan. The fastener holds the pipe until the concrete screed reaches the desired degree of hardness. The use of fasteners facilitates the installation of the floor and ensures correct placement of the pipe in the thickness of the concrete pad.
Fasteners can be special metal strips, metal welded mesh, plastic brackets that pin the pipe to the foam base.
Metal strips are used when the thickness of the concrete pad is increased.
They slightly raise the pipe relative to the heat insulator, due to which it is closer to the upper surface of the concrete pad. The pipe simply snaps into the shaped recesses of the planks. The metal mesh not only secures the pipe, but also reinforces the layer of concrete pad. The pipe is tied to the mesh with pieces of wire or plastic clamps.
Fastener consumption is 2 pcs. per linear meter. Additional fasteners can be used in places where there are curves. Plastic brackets are installed manually.
They pin the pipe to the polystyrene foam as it is laid. Do-it-yourself semi-industrial heated floors are made using a special stapler. But its purchase is justified only with intensive professional use.
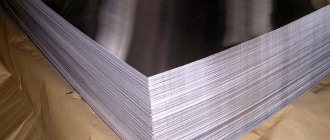
In recent years, manufacturers of underfloor heating systems have begun to offer another very convenient solution. We are talking about special sheets of dense polystyrene foam with a profiled surface. Typically, the surface of such sheets consists of intersections of grooves or rows of protruding elements, between which heating pipes are easily laid.
The surface of the sheets is smooth, extruded, all pores are closed and no additional waterproofing film is required. Having a special thermal cutter, you can cut grooves in polystyrene foam yourself. But to carry out this work you need at least minimal experience.
Important! Metal-plastic pipes are supplied in coils. When laying, the coil rolls out along the pipe placement path. Do not pull the pipe from a lying coil, as this will cause it to twist and may lead to delamination of the internal layers.
Rules for connecting underfloor heating
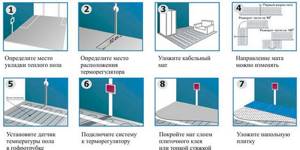
At the base of the concrete floor you need to make an oblong hole with parameters of 20x20 cm and pass the ends of the heating elements through it to the main module.
You should also not forget about checking the resistance of the heating mat wires and monitoring the temperature sensor. Their indicators must completely coincide with those stated in the manufacturer’s instructions. It would also be useful to draw up a special diagram on which the areas where the wires are located on the floor should be displayed. This drawing can serve well if any repair work is performed after the installation of the heated floor is completed (
Last stage: checking and screeding
The next very important stage is checking the functionality of the floor. It needs to be filled with water under pressure, which is one and a half to two times higher than the working one.
You can use not water, but air, which is pumped using a compressor. The main thing is to withstand the pressure and leave it like that for at least 2 days. Of course, in winter conditions you can only use an air compressor, as the water may freeze.
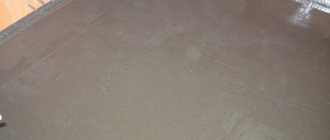
After everything has been checked and no leaks are found anywhere, you can make a concrete screed.
Stages of work:
- the pipes are covered with another layer of reinforcing mesh;
- install beacons;
- pour concrete in the proportions of cement and sand 1:3. For each bag of cement add a glass of PVA glue (200 grams). This is necessary for plasticity.
Important. During concrete work, the pipes must be under pressure. You should know that concrete must stand for about 26-28 days in order to gain the required level of strength. And only after that you can start the system.
The task of pouring a concrete screed will be greatly facilitated by a solution that does not require beacons. It has excellent quality, but the only drawback is that it is not cheap, because even a screed of half a centimeter will take a lot of it. Therefore, cement-sand mortar would be a good option.
How to perform a screed correctly?
Having completed all the measures described above, the heating mats must be filled with a solution specially designed for this purpose with a layer thickness of approximately 8 - 10 mm.
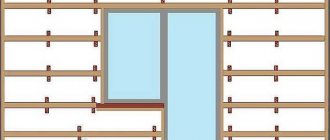
After the material has dried, you need to make sure once again that the heated floor is functioning normally. Only after this can you begin laying the desired flooring or tiles. It is important to remember here that when performing this work, it is very important to prevent drafts from penetrating into the room being equipped, and the installed system can only be turned on after the screed has completely dried. You need to start installing such a system with the equipment of a special collector-type cabinet, which needs to be installed in the wall next to the floor surface. In this mechanism, the loop pipes must be connected to the central heating system to which the home is connected.
Next, you need to clean and, if necessary, level the surface on which this type of warm floor is supposed to be installed. A layer of waterproofing is applied to it, the function of which polyethylene will perfectly cope with. The wall, as in the previously described method, is equipped with a damper tape, after which insulation is laid, which can be materials such as mineral wool, foam concrete or polystyrene.
Then you need to start laying pipes, which can be made of materials such as metal-plastic or polypropylene. These elements are secured to the reinforcing mesh using special clamps, and to the thermal insulator - with tapes or staples.
After this, you need to create a special deformation seam, where you should also use the already known damper tape. The operation of the system must be tested by supplying liquid from the manifold to all loop pipes. The installation process ends with the screed, and its height should not exceed 3 – 7 cm.
If difficulties arise during the work, you can always contact specialists who will always give the right advice and provide detailed photos and videos on installing heated floors.
We carry out the necessary calculations
Let's start calculating the warm water floor. It must be done even before the stage of purchasing material. This way we will know what material we have to buy and in what quantity.
In addition, we need a subsequent installation diagram with carefully drawn contours. Save this diagram because knowing the exact location of each pipe will allow you to avoid serious complications that may arise during repair work.
Rules and regulations
When performing calculations, follow the following rules:
- pipes do not need to be laid where any furniture (wardrobe, sofa, etc.) or plumbing items will always be located;
- to maintain pressure in the system with a circuit diameter of 20 mm, its length cannot exceed 120 meters (for 16 mm - 100 meters), in other words, the approximate area that one circuit will occupy should not be more than 15 square meters. meters;
- in a large room there should be several circuits, the difference in length should not be more than 15 meters: they should have approximately equal length;
- if your house has good thermal insulation, then the pipes should be laid in increments of 15 cm; in winter frosts of -20°C, the increment can be reduced to 10 cm over the entire area of the room or only along the outer walls;
- a step of 15 cm corresponds to an approximate pipe consumption of 6.7 m per 1 sq. meter, if laying is done every 10 cm, then the consumption per unit area will be 10 meters;
- The minimum pipe bend radius corresponds to five of its diameters.
Residents of the north cannot do without heating radiators: heated floors alone will not be enough.
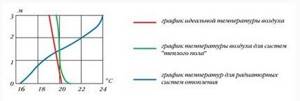
If you look at this temperature comfort graph, you can see that the air temperature graph for a “warm floor” system is closer to ideal than the temperature graph for radiator heating systems
Of course, the calculation of a warm water floor is carried out taking into account the specific data of the room and area where it will be installed. For example, the basic characteristics of the room in which heated floors will be located are its type, area and configuration.
If we abstract from external indicators, then the schedule for calculating a heated floor will look like it is shown in the photo below. The graph shows the dependence of the heat flux density in the pipes on the average coolant temperature.
At the same time, several options are indicated for different pitches and for different pipe diameters: for a diameter of 16 mm, the direct relationship is shown as a dotted line, and for a diameter of 20 mm – as a solid line.
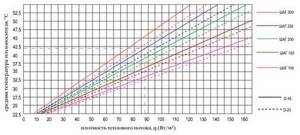
When considering this graph for calculating a heated floor, you can see how many indicators need to be calculated in order to create the design that is ideal for your home
The values given in this graph are valid if the finishing coating is tiles, and a 7 cm thick concrete screed is used as the installation method. If the thickness of the screed increases by only 1 cm, the heat flow density will decrease by 5-8 percent.
The density of the effective heat flux given off by 1 sq. meter of heated floors is calculated by dividing the amount of heat loss of a given room, expressed in watts, by the area that the pipes will occupy. In this case, the distances from the wall must be subtracted.
The average coolant temperature is defined as the average value for the water leaving and entering the heating circuit. The water should not be hotter than 55°C, and the temperature difference is usually 5-10 degrees.
Factors influencing heat loss
For the calculation, it is important to determine the level of heat loss. This value is influenced by:
- materials from which the house is built;
- type of glazing, including type of glass unit and profile;
- temperature conditions in the region where the housing is located;
- the possibility of using additional heat sources for heating purposes;
- room parameters;
- planned temperature regime for a given room;
- the floor on which the room is located.
An important factor is the thickness of the existing floor, its current insulation and the planned finish.
Choosing the “right” pipes
The data we receive as a result of measurements will help us determine the power of an electric or gas boiler, heating heat pump and find out the distance between pipes.
The need for pipes also depends on what types of pipes we will use during installation.
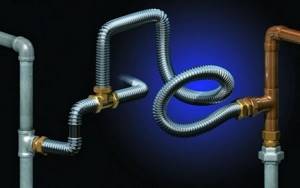
Corrugated stainless steel pipes are the most durable and functional when installing warm water floors, but such pleasure is expensive
Types of pipes that are used for the construction of warm water floors:
- corrugated stainless steel – high quality and excellent heat dissipation;
- copper pipes are expensive, but with impressive heat transfer;
- cross-linked polyethylene pipes;
- metal-plastic is an ideal option for the price-quality ratio of the product;
- propylene foam products are inexpensive, but also have low thermal conductivity.
Based on the information and measurements obtained, preliminary rough calculations can be made.
The approximate length of the pipes is calculated by dividing the active heating area (in sq. m) by the pitch of their installation (in m). Don’t forget to make adjustments to the bend and add the distance to the collector. Knowing the pipe diameter and length, you can determine the speed and volume of the coolant. Optimal indicators are 0.15-1 m/sec. If the movement speed is higher, you need to choose pipes with a larger diameter.
To choose the right pump for the heating circuit, you need to know the need for water - the coolant with a 20% reserve. Such a reserve is needed if we take into account the resistance of compressible water that occurs in the pipes.
Only a professional can perform all the above and other necessary calculations correctly and accurately. We offer you two videos dedicated to the topic of calculating warm water floors.