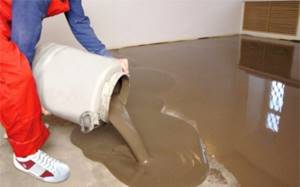
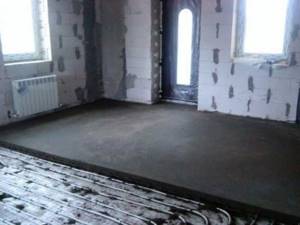
For a heated floor, in any case, you will eventually have to install a finishing coating, including a screed. They can be used as self-leveling mixtures, as well as cement-sand based solutions. Everything will depend on financial capabilities and the selected device option. In any case, the surface should be perfectly flat, including relative to the level of the water-heated floor contour. In this case, the heating of the subfloor will be uniform over the entire surface of the room. In this case, it is worth paying attention to one very important point, which is the optimal thickness of the future screed.
Recommendations for screeding
All activities related to ensuring the flatness of the floor using cement-sand compositions must be carried out in accordance with the requirements regulated by building codes and regulations.
SNIP specifies the main parameters that cement screeds must have:
- minimum permissible thickness;
- strength characteristics;
- the need for waterproofing;
- size of the layer covering communications;
- the need for reinforcement with reinforcement;
- requirements for the location of expansion joints.
Depending on the composition used for its implementation, the thickness varies. The minimum thickness of the composition based on sand and cement, according to the requirements of SNIP, for residential premises is at least 20 mm. For cement mixtures with the addition of polymer fibers, the tolerance is reduced to 15 mm. The rules stipulate that when ensuring a slope of the surface, the minimum thickness of the screed in areas located next to trays and ladders must be at least 20 millimeters. Deviation from flatness should not exceed 4 mm.
When pouring a cement screed with their own hands, home craftsmen rarely pay attention to the requirements set out in SNiP
A barrier for waterproofing is necessary in situations specified by SNIP, when there is a possibility of waterlogging of the layer.
If the thickness of the screed is more than 5 centimeters, it is subject to reinforcement. This requirement is prescribed by building codes and regulations for residential premises in which small and medium forces are applied to the floor surface. Thanks to the reinforcement, the base of the floor acquires additional strength and does not crack. With a smaller thickness, mandatory reinforcement is not required. If necessary, steel rods are installed, for example, if the floors are operated under conditions of temperature changes. Rough cement coatings are not reinforced with reinforcement, since the main forces are absorbed by the layer on top.
Expansion joints are indicated on the coating technological map, which takes into account all parameters. The document is necessary when arranging large areas. It is a project containing information about the order of operations, the properties of the materials used, the location of the seams and the distance between them, which should not exceed 6 meters.
The standards provide for screeding if required:
- Plan the base surface.
- Cement the lines.
- Distribute efforts evenly across layers.
- Place the floor on a slope.
- Ensure thermal insulation of the floor in accordance with regulations.
The surface created by builders must necessarily comply with the requirements of SNIP both in terms of design features and operational characteristics and perceived effort. Technical requirements for underlying layers and load-bearing soils are regulated by sections of construction regulations.
The tables attached to building codes provide data for selecting the coating required for a particular room and ensuring its strength.
Manufacturers' recommendations
German manufacturer. It is worth paying attention to the demands of such pedantic Germans. Preferring a clear calculation and specific numbers, we recommend a screed thickness of 45 mm. This coincides with the majority opinion. Detailed recommendations here.
German manufacturer. The recommended thickness of the screed is 45 mm above the heating pipe, but not less than 65 mm from the thermal insulation material. Using especially durable materials when pouring the screed, the thickness can be reduced to 25 mm. You can read more on the manufacturer's website.
Builders' favorite material. The manufacturer has developed its own standards for quality and work performance. According to the regulations 45 mm. – this is the thickness of the minimum screed. Do not neglect the maximum figure - in residential premises it is 61 mm, for industrial floors 92 mm.
Thickness of underfloor heating layers
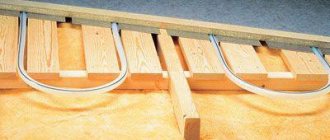
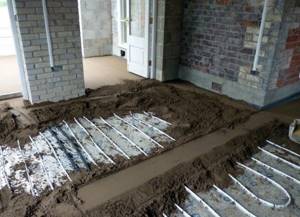
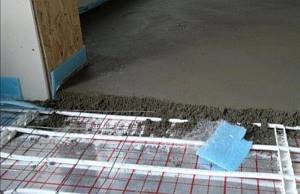
The heated floor consists of several layers. First, the screed is taken into account. It is mounted to the finishing field and tied to the base or foundation. But if the surface is insulated on the ground floor, the screed is done on the ground. The screed is a kind of pillow. Its average size is about 5 cm.
The next layer is insulation. It all depends on the chosen material. If you choose expanded polystyrene (it is the most common), its average thickness should be about 10 cm. But you can set the minimum - 5 cm. The density of the material is also taken into account. These figures are suitable if the density is about 30 kg/m3. For denser material, the thickness must be reduced.
Then comes the plastic film. Its thickness is from 1.5 to 2 cm. A mesh of rods with a thickness of 0.4 cm is made on top of it. And after creating the reinforcement, you can solve the issue with the pipeline. The diameter depends on the material of manufacture. The average pipe thickness is 1.5 cm.
Now you need to cover the pipeline. An additional 2 cm of mesh is sufficient for this. The last layer is a screed, about 5 cm thick. It is not only the base, but is also responsible for heat accumulation.
By calculating the sum of all layers, we get the height of the total floor.
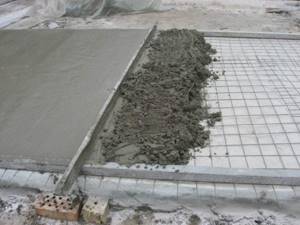
Concrete floor on the ground
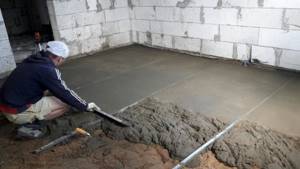
If the base for the floor is soil, then it must be leveled, a drainage pad must be placed on it, and protection from moisture and cold must be provided. The flat surface is filled with concrete screed.
Reinforced mesh is used for weighting. The concrete covering is the basis for the underfloor heating system. How high will the floor rise?
- The soil is leveled and a drainage cushion is formed; its height will be 20 cm; 10 cm of sand and 10 cm of fine gravel; All layers are compacted well.
- The base is protected with rolled waterproofing; its thickness is small, 0.5 cm.
- To keep the floor warm, insulation is provided; for northern regions it is recommended to lay polystyrene foam boards; total height 10 cm; for southern regions with mild winters, the height of the thermal insulation material is 5 cm.
- Reinforced mesh is laid on the insulation; another 1 cm is added to the floor.
- The surface is filled with concrete screed up to 10 cm deep.
The total height of the rough coating from the soil base will be about 42-47 cm.
For concrete mortar, M500 grade cement, fine crushed stone and clean river sand are used. The dry mixture is diluted with water. The following proportions are observed: 1 hour of cement, 4.1 hours of river sand, 5.5 hours of crushed stone, 0.7 hours of liquid.
We recommend: How to choose a boiler for underfloor heating?
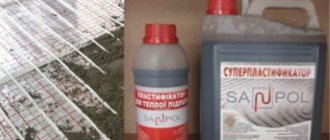
Plasticizers or polystyrene fiber are added to concrete intended for floor heating. Additives will increase the elasticity of the screed and improve its thermal conductivity.
Selection of optimal values
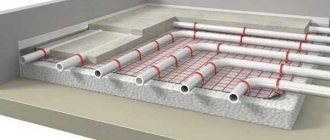
If the screed designed to strengthen the warm water floor is designed correctly, then practically no problems will arise during operation. The main criterion when selecting its thickness is the cross-section of the pipes of the heating circuit being laid. For example, for a pipe of grade MB12, a screed of 60 mm thickness is selected, for MB17 the recommended value is 65 mm.
MULTIBETON pipe for water heated floors
The optimal thickness depends on the method of laying the screed oriented above the water-heated floor.
- If you need to fill a sufficiently large area, then to improve the quality of the solution, fiber fiber is introduced into it - polypropylene, basalt. With this additive, the coating layer becomes more even, gaining wear resistance and good strength. Such a base, subject to the standard thickness of 40 mm, does not crack or delaminate.
- The main disadvantage is the long installation period, since the screed takes almost a month and a half to dry. The generally accepted thickness with this method should not be less than 40 mm. If the diameter of the pipes allows this size to be slightly reduced, then measures should be taken to increase the plasticity of the cement-sand mortar. Plasticizers help avoid deformations and cracks when the slab dries.
- The most traditional is the wet variety. Among the advantages is the high strength achieved after the slab dries and reaches operational condition. The advantage of this method is also the availability and low cost of starting materials. Typically, plasticizers are added to the cement solution to increase strength, as well as additives to improve thermal conductivity.
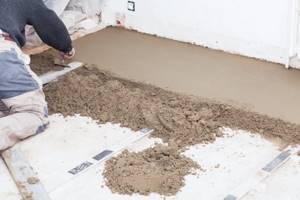
- The semi-dry variety dries faster because less water is added to the mixture than with traditional work. This screed turns out to be lightweight and is more suitable if a warm water floor is installed in the apartment. It is stronger than a conventional cement slab and does not crumble from heat. The base must be prepared and a vapor barrier must be laid. The material for the screed is prepared in accordance with the instructions. The layer thickness varies from 40 to 200 mm. The need to increase it is mainly influenced by an uneven base.
- The dry mixture does not add excessive loads, being the most gentle for floors. Since no drying time is required, this installation is the fastest. After leveling, plywood sheets are laid on the dry screed and only then the finishing coating.
When pouring, it is advisable to purchase ready-made leveling compositions, in which the proportions of the incoming components are strictly adjusted, and the necessary additives are added to the mixture - plasticizers, additives. The technology is traditional, when the screed is aligned along the beacons. After the time required for complete drying specified by the manufacturer, the slab becomes durable, resistant to loads and temperature fluctuations.
Screed thickness for heated floors
When installing a screed, it is considered optimal to have a layer above the pipeline of at least 20 mm. This will avoid damage to the slab. If necessary, you can increase this size by another 20 mm and achieve a total thickness of 60 mm (with a pipeline diameter of 20 mm). A larger increase should not be carried out so as not to lose the economic advantages of a water-heated floor, since a thick layer of concrete will be more difficult to warm up.
Underwater rocks
The main mistakes made by inexperienced electric heating system installers:
- incorrect calculation of the required power,
- laying cables or mats in closed areas of the floor,
- the presence of air voids when pouring screed or laying tiles,
all this leads to a sharp decrease in efficiency or even failure.
If we consider it from the point of view of economics, the disadvantage of such a system will be a fairly high fee for the energy consumed, compared to gas heating.
You can come across claims against electric heated floors as a source of increased electromagnetic radiation. This is more typical for single-core cables.
However, this drawback cannot be taken seriously - the intensity of the created electromagnetic field is tens and hundreds of times lower than the maximum permissible norms, and is not even comparable with the geomagnetic background of the Earth.
Materials used in work
To install a water heated floor, you can mix the materials yourself and get a solution of the desired consistency. To do this you need to prepare:
- sand with a fraction of 1.8-2.00 mm;
- Portland cement - categories no less than M-400;
- plasticizer - at the rate of 1 liter per 100 kg of cement used;
- polypropylene fiber - added to the desired consistency, up to approximately 900 g per batch;
- water in the right quantity.
The presented materials are kneaded until smooth so that there are no lumps. If the mixture does not work, it is recommended to use a mortar pump. The resulting composition is used for one and a half hours for its intended purpose, in accordance with the installation techniques for water-based underfloor heating.
This mixing method helps save money, and the resulting solution is not inferior to the properties of purchased ready-made compounds.
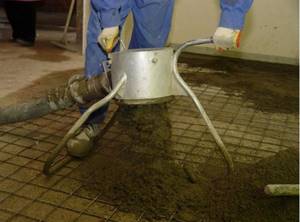
Filling, materials for screed
Each owner decides independently what to use and how to make screeds for water heated floors. This is done taking into account the location and characteristics of the premises where the coating will be made. The following compositions can be used for filling:
Self-leveling mixtures
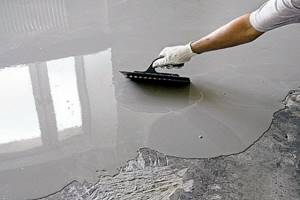
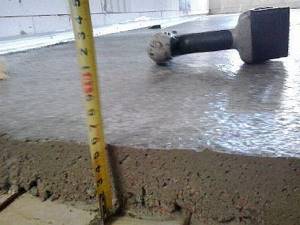
Dry mixes. The preparation method (how much water is needed) is indicated in the instructions. The readiness of the solution is determined by compression (should not release moisture). Strength and elasticity are imparted by the plasticizers present in such solutions. To achieve a perfectly flat surface of the heated floor screed, the heated floor screed is laid along the beacons. Reinforcement will protect the top layer from cracks and peeling. The surface is sanded with a special machine, approximately 1 hour after pouring. This process simultaneously compacts and levels the mixture. Drying takes 12 hours. After 5 days you can begin the finishing coat.
Dry mixes
The most common surface is concrete. The solution is made from cement grade no lower than M-300, sifted sand, and water. To make concrete elastic, a plasticizer and fiber are added. Next, the reinforcement frame is laid and the screed is poured. Floor finishing is possible in 1 -1.5 months. Until this moment, the concrete pad under the heated floor is dried, and a plastic film is laid over the heated floor. It promotes complete drying without rapid loss of water.
Screed made of concrete and reinforced mesh
The screed lies flat, according to pre-installed beacons. Aligned using a special rule. It is necessary to ensure that there are no voids in the thickness of the solution. When drying, do not connect heated floor elements. It is not recommended to use heat guns or hair dryers for top drying. You need to let the composition dry on its own. Otherwise, the appearance of cracks and damage to the structure of the structure cannot be ruled out.
It is not recommended to use crushed stone for preparing concrete screeds. Preparatory stage for pouring:
- Removing debris from the base.
- Waterproofing. It is carried out by treating the base of the floor with deep penetration mastics.
- Thermal insulation. The surface is covered with heat-insulating materials.
The design of the floor resembles the structure of a “layer cake”. Here, too, one preparatory layer is superimposed on another.
Design of heated floors for different coatings (click to enlarge)
Maximum performance

Maximum performance
There are no specific approved standards regarding the maximum thickness of the screed layer poured over a water-heated floor. In practice, it has been established that technologically it makes no sense to fill a layer thicker than 15-17 cm.
At the same time, the need for arranging such a thick screed is not in all cases. As a rule, such radical thickening is resorted to in the following situations:
- when arranging a layer that is simultaneously part of the foundation and the floor;
- in the case of arranging floors in various types of rooms with increased loads, for example, in a garage;
- in case of filling the floor on problematic soils. Relevant for private homes.
Some developers resort to arranging the thickest possible screed in the presence of very large differences in the base. But this is impractical, because It is almost always possible to pre-fill uneven areas with gravel and sand, or simply try to get rid of the differences using a jackhammer.
Screed for heated floors
In addition, the thicker the screed, the more concrete and, therefore, money will have to be spent. For example, when pouring 10 m2 with a layer only 10 cm thick, 1 m3 of concrete will be consumed. To furnish the floor in a house with an area of 100 m2, it will take 10 m3 of mixture. Taking into account the fittings, the costs are quite significant.
Choose a screed thickness that will allow the heated floor to function efficiently and safely
In this case, the installation of a layer of screed that is too thick will lead to a number of other problems, namely:
- increasing surface heating time;
- reducing the efficiency of the system;
- significant increase in heating costs.
Video - How to properly fill a water-heated floor screed
Thus, the issue of choosing the optimal thickness of the screed should be approached with maximum responsibility and knowledge of the matter, carefully weighing the ratio of cost, quality and performance characteristics. The information received will help you make the right choice and install the most efficient, reliable and profitable water heated floor.

Installation of heated floors

Creating a water floor on a wooden base
About the thickness of the screed in general terms
There is no universal answer to the question of the optimal thickness of the screed layer. This point largely depends on the following indicators:
- type of soil, in the case of installing a water heated floor in a private house when pouring a common concrete layer;
- features of the room configuration;
- purpose of the furnished room.
The above points are the main ones. In addition to them, there are a number of other nuances, for example, the brand of cement or self-leveling mixture, characteristics of reinforcement and reinforcing mesh, etc.
The type and thickness of the screed depend on many factors
Conventionally, we can distinguish 3 main types of water heated floor screed. The information is given in the table.
Table. Types of screed for water heated floors
| Index | Values | Notes |
| Minimum thickness | About 2 cm | It is constructed using ready-made self-leveling mixtures. No reinforcement is performed. |
| Average thickness | About 7 cm | Reinforcing mesh or thin reinforcing bars are used. |
| Maximum thickness | About 15-17 cm | Monolithic system with reinforcement. It is used in the case of arranging an integral support system, which is simultaneously part of the foundation of the house and the floor. |
The thickness of the layer is also influenced by the characteristics of the materials included in the mixture. For example, the thickness of a screed using crushed stone cannot meet the above minimum values, because the elemental fraction makes this impossible.
Along with this, a large selection of ready-made self-leveling mixtures are available for sale, the construction technology of which does not require pouring too thick a layer. Such compositions are used to level the surface immediately before laying the finishing material.
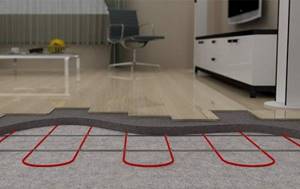
Self-leveling self-leveling floor is perfectly compatible with water heated floor pipes
In general, the layer should have such a thickness that the elements of the heating system are completely covered by the fill. Due to the fact that the maximum diameter of the pipes from which the underfloor heating system is assembled does not exceed 2.5 cm, it can be argued that screeds with a thickness of about 5-7 cm will be sufficient in most cases.
However, along with the above information, it must be taken into account that when using the system in question, heat is generated, under the influence of which the concrete part of the “pie”, and with it the finishing coating, will expand. It is necessary to make a screed of such thickness that the finishing coating material is subject to thermal deformation to the least extent, but at the same time maintains optimal thermal conductivity.
It is necessary to make a screed of such thickness that the finishing coating material is subject to thermal deformation to the least extent, but at the same time maintains optimal thermal conductivity.
Experts do not recommend pouring a screed that is too thick over a water-heated floor. This means that there should be no more than 4-5 cm of concrete mixture above the pipes
It is important to understand: the thicker the fill, the more energy will be consumed by the system and the more difficult it will be for the user to control the heating intensity
Minimum indicators
In accordance with generally accepted standards, the minimum acceptable screed thicknesses are as follows:
- 2 cm – for ready-made self-leveling mixtures;
- 4 cm – for cement screed without reinforcement.
With a smaller layer thickness, it simply will not be possible to achieve the required wear resistance and strength.

Thickness indicators. Choosing the best option
Filling a thin screed is only possible if:
- there is already a subfloor;
- a rough screed was installed, through which significant unevenness was leveled;
- There are no reinforcing elements in the “pie” design.
In addition, a 2-4 cm screed cannot be used in rooms with high load rates. These include: toilets, bathrooms, corridors and kitchens, various technical rooms.
Video - About installing a warm water floor
Semi-dry coating
Today, many people prefer dry mixture for laying screed. It is less problematic to pour than a cement-sand mixture. This installation method has its own characteristics. The semi-dry mixture is considered stronger than ordinary cement. After pouring, the drying period is much shorter, which makes it possible to finish laying heated floors faster.
Experts say that the material does not crumble or collapse under the influence of heat emanating from the pipes. It is easier and more convenient to work with this type of mixture.
Before laying the semi-dry mixture, you should carefully prepare the base. All debris is removed, the base is laid with a vapor barrier material. If there are deep cracks or depressions, it is recommended to fill them with a viscous cement solution. Rolled materials are laid with an overlap, and it must also overlap the walls. The seams are treated with special tape. The semi-dry mixture is poured onto the finished base.
The mixing proportions that should be used are indicated on the packages of the semi-dry mixture. The consistency of the material should not contain a lot of water. If you squeeze it in your hand, you get a dense lump. Moisture should not flow down your hand. In this way, they check that the ingredients of the mixture are mixed correctly. Very often, fiber fiber is added to the dry mixture to make the coating even more stable. The fiber is well distributed throughout the structure in all directions.
The minimum thickness of the screed will be 4 cm. Its height also depends on the method of laying the pipes themselves and what material they are laid on. The floor and its maximum height can reach 20 cm. If the base for pouring has significant unevenness, the height must be raised significantly. In general, the thickness will be at least 4 cm and no more than 20 cm.
The coating may be destroyed by improper drying methods. Just because you can walk on the floor does not mean the grout is truly dry. A liquid cement-sand mixture 4 cm high takes at least a month to dry. The mixture prepared from dry materials dries within several days, depending on the height of the coating. In order for the material to harden correctly and without cracking, the surface should be moistened with water and covered with film. As a result, the base will not sag, will dry well and will not crack.
The size of the water coating depends on the type of fill and the characteristics of the base. The more significant irregularities on the surface, the higher the structure will be. This happens due to the application of several layers - this is a necessity to achieve the zero level.
Based on experience, experts say that the relative total height of the warm water coating is 10-15 cm, taking into account absolutely all materials used, including the floor covering.
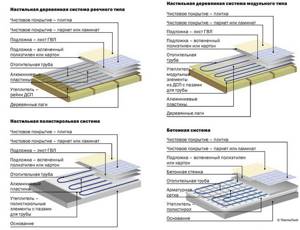
Heated floor structure
It is determined by two indicators:
- underground space;
- type of heating elements.
Underground space
- Before pouring the screed, two types of insulation are installed on the first floors or in basements: thermal and water. Thermal insulation consists of insulation. For flooring in residential premises, basalt mineral wool or extruded polystyrene foam is used. Layer thickness – 50-100 mm. It depends on the climatic region. Mineral wool must be waterproofed on both sides. For this purpose, use ordinary polyethylene film or membrane vapor barrier. Extruded foam does not absorb moisture. Therefore, the waterproofing is laid directly on the rough base under the insulation.
- In rooms with a warm underground space, it is not necessary to install insulation. If a decision is made on additional insulation, then the thickness of the material is only 20-30 mm.
Type of heating elements
Water or cable - provides the maximum number of layers:
- The first is the foundation. This could be a floor slab that needs to be leveled, or an earthen substrate on which a reinforced monolithic concrete slab needs to be mounted.
- The second is waterproofing. In the case of a floor slab, it is laid over it. When constructing a monolithic reinforced concrete slab, the film is placed directly on the ground.
- The third is insulation. These are sheets of basalt mineral wool or polystyrene foam. They are laid end to end. The cracks are sealed with polyurethane foam.
- The fourth is steam or waterproofing. It is used only to protect mineral wool. It is not needed for polystyrene foam.
- The fifth is a heat-reflecting surface. It consists of foil material and foamed polystyrene.
- Sixth – heating elements. Use polypropylene pipes or electrical cables. They are attached to the base with staples.
- The seventh is reinforcing mesh. It is installed when the thickness of the heated floor screed is more than 50 mm.
- The eighth is a leveling screed made of sand and cement. It is poured over the entire surface of the heated floor.
- Ninth – finishing coat. For water and cable heated floors, this can be ceramic tiles, laminate, parquet boards and other finishing materials.
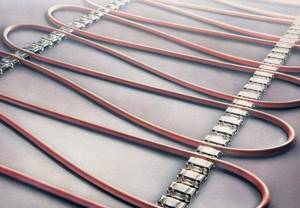
For cable or infrared heating mats, the number of layers is reduced:
- The first is the foundation. The mats can be installed on flat floor slabs without prior preparation. It is enough to sweep away all construction debris.
- The second is cable or infrared electric mats. They are sold in rolls, which are rolled out on the floor and connected to the electrical network.
- The third is the finishing coat. Most often these are tiles laid on glue.
When installing film heating elements, it is strictly forbidden to install a “wet” screed.
They use “dry”, consisting of several layers:
- The first is the foundation. The technology of its device is no different from the previous two.
- The second is film heating elements. They are mounted directly on the base. Then they are connected into a single electrical circuit.
- The third is waterproofing. Polyethylene is laid on the film floor.
- The fourth is flooring. For rigidity, GVL, fiberboard, OSB sheets are mounted.
- Fifth – finishing coat. This could be laminate, cork flooring, linoleum, etc.
Infrared heating
Heating can be done using carbon rods. They are collected in mats. The thickness of the material is no more than 5 mm. The mats are laid under screed or tile adhesive. It is recommended to insulate the base so that infrared waves do not pass down to the rough base.
- The base is treated with impregnations that repel moisture.
- Use insulation 3-5 cm thick.
- A reflective screen is installed.
- Next, carbon mats are installed.
- Screed depth 3-5 cm.
- The height of the heated floor will be about 7-10 cm.
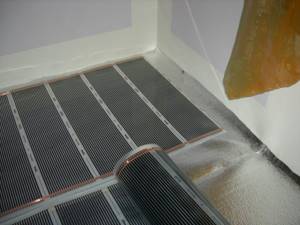
If parquet, laminate or linoleum is used as cladding, then thermal film is chosen for heating. Its thickness is 0.33 mm. It will not affect the thickness of the floor. The film is laid on insulation and a reflective screen. The system is covered with a 3 mm substrate and cladding.
The liquid line greatly increases the height of the floor. This must be taken into account if doors are already installed in the room. A coating with heating elements in the form of a cable, carbon rods and thermal film will rise to the thickness of the thermal insulation material.
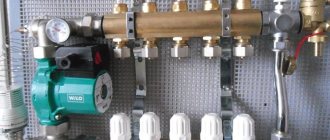
We recommend: How to assemble a manifold for underfloor heating?
This is the best option for residential premises. If the house is just being built, it is recommended to install liquid heating.
YouTube responded with an error: The request cannot be completed because you have exceeded your quota.
- Related Posts
- Which is better, warm floors or radiators?
- How to install heated floors under porcelain stoneware?
- How to choose material for a warm water floor?
- Rating of manufacturers of heated floors for tiles
- How is the mesh for underfloor heating installed?
- What is the diagram of a heated floor mixing unit?
Water cover height
When planning heating with a warm water floor, you should take into account the rise of the surface by several centimeters. If the coating is laid in an apartment, its thickness is of particular importance, as pressure may arise on the slabs. It is advisable to avoid this. In this regard, in multi-storey buildings they prefer to do without concrete screeds; special metal structures are used for heated floors.
However, this does not mean that the screed will become lower. The base will rise in any case to a height of at least 10 cm in general. In order to correctly determine how much the coating will rise, you should decide on the type of rough screed. That is, how it will be made and from what material. These factors greatly influence the thickness of the warm coating and its quality.
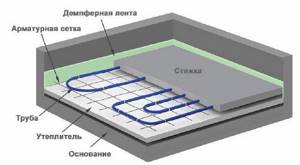
Description of the "pie"
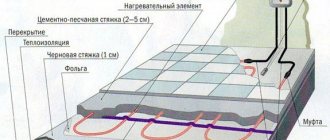
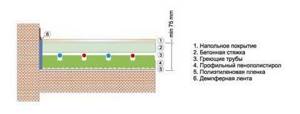
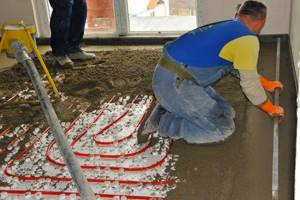
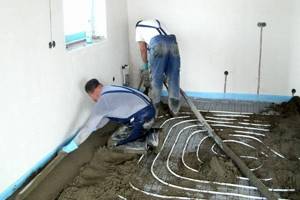
The standard “pie” of a water heated floor looks like this:
- base - concrete, wood, or rough screed;
- waterproofing - polyethylene film (if groundwater is close);
- damper tape - necessary to compensate for temperature expansion, it is placed around the perimeter of the room, in places where shrinkage joints are installed, at the junction of walls and floors;
- thermal insulation - polystyrene foam boards are used as insulation, standard thickness 1 cm;
- waterproofing - polyethylene film;
- reinforcing mesh - average rod diameter 1 mm;
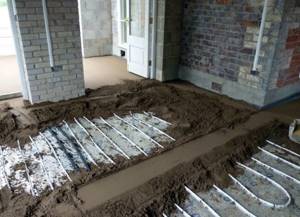
- heating elements (pipes made of metal-plastic, polypropylene or PEX);
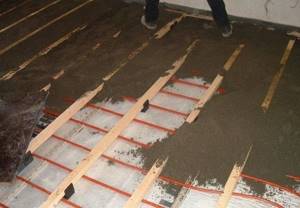
- concrete screed - it is recommended to fill it along the beacons, then it will be easier to level the surface;
- substrate;
- flooring.
Semi-dry screed on a warm water floor
A feature of semi-dry screed is the reduced water content in the composition, which promotes rapid hardening and increased strength properties.
The process of pouring screed for a water heated floor system begins with preliminary work, the essence of which is to clean the surface
The mixture, intended for the accelerated formation of a semi-dry base, includes the following components:
- cement marked M400;
- coarse sand, free of impurities;
- fiber filler.
Fiber fiber reinforces the mass and is added at the rate of 0.6–0.8 kg per 1 cubic meter of composition. Operational strength is also ensured thanks to the correctly selected proportion of Portland cement and sand mixed in a ratio of 1:3. Saturation of the mixture with water is carried out gradually until a moist and, at the same time, crumbly consistency of the composition is obtained.
Screed for heated floors based on a semi-dry composition has a number of advantages:
- reduced curing time compared to concrete;
- increased strength characteristics;
- slight shrinkage during strength gain;
- absence of cracks in the massif;
- resistance to temperature changes.
Main disadvantages:
- the need to apply significant effort when mixing components;
- increased hygroscopicity of the semi-dry composition;
- the formation of voids after compaction, caused by problematic compaction.
Semi-dry technology has proven itself positively when performing screeds.
The required volume of screed is calculated in advance
Laying semi-dry screed
Now there are dry mixtures for screed, which are used with the addition of a small amount of water. “Semi-dry” screed has better properties than conventional cement screed.
The advantages of screed made from ready-mixes include:
- porous screed structure with high heat and sound insulation properties;
- no shrinkage, no peeling or cracks form when drying,
- greater strength;
- less drying time.
Screed with semi-dry mixture
“Semi-dry” screeds with modifiers and a reinforcing layer are used.
The base is prepared as follows.
- The base is cleared of debris and loose fragments. Dust is removed with special care using a vacuum cleaner.
- The cracks are sealed with cement mortar.
- A layer of waterproofing (thick polyethylene film) is laid on the floor, which will protect the screed from moisture. In addition, waterproofing improves sound insulation and thermal insulation properties.
- The bottom of the walls is covered with damping film. The edges of the waterproofing should extend 15 cm onto the walls.
- The height difference is measured.
- The solution is prepared and laid according to the instructions.
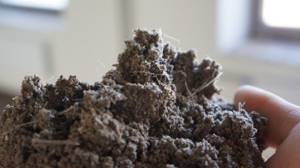
Mixture for semi-dry screed with polypropylene fiber
It is not difficult to prepare a solution from a dry mixture. The manufacturer encloses with its products precise instructions explaining how to prepare a solution for “semi-dry screed”. The degree of readiness is checked as follows: take a handful in your hand and squeeze tightly; if water seeps out, it means there is excess moisture in the solution. A properly prepared mixture, after compression, turns into a dense lump.
Semi-dry screed with fiber fibre. Laying process
Before laying the “semi-dry” screed, the floor is divided into zones. The semi-dry solution is placed in parts in these zones and is equal to the rule. The thickness of the screed made from semi-dry mortar should not exceed 40 mm. After the mortar is laid, the screed is allowed to dry for 20 minutes and they begin to grout and sand it using a trowel. This technique not only makes the surface of the screed even, but also compacts the mixture. The coating is of high quality and durable.
Calculation and installation
Getting started with arranging a heated floor means carefully calculating the required power of the system and drawing up a detailed layout of the heating elements.
Here you should take into account several practice-tested nuances:
- If the underfloor heating system is planned as the main, only source of heating in the room, then the required power of the heaters is taken to be 150 W/sq.m, and for the first floors it can reach 180 W.
In this case, the installation of heating elements should occupy at least 70% of the room area.
When using heated floors as additional heating, 110-130 W/sq.m will be sufficient.
When drawing up the diagram, the stationary location of the furniture is taken into account - heating elements are not placed in these places. The point is not so much that this is an “empty” energy consumption, but rather a disruption of the normal heat exchange between the floor surface and the air. The cable may overheat and fail.
- The distance between walls, pieces of furniture and the nearest cable turns must be at least 50 mm, and the distance from the central heating risers must be at least 100 mm.
The interturn distance during installation is calculated depending on the required power of the system and, accordingly, the length of the cable used, and the heated area of the room.
Н = S×100/L, where
- H – interturn distance in centimeters;
- S – heated area
- L – cable length.
L = S×Рs/Pk, where
- S – heated area
- Рs – required specific power per sq. meter of area;
- Pk is the specific cable power rating per linear meter.
- When laying the cable, the location of its connection to the junction box and the thermostat is immediately taken into account.
It is strictly forbidden to allow cables to cross. When using a solid wire, both ends must meet at one connection point.
READ MORE: Warm film floor under linoleum - preparation, drawing up a diagram and step-by-step installation
The location of the temperature sensor should be indicated in advance on the diagram.
It should be laid exactly in the center of the loop, at a distance of 40-50 cm from its edge.
After making calculations and drawing up a diagram, you can proceed to purchase the necessary material and get to work.
- Heating elements should only be laid on a carefully prepared base.
If it is a concrete screed, then it should be solid, without damaged areas; leveling the floor with a self-leveling mixture is good here. The necessary work on waterproofing the bathroom floor is carried out in advance. The surface is thoroughly cleaned of debris and dust.
- On the wall where the distribution panel with the thermostat will be installed, a vertical groove is made, with a cross-section of 20x20 mm, in which the power cable and temperature sensor will be placed.
It is connected to a similar groove in the floor, where the temperature sensor itself is placed in a corrugated plugged tube (16 mm).
This is done so that if the sensor possibly fails, it can be replaced without opening the floor surface.
- After laying the sensor, the surface is covered with thermoreflective mats. Reinforcing mesh or mounting rails are laid and fastened on top of them.
In accordance with the diagram, the cable is laid - from the grooves in the wall and along the entire heated surface. The cable loops are fixed (tied) on the mesh or slats.
- After the cable is completely installed, the functionality of the system must be checked.
First of all, the cable insulation resistance is measured, for which a special device is used - a megger. For safe operation of the system, this value must be at least 20 MΩ.
- The continuity of the circuit and the resistance of the cable cores are checked.
The value must correspond to the passport value ± 10%.
After this check, you can connect the cable to the power source and perform short-term heating to ensure that the system is working.
If everything is functioning normally, you can proceed to pouring the screed.
Before pouring the screed, the cable must be disconnected from the power supply.
Before pouring, the bottom perimeter of the room is taped with damper tape.
The screed for the heating cable under the tile must have a thickness of at least 30 mm. In order for the surface to be smooth and the screed itself to be monolithic, without voids, it is strongly recommended to add special plasticizers to the solution for heated floor screed.
After the screed has gained the necessary strength, you can begin laying the tiles.
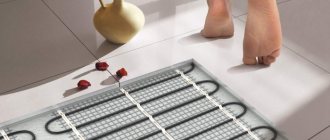
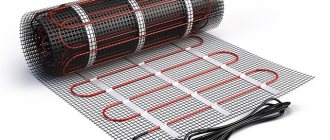
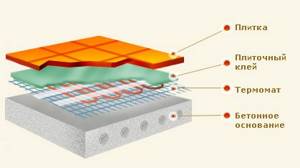
The installation of heating mesh mats looks somewhat different.
They are laid out on the floor in accordance with the diagram. They can be trimmed for installation without affecting the cable itself. The mesh is attached to the floor using special tape or hot glue (silicone gun).
Electrical contact between adjacent mats is ensured by couplings.
After laying the mats, checking their electrical parameters and performance, you can proceed directly to laying the tiles.
At the same time, the thickness of the adhesive layer is increased only slightly, up to 8-10 mm, which will slightly increase the consumption of tile adhesive, but, unlike using a heating cable, you will save on the screed.
When using rod infrared mats, you can also lay tiles directly on top of them.
However, there is a nuance - for the correct functioning of the temperature self-regulation system, the presence of a reflective thermal substrate is required, and the thickness of the adhesive layer should not be less than 2 cm.
Laying tiles requires the use of a special tile adhesive for heated floors that can withstand repeated temperature changes.
Additional components are introduced into its composition to increase the elasticity and strength of the material. An example would be the compositions “Sopro FF455” or “Ceresit CM12”.
Only after complete polymerization of the glue, depending on the brand, this can take from 20 to 30 days, and after another check of the electrical parameters of the system, it can be finally connected to the power supply, automatic control system, and run at its designed capacity.