Until recently, heated floors were an exclusive element in home improvement. Today, the technology for installing electric heated floors is quite simple, so almost anyone can install this element in their home. Thanks to modernized technologies for manufacturing such a design, it is possible to obtain an economical heating system for existing premises.
Diagram of an electric heated floor.
It is best to select an electric heated floor based on the characteristics of your existing apartment or private house. The selected system should generate a sufficient amount of heat, not consume too much electrical energy, and be easy to install.
It is especially important to pay attention to ease of installation if you plan to install an electric heated floor yourself.
Such a heating system can be used in any room and under any floor base. It can also be installed outdoors.
The types of such systems that are present on the construction market today have different configurations and a wide range of power ratings. This allows you to simplify your choice and buy a heating system that fully meets the requirements of your home. There are the following types of underfloor heating systems:
- Cable.
- Infrared film.
- Cable floor on the base.

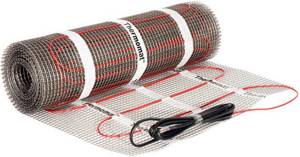
Example 1. Scheme of a cable electric heated floor.
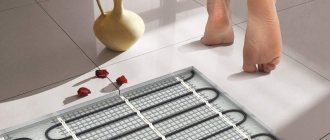
The main working element of this type of underfloor heating is the heating wire, which converts electrical energy into heat. The cable consists of several conductors, a polyester film, a copper conductor, an aluminum screen and a plastic layer for protection.
The cable heating system is the most complex. It will take a long time to install it, because you will need to carefully lay the cable, observing the step. At the end you need to fill the screed. An additional layer of screed can lead to a significant loss of height in the room. This point is fundamental when laying floors in apartment buildings. The disadvantage of this design is that it cannot be installed under furniture and plumbing fixtures. Among the advantages of this type of underfloor heating, it is worth noting that the heating wire can be installed in rooms that have a non-standard layout, as well as in order to heat the external elements of the building - ebbs, drains, roof.
In which rooms is it better to have heated floors?
There are no prohibitions on the installation of heating in certain premises. But laying several layers along with heating equipment is quite expensive. If you want to make repairs and install heated floors, calculate where the heated floor is most needed.
It is recommended to install warm flooring in rooms that have tiles on the floor. It itself is cold, and heating it will not hurt. These areas include the bath, toilet and kitchen.
It is recommended to install heated floors in corner rooms, in those that are most exposed to cold winds. A warm floor on the loggia wouldn't hurt. In the morning, go out onto the balcony and feel the warmth of your cozy home.
For economical distribution of heating, before starting the renovation, the arrangement of furniture or plumbing equipment in the bathroom is determined in advance. The warm areas of the floor will be above the laid pipes and nothing more. Therefore, equipment is not installed under cabinets, refrigerators, bathtubs and toilets.
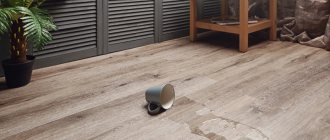
Warm floors are most often covered with tiles. This type of heating works well under a plank floor or under a laminate floor. It is not recommended to finish a heated floor with linoleum, since the coating often emits an unpleasant synthetic odor when heated. They do not make warm floor structures where they expect to lay carpets and palaces that will not allow heat to reach your feet.
When determining the location for a heated floor, you need to know that its design will raise the level of the existing floor by 10-11 cm. In some cases, it is recommended to dismantle the old screed to lower the floor.
Choosing the best option
You can heat the floor covering using a heating cable or thermomat. Each option has its own advantages and disadvantages, which you should know about before going to the store.
Cable electric underfloor heating has a lower cost, but it is quite difficult to correctly calculate the cable length and install it. In addition, laying a cable heated floor under the tiles involves installing a thicker floor screed, which will lead to a decrease in the height of the room.
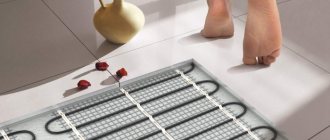
A heating mat is an improved version of a conductor and therefore has great advantages. Among the design features, we can highlight the placement of the cable on a special mesh made of fiberglass fabric with an even pitch between the turns.
One of the advantages of a thermomat is the simple calculation of the material; for this, it is enough to know the area of the room. Using this parameter, a roll of the required size is purchased in a specialized store.
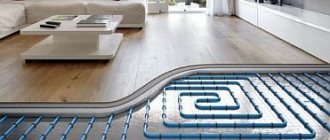
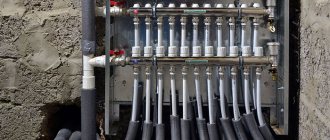
Water heating floor heating device
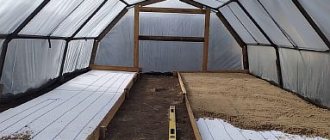
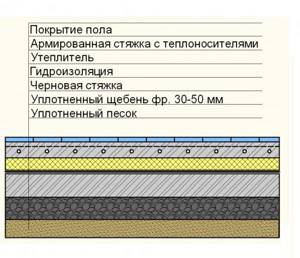
Preparatory screed before laying the heated floor
To begin with, they take care of laying insulation against possible moisture leakage, especially if the apartment is located above the first floor. It must be laid before laying the sand bedding. It is a mistake if you lay a layer of dense cellophane over the sand, and crushed stone or expanded clay is poured on top, which subsequently presses through the insulation and disrupts its protective function.
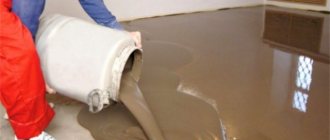
After laying the expanded clay concrete insulation, beacons are placed, which will serve as an indication of the level of the screed. It is made with a thickness of at least 4 cm. The material is a solution of cement and sand or concrete.
Laying heating pipes
To reflect heat rays from hot water in pipes, foil foam insulation is laid inside the room over the dried screed. It will also serve as additional insulation from moisture in cases of leakage. The layer is laid extending onto the walls of the room by 10-15 cm.
Water carriers are laid on top of the penofol. To heat the floor, polyethylene or plastic products with a diameter of 2 or 1.6 cm are used. In order to correctly place the pipes, the places where they pass on the floor area are first marked, taking into account recommendations for installing furniture and places for people to pass. Determine the location where the collector will be installed. Usually there is a place for it in the wall.
A reinforcement mesh is placed on the surface of the insulation, which serves to impart strength to the water-heated floor heating layer.
To support pipes and ensure uniform laying, professional mats are used - linings, which provide landing grooves for the selected pipe diameter. The distance between them is 10 or 20 cm. A tape is placed along the contour of the room to compensate for the expansion of the screed when heated.
To facilitate bending of metal-plastic pipes without cracking at the turning point, a steel spring is put on the pipe. Heat carriers should be 8-10 cm away from the walls if there is no furniture in the room.
The laid pipes are connected to the collector from the first end of the pipe. To determine the number of collector outlets, you need to determine how many water circuits there will be, while the length of one is not recommended to be more than 60 m. At the final stage, the remaining end of the circuit is connected to the return output of the collector.
Before continuing work, check the functionality of the system and its tightness. To do this, water is supplied to the system under pressure one and a half times greater than usual. The check is carried out only on days 25-35, after the screed components have completely set and hardened.
How to lay tiles
The device of the second screed along the water circuit is distinguished by careful placement of beacons. Properly done work will allow you to lay the tiles without disturbing the surface level and save expensive construction adhesive.
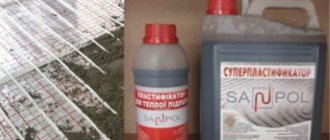
A plasticizer is added to the screed to prevent the formation of cracks when heated. The amount of additive is indicated on the packaging. The screed at its highest point should be 7 to 9 cm thick. This will allow it to be preserved in its original form, without cracks forming during operation. It is not recommended to use a very liquid solution, since it shrinks when it dries; a rigid solution shrinks less.
After checking and completely drying the solution, the tiles are laid in accordance with the owner’s wishes in the same way as is usually done without installing a warm covering.
How to lay heated floors under tiles
Basic provisions
Equipment for electrically heated floors includes cables and a thermostat, for which the location is determined in advance. The cable can be single-core or double-core. The second option is better because of safety, although it is more expensive.
To connect the heated floor, they run separate wiring from the meter and install their own machine to ensure safe use.
The cable is mounted on a pre-installed heat reflector, which will not allow heat to escape down through the ceiling. Penofol is mounted with the foil facing up, the joints are glued with special tape.
A thin metal mesh is laid over the top of the insulation and the installation of the warm cable begins.
Laying the cable and installing the thermostat
The wire is secured using tape for mounting to the floor. It allows you to avoid unnecessary irregularities in the cable and maintain the required technology step between coolant penetrations. The industry produces ready-made rolls of cables attached to tape in increments of a quarter of a meter; this greatly simplifies floor installation.
The temperature sensor is positioned so that in case of failure, replacing it is not expensive. After a working check by connecting the heated electric floor to the network and supplying voltage, further work begins.
Screeding and laying tiles
The thickness of the screed after laying the cable should be 5 cm; when making the screed, ensure that all voids are thoroughly filled. Incomplete filling will affect the failure of the wires. The screed is carried out according to carefully placed beacons, which will determine the height and evenness of the future surface.
Start laying tiles only after three days after making the screed. The tiles are laid in the usual way. At least a month passes before the first test is turned on after the heated floor has been manufactured. The screed needs to dry completely, otherwise short circuits or cracks may appear.
Positive characteristics of heated floors
- Efficiency in work. Uses only heated water, which can be used again after passing through the pipes. They do not require payment for electricity consumption.
- Warm-coated water heating pipes are made from high-quality materials, and they last a long time without replacement. If the installation technology is followed, there are no leaks.
- You can manually turn the system on and off if necessary.
- The ability to lay tubes not over the entire surface, but only in the right places, which provides significant savings in material.
- Due to contact with a warm surface, it can reduce the heating temperature by 20% compared to radiators.
- It is safe to use, has no complaints from the sanitary service, and does not shield electrical waves from an environmental point of view.
- Allows you to remove heating radiators from the area of the room and thereby expand the usable area of the kitchen or bath and make more full use of the room.
Marking the room
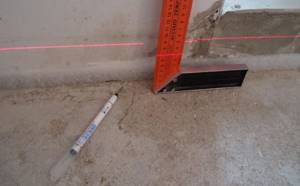
To facilitate the process of laying tiles, you need to mark the room. The easiest way to do this is with a laser level. Although it is possible to use the old, proven method - a lace with dye powder.
The process looks like this:
- A line is drawn in the center of the room parallel to the longest wall:
- the second line is located perpendicular to the first, also in the center;
- A block of wood is installed in the doorway; it will serve as a limiter.
Not without its shortcomings
- There are certain administrative delays in connection with permission to lay heated floors with water pipes.
- Long and labor-intensive installation requires the installation of a layer of insulation from moisture.
- An expensive installation system, subject to all technological details.
- When connecting the floor to a common central heating system in a multi-storey building, it reduces the pressure in the pipes and takes away a lot of heat. After passing through the circuits, the water enters the adjacent room with a significantly reduced temperature.
Positive aspects of installing underfloor heating
- When using the electric option, the height in the room is saved, since the heated floor pie does not contain thick water pipes.
- In operation, electric floors do not dry the air.
- When turned on, the floor surface quickly heats up compared to water floors; the load and degree of heating can be adjusted.
- Safe to use, does not require an additional layer of waterproofing when installing.
- The durability of the laid heated floor in the electric version is equal to the service life of the building itself, according to some experts.
Installation of thermal insulation
Laying a heat-insulating layer is a necessary measure that will increase the efficiency of the entire system. Thanks to it, it will be possible to reflect heat flows and significantly reduce heat loss during operation of the heating elements. As a result, all energy will be transferred into the room, and not accumulated in the concrete base of the floor.
Thermal insulation of heated floors
To create a heat-insulating layer with your own hands, roll foil material is used, the thickness of which is 3-4 mm. It is laid on the entire base, preventing the formation of cracks. For this, adhesive tape is used, and the strips are fixed using a construction stapler.
In a private house where there is an unheated basement or soil under the floor, any slab insulating material can be used. Mineral wool insulation, extruded polystyrene foam, glass wool and others are often used. The thickness of the insulating layer should be 5-10 cm. A reflective foil layer is also used along with the insulation.
Tools for laying underfloor heating
- Trough for mixing mortar, shovels, trowel, trowel, buckets.
- Construction and water level or level.
- Rule for screed, rubber gloves.
- Linings of various thicknesses for installing beacons.
- Hammer, axe, knife, pliers.
- Drill with nozzle for mixing glue, container.
- Notched tile trowel, soaking container.
- Crosses for tile seams, machine for cutting ceramics to size.
How to make a heated floor in compliance with all the subtleties of technology, you can watch in the video. Of course, installing a heated floor requires a lot of money, but the feeling of a warm coating under your feet will allow you to forget about the money spent and enjoy the comfort of your home to the fullest.
Options for installing heated floors
A few words about tile adhesive for heated surfaces
High-quality installation of heated floors under ceramic tiles is only half the battle. The correct choice of adhesive composition for installing ceramics is important; ordinary glue is not suitable here; after a short period of time, peeling and cracking of the surface will begin.
Here are some trusted brands:
- Evostik;
- Sopro;
- Ceresit.
Compositions of special adhesive materials are able to withstand cyclic temperature changes without serious consequences. Plasticizer components add elasticity to the mixture and also do not have any effect on the heating process of the structure.