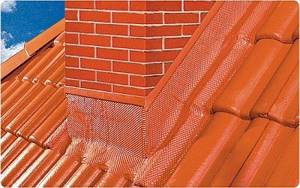
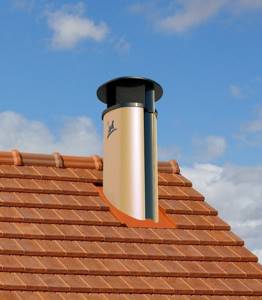
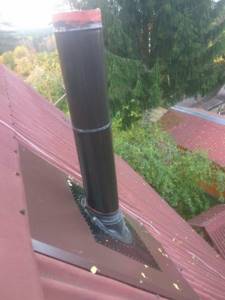
Figure 1 shows in detail how it is necessary to install a hermetically sealed connection between the roof and a rectangular chimney pipe. The junction strip, which is included in the set of standard additional metal tile elements, plays a decorative role in this case. The main function of drainage is performed by an apron made to fit the dimensions of the pipe from an ordinary flat galvanized sheet. Pay attention to the 20-30mm high folds on the bottom and sides of the apron. Thus, we set the direction for excess moisture using a narrow “tie”. Such a galvanized device, made by hand, should go down to the nearest valley. If there is no valley, the tie is extended all the way to the cornice. In the first case, the water will go down along the valley bar. In the second, when using a drainage system, water from the apron falls onto the eaves strip, and then straight into the gutter.
For maximum tightness of the joint between the roof and the chimney, it is necessary to make a groove with an upward slope and insert the upper edges of the junction strip and apron there. In this case, the junction strip will additionally protect the metal tiles from leakage. You can do without grooves and use sealant, but this option is less reliable.
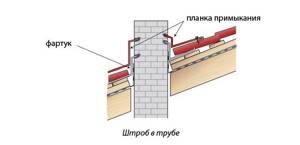
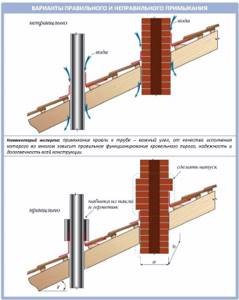
Fig.2 The edges of the planks are inserted into the groove
Important. Drilling into masonry seams is strictly prohibited!
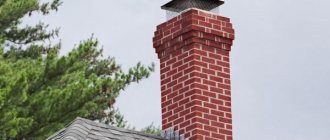
This method of installing a roof in areas of a rectangular brick chimney is the most reliable of the existing ones.
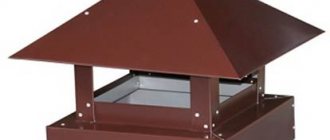
Ready-made flashings for chimneys
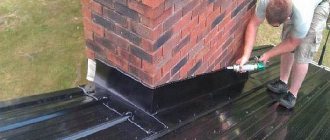
Currently, there are special flashings for a sealed joint between the roof and the chimney pipe. They are a ready-made material to replace an apron made independently. The flashing for chimney pipes is identical to the flashing that is installed when installing roof windows. If you are not confident in your abilities, you can safely use this solution. The downside is the overpayment for the material, the plus is the saving of time and effort.
It is quite difficult to make such a frame yourself without special bending equipment, so for those who like to do it themselves, we recommend using the instructions described above.
Do-it-yourself connection for a chimney pipe
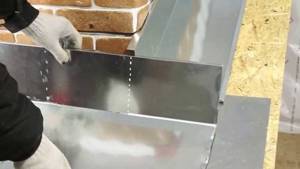
If you still want to make a chimney flashing yourself, you can use a ready-made cutting of galvanized sheet to make an attachment to the chimney. The following dimensions should be observed to achieve the most airtight design possible.
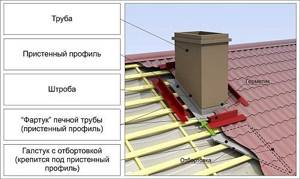
Flashing at the junction of the roof and the chimney
All dimensions are given in millimeters. Angle γ is the slope of the roof relative to the horizon.
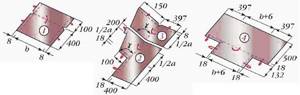
Scheme of cutting galvanized sheet for making flashing
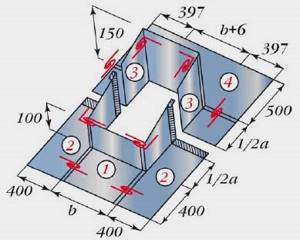
This method of making an apron is often used by professional roofers and stove makers. The upper element (4) must be placed under the roof, the remaining parts are secured with self-tapping screws on top of it.
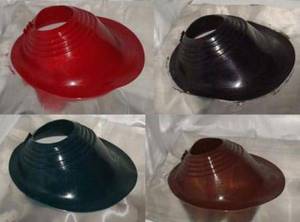
The material used to make the chimney flashing is a flat galvanized sheet. If a “painted” roofing material is installed on the roof, the flat sheet is selected in the same color.
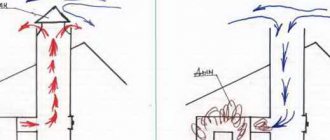
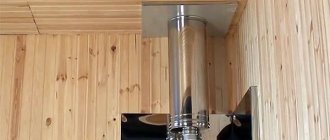
Arrangement of a passage through the roof
A strong and reliable connection of the roof to the vertical element can be arranged only in cases where the sheathing is a strong structure that can withstand the load of the weight of the material and the negative influence of natural factors. If the object was installed without operations with sheathing, then the rigidity of the top covering, which is made of sheet or roll material, is ensured by installing an additional element with a base in the form of a sheet of metal.
In most cases, the installation of a rectangular chimney involves the dismantling of some fragments of the sheathing. Very rarely it may be necessary to remove rafters. To maintain the performance characteristics of the rafter system, wooden formwork is installed around the object being built on the roof, with the help of which a protective layer of the roof is installed.

The chimney passes through the soft roof
The layer of waterproofing material is held in place by contact with the sheathing, and is vapor-proofed by means of frame fragments for installation. SNiP II-26-76* strictly regulates the dimensions of the gap between the pipe and the frame. This gap must be filled with stone wool.
When creating a passage through the roof for a pipe, attention should be paid to processing the junction of the sheet material and the vertical object. It is also necessary to arrange the drainage of rain and melt water, which will flow down the roof and the chimney itself. In most cases, this means installing a special apron.
Features of installation of the connection when the chimney is discharged through the ridge
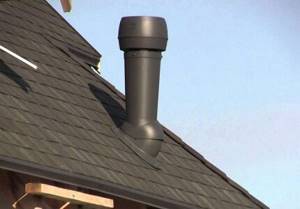
Galvanized steel pipes are cheaper than other types. The bottoms have better protection from moisture and are more resistant to corrosion.
Plastic pipes are much more common than galvanized pipes. They have great positive qualities: light in weight, cheap, high corrosion resistance, convenient and easy to install.
In order to install a plastic ventilation structure, no special experience or skill is required. At home, every homeowner can perform this operation. One indisputable advantage is the smooth surface of plastic pipes. Which has a positive effect on the functional tasks of ventilation.
Passage units vary in shape and are used for a specific chimney section - round, square, rectangular. This element also varies depending on the roofing material. But, regardless of this, sealing the pipe on the roof is carried out using the same method.
Adjacency
Tie:
- it is necessary to mark the pipe, to what height the protective building materials will be located;
- all debris and all foreign objects are removed, the surface must be washed with water;
- work starts from the bottom. The material must be cut;
- after the protective building material is installed from below, installation is carried out on the remaining sides; IMPORTANT. The material must be overlapped by 15-20 centimeters.
- then sealing is carried out;
- the apron of the tie is directed downward;
- After the work has been done, you can begin installing the roofing.
IMPORTANT. We must not forget about ventilation. It is necessary so that the pipe does not heat up to extremely high temperatures. It will also ventilate the roof space and dry it out.
Chimney bypass:
- It is necessary to leave a waterproofing coating of 5 centimeters, this is done if the material is heat-resistant. This building material is glued to the pipe.
- Then the frame is framed for protection.
- Storming is in progress. The seams should be smooth.
- Drainage is being done.
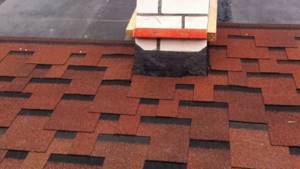
IMPORTANT. If tiles are used as roofing material, then the chimney is treated after laying the roof.
Chimney options for soft roofs
Soft roofing can be flat or pitched. The pipe itself is metal, brick, ceramic, square or round.
Chimney passage through the soft roof of a flat roof
The base is a concrete slab. We draw a rectangular chimney:
- Remove all layers of the cake down to the concrete in a rectangular area with dimensions equal to the cross-section of the pipe + a margin of 15 cm.
- Install formwork around the perimeter.
- Make a side of concrete 15 cm high. Wait until it sets.
- Place roofing on the walls.
- Install a metal strip at the connection of the roofing material with the side and reinforce it with dowels through the covering.
- Install a drip tray with a drip on the side.
If the pipe is brick, the side is not made:
1. Place material on the walls.
2. Place a metal apron on top.
3. Make a groove one and a half centimeters deep in the wall (in the brick, not in the seam!), and insert the edge of the apron into it.
4. Fill with sealant.
Connection to the chimney of a soft roof on a pitched roof
In this case, you first need to install a flange that will take on the load of the sheathing, because in this area it is cut out. To make a flange, you can use a three-millimeter sheet of steel, to which stiffeners should be welded.
1. Clear a strip of about four centimeters around the pipe.
2. Lay a basalt wool pad along the walls.
3. To seal round pipes, a metal round flange with rubber/silicone corrugation is often included in the material kit. If not, you can purchase it separately. The flange is placed on the pipe, coated with sealant and fixed to the sheathing with self-tapping screws.
note
The flange is selected according to the diameter of the chimney and the slope of the slope. There are adjustable models.
If the pipe is rectangular, a four-piece metal apron is used.
1. The top bar is placed under the covering and fixed to the pipe.
2. The rest are placed on top of the covering.
3. A tie is placed under the front bar - a wide metal sheet with sides.
4. Grooves are made on brick pipes into which the upper cut of the apron is inserted. On the rest, the apron is placed on rubber seals.
5. The seams are filled with sealant.
Features of fastening the apron when bypassing the pipe
Speaking about fixing the valley, it is worth noting that according to the standards, the self-tapping screws must be tightened at a distance of 25 cm from the axis of the valley. The shape of the gutter of this roofing element promotes the organized movement of water. Therefore, there are no leaks.
When placing a sheet of metal tile on the apron, it turns out that in any case it will be stitched with self-tapping screws, and in many places. And since a flat apron cannot have a definite axis of water movement, it spreads over the entire surface. And in its path there will inevitably be holes made with self-tapping screws.
No gaskets or seals are placed at the entrance of the self-tapping screw into the apron, which means it is impossible to guarantee the absence of leaks in the future.
Today, many manufacturing companies are busy developing technologies for the production of aprons for bypassing pipes.
note
You can ensure a good connection between the roof and the pipe in other ways that allow you to reliably protect the under-roof space from moisture, and they are not at all difficult to do. The bypass can be done using a metal apron, as presented in the installation instructions for M28 metal tiles from UNIKMA, also using an apron using seam technology, using universal flashings from FAKRO or corrugated aluminum tape.
If you have any questions about the arrangement of the connection of the pipe to the metal skull, ask them in the comments, I will try to answer.
I would like to remind you that our team is always ready to help you install your roof. Call.
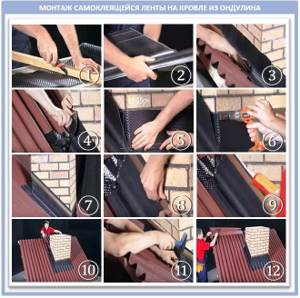
Waterproofing self-adhesive tapes: a flexible approach
One of the most popular and proven methods for arranging the connection between the roof and the chimney pipe is the use of special waterproofing tape.
For example, it is difficult to come up with something better for a roof made of piece materials, for which a galvanized steel apron is not suitable. It is easy to work with such tapes, the main thing is to adhere to the temperature regime – from +5 to +40°C.
In this article we will look at the highest quality and most popular tapes. In general, there are many options, because each manufacturer of roofing material tries to produce its own roofing element, which will be most suitable for a specific brand.
For example, if you need to go around a round chimney, an Ecobit type tape will help you. It is good because it has a self-expanding base and can be sealed without problems.
Its lower part must be placed under the tiles, and the upper part must be placed on the roofing. Next, press both layers and glue them to the walls of the chimney and to the tiles. Next, cover the edges of the top tape with metal profiles.
This is what these waterproofing tapes look like:
In total, today tapes are produced on two bases. Thus, butyl rubber has the highest waterproofing qualities, and aluminum allows you to hermetically fit even the most complex shapes.
Easy-Form: the strength of aluminum
Easy-Form is an aluminum tape with a butyl layer on the surface. The elongation of such a tape is 70%, and at the same time there is a rigid lining made of polyester material.
It is self-adhesive and is great for waterproofing a chimney. Does not rot, is resistant to frost and temperature changes, does not lose its properties within the temperature range from -20° to +80°C.
This tape completely replaces the use of lead sheets, and is cheaper and much easier to install. It comes with a 10-year warranty. And the work is quite simple, although the instructions look voluminous:
- Step 1. Even at the stage of construction of the sheathing, include additional elements made of timber with a section of 40x40 or 50x30 mm. Secure them along the chimney walls.
- Step 2. Cover the front of the pipe with a covering apron. Usually this is recommended by the manufacturer himself, from a specific material for each type of roof.
- Step 3. Install the apron in its place - along the lower edge of the pipe.
- Step 4. Make markings on the apron and make cuts along it. Make sure that the top of the apron is exactly the width of the pipe, and that the wavy part has one wave on each side.
- Step 5. Make markings with a pencil and cut off excess material along the lower crest of the wave with a sharp knife.
- Step 6. Press the finished apron onto the pipe and fix it to the surface with proprietary roofing nails, directly into the sheathing beam. Drive nails into the top of each wave, strictly vertically, except for the waves that extend on the sides beyond the dimensions of the pipe.
- Step 7. Now attach the cut piece to the installation site and give it the shape of a corner relief.
- Step 8. From the back of the tape, remove the protective film that covers the adhesive layer. Apply the tape to the pipe so that it covers the top and bottom of the apron by 70-80 mm. To ensure that the tape fits tightly to the roof, trim its corner.
- Step 9. Press the tape onto the entire surface with a little force. Do this on one bottom corner of the pipe, and then on the second.
- Step 10. Attach the side apron to the pipe, press it and mark the cut line. You will need to cut along the vertical boundaries of the pipe with a sharp knife. Do not press the knife itself too hard, so that it enters the apron only 2/3 of the thickness of the material. Then bend it and carefully break it off.
- Step 11. Nail the prepared side parts of the apron to the roof, three nails in each part: one in the center and one more at the bottom and top.
- Step 12. Cut a piece from the self-adhesive tape that will be 200 mm longer than the width of the pipe. This length is suitable for sealing the back of the chimney pipe.
- Step 13. Now glue the tape to the front side of the pipe. Now the length of the tape should exceed the width of the pipe by 200-300 mm. The tape itself will bend over the sides of the pipe and go under the side parts of the apron.
- Step 14. Press the top edge of the tape with the metal fixing bar and secure it to the dowels. Bend the edges of the apron away from the surface of the pipe.
- Step 15: Seal the corner between the pipe wall and the folded edge with a layer of polyurethane sealant.
- Step 16. Lay an additional piece of ondulin on the back side, from the ridge to the pipe.
Here's what it all looks like in practice. Part 1:
In the case of a metal roof, the whole process is as follows:
Wakaflex and Grind Line: modern waterproofing
Vakaflex is a reinforced polyisobutylene mastic, which is supplied in the form of a roll 5 meters long and 28 cm wide. On its reverse side there are strips of synthetic rubber, which are glued to the base using a stitching roller.
Let's look at the Wakaflex tape installation technology step by step:
- Step 1. Trim the waterproofing film so that there is an overlap of at least 10 cm on the pipe.
- Step 2: Make a drainage groove using waterproofing material directly above the pipe opening.
- Step 3. Trim the tiles around the pipe and lay them with a gap of 2-3 cm.
- Step 4. Now cut the Wakaflex to a length that is equal to the width of the pipe + 5 cm for each side of the pipe.
- Step 5. Bend the strip using a corner so that the resulting corner width is 15-16 cm.
- Step 6. Next, apply the wide part of the strip to the pipe, remove the protective film and press the Wakaflex to the base.
- Step 7. Stretch the tape over the surface with your hands and roll it using a roller.
- Step 8. Cut the upper part of the Wakaflex at an angle of 45°, but do not cut 1 cm to the line of the pipe and the slope. Glue with a roller.
Causes of leaks
On the roof, many holes are made from corrugated sheeting, through which the chimney and ventilation ducts exit; they violate the integrity of the waterproofing layer, leading to leaks. The most difficult thing to do is to waterproof the joint between the pipe and the roofing pie, if the installation is carried out after the roofing work has been completed, in which case it is extremely problematic to ensure a tight fit of the corrugated sheeting to the chimney wall. If the finishing of the pipe passage on the roof is done poorly, the following problems arise in the design:
- Leaks. If the chimney is installed on the roof and the joint between it and the corrugated sheeting is not properly sealed, leaks will occur in the structure.
- Rotting of the rafter frame. The flow of water through the joint between the corrugated sheet and the chimney leads to dampness of the wooden structural elements, and then to rotting and deformation of the rafters.
- Roofing corrosion. When moisture appears under the corrugated sheet, it begins to corrode, since the protection on the inside of the material is not as reliable as on the outside, since the outside of the profiled sheet is covered with a polymer protective film, and the bottom only with varnish.
- Damp insulation. If you do not seal the joint on the roof where the chimney exits, moisture penetrates into the thermal insulation material, reducing the effectiveness of insulation by half.
Note! High-quality finishing of the joint between the corrugated sheet and the stove or ventilation pipe is considered the key to long-term operation and reliability of the roofing. To seal this seam, use silicone sealant, a galvanized steel apron, self-adhesive waterproofing tapes, silicone or rubber elastic penetrations.
How to pass a profiled sheet with a pipe without disturbing the rafter system and the “roofing pie”?
If during construction or renovation it is necessary to bring the chimney to the roof, you should familiarize yourself with some tips on this topic in advance.
The first steps are to carefully plan everything: where to place the stove, how to arrange the wells and chimney, calculate the required length of the pipe above the roof.
Determine the location where the pipe will be located. According to the principle, it is better to place the pipe where it will be more exposed to gusts of wind. This will provoke more powerful draft in the firebox. The chimney pipe, accordingly, is installed in the middle of the roof, near the ridge. The farther the pipe is from the ridge, the higher it is above the ridge.
The brick also heats up, but weaker. And he will also need thermal insulation in the roof opening. This opening must be well caulked or sealed to prevent precipitation and fumes from entering.
Of course, it is difficult for a person without certain skills and experience to make a pipe on the roof himself. Therefore, it is better to find a professional in this matter, because fire safety and warmth in the house depend on this.
The rules for the installation of smoke and ventilation ducts are regulated by SNiP 41-01-2003 “Heating, ventilation and air conditioning”. However, there are no requirements for the location of chimneys in the regulatory documents. Only the height of the chimney is clearly and unambiguously regulated.
Most experts believe that it is better to place the pipe outlet through corrugated sheeting as close as possible to the ridge of the roof of the building. In this case, the smallest part of it ends up in the cold zone, and this significantly reduces the likelihood of condensation occurring when cooling the flue gases. This phenomenon is quite unpleasant, since the condensate formed on the outer or inner surface of the chimney contains aggressive acids that destroy the brickwork of chimneys.
Very often the layout of the house does not allow smoke and ventilation ducts to be installed at the location of the roof ridge. The case where the junction of the pipe to the corrugated sheet is on the roof slope is the most difficult in terms of waterproofing.
With this type of pipe arrangement, the correct installation of the upper part of the apron is of particular importance, since it is necessary to drain all the water flowing to the pipe along the roof slope located above. The upper part of the apron must be placed under the corrugated sheeting.
The most complex junction unit is when the pipe width is more than 80 cm. With such a width, it is necessary to arrange a slope in the upper part of the pipe to drain water to the sides from the center of the pipe. Carrying out slopes on roofs made of corrugated sheets is quite difficult. In this case, two short valleys are formed above the pipe, which must be performed using the same technology as valleys in the roof plane.
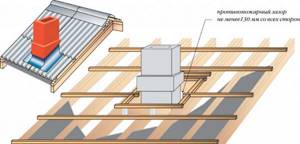
No less problems arise when chimney or ventilation pipes pass through a roof with an already insulated roofing pie. The main difficulty in this case is the need to ensure fire safety with simultaneous continuity of vapor and waterproofing.
The chimney should not be located close to wooden rafters. Therefore, the passage of the chimney is usually carried out in a separate box, consisting of two rafters located next to the chimney, and two beams fixed between these rafters below and above the chimney. The distance from the rafters and cross beams to the chimney is selected based on fire safety requirements. Depending on the material from which the pipe is made, this size should be from 130 to 250 mm.
The inside of the box is filled with non-flammable high-density insulation made from basalt fiber, since such material is less hygroscopic than conventional roofing insulation. At the same time, to ensure the tightness of the roof, the vapor and waterproofing sheets in the place where the pipes pass are cut through an envelope, the edges of which are secured outside the wooden box.
Before cutting out the corrugated sheeting for the pipe, a continuous sheathing must be made in the passage area. It allows you to securely fasten the lower abutment strip and the edges of the corrugated roofing sheeting near the pipe walls.
Useful article? Save it on social networks so you don’t lose the link!
The rules for the installation of chimneys are indicated in SNiP 41-01-2003 “Heating, ventilation and air conditioning”. So in SNiP there are clear recommendations regarding the height of the pipe, which depends on its location:
- If the chimney is located within 1.5 meters of the ridge, it should be 30 cm higher than the roof.
- If the chimney is located within 1.5-3 meters from the ridge, its height should correspond to the height of the roof.
- If the chimney is located within 3-10 meters from the ridge, the height of the pipe should be 12 degrees below the ridge.
It is very important to follow these recommendations.
If the height of the chimney is underestimated, the draft may be insufficient; if it is too high, the risk of condensation will increase, and it is very harmful, as it contains acids that destroy stove bricks.
But SNiP does not indicate where it is preferable to locate the pipe passage through a corrugated roof. At the same time, experts advise placing it on the ridge, or as close to it as possible.
- First, it will prevent smoke from entering the attic.
- Secondly, the smallest part of the chimney will remain in the cold zone, which will prevent the formation of condensation.
The chimney outlet through the ridge is the most convenient option for subsequent installation of the junction. This also minimizes the risk of leakage and eliminates the possibility of snow and debris being trapped on the roof.
At the same time, to implement this idea it will be necessary to violate the integrity of the ridge beam. This problem can be solved by installing additional supports.
If the chimney exits exactly in the center, an apron made of smooth metal of the same color as the entire roof is used to remove precipitation. The base of the apron must be sealed.
The most suitable material would be butyl rubber self-adhesive tape. The upper part must be protected from leakage with a decorative joint.
We invite you to familiarize yourself with the passage of a pipe through the ceiling in a bathhouse, 3 types of chimneys
We have already answered the question of how to bypass a pipe on the roof with corrugated sheeting. Now let's consider a situation where it is necessary to remove the chimney through an existing roof.
First, the following preliminary work is carried out:
- Determining the diameter of the future chimney.
- The cutting line is indicated on the corrugated sheet with a construction marker. It is worth leaving a few centimeters of margin on the smaller side. For example, if you need a hole of 40 by 80 cm, then you need to mark 38 by 78 cm.
- It is best to cut out the hole using a grinder with a thin metal circle. To avoid the formation of burrs, work is carried out as carefully as possible.
- Make small cuts at the corners of the hole and bend outward those few centimeters of corrugated sheet that we left in reserve.
- In the place where the pipe passes, it is necessary to make a continuous sheathing so that it is possible to secure the lower junction strip and the corrugated sheet.
- Cuts are made in the insulation and waterproofing. In order not to throw away excess, the waterproofing can be cut with an envelope and temporarily secure the edges with staples. This cannot be done with insulation.
- A box is constructed between the chimney and the two rafters located on either side of it. The gap between it and the chimney itself is around 150 mm.
- The edges of the waterproofing film are glued to it.
- Before running the pipe through the roof, it is necessary to resolve the issue of thermal insulation to avoid a fire. Stone wool is best suited for these purposes. This is exactly why we left a gap in the box.
After the pipe has been thermally insulated, you can begin its direct installation.
- We install the chimney in the box. It is important that there is at least 5 centimeters of clearance between the open parts of the pipe and the tree.
- To prevent the pipe from collapsing, steel clamps are used that are attached to the rafter system and sheathing boards.
The next stage is external work. Now we will look at how to seal a pipe on a roof made of corrugated sheets.
- If there is just a round pipe leading outside, without a duct, it is necessary to waterproof it using foil tape or roll waterproofing, and install a roof passage, attaching it to the sheathing we created and treating the contact areas with sealant.
- If a rectangular box is installed outside, you will have to install a lower junction bar to prevent leakage.
Arrangement of a passage through the roof
A reliable connection of the roof to the pipe can only be made if the roof sheathing is a rigid structure on which the load from the coating and external influences is evenly distributed. If the chimney is installed without violating the integrity of the sheathing, then the rigidity of the external flooring, made of sheet materials, will help ensure the installation of a special roofing penetration with a base in the form of a metal sheet.
The construction of a rectangular chimney usually involves the need to partially dismantle the sheathing. In some cases, it may be necessary to remove part of the rafter leg. To avoid damaging the load-bearing capacity of the rafter system, a special wooden frame is mounted around the chimney, onto which a waterproofing and vapor barrier layer of the roofing pie is attached. The waterproofing sheet is pressed against the lathing and counter-lattice, the vapor barrier is pressed against the frame elements for installing the finishing of the room under the roof. The size of the gap between the chimney and the frame must comply with the requirements of SNiP; it is filled with a non-flammable thermal insulator - stone wool
.
The design of the roofing pie must be continuous over the entire roof area.
When arranging the chimney passage through the roof, special attention is paid to sealing the junction of the roofing material and the pipe. It is necessary to ensure the drainage of water flowing down the roof slope and the pipe itself. Usually, when making a connection, the installation of an apron is required.
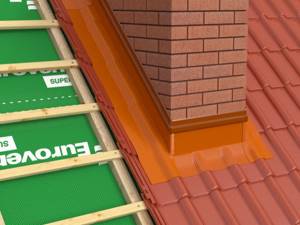
Connecting the tiled roof to the chimney
The connection of the roof to the chimney is often done using aprons designed specifically for certain roofing materials and sold as a set of components. Ceramic and cement-sand tiles are equipped with elastic tapes made of aluminum alloy and equipped with an adhesive layer on one side.
To seal the junction, an elastic tape is glued along the joint, with one half of it adjacent to the pipe, and the other to the roof, repeating the curves of the tile covering. Then the upper part of the tape needs to be fixed with a metal profile strip. For this, heat-resistant dowels are used. The installation sites of fasteners and the junction of the strip and the pipe must be treated with sealant.
The adjacent roofing unit made of flexible tiles is installed using the same technology, but instead of an elastic metal tape, a valley carpet or ordinary tiles, which were previously inserted into the chimney, are laid.
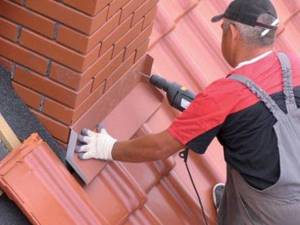
Attaching a metal tile roof
If the roof is made of metal tiles, a sealing apron is usually used, made using upper and lower abutment strips. To do this, the lower strip should be attached to the walls of the chimney pipe and its upper edge should be marked. A groove is made along the marking line, the depth of which should be at least 1.5 cm. At the end of the work, dust should be removed and the groove should be washed with water.
The arrangement of the internal apron begins with the bottom wall of the chimney.
The planks are mounted with an overlap of 15 cm to eliminate the risk of leaks. The upper edge of the additional elements is inserted into the groove and filled with heat-resistant silicone sealant. A flat sheet of metal with an anti-corrosion coating should be placed under the bottom of the apron; it will allow water to drain. It must be directed down to the eaves of the roof or to the nearest valley; a side is made along the edge using pliers and a hammer.
In order for the connection of the chimney to the roof to be as reliable as possible, before installing the internal apron on the pipe, the waterproofing should be removed (to a height of 5 cm) and its upper edge should be glued with tape. The insulating material must be heat resistant.
It is recommended to wrap the furnace entrance area with self-expanding Ecobit tape or a similar material that can fill the through hole.
Metal tiles are laid on top of the inner apron around the pipe. Upon completion of the installation of the roof covering, an external decorative apron is installed. This requires the use of upper abutment strips. Installation is carried out according to the same principle as installing an internal apron, but in this case the upper edges of the elements are attached to the chimney walls without grooves. The joint must be filled with sealant.
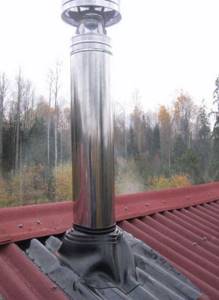
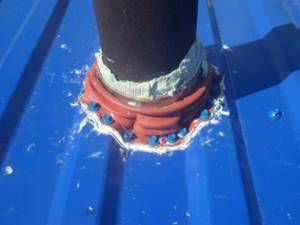
Round pipes: joint protection
The connection of a round pipe to the roof is usually done using ready-made systems. A modern chimney with a round cross-section is a three-layer structure, the central segment of which is made of heat-insulating material. Special connections for roofs are made to them, consisting of a flat steel sheet and an apron-cap through which the chimney pipe passes.
The connection models differ, first of all, in the angle of inclination of the plate relative to the vertically located pipe. Designs are produced that are designed for use on roofs with the most common slope angles.
The junction plate is rigidly fixed to the roof plane. The top of the cap is cut off so that the pipe fits into it tightly, without gaps. After securing the junction plate, the upper edge of the apron is pressed against the pipe using a steel clamp with an elastic heat-resistant gasket. This makes it possible to seal the joint and prevent moisture from getting under the apron. It is recommended to install the plate itself using self-tapping screws equipped with rubber or neoprene gaskets
.
If the angle of inclination of the pitched roof does not allow the installation of a finished penetration of a standard size, the junction of the roof to the pipe can be completed independently. The easiest way to create a sealed apron around a chimney pipe with a circular cross-section is to cover the perimeter with segments of lead or aluminum tape. You can use a ready-made lead part; it has an oval shape and is easily profiled along the roofing using a rubber or wooden hammer.
Self-adhesive lead material allows for a high-quality connection. Lead is characterized by resistance to temperature changes, ultraviolet radiation, and corrosion.
To ensure high quality installation, all surfaces on which this material is glued must be dry, clean and grease-free.
What is the difficulty of arranging the junction?
Experienced roofers know well that one of the most difficult and critical stages is the connection of the pipe to the roof and its installation.
After all, several risk factors are at work here:
- high temperature of the pipe, which can heat almost any roofing material, especially wooden sheathing, to a critical temperature;
- technological gap between the pipe and the roofing, which must be completely sealed;
- a cap of snow that always accumulates on any obstacle it encounters on its way down.
Therefore, the main requirement for a chimney bypass is to be fireproof, durable and 100% airtight.
The chimney protective apron itself is made in two ways: from lead or aluminum flexible tape or steel sheet with a special coating.
The main thing is to do everything right:
The issue of the tightness of the junction of the roof to the chimney is usually solved with the help of an internal apron made of junction strips, and we will try to analyze this issue in detail with you.
Junction location
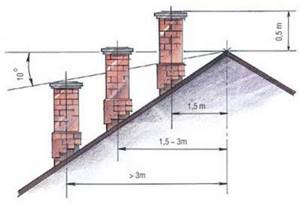
According to building regulations, chimneys can be installed in several places on the roof. When removing the pipe, the following parameters should be taken into account:
- The chimney must be installed in such a way that it rises above the ridge by at least 50 cm, if this structural element is located no further than 150 cm from the ridge.
- If the pipe is installed at a distance from 150 to 300 cm from the ridge, it can be at the same height with it.
- In the case when the pipe is located further than 300 cm, it is located level with the ridge or below it. But at the same time, installation cannot be carried out below a line drawn relative to the horizon at an angle of 10 degrees.
All other rules regarding the location of the chimney are not regulated, so during work you should rely on the experience of professional builders. In order to correctly position all the roofing elements that protect the junction from moisture, you need to look at various photos depicting the installation of the “apron”.
Many home owners who have done the construction themselves recommend running the pipe as close to the ridge as possible. This is due to several reasons:
- in such a place it is easy to organize a connection;
- due to the fact that the slope above the pipe is small, a large amount of snow does not form there.
After determining the best place to place the pipe, you need to know how to secure the covering so that it reliably protects the joints.
Joint of pipe and corrugated sheet on the slope
Not in all cases, the layout of the building allows the chimney to be brought out through the roof ridge. Therefore, another path is chosen - to make a hole on the slope. In this case, the work on sealing the junction becomes significantly more complicated.
The main goal is to correctly install the top element of the apron. Therefore, the main rule is to install this element under corrugated sheeting.
Attention! If the upper side of the chimney structure is more than 80 cm wide, a shaped apron with a slope is installed on it. This design resembles a breakwater that diverts water in different directions from the chimney.

Installation of such an apron is associated with certain difficulties. In addition, at the junction of its elements and corrugated sheeting, two valleys are obtained. They need to be sealed in the same way as valley roofs. This requires the installation of additional strips and increased waterproofing.
Joining a round pipe
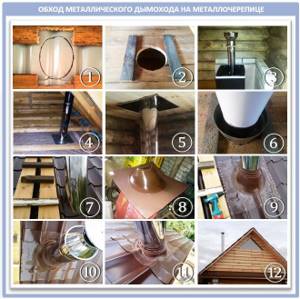
In this case, it is possible to make an abutment to the roof chimney using ready-made systems. This type of chimney means the presence of three layers (the middle is made of a material that retains heat). The round design is considered standard, so choosing steel connections and an apron-cap is not difficult. There are still differences; the angle of inclination of the plate relative to the chimney is of fundamental importance. Example in the photo.
The connection occurs as follows:
- The plate is placed on the plane of the roofing pie, strictly observing the established parameters. Installation of the adjacent plate occurs using self-tapping screws, the design of which contains neoprene or rubber gaskets.
- The top of the apron is cut off, since the chimney must fit in without leaving any gaps.
- The upper edge of the cap is pressed using a steel clamp with an elastic heat-resistant gasket.
If you couldn’t find a ready-made system, then all you have to do is make it yourself. How to make an apron for a round pipe with your own hands? To do this, you need to cover the required perimeter with aluminum or lead tape.
The latter is preferable, as it is resistant to direct sunlight, high air humidity and temperature changes. Before starting the process of creating an abutment plate, the working surface should be degreased and dried.
Lining the chimney with corrugated sheeting
Chimneys are subject to aggressive environmental influences. This:
- Temperature changes and precipitation.
- Formation of condensation due to the difference in temperature between the air and the chimney.
Also, a bare pipe on a corrugated roof is not attractive from a purely aesthetic point of view. To solve both of these problems, it is necessary to line the chimney.
There are several popular types of facing materials:
- Tiles and clinker bricks.
- Plaster.
- Profiled sheeting.
We will look at how to line a pipe on the roof with corrugated sheeting. The profile sheet has several advantages:
- Durability
- Wide range of colors
- Ease of installation
- Easy maintenance
- Light weight
- Resistance to temperature changes
- Ecological cleanliness
In addition, corrugated sheeting manufacturers produce special facing sheets designed for finishing various structures, including chimneys.
Thus, to line the pipe we will need:
- Gloves or mittens to protect your hands. Profiled sheets have very sharp edges, especially if you cut them yourself.
- Jigsaw with a special blade. As a last resort, if it is not available, you can use a grinder with a thin circle. But keep in mind that the grinder heats up the metal very much, which damages the polymer and zinc coating of the sheet.
- Screwdriver and screws.
- Insulation. Any non-flammable material will do.
- Mushroom dowels for attaching insulation and regular dowels for attaching the frame.
- Hammer for fastening dowels.
- Drill with drill bit for dowels. In its absence, you can use a screwdriver, but this will slightly increase the time cost.
- Metal profile to create a frame. In its absence, wooden blocks treated with an antiseptic will do.
- The cladding elements themselves: profiled sheets and additional elements.
Let's move on to installation.
- The first stage of work is installation of insulation. To do this, drill a hole directly through it with a drill in the chimney and secure them with a hammer.
- Next, we build a frame for the cladding from a metal profile and wooden blocks. We attach it to the chimney in the same way as the insulation.
- We measure and cut the profiled sheets. The main principle: “Measure twice, cut once.”
- We attach the cladding to the frame. The sheets can be butted or overlapped. The second option is preferable, as it guarantees the absence of gaps.
- Installation of additional elements made to order. This is the upper eaves strip and the chimney umbrella.
- For greater aesthetic beauty, you can install a decorative chimney connection.
Thus, today we found out how to lead a pipe through a roof made of corrugated sheets, as well as how to line a chimney with corrugated sheets.
Arranging a box for sealing
Installing a pipe on a roof made of corrugated sheets involves further sealing using an equipped box, for which you must perform the following steps:
- Make a hole in the roof so that the distance from the pipe to the cut edges of the roof complies with fire regulations.
- The chimney and adjacent edges are treated with heat-insulating material.
- Install a box made of corrugated sheets or galvanized iron, sheathing the pipe around the perimeter with strips up to 40 cm wide.
- If the roof slopes have a slope of more than 30 degrees, then a metal rainwater drainage system around the pipe is required.
- Insulation is placed in the space between the walls of the box and the pipe. The best option in this case would be basalt wool.
Output location
The reliability and tightness of the roofing pie depends on the correct choice of the outlet of the chimney and ventilation ducts through the roof. The finishing of the joint depends on the location of the passage. If the roof is made of profiled sheets, the pipes are installed in the following places:
- On a ridge. The ridge of the structure is considered the most advantageous place for the pipes to exit. This arrangement eliminates the formation of snow pockets and condensation, reduces the likelihood of leaks, however, it violates the integrity of the ridge beam. If a chimney or ventilation duct is discharged through a ridge, then the joint between them and the roofing material is sufficient to fill it with silicone-based sealant and then cover it with a decorative apron.
- At a distance of 50-70 cm from the ridge. This arrangement is considered advantageous, as it minimizes the formation of snow pockets and prevents leaks. When the chimney is brought out at such a distance from the ridge, the rafter structures are not disturbed. To protect the joint between the pipe and the roofing material, elastic penetrations and additional elements are used to assemble the apron.
Options for placing pipes relative to the ridge
There is a simple rule: the lower the pipes are located along the roof slope, the more effort it takes to waterproof the joint between it and the roofing pie.
Conclusions and useful video on the topic
How to properly install the ventilation unit can be seen in the video:
Thus, venting ventilation through the roof is a rather painstaking and complex process. Failure to comply with the requirements for installation can lead not only to the cessation of ventilation, but also to the appearance of excessive humidity and mold in the house.
Therefore, if you are not sure that everything will be done correctly, it is better to entrust this work to professionals.
Have you ever had to arrange the ventilation passage through the roof yourself? Perhaps there were any difficulties with this? Please share your experience in arranging a ventilation passage through the roof. Leave your comments, ask questions - the contact block is under the article.
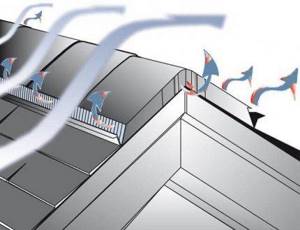
Roof ventilation - why is it important?
Because due to sudden changes in air temperature, numerous evaporations inside the room and high air humidity, condensation forms in the under-roof space.
Thus, accumulated moisture penetrates the thermal insulation layer, which leads to a decrease in its effectiveness.

Due to prolonged exposure to moisture on the rafter system, the wooden structure will gradually begin to deteriorate, regardless of whether it has undergone special treatment with anti-corrosion agents
In addition, the lack of necessary air exchange leads to significant overheating of the roof in the hot season, which will make it unbearable to stay indoors.
Consequently, installing a roof ventilation system allows you to solve several problems at once, providing:
- sufficient flow of fresh air into the roof space;
- stable temperature and humidity in the attic;
- reliable protection of the roof, ceilings and walls from mold formation;
- full functioning of the thermal insulation material.
Installing roof ventilation will significantly reduce the cost of heating or cooling the room, replacing the rafter system, or numerous attempts to combat fungus.
The ideal time to install a ventilation system is to replace the old covering with a new roof made of soft tiles.
Requirements for roof ventilation
Proper ventilation for soft tile roofs should be taken seriously to avoid the above problems.
First of all, you should remember the space between the base and the insulation, to achieve which you will need to fill timber 5 cm thick
In addition, it is important to ensure in advance that there are small holes at the bottom of the slope to ensure sufficient fresh air flow
It is advisable to immediately equip the ventilation holes with special decorative grilles so that the birds do not have time to build nests inside them, and the system works properly
During the installation of a soft roof, you should also not forget about the holes for ridge ventilation and the installation of aerators.
When installing the sheathing, it is important to take into account the need for gaps, which will ensure continuous circulation of fresh air. All these nuances must be thought out at the system design stage.
Types of roof ventilation
The shape and design of the roof completely determine the type of roof ventilation. If a roof made of soft tiles has a complex geometric surface, sufficient air exchange can only be ensured by installing ridge ventilation.
So, depending on the features of the construction of the house, there are two types of ventilation through the ventilation ridge:
- Spot. It is installed on separate sections of the ridge or slope, and has a mushroom-shaped shape. Such aerators are often integrated into the overall ventilation system of a building, but in some cases they can be equipped with a separate hood.
- Continuous. It is mounted along the entire ridge, and thereby ensures complete ventilation of the area under the roof space. Unlike a point system, continuous ventilation is more effective for soft roofs.
In this case, it is worth considering a continuous type of ventilation. Thus, the ridge element is a rigid plastic structure, which consists of a solid upper part in the shape of a corner, as well as perforated walls.
Roof continuous ventilation can be installed on almost any roof, but with the only condition - the slope of the slope must be 14-45 degrees, and the length of the aerator must fully correspond to the length of the ridge
Ridge ventilation works by convection, in which warm air masses rise upward from the eaves, and cold air, in turn, is pulled down. In this case, the system has its own entry and exit zones.
Thus, fresh air penetrates into the under-roof space through the roof ventilation overhangs (from below), while the ridge aerator located at the top of the soft roof is the outlet for exhaust air.
Sealing by arranging a box
There is a method of sealing by arranging a box.
- Leave a distance between the edge of the cut roof and the pipe in accordance with fire safety standards.
- Treat the adjacent edge of the roof to the chimney and the chimney itself with heat-protective material.
- A box made of galvanized steel or corrugated sheeting is installed in this area. Cut strips up to 40 cm must be sheathed around the perimeter and the angle of inclination of the slope.
- The elements of the box (collar) are overlapped and soldered.
- When the roof slopes at an angle of more than 30 degrees, a metal outlet is installed to drain rainwater around the chimney.
- Fill the space between the pipe and the box with thermal insulation material. You can use basalt wool.
The principle of arranging a passage with thermal insulation materials is applicable to a chimney on a slope and a ridge with minor differences. The installation of a chimney along the ridge involves changes to the design of the rafter system.
The roofing deck is covered with roofing felt, overlapping the pipe walls, and the apron is installed, followed by filling the gaps between the apron and the wall with polymer sealants.
How to protect a chimney from moisture
Practice shows that most often water leaks on the roof near the pipe are associated with poor-quality sealing of the roof section. If the cutting is under the roof, it will leak from below, if on top, it will leak from above. To prevent this, the chimney on the roof is waterproofed by installing insulating aprons.
The work is carried out in several stages:
- First of all, a drainage gutter is placed in the waterproofing layer above the chimney, designed to remove moisture from the chimney.
- Then an internal apron is installed, ensuring complete sealing of the junction of the roofing covering and the chimney.
- Next, the so-called “tie” is laid. This is an element cut from waterproofing material, placed under the lower edge of the inner apron. The structure must reach the very edge of the roof. If the roof is covered with slate or metal tiles, the edge of the tie is brought out between the lower sheets of covering onto the roof surface. Along the edges of the structure, be sure to make a side with the help of pliers, which will prevent water from spreading over the roof, but will direct it down the slope.
- A roof covering is laid around the pipe.
- An external decorative apron is mounted on top of the roof. It is installed in the same way as the internal one. The only difference is that the top edge is fixed directly to the pipe wall.
Insulating aprons are made independently, but if desired, you can purchase industrially manufactured units designed specifically for these purposes. They are used for wiring circular chimneys through the roof and are called roof passages. The nodes are an element consisting of a flat sheet of steel in the form of a base, to which an apron made in the form of a cap is attached. A chimney runs inside it.
To ensure stove draft, it is necessary to install ventilation outlets on the roof. They form air flows, protect ventilation from precipitation and create draft in heating devices. The outlets must be fixed strictly vertically and be equal in height to the chimney; only in this case the air flows generated in them will be strong enough to ensure optimal combustion of fuel in the heating device.
Waterproofing a pipe is a responsible undertaking. Not only the integrity of the roofing pie, but also the safety of using heating devices depends on the correctness of its implementation. Of course, you can do all the work yourself, but you need to calculate your strength and be sure that everything will be installed absolutely correctly. If you still have doubts about your competence, it is better to entrust the installation of waterproofing to specialists and receive a unit mounted in accordance with all the rules in a short time.
Selection of materials for sealing
To seal the joint between the ventilation pipe and the roof, you can use sealant or special tape. Both options are suitable for this stage of installation; the specific type is selected taking into account the type of roof slab.
A characteristic feature of any type of roof is its high temperature range. In hot summers, the roof can heat up to +70 degrees, and in severe frosts it can drop to -40 degrees Celsius.
Therefore, it is important to choose a sealant that will be very elastic and resistant to such temperature changes. So, if self-leveling roofing or bitumen shingles were used during construction, then it is better to use acrylic sealants.
However, if the house is located in a cold climate, where temperatures are often below freezing, then acrylic sealant can only be used to seal internal seams. You can also use bitumen sealants to treat internal joints. Polyurethane products are more universal, as they are suitable for any type of roof and do not have special requirements for temperature conditions.
In order to protect the room from moisture, insects and birds, you can install tips that will close the pipe opening
Using tape for sealing, you can significantly simplify the process of processing the joint between the roof and the ventilation pipe.
The tape is a thin strip of foil that is attached with glue or has its own adhesive backing. It completely follows the contours of the joint, thereby achieving perfect sealing.
Nuances of laying Wakaflex material
Wakaflex is an adhesive elastic waterproofing strip with internal aluminum reinforcement. Its design allows it to repeat the shape of the roof and at the same time adhere tightly to the pipe surface.
Laying Wakaflex material
Installing Wakaflex is simple, which you can do yourself:
The strip is glued along the lower edge of the chimney. Cut it around
Bend it in half along the tape, release the top protective film and glue it to the chimney, pressing it with a hard roller. Subsequently, the lower protective layer is removed and glued to the roof, scrupulously pressing with a roller to ensure complete adhesion. The corners are carefully trimmed, wrapped onto the pipe walls and glued. The sides of the chimney are treated in a similar way. The corners are carefully placed on the lower/upper area of the pipe, the corners are rounded for the best contact and wind protection. The upper wall of the pipe is processed last, its corners are fixed to the side planes. A Vaka strip is attached to the chimney on top of the waterproofing tape, which prevents water from flowing down the pipe surface.
Waterproofing prevents water damage or destruction in the chimney. If the chimney duct masonry already has gaps, voids, cracks or missing mortar, it should be repaired before waterproofing. Its outer surface must be cleaned before waterproofing, since any particles or dirt will not allow the waterproofing material to create a tight connection.
Carrying out moisture protection is a mandatory operation for every chimney; if this is not done, the damage caused by water to the smoke ventilation system can be significant and lead to its complete destruction. Modern waterproofing materials are well represented in construction stores in all regions of the country, including Moscow.
What and how to seal it with?
Now you need to seal the gap between the pipe and the corrugated roof. This can be achieved by sealing the area. Let's try to figure out how to do this in different cases. If there is an abutment to a brick pipe, then the whole process is divided into 2 stages:
- installation of an apron;
- ensuring its tight fit to the roof.
First the roof is prepared. To do this, the waterproofing should be placed on the pipe and secured. This is often done in a bathhouse. There should be no gaps here to prevent condensation from getting inside.
After this, either an apron is installed with subsequent sealing of the joints of the additional type parts, or folding is carried out. In the first option, installation begins with fitting the lower adjacent strip to the pipe. Here the chimney corners are marked, after which you should retreat 20-30 millimeters from them and cut off a piece of the upper arm of the extension. Where the corner is bent, an incision is made and the bar is bent to grasp it. Now a self-adhesive butyl-based tape is applied along the length of the roof, and a sealant is placed on top so that dirt does not accumulate under the apron, and sealing is carried out.
The joint located between the pipe and the roof is closed with an abutment strip. Since the work takes place with corrugated sheets, fastening is carried out using roofing screws with an EPDM rubber gasket. Self-tapping screws are screwed in perpendicular to the sheet on top of all the waves. The sides of the planks are attached in approximately the same way. They are cut to the dimensions of the pipe, bent, but mounted only with sealant and butyl-based tape. And the sealant is applied only to the bottom of the apron so that it covers only the line of the plank joint. The pitch between the screws when attaching these strips cannot be more than 150 millimeters.
The width of the lower part of a good-quality element must be at least 450 millimeters with a 15-degree roof slope. On roofs that have a large sloping surface, the upper apron should be wider. It is necessary to coat the entire joint with the roof with sealant, including the bottom and sides.
Where the abutment support sheet is located, a strip is located under the top sheet of corrugated sheeting, which is fastened with self-tapping screws with flat-type caps. This way the fasteners will not interfere with the installation of the roof covering. Where the part will be open, the strip can be attached using ordinary self-tapping screws.
A sheet of corrugated sheeting can be laid on the upper junction bar, which should be placed under the ridge.
What is a sandwich chimney?
In another way, designs of this type are also called modular chimneys. Such pipes can be used when installing boilers and stoves for heating residential buildings and baths. Chimneys of this type are assembled by inserting individual parts into each other using the “condensate” or “smoke” methods.
Sandwich pipe elements can be made from stainless or galvanized steel. The first type of structure is used most often by owners of country houses. Galvanized chimneys, since zinc can burn out at high temperatures, are mainly used only when installing gas boilers or boilers.
Pipes of this type received their original name for their multi-layer nature. When assembling such structures at the factory, another one is put on the main smoke exhaust pipe, which acts as a protective casing. Mineral wool is also installed between the pipes inserted into each other.
The main advantage of sandwich chimneys, in comparison with conventional single-wall structures, is that condensation does not form inside them during operation. Acid never accumulates in such chimneys and soot is not deposited. Accordingly, the service life of exhaust gas exhaust structures of this type is quite long.