A mixing unit in a heated floor water system is needed to adjust the temperature of the coolant. The installed boiler heats the coolant to the required temperature - 55 degrees. This is enough to warm the floor up to 30 degrees. This indicator is comfortable for the cold season. In the manifold, the mixer independently mixes hot and cold water to the desired temperature. If you plan to have a heated floor without a pump, then the coolant is supplied to the system at a given temperature, but this requires a separate boiler or a centralized heating system.
Sometimes installing a collector is not justified
The nuances of arranging water floor heating without the use of a mixing unit
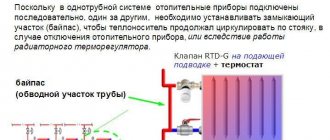
The main disadvantage of installing a water heating system without mixer and manifold units is that it is necessary to minimize the loss of water temperature along the heater-circuit path, because the temperature on the floor covering must be kept constant. Therefore, it is recommended to take into account the following requirements:
- insulate the walls of the building;
- lay thermal insulation material in the floor covering cake;
- install high-quality window frame designs;
- install the floor covering as close as possible to the heater;
- The area of the room should not be more than 20 square meters. m.
Attention! The main mistake in installing a water brushless floor system is trying to use it over large areas. Therefore, it is necessary to calculate the duration of the pipes and the laying scheme so that the temperature in the return pipe is not too low. Otherwise, a lot of condensate will form in the boiler, and this will lead to its breakdown.
Some experts say that in the case of a cold return, connecting a condensing boiler with a high efficiency helps - it is not afraid of low coolant temperatures.
Advantages of heated floors with mixer
A heated floor with a mixing unit has many advantages compared to other heating systems.
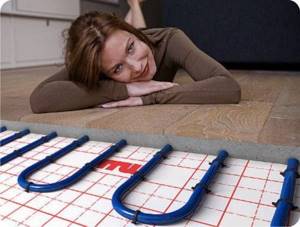
Comfort
It is possible due to the supply of heat energy due to radiation, but not convection. In addition, the floor surface and the room are heated evenly. There are no cold bridges or hot radiators in the rooms. All this creates a comfortable and healthy atmosphere, therefore there is no dust. The surface always remains dry and does not create an environment for mold, mites and other harmful microorganisms.
Warm floor with mixer
Economic benefit
Depending on the location of the tubes and the functioning of the heating system, you can save on heating the room. It has been established that residential apartments consume 30% less electrical energy, provided that the ceiling has a standard height. Thus, the consumption of energy resources can reach 50%.
Safety
This is important for rooms where people are constantly present. The operation of a heated floor allows you to avoid burns and other manifestations that may occur when using radiators or convectors
Hygiene
The water floor system with mixer allows for proper disinfection of the finish coating. The floor can be cleaned with various detergents and water. This heating system is ideal for rooms with specific hygiene requirements. For example, a water floor with a mixing unit is suitable for kindergartens and hospitals.
Warm floors - comfort and convenience
Options for installing a heated floor system without using a unit and a manifold
To install a water heating system for heated floors without using a collector, the following materials and devices are required:
- pipes for the circuit;
- boiler;
- components for the pipeline;
- three-way thermostatic valve.
Scheme for laying a heated floor from a centralized heating system
Some craftsmen try to use the easiest installation method - to equip a heating system by connecting it to the central heating. This solution may subsequently lead to pipeline malfunctions, since the temperature of the radiator coolant is significantly higher than that required for the floor. And if supervisory organizations discover the presence of this “homemade device” without permission from the relevant authorities, the owner will be issued a considerable fine and will be required to dismantle the water heated floor system.
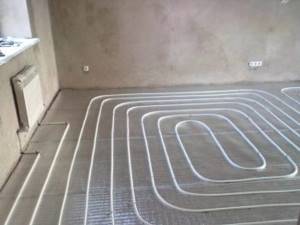
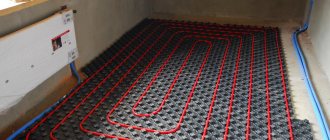
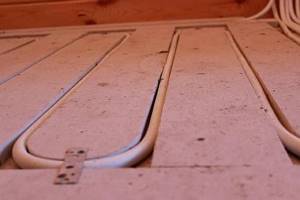
Laying the pipe circuit
Several methods are used to lay the pipeline contour, the most acceptable are snail and snake. These circuits consist of two parallel water floor loops (supply and return). The advantage of the “snake” is the distribution of heating zones; for example, you can bypass plumbing. The advantage of the “snail” is uniform heating of the area. After installation, the pipes are connected to the boiler according to the connection diagram.
To speed up the movement of water through the pipes under the boiler, a supply pump is installed, which is controlled automatically or manually. In a system where there is no mixing unit, a three-way thermostatic valve closes the circuit between the pipeline and the boiler.
Attention! In order for the heated floor to function without a pump, it is recommended to choose a powerful boiler, no matter gas or electric. The main thing is that its power is enough for a warm floor covering. It is worth choosing a boiler with a built-in pump.
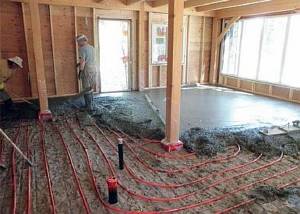
Heated floor installation
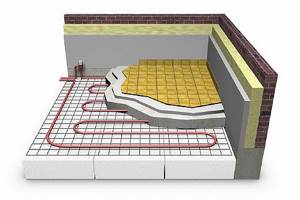
The “pie” of a warm water floor is a multilayer structure with a liquid coolant inside. The main element of a heated floor is a pipe made of metal or polymer through which water or antifreeze circulates. Each layer has its own purpose and plays an important role for the effective functioning of the entire system as a whole. Therefore, during construction, a clear sequence should be observed.
The “pie” of a water floor looks like this:
- base - made of wood or concrete slab;
- waterproofing - polyethylene film (0.1 mm);
- thermal insulation - polystyrene foam boards, or other insulation with a density of 40 kg/m³ and a thickness of 300 mm;
- water circuit - pipeline;
- reinforcing mesh - provides screed density, the permissible thickness of the rods is 3 - 5 mm;
- concrete screed - a solution of concrete and cement with plasticizers;
- finishing coating - any material compatible with heated floors.
In total, the thickness of this structure in a private house can be from 7 to 15 cm. The water floor circuit is connected to the collector unit.
Water structures are:
- Heavy (wet) - one of the most common options. An important role here is played by the rough foundation; hydro- and thermal insulation, pipes and reinforcing mesh are placed on it, and everything is filled with concrete mortar. This method is recommended for brick cottages with concrete floors that can withstand the weight of the screed.
Important! The concrete layer under the contour should not be less than 3 cm.
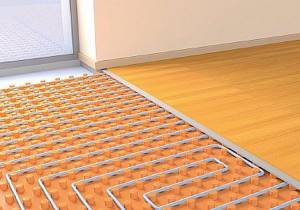
- Lightweight - the base under the pipes is polystyrene foam boards. They are laid on the subfloor and a water circuit is mounted on them. Since the slabs are equipped with bosses with which the pipes are fixed, their additional fastening is not required. Thermal plates are laid on top, on which the floor covering is laid.
For your information! This option is suitable for private houses with wooden floors that are not able to withstand a heavy structure.
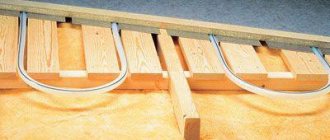
- On wooden slats - that is, the base will be wood, to which the heating elements are mounted. This structure is covered with gypsum fiber and a finishing coating. But this method is not reliable, so it is recommended for installation as a last resort.
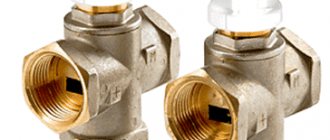
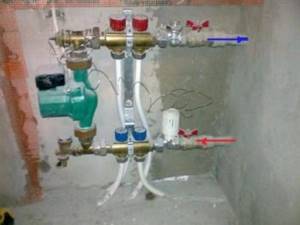
Installation of a thermostatic valve for warm floor coverings
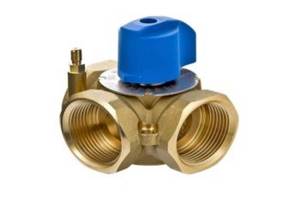
three-way thermostatic valve
The valve is mounted on the coolant supply, and a jumper is installed to the return pipe. The valve is designed to regulate the temperature of the coolant; it is a mixer, inside of which a temperature-sensitive element is installed. The valve protects the system - it automatically stops the flow on the supply pipe at the right time.
How to connect a water electric floor?
Warm hydraulic floor is a system in which TENS are installed in a screed or placed under a covering, due to which there is an equal distribution of air flows throughout the room. To install the equipment, you need to make the correct calculations; this will help you lay the pipes correctly. It is also necessary to remember the connection technology so that the heat supply functions without interruption and provides protection from cold in the premises for a long time.
Connection to the boiler
Buildings consisting of several floors are usually not suitable for this option. This connection scheme is better suited for owners of private homes. The characteristic is the temperature of the circulating medium, which can reach 35-38°C in pipes and reaches 80° in heating devices. There are several options for laying TENS:
1. Snake. In this case, the line is a little hotter on the initial turns, which must be taken into account when locating window openings in the far walls.
2. A spiral or snail is suitable for large rooms; the flow in the system is distributed equally.
3. The method of bordering sections involves the installation of pipes with a large pitch in the warm zones of the room and more dense laying in places with possible cold bridges.
4. The combined installation diagram of traditional heating implies a couple of options at the same time, depending on the need to warm up a personal home.
When installing, you can’t do without a pump. Convective circulation occurs exclusively with a small pipe slope and a circuit with a modest area, without connecting heating devices. The collector acts as a water tap and disperses the media through the pipes. Without this component, the liquid temperature reaches 95°, which is unacceptable for a heated hydraulic floor; it will fail quickly.
If the privatized house is less than 100 m2, there is no need to connect batteries; the collector consists of two combs - for supply and return. The cabinet is installed in a comfortable place, shut-off valves and pipes are installed. For monitoring and adjustment, an external water thermostat and sensors are connected nearby. When connecting, use fittings and adapters.
If a warm hydraulic floor is connected to the boiler at the same time as heating devices, the scheme involves installing two collectors, due to the large temperature difference between the devices. The water is heated in the battery to 95°C, while the difference in values from forward to reverse is no more than 25°C, in other words it comes out to 95 to 70. And the ideal value for a traditional heating system should be 30-400C.
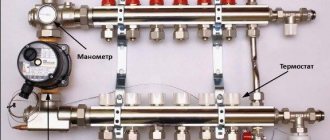
Working principle of the collector
The thermostat valve and distributor are located at the connection point to the primary circuit. This element allows you to adjust the temperature to a good value. From the boiler, the carrier enters the system, passes through it and returns back in a cooled state. If the thermostat is set correctly, the necessary balancing of the valve is achieved. Depending on the load, the flow of hot water into the mixer will be sufficient to maintain the temperature.
The warm hydraulic floor is connected to a gas water heater with flow meters on the supply comb. With their help, the largest carrier flow through the circuit is set. The length of the pipe branches is not always the same, so to equalize the resistance in terms of hydraulics and equal distribution of liquid from the boiler to the heating devices, it is worthwhile to provide an adjustment scheme using sensors and thermostatic valves.
Having formed the manifold and positioned it correctly, proceed to connecting the boiler to the floor surface. Usually, for this purpose, an individual room is emphasized where all the equipment and pipes are installed. The return and supply parts are inserted into the unit. The second will supply heated liquid to the heating system, and the first will receive cold water and send it to the boiler for heating. All parts are combined using connectors and installed to the manifold.
Connection to the system
The wiring diagram for autonomous heating can only be used in a private home. In this case, the signal to the thermostat is supplied from a heat sensor placed at a distance. If the indicator can reach the specified value, media feeding automatically ends. A balancing valve is connected to eliminate idle water in the circuit.
The circulation pump provides additional pressure. Connecting a safety external water thermostat is necessary to control the temperature level; it is located on the inlet pipe. The electric drive of the heating system controls the valves of the heating group. The collector distributes the media flows, and the circular pump ensures circulation in a small circle. There can be several remote thermostats. Using these devices, it is convenient to monitor the temperature in any room separately.
Sometimes, instead of a pump, a three-way mixer is installed, which performs a similar function, but under conditions of good circulation. It is fixed at the hot water supply point and connected to the outlet through a circular pump. A Mayevsky tap is installed on the collector to remove oxygen bubbles from the batteries. A drain valve is placed on the return line to remove water from the heating system during repair work.
If necessary, you can use more than ten types of liquid mixing. Such a scheme is very productive, since the output flow towards the boiler will be reduced, and the temperature will be equal to the heat indicator of the floor.
If the circular pump is replaced with a bypass valve and the pressure is adjusted, then the circuit can be closed when favorable heating is achieved. With such a parallel mixing scheme, the pump does not stop working without load, saving electricity.
General recommendations and advice
After connecting a heated hydraulic floor to the heating system, the level and tightness of all components should be analyzed. The equipment is turned on, the carrier begins to move under a pressure level of 0.6 MPa. The initial process is carried out for about 40 minutes without reducing the parameters. Then the pressure is increased to 1 MPa for 2 hours, maintaining all the indicators on the thermostat. If the system has withstood the load, we proceed to pouring the screed.
When laying wiring in walls, protection from damage must be provided. To do this, use a corrugated pipe made of polypropylene, which has very high strength. When arranging, the main thing is to keep the loop radius at bends of 5 mm in diameter; when installing, they should not be pulled together tightly.
Since the lengths of the pipes in each circuit are different, after installing the floor, starting the system and its entry into normal operating mode, it is necessary to manually adjust the media flow for a particular branch. The longer the peshel, the higher the amount of water on it. For this purpose, measuring instruments are equipped with specialized floats.
If installation is intended for central heating, the carrier should not be used directly due to the high pressure. In this case, the indicator is 12 times higher than the optimal norm, which is dangerous for the main line to rupture.
The effective distribution of the media between the circuits depends on the connection diagram of the heated hydraulic floors. Simultaneous operation of heating devices is acceptable. Test work is carried out before the screed is poured; first, air is removed from the system, after which the pressure gradually rises. To connect several circuits, it is necessary to install a collector unit.
Installing a heated floor without using a mixing unit
The need to install a pump is completely eliminated if you purchase and install a boiler with a built-in pump. The main advantage of such a boiler is its well-chosen equipment. This means that you should not choose a boiler based on any characteristics; it is enough to determine the required power.
The installation methods described do exist, but it is better to purchase all the elements once, connect the heated water floor system correctly and not worry that the money spent on installing such a floor will be wasted.
Average score of ratings is more than 0
Share link
Comments There are no comments yet, but you could be the first...
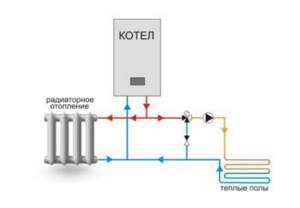
Direct connection diagram
You have a boiler, after which all safety fittings + a circulation pump are installed. In some wall-mounted boiler versions, the pump is initially built into its body.
For floor-standing units you will have to install it separately. From this boiler, the water is first directed to the distribution manifold, and then disperses through the loops. After which, having completed the passage, it returns through the return line to the heat generator.
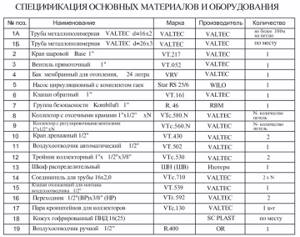
Specification of materials and equipment using the example of Valtec
With this scheme, the boiler is directly adjusted to the desired temperature of the TPs themselves. You don't have any additional radiators or radiators here.
What are the main features worth paying attention to here? Firstly, with such a direct connection, it is advisable to install a condensing boiler.
In such schemes, operation at relatively low temperatures is quite optimal for the condenser. In this mode it will achieve its highest efficiency.
If you use a regular gas boiler, you will soon say goodbye to your heat exchanger.

The second nuance concerns solid fuel boilers. When you have it installed, for direct connection to heated floors, you will also need a buffer tank.
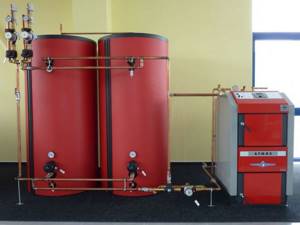
It is needed to limit the temperature. It is very difficult to directly regulate the temperature with solid fuel boilers.