Today, the most effective way to heat a home is a heated floor system. Not only the comfort and durability of the system, but also the efficiency, as well as resource savings compared to other types of heating, depend on the correctly selected type of temperature control. In this article we will look at the most modern control systems for water and electric underfloor heating. Below you will learn how you can remotely control heating in a country house via the Internet, wifi or even SMS messages.
Thermostats with integration with external systems.
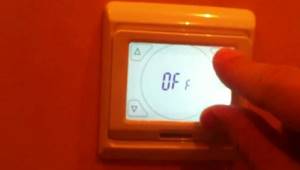
The thermostat can be a regular device, or it can be integrated into smart home systems or available for control remotely and from other systems.
The following methods of external communication with the thermostat can be distinguished:
- Wi-Fi;
- WEB;
- Cloud service;
- MOD Bus;
- Radio channel;
Wi-Fi.
The article “What is a thermostat with Wi-Fi” discussed ways to control thermostats via Wi-Fi. The easiest way is to directly connect to the thermostat as an access point.
WEB.
More convenient connection to the Wi-Fi thermostat via a Wi-Fi router.
But such a thermostat is a WEB device and can be connected to it via the Internet.
Cloud service.
In order to access the thermostat without an IP address, a third-party server is used - a cloud service with a mobile application or WEB interface.
Such thermostats were discussed in detail in the article “Review of thermostat models with WiFi and cloud service.”
MOD Bus.
I've seen discussions about such thermostats. Most likely it makes sense to control cooling with a central air conditioner and with a central air conditioning controller.
Probably it can somehow be used in zone heating systems with a central controller.
Model SML-1000 version GB,GD,GC.
Remote.
Thermostat with the ability to be remotely controlled using a remote control, like a TV.
Perhaps it makes sense when controlling an air conditioner or an infrared heating panel.
| Wireless Remote Room Digital Thermostat | Eco Art Outdoor Infrared Heater, 2400W Outdoor Patio Heater wall mounted heater with Smart thermostat |
Connection options diagrams
Any type of thermostat requires proper connection. For this purpose, you can use several diagrams that reflect all the features of the process. You should first take into account that you cannot place the heater with a regulator close to heat sources or in rooms with high humidity, as this will lead to incorrect operation of the control system.
Infrared panels will easily complement any interior
To operate you will need an automatic type relay. This element will act as a power source for the device. After selecting all the necessary parts, you can use one of the following connection diagrams:
in the first case, you can use 1 heater and 1 thermostat. The machine has 2 pairs of wires, one of them is directed to the thermostat. One wire is neutral, the other is phase. The connection is made accordingly. Using the second pair of elements, a connection is made to the infrared heater;
You can connect one heater to the regulator using wires
Connecting two heaters requires wiring from a thermostat
When connecting several devices, an individual circuit is developed
Features of thermostat models
Connecting the regulator to infrared electric heaters from different manufacturers requires taking into account the features of the device. One of the most popular electric heaters from Ballu is the Bih series, which are ceiling models. They can be connected to a remote controller, and it is also possible to combine several heaters into a whole system. Electronic models of thermostats are often used for connection.
The thermostat is convenient for both ceiling and other infrared heaters
Ballu thermostats combine well with infrared electrical devices of the same brand. The kit includes connection instructions, which makes work easier. The mechanical device has a built-in air temperature sensor, as well as an adjustment wheel, the range of which is often from 5 to 30°.
The regulator and heater of the same brand go well together
The Timberk brand produces both infrared heaters and temperature control devices. Modern models of regulators are produced complete with a remote control, as they are connected according to a circuit diagram to ceiling heating systems. The operation of the device is visualized using multi-colored sensors. Many models have the ability to program shutdown with a delay of 13 hours, and the step is 60 minutes.
The Timberk range includes diverse and modern regulator models
Universal control devices of the Eberle brand and the Instata 2 series are suitable for infrared, water and air heating systems. Digital and push-button control, the presence of a control unit allows you to control one sensor. The result of the work is visualized on the display, it is possible to program the mode for 7 days in advance.
Eberle's assortment includes regulators for heating boilers, as well as for infrared devices
Many brands that produce infrared heaters supplement their range with various types of thermostats. This allows you to create a high-quality chain of devices from one company, which facilitates connection and ensures reliable operation of the system.
Recommendations for proper installation
Universal and simple rules for connecting control devices to infrared panels should be followed for safe and uninterrupted operation of the equipment. Basic tips for installing and placing elements are expressed as follows:
- one thermostat can be installed in each room heated by an infrared heater;
- The sensor can be mounted on the surface of the infrared panel, but a heat-reflecting screen must be installed between them;
- ceiling heaters equipped with a control sensor do not have a power of more than 3 kW;
- It is recommended to install the regulators at a height of 1.5 m from the floor level.
The regulator on the infrared panel has a laconic design and does not spoil the interior of the room
Video: design and connection of a mechanical thermostat
Equipping infrared heaters with a thermostat allows you to remotely or manually regulate the operation of the heating system. Thanks to such control, it is easy to create an optimal atmosphere in the room, eliminating overheating or insufficient heating of the space.
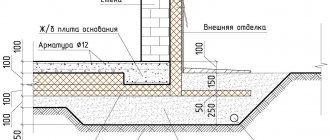
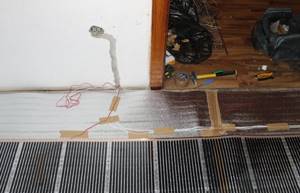
Temperature of heated floor under laminate.
On the most common laminate you come across, you can find that it is suitable for heated floors and that the temperature of the heated floor should be no more than 28 degrees.
It may seem like the temperature is too low to heat anything.
But that's not true.
In one room I don’t have radiators and the warm floor is turned on rarely - no more than for 10 minutes.
During this time, the temperature increases from 21.5 to 23 degrees and the floor turns off.
Experience in using an electric heated floor under tiles in a bathroom has shown that the floor does not feel cold at a temperature of 23 degrees.
At a temperature of 26 degrees, the tiles feel warm.
In the bathroom, the electric heated floor is controlled precisely by the floor temperature to ensure the required sanitary conditions.
In all other rooms with water-heated floors under laminate, the floor temperature is not measured.
Experience in operating a water heated floor under a laminate in one room has shown that there is no point in controlling and limiting the floor temperature with water heated floors.
It is enough to supply the coolant to the heated floor circuit at the required temperature.
And regulation is carried out by opening the directions of the heated floor according to the room temperature sensor.
Regulation using electric heads on the underfloor heating manifold is the most reliable and cheapest.
And if you look at the design options for thermostats, you can see that it is rare that thermostats designed to control water heated floors (3A load) are equipped with external sensors.
Thus, it makes sense to listen to the recommendations of the laminate manufacturer.
But 28 degrees on the laminate does not mean that the coolant should be supplied at a temperature of no more than 28 degrees.
There is a heat transfer coefficient between the pipes and the floor, the floor and the laminate through the substrate, and there is heat transfer from the laminate into the air of the room.
This means that the temperature of the supplied coolant may be higher.
32 degrees can be safely served. Perhaps more.
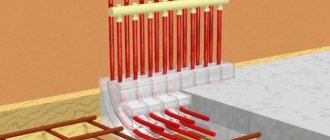
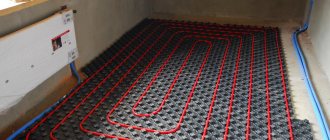
Operating principle of a group collector
The instructions for controlling a heated floor unit of this type are practically no different from automatic analogues or semi-automatic ones. The whole process can be divided into several stages, namely:
- Supplying a signal from the group collector to the servo drive.
- Setting the control valve in motion.
- Adjustment of coolant fluid in pipes.
- Grouping of mixing parts responsible for adjusting the circulating water in several collector compartments.
It is worth noting that the connection of individual mixing blocks is carried out through a group connection, when individual points for adjusting the operation of heated floors in compartments or rooms are developed and installed. The branched system makes it possible to regulate the operation of the structure using a thermostatic head or a three-position valve.
Consumer qualities of Beok CCT-10 Hub Controller.
When I picked up the parcel, I found a larger device than I expected
Although the size is indicated on the product, you never pay attention to it. All switching can be done in this device
Nice, well made body.
Three mounting methods: on a DIN rail, with self-tapping screws through the device and by putting the device on self-tapping screws
I pay attention to this because I’m infuriated by devices that can only be attached to self-tapping screws
Conveniently located connection terminals.
The presence of grounding terminals for the input cable and connection of the pump and fuse-link at the input, which is rare for products from AliExpress.
Soldered pump control tracks.
But the nearby tracks of the pump and boiler control circuits are disturbing.
Automatic control mode
In automatic mode, each room has its own circuit and thermostat, where the desired temperature mode for a given room is selected. Each circuit is equipped with a servo drive that changes the flow of coolant, thereby regulating the temperature in the room.
Structurally, it looks like this. Each room has a temperature sensor that constantly measures its value at a certain point and transmits data to the heated floor control unit, the core of which is a programmable controller. If the air temperature changes from the specified limit, the controller sends a command to the servo drive, which regulates the flow of coolant into the system. The temperature changes to the specified level. A timer is connected to the controller, which allows you to program the temperature in each room depending on the time of day.
Heated floors can also be controlled remotely. Typically, water heating systems in private homes are made using a two-pipe circuit with a circulation pump, so the simplest remote heating control system includes a GSM socket to which the pump is connected. It is impossible to regulate the temperature in this way, but it is quite possible to turn the heated floor on or off using a command from a mobile device. When the circulation pump is turned off, the coolant returns through the bypass without entering the heated floor circuits.
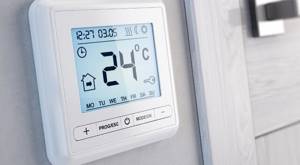
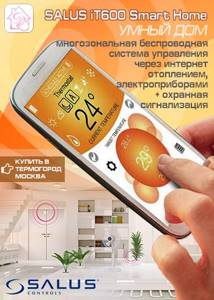
Ready solution - Salusi T600 Smart Home
The Salusi T600 SmartHome complex can be considered a universal heating control system. This is a ready-made Smart Home solution that performs all the necessary functions, including controlling heated floors. The Salus system provides remote control of heated floors or heating radiators via the Internet or from a smartphone using a special application. There are two versions of the system, one of which involves laying wired lines between the elements, and in the other, communication between the temperature sensors, controller and servo drive is carried out via a radio channel.
Automation functions
- Determines the heating temperature of water in the pipeline, turns on or off the circulation pump. This type of control of water flow in a pipeline is suitable for apartments and houses in which several pumps are installed. If there is one pump for the whole house, then the system will turn the heating on or off (depending on the water temperature) in all rooms at once.
- Semi-automatic control of the thermal head is quite simple and inexpensive. Allows you to regulate the intensity of water supply: the valve closes or opens depending on the degree of heating.
- Control is carried out by installing a servo drive on the collector; with its help, the heat supply to individual rooms is simultaneously regulated.
- A modern automatic thermostat can save up to 1/3 of gas consumption or 1/7 of wood for heating a room. Can adjust the degree of heating depending on the weather outside. Such a controller for a heated floor has many sensors, some of which are mounted outdoors, the rest indoors. Based on their readings and the settings, the heating intensity of each room is adjusted individually.
If underfloor heating is used as the main system, it is better to purchase a thermostat that regulates the level of air heating in the room.
For the main water heated floor system, it is better to install a device with the ability to connect two sensors.
Comfortable temperature in the rooms of a private house.
I would never have thought that a person’s comfortable temperature lies in such a narrow range.
Until I started using thermostats.
Although we lived without thermostats before and did not grieve.
| It turned out that at 21.5 degrees you want to add heating, and at 23 you want to turn it down. It is believed that at night, during sleep, the temperature should be low. During the day, when most likely no one is at home, there is also no need to heat it to 22 degrees. Of course, such desires arise when there is a way to put them into practice. Actually, this is what weekly room thermostats are for. |
In new programmable weekly room thermostats, the night temperature is factory set to 16 degrees.
This is probably how it is done in China. I can’t imagine anyone in Russia sitting at +16 degrees if there is a thermostat with a “+” button.
It's another matter when there is a child in the house. And when the house has laminate floors on screed and no carpets.
In the interior hallway I have linoleum, and there are no heated floors, and no carpets. And nothing. There is no desire to install a carpet. The screed placed on a layer of polystyrene does not cool down much.
But there are other rooms around this room and no one sits on the floor in it.
In residential premises, using laminate flooring on concrete would not be very pleasant.
Floors with laminate on screed must be heated.
Bolid address system.
This system is similar in purpose to the Astra address system discussed above.
Since PLCs have already been mentioned, I’ll also mention the S2000T Bolide controller.
This is the same OWEN, but twice as expensive.
But there are many addressable peripheral devices that are easily connected, cheap and tested in low-current engineering systems, and there is no need to write a program - the logic of the controller is configured according to standard scenarios. That is, the price is worth it.
The manufacturer's website provides an example of the implementation of a zone heating system.
Recently a thermohygrometer with a radio channel indicator began to be sold:
Unfortunately, the buttons do not regulate the temperature as we would like.
If we’re going to bother with controllers, then we need to solve the more global problem of home automation.
How to fix Bluetooth connection problems

If you're having trouble connecting your Pixel or Nexus device to your car or Bluetooth accessory, try the steps below.
Note. Some of the steps listed here can only be performed on devices running Android 8.0 and later. How to find out the Android version?
Step 2: Select an issue from the list below
- Open the Settings app.
- Select Connected Bluetooth devices.
- Next to each unused device, click Settings Remove.
- If you've already connected your phone to your car, next to the car's name, tap the Settings icon Remove.
To learn how to clear the list of connected devices, see your vehicle's manual.
- Remove any devices you are not currently using.
- If you have already connected your phone to the car, remove the phone.
Step 3: Update the device list, then connect
Check your vehicle's manual to find out whether to connect from your phone or your car.
- Make sure your car is visible to your phone and ready to connect.
- Open the Settings app.
- Select Connected Bluetooth devices.
- Click on the “More” icon Update vehicle name.
- Open the Settings app.
- Select Connected Bluetooth devices. Don't switch to another application.
- Select your phone from the list of devices on the car screen.
- Check your PIN if necessary. Then click Accept or Confirm.
- Check the box next to the Contact Sharing option.
- If this is your first time connecting your watch to your phone, read this article.
- If the connection between your watch and your phone is unstable, read this article.
- Review the accessory manual to ensure it is visible to other devices and ready to be connected.
- When the accessory is ready to be connected, a blue light on it usually lights up.
- Some accessories, such as keyboard cases, must first be physically connected to your device.
- Update the list of accessories.
- Open the Settings app.
- Select Connected Bluetooth devices.
- If the accessory is not in the list of connected devices, click on the “More” icon Update device name.
- If necessary, enter the access code. If you don't know it, try standard codes such as 0000 or 1234.
Note! You can't listen to music via Bluetooth in all cars. If the problem is specific to your vehicle, read your vehicle's manual.
- Make sure the volume is turned on on your phone and on your car or accessory.
- Make sure that other devices connected to your phone are not currently playing music.
Enable A2DP profile. Here's how to do it:
- Open the Settings app.
- Select Connected Bluetooth devices.
- Click on the “Settings” icon next to the name of the car or accessory.
- Check the box next to the A2DP Profile option.
Note! Not all cars can make and receive calls via Bluetooth. If the problem is specific to your vehicle, read your vehicle's manual.
- Make sure that other devices connected to your phone are not receiving calls.
- Enable HSP/HFP Profile.
- Open the Settings app.
- Select Connected Bluetooth devices.
- Click on the “Settings” icon next to the name of the car or accessory.
- Check the box next to the HSP/HFP Profile option.
Selecting a thermostat
To choose the right thermostat for your apartment, you must pay attention to your own wishes, as well as to ensure that the parameters of the sensors and heating elements suit each other. What you should pay attention to:
What you should pay attention to:
- The most important thing is to match the power of the floor and the sensor. If the sensor does not provide enough power to the floor, then you will not be able to heat it to the desired temperature. To avoid this, first of all, pay attention to the indicators when purchasing. However, sometimes you have to install several sensors at once on a heated floor in one room, for example, you can connect the programmers to one network and create a power of 3 kW. In large rooms it happens that even a power of 3 kW is not enough, so in this case you will have to connect several regulators separately.
- The type of installation is also an important aspect. If you are ready to cut a hole in the wall, then a built-in controller that is embedded in the wall is suitable for you, and if you do not want to spoil the walls, then simply install a box with a thermostat. All other settings, such as connection to heating elements, are specified in the instructions that come with the sensor.
- Functionality is something that everyone decides for themselves. As mentioned above, control units with little functionality are often used, but if you want to control the floor remotely and program it for a long period of time, for example, a week, then it would be better to purchase a more expensive option - a programmer.
- Appearance is the final factor, which is determined by the style of the room. In the store you can find many different solutions, differing in color, shape, etc., however, most often, control panels look like small sockets.
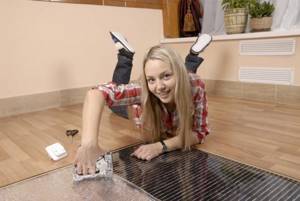
Thermostats for electric floors
The heated floor is controlled by an electric unit, on which you can configure the operation of the heating elements. Typically, you can turn the heat on and off, adjust the temperature, and set how often the thermocouples turn on and off.
In total, there are several types of electric floor control panels, which differ in the location and method of attachment, appearance, method of interaction with a person and the number of connected sensors.
Let's divide them according to the principle of their operation:
- An electronic-mechanical regulator
is the easiest way to control a warm electric floor. The range of functions of such a device is quite meager: heating control and turning off the electric floor. Control is done manually using a wheel, like on an iron, connected to a regulator that maintains a constant floor temperature. Due to its simplicity, such a “remote control” is one of the best solutions, because its price is quite low, and breakdowns occur rarely and are easily fixed. - The digital control panel
works the same as the previous version, but differs in the control method: the user sets the desired temperature not with a wheel, but with buttons or a sensor. The control unit for heated floors is also equipped with electrical sensors that measure the temperature of the floor and air in the apartment, after which they transmit the collected information to thermostats. - A programmable thermostat
is the most modern development on the heating equipment market. This regulator is equipped with several temperature sensors that transmit information to the controller, which is capable of maintaining different temperatures in individual rooms or areas organized by different heating circuits. The most modern programmable thermostats can be controlled via the Internet, for example, you can leave the house, turning off the heating, and when you return, turn it on again from your smartphone so that the floor warms up before you arrive.
When choosing an option for yourself, you should give preference to a digital control panel, because adjusting the temperature from it is quite convenient and its price is also not high, compared to a programmable thermostat, the functions of which not everyone needs. Digital panels have various design solutions, so they can fit into any apartment, for example, as in the photo.
Types of control
It is common for modern people to think about improving their living conditions and level of comfort. Thanks to technological capabilities, it has become possible to significantly simplify your household responsibilities. Today, there are several heating floor control systems, ranging from manual ones, which require some effort, to automation of all these processes by installing special systems and sensors that perform all the work without human presence.
Smart home system
This system is capable of solving a complex of tasks assigned to it, as a result of which the house becomes comfortable and safe for further living. Using a smart home, you can control the following functions:
- Lighting – controls all lighting fixtures.
- Security - the system monitors gas and water leaks, controls access to the house, controls a video surveillance camera, and a fire alarm.
- Turning off household appliances when no one is using them, turning them on if necessary.
- Maintain a certain indoor microclimate. When there is no one in the room, the heating temperature decreases, then it is set to the previous temperature. If the floor surface is heated in the house, then control sensors for the heated floor are installed, as a result of which control also occurs at an automatic level.
- Carry out automatic opening and closing of gates and barriers.
- It is possible to monitor and control the house remotely through a special program installed on a mobile device.
Manual control
Controlling the system mechanically involves setting the required temperature conditions for heated floors yourself. This control method is relevant in cases where there may be malfunctions of the regulator, or if there is a failure in the electrical energy supply to the house.
Automatic control
If we consider automation for heated floors, the control process is carried out through the central panel. Thanks to it, you can set the required temperature regime and program the system. The panel is installed in an accessible place and connected to the electrical network.
Automatic control of water floors assumes that the system operates without human intervention. First of all, the desired parameters are set, which are subsequently taken into account by the system during operation, and the specified microclimate is maintained. Thanks to the availability of various combinations, it is possible to make the living conditions in the house as comfortable as possible.
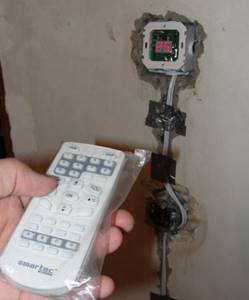
Remote control
In most cases, thermostats are remote controlled. The signal is sent using a remote control, which allows you to change settings and control thermostats.
Instead of a remote control, you can use a mobile device or tablet, where a program is installed for further control of the heated floor. The sound command is gaining particular popularity: it can be just a voice or clapping. All standard commands are pre-prescribed in the program, which can be used if necessary. Instructions for the control unit are included upon purchase and are included with the device. If any questions arise during installation and operation, you can turn to her for help.
Wired and wireless thermostats
A room thermostat is used to control the system in different zones. If we consider devices by connection method, we can distinguish between wired and wireless thermostats.
Wired ones are installed indoors, the height from the floor is about 1.5 meters; for installation, a place is selected where it is possible to set the temperature mode as accurately as possible. Most experts do not advise installing the device in places exposed to sunlight, near heating devices and other operating household appliances.
Wireless controllers for heated floors are indispensable devices in rooms where renovation work has been completed and the owners do not want to lay cables. The device is placed next to the boiler or heating system. The regulation process occurs via radio frequency channels; two AA batteries are provided for power supply; the receiver operates from a 220 V electrical network.
Thermostat location
Where to place the thermostat is an independent decision, but it is worth mentioning some rules for installing the thermostat:
- You can choose the height of the controller yourself, because it absolutely does not affect the operation of the sensor. Most often, the regulator is installed near the floor or next to switches.
- The strictest rule is the prohibition on installing the regulator in wet rooms, for example, in the bathroom. If you have installed a heated floor in the bathroom, then it is recommended to take the control unit out into the corridor, running the cables to the heating elements through the wall.
- The rules for connecting to the network are individual for each model, but they are all similar. Each model has several terminals for connecting heating elements, power and sensors. There are models with a power cable already connected, in which case its length will be from two to three meters, which is quite enough to connect to the junction box.
All additional installation rules are usually described in the instructions, so it is a must-read; in addition, you can read in it about how to use heated floors.
Remote control via cell phone
Often there is a need for remote control of a remote object, for example, control of heating, alarm system of a country house, etc. Traditional management methods will not help here.
In this case, cellular communication will come to the rescue. But simply picking up a cell phone will not help the matter; you need a DTMF code decoder, which, when you press one or another number on the cell phone, will switch one or another channel on the decoder.
It is this decoder that is presented to your attention.
Main decoder parameters:
- has 10 independent control channels;
- password access;
- maintaining the state when the power is turned off;
- sound confirmation of events;
- automatic recording of output status, if enabled;
- automatic device locking if password access is enabled.
The decoder circuit is quite simple and does not require adjustment. All functionality is implemented on the PIC16F883 microcontroller.
A specialized MT8870 chip is used as a DTMF signal decoder. At the output, buffer cascades based on ULN2003 are installed, which allows the relay windings to be connected inconsistently.
The diagram provides for the installation of three jumpers, their purpose:
- S1 – Enables saving the output state;
- S2 – Password reset;
- S3 – Enable password access.
The operating algorithm of the device is very simple:
We call the phone and control the device by pressing buttons on the phone. If jumper S3 is installed, a password must be entered before switching the output state (default 0000).
Next, to turn on the required channel, press the channel number and the number 1. To turn it off, press the number of the selected channel and the number 0. For example, turn on and off channel number 5. Press 51, and then 50.
If you want to turn on all channels at once, press two stars (**). To turn off all channels at once, use two bars (##).
note
To change the code, enter the following combination: *#*# followed by four digits of the new code. If you forget the entered code, you can easily reset it to standard 0000 by briefly setting jumper S2.
As a rule, power outages are common in country houses, and short-term blackouts are also possible during strong winds. To save the state of the outputs, it is possible to record the state into the non-volatile memory of the microcontroller and restore this state when the power supply is restored. Jumper S1 is used for this.
I would like to pay special attention to the wiring of the connector for connecting the device to a cell phone. Different manufacturers solder this connector in the phone differently! If the device does not respond, swap the pins, or look for a pinout specifically for your phone
The auto-raise function is available in almost any phone!