Types of heating cable
Heating wire for plumbing can be resistive or self-regulating. Each type has a specific area of application. Resistive cables are used to heat short sections of pipelines of small diameter - no more than 40 millimeters, and on long sections of pipes, self-regulating wires have proven themselves to be the best (for more details: “Which self-regulating heating cable for water supply is best to choose and how to use it correctly”).
Characteristics of resistive type wire
The principle of its operation is simple: current flows through the conductors in the insulating winding, of which there may be one or two, and as a result heats the cable. A high heat dissipation coefficient is ensured by maximum current strength plus significant resistance. As the name suggests, solid wire has a single core, double insulation and an outer sheath. The heating element is a single core.
Pieces of resistive heating cable for water supply pipes of a certain length, which have a constant resistance value, are offered for sale to consumers. During operation, they give off the same amount of thermal energy along their entire length.
When installing a heating system, a single-core cable should be connected on both sides. The connection diagram for this type of heating cable is similar to a loop. First, it must be connected to an energy source, then wound or pulled along the entire pipeline and returned to the starting point.
Closed heating circuits are usually used when it is necessary to provide heating for the roof drainage system or when installing a “warm floor”, and in addition, there is an option applicable for water supply systems.
Installation of a heating cable with one core inside the pipe is not performed, since laying the “loop” requires more internal space, and if the wire accidentally crosses, overheating will occur. But the two-core version differs in that the conductors in it are separated, with one being responsible for heating, and the second for energy supply.
The connection diagram is different. There is no need for loop-shaped installation. The cable is connected to the power source at one end, and the other is pulled along the pipe. Resistive wires with two cores are very actively used for water supply systems. You can lay this type of heating cable inside the pipe using tees and seals.
Its main advantage is its affordable price. Many consumers note a long service life, reaching 15 years, reliability and uncomplicated installation work.
A resistive cable has some disadvantages:
- There is a high degree of probability that overheating may occur in places where two wires are close or where they intersect.
- Fixed length. It can neither be shortened nor enlarged.
- There is no way to replace the burnt out section. In this case, the wire will have to be changed completely.
- Its power is always the same along its entire length; it cannot be adjusted.
Causes of malfunctions
When using a heated floor, problems may arise related to its operation. There are two types of malfunctions - complete loss of heating and the inability to control it. For some breakdowns, you will have to remove the finishing coating and dismantle the screed, and for others, you will have to repair the temperature controller.
The reason for the breakdown of the heated floor may be a malfunction of the thermostat or a cable break.
Before you undertake the repair of warm electric floors, you will need to determine the reason that led to the breakdown. For example, this could be construction work that caused a heating wire to be broken, or a flood that flooded the control unit.
If the heating has completely disappeared, then the presence of voltage is checked on the line supplying electricity to it. Sometimes a breakdown occurs due to a circuit breaker tripping or poor contact.
When the input voltage is present, but there is still no heating, you need to find the cause of the malfunction. It may be hidden in the heating wire or thermostat. To understand what caused the breakdown, you need to disconnect the underfloor heating contacts from the regulator and measure their resistance. For this you will need a multimeter. The resulting resistance value should not differ by more than 10% from that specified by the manufacturer.
A significant deviation from the norm indicates damage to the cable under the tie. It can be caused by an insulation breakdown (when the resistance value decreases) or a cable break (the multimeter will show infinity).
If everything is in order with the resistance and there is voltage at the input, then the breakdown is in the thermostat, which is easiest to check by replacing it. Malfunctions in it also lead to incorrect setting of the heating temperature, but in this case the culprit may also be a broken sensor.
Thermostat failure
A common failure in practice is insufficiently tight contact of the wires in the regulator terminal block. Before removing the thermostat, you should try to tighten these contact points.
Before disconnecting the thermostat, try tightening the contacts, this may be the reason
You can understand that it is the thermostat that is to blame by directly connecting the underfloor heating wires to a 220 volt network. If after this the floor becomes warm, the thermostat will have to be replaced. If you have the appropriate skills, you can try to repair it yourself.
The most common radioelements that fail are key transistors, voltage stabilizers, electrolytic capacitors and relays. Often a breakdown of the mains capacitor also occurs.
Cable damage
Repairing the wire under the screed is a very serious task, since it will have to be dismantled. But in order not to tear off the entire coating, special devices are used to help narrow down the location of the breakdown.
Repairing a broken cable requires dismantling the tie
To repair a broken cable, you will need to prepare:
- thermal imager or hidden wiring detector;
- generator;
- connecting sleeve;
- heat shrink;
- press tongs.
Before determining the location of the damage, the wire laid in the floor is disconnected. High voltage is then applied to the cable through a generator or high-frequency transformer. Next, using a thermal imager, a point with a higher temperature is determined.
Once a place is found, the section of screed located above it is dismantled. The ends of the damaged cable are stripped and connected to each other through a copper sleeve, followed by crimping. After this, the cable connection is protected with electrical tape or heat shrink tubing. Before restoring the screed, the system is turned on and checked for functionality.
Sensor repair
If the sensor malfunctions, you will not have to destroy the floor to replace it, since it is installed in a special protective tube.
The sensor cannot be repaired; it must be replaced with a new one.
To dismantle it, you only need to find the exit of this tube and pull it out by the ends of the wires. But in rare cases, the tube may be embedded in the wall.
The sensor itself cannot be repaired; a new one is purchased instead. If necessary, a wire of the required length is soldered to it, which is installed in place of the old one.
Connecting the heating cable to the network and controlling the temperature
On the market you can most often find modifications of cable heaters complete with thermostats, while the length of the cable, which is connected to the heating elements through special sealed couplings, does not exceed 3 - 5 meters.
When heating pipelines, the thermostat is installed in a convenient place, protected from harmful environmental factors, as far away as possible (a residential building), and there is a need for a hermetically sealed connection between a short cable and a long wire coming from the house. To do this, use a household hair dryer, special couplings and clamps, installation work is carried out as follows:
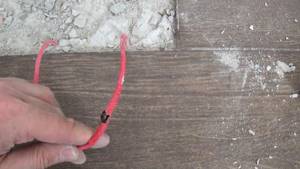
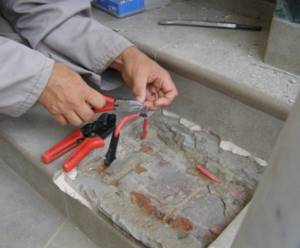
- The conductors of the connected cables are cut at different distances (with a ladder) and removed from insulation to a length of 10 mm.
- Heat-shrinkable sleeves are placed on each conductor, and a common large-diameter sleeve is placed on top of the cable.
- Insert the ends of the wires into the sleeves and clamp them on one side with pliers; after inserting the other ends, the sleeve is crimped on the other side.
- Internal couplings of small diameter are pulled onto the wires and heated with a hairdryer; after compression, an outer coupling is placed at the junction and also heated with a hairdryer.
- In self-regulating cables, it is necessary to seal the two end wires; to do this, they are cut with a ladder, a special heat-shrinkable sleeve with a closed end is put on top and heated with a hairdryer.
To control the heating temperature, a thermostatic regulator is used, which is placed in a convenient place near the electrical panel; to increase safety, automatic RCD circuit breakers are installed in its circuit, which open the circuit when a short circuit occurs in the line.
Rice. 19 Thermostats to which the heating cable is connected
Thermostats and sensors for heating cables
Thermostats allow you to reduce energy costs several times when using cable heaters; with their help, you can set the temperature limits for switching on and off depending on the application.
Manufactured thermostats, depending on their purpose, are divided into several groups:
- for heated floors,
- de-icing on roofs,
- for heating water supply and sewerage,
- maintaining heat in hot water pipelines.
The main difference between all types of thermostats is the temperature thresholds for operation; when used in wells, the switch-on temperature is set within +2 - +3 degrees, the switch-off temperature is +10 C; to save energy, the threshold values can be lowered. Thermal sensors with response thresholds from -15 to +5 C are installed in external systems to combat roof icing.
Industrially produced thermal sensors with two wires and a tube at the end differ in their operating principle; the most popular are resistive and semiconductor types. The operating principle of the former is based on a change in the electrical resistance of the resistor depending on temperature; in semiconductor devices, when the temperature conditions change, the characteristics of the pn junction change.
In both cases, the electric current passing through the resistor or semiconductor changes its value with temperature, and the electrical signal from the sensor controls the operation of the electronic circuit that supplies power to the heating cable.
Rice. 20 Methods of thermal insulation
Thermal insulation of heating cables
When laying outside, thermal insulation must be used - it prevents heat from escaping from the cable into the environment, thereby increasing the heating efficiency. When immersed in the ground, hard types of waterproof insulating shells made of polystyrene foam, penoplex or polyurethane foam are used.
When laying pipelines externally, there is no earth pressure on their insulation; you can install a heated sewer entrance to a house using soft materials - polyethylene foam, all types of mineral wool, glass wool. It should also be taken into account that the thickness of the protective shell of the insulation for external installation should be greater than the underground version.
Lack of power
The first step is to make sure that there is power to the heating system. As a rule, the film or heating cable is connected through a thermostat to which voltage is applied. If the indicators on the temperature controller display are lit, then there is power; if the indicators are missing or not lit, you will have to check manually why the heated floor is not heating. You need to take a multimeter and check if there is voltage at the input contacts. We described in detail how to use a multimeter in the corresponding article.

By the way, low voltage in the network is also the reason why the heated floor does not heat up to the required temperature. If 200 volts are supplied to the terminals rather than 220, heating efficiency is reduced by 20%. To solve this problem, you need to install a voltage stabilizer in your house.
The video shows another way to check the regulator:
Checking the thermostat
If there is voltage at the input, you need to make sure that it is normally supplied to the heating cable itself or infrared film. To do this, make sure that no one accidentally touched the settings, because... Perhaps the temperature is simply set to a minimum, as a result of which the heating does not turn on. Also check that the wires are securely connected to the terminals. Poor contact is also the reason why an electric heated floor does not heat or heats up poorly.
Is everything okay with the connection and settings? Measure the voltage at the output of the thermostat (the terminals to which the heating system itself is connected). When enabled, it must comply with the network parameters. If this is not the case, the thermostat will have to be replaced.
You can verify that the thermostat is malfunctioning by connecting the heated floor directly to the network. If the floor covering starts to heat up, then the problem is with the regulator.
This is interesting: Harm from infrared heaters - sharing knowledge
Useful tips
It is very difficult to navigate the sea of heating cables offered on the modern market - there are too many offers from different manufacturers. What you need to know and consider:
Before going to the store, you need to know exactly the diameter of the heated pipe and the length of the area protected from the cold. At the same time, you still need to focus on the lowest temperatures to which the soil or air can cool. It is necessary to clarify the presence of a protective braid, which increases the reliability of the heating element and provides grounding. The following is also important: type of external insulation, power, temperature class, as well as the manufacturing company.
External insulation type
If a polyolefin-insulated cable is suitable for sewer pipes, then fluoroplastic protection is better suited for internal installation (directly into the pipe). Fluoropolymer is also quite suitable for outdoor installation - it protects from both moisture and ultraviolet radiation.
Temperature and power
The medium temperature system is suitable for larger diameter pipelines. The maximum system temperature is 120°C. The power reaches up to 33 W per meter.
The most powerful are with a temperature of 190°C, their power is already 95 W per meter. Such systems are not used in everyday life; their scope of application is industry.
You can select and correctly calculate the optimal power based on the diameter of the pipe. Examples:
- For water supply systems with pipes up to 25 mm in diameter, cables with a power of 10 W per meter are used.
- From 25 to 40 mm – 16 W per meter.
- From 40 to 60 mm - 24 W per meter, etc.
Recommended Manufacturers
There are brands of heating elements that have proven themselves to be long-term, stable and reliable. Imported products:
- Lavita.
- Nelson.
- Ensto.
- Devi.
- Raychem.
The most popular Russian manufacturer is considered to be the company Teplolux (SST), which specializes in high-quality household products.
Homemade heating cable
Nothing is impossible, and you can also make a heating cable with your own hands. There is enough information on this topic on the Internet in the form of:
- Videos.
- Schemes.
- Articles.
Having some skills in basic electronics, as well as the desire to produce one, using an on-board computer, a power supply, and some materials, many craftsmen make effective, reliable and safe systems for such heating.
The most common reason for making homemade products is the desire to save money, and such “craftsmen” often use “mongrel” wires instead of cables. So, when creating something like this, you need to think a hundred times before doing something that could ultimately lead to a short circuit, even a fire. In addition, everything related to drinking water requires a special, thoughtful attitude.
You can make homemade automation if you have experience in this matter, but it’s not worth experimenting with wires at all - it will end up being more expensive.
They say that the greedy pays twice - but that’s not so bad, it’s worse when such a makeshift device harms your own health and the health of your household. Not to mention the safety of the home itself and the breakdown of the water supply due to defrosting.
Design differences of self-regulating systems
Samregi (abbreviated) should not be confused with resistive analogues - the first modifications of heating cables.
In short, the disadvantages of the resistive type, due to which it is used less and less, are the following:
- certain length, impossibility of extension or shortening;
- constant resistance along the entire length, which makes it impossible to regulate the temperature in individual areas;
- connection at both ends, causing installation difficulties;
- risk of overheating at intersections;
- There is no repair as such; the entire system has to be replaced.
A positive feature of the resistive type is its low cost, so it is used where small protected areas need heating.
The resistive single-core cable circuit contains four main elements: a copper core, which combines the functions of heating and heat transfer, internal and external protection, and a reinforcing braid.
There are fundamental differences in the design of a self-regulating heating cable:
- Two high resistance copper cores. The greater the resistance, the greater the possibility of temperature regulation.
- Semiconductor matrix. This is a significant element of the cable, which makes it self-regulating. The matrix is sensitive to ambient temperature. As the temperature drops, the resistance of the material rises and it begins to generate more heat.
- Internal insulation. High-quality material has a uniform structure and maximum thermal conductivity.
- Shielding braid. Most often it is a copper mesh or aluminum screen. To protect the cable, the power must be connected via an RCD.
- External insulation. Its function is to protect all cable elements. The service life of the product depends on the characteristics of the external insulation.
The ability of samreg to change its own resistance (and therefore power) from temperature fluctuations frees you from the purchase of additional equipment - various kinds of thermostats with sensors.
Samreg scheme. The main distinguishing element is the semiconductor matrix located between two copper cores. It is she who regulates the level of heat dissipation
The cable can be cut, and the length of the finished product can be shortened or increased if necessary.
If two cable branches accidentally intersect, overheating or system failure will not occur. You can cut off or replace any fragment at any time without damaging the entire heating structure
But the main advantage of samreg is its “selectivity”. The matrix independently detects cold areas and brings their temperature to the optimal value.
In sufficiently heated areas, it simply maintains the required parameters (usually + 3-5 ºС). This is very convenient when it is necessary to protect a cable from freezing that has different heating conditions along its entire length (for example, it passes through both a heated room and cold ground).
At the end of the cold season, there is no need to heat the pipes, soil or roof, so the cable is disconnected from the power supply. When there is a possibility of severe night frosts, you can use a thermostat that automatically turns on the system.
Water Hammer Assist
Hydraulic methods at home include cleaning with a plunger. The rubber pad of the device is placed on the toilet drain hole and 3-4 pumps are done.
If you don't have a plunger at home, use a plastic bottle.
The procedure for using the device is as follows:
- The bottom of the container is cut off.
- The lid closes.
- The bottle is pressed all the way into the toilet flush and abruptly returns. The action is repeated. On average, it is necessary to make 3-4 movements. The garbage plug is broken through by creating pressure.
The methods described will allow you to quickly remove a clogged toilet.
To prevent this phenomenon in the future, it is important to follow preventive measures: prevent foreign objects from getting into the toilet, regularly clean lime deposits
Recommendations for preventing blockages
As in many areas, prevention is the most effective means of combating the consequences. After all, by preventing a blockage from forming, you don’t have to waste time, effort and money on eliminating it. We have prepared some simple recommendations to prevent blockages from forming:
- Do not throw foreign objects into the toilet bowl. If it got there by accident (for example, a child dropped a toy), then the item must be removed immediately.
- Try not to throw away food scraps. Fats tend to accumulate on the walls of pipes, which subsequently leads to deterioration of permeability.
- If renovation work is being carried out in the room, it is necessary to close the toilet with a lid. This will help prevent construction debris from entering.
- Use chemicals regularly for prevention. They will dissolve accumulations in the early stages.
- If your house has old metal pipes, try to replace them with modern ones. They are made from polymer compounds that are not afraid of corrosion, do not accumulate grease and waste on the walls, which ultimately prevents pipes from being climbed.
Now you know how to unclog a toilet at home, and you can deal with them yourself. However, there is nothing better than prevention, as it will allow you to avoid such unpleasant situations. We hope that the information presented above will help eliminate blockages in your sewer system, and recommendations for their prevention will allow you to avoid most of the reasons for their occurrence. Do not forget to clean up urinary stones and calcium deposits in a timely manner so that they do not accumulate and interfere with the conductivity of the sewer system.
Heating cable manufacturers
The need for heating homes and infrastructure is in demand for residents of the northern regions, so this technology and materials came to us from there.
There are many companies on the world market that produce thermal cables. The most popular ones that produce high-quality products are presented below in more detail:
- Ensto (EFPO10, TASH0.05) - the country of origin is Finland. Produces a self-heating cable that meets the latest innovation requirements. The products are easy to install and have an improved design.
- Nelson - the line of models produced by the American company is quite large (CLT; LT; LLT; HLT; SLT-2; QLT; HLT; NC). The products have a long service life and have constant, improved performance characteristics during operation.
- Lavita is a South Korean company. Three main models produced by it:
- HPI 13-2 CT - long, uninterrupted operation;
- GWS 10-2 - energy efficient performance;
- VMS 50-2 CX (CT) is a model with increased resistance to external loads.
- DEVI is a Danish company. Large range of models (DEVIflex, DEVIsnow, DEVIiceguard, DEVIpipeguard, DEVIhotwatt), all types with a 20-year warranty - replacement and reinstallation of cables that have become faulty. In addition, the products are famous for their high performance and speed. It is successfully used for both external and internal heating systems.
- FreezStop is a Russian manufacturer; this product also cannot be ignored. All models (FreezStop, Freezstop Inside, Freezstop Simple, FreezStop-Lite) are of high quality and are suitable for different systems.
It should be noted that the Swedish heater SVK 20 with a power of 1645 W is intended for both underfloor heating and heating water pipes.
As you can see, the range of self-regulating cables for heating pipes is huge, and it’s up to you to decide which model to choose. The main thing is that the product matches the performance characteristics of your system.
What is a heating cable for?
Some will say that using a heating cable to prevent pipes from freezing is expensive and irrational. And it is much more logical to find out to what depth the soil freezes at the lowest temperatures in your region, and simply deepen the trench to the required amount. That’s how it is, but it’s not always possible to go deeper by 1.5-1.7 meters. For example:
- If you dig trenches for laying pipes yourself in order to save money or just like to personally control everything, then considerable physical effort will be required. After all, there is a difference - to go deeper by 0.5 meters or 1.5?
- The composition of the soil on the ground is not always strong and homogeneous. You may stumble upon hard rocks during work;
- If the area is swampy, then during the rainy season or snow melting, the groundwater level can rise significantly, which will lead to flooding of communications. Moreover, this process will be regular, will negatively affect the condition of the water supply system and will certainly lead to its destruction;
- In regions where the temperature drops significantly in winter, even significant deepening of the trench cannot always prevent local freezing;
- The place where the pipes enter the house will still remain unprotected;
- And, in the end, what if the water supply system has already been completely installed and buried, and the problem was discovered recently? It will be much simpler, and in this case cheaper, to install the heating cable inside the pipes than to dig everything out, dismantle it, deepen it and reassemble it.
It follows that sometimes the use of a heating cable is an unavoidable necessity.
In general, the scope of application includes several main areas:
- For private needs - heating water pipes and sewerage systems, preventing roof freezing. In the latter case, the cable is laid in places where icicles and ice cover form. Thanks to this, there is no need to regularly clean the roof. The main element of the “warm floor” system is also the heating cable;
- For commercial – heating pipes or fire extinguishing systems;
- For industrial - when high-risk work is carried out, or there is a need to heat various liquids in large tanks. For example, petroleum products or other chemical compounds.
Installation methods
The heating cable for water supply is laid outside or inside the pipe. For each method there are special types of wires - some only for external installation, others for internal installation. The installation method must be specified in the technical specifications.
Inside the pipe
To install a heating element inside a water pipe, it must meet several requirements:
- the shell should not emit harmful substances;
- the degree of electrical protection must be at least IP68;
- sealed end coupling.
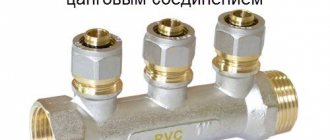
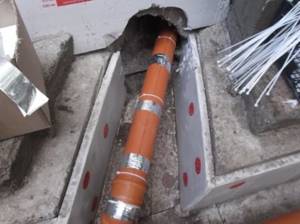
To be able to thread the wire inside, a tee is placed at the end of the pipeline, into one of the branches of which the wire is inserted through the gland (included in the kit).
An example of installing a heating cable inside a pipe through a gland
A tee for installing a heating cable inside a pipe can have different outlet angles - 180°, 90°, 120°. With this installation method, the wire is not fixed in any way. It is simply tucked inside.
Types of tees for installing a heating cable inside a water supply system
Outdoor installation
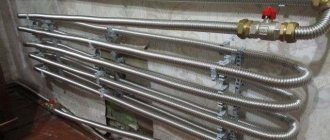
The heating cable for the water supply must be secured to the outer surface of the pipe so that it fits tightly over the entire area. Before installation on metal pipes, they are cleaned of dust, dirt, rust, welding marks, etc. There should not be any elements left on the surface that could damage the conductor. A wire is laid on clean metal and fixed every 30 cm (usually possible, less often not) using metallized adhesive tape or plastic clamps.
If there are one or two threads stretching along, then they are mounted from below - in the coldest zone, laid parallel, at some distance from each other
When laying three or more wires, they are positioned so that most of them are at the bottom, but the distance between the heating cables is maintained (this is especially important for resistive modifications)
Methods for attaching a heating cable to a pipe
There is a second installation method - a spiral. The wire must be laid carefully - they do not like sharp or repeated bends. There are two ways. The first is to unwind the coupling, gradually winding the freed cable onto the pipe. The second is to secure it with slack (bottom picture in the photo), which is then wound and secured with metallized adhesive tape.
If a plastic water pipe is to be heated, then metallized tape is first glued under the wire. It improves thermal conductivity, increasing heating efficiency. Another nuance of installing a heating cable on a water supply system: tees, valves and other similar devices require more heat. When laying, make several loops on each fitting. Just watch out for the minimum bend radius.
Fittings and taps need to be warmed up better
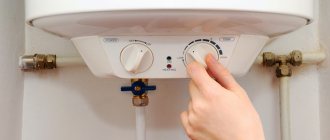
With or without thermostat?
If you want to pay a pittance for heating the water supply, it is better to install a thermostat. Even if you are planning to install a self-regulating heating cable. Basically, the characteristics are as follows: switches on at +3°C, switches off at +13°C.
If your water is supplied from a well, it will never have a temperature of +13°C. It turns out that the heating will work all the time, even in spring and summer. In the summer, of course, the cable can be turned off, but in the spring and autumn this cannot be done due to the possibility of sudden frost. With wells it is somewhat simpler, but not much - in summer the water there can have a temperature slightly above the shutdown threshold. But this is in the summer, and during the hottest period. And in general, why do you need to heat, say, the water that goes into the drain tank? And you will still heat the one that goes to the kitchen or shower with boilers or instantaneous water heaters.
In any case, it turns out that a thermostat is needed. On it you set the shutdown temperature to around +5°C. The costs of heating the pipeline fall significantly. At the same time, the service life of heating cables increases significantly - they have a certain service life of working hours. The less they work, the longer they will serve you.

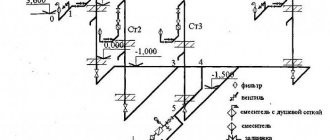
Heating cable for water supply - connection diagram to the thermostat
When installing a water heating system with a thermostat, you will also need to install a temperature sensor. There is a difficulty here. It must be placed on the pipe so that it is not affected by the temperature from the heaters. That is, it does not need to be thermally insulated from the pipe, but it is necessary from the cables.
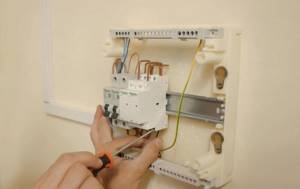
It is advisable to install the thermostat itself indoors. It is connected to the house electrical panel through a circuit breaker and, preferably, an RCD. The power consumption of the heating cable is small, so the rating of the machine can be about 6A, the rating of the RCD, choose the nearest larger one, otherwise the leakage is preferably 30 mA.
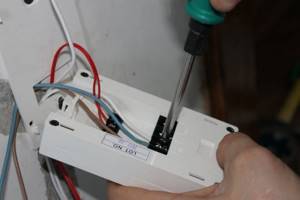
Connect the heating cable for the water supply to the corresponding connectors on the thermostat housing. If there are several branches, they are paralleled. A temperature sensor is connected to adjacent contacts. Each thermostat has markings that make it clear what needs to be connected and where. If there is no marking, it is better to buy another one: the performance of this copy is very doubtful.
Selecting a heating system wiring diagram
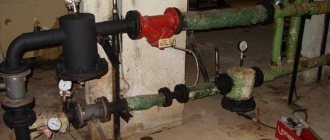
There are several options for lining the boiler with polypropylene. This scheme is selected individually for each house. What is optimal in one building may be ineffective in another.
In addition, heating systems based on the principle of water movement are divided into: forced with a hydraulic pump and gravity (gravity, natural), there is also a classification based on the construction of pipelines. According to their structure, they are single- and double-pipe, collector beam or analogues with closed rings.
Which is better: gravity or pump?
In the gravity circuit, heated water flows from the boiler to the radiators by gravity. A hot coolant that has a high temperature always tends to replace a colder liquid. This heating boiler piping system is the easiest to assemble. In addition to the heater, it contains polypropylene pipes, radiators and an expansion tank.
In the version with top distribution, water, after heating, rises to the highest point - into the expander, and from there it goes down to the batteries. After the heat is released, it returns to the boiler, where it is heated again, then starting a new cycle.
This is how heating is installed in many houses in our country’s villages. Only there is a solid fuel stove. This is the simplest and cheapest way to organize heating for a small cottage. However, it has limitations both in the number of connected radiators and in the distance of the outermost one from the water heater.
The piping scheme with natural water movement is the simplest of all possible options, it has a minimum of nodes and connection points for polypropylene pipes
The compulsory system is more complex and expensive. However, it greatly simplifies the creation of comfortable temperatures in individual rooms. The coolant moves in it due to the stimulation of its movement by the pump.
The choice of polypropylene pipe layout and the boiler itself are closely related. The natural circulation system is energy independent. If the water heater does not require power from the electrical network, then even during power outages the house will be heated.
In a forced circuit, the pump requires a constant power supply to operate. Therefore, it is best to select a boiler for it that is dependent on electricity, which has additional capabilities. But in order to insure against voltage problems, you will have to purchase a backup generator or uninterruptible power supply.
Pipe mount
- How to attach a cable heating system to a pipeline?
Here are some of the simplest solutions:
- Spiral winding;
- Scotch tape (regular or, which is much better, aluminum: it will reduce heat loss from the pipeline due to infrared radiation);
- Polyethylene ties.
Aluminum tape and polyethylene ties were used to attach the heating system to the sewer pipe.