A faulty thermostat can cause the engine to overheat or prevent the engine from reaching operating temperature.
Replacing a car thermostat is not difficult. But you need to pay special attention to the key points of the process.
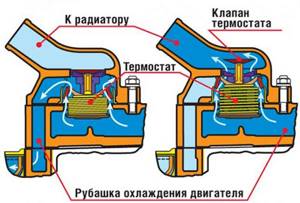
The thermostat is needed for what it is needed - to ensure that the flow of the car's coolant - antifreeze - into the car's cooling radiator is blocked until the car's engine warms up well. When the engine is cold, the flow of antifreeze does not pass through it, but as soon as the engine warms up to a temperature of 95-100 degrees, the spring in the thermostat is activated - the thermostat opens and the liquid begins to flow through special ducts in the engine housing and thereby effectively remove heat from it to the radiator cooling (the radiator is blown by the wind when driving or forced by a radiator cooling fan), thereby preventing the engine from overheating and becoming unusable.
Checking functionality in ways
Signs of a malfunction are the temperature arrow, which drops sharply when the engine speed increases and rises when the car is stopped. In addition, if the engine boils and the lower pipe remains cold, this indicates that the thermostat is stuck closed.
Without taking off
You can control the work using the temperature sensor, heating of the pipes and the time spent on it.
To perform the check you should:
- Start the engine and let it run for two minutes.
- Then check the hose going from the thermostat to the radiator. Normally, this area should be cold.
- On the other hand, if after some time it still does not heat up, then the valve is stuck.
- If the arrow of the coolant temperature sensor is in the red zone, and in cold weather the car takes a very long time to warm up, then this is direct evidence of a thermostat malfunction.
If such signs appear, you should seek professional help from specialists. Timely elimination of problems is a guarantee of high-quality operation of the cooling system.
By heating
When the thermostat is closed, the engine overheats because the coolant flows in a smaller circle. In this case, the heat remains inside the power unit. Otherwise, the engine may not have enough heat.
This requires dismantling the device. Before doing this, drain all remaining coolant from it. The next step is to clean the valve hole from scale.
To check the thermostat you need to do the following:
- heat a pan of water on the stove and place the device there;
- Using a thermometer with a scale of 100 degrees Celsius, monitor the temperature at which the valve opens, as well as the diameter of the opening hole.
When carrying out the described test, you need to focus on the temperature indicated on the thermostat body.
Another way to check is to measure the distances between the points of the device in a heated and cooled state using a caliper. Typically, the difference in readings should not exceed 7 mm.
It is recommended to check the valve for full opening on a warm thermostat. If a malfunction is detected, it is better to purchase a new part.
Tips before installation
In addition, we would like to give you some useful tips before installing the equipment:
- Be sure to read the instructions from the manufacturer, since the installation and configuration of each device may have its own characteristics, without knowing which you can damage the equipment.
- Seal all connections well, do not overtighten the nuts to avoid damaging the parts.
- Look in which direction the arrows on the thermostat body point - they will correspond to the direction of coolant flow in the system.
- If the installation will take place with a single-pipe heating system, we must provide bypasses, otherwise your thermostat will disrupt all its operation.
- Choose a place to install the thermostat so that it is not exposed to direct sunlight and there are no other heat sources nearby, such as household appliances. This will allow the devices to work more accurately. Drafts are also contraindicated for them.
- In the coldest rooms, give preference to electronic devices, as they are more sensitive.

Valve installed on tee
The rules are quite simple, but despite this, they are very effective and will help you save on heating, reducing not only the cost of the regulators themselves, but also making them a plus over time.
Video - Thermostat for a heating radiator: installation and configuration
Cleaning
Often the cause of thermostat failure is scale, which clogs the cavities of valves and springs. The result of this is a “freeze” of the valve, which leads to the fact that the power unit cannot reach the optimal temperature regime without heating up enough or, conversely, overheating. It is best to replace such a “stuck” thermostat.
Resuscitation of the device is available to almost every car enthusiast. Any product for kettles or water heating equipment is suitable for cleaning. The technology itself boils down to boiling a thermostat in such a solution for 20 minutes.
After this procedure, you should flush the entire cooling system using special products.
Symptoms of a broken thermostat
Prerequisites that the thermostat will need to be replaced soon are:
- slow warming up of the power plant, especially noticeable in winter;
- starting a cold engine leads to rapid heating of the large circle pipe;
- the temperature rises too quickly and does not stop when the upper limit of the nominal value is reached;
- The thermostat gasket leaked;
- Despite the high temperature of the engine, the lower pipe is cold.
It is prohibited to operate the car with the above problems, especially if the thermostat is stuck. The presence of problems with engine temperature in most cases negatively affects all components of the iron horse. If you continue to drive the car, the cost of repairs will be an order of magnitude higher than replacing the thermostat.
Device failure
It happens that such a well-functioning system fails and stops working. It is at this point that motorists wonder how to check the thermostat. First, it’s worth understanding the causes of the malfunction, since further actions depend on this.
Possible breakdowns:
- The valve is stuck closed. In such a situation, the sensor itself works and constantly tries to open the damper, however, nothing works. The liquid will move in a small circle of the system, thereby continuing to pump up heat. The engine overheat indicator on the dashboard should immediately light up;
- The valve is not initially closed tightly. In this case, the antifreeze immediately begins its movement in a large circle of the system. What could be the consequences? Once in the radiator, the liquid cools and is not able to reach the optimal temperature of 90 degrees, since the engine simply does not heat up to this value. The thermostat operation will not be felt, and the engine will be constantly cooled. Improper operation is especially acute in the cold season, when the engine simply cannot be warmed up to operating temperature.
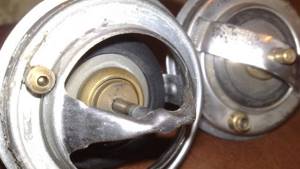
On the left is a faulty thermostat that is stuck in the open position, on the right is a working one
This is why it is very important to understand how to test the thermostat for functionality. A poorly heated engine consumes significantly more fuel, which burns worse and pollutes the environment.
This is interesting: We prevent the purchase of a drowned car on our own
Basic faults
A common malfunction of the thermostat is the valve not closing tightly. After starting the engine, antifreeze circulates in a large circle. This leads to a long time to reach the nominal temperature. In winter, the engine may not reach the required 90°C at all. By operating a car with such a breakdown, the owner reduces the engine's life every day, since prolonged warming up is contraindicated for the engine.
A valve stuck in the closed position can have more serious consequences. After reaching a temperature above the nominal temperature, the liquid continues to circulate in a small circle. If the car owner does not check whether the thermostat is working, the engine will boil. Unlike gradual excessive wear when the valve is constantly open, its closed position can lead to a major overhaul of the engine at the first emergency situation. Jamming of pistons, warping of metal parts, destruction of rubber products and other serious consequences accompany engine boiling, so if the first signs of a thermostat malfunction appear, it is necessary to diagnose it and, if necessary, replace the jammed product with a new one.
If the heat-sensitive fill material leaks, the valve may be delayed in response. If the time interval is large enough, the consequences will be similar to jamming. In some cases, coolant enters the sealed cavity, changing the temperature coefficient of expansion.
If the rubber thermostat gasket breaks, coolant leaks may appear. Very often, seal failure is associated with oil getting into the cooling system. In this case, the vehicle exhaust may acquire a white tint. In such cases, replacing the thermostat will not solve the problem, since its root is hidden elsewhere.
Why doesn't the car heater heat up well?
Insufficient heater performance can be blamed on:
- Air conditioning control unit dampers. Modern cars do not have valves that shut off the circulation of coolant to the heater radiator, as in older models. Here, the coolant constantly circulates through the heater radiator, and the temperature is regulated by dampers that block the air flow through the heater radiator. If they are broken or incorrectly adjusted, then cold air will enter the cabin.
- The heater core is clogged. Therefore, the coolant circulates poorly through the heater radiator and, accordingly, the efficiency of the heater decreases
- The thermostat does not close properly. Therefore, coolant constantly circulates through the cooling radiator. Because of this, the engine does not warm up to operating temperature and, as a result, the heater gives off little heat.
In our case, the thermostat is the first to come under suspicion. Because, according to the owner, the heater heats up the worst on the highway.
It can be assumed that the thermostat does not close and the coolant is constantly circulating through the cooling radiator. And the higher the speed, the more the coolant in the radiator is cooled. And, naturally, it becomes colder in the cabin.
Warmly bright
1. Proximity to the heating zone It is advisable to place the thermostat as close to the heating zone as possible. Firstly, this minimizes the length of the sensor, which sometimes breaks and which may need to be replaced. Based on experience, this is why we recommend a thermostat height of 30-40 cm from the floor. This arrangement is certainly less convenient than the 90 cm recommended by most manufacturers, but it significantly reduces the length of the sensor cable. If there are small children in the house, the thermostat must be placed higher. When using air sensors, the supplier's recommendations for thermostat height and location must be followed.
Secondly, it is advisable to install thermostats closer to the beginning of the cable layout (to the so-called cold ends, this is especially true for mats).
Here it may be useful to draw a preliminary installation diagram. 2. Possibility of installation in the same frame with switches or sockets.
Some thermostats can be installed in the same frame with sockets and switches.
If this factor is important to you, check with the supplier which electrical fittings the regulators you are purchasing are compatible with. 3. Possibility of installation in rooms with high humidity.
As a rule, it is not recommended to place thermostats inside rooms such as a bathroom, shower, etc.
The reason is the possibility of moisture, splashes and even jets of water getting inside the device. If, however, there are no options left, it is best to opt for models protected from water. To do this, you need to pay attention to the device’s protection class according to the international IP security standard. Protected models must have a protection class of at least IP21. The second digit indicates the presence and degree of protection against water. So 0 – there is no protection (IP20), 1 – there is protection against vertical drops of water (IP21). Thus, the most popular simple thermostat OTN-1991 (OJ Electronics) has a degree of protection IP21. 4. Connection to the electrical panel via a separate line
Low-power floor thermostats - 200-300 W - can be powered from the nearest outlet, which generally speaking, like any thermostat, must be protected by a residual current device (RCD).
Powerful floors require a separate line; it is more convenient for them to place thermostats as close as possible to the electrical panel. 5. Installing a thermostat on a balcony and loggia
When using thermostats on balconies, loggias, etc., it is necessary to take into account the operating temperature of the device indicated in the instructions.
In this case, it is better to choose an installation location closer to the door to the room, because The temperature in this place will be higher in winter. And when passing through thick walls (if the thermostat for the balcony is located indoors), you must remember to ensure that the sensor can be replaced. 6. Installing the thermostat in a mounting box, directly on a wall or in an electrical panel
Most thermostats are designed to be installed in a standard mounting box. In this case, the box can be located in the wall (hidden installation) or placed on its surface (external installation). Hidden installation is used in the vast majority of cases, while external installation is more typical for rooms such as balconies and loggias, in which the wiring is external (usually in a box).
There are also special models of thermostats that do not necessarily require the use of a mounting box, for example, the MTU2 thermostat (OJ Electronics) for wall mounting. Models such as the ETV-1991 thermostat (OJ Electronics) for DIN rail mounting can be installed in the electrical panel
Dismantling instructions
Before changing the thermostat, you must remove the previously installed device. To perform dismantling yourself, you must follow the instructions below:
- Drain the antifreeze;
- Remove the air filter;
- Unscrew the 2 bolts and the fastening nut;
- Remove the recirculation valve;
- Loosen the air hose leading to the mass air flow sensor. After this, move the meter itself;
- The connection diagram of the hoses to the thermostat may differ, but it is important to disconnect all pipes;
- Disconnect the electrical wire going to the thermostat. It is not present on all types of devices;
- Unscrew the stud and nut of the temperature sensor;
- The thermostat gasket may stick in the seat. It is necessary to remove the thermostat by slightly shaking it, as shown in the image below.
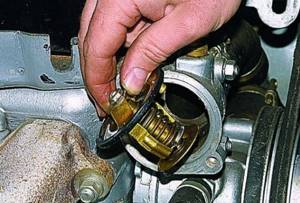
Dismantling
On different cars, the technology for replacing a thermostat may differ. It may be necessary to dismantle interfering components. Or, on the contrary, the car owner has access to the thermostat immediately after lifting the hood.
Replacement process
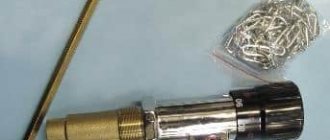
The thermostat cannot be repaired, since the part is not repairable. In rare cases, replacing the thermostat valve may help. Therefore, in case of any malfunctions, it is better to install a new one. And this consumable is not expensive, it costs only 1000 rubles. Below are details on how to do it yourself. Before the procedure, be sure to drain the antifreeze and cool the engine.

where is the device located
If the part is located in the section of the pipes:
- Remove the battery with the platform.
- Loosen the clamps.
- Pull off the pipes.
- Dismantle the device.
- Check hoses for cracks and other damage.
- Install a new valve, also replacing the clamps.
Replacement option when the device is located in the cylinder head:
- Unscrew the fasteners on the top cover using a wrench or sockets.
- Pull out the device.
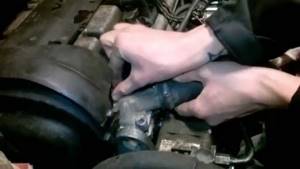
- Cover the opening on the engine with a clean rag to prevent debris from getting inside.
- Install a new consumable, be sure to replace its gasket or apply a fresh layer of sealant (pre-clean the seat using a knife, fine sandpaper or a regular plastic scraper).
That's all - all that remains is to fill in new antifreeze in a volume corresponding to the engine model.
Attention! To quickly determine the location of the thermostat, you need to walk your hand along the upper radiator hose, towards the engine. On some cars, to do this, you will have to remove the air filter.
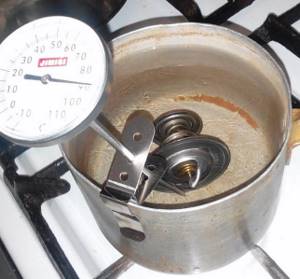
Diagnostics of a removed thermostat
Instructions on how to check a thermostat removed from a car:
- Pour enough cold water into the pan;
- Put the thermostat down;
- Start heating, taking thermometer readings and monitoring the condition of the thermostat;
- When boiling is reached, working thermostats change state;
- In order to make sure that the thermostat does not have problems in operation, it is necessary to monitor its operation when cooling the water.
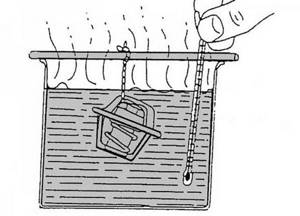
Heating of the regulator in the container
There are many ways to check a thermostat, but the above is the simplest and most accurate. It makes no sense to linger too long at the verification stage, therefore, once you are convinced of the malfunction, you need to move from diagnostics to replacement.
Subtleties of installing a new device
Doing the installation yourself is not difficult. When connecting the thermostat, you must follow a sequence similar to removing the thermostat, only in reverse order. During installation, it is important to avoid distortions and debris.
Control of nominal thermostat temperature
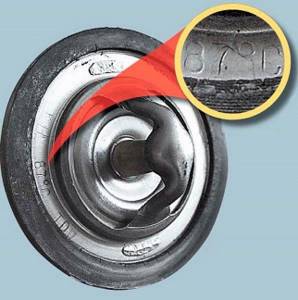
Before purchasing a new product, you should make sure that its parameters match the factory recommendations. Information about the thermostat is present on its body. It must match the previously installed thermostat.
Replacing the thermostat in a timely manner will save you from troubles on the road, so the car owner should be attentive to signs of overheating. Otherwise, he will soon have to undergo a major overhaul of the power plant.
Determining thermostat malfunction without dismantling
Instructions on how to check the operation of the thermostat without removing it from the car:
- Determine where the thermostat is located;
- Find the hose connecting the radiator to the thermostat;
- Start the cold engine;
- Check the temperature with a pyrometer. You can approximately measure the temperature with your own hands, but it is not recommended. In this case, you should be especially careful, since there are many moving and hot parts in the engine compartment;
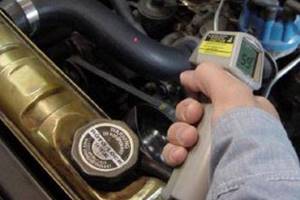
Determining the temperature directly on the car
- Check the pyrometer readings for trend to decide whether the thermostat needs to be replaced.
The thermostat is fully operational if during the first few minutes the pipe was cold or slightly heated, and then there was a sharp jump in temperature. If the hose slowly warmed up from the very start of the engine, it means the valve is stuck in the open position. If the pipe is not heated, there is a risk of a stuck open thermostat. A more accurate state of the device can be found by removing the thermostat.
Fault diagnosis
It turns out that if the engine quickly overheats or its temperature does not reach 80-90 degrees, the thermostat is faulty? You could say this. However, to confirm the symptom it is necessary to conduct a full diagnosis. Below is how they do it.
- Start the engine.
- Feel all the highways. The pump hose must be hot. On the contrary, the pipe that goes to the radiator should be cold.
- After heating the engine to 90 degrees, turn it off, recheck the hoses, as well as the bottom of the radiator. This time all surfaces should be hot as a large cooling loop opens. Replacing the engine thermostat will be required if, as the internal combustion engine warms up, the temperature of the lines coming from the valve is approximately the same.
And of course, if it is not possible to warm up the engine or it takes too long, the valve again needs to be replaced.
Another way to check the device involves removing the thermostat. Then you need to lower it into some container, fill it with cold water and put it on the stove to heat up. As soon as the liquid begins to boil, a working valve should make a loud click, indicating that it is opening. If this does not happen, you need to install a new part.