Having a kitchen hood is not just a fashion statement, as it represents an important functional element. It is necessary to ensure that there are no extraneous, sometimes unpleasant odors in a person’s home that appear as a result of cooking in the kitchen. Its installation and connection has some nuances that everyone should know about.
Rules for placing a hood over a stove
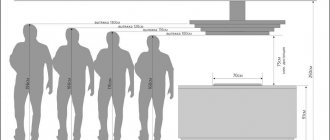
As a rule, the width of the hood exceeds the dimensions of the slab or these dimensions correspond to the width of the slab. For the hood to work effectively, it must be installed correctly. Firstly, it is placed exactly above the stove, and secondly, it should be fixed at a certain, recommended height.
Depending on the type of hob, the hood is installed at the following height:
- If the stove is gas, then the hood is mounted at a minimum height of 75 cm from the stove.
- If the stove is electric, then the minimum installation height is 65 cm.
The height of the installation can be determined by the height of the housewife who practices cooking for the family. It is also necessary to ensure that the lower edge of the hood is slightly above head level. The main thing is not to hang this functional element below the recommended level, but above this level you are always welcome, although at the same time the performance of the device will decrease somewhat. If you want to place the hood higher, it is better to choose a device with higher performance.
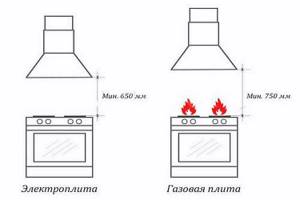
Minimum height for installing hoods above gas and electric stoves
The fastening of such an element may vary depending on the model. If the hood is built-in, then it is placed in a special niche of the wall cabinet and attached directly to the cabinet elements. As for wall-mounted models, they are attached to the wall. There are also dome or fireplace hoods, but they are also attached to wall elements. This type of hood can consist of two parts - the dome itself, as well as functional elements such as a motor and a filter. Despite the fact that they are mounted separately, their mounting axes must coincide.
There are also island hoods that are attached to the ceiling using special pendants. In any case, the device passport contains enough information on the mounting method.
At what height are inclined hoods hung?
The inclined hood should hang at a distance of 60 centimeters from the hob. This height ensures maximum efficiency of the device. Also, at such a distance a person does not experience discomfort when preparing food.
The installation height of inclined models plays an important role in the further operation of this equipment. Therefore, if the choice fell on this type of exhaust devices, it is necessary to work out the kitchen plan in advance.
See also
What to do if the plate does not spin in the microwave and is it possible to use it?

Installation process

Installing a hood in the kitchen involves several technological steps. These include:
- The moment of fixing the hood in the designated place.
- Connecting this device to electricity using a cable and an electrical plug. If there is no outlet nearby, you will have to make sure that the outlet is located next to the hood.
- Connection of the exhaust duct with a ventilation duct or with an individual ventilation system.
To carry out all the necessary stages of installing and connecting the hood, you need to go through the preparatory stage, which can take much longer.
Wall mount
As mentioned above, models such as dome and wall-mounted ones are attached to the wall, although they differ significantly in appearance. Fastening is carried out through the holes provided by the manufacturer, located on the rear wall of the case. Some manufacturers complete such products with special templates. Having attached the template to the wall, the fastening points are marked, after which holes are drilled in the wall, dowels are hammered in and finally the product is secured with screws. Often the kit also includes fastening elements, which are represented by dowels and screws. If there is no template, you will have to work hard, carefully measuring the distance between the holes, after which these dimensions should be transferred to the wall.
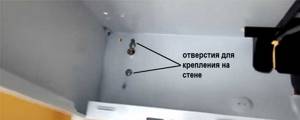
The hood must be attached to the wall through the standard holes in the housing.
Of course, it’s quite difficult to do everything yourself, so it’s better to have an assistant. At this stage, it is very important to ensure that the hood is fixed strictly level.
It will be worse if there are pipes in the place where the hood should hang and it will not be possible to attach the hood directly to the wall. In this case, you will first have to attach wooden blocks to the wall, and then you will have to attach the hood to them. Unfortunately, this is not the best option, since the hood will be far from the wall and will not be located directly above the stove, and the space behind the hood is a comfortable place for cockroaches to live, for example.
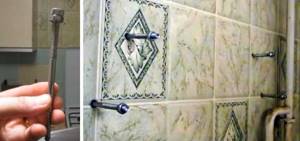
How to install a hood on a wall if a gas pipe is in the way or the wall is uneven
Instead of wooden blocks, it is permissible to use special long pins, but again, this is not a very good option, since reliable fastening will not work. It is better to make sure that nothing interferes with the hood, although this is not always possible.
How to install a hood on an uneven wall
Is it possible to move a gas pipe?
The absurd and technically unreasonable placement of pipes in the middle of the wall is not such a rare phenomenon. There are options that confuse new residents and nullify their plans to install kitchen furniture or appliances.
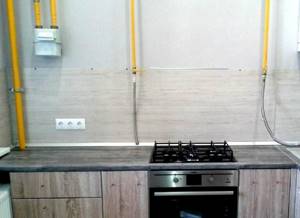
The traditional location of the gas riser is in the corner, near the kitchen window. The main pipe with the stove is connected by a horizontal bend with a tap and a dielectric, connected by welding
To expand the possibilities, the outlet is extended with a flexible hose - in this case, the gas stove can be installed at a distance of up to 2-3 m from the end of the metal structure.
If the riser is located not in the corner, but in the center, installation of the hood or furniture modules becomes more complicated. The same happens when the horizontal section of the pipe is located not below the table level, which is convenient for masking it, but at a height of more than 150 cm - that is, in a place where the hood could potentially be installed.
The horizontal outlet is usually moved, but this requires the approval of the gas service. Installation and welding work is also carried out by Gorgaz employees - it is prohibited to move gas communications yourself. The procedure is expensive and time-consuming, so it is advisable to undergo it, for example, when installing a gas meter.
The gas riser, like the ventilation hole, cannot be moved. The vertical metal pipe is part of the common house equipment, which should not be touched under any circumstances. This is prohibited by all regulatory documents, so it is better to think through the installation of the stove and the location of the hood in advance - just place them away from gas communications.
You can learn more about gas equipment in a residential building in SNiP 2.04.08-87* (in the current version).
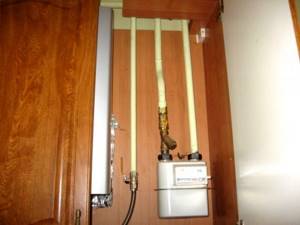
Modular kitchen furniture comes to the rescue - the pipes along the entire length are covered with a cabinet with doors that provide easy access to the gas meter
If the ventilation hole is located near the riser, it is not necessary to place the stove directly under it. There are many ways to connect it to the hood using a duct structure.
Conclusion: to avoid damaging the interior design, the easiest way is to move the stove together with the hood to another place. If finances allow and there is a desire, you can move the horizontal section of the pipe, but with the approval of the gas service.
And for those who don’t want to redo anything, we offer instructions on installing a hood on wooden blocks. This option is not the best from a technical point of view, but it can help out as a temporary solution or for installing an exhaust device in the country.
Built-in hoods
Such hoods are built into kitchen furniture, or rather, into wall cabinets. Fastening is also carried out using screws (self-tapping screws) directly to the furniture elements. Before installing such a hood, it is also necessary to go through the preparatory stage, which consists of making the necessary holes for the air duct. The most important thing is to decide on the model in order to do everything right.
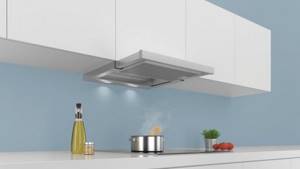
As a rule, such work is carried out by the person who installs the furniture, although you can do it yourself. To do this, you need to use a tool and you can’t do without an electric jigsaw. To cut a hole in furniture, you need to mark this place, after which a hole is drilled so that the jigsaw file fits into this hole. After this, the hole for the air duct is cut without much effort. The most important thing is to do everything very carefully with a fairly sharp file so that there are no chips left.
In this way, holes are cut both in the shelves and in the walls of the cabinets. Depending on the shape of the air duct, and it can be round, square or rectangular, holes are cut in the furniture. It is advisable to cut the holes so that the air duct elements fit into them freely.
It is better to make holes on the removed shelves or cabinets, after which they are installed in their places.
Installation of a FRANKE Kitchen Hood in the Kitchen. Remodeling a kitchen cabinet.
We put the devices themselves in order
We put a special nozzle “under the corrugation” on the ventilation hole (its diameter is usually 120 mm - this is the diameter of the corrugation).
After this, we determine the center of the ventilation hole in depth and width (it is always in the center), and transfer the coordinates of its center to the lower horizon.
In this case, it is necessary to take into account the difference in the depth of the hood itself (it is equal to 280 mm) and the lower horizon (which can be large). In this case, the depth of the box (and, therefore, the lower horizon) is 300 millimeters.
Having marked the cent, we draw a circle with a compass that is slightly larger than 120 millimeters (for example, 150 mm).
After this, you need to cut out the hole itself with a jigsaw.
To do this, we drill with a 10mm drill near the circle itself (from its inner side). After this, a jigsaw file is easily inserted into the drilled hole, and you can continue working.
After the hole for the corrugation attachment is cut, you need to determine the location (relative to the side parts) of the lower horizon of the box.
Until this point, the upper horizon and sides of the box must be assembled.
We place the lower horizon on the hood, and install the box so that its sides “stand” on the lower base of the hood.
Now, “on the fly,” you can use a tape measure to determine the axis on the sides on which you will need to drill holes for attaching the lower horizon.
When the module is assembled, we attach our equipment to it.
Yes, if the module is equipped with lifts, you can immediately attach their fasteners to the sides of the box.
As a rule, a diagram of their installation is shown along with them (on the back of the package or in the instructions).

By the way, there is a nuance here (in the case of gas lifts).
To install them, there must be a certain free space between the lower and upper horizons (there must be at least 280 millimeters between them).
If this distance is less, then they can simply not be installed (the height is not enough). This point must be taken into account already at the design stage, calculating the total height of the module we are considering.
Although, even if this happens (it doesn’t happen to anyone), instead of gas lifts, you can always install mechanical folding lifts, for which the opening between the horizons can be several times smaller.
Connecting the hood to electricity
Since kitchen hoods belong to the category of household electrical appliances, there are no problems with their connection, especially since their power consumption rarely exceeds 1000 watts. It is desirable that every electrical device has a grounding connection, although this cannot always be provided for.

Connect the hood via Vago terminal blocks
Grounding or grounding can be done if a major renovation is carried out in an apartment or house. In this case, the task of connecting a hood in the kitchen is greatly simplified. To do this, you should find a point in the lighting panel, in the form of a welded bolt, which is connected to the body of the electrical distribution panel. As a rule, this point is connected to the grounding of the electrical substation. As a grounding conductor, it is permissible to use a single-core or stranded wire with a cross-section of at least 2.5 mm square. It is better to use wire in heat-resistant insulation.
As a rule, nowadays, when purchasing electrical household appliances, some of them are not equipped with a wire and a plug, while there are models with a wire and a plug, and there are models that have a wire but no plug. Such hoods can be connected without a plug, but this is not a very good option. If you have to remove the hood to clean it, then this is not entirely convenient, since it will take a lot of time to disconnect such a hood, and also to connect it. Therefore, it is better to go to the store, buy a plug and connect it to the wires. In this case, to disconnect or connect this device, simply pull out or insert the plug into the outlet. If there is grounding, then you need to buy a plug with grounding pins, and if there is no grounding, then the most ordinary plug will do, but it is better for European sockets, since former Soviet sockets are no longer in demand. The fact is that they are unreliable, and they are designed for domestic plugs, whose contacts are thinner.
Power determination
In order for the ventilation of a kitchen with a gas stove to fully perform its functions, it is important to be able to correctly calculate the power of the future exhaust system.
Otherwise, even with the correct installation of the hood, there will be no fresh air in the kitchen. In order not to make a mistake in the chosen power, it is worth considering how many people are in the family, how often they cook and what dishes they prefer. Those who rarely cook a lot, often only for themselves, and in a family of 1-2 people, a power of 200-300 m³ will be enough /h
In order not to make a mistake in the chosen power, it is worth considering how many people there are in the family, how often they cook and what dishes they prefer. For those who rarely cook a lot, often only for themselves, and in a family of 1-2 people, a power of 200-300 m³/h will be sufficient.
For a medium-sized kitchen and a family of 3 people, who periodically like to cook unusual dishes that require long-term operation of the gas stove, a system with a capacity of 300-400 m³/h is needed.
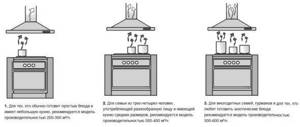
If a large family lives in an apartment, or you plan to install an exhaust system in a large kitchen of a private house, you will need equipment with a capacity of up to 600 m³/h. If you follow these simple instructions, the ventilation system will fully remove stale air from the kitchen, and working with food will only bring pleasure.

Installation of air duct for exhaust hood
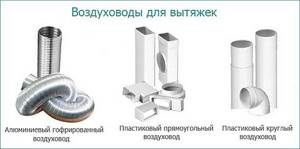
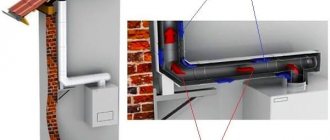
Unfortunately, the hood will not be of any use if you do not install an air duct that is designed to remove air contaminated with combustion products to the street. Since the air is at room temperature, there are no special requirements for the structural elements. Basically, 3 types of air ducts are used:
- Corrugated air duct made of round aluminum . Its advantage is that it stretches to the desired length, while easily bending at any angle. Its disadvantage is that, under certain conditions, the operation of the hood can be noisy due to the fact that the surface is ribbed. In addition, such a surface creates additional resistance to air flow, and it is quite difficult to care for such a surface.
- PVC duct, also round in shape . To assemble an air duct of the required configuration, you will have to buy additional elements in the form of adapters, bends, angles and couplings. Since the inner surface of such an air duct is smooth, they operate silently, since they do not present any resistance to the air flow, and they are also easy to maintain. The disadvantage is that such an air duct, in the case of a complex configuration, takes up a lot of space.
- Rectangular plastic air duct . The material of manufacture is the same as in the case of plastic round air ducts. The rectangular section allows you to save space, since such an air duct can be hidden behind drywall, as well as behind other structures if saving space is a priority.

You should also pay attention to the fact that a corrugated air duct will cost less. The only problem is that if such an air duct is left open, it negatively affects the design of the room, which cannot be said about neat plastic structures.
Regardless of the model, the outlet of the hood is round, but this is not a problem, since adapters are sold and connecting such a hood to a rectangular duct will not be difficult.
Duct sizes
Round air ducts are available in three types - with a diameter of 100, 125 and 150 mm. As for rectangular air ducts, their choice is somewhat larger, which is presented in the table below.
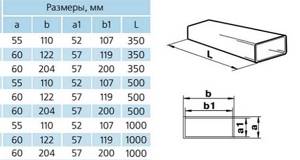
Dimensions of flat PVC air ducts for hoods
When the question of choosing the type of air duct is raised, you should focus on the dimensions of the hood outlet. The cross-section of the air duct should not be smaller than this hole, otherwise the hood will not cope with its task and will work ineffectively. This is true for air ducts of any shape and configuration.
Methods for attaching corrugations to the hood and ventilation system
When using aluminum corrugation as an air duct, you need to think about how to secure it to the exhaust outlet pipe, as well as to other elements of the ventilation system. Firstly, you need to make sure that the correct size corrugation is matched to the hood pipe. If this is not done, then it will be difficult to implement it in any case. When the air duct is smaller, there is no question of connection at all, but when the dimensions are larger, this will most likely lead to deformation of the air duct, the appearance of air leaks and, as a result, ineffective operation of the device.
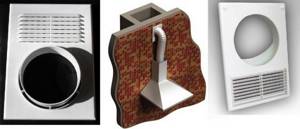
Attaching the corrugation to the grid on the wall
Basically, fastening is carried out using metal or plastic clamps. The best option is metal clamps, which can be easily removed if it is necessary to disconnect the air duct from the hood.
To connect the hood to the ventilation system, you will need a special ventilation grille with holes for natural air circulation when the hood is not working. If the air flow goes directly to the street, then a completely different ventilation grille is installed on the street. The ventilation grilles also have short pipes that allow corrugation to be attached to them. The main thing is to choose the right grille according to the size of the pipe. Fastening is also carried out using clamps.
Attaching the duct to the wall
In addition to air ducts, manufacturers have developed and produced special fastening elements in the form of clamps and latches. Clamps are used for fastening rectangular air ducts, and latches are used for fastening round air ducts. The distance between the fastening elements depends on the configuration of the air ducts, with a distance of about 60 cm considered optimal.
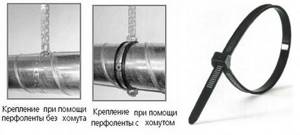
Methods for attaching corrugations
In the case of attaching a ventilation system to the ceiling, the fastening technology is the same, since the latches allow you to hold air ducts laid on any surface and in any plane. The corrugated aluminum air duct is attached exclusively using clamps, and it is necessary to monitor the fastening force, since the air ducts are thin-walled and easily deformed.
Installing a plasterboard box
Assembling a plasterboard box for masking gas pipes is one of the simplest and most affordable masking methods.
For this job you need to stock up on the following:
- plasterboard in sheets;
- tin profile;
- electric screwdriver;
- self-tapping screws;
- stationery knife;
- metal scissors;
- construction foam;
- diamond mesh no. 100.
It is worth paying attention to drywall with a moisture-resistant coating, since the atmosphere in the kitchen is quite aggressive
When starting work, first of all you need to vertically fix 3 profiles, and then measure the distance between them. According to the obtained dimensions, the necessary sections are cut from the profile in order to mount them horizontally between the racks in the form of spacers. Be sure to check the level of the lines after attaching the screws. Alternatively, you can use a cutter to connect the profiles together.
Next, sheets of drywall are screwed to the profiles on both sides using a screwdriver and self-tapping screws. An excessively protruding section of the blade is cut off, and the uneven end is sanded with a diamond mesh.
Where and how should the air duct be routed?
Quite often, especially in apartments, the air ducts from the kitchen hood are connected to the home ventilation system, which ensures natural air circulation. In fact, this is the wrong approach because it makes the hood ineffective due to the fact that most of the grille is blocked by the ductwork.
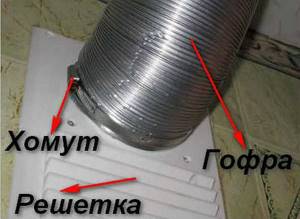
A significant part of the ventilation grille is closed and ventilation in the apartment will be insufficient
Because of this, natural air circulation will also suffer. Therefore, the most optimal option is when the hood is connected to a separate ventilation duct using the ventilation grille shown in the image above.
How to take it outside
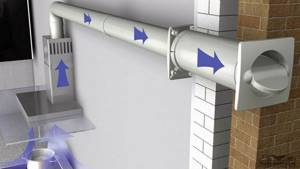
It makes sense to choose this option by making a hole in the wall so that the air duct goes outside. Of course, punching a hole in a load-bearing wall, the thickness of which can be half a meter or even more, is quite difficult, but it is possible, especially since in our time such a tool is available.
The air duct is ducted outside and closed from the street with a ventilation grille. All free space between the wall and the air duct is carefully sealed. It can be covered with a solution or foamed with polyurethane foam, which is more relevant in our time.

This is what a non-return or anti-return valve for air ducts looks like
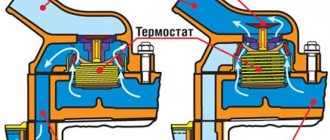
If reverse draft occurs, which happens very often, the ventilation grilles are equipped with a check valve, which closes if the hood is not working. This limits the flow of cold air into the room. This is especially true for the cold season. In the summer, on the contrary, everyone wants as much fresh air as possible in their home. If a check valve is not installed, then foreign odors from the ventilation system will enter the room. As a rule, this applies to ventilation systems of multi-storey buildings.
Exiting a kitchen hood to the street instead of a common house ventilation duct
Providing natural ventilation
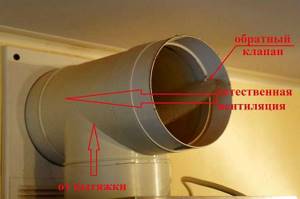
To prevent the hood from having a negative impact on the natural ventilation process, you can assemble a system using a tee and a check valve. The check valve should be installed in such a way that it closes when the hood is operating and opens under the natural flow of air from the room. This operation is ensured by a weak spring located in the valve itself. The only problem with such a system is its unattractive appearance. But this is not a problem at all if it can be placed inside a wall cabinet, carefully disguised, especially since it does not take up so much space.
Features of installation of horizontal devices
It is optimal if horizontal models are located at a distance of 80 centimeters from the hob. However, this parameter varies depending on both the design features of the specific equipment and the manufacturer’s recommendations.
In particular, low-power equipment should be installed closer to the hob.
In addition, horizontal devices cannot be placed close to the ceiling covering. This requirement also applies to recirculating models. During installation, it is necessary to ensure air removal from the hood. That is, you need to lay the box up to the ventilation shaft, for which you should leave free space between the hood and the ceiling covering.

