Mixer installation features
First of all, you need to determine how to install the equipment. In particular, the mixer can be installed on a countertop, on the sink body or on a table. Before you cut the sink into the countertop, you need to think about all this. In addition, it is necessary to consider the location of hot and cold water supply pipes. It is very important to provide free access to the joints in case of unexpected repairs. Also, when solving the problem of how to assemble a faucet in the kitchen, you should take into account the installation of additional equipment, for example, filters for water purification. It is necessary to foresee its location in advance.
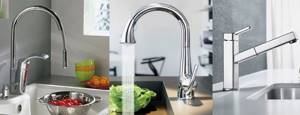
How to choose the right kitchen faucet
Almost all faucet models are used in conjunction with a sink, so when choosing and installing a faucet in the kitchen with your own hands, you need to consider the following:
- Dimensions and depth of the sink.
- Distance from the wall to the hole for the mixer.
- The diameter of the technological hole intended for installing the mixer.
- Location of the drain hole.
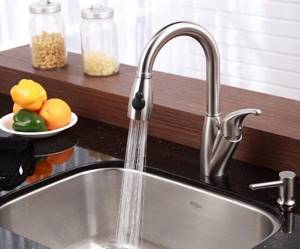
In addition, when installing a kitchen faucet, it is important to pay attention to the length and height of the product. The end of the spout should be in the center of the sink, and its height should allow you to place a tall pan. However, it is worth understanding that when water is supplied from a faucet that is too high, splashes will be created that will fly outside the sink.
Another important parameter is the angle of rotation of the mixer. For a sink located a short distance from the wall, it is recommended to use a faucet that rotates 900. For a sink with two bowls, it is better to purchase and install a faucet in the kitchen with a rotation angle of up to 3600.
Types of taps for PVC and HDPE pipes
Although both of these pipe modifications are made of plastic, each of them has its own characteristics. And this applies not only to the material itself, but also to the scope of application, diameters, installation method, etc. Therefore, we will consider the types of taps for PVC and HDPE plastic pipes separately.
For PVC pipes
These locking mechanisms can be installed on any plastic pipe, both non-reinforced and reinforced. The ball mechanism of such a valve is made of stainless steel, which is also not susceptible to corrosion and clogging.
Such taps are used for installation of plumbing and heating systems. You can install the locking mechanism into the system in the same way as the other elements, using a special soldering iron for PVC pipes.
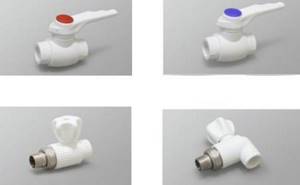
Types of shut-off ball valves for PVC pipes for soldering (straight and angled)
When purchasing a faucet, you need to pay attention to the following:
- the valve must be made of the same material as the rest of the pipeline elements;
- the diameter of the shut-off device must correspond to the diameter of the pipes;
- characteristics of temperature, pressure and external environment must correspond to the actual parameters in which it will be operated.
Shut-off valves for PVC pipes are manufactured in the following modifications:
- Double-sided - plastic ends are provided on both sides of the tap for soldering into the pipeline system. Used to shut off the flow of hot or cold water in plumbing or heating systems. Mounted on a pipe in a vertical or horizontal position.
- Single-sided - on one side there is plastic for soldering, and on the other there is a thread. One-way taps are used in cases where it is necessary to connect a PVC pipeline with elements of another material. For example, when installing heating, connect the battery to the pipes.
- A plastic valve is used in heating and plumbing systems through which hot or cold water flows to restrict flow. This device differs from the ball mechanism in that it allows you to regulate the pressure, and not just open or close it.
For HDPE pipes
Locking mechanisms for HDPE pipes are usually classified, first of all, according to the installation method. There are three types here:
- Collet. The main feature of such cranes is their ease of installation, which can be easily done with your own hands without additional equipment or any installation skills. However, it is worth noting that they are used mainly for domestic purposes, on pipelines with a diameter of 20 to 110 mm.
Push-in shut-off valves are not designed for high pressure (above 15 bar) and hot water (above 45ºC) systems.
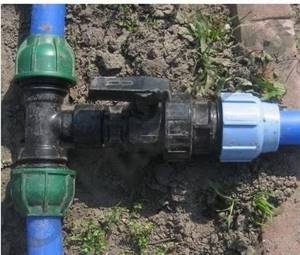
Collapsible plastic tap on HDPE pipeline
It is very easy to install such a product into a pipeline. To do this, you need to cut two pipes that will be connected by shut-off valves so that the cuts are even and strictly perpendicular to the flow of the liquid. Place control nuts on both pipes. Then insert the ends of the pipes into the grooves of the coupling and tighten with nuts. The tap is installed.
- Flanged. This type of shut-off valve is used for larger diameter pipelines (up to 315 mm). The faucet is installed into the overall system using bolts that secure the flanges.
Unlike collet products, flanged products are designed for high pressure. Due to their chemical resistance, such mechanisms are often used in the chemical industry.
- Welded. This type of faucet speaks for itself. To install them in a pipeline, a heating element is used, which adjusts one element to another. This connection method can withstand greater pressure and provide guaranteed tightness.
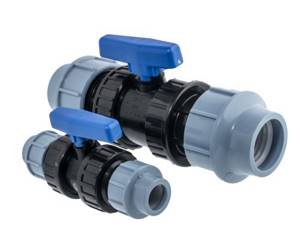
Compression ball valves for HDPE plastic pipes
Installation work in this case looks a little more complicated.
They can be produced:
- end-to-end, when the edges of the joined elements are melted using a special soldering iron and then joined under pressure;
- electrofusion method. In this case, a special coupling is used, inside which a heating coil passes. The ends of the connecting elements are placed inside the coupling, melted and solidified. This connection method can ensure the integrity of the pipeline.
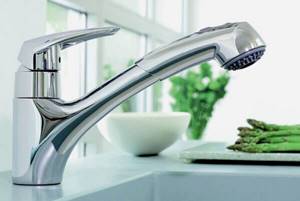
Appearance
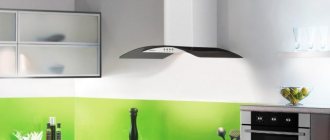
The appearance of the faucet is of great importance when looking for solutions for how to install a faucet in the kitchen, since the plumbing equipment must be selected in accordance with the design style of the kitchen. In specialized stores, mixers are presented in a wide variety. These can be models made in loft, hi-tech, classic and minimalist styles. The shape of the faucets can be chopped or streamlined; in addition, chrome, copper or black products are produced.
As for the cost, it is important to adhere to the rule: the higher the price, the better the quality of the plumbing equipment, including faucets.
Design selection
Each mixer model is characterized by the presence of certain design features. Single-lever products are distinguished by their practicality. This design allows you to regulate the flow intensity and temperature using one lever. Mixers with two valves are less practical, but fit perfectly into the classic kitchen interior.
Some models are equipped with a special motion sensor; they are classified as non-contact products. When you bring your hands to the faucet, a sensor is triggered and water starts flowing. For the kitchen, this option cannot be called suitable for solving the question of how to install a faucet in the kitchen, since very often it is necessary to draw water into various containers.
The main factor influencing the cost of mixers is the alloy used and the brand of the manufacturer. The most affordable products are made of silumin and other cheap alloys. Such faucets have an attractive appearance, but quickly become unusable. This is explained by the fact that the manufacturing material itself is prone to cracking and quickly turns into crumbs.
High quality faucets are made of brass with a layer of nickel, aluminum or chrome. This increases the attractiveness of the products and makes them more resistant to wear.
Joining HDPE pipes with PVC
When connecting HDPE pipes with pipes made of polyvinyl chloride, certain parameters must be taken into account. Pipes made of low-pressure polymer can transport any fluid. Products made from polyvinyl chloride are used only for moving liquids. Compared to HDPE pipes, PVC pipe can withstand up to sixty degrees Celsius. But the frost resistance of these types of pipes is different. When the ambient temperature drops to minus 10°C, the polyvinyl chloride pipe may begin to crack. At high loads (water pressure in the pipe), HDPE is stronger than polyvinyl chloride. Therefore, due to the significant difference in technical characteristics, direct welding of these types of pipes is categorically not recommended. If this parameter is violated, sometimes allowed by incompetent specialists, sudden destruction of the pipe section may occur. Separate sections of polyvinyl chloride pipes are mounted between each other by electrofusion welding or contact soldering.
Pipes made from low-pressure polyethylene (polymer) are harmless to human health because they are chemically inert, and a polyvinyl chloride pipe, deteriorating over time, can begin to release toxic substances (chlorides) into the transported environment. Therefore, pipes made of polyvinyl chloride are used more often only for free-flow transportation of sewage, technical water supply systems, irrigation and drainage.
It is not recommended to use polyvinyl chloride in a water supply system intended for direct human use (water for cooking). Although, for domestic water supply systems there is a special version of polyvinyl chloride, its unplasticized form, which does not release toxic substances into the moving environment. When installing pipes of different structure materials (HDPE and PVC), it is recommended to use special transition modules. This is the only way to avoid problems with liquid leakage, ensure the tightness of the connection, and prevent possible damage to the pipe section.
Preparatory work
Before you begin to solve the problem of how to connect the kitchen faucet to the water supply, you must definitely turn off the water supply to your house or apartment. Otherwise, you may encounter serious troubles when installing the mixer. In addition, it is necessary to open the tap at the water collection point to drain the remaining liquid.
Then you can begin to prepare the necessary tools and materials. In most cases, the working set for solving the problem of how to install a faucet in the kitchen consists of the following:
- Screwdrivers of different types. Most often, the work requires a Phillips and flat-head screwdriver.
- A set of socket wrenches and an adjustable wrench.
- A self-contained lighting device, such as a flashlight.
- Sandpaper.
- Flexible hoses.
- Tow.
- A special composition WD-40, which is used to treat stuck compounds
Before assembling the faucet in the kitchen, you need to take care of the new connection to the mixer, this will ensure the tightness and durability of the connections.
Preparing the necessary tools
Installation of the faucet requires several steps. To begin with, you should carefully familiarize yourself with the equipment included in the device. Next, you should prepare the necessary tools.
To carry out installation work you need:
- different shapes of screwdrivers;
- adjustable wrench;
- flashlight;
- sandpaper;
- several flexible hoses;
- dishes for water;
- WD-40 product;
- end keys.
If you don’t have any tools, you can purchase them at any hardware store. Having the entire list will significantly speed up the work process.
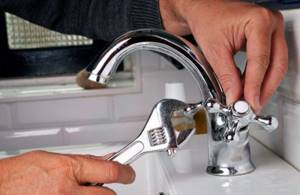
Removing the old faucet
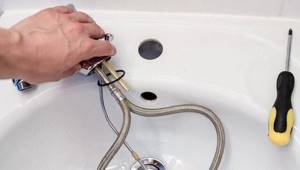
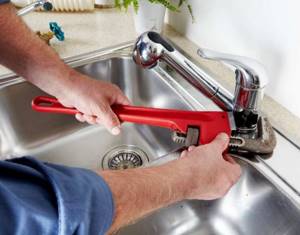
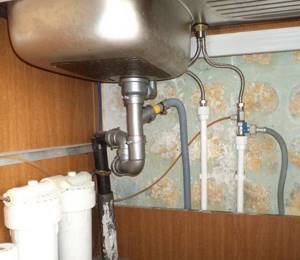
Before you start solving the question of how to install a faucet in the kitchen, you need to dismantle the old device. First of all, you need to determine the places where the mixer connects to the hot and cold water supply pipes. Then inspect the structure and find the place where the faucet is fixed on the sink. Using an adjustable wrench, the flexible connection of the mixer is disconnected from the pipe. To avoid flooding the workspace with residual water from the plumbing system, it is recommended to place a small container.
When connecting a faucet in the kitchen, a surface-mounted sink must be carefully removed, having first disconnected the lower part of the siphon. Next, the sink is turned, providing access to the place where the mixer is attached to the side of the bowl.
The connecting nuts are unscrewed using an adjustable wrench. First, loosen the nuts on the threaded pin a little, then use a screwdriver to unscrew the pin itself. Throughout the entire process of attaching the faucet to the sink, it is recommended to hold the mixer slightly to prevent it from falling.
In some cases, when installing a faucet in the kitchen, it is not possible to unscrew the connection nuts the first time, since rust may form in these places, and the parts being connected may stick to each other. The problem can be solved using a special WD-40 compound that is used to treat the fastener. After 10-15 minutes, you can safely begin to unscrew the connecting nuts.
Then the mixer is removed along with the clamp, and if necessary, the old hoses are replaced with new products. The hole for installing the mixer is cleaned of accumulated dirt. It is recommended to dispose of the dismantled old mixer.
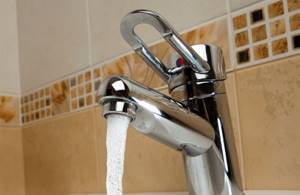
Installing and connecting a faucet in the kitchen - how to install a faucet on a sink
One of the most popular places in a living space is the kitchen. Therefore, choosing a high-quality faucet is very important, since this part experiences heavy daily stress. But in order for the device to work properly, you also need to know how to install the faucet correctly.
How to get rid of an old faucet?
Removing a broken faucet
When carrying out kitchen renovation work, you first need to get rid of the old faucet. After completing the preparation, you should determine the contact points of the water pipes and the dismantled device. The next step is to locate the mounting points for the faucet and sink. Using an adjustable wrench, you need to disconnect the mixer from the pipe, not forgetting to place a container under the disconnection point. This will prevent liquid remaining in the pipes from leaking onto the floor.
If you have an overhead sink, you need to carefully remove it. But before this you will need to disconnect the lower part of the siphon. For convenience, when removing the faucet fastenings, the sink must be correctly rotated. At the connection areas, you need to use a special product WD-40, which can help in case of rust formation and sticking of the contact points to each other.
The connecting nuts must be removed with an adjustable wrench 15 minutes after using the product. You should start by securing the threaded pin and then removing it. To carry out such work, the best assistant would be a regular screwdriver. It is recommended to support the mixer with your free hand to prevent it from falling.
The next step is to remove the clamp along with the mixer. Old, connected hoses can also be easily removed with the dismantled device through the hole for installation work, which after completion of the procedure should be freed from dirt accumulations. After disposing of the removed faucet, it is time to install a new faucet.
Features of choosing mixers
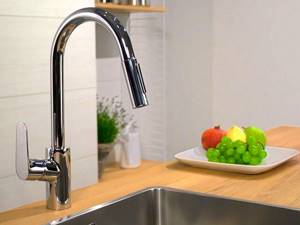
Kitchen faucet with one handle
There are many options for installing and positioning the mixer. It can be installed in the sink frame, on a table surface or on a wall. Using any of the methods, the first step is to mark the location of the hot and cold water supply pipes, ensuring that their connection is accessible. This may be necessary during the next repair work, as well as when installing filters.
You should pay attention to some features of choosing a mixer and take into account the following details:
- Distance between the hole and the wall.
- The width of the opening for the mixer.
- Location of the drain hole.
- Mixer drain. Preferably, its end should coincide with the center of the sink.
- Taking into account the size of the tableware, you should select the height of the drain.
- Depending on the type of sink, the angle of rotation of the mixer is selected. A single bowl sink requires a rotation angle of no more than 90 degrees. In other cases, the indicator needs to be increased.
Selecting the required faucet model, taking into account design and functionality, is not a difficult task, since there is a huge variety of types of plumbing fixtures offered.
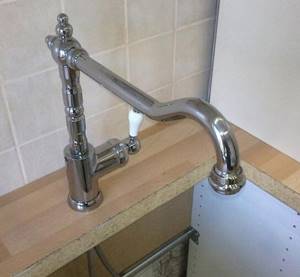
Kitchen faucet with two valves
Important! Faucets from European manufacturers are of the best quality.
A model with a single stainless steel lever, in which the water pressure and temperature are regulated using a single handle, is very popular due to its simplicity and practicality. For a classic interior, designs with two levers are a more suitable option. Faucets equipped with a motion sensor do not require tactile contact to operate, but adjusting water supply parameters with their help is very problematic.
Also, an important component of choosing a mixer is the choice of material from which the device is made. Models made from inexpensive alloys have an affordable price, but low quality reduces their service life. Quality and durability are guaranteed by faucets made of brass, as well as those coated with chrome, nickel or aluminum.
Preparing the necessary tools
Installation of the faucet requires several steps. To begin with, you should carefully familiarize yourself with the equipment included in the device. Next, you should prepare the necessary tools.
To carry out installation work you need:
- different shapes of screwdrivers;
- adjustable wrench;
- flashlight;
- sandpaper;
- several flexible hoses;
- dishes for water;
- WD-40 product;
- end keys.
If you don’t have any tools, you can purchase them at any hardware store. Having the entire list will significantly speed up the work process.
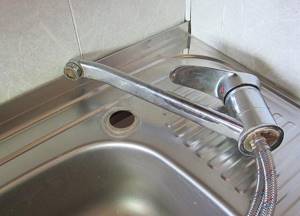
Installation of the faucet to the sink
Before installing the device, the hose threads must be covered with tow.
Installation of a new device with one handle must begin with the connection of the liner. High-quality sealing can be achieved by isolating all attachment points using tow, which must be used to cover the threads on the hoses before combining them. To maintain the shape of the winding, you should add drying oil to it.
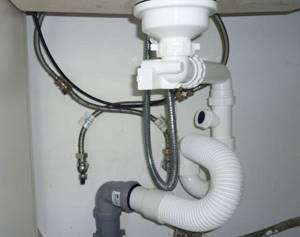
The plumbing fixture kit includes a ring-shaped rubber gasket. It has a metal base, and when installing, it requires the rubber insert to fit exactly into the grooves on the ring. The next step is to thread the gasket up to the faucet body.
Installing the faucet requires the help of an extra pair of hands. Having threaded the hoses through the mounting hole, you should begin fixing the device while your partner holds it. It is necessary to pass a spring plate through the liner, through which threaded pins are mounted into the mixer body, and then secure them with nuts, while simultaneously fixing the operating position of the faucet.
Important! After taking the desired position of the mounted device, you should make the final tightening of the nuts, after making sure that the gaskets are correctly placed.
Before connecting the hoses to the water supply, you can secure the sink.
Next, you should secure the body of the sink in the desired position, and then install the connections to the required points of the water supply. The bases of the tubes should be treated with sandpaper and then wrapped. This action can be performed using linen thread or a sealing agent in tape form. The appropriate winding method in this case is cross to cross.
To use thread, you must first treat the thread with a sealant.
After connecting the siphon to the sink, it is necessary to turn on the water with strong pressure in order to test the integrity of the tightness of the connecting parts of the system. If there is a leak, you need to tighten the thread more and repeat the procedure again.
Tabletop mounting
Installing a faucet on a countertop
The process of installing a faucet on a countertop is more labor-intensive. It requires more strength and time.
Before connecting the device, you need to purchase an additional set of tools:
- electric jigsaw;
- perforator;
- a set of drills of various sizes.
One of the nuances of choosing a site for a hole is the ease of use of the shift lever. The location of the tap should be such that liquid does not leak onto the table.
Note! The dimensions of the hole made must correspond to the diameter of the rings for pressing.
The first step is to mark the drilling spots on the base of the mixer. Then you need to make holes for the threaded pins and the device itself. Next, using a jigsaw, you should widen them sufficiently to the size of the holes in the sink. It is better to process uneven trimming areas with sandpaper. A silicone-based sealant will help ensure the wood is resistant to moisture. The installation algorithm is identical to installing a faucet on a sink.
Mounting the device on a wall surface
Installation of the tap on the wall surface
A current and popular way to install a mixer is to mount it on the wall. The device does not occupy a large area and can also be located at different heights. A pleasant appearance is also caused by the absence of pipes and components that are hidden in the walls.
To install such a tap, you can use different types of pipes. Special parts - couplings, tees and angles - will help ensure that their sizes and the mixer match. Special fittings are available for some situations.
Important! The tap should be connected to the central water supply only when the water is turned off.
The main difficulty in installing a mixer lies in the correct installation of the water supply and sewerage systems, installation of adapters and fasteners. They can be of several types - valve, cartridge, with sagging and solid spout. For the flexible type, a wide range of placement options is possible. A solid is characterized by limitations in position and angle of rotation. Any wall-mounted faucets are distinguished by ease of use, interesting design and build quality.
Installation proceeds as follows. Linen thread should be wound around the cut liner pipes and the eccentrics should be screwed on. The axial distance between the pipes should be 15 cm. If there is no coincidence, it is necessary to turn the eccentrics and set the required distance in relation to the surface.
The installation of the faucet should result in completely covering the connecting fasteners and defects on the wall surface. If a gap occurs, you will need to shorten the eccentrics to the required size.
The next step is to secure the nuts, having previously sealed them with gaskets included with the device. You must first tighten it by hand and then with an adjustable wrench. Be careful when doing this to avoid damaging the threads. Lifting of the joints can take place at any time, depending on the need.
Types and options for repairing breakdowns
A frequent breakdown is the breakdown of the valve or its defect.
During the operation of the mixer, various breakdowns may occur from time to time. More common problems are water leaking from different parts of the installed appliance and the sound of the mixer operating.
Problems of this kind are quite easy to deal with:
- Water leaking from the spout often occurs if the tap switch is not completely closed.
- If there is a leak remaining after closing the valve, you should pay attention to the valve axle box. If the gasket is made of ceramic, then the entire part must be replaced. For a rubber seal, just change the gasket.
- Water leaking from the valve may be a consequence of improper installation of the gasket, or a manufacturing defect. The solution is to replace it.
A fairly common problem after the installation of a new faucet is completed is the appearance of noise that accompanies the inclusion of the mixer. They are caused by fluctuations in the sound emitted by water during changes in pressure in the pipes. The solution may be to install a new seal, or change the shape using sharp objects.
You can install and connect new faucets in the kitchen and bathroom yourself. Certain difficulties can be caused by the wear and tear of already installed pipes, which requires restoration of the water supply structure. In any case, anyone can install any faucet in the bathroom or kitchen with a minimum set of tools.
Installation of a new mixer
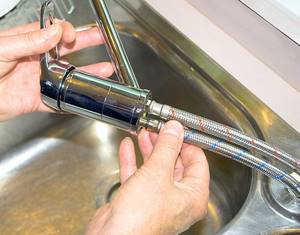
Before you begin to resolve the issue of how to properly install a faucet in the kitchen, you need to connect the product to the liner. The joints are wrapped with tow, which ensures maximum sealing of the system. Tow should be wound onto the threads of flexible hoses before connecting them to the mixer. When adding a drop of drying oil to the tow, the material does not bunch up towards the base of the thread during the tightening process.
Each mixer is equipped with an annular decorative gasket, which is a metal element with a rubber layer. Before installing the faucet on the sink, it is necessary to inspect the gasket to ensure that the rubber layer matches the designated grooves of the ring. The ring gasket is threaded through the liner and pulled to the base of the mixer.
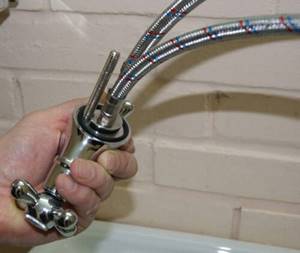
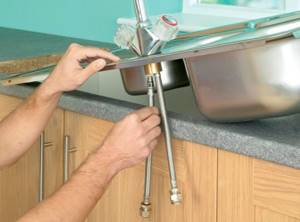
Next, flexible hoses are inserted into the mounting hole and the mixer is pulled directly to the connection point with the sink. During the process of screwing the mixer, it is recommended to invite an assistant who will hold the device for more convenient fixation. A pressure plate is passed through the liner.
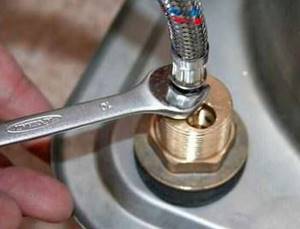
At the next stage of solving the problem of how to install a faucet on a kitchen sink, threaded pins are screwed into the base of the faucet, passing them through the pressure plate. Screw the nuts onto the pins without fully tightening them. Full tightening of the nuts is carried out using a socket wrench, having previously fixed the mixer in the working position. You can proceed to the final tightening of the nuts only with full confidence that there is no displacement of the sealing gaskets, and they are all in their place.
Next, the sink is installed in place and the connections are connected to the hot and cold water supply system. For a more airtight connection, the pipes of the water pipes are cleaned with sandpaper and a layer of flax thread or a tape of rolled waterproof sealant is wound.
The tape is wound overlapping; when using flax thread to install a faucet in the kitchen, the threads are first lubricated with sealing paste, after which the thread is wound.
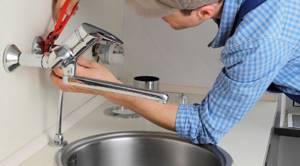
The installation process is completed by connecting the siphon to the sink and testing the mixer. When supplying water, carefully inspect all connections for leaks. If defects are detected, you can try to tighten the threaded connections and retest.
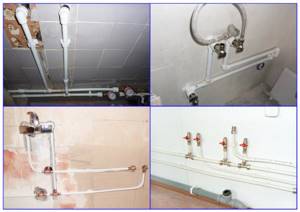
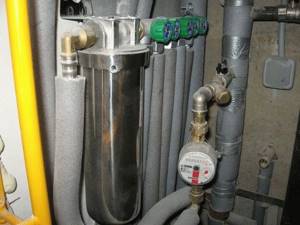
Water pipe materials
Currently, not only in individual houses, but also in communal apartments, owners are laying new or replacing outdated water supply lines with pipelines made from the following traditional or modern materials:
Steel. Laying steel water pipes in comparison with polymers is economically unprofitable, labor-intensive and time-consuming.
Since the main technology for joining them is electric arc welding, installation requires the services of a highly paid specialist with a welding machine. It is almost impossible to install a steel water supply system with your own hands without welding equipment and skills, so such pipes are obsolete and are practically not used in households.
An equally labor-intensive method of installing steel water pipes is the use of threaded connections. To join the fragments, you will need to cut threads on pipe sections with a special tool for connecting corner couplings, tees, and fittings.
To connect a mixer to a steel pipeline, an external thread is cut at the pipe ends that corresponds to the internal diameter of the flexible hose union nuts.

Rice. 2 Steel and copper water pipes
Copper. Copper pipes can be connected to each other by soldering, however, this technology also requires high professional skills and special equipment, and a wide range of consumables.
To connect a copper pipeline to a kitchen faucet, threaded fittings are soldered onto the pipe ends; less often, threads are cut.
Thin-walled pipes. Pipelines with thin walls, popular in the West, connected by press couplings, are not widely used in our country due to their high cost. In addition, they are used mainly for external installation in heating and hot water supply systems.
Thin-walled pipes are produced from stainless steel, copper, galvanized and steel alloyed with various additives; electric press tongs are used for installation of communications. To connect fittings and equipment, press fittings pressed into pipes are used.
Corrugated stainless steel. The main purpose of corrugated stainless steel pipes is for use in water-heated floor heating systems.
They can be used for laying water supply lines both on top and in grooves under plaster walls.
To connect to the fittings, the end of the corrugated stainless steel pipe is flared and a union nut with a flat sealing gasket is placed on it.

Rice. 3 Thin-walled and corrugated stainless steel pipes in water supply systems
Related article:
Connecting a bathtub to a sewer system - types of siphons, connection options, installation . If you are renovating your apartment or have decided to change not only the faucets in the kitchen, but also the drains in the bathroom, then it may be interesting to read an article about connecting the bathroom to the sewer.
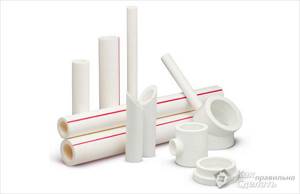
Polypropylene (PP). Polypropylene is the leader in use among plastics in water supply and heating networks. Both conventional and fiberglass and aluminum reinforced pipes are widely used. The first type is used in cold water supply (CW) networks, products with reinforcement are used in hot water supply (DHW) and heating communications.
Polypropylene pipes are connected to metal threads by soldering adapters from plastic to metal.
Cross-linked and heat-resistant polyethylene (PEX). This type of pipeline is widely used in underfloor heating systems. For a number of reasons, it is not used in water supply networks, although a polyethylene pipeline can be laid under plaster walls.
To connect soft and elastic polyethylene pipes to fittings, a technology has been developed using fittings and tension couplings put on with a special tool.
Metal-plastic. Metal-plastic is pipes made of cross-linked polyethylene with an inner shell of aluminum. Metal-plastic is the second most widely used material after polypropylene in hot water supply and heating networks. To connect it, various types of fittings are inserted and pressed into the pipe shell.
Rice. 4 Water pipes made of polypropylene and metal-plastic
Technological nuances of installation
When solving the problem of how to connect a sink faucet, some difficulties may arise that have a significant impact on the quality of the work performed. For example, the joints of flexible hoses can become very sticky, and the use of special tools does not give the desired result. In addition, sometimes the diameter of the cut-in hole may need to be adjusted or the faucet may need to be mounted on a countertop.
In this case, you can use a jigsaw and cut a new hole. In addition, it is necessary to check the condition and functionality of the water pipes and all wiring. If necessary, these elements need to be modified or completely replaced.
To independently install and connect a kitchen faucet, it is enough to study materials on the relevant topic, and professional craftsmen will help solve complex problems.
How to select and install a faucet on a plastic pipe
The emergence of many new materials has led to the emergence of new components and even new ways of connecting pipeline fragments: it is clear that fittings for a metal-plastic product and a polypropylene product will be different. And the installation methods will differ, since the pipeline design requires a different approach.
Taps for plastic pipes must be selected taking into account the characteristics of the material.
Metal-plastic water conduits
The material is a multilayer composite, where a layer of aluminum foil is located between the layers of plastic. On the one hand, this makes the process of welding a product a rather specific task. On the other hand, it facilitates the connection of shut-off valves to the water supply system.
For metal-plastic water pipelines, metal taps are used. Their installation does not require welding, which greatly facilitates the work. The latter consist of a nut, a collet ring and a fitting (it is located on the body). How to install a ball valve on a metal-plastic heating system?
- Cut the water pipe with a diameter of 25 or 32 mm so that the cut is exactly perpendicular to the axis, and clean the end.
- Slide the nut and collet ring on. Then the product is put on the fitting.
- Unscrew the collet ring at the connection point and tighten the nut. If higher tightness is required, fum tape is wound.
- The docking on the other side is performed in exactly the same way.
Polyethylene pipeline
A ball valve for a plastic pipe made of HDPE, just like other fittings, is made of plastic. This does not affect the quality, but ensures the overall tightness of the system. Installation is carried out in several ways, which determines the purpose of the pipeline - heating, plumbing and the diameter of the product.
The push-in ball valve in this case does not have a fitting, so its installation is carried out somewhat differently. The plastic pipe is cut exactly perpendicular and chamfered, then a locking and sealing ring is put on it, and then a nut and collet ring are put on. The remaining steps are similar to the scheme for attaching fittings to metal-plastic water pipelines.
- Rebated - the connection of plastic pipes with shut-off valves is made by bolting through holes in the rebates. In everyday life, this method is extremely rare.
- Welded - usually required for water pipes and heating systems with a diameter much larger than 25 or 32 mm. There is no need to unscrew or put on anything here. The tap and the section of the product are welded with a special soldering iron or connected through an electric coupling. The latter method is more convenient, since it does not require holding the parts in your hands for welding. A coupling is applied to the ends to be connected, current is connected to it, and the products are welded.
Polypropylene heating systems
Polypropylene has much greater rigidity and hardness than polyethylene. A PP pipeline is assembled by welding and the installation of valves is no exception. This type of fitting looks like a coupling; installation requires a welding machine.
How to install a tap on a plastic PP pipe?
- Nozzles of the required diameter are attached to the soldering device, the device is turned on and heated to the desired temperature.
- The ends of the joined fragments are cleaned.
- The coupling and plastic pipe are inserted into the heated nozzle and wait until the sections of the product become soft. The time required for this is indicated in the instructions for the device.
- The ends are removed from the nozzle and connected to each other so that the plastic is fused into one whole. Under no circumstances should you unscrew or change the position of the product at this moment. The retention time depends on the material and wall thickness of the product.
- The element is secured on the other side in the same way.
PVC pipe
Ball valves for PVC plastic pipes are a special type of fittings. They are connected using a threaded method. But in order to install the part, you need to glue special tips to the water conduits. The latter are included with the product.
Installation recommendations
Kitchen faucets can have two types of fastening: the device is fixed with a nut or two studs. Depending on this, the installation method of the mixer is determined.
In designs with a clamping nut, the installation process is complicated by the presence of a long base, so the question of how to install a kitchen faucet is solved in the following order:
- Install the O-ring.
- Mark the mounting hole in the sink and drill it.
- Install the mixer into the prepared slot.
- Screw on the fixing nuts and tighten them using an adjustable wrench.
- Connect a hose with a short fitting.
- Next, connect a flexible hose with a long needle.
- Check the functionality of the equipment, paying attention to the formation of defects.
The second option for attaching the faucet to the sink involves the use of studs. In this case, it may be difficult to tighten the flexible hoses after installing the faucet on the sink or countertop. For this reason, it is necessary to first screw the nuts into the base of the mixer, and then install it in place. Then you should figure out how to connect the sink to the sewer so that there are no problems later.
In general, the work is carried out according to the following scheme:
- The studs are screwed into their regular places.
- Flexible plumbing hoses are installed from below the sink.
- Place the mixer in the seat.
- Fix the device using fastening pins.
In both cases, it is necessary to control the position of the sealing elements; the space between the parts must be completely filled. Even minor gaps are not allowed.
Bathroom faucets, their types and choice of installation location
When buying a bathroom faucet, it is important not to get lost in the abundance of models offered. When going to the store, you should already know exactly what device you need to buy.
Currently, bathroom faucets are available in three installation options:
- wall-mounted - the most common and familiar;
- onboard, installed on the side of the bath (which must be at least 7-8 cm wide, otherwise installation will be impossible);
- A mixer on a stand or a special shelf is an expensive device, the cost of which is several times higher than that of a conventional mixer.
The latter option is rarely used, since its installation requires quite a lot of space, which is simply not available in a standard bathroom. You will need to choose a place to install the faucet only if you are installing a new bathroom during the construction of a house or a major renovation of a bathroom.
Here you need to focus on the following considerations:
- Select the installation location by eye and evaluate whether it will be convenient to use the mixer.
- If it is a mixer with a shower, then it must be mounted at a height of 120 cm from the bottom of the bath after its installation.
- If the faucet handle also rotates the sink, then the height needs to be selected even more carefully. Please note that the height of the sink is rarely less than 85 cm. To this you need to add the size of the faucet itself and the height necessary for convenient hand washing.
- You should not mount the mixer on the horizontal line that is located at the height of the curb, which is usually made at a height of 100 cm from the floor. It is better to place the device where the wall is lined with smooth tiles, otherwise the faucet reflectors will not adhere tightly to the surface (the curb usually has a rough coating).
Mounting the mixer on the countertop
To solve the problem of how to connect a faucet in the kitchen and install it on the countertop, you will need a similar set of tools as when installing the device in the sink. In addition, you need to prepare an electric jigsaw, drill and drill bits.
The actual installation of the mixer is carried out according to the same scheme, however, in this case, dismantling the sink is not required. For the mixer you need to make a hole in the countertop.
When choosing the location of the mounting hole and before screwing the faucet to the sink, you should listen to the advice of professional craftsmen:
- When using a mixer, water should not fall on the countertop.
- The location of levers or valves should be as convenient as possible for use.
- The faucet spout should point directly into the center of the sink.
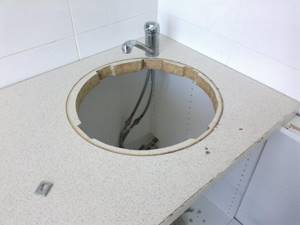
The installation process begins with markings, using a pencil or marker to outline the contour of the base. Next, several holes are drilled with a drill and a hole of the desired size and shape is cut using an electric jigsaw. Subsequently, the liner is pulled through it and threaded pins are inserted. The cut area is treated with sandpaper and the resulting sawdust is removed.
The hole should not be too large, slightly smaller than the diameter of the pressure ring. In this case, you can expect that the entire hole will be closed. Subsequent steps when deciding how to fix the faucet on the sink are carried out according to the diagram for installing the faucet on the sink.
Mixer installation tools and work procedure
If you are simply replacing an old device with a new one, then you will not have to choose a mounting location. The installation will be carried out where there is already a communications outlet. We'll look at replacing a regular wall-mounted faucet.
To replace the mixer you will need:
- new mixer;
- gas key No. 1;
- adjustable wrench;
- open-end wrenches No. 17 and No. 14;
- linen tow or Teflon tape for sealing threaded connections.
The following is the procedure:
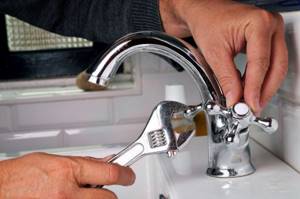
- Make sure that the taps that shut off the supply of hot and cold water are in good working order. To do this, rotate them clockwise until they stop. If these are ball devices, then simply rotate them 90 degrees. When shut-off valves are not used for a long time, lime deposits may appear inside the mechanism, which impede rotation and prevent the water flow from being completely blocked. If this is the case, then you need to slowly open and close each tap several times. After making sure they are closed, turn the water on the faucet all the way and make sure there are no leaks.
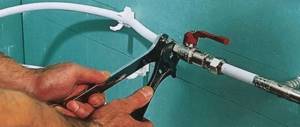
- Next you need to dismantle the old device. To do this, unscrew the nuts holding it to the eccentrics. Assess the serviceability of the old eccentrics - check their integrity and the condition of the threads. If they are made of good metal, then it is not necessary to change them. This will save you from having to install and position new eccentrics. If there are doubts about the serviceability of the old eccentrics, then carefully unscrew them counterclockwise from the pipe entry so as not to damage it (otherwise you will have to change the pipe entries, which will ruin the entire repair in the room). If the old eccentrics do not unscrew, then the places where they connect to the pipes can be gently tapped using an open-end wrench, or heated with a lighter. This usually helps. After removing the old eccentrics, it is necessary to clean the water pipes from various contaminants.
- The new eccentrics are screwed in clockwise until they stop. Their outlet pipes should be located on the same horizontal line, and the distance between their axes should be 150 mm. Even before you start screwing, you need to wrap tow or tape on the threads of both eccentrics. You need to start from the beginning of thread cutting in the direction of the element cut. The tape or tow should be wound in a dense, even layer. Checking the correct installation of the eccentrics is carried out by first installing the mixer in place. To do this, the device is attached with one input to any eccentric, and the second is combined with another eccentric. If everything fits together exactly, then the final installation of the mixer can be done. If not, then you need to tighten one of the eccentrics to the correct position.
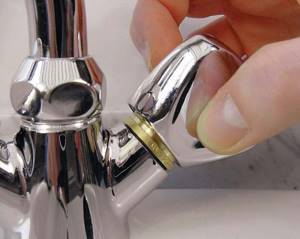
- Place decorative caps on the eccentrics, install the sealing gaskets that are included in the kit on the mixer pipes. Then unscrew the nuts on it until they stop, otherwise they will interfere with you. Tightly wrap tow or tape around the threads of the eccentrics. Tighten the mixer nuts by hand. Then tighten the connections with a wrench, but do not overdo it, otherwise you may strip the threads.
- The last step is to install the faucet attachments: the gander, the shower hose and the watering can. Be sure to seal all joints with tow or tape.
First unscrew the aerator from the tip of the spout, otherwise it may become clogged with particles of scale and deposits that got into the pipes when installing the device.
Check the faucet by changing the water pressure. In this case, there should be no leakage in any connection. If it is still detected, you will have to remove the device and repeat the entire installation, replacing all the tow and tape on the threads.
As you can see, the work of replacing the mixer is not difficult and can be done with your own hands. Your assistants in this matter will be the accuracy and thoroughness of all stages.
Installation of wall mixers
By installing the faucet on the wall, you can make the kitchen interior more unusual and attractive. This option takes up minimal space and significantly expands the work space. To solve the problem of how to connect a faucet in the kitchen and perform installation work, technological holes of a certain size are made in the wall or tile through which the equipment is connected. The hot and cold water supply pipes remain hidden behind the wall, so the device looks quite aesthetically pleasing.
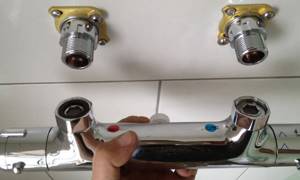
To connect the mixer to the water supply system, the corresponding elements are brought out. Connecting a faucet in the kitchen follows the same pattern, regardless of the material from which the pipes are made. The pipe can be iron, plastic, copper or metal-plastic; only the adapters and fitting elements differ. The mixer is connected to iron pipes using tees and angles; to connect to other types of water pipes, special fittings are used, their other name is water sockets.
The method of connecting a kitchen faucet to the water supply also does not depend on the type of faucet, which can be cartridge or valve. The main condition is that the design of the mixer must be suitable for installation on a wall.
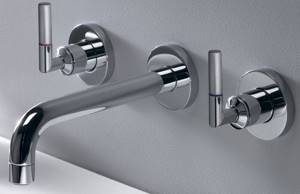
Wall faucets can be installed at any height; the product spout can be flexible or rigid. In the first case, multiple variations significantly expand the range of actions in the kitchen. Faucets with a rigid spout have limited stroke and rotation angle.
Features of choosing mixers
Kitchen faucet with one handle
There are many options for installing and positioning the mixer. It can be installed in the sink frame, on a table surface or on a wall. Using any of the methods, the first step is to mark the location of the hot and cold water supply pipes, ensuring that their connection is accessible. This may be necessary during the next repair work, as well as when installing filters.
You should pay attention to some features of choosing a mixer and take into account the following details:
*
- Distance between the hole and the wall.
- The width of the opening for the mixer.
- Location of the drain hole.
- Mixer drain. Preferably, its end should coincide with the center of the sink.
- Taking into account the size of the tableware, you should select the height of the drain.
- Depending on the type of sink, the angle of rotation of the mixer is selected. A single bowl sink requires a rotation angle of no more than 90 degrees. In other cases, the indicator needs to be increased.
Selecting the required faucet model, taking into account design and functionality, is not a difficult task, since there is a huge variety of types of plumbing fixtures offered.
Kitchen faucet with two valves
Important! Faucets from European manufacturers are of the best quality.
A model with a single stainless steel lever, in which the water pressure and temperature are regulated using a single handle, is very popular due to its simplicity and practicality. For a classic interior, designs with two levers are a more suitable option. Faucets equipped with a motion sensor do not require tactile contact to operate, but adjusting water supply parameters with their help is very problematic.
Also, an important component of choosing a mixer is the choice of material from which the device is made. Models made from inexpensive alloys have an affordable price, but low quality reduces their service life. Quality and durability are guaranteed by faucets made of brass, as well as those coated with chrome, nickel or aluminum.
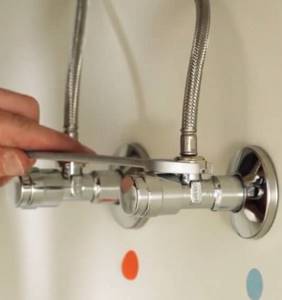
Instructions for connecting the mixer
The connection begins by screwing in the eccentrics; these elements are designed to connect the mixer to the water pipes. By setting the distance between the axes to approximately 15 cm, you can achieve minimal condensation formation on the pipes. This is exactly the gap that the manufacturer sets when producing most wall mixers. To ensure a tight seal, the threads must be wrapped with linen or synthetic tow.
Then the faucet nuts are screwed onto the eccentrics and a decorative trim is installed. When fixing it, you should be careful, and the decorative element should fit snugly against the wall. If after installation the gap is more than 5 mm, then you can remove the mixer and cut the eccentrics to the required length. The decorative overlay should hide all the imperfections of the wall that are formed during the installation of the wall mixer.
At the next stage, gaskets are installed, which are equipped with almost every mixer. This element can be silicone, paronite, rubber or made of another polymer material. The gasket is inserted into the housing nuts, which allows for a tighter fit to the eccentrics. To ensure maximum tightness, the eccentrics must be checked for cracks. Uneven cuts can be processed with sandpaper.
The final step is to tighten the nuts, first tighten them by hand and then tighten them with an adjustable wrench.
During the tightening process, it is not recommended to use much force to avoid stripping the threads on the nuts. Installing plumbing equipment in the kitchen and connecting the faucet to the sink cannot be called a difficult job, so a simple home craftsman can easily install the product. To perform installation work efficiently, you must have a set of necessary tools and materials on hand, follow the recommendations of professional craftsmen and follow safety regulations.
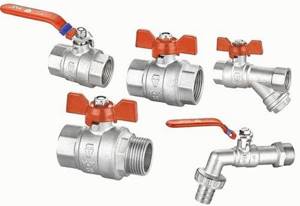
Fitting
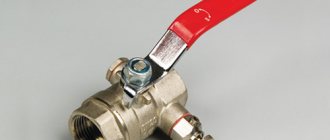
When installing any type of pipes during plumbing work, you cannot do without fittings, which also include all kinds of taps and valves. These can be soldered ball valves, straight or angle valves (with American type). Brass ball valves are used (crimp, with a butterfly handle), which are characterized by good anti-corrosion resistance. When connecting such a tap to a pipe, a split brass ring is used to crimp the pipe; rubber (ethylene-propylene) is used as a sealing material. Similar ball valves are three-way, with external thread, with internal thread, for connecting pipes at right angles.
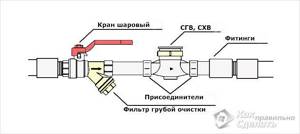
Ball valve connection diagram
No special tools are required to install these faucets.