Selecting the type of insulation
Modern industry offers three types of heat-insulating materials: slabs, rolls, and shapeless (foam). In this case, we do not consider bulk insulation, since insulating inclined and vertical surfaces with bulk materials is extremely inconvenient.
The material for insulating the attic should be selected in accordance with the design and necessary parameters of the heat-insulating layer, namely density, thermal conductivity and vapor permeability.
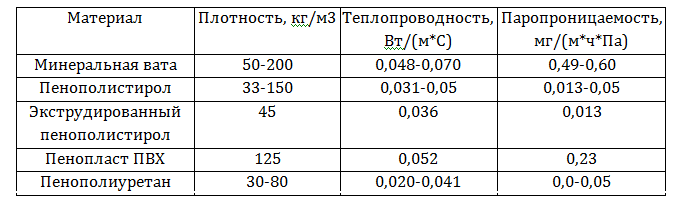
Density affects the weight of the material - it is undesirable to make the rafter structure too heavy, especially if it was originally designed “end-to-end”, without a margin of safety. Insufficient thermal conductivity will significantly increase heating costs, and poor vapor permeability will lead to increased humidity in the room.
Accordingly, the optimal choice for the attic would be:
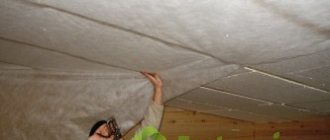
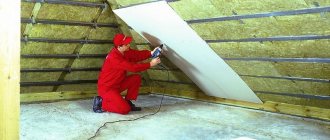
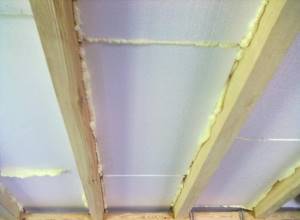
- when covering with plasterboard or other similar materials - mineral wool. Plates or roll sections (depending on density) are laid in the spaces between the rafters. The spacer beams remain visible, the inclined elements of the attic are covered with sheet material;
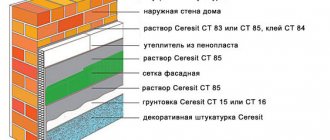
- expanded polystyrene, regular or extruded, as well as polystyrene foam - for plaster or plasterboard finishing, if the finishing is not afraid of high humidity;
- polyurethane foam for complex roof geometry and in the presence of additional elements that complicate insulation with slabs or rolls.
If, in addition to the walls and ceiling of the attic, it is also necessary to insulate the floor (actually the floor between the first and attic floors), it is permissible to use either any of the listed heat-insulating materials or bulk insulation materials. More on this later.
Features of the attic room
The main distinguishing feature of an attic from an attic space is the presence of a layer of insulation in the walls and roof, which allows it to be used for permanent occupancy of people. The building’s gables and roof slopes act as enclosing structures of the room. Depending on the shape of the roof, the configuration of the attic will vary.
The most common option:
- two vertical pediments;
- two roof slopes with fractures (in the upper part the angle of inclination is more gentle, at some distance from the ridge the overhang angle increases sharply and the overhang breaks down).
From a structural point of view, the attic is characterized by variable ceiling heights. In the area of the ridge it will be maximum. As you move away from him, it will fade away.
Advantages of insulation
So, let's see why polystyrene foam attracts users:
The highest thermal insulation qualities combined with low cost

As already mentioned, expanded polystyrene has a meager thermal conductivity coefficient - no more than 0.037 W/m*C.
For comparison: for expanded clay this figure is 0.1 - 0.18 W/m*C, for foam glass - from 0.07 to 0.11 W/m*C.
Even some brands of basalt wool - the closest competitor to polystyrene foam - have a thermal conductivity of 0.048 W/m*C.
At the same time, polystyrene foam is the most affordable material: its cost is 2.5 thousand rubles / cubic meter. m, while basalt wool in the same volume will cost 4-5 thousand rubles.
Convenience and safety of installation
The polystyrene foam board is rigid, so, unlike roll-type materials, it can be easily installed in place by one person. At the same time, it is easy to cut, and if necessary, it can be broken with bare hands.
The small size of the polystyrene foam is also important - both from the point of view of ease of installation and in the sense of the absence of additional load on the insulated structure. For comparison: the density of basalt wool varies from 35 to 400 kg/cube
m.
The installer working with expanded polystyrene does not need to use personal protective equipment - the material is completely safe.
Moisture resistance
The advantage of expanded polystyrene, the importance of which is difficult to overestimate.
Indeed, for many heat insulators that have mainly a fibrous structure (basalt wool is one of them), water is the main damaging factor.
Penetrating into the structure of the material - in liquid form or in the form of steam, which then condenses - it completely deprives it of its thermal insulation properties.
Expanded polystyrene is waterproof, so if a leak develops anywhere on the roof, its performance will not be affected.
It is better to insulate a frame house with foam plastic or mineral wool
This is a serious question, since these two materials are similar in properties and each is good in its own way for insulating frames.
The thermal conductivity of these materials is almost the same. In terms of weight, they also both belong to lightweight materials.
Polystyrene foam and expanded polystyrene are hard materials; it is easier to install it between the frame posts, although adjusting the heat insulator to the dimensions between the posts takes a lot of time.
Mineral or stone wool has a loose structure and is more difficult to install.
Polystyrene foam practically does not absorb moisture (the water absorption coefficient is approximately 0.4%), so it is preferable to use it in rooms with high humidity. It does not lose its thermal insulation qualities in such rooms.
Mineral wool absorbs moisture well (its water absorption coefficient is 1-1.5%). When wet, it loses its thermal insulation properties.
Do not forget about the fire hazard of polystyrene foam. When ignited, it releases toxic substances. And although polystyrene foam is cheaper than mineral wool, its dangerous properties in case of fire make us think about the rationality of its use.
See also “Schemes for insulating a frame house with mineral wool for floors, walls, ceilings.”
In general, polystyrene foam and expanded polystyrene are excellent materials for insulating a frame house and will completely ensure coziness and comfort in the room.
Views: 1,332
How to insulate an attic effectively: calculating the thickness of insulation
After the initial selection of the type of insulation, it is necessary to determine the required thickness of the layer/layers. This is done in accordance with the requirements of SP 50.13330.2012. Considering that the roofing material does not actually provide thermal resistance, it is actually necessary to choose a thickness of insulation that will provide the necessary thermal resistance of the enclosing structure.
Calculation formula
R=p/k,
Here p is the layer thickness in meters, k is the thermal conductivity coefficient. Then
p = R x k.
The required standard value can be taken from the SP (Table 3), taking into account the type of structure (in this case, walls) and the number of degree days of the heating period.
| Number of degree days of the heating period per year | Standard value R (m2 x degrees)/W |
| 2000 | 2,1 |
| 4000 | 2,8 |
| 6000 | 3,5 |
| 8000 | 4,2 |
| 10 000 | 4,9 |
| 12 000 | 5,6 |
You can clarify the number of degree days using the table; you must take into account the desired temperature in the room.
Naturally, all populated areas were not included in the list - we recommend finding the nearest large city and navigating around it. At the same time, for buildings in large settlements, you can take the nearest lower value from the table, since dense buildings and an abundance of transport increase the average daily temperature. And, on the contrary, for buildings around which there is a lot of free space, and the area is characterized by strong winds, it is better to take a larger number of degree days.
Example definition
For the Chita region, for an interior temperature of 20 degrees, the number of degree days is 7600. If the house is located on the shore of a lake or in the mountains, we take 8100, if inside the city - 7100.
An example of calculating the thickness of insulation
For the same Chita, the required thermal resistance of the structure is about 4...4.1 (m2 x degrees)/W. We accept insulation with a heat transfer coefficient of 0.05 (low-density mineral wool, polystyrene foam). Accordingly, insulation with a thickness is required
p = R xk = 4.1 x 0.05 = 0.2 m
Thus, even for such a cold area, 20 cm of insulation is sufficient. If you do insulation in two layers, you can not only save on material, but also eliminate the risk of “cold bridges” appearing. In fact, insulation will be achieved “with a margin”, since in reality the roofing material, waterproofing film, and interior decoration of the attic will also retain heat.
For those who do not want to independently calculate the amount of insulation for the entire attic, we recommend our online calculator.
After completing the calculations and making the final choice of insulation, you can proceed directly to installation.
Tips and tricks
When installing foam plastic sheets to insulate the attic from the inside, the following recommendations must be taken into account:
- It is necessary to avoid the appearance of gaps between the slabs from inside the room. They will be the reason for the appearance of moisture in the insulation, which will affect its functionality. In addition, in winter the gaps will become “cold bridges”, which will also negatively affect the microclimate in the attic.
- Under no circumstances should you use polyethylene film or materials containing polyethylene as waterproofing from the inside of the attic. Such insulation quickly loses its properties, as a result of which the performance characteristics will sharply deteriorate.
- When insulating an attic from the inside, it is necessary to take into account the installation technology and the rules of thermal insulation.
- Before you begin installation, you need to make a correct calculation of the thickness of the insulating material. An incorrectly chosen width of the slabs can cause a leak in the insulation.
Pros and cons of attic insulation with foam plastic
Among the most noticeable advantages of using polystyrene foam as insulation are:
- low level of thermal conductivity;
- lack of water absorption, high level of hydrophobicity (when the material is immersed in water for 24 hours, it will absorb no more than 1% of the liquid from its volume);
- strength - not subject to compression and stretching;
- ease of installation;
- no problems with rotting, resistance to harmful microorganisms;
- resistance to any weather conditions;
- light weight, due to which the material does not create additional load on the rafter system and attic roof;
- the absence of hazardous chemical compounds, which makes it harmless to humans and the environment.
In addition to the advantages, do not forget about the disadvantages:
- a rather rigid structure, which causes the material to become brittle;
- low resistance to mechanical loads;
- lack of protection against the effects of aggressive chemical compounds. When treated with nitro paints or varnishes, the structure of the insulation is destroyed;
- polystyrene foam does not allow air to pass through, which is why you will need to think about installing ventilation;
- needs additional protection, as it does not create obstacles for rodents and birds.
Despite the controversy regarding the use of foam plastic for roof insulation from the inside, this material continues to be in great demand. Low cost and good operational capabilities made it the most budget option for roofing.
What is needed to reduce heat loss
The market of modern building materials can offer the consumer a lot of insulation options. The best materials, or rather those with the most advantageous insulating qualities, will be:
Mineral wool
Time-tested, environmentally friendly insulation with a low thermal conductivity coefficient. Its other advantages include: excellent soundproofing and heat-saving qualities.
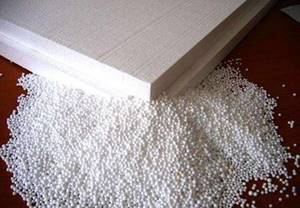
Foam plastic (expanded polystyrene)
The most commonly used insulator. Its popularity is due to its low cost and easy installation. Available in slabs.
Polyurethane foam
A relatively new material that allows you to reduce the time spent on roof insulation by almost half. However, its cost is quite high.
All of the listed quality characteristics and versatility are most satisfied with polystyrene foam of the PSB-S 25 and 35 brands. Its service life is more than 80 years.
Using polystyrene foam, it is easiest to answer the question of how to properly insulate a roof, spending a minimum amount of time and money.
Advantages of expanded polystyrene
Physical and technical characteristics of polystyrene foam boards.
Expanded polystyrene may contain components that increase the fire resistance of the material. The insulation has a homogeneous structure without micropores, so it can be used in various fields. The insulation is not afraid of temperature changes, which allows it to perfectly withstand temperature changes even in the coldest regions. Among its strength characteristics, special mention should be made of its high compressive strength, which significantly increases its durability. Expanded polystyrene is practically neutral to the effects of chemical and biological factors, and its structure does not allow the spread of insects, fungi and bacteria. The only thing that can cause significant harm to extruded polystyrene foam is gasoline or solvent.
The material shows high sound insulation properties, so the penetration of extraneous sounds into a building insulated with extruded polystyrene foam will be significantly lower. It can be used both as external and internal insulation, which makes it an almost indispensable material for thermal insulation of a building. In addition to insulating the attic, extruded polystyrene foam can be used in insulating roofs, foundations, balconies, loggias, walls, basements and other building elements. Finishing work can be carried out on top of it, which has become the reason for the use of expanded polystyrene for the facades of buildings of various types and purposes. Thus, the main advantages of extruded polystyrene foam include:
- The material is light in weight, allowing it to be easily transported to the desired location.
- Excellent compressive strength.
- Insulation has a long service life.
- It does not rot or decompose.
- Good thermal insulation.
- Does not require the use of additional expensive materials and devices during installation.
- Finishing work can be carried out on top of polystyrene foam insulation.
- It is mounted to the wall surface using glue and mastics, which do not destroy the structure of the material.
Grate bars and ash pit
Grate in a can design
In order for a potbelly stove to turn from a conventional stove into a slow-burning design, it is necessary to remove the grate during operation. This will ensure uniform combustion when the smoldering mass independently sucks in air in the required quantity.
The grate should be made not from a solid steel sheet, but from stacked cast iron grates. Otherwise it will be difficult to remove it from the firebox door. Steel corners welded from the inside to the walls of the firebox or parts of reinforcing rods with a diameter of 15 mm can serve as support for the grate.
The blower should be made round, and also equipped with a pipe mounted on rivets or screws.
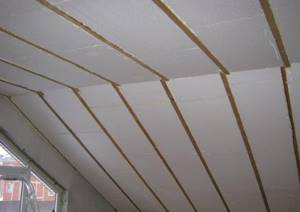
Stages of installation work
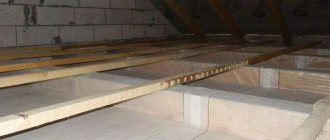
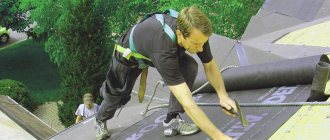
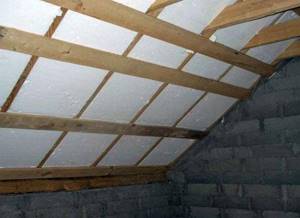
The attic is a roofing surface, which consists of the roofing material itself, the rafter system and sheathing. All foam boards are laid in the space between the rafters. In order to insulate the attic according to all the requirements and provide warmth to the room, the first layer of slabs must be cut clearly along the contours of the rafters and the foam must be laid with a slight stretch. This way, there will be nowhere for cold air to get through and the room will be quite well insulated. So, the first step can be the installation of the first layer of waterproofing material in the space between the rafters in case the attic is already equipped, and you decided to install thermal insulation only now. Otherwise, if the attic roofing material has not yet been installed, then the foam plastic must be attached to the sheathing from the outside. By following this small rule, you will provide yourself with warmth and comfort even on the most inclement frosty day. Professional builders recommend securing foam plastic products with metal brackets. The second stage is the installation of insulation. The width of the foam should correspond to the width of the rafter leg. In order to strengthen the structure, you can punch nails through the rafters and thread any strong thread in a zigzag. Such a frame will hold the insulation in the canopy and the structure will never collapse. The third step is to equip a vapor barrier. Everything here is elementary. It is enough just to overlap the vapor barrier material along the entire roof and strengthen it with metal brackets. If this is necessary, insulate the windows. The fourth and final stage is the cladding. To begin with, in order to provide additional good ventilation, it is necessary to install a sheathing. Afterwards, lay any finishing material on it that you have chosen based on your budget and personal preferences.
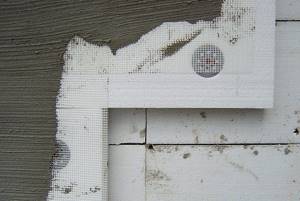
Covering with hexotextile and gravel
Geotextile material is laid on top of foam boards.
Thanks to this type of textile, the following main problems can be solved:
- protect the roof from the negative effects of solar radiation;
- reduce the effect of mechanical loads;
- increase the service life of the roof.
After the geotextile, a 5-centimeter layer of gravel is backfilled, the fraction of which is 16/32. The thickness of the layer, depending on the strength of the wind, may be less. Instead of gravel, paving slabs or concrete can be used, but a gravel layer is a more profitable option. This is explained by the need to carry out complex activities if you plan to lay paving slabs or work with concrete, and gravel can simply be filled in.
How to insulate an attic with your own hands
In order to insulate an attic with your own hands, it is enough to create a layer cake from insulation and several insulating layers.
In addition to insulation, steam and waterproofing will have to be installed.
Then cover it all with some material and wallpaper it.
In principle, there is nothing complicated in these works.
If you have read everything written above, then it has long since become clear to you what should be done and how.
If your attic has stone gables, then you should think about insulating them.
If this is not done, then insulating only the roof will have practically no results - it will still be cold.
Remember safety: use only environmentally friendly materials and fasten everything very securely!
Video about insulating an attic roof.
What else to read on the topic?
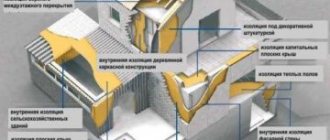
Thermal insulation diagram of the attic roof from the inside
The insulation of an attic roof has its own characteristics, due to the fact that the walls of the living space are directly adjacent to the roof, or rather, they actually form a single whole with it
That is why it is customary to pay close attention to insulating the attic roof from the inside, which allows you to ensure a normal microclimate in the room
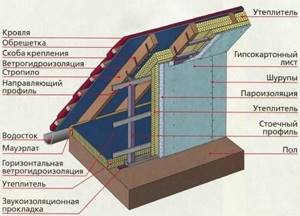
Before we start talking about how to insulate an attic roof from the inside, let's figure out what layers the so-called “roofing pie” consists of, and why it is so important to place these layers in the right sequence:
- Roof;
- Waterproofing;
- Ventilation;
- Thermal insulation;
- Vapor barrier.
The diagram shows the correct order of arrangement of elements of the attic roof thermal insulation system
What is the reason for this particular arrangement of layers? Elementary laws of physics. Let's imagine that in winter a decent layer of snow fell, which, by the way, is a natural heat insulator. As a result of the life activity of people living in an attic house, warm air will rise from the inside to the surface of the roof. The snow covering it will melt. And as soon as the temperature outside drops below zero, a crust of ice forms, which no longer has any heat-insulating properties. The essence of proper insulation of an attic roof is to prevent snow from melting in winter and scorching heat from penetrating in summer.
additional information
Manufacturers have created improved insulation based on the use of foam plastic. Penoplex seems to be a strong and durable raw material, the fastening of which takes place using mushroom-shaped self-tapping screws. This insulation does not change its external characteristics under the influence of dampness.
Penoplex is convenient and profitable for finishing an attic space. This building material is inexpensive, it is convenient, practical and wear-resistant. You can always carry out installation work using penoplex, regardless of the season.
Technological processing techniques
Foam insulation is easily machined. They are easily cut using a hand tool (hacksaw or construction knife). Thick sheets of expanded polystyrene can be cut using an electric jigsaw.
In cases where the final finishing involves applying a layer of plaster, the surface of the extruded polystyrene foam is processed using a needle roller. In this way, the surface is given the roughness necessary for strong adhesion to the plaster.
When using polystyrene foam, such an operation is not performed. The surface already has sufficient roughness.
Main characteristics of polystyrene foam
First, let's understand the terminology. Polystyrene foam is a fairly broad concept that can be used to designate any material obtained by foaming a particular polymer, otherwise known as plastic.
There are a great variety of polymers and their foamed versions, respectively.
Chemists have learned to foam polyethylene, polypropylene, polyvinyl chloride and many other materials. But in everyday life, the word “foam plastic” usually means the most common representative of this family - expanded polystyrene. This is what we will continue to talk about.
Expanded polystyrene is made in two modifications:
- foamed;
- extruded.
These varieties can be distinguished from one another visually: expanded polystyrene foam consists of many granules of different sizes glued together; extruded – has a uniform structure.
But the main difference is strength: extruded polystyrene foam can withstand higher loads than foamed polystyrene. But it also costs much more, so it is used mainly for insulating structures that are subject to mechanical stress, for example, foundations or the base of a roadway. In everyday life, this type of polystyrene foam, if finances allow, can be used to insulate floors.
Insulating a pitched roof from the inside
It is customary to insulate walls and roofs with expanded polystyrene foam. Let's look at its characteristics:
- Density: All foams are extremely lightweight materials. Expanded polystyrene can have a density of 11 – 15 kg/cubic meter. m (grade PSB-S 15) up to 25 – 35 kg/cu.m. m (grade PSB-S 35).
- Thermal conductivity coefficient: according to this parameter, foam plastics are among the leaders. The thermal conductivity of these insulation materials depends on the density: the more the material weighs, the more pores it has and, accordingly, the lower the thermal conductivity. Thus, the thermal conductivity coefficient of expanded polystyrene grade PSB-S 15 is 0.037 W/m*S, grade PSB-S 25 (density from 16 to 25 kg/cubic m) is 0.035 W/m*S, and grade PSB-S 35 – 0.033 W/m*S.
- Vapor permeability: the vapor permeability coefficient for expanded polystyrene foam is 0.05 mg/m*h*Pa, extruded - 0.005 mg/m*h*Pa. Not all foams have such low vapor permeability. So, for example, for PVC foam this indicator is 0.23 mg/m*h*Pa.
- Moisture absorption coefficient: most foam plastics have closed pores, as a result of which they perfectly resist the penetration of water into their structure. Thus, a sample of expanded polystyrene, when completely immersed in water, absorbs liquid in an amount of 1% of its own volume per day. Moreover, only open pores located on the surface are filled, that is, with increasing exposure time, absorbency does not increase.
- Flammability: depending on the brand and the presence of various additives, polystyrene foam may belong to the flammability group G2 or G3.
- Form factor: expanded polystyrene is available in the form of rigid slabs or shaped products, for example, shells (used for thermal insulation of pipes). Other types of foam can be flexible, such as polyethylene foam or foam rubber.
It is better to use slabs that are connected to each other using a tongue-and-groove method (the slabs have protrusions and recesses corresponding to each other).
With this connection, the plates mutually overlap the butt seam, thus preventing heat leakage through it.
Disadvantages of use
But, despite the impressive list of advantages, polystyrene foam cannot be considered an ideal thermal insulator. There are several reasons:
Low maximum permissible operating temperature
Most foam plastics are not resistant to thermal influences. Already at a temperature of 80–90 degrees, polymer molecules begin to decompose. In this case, not only the structure of the material suffers, but also volatile substances are released that are dangerous to human health.
How hot the attic roof will be in the summer depends on its color and material. This must be taken into account when choosing a heat insulator.
The most profitable building material is the one whose raw material is waste. You can create insulation for your home yourself. Do-it-yourself ecowool - manufacturing technology and list of necessary equipment.
Is it worth insulating the house from the inside? Arguments for and against are given here.
If it is not possible to insulate the house from the outside, then you can insulate it from the inside, the main thing is to do it correctly. This article contains useful recommendations for choosing insulation and performing the work.
Flammability
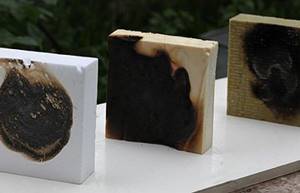
The biggest concern of foam opponents is its flammability. It contradicts the main rule of builders: good material is non-flammable material.
Not only do polystyrene foams burn, they also emit super-toxic smoke.
There are known cases when, during a fire in an apartment insulated with foam plastic, residents of higher-lying apartments located at a considerable distance from the fire died from poisoning. Of course, for the attic of a private house this is less relevant, but here too toxic smoke can play a fatal role.
There are brands of expanded polystyrene that are positioned as fire resistant. They differ from ordinary ones by the presence of special additives - fire retardants. Such foam plastics withstand the onslaught of fire somewhat longer, and in its absence are capable of self-extinguishing. But they still emit large amounts of toxic smoke.
Instability to the influence of active biological environment
Specifically, rodents. The idea of eating styrofoam would seem wild to a human, but the mice really liked it. Just like the foam itself. Having access to it, a rodent can quickly make an entire hole in the heat insulator.
As you can see, there are plenty of shortcomings. But any thermal insulation material has them, so polystyrene foam can be considered quite suitable for insulating an attic.
Which insulation to choose for the attic
Having decided on the specifics of choosing a room, it is worth deciding on the choice of materials, namely, how to insulate the attic from the inside. So, the choice of material can be influenced by some undeniable factors, namely:
- roof parameters;
- roof structure;
- climatic features.
So, there are several types of materials that can be used to insulate the attic from the inside:
Insulating the attic with penoplex
Polystyrene foam is one of the cheapest and most popular types of insulation material. Easy to install. However, its vapor permeability is significantly reduced. It can be seen from this that when using this type of material, the room may be exposed to dampness, and as the rafters dry out, unwanted gaps may form;
in this material
Expanded polystyrene. An analogue of polystyrene foam, but with slightly increased physical strength characteristics. It is quite durable, retains its shape well, is not afraid of high humidity and, very importantly, does not burn. It deserves special attention that insulation requires a not very thick layer - 5-10 cm.
Mineral wool is an absolutely ideal solution in all its parameters. It has a high density, is moisture resistant, has the property of fire safety and weakly transmits heat. This material is more durable, and if we consider it as a sound insulator, it is more effective
Cotton wool can withstand low temperatures. However, when working with it, special precautions should be taken into account;
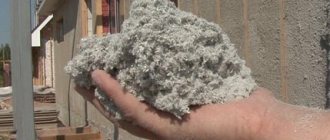
Cellulose wool (ecowool) refers to a heat insulator made from dust-free materials. It contains an antiseptic that prevents deterioration of the insulating layer and the wood in contact with it. Ecowool is able to penetrate into the slightest voids, filling them
This is an environmentally friendly material that can “breathe”; moreover, it is not afraid of moisture and does not support combustion. Ecowool is not harmful to health, unlike mineral wool, for example;
Polyurethane foam is applied by spraying to absolutely any surface. Using this material to insulate the attic, you can create a monolithic layer without existing gaps; Foil materials that function not only as insulation, but also work as a mirror reflector that prevents heat from escaping outside. To create the desired effect, this material should be deployed with an aluminum coating inside the room, leaving a distance of 5 cm between it and the vapor barrier layer.
Of course, when choosing material for insulation, the last word belongs to the owner of the house. When working with any insulating material, safety precautions must be observed. Required: gloves, safety glasses and long sleeves.
Styrofoam harbors mice
And one more fact that needs to be pointed out when assessing the pros and cons of foam insulation is that mice breed in the material.
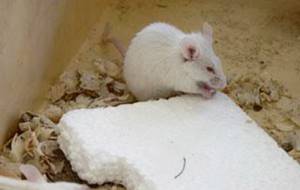
Expanded polystyrene is an ideal habitat for them, because it is warm and soft. Therefore, when insulating with polystyrene foam, block the access of mice. To do this, you can finish the places where rodents can enter with mineral wool, which mice do not like.
Therefore, although polystyrene foam has a number of positive qualities, we should not forget about its disadvantages. Therefore, it should be used thoughtfully and in accordance with all the technological features of the material.
Work technology
The attic roof can be insulated in two ways: from the outside and from the inside.
However, the preferred method is external thermal insulation.
Because its efficiency is higher.
It is not difficult to install thermal insulation in this way.
It is necessary to properly prepare the workplace, lay and secure the material:
the lower part of the rafters is hemmed from the inside with any dense sheet material: OSB, plywood or edged board, but so that there are no gaps;
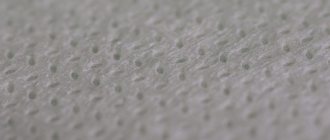
outside, on top of the base, we lay a layer of vapor barrier. The material sheets and the places where they are joined are glued with foil tape. When installing a vapor barrier sheet, you should pay attention to the sides of the material. They are different, and the material should be laid on that side. If you mix up the sides, the vapor barrier will start working in a different direction. Manufacturers of vapor barriers mark the sides, so it is difficult to confuse them. But there have been such cases;
lay a layer of insulation on top of the vapor barrier
It is very important that when laying the insulation there are no voids left;
Waterproofing is spread on top of the insulation. We also glue the hydrobarrier strips together using foil tape;
a gap is created for ventilation of the under-roof space
To do this, we fill a strip of a certain height along the rafters on top of the waterproofing. This size depends on what roofing material you use as the finishing coating. If a wavy material is used, then the thickness of the slats can be 30 mm. If the material is flat, then you should take a thicker slats - 50 mm;
At the final stage, the sheathing is installed and the roofing is installed.
Important!
When performing external insulation of an attic roof, you should remember that at a certain stage the insulation is open.
Therefore, work should be carried out in dry weather so that precipitation does not wet and damage the material.
We insulate the attic roof from the inside
Despite the fact that this method of insulation seems more rational (the insulation will not get wet in any case), it has several disadvantages:
- Most insulating materials are simply inconvenient to install from bottom to top. And it is basically impossible to lay out rolled materials and then fix them;
- Quite often, various purlins and connections are used to strengthen the rafter system. And in those places where the connection with the insulation does not occur, many unprotected voids remain. In these places, cold bridges are formed and all insulation efforts are reduced to nothing.
Thermal insulation of the attic roof from the inside is carried out as follows:
- a waterproofing film is laid, starting from the bottom edge. We fasten the edges and joints with adhesive tape. This covering of the walls is done with a small margin. After installation, excess film is easily removed;
- to ensure a ventilation gap, as well as a good fit of the film to the roofing material, it is necessary to nail counter-battens to the rafters;
- a layer of insulation is laid with maximum density;
- the entire space is covered with a membrane vapor barrier. It is fixed with an overlap using construction staples.
Instructions for installing polystyrene foam in the attic
The stages of working with polystyrene foam are not particularly difficult and you can insulate the attic from the inside with your own hands, without the involvement of hired workers. But there are certain points that are worth paying attention to.
As a rule, work begins with the installation of the lower part of the attic sandwich.
Let's consider the most common version of the load-bearing roof structure: wooden rafters with a section height of 200 mm, located with an axial pitch of 60 cm. All actions for arranging a roofing sandwich can be divided into those that are carried out from above, and those that are carried out from inside the room, from below. On the roof side, a waterproofing membrane is installed on the upper plane of the rafters, sheathing and roofing are installed. Before you start insulating the cells between the attic rafters with foam plastic, you should make sure that there is a membrane.
Attention! Vapor and waterproofing are sold in rolls, and during installation they must be overlapped. Typically, the overlap size is 10 cm. Therefore, when calculating the required amount of insulating membrane, you need to take into account the cost of overlapping layers.
Further work is carried out in the following order:
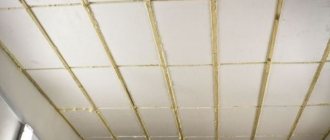
- The necessity of installing the bottom lathing is calculated. We compare the height of the rafter profile and the sum of the heights of the ventilation gap (between the foam and waterproofing) and the foam itself. Suppose, in accordance with the calculation, you have chosen a thickness of the insulating layer of 22 cm. Taking into account a ventilation gap of 3 cm and a margin of 1 cm, it is necessary to increase the rafters by a minimum of 6 cm. We install the sheathing with timber 6–7 cm high and a width equal to or slightly inferior to the thickness of the rafter beams. This installation can be performed after fixing the foam, but in this case, the operation of sealing the joints with foam will be divided into 2 parts and will take more time, and will also require more adhesive foam.
- Suppose you have chosen 10 cm and 12 cm thick PPS slabs to achieve the required insulation cross-section of 22 cm. We select a 10-centimeter material to perform the first (from the roof) layer. We create a stop to ensure a ventilation gap of 3 cm. This is easier to do with the help of clamps. We attach stops from below to the rafters with clamps, the distance from which to the waterproofing is 13 cm.
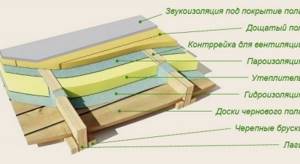
Thermal insulation design of the attic floor.
- We measure the width of the cell between the rafters and cut out a slab of the required size with a hacksaw. There is no need to adjust the size taking into account gaps or interference. The resulting piece should fit into place freely or with a slight tension that does not lead to destruction of the foam.
- We lay PPS slabs on the stops. To fix the insulation to the rafters, we use foam adhesive. We carefully foam all the gaps between the wood and the foam plastic, as well as between the PPS boards themselves. Before installing the insulation, you should allow 5 minutes for the glue to polymerize.
- After the first layer of insulation is installed, excess adhesive foam should be trimmed. Otherwise, it will be impossible to achieve a tight fit of the next layer.
- Before installing the second layer, apply a layer of adhesive foam along the rafters and over the joints of the first layer. After preliminary polymerization, we install 12 cm slabs so that the joints between them do not coincide with the joints of 10 cm slabs. Do not press hard when fixing the slabs. If there is a gap of about 5 mm between the layers, this is quite acceptable. We had another 1 cm of height for the sheathing strips in reserve, so we would not go beyond the indicated dimensions.
- After completing the work with the foam plastic, we install the vapor barrier membrane on the bottom sheathing using a stapler. Now the ceiling is ready for installation of decorative lining or slab covering made of plasterboard or OSB panels.
Video: insulation instructions from professionals
How to properly insulate a roof
Waterproofing is first laid along the rafters, from the roof ridge to the very bottom. But if the roof is covered with roofing iron, waterproofing is not necessary. When installing insulation, you need to know what its thermal conductivity is. This can be found on the Internet and in the Certificate upon purchase. Thanks to this, it becomes clear whether to install one layer of insulation or two.
When laying insulation, we must not forget that the material should not be close to the roof. An air gap is needed for good ventilation so that the rafters do not rot from dampness.
Insulation of the attic roof according to the scheme
If the roof is covered with corrugated material (tiles, metal tiles), then the thickness of the air gap is made at least 25 mm. When the roof is covered with steel sheets, asbestos cement or rolled materials, the air gap should be more than 5 cm.
If the thickness of the rafters and polystyrene foam boards are different, do this. If the slabs are thin, one layer is placed between the rafters, and the second layer of slabs is already covered by the rafters. If the thickness of the slabs is large, then wooden slats of the required thickness are placed on the rafters so that the slabs cover the rafters.
The insulation is protected from moisture using a vapor barrier. To do this, use: roofing felt, foil, polyethylene, glassine. The vapor barrier is overlapped, and the edges are secured with tape or thin wooden slats.
Foam laying technology
To work with polystyrene foam boards you will need a simple set of tools. The main ones are:
- roulette;
- pencil;
- sharp construction knife or hacksaw;
- gun with polyurethane foam;
- stapler and staples.
If the material will be fixed on a flat concrete surface, then prepare special dowels with a wide thermal head.
Umbrella nails allow you to secure foam boards to a flat roof
A vapor barrier film is required for any roof. To cover the slopes from the inside, you will need slats with a cross-section of approximately 2x5 cm. Vapor barrier and wall finishing will be attached to them if the roof is attic.
The structure of the roofing pie of a pitched roof is clearly shown in the diagram: a layer of waterproofing is laid on top of the insulation, and a vapor barrier membrane is laid below.
Installation on a pitched roof
To protect a pitched roof from heat loss, the method of internal installation of foam plastic is often used. The operating technology is simple and includes the following steps:
- A sheathing is mounted over the rafters and a waterproofing film is attached, then the roofing covering is laid.
- Foam boards are cut to fit the width of the gaps between the rafters.
- The insulation is laid between the rafters, pressing tightly against each other, but with a gap between the waterproofing layer. The cracks are filled with polyurethane foam.
- The sheathing for the ventilation gap is attached: the slats are nailed to the rafters in increments of about 50 cm.
- The vapor barrier is fixed - there should be a gap of about 3-5 cm between the film and the foam.
- The walls of the attic are covered with wood.
The method of such insulation is easy to implement independently. But it should be taken into account that for high-quality roof protection, a foam layer thickness of 5 to 20 cm is required. Additionally, you can use mineral wool slabs, which are glued directly to the foam, and then a vapor barrier and finishing materials are installed.
Video: rules for roof insulation with foam plastic
Flat roof installation
Private residential buildings with a flat roof are rare. However, foam insulation is suitable not only for residential, but also industrial or utility buildings with a low roof slope. Before insulating such surfaces, it is necessary to waterproof the surface with bitumen mastic, applying it in several layers after each previous one has dried.
The mastic is distributed evenly over the entire surface
This method is simple, but it is also possible to lay roofing material or rolled fused TechnoNIKOL material with a bitumen layer. Why do you need a gas burner? Although on large roofs this type of waterproofing will be expensive, so mastic is a simple and effective solution.
After the mastic has dried, the entire roofing pie is laid sequentially:
- If the foam sheets do not have a locking fastening in the groove, then the material is placed in two layers. In this case, the slabs of the second layer should always overlap the joints of the lower layer. If the plates are fastened together, then one layer of material of the required thickness is mounted.
- Typically, the foam is glued to an additional layer of cold mastic. If dowels are used, they are placed every 40–50 cm.
- After laying and drying the second layer, carefully seal all the gaps between the insulation elements and the wall. For this purpose, polyurethane foam for external use or mastic is suitable.
- Next, geotextiles are installed, and then a screed is made, on which roofing felt with a bitumen base is laid. Although it is also possible to install OSB boards, on top of which roll protective materials are fixed in the same way.
Waterproofing the top layer of the roof is mandatory to protect the insulation
After installing thermal insulation in this way, the flat roof will have sufficient strength and will withstand any snow loads. But a prerequisite is the installation of a drain, because its absence will lead to damage to the roofing and insulation.
Application area
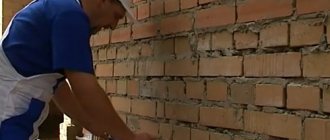
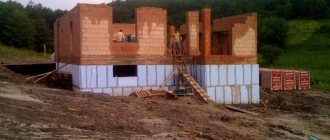
Taking into account the previously mentioned disadvantages, it is possible to choose the use of polystyrene foam without damaging the building. Polystyrene insulation of wooden buildings (if required) is better done from the inside than from the outside. This will protect the material from destruction and the building from defrosting. It makes more sense to use vapor-proof material in stone buildings (brick, concrete), but if absolutely necessary, wooden ones can also be insulated.
Stone and block buildings can and should be insulated from the outside. But it is not recommended to insulate wooden houses from the outside with polystyrene foam.
Insulation of floors
When used internally, the main area of application is the ceiling. Laying into a floor structure is also possible. But when carrying out work, the strength of the material should be taken into account.
- The first use case is common for concrete floors. In this case, the insulation is laid under a cement-sand screed. To prevent the foam from breaking through, the screed is made reinforced with a thickness of approximately 50 mm. For reinforcement, special meshes with reinforcement with a diameter of 3 to 6 mm are used.
- The second option is applicable for buildings with wooden and concrete floors. In the first case, the insulation is laid in the ceiling or floor between the beams. In the second case, you will have to make a wooden frame, with foam plastic mounted between the joists. In this case, the ceiling pie increases, eating up the useful height of the premises.
There are also two ways to attach foam to the ceiling. With or without a frame. The choice of method depends on what material the ceiling is made of and technical capabilities.
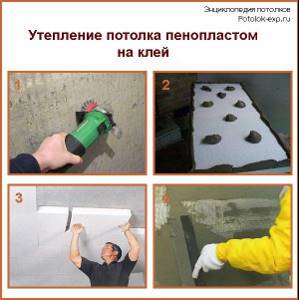
Ceiling insulation with foam plastic
When insulating the ceiling, it is worth remembering about waterproofing and vapor barrier. Polystyrene balls are not afraid of water, but moisture can accumulate between them. Manufacturers are usually silent about this property. In this case, the ceiling should contain the following layers (they are listed from bottom to top, from the side of the warm room):
- the material with which the ceiling is sheathed;
- vapor barrier necessary to protect the insulation;
- insulation;
- floor design;
- waterproofing (sometimes mounted on top of the ceiling);
- floor of the next floor.
If it is necessary to insulate the floor, vapor barrier is also laid below, and waterproofing on top
It is important to remember that the first is always located on the warm air side, and the second on the cold air side.
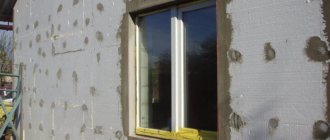
Wall insulation
Foam plastic is also actively used for thermal insulation of the walls of houses from the inside. In this case, steam and water protection is also required. When performing interior finishing, it is worth leaving a small gap between it and the heat insulator to eliminate settled steam.

But it is important to remember that polystyrene foam is not the best option for walls. It has extremely low breathability, so it can create a greenhouse effect indoors
In this case, you will have to take care of installing additional forced ventilation (which is expensive).
Based on all of the above, we can generalize: polystyrene foam is an inexpensive material to protect a home, with an impressive list of disadvantages. It makes more sense to use it for floors than for walls. In a wooden building, if possible, it is better to use vapor-permeable mineral wool.