A distinctive feature of a two-pipe heating system, as one might guess from the name, is the presence of two independent pipe circuits - for supplying hot water and for discharging cold water. If the radiators are connected incorrectly, and the system itself consists of 7-9 batteries, then the heat transfer of each subsequent one will decrease to such an extent that the power of the last will be only 10% of the maximum possible. This is why it is so important to correctly connect a heating radiator to a two-pipe system, which we will discuss in this article.
Connecting a heating radiator to a two-pipe system
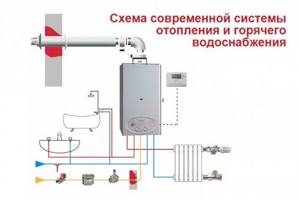
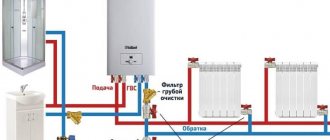
Diagram of a heating and hot water supply system from a gas double-circuit boiler
Possible connection diagrams
The most efficient connection of batteries is quite easy to carry out - both in terms of the number of nodes and in terms of installation technology.
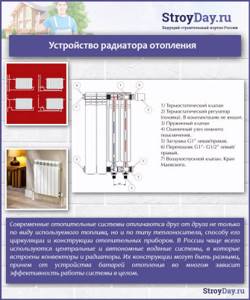
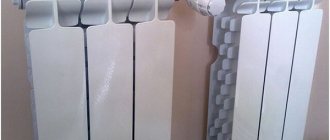
Heating radiator design

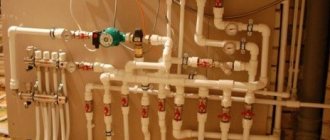
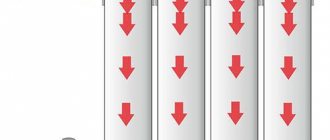
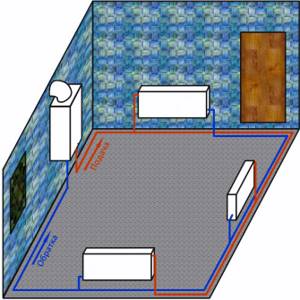
Two-pipe heating system
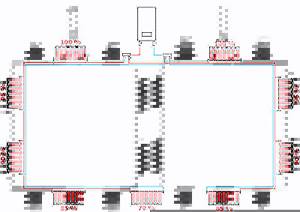
Option #1. Tichelman scheme
The most popular connection scheme, its main advantage is the maximum efficiency of all heating radiators at any point in the system. In addition, the Tichelman circuit allows you to regulate a separate radiator without any effect on the rest of the system. So, if it is very hot in one of the rooms, then the battery there can be completely/partially disconnected from the supply of hot coolant. And the thermal energy that is released as a result will be evenly distributed over the remaining radiators.
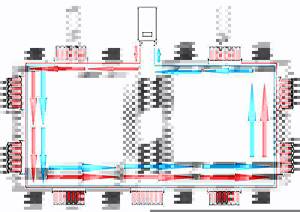
Tichelman scheme
On a note! In other schemes, such a seemingly obvious phenomenon is not available, as you can personally verify when reading the next paragraph of the article (there is an uneven distribution of residual thermal energy there).
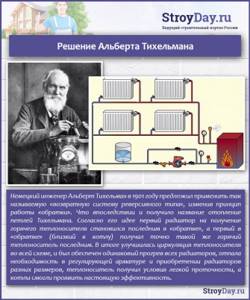
Albert Tichelman's solution
Another advantage of the scheme is that the water in both pipes has a common direction of movement. In terms of hydraulics, this is very good, since the load on all components of the system (in particular, the pump and heating boiler) drops noticeably.
Hot water begins to move from the boiler, moving alternately through all radiators. The return movement also starts from the first battery. It turns out that battery No. 1 will be the last on the return path, but the first on the hot coolant supply. Water will flow to battery No. 2 at a slightly lower temperature, but this unit is already closer than the first to the boiler on the “return” circuit.
Water flow process
The situation is similar with each subsequent radiator: the further it is from the source of hot coolant, the shorter the distance to the cold water outlet point. As a result, the conditions for all batteries are approximately equal (in terms of heat exchange with the system); they all heat up equally, regardless of their location.
Pipes with a diameter of 25 mm are used for wiring, while the batteries are connected to the network using pipes of 20 mm.
The radiator in the middle will not work
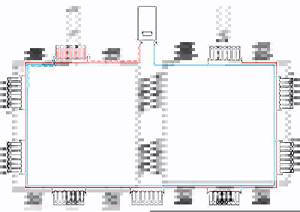
The Tichelman scheme has only one drawback - radiators cannot be placed exactly in the middle of the system (they simply will not heat in this place). This is explained by the hydraulic effect that occurs in the middle - here the outflow of cold and the supply of hot fluid form equal pressure. In reality, this almost never happens; the problem is solved by slightly moving the battery to the right or left. Although there is a simpler option - to create a small turn on one of the circuits in order to increase its length and thereby move the heating battery from the middle.
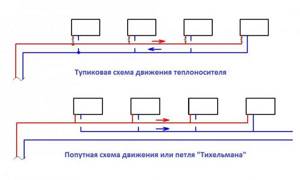
Dead-end and associated house heating schemes
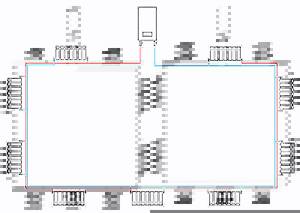
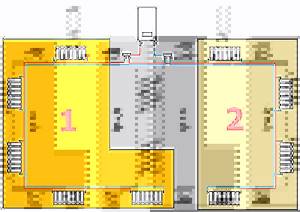
Option #2. Connection via two double collectors
This scheme differs from the previous one in that the battery, which is the first to the heating boiler on the supply side, is also the first on the “return” path. This first battery operates as efficiently as possible, while the remaining nodes lose efficiency as they move further into the system.
Connection via two double collectors
The use of two collectors makes it possible to minimize this effect, since two circuits are created. Thanks to this, the number of radiators in one circuit is reduced, and thermal energy is distributed more or less evenly.
Important! On the “return” and supply, almost immediately after connecting to the heating boiler, a double manifold is installed. On the supply line, the collector divides the coolant into two circuits going to one and the other part of the radiators, respectively. A similar situation is observed on the return line. As a result, a pair of shorter contours is created.
Two circuits
In this circuit, each subsequent radiator heats up worse, as we already mentioned above, but this effect can be partially eliminated using balancing valves. If you tighten this valve a little at the supply to the first radiator, then a better flow of coolant will be ensured to the remaining nodes, which are more distant. We also note that it is necessary to adjust the valves in any case, since in reality the length of the circuits created by the manifolds always differs somewhat. Consequently, the batteries will not produce the same amount of heat and therefore need to be balanced to balance their operating efficiency.
Which scheme should I choose?
From everything we said above, we can conclude: the simplest, most flexible and effective is the Tichelman scheme. The use of two double collectors can be an alternative - the efficiency of liquid distribution in such a scheme is quite high, but there are some difficulties during installation; in addition, additional adjustment will be required in the future.
Tichelman loop diagram
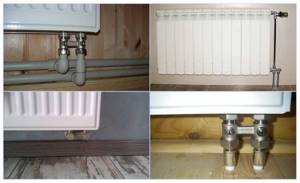
Main installation features
When assembling and installing fittings on a heating device, it is laid lying on the floor. Instead of a radiator liner, a special valve is used, which allows you to connect the supply and return to the bottom of the battery. An O-ring seal is used to seal the connections.
On a note! It is recommended to mark the location of the through hole on the valve, which is located on the shank. This will allow you to align it in a vertical direction during installation.
The design of the injection unit often lacks a nut, which is used instead of a radiator liner. Despite this, its installation is similar to that of a valve. If a one-sided bottom connection is created, plug the outlet located on the reverse side with a plug. After this, install all the fittings on the battery using tow and paste. Then the assembled radiator is usually hung on wall brackets. Finally, it is connected to the heating system pipelines.
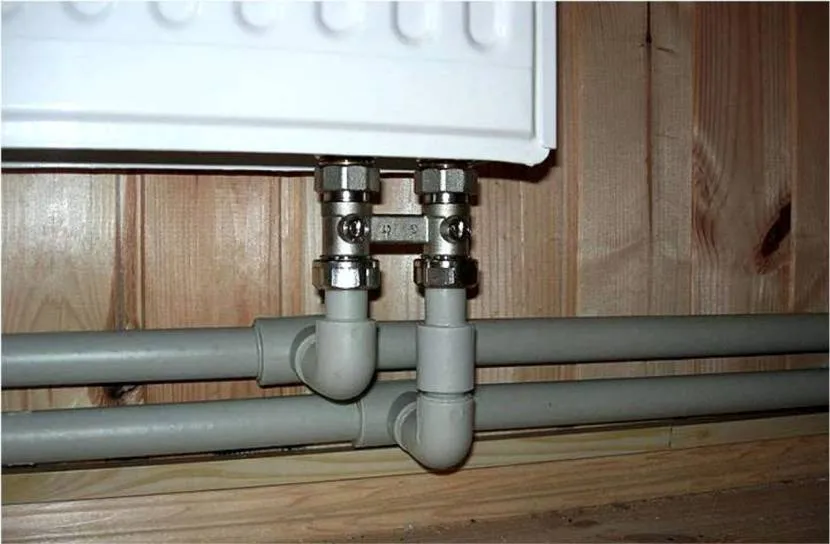
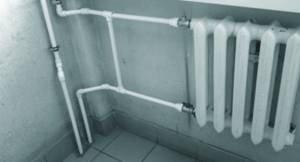
Installed and connected radiator to polypropylene pipelines Source santeh42.ru
About choosing a location to install the battery
You can’t just install a radiator on the wall - you need to choose a place for its installation in accordance with certain requirements. And this, in turn, should be taken into account when planning a future connection.
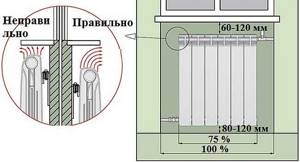
The photo shows a diagram of the correct location of the battery in the window sill niche
This is explained by the fact that if the radiators in the room are positioned correctly, they will create a kind of protective screen that prevents the penetration of cold air. That’s why batteries are often located under windows – that’s where heat loss is greatest.
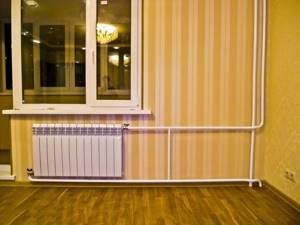
Top feed, radiator longer than 12 sections, diagonal connection
Note! A pre-prepared battery layout will make it possible to determine the installation distances. It is important that each radiator is located at least 20 mm from the wall, 100 mm from the bottom of the window sill and 120 mm from the floor. Don't change these standards!
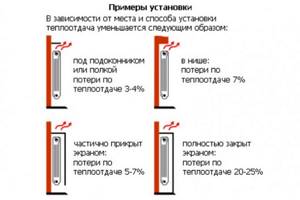
An incorrectly chosen location leads to heat loss
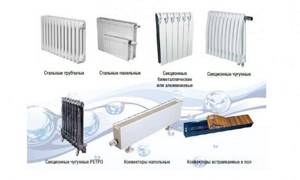
Types of heating radiators
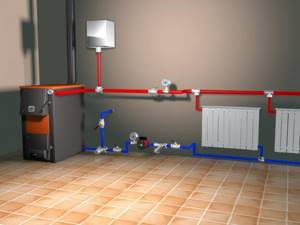
How to properly connect a radiator with a two-pipe system?
The one-pipe system has one big disadvantage. The more heat the first radiator uses, the less heat each subsequent radiator will give off.
In a two-pipe heating system, water of approximately the same temperature is supplied to each radiator, so you need to use it to the maximum.
Accordingly, for conventional radiators it is best to use a diagonal heating system, or install radiators specifically designed for the upper or lower system. It is better to abandon the side connection system.
About methods of water circulation in the system
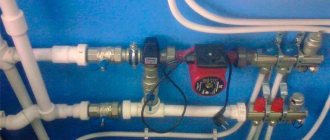
There are two ways of coolant circulation - natural and forced. In the second case, a circulation pump is included in the circuit, which pumps water into the pipes. This pump is usually installed near the heating boiler or, alternatively, is initially present in its design.
Connecting a heating radiator
If in your region there are frequent power outages and the pump, accordingly, will turn off from time to time, then it is better to give preference to a system with natural circulation and a non-volatile heating boiler.
When connecting radiators, you also need to take into account the design features and length of the heating main. If a pump is used, any of the connection methods can be implemented.
Circulation pump pressure calculator
Go to calculations
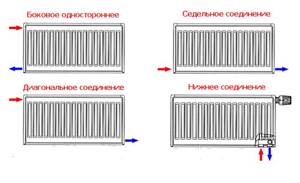
Heating radiator connection diagram
Table. Radiator connection options.
| Name, photo | Short description |
| Cross (also known as diagonal connection) | The most effective connection option. Heat loss is minimal (no more than 2%). Water is supplied from one side in the upper part and discharged from the other in the lower part. It is possible to connect multi-section batteries. |
| Lower and saddle | The “return” and supply are connected from below; this method is used when laying a pipeline in the floor. Heating efficiency is the lowest, heating of the batteries is uneven, and heat loss reaches 15%. On the other hand, the interior is not spoiled by pipes. |
| Unilateral | “Return” and supply are connected on one side (bottom and top, respectively). In this case, the battery sections heat up unevenly. The best option for one-story houses. |
On a note! When choosing one method or another, you must decide what is more important - the attractive appearance of the room or good heat transfer.
Calculator for calculating the number of heating radiator sections
Go to calculations
Bottom radiator connection unit - advantages of use
Radiator fittings, which are used to connect from below, are intended for use in steel panel heat exchangers and are not suitable for aluminum radiator sections - due to this, steel types are highly competitive with them. Bottom inclusion compared to other types has the following advantages of using fittings:
- Saving pipe materials and outlets - in the floor structure or on the wall there are only two short outlets for connecting the radiator; the pipes do not go to its upper inlet.
- The connection at the bottom is aesthetically pleasing, and if the pipeline comes out of the wall, it is practically invisible under the body and does not interfere with cleaning the floor covering.
- Shut-off control valves (ball valves or valves) in the “binoculars” allow you to control the intensity of the liquid entering the heat exchanger, and when it is completely shut off, remove the batteries for maintenance or repair.
- The bottom connection unit with a vertical bypass evenly distributes water throughout the radiator with heating of its coldest upper corners, which is observed with the bottom connection. Also, with single-pipe wiring, the bypass helps to equalize the temperatures of the incoming and return flows, which in turn leads to uniform heating of the devices built into the line.
Rice. 2 Straight and elbow 3/4" bottom fittings installed
Master Class. An example of installing a heating radiator with your own hands
Let's consider the algorithm of actions when connecting a battery to a heating system.
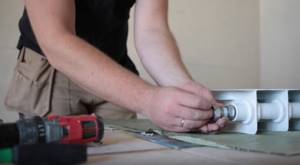
Step 1. First, prepare and assemble the heating radiator itself. Clean all threaded holes from factory grease, for which you can use a special cleaning agent and a brush.
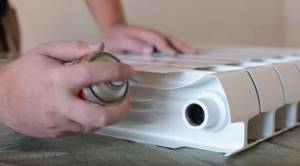
Radiator preparation
Step 2. When finished, remove any remaining cleaning product with a paper towel. It is important that the holes are as clean and dry as possible.
The hole is wiped dry
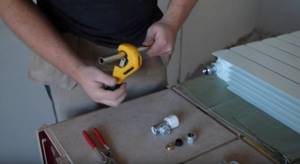
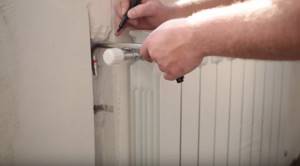
Step 3. Install adapters (in our example these are ½ and ¾ inches).
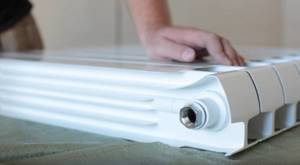
Adapter
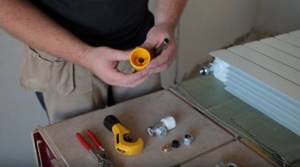
Step 4. Install the “American” faucet onto the adapter that you installed in advance. To tighten, use a special key for “American women”. As a result, you will equip a pair of holes - inlet and outlet (in the example they are located diagonally).
“American” is installed
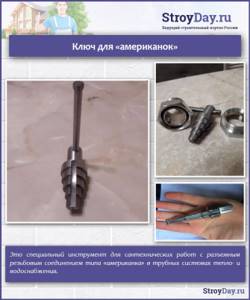
Key for "American"
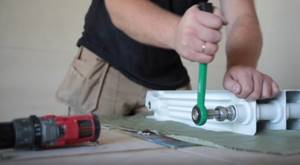
The key for “American women” is used
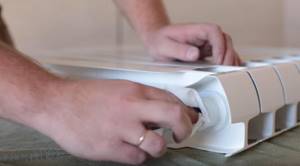
Step 5. Install plugs on any unnecessary holes that need to be closed.
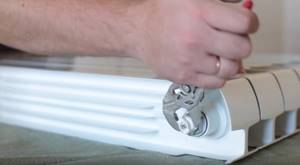
Installing the plug
Step 6. Prepare the shanks (these are special thin tubes) and cut them. Remove the internal chamfer in the shanks. Then feel the internal parts - it is important that you do not feel any burrs there.
The tube (shank) is being prepared
Internal chamfering tool
Step 7. Place the nut, brass spacer and rubber band on the tube (in that order). Then expand the tube using a special device, inserting it inside until it stops. After expansion, the tube will no longer be able to jump out of its place under the influence of pressure during operation of the heating system.

Pipe expansion
Step 8. Move the elastic and other parts to the extended edge, attach the adapter.
Step 9. Mark the place where the radiator will be installed on the wall, in accordance with the requirements described above. To begin, determine the center of the window sill, measure down 10 cm - the battery mounts will be located exactly at this level.

Marking
Step 10. Draw a line for installing the holders parallel to the window sill at a distance of 10 cm. The holders themselves will be attached to dowels.

Drawing a line for installing holders
Step 11. Another fastener will be located 12 cm from the floor surface along the vertical center line.
Installing the Bottom Mount
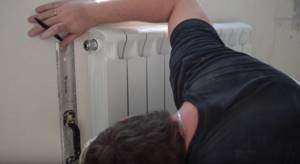
Step 12. Place the battery on the mounts and level it.
Heating radiator installation
Note! If necessary, you can slightly adjust the battery mounts.
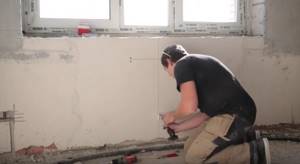
Step 13. Mark on the wall the places where the grooves will be located (in our example, the pipes will be laid inside the wall). Do this in all places where pipes will be connected to the radiator.
Marking for future wall grooves
Step 14. Perform grooves on the previously planned areas. Remove the battery to make it easier to carry out work.
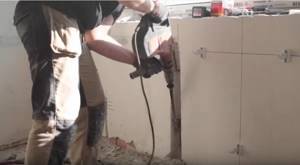
Grooving
Step 15: Prepare the tubes. Make a mark where they will be cut, as shown in the picture below.
Preparing pipes for connecting the radiator
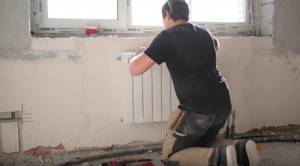
Step 16. Connect the battery and faucet to the soft line laid in the wall. Tighten all connections tightly. The input should be located at the top, and the output, accordingly, at the bottom.
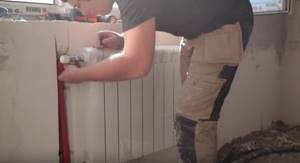
Pipe connection
Video - Various schemes of a two-pipe system
What is a radiator connection unit?
A radiator connection unit with a bottom connection is an N-shaped piece of plumbing fittings with two parallel fittings located at a distance from the seats of a steel panel radiator, and a rigid jumper between them. A typical part has, on one side, a fitting into a pressed-in union nut with a gasket (American connector) with an internal diameter of 3/4 inch, and on the other side, a 3/4 inch external thread is applied to the fitting.
Inside each of the inputs there is a shut-off ball valve or screw valve, which allows you to regulate or shut off the incoming coolant; when removing the battery during its repair or replacement, a shut-off function is used.
Conditions for efficient heat transfer of batteries

Two-pipe heating system
The correct choice of heating devices ensures energy savings. Among the many offers on the market, they differ:
- shape;
- material;
- heat transfer level;
- connection type.
For each room in which the heating system is installed, the number of radiators will be different. This depends on the following parameters:
- heated volume;
- room area;
- wall insulation;
- radiator thermal power;
- the presence of window openings;
- air temperature outside during the cold season;
- the presence of adjacent rooms and an attic.
To ensure maximum heat transfer between the heating device and the wall, it is recommended to install a special heat-reflecting film. When installing radiators, you must adhere to the following rules:
- batteries must be placed on the same level;
- The radiator fins must be positioned in a strictly vertical position;
- the center of the heating equipment must coincide with the center of the window;
- The radiator length must be at least 75% of the opening length.
When performing work on installing a heating system, you need to take into account the type of material from which the communications are made. For example, connecting plastic pipes to cast iron radiators can cause a lot of trouble and ruin the heating system.
The use of polypropylene pipes in the heating system
Polypropylene heating pipes
The most popular material for coolant communications is polypropylene. Pipes made of this material provide maximum resistance to aggressive environments.
No plaque forms on their interior, and solid particles do not settle in the system. Installation of polypropylene pipes is carried out using special equipment. If they are used, you can be sure that the heating radiator piping will prevent coolant leakage.
The advantage of polypropylene pipes is the ability to create a heating circuit of any configuration. However, in this case, it must be taken into account that the longer and more complex the pipeline, the higher the heat loss.
Pipe connections can be made by soldering and using fittings (special parts for fixing). This method is less reliable than soldering, because it does not exclude the possibility of communications leakage.
Modern polypropylene pipes have a long service life (up to 40 years). They easily withstand internal pressure, and exposure to a heated coolant does not cause deformation.
There are some restrictions when installing plastic communications. They cannot be used near the boiler, and the gas supply pipe to the heating device must have a rigid connection.
During installation, do not use tow, tapes, or rubber gaskets. These warnings are for safety reasons. Before turning on the system, you must carefully check all connections.
The peculiarity of the boiler - the main element of the system - is taken into account when installing and choosing the type of communications for heating the premises. To increase the effect of its operation, various types of additional elements are used, including a circulation pump, an expansion tank and a device for regulating pressure.