Communications laid on the walls are unlikely to decorate the interior of the bathroom. To camouflage and decorate pipelines, various structural forms are used, one of which is the box. Any home craftsman can handle its construction without any problems if he is familiar with the technological subtleties. Right?
We will tell you how to make a beautiful and durable pipe box in the bathroom with your own hands. For independent owners, we have listed a number of the most popular options available to an inexperienced performer. The tips given in the article will ensure the impeccable results of your efforts.
How to hide communications?
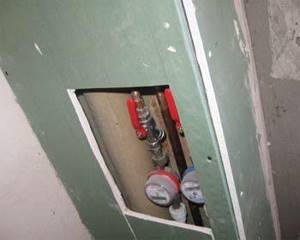
The wiring in the bathroom includes pipes connected to various plumbing fixtures (bathtub, washbasin, and with a combined bathroom, to the toilet), as well as various devices and devices: valves, filters, water meters.
To prevent communication systems from being conspicuous, they are hidden using various methods.
When organizing hidden wiring, the pipes are hidden in specially cut channels in the walls. Please note that this method has many limitations.
One of them is hidden wiring. In this case, the pipes are hidden inside the walls, arranging special grooves in the latter.
True, this method is not universal, since it has a number of limitations:
- wall gating can only be carried out during a major overhaul, since in this case the complete elimination of finishing coatings and replacement of communication equipment is required;
- when installing hidden wiring, it is impossible to hide a filter, meter or other device;
- building regulations prohibit punching grooves in load-bearing structures, since they sharply reduce the strength of the walls;
- there are restrictions on the dimensional characteristics of pipes that are used for hidden wiring: their diameter should not exceed 50 mm. Therefore, this method is in no way suitable for masking a thick sewer pipe;
- This method is not suitable for risers, the appearance of which is unlikely to decorate the bathroom interior.
An alternative to hidden wiring is a combined system that involves installing a box on the surface of the walls. In this case, the pipes are placed in a specially allocated space, and the outer walls are finished in accordance with the style of the interior.
Plumbing cabinets
Allows you to make the most efficient use of space. Covering the sewer pipeline with a plumbing cabinet is a reasonable solution for small spaces. This niche combines a screen, as well as additional space for household chemicals, paper and other items. The most convenient is a two-door sanitary cabinet. The doors are cut from MDF boards. You can also order a ready-made screen.
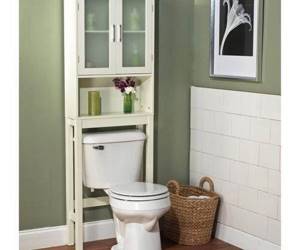
Furniture companies will select a product of the required color and texture. To hide the wiring, a wooden beam is installed on the side walls of the opening. Then the doors are installed using hinges. It is possible to make a sliding structure. To save money, an edged board is used.
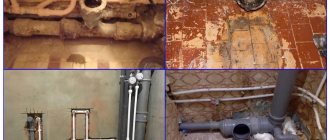
Masking using gating
Hidden installation looks the most aesthetically pleasing. The parts are sewn into pre-punched grooves. These are the grooves. You can cut holes with a hammer drill or wall cutter. When laying sewer and water supply lines hidden, they are hidden in the floor screed.
The wiring from above is poured with concrete. This process is expensive and complex. In case of a breakthrough, it is impossible to reach. We'll have to say goodbye to the perfect renovation. Also, before hiding the pipe using grooves, you should take into account some of the nuances of such arrangement.
You cannot use grooves:
- In load-bearing walls. They already have a lot of workload. The grooves will only strengthen it.
- Hiding this way will not work in areas where electrical networks are located.
- The method is only suitable for soldered products. Monolithic technology is used to connect them.
- Anyone who has closed pipes this way knows that when they come into contact with the walls, they make unpleasant sounds. Clamps will help fix the problem. Additionally, thermal insulation is used.
Note! An accurate drawing will be helpful. It's better to save it. In case of an accident it will be useful for plumbers.
Decorating pipes
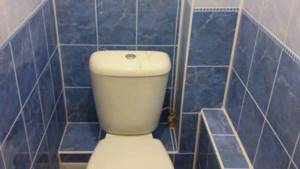
Since it is not always possible to seal the pipes in the toilet, due to the small size of the room, in order for the room to have an aesthetic appearance, it is possible to simply decorate some of its elements.
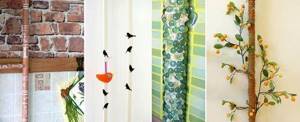
Decorating techniques:
- You don’t have to hide it, just paint it. The color should be in harmony with the overall design of the bathroom.
- Using stencils, original patterns are applied. A little patience - and interesting stories will appear on boring pipes.
- Various pieces of glass, pebbles or ordinary sewing braid are suitable as decorative elements.
- You can braid with artificial flowers. The design will be close to eco style.
- Stickers and decals are also an option. If you cover it with newspaper or magazine clippings, they will resemble stands with posters. It will turn out stylish and unusual.
- Plumbing items can be wrapped with twine or other similar items.
Owners do not always strive to seal communications. Sometimes plumbing communications become part of the interior. Fans of high-tech or loft style will appreciate this design. The most successful combination is copper plumbing and the same pipes.
External piping is installed much faster. And there will be no problems with repairs. You can always replace worn parts.
Metal products require careful care. A significant disadvantage is the price. In addition, the metal heats up quickly. If you come into contact with it, you can get serious burns.
The arrangement of a bathroom requires a special approach. Materials must be durable and meet sanitary standards. There is plenty to choose from. All that remains is to decide on your preferences. There are no strict limits. Each option is easy to rework at your discretion. It all depends on the area of the room and the imagination of the owner. Based on these options, it is possible to create your own method of disguise. Dream boldly, and leave your dreams to the professionals.
Advantages of a camouflage box
In the design of modern bathrooms, similar structures are often used, masking one or more pipes, since the boxes have a number of undeniable advantages.
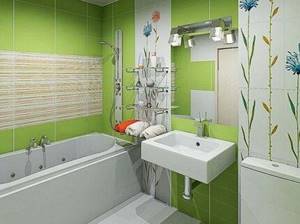
A pipe box made of plastic panels or plasterboard will improve the interior of the bathroom. This design will fit well into any room
Similar designs are characterized by:
- A neat appearance, which is achieved by using high-quality materials for the manufacture and design of the structure.
- Easy to install. The system can be performed not only during major, but also during cosmetic repairs, since the box can be installed even on top of the existing finishing.
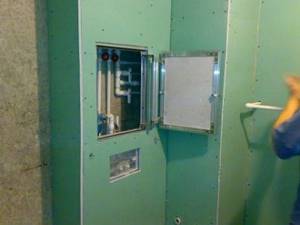
- Providing easy access to the pipeline, which allows not only to take meter readings, but also to monitor the condition of the pipes, and, if necessary, repair instruments and communications.
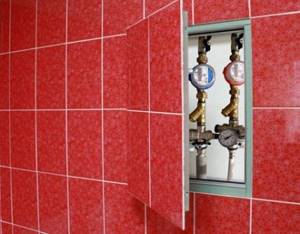
- The possibility of combining the box with a toilet installation, shelves and other parts, thereby achieving optimal use of the space of even a small room.
A carefully made and finished box can become a real decoration of the bathroom, combining functionality and aesthetics.
Box in the toilet made of PVC panels: advantages and disadvantages
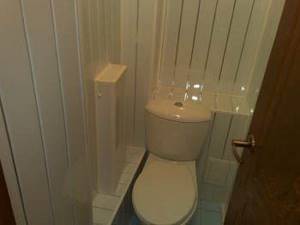
A box made of PVC panels is a very popular way to hide communications. They are inexpensive. At the same time, the color range is sufficient to harmoniously fit the box into the interior of the room.
They are popular due to the following characteristics:
- They are easy to sew up communications.
- They are quite durable and lightweight.
- They do not burden the interior.
- Plastic is resistant to moisture.
- With regular maintenance, mold problems will not arise.
Compared to other materials, it will be cheaper to put a sewer pipe in a PVC box.
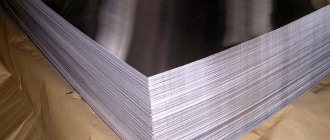
Selecting building materials for installation
To make a box, you must first build a frame, which is then covered with sheathing material, and often additionally finished, for example, covered with tiles. The base is made of galvanized metal guides (vertical and horizontal).
Various types of building materials can be used as coatings, which must have a number of qualities, namely:
- Moisture resistance. Boxes are installed in bathrooms, where there is a high percentage of water vapor.
- Light weight and small thickness. Both the ease of installation and the size of the finished structure depend on these factors: walls that are too dense can “take up” a significant part of the space.
- Environmentally friendly. Such structures should not emit toxic substances or have a pronounced allergenic effect.
- Aesthetic appearance or the possibility of additional finishing.
Most often, the following types of materials are used for cladding.
Option #1: plastic panels (PVC)
Polymer panels have a beautiful appearance. They are produced in a large assortment, which allows you to choose a finishing material that ideally matches the color palette of the bathroom.
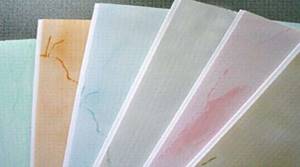
In the assortment of construction stores you can find plastic panels of various colors and shades. In addition to its beautiful appearance, this material is also strong and durable.
In addition to aesthetics, PVC panels have high consumer qualities:
- ideal water resistance;
- resistance to deformation and mechanical damage;
- durability: flexible and durable plastic can last for many years;
- easy to clean - dirty parts can simply be wiped with a damp cloth;
- ease of installation: working with this material does not require special professional skills or special equipment;
- availability: PVC panels are a budget finishing material with low cost;
- possibility of quick repair: damaged structural elements can be removed without destroying the entire box;
- compactness. The panels are thin, so structures made from them do not take up much space, which is extremely important for miniature rooms.
An alternative to plastic panels is usually plasterboard, which is widely used in construction.
Option #2: moisture-resistant plasterboards
There are different varieties of this popular material. To decorate a bathroom, you should not use standard drywall (gypsum plasterboard), intended for rooms with moderate humidity (up to 70%).
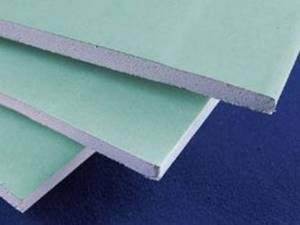
Moisture-resistant plasterboard sheets are often used to construct boxes. This inexpensive material is easy to install; it also has good resistance to water vapor
At the same time, a moisture-resistant type of drywall - gypsum board, which is easily recognized by the green surface of the slabs - is well suited for finishing the plumbing unit. Such sheets are suitable for both standard cladding work and for creating complex structures with convex, concave and curved surfaces (in this case, however, working with drywall requires special skills).
Another additional advantage of GKVL is that the slabs are impregnated with antifungal agents that prevent the development of harmful mold.
At the same time, when choosing a material, you should take into account some features of drywall:
- Installation of structures made of gypsum board or gypsum board requires more effort than installation of systems made of plastic or MDF boards.
- It will not be possible to make a collapsible structure from plasterboard, so when making a box you must definitely provide a door or hatch that provides access to valves, meters and other elements of the communication system.
- GKL (GKVL) boards are not a finishing material: when making a box from them, it is important to think about the finishing. Given the high humidity in bathrooms, tiled paneling is usually used, but other types of decoration can be used: paint, decorative plaster, wallpaper.
It is important to note that experts advise additionally impregnating even moisture-resistant boards with a special composition in order to increase the strength and resistance of the element to moisture.
In addition, you can build a box from other materials.
Option #3: waterproof plywood
This modification differs from ordinary plywood in the special composition of the glue used. The sheets have a thickness of 6 to 40 millimeters and have fairly good consumer properties, however, despite the name, it is better to additionally treat them with special compounds that improve water resistance.
The main disadvantage of waterproof plywood is its high cost, due to which it is used less often than other building materials.
Option #4: MDF and HDF boards
Sometimes you can find advice on using MDF panels (Medium Density Fiberboard) for constructing boxes. It is hardly worth following such recommendations, since this material absorbs water vapor well and is not very suitable for wet rooms.
It is much more expedient to cover the structure with HDF sheets (High Density Fiberbord). This material resists moisture well, so structures made from it do not lose their properties for 10 years or more.
Option #5: OSB boards
Another suitable option that allows you to successfully hide pipes in the bathroom can be oriented strand boards (OSB, Oriented Strand Board) - multilayer sheets glued with resins, into which synthetic wax and other additives are added.
There are several varieties of this material. To make boxes, it is best to use OSB3 sheets (with additional impregnation), as well as OSB4 sheets. The latter can be used for particularly strong structures or in places where heavy loads fall.
To construct a box with lining made of OSB, plastic panels, plywood, it is better to construct the box from lumber:
Image gallery
Photo from
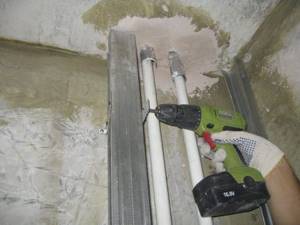
The use of lumber in the construction of the frame
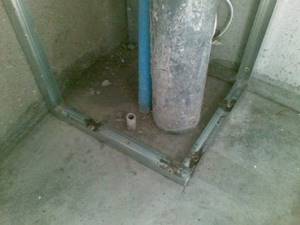
Sewing the area where the risers are located
Frame for masking water pipes
General frame for masking pipes and trim
Choosing the optimal design
Protective and decorative structures for pipes can be made in different ways, and the most common configurations are the following.
Boxes-cabinets . This option is usually provided for risers and other vertical systems. The design provides full access to communications. In addition, it can be easily combined with shelves and other devices that allow you to make maximum use of the usable area.
Partition boxes . These structures are installed over the entire width and height of the room, practically isolating a certain part. Although in this case the bathroom area is somewhat reduced, the room looks very neat, since all communication systems are masked.
This option is especially suitable for spacious bathrooms. It can also be recommended when using a wall-hung toilet, since the partition simultaneously with the communication systems allows you to hide the installation. Behind the partition you can also place devices for storing necessary things, for example, household chemicals.
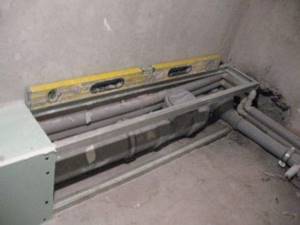
In addition to vertical systems, horizontal boxes are very popular, which allow you to disguise pipes adjacent to the floor or ceiling
Compact box built around pipes. The most commonly used design, which practically does not absorb space, but gives the interior a neat look. Such systems can be either vertical or horizontal, adjacent to the floor or ceiling.
Below we will analyze in detail the stages of manufacturing such a structure.
Preparing to install the box
Before starting the construction of the structure, preliminary work should be carried out.
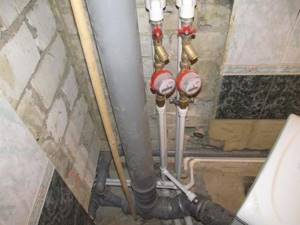
Before starting work on the manufacture of the box, you should make sure that the pipes and other elements are reliable by checking all communications for leaks and hidden defects
If a new pipeline is being laid, it is advisable to provide a minimum number of connections.
Then choose a box design that would be best suited for the bathroom, take all the necessary measurements, and then make a sketch of the structure. In this case, it is necessary to provide access to devices and instruments (filters, valves).
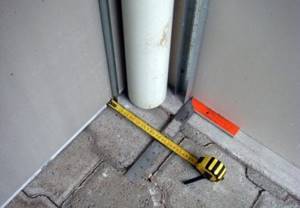
Before starting the manufacture of the box, it is important to carefully measure the distance, and then make a calculation, finding out the required number of profiles, PVC panels and other materials
According to the drawn diagram, you should calculate the required amount of building materials, providing a small reserve.
It is also important to stock up on all the necessary equipment in advance, as well as purchase panels, guides and other necessary structural elements. They need to be carefully inspected in order to identify chips, defects and damage in time.
Material requirements
A toilet is a room with a specific microclimate. Therefore, before hiding pipes in the toilet, decide on the material.
It must meet such important criteria as:
- Moisture resistance. There is constant condensation in the toilet. Droplets of water settle on surfaces. Over time, unstable products begin to get wet, and fungus and mold appear. Therefore, the wiring should be sealed with products that are resistant to high humidity.
- Strength. Constantly need access to meters and ball valves. For this purpose, special hatches are installed - with a fragile structure, they will not withstand.
- Aesthetics. Another important criterion. It is better if the product is combined with the overall decoration of the toilet.
Required tools and materials
If you have already decided which box is best to hide the heating, drainage and water supply pipes, then you should start preparing tools, fasteners and materials.
To build the box you will need the following equipment:
- a well-sharpened construction knife;
- roulette;
- metal scissors;
- level or square;
- screwdriver or screwdriver;
- pencil;
- fasteners (self-tapping screws, European screws, dowels);
- drill or hammer drill.
Materials you should purchase:
- galvanized metal profiles (types ud, cd);
- silicone sealant;
- GVKL, HDF, OSB boards or plastic panels (in the latter case, it is important to choose a shade that matches the color palette of the interior);
- PVC skirting boards designed to mask joints with walls.
To prepare the plasterboard box for additional finishing, you may also need putty and corners.
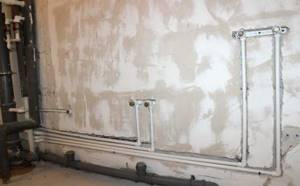
Frame installation instructions
Regardless of what type of coating the box design provides, first of all you should install a metal frame. To do this, it is important to adhere to the following regulations. Work should begin with the walls adjacent to the corner.
First of all, you need to make markings on vertical and horizontal surfaces.
The first stage of creating a pipe box is the installation of vertical guides, which are mounted on both sides of the corner or from communications
After this, you should install guides (ud profile), which determine the dimensions of the box. To attach them to the surface, you can use European screws (dowels) by drilling holes in the appropriate places with a drill. For walls lined with tiles, flea screws (length 2.5 mm, diameter 3.5 mm) are well suited, which can be screwed into the joints between the tiles.
If the pipes run horizontally, it is enough to lay out the guides parallel to the floor and secure them. After this, you should form the outer corner by twisting the corner post from two ud profiles. Their shelves need to be directed at right angles in different directions, and then connected with small screws.
The vertical structure should be fixed to the floor and ceiling using horizontal elements that are fixed to horizontal surfaces
The supporting profile cd is cut with a knife into pieces whose dimensions correspond to the width and length of the box. The first corner rib is fixed on the vertical surface, which determines the rigidity. The resulting sections of the profile are inserted with one end into the installed guide, and the other into the stiffener, so that the parts of the corner are connected to the profile.
At a certain distance, which can vary from 30 to 70 cm, jumpers should be added - they give the system strength and reliability, and are also used for hanging panels.
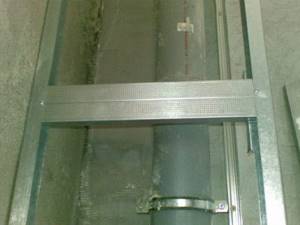
The finished frame of the pipe box combines vertical guides and horizontal jumpers, giving rigidity to the structure. It is also important to provide space for a door or hatch
Having completed the work on one side, a second corner profile is attached to the other wall in the same way, after which the work on creating the frame of the box is considered complete.
Two frame covering options
Elements of finishing material should be connected to the base. Let's look at the most common options, each of which has its own characteristics.
Working with PVC panels
This is one of the easiest ways to disguise pipes.

The box made of plastic panels has a collapsible design. If necessary, you can remove a loose part to gain access to pipes and other communication elements
Instructions for implementation:
- Install the starting profile, carefully securing it using small self-tapping screws on the installed guide part. Measure a strip of plastic panel of the required size, then cut it with a knife.
- Fix one panel in the starting profile, fasten the other to the corner profile, after which the latter is installed to another plane of the box. For fastening, you can use “fleas” (small self-tapping screws).
- The second side of the box is assembled using a similar method, while the starting profile is fixed and secured on the last plastic panel, which is most easily done using silicone sealant.
- In places where it is necessary to provide access to important communication elements (taps, joints, meters), it is important to cut inspection holes on which special hatches are secured (with sealant or other means).
- At the end of the work, plastic skirting boards should be installed at the joints of the panels with the floor, walls, and ceiling.
To quickly disassemble a plastic box, it is important to remember which side the loose panel remains on. If necessary, this element is pulled as far as possible to the side, and then taken and removed.
After inspection of pipes or repair work, the integrity of the structure is restored using the same method: the corner of the panel is pulled back, after which it is returned to its place.
Working with GVKL slabs
Installation of plasterboard construction is also quite easy.
Boxes covered with sheets of moisture-resistant plasterboard can additionally be decorated with other finishing materials: paint, wallpaper, decorative plaster, ceramic tiles
Procedure:
- First of all, you should correctly cut the gypsum fiber board sheets in accordance with the calculated dimensions. To do this, they need to be placed on a flat surface, marked with a tape measure and small cuts made on the surface.
- The notches need to be aligned with a metal ruler or long lath, and then the surfaces should be cut with a construction knife. Along the drawn line, break the plasterboard sheet, if necessary, trim the edge with a knife.
- Blocks prepared in this way are attached to the frame using self-tapping screws. In this case, the sheets are pressed as tightly as possible against the profiles, and the screws are screwed first into the drywall and then into the metal guides.
- It is important to ensure that the caps of the fasteners are screwed on the surface line or even below, which is especially important if you plan to further finish the box with tiles. To prevent cracks from appearing on the gypsum board panels, it is important to screw in the screws at a distance of 20-30 mm from the edges.
Having completed the installation, it is important to prepare the structure for subsequent finishing work. To do this, joints and junctions with horizontal surfaces are treated with sealants to create a dense protective layer.
After this, the surface is covered with putty, covering the fasteners. You can strengthen the fastenings by installing perforated corners on the internal and external corners of the parts. Having finished the work and having dried the structure well, you can begin gluing tiles or performing other finishing work.
How to cover pipes with plasterboard?
This material requires additional finishing. And this does not limit the flight of imagination. Otherwise, drywall has excellent characteristics. It's easy to hide wiring with it. It is easy to install and dismantle.
Inserting plumbing hatches is much easier. The material is environmentally friendly, moisture-resistant and fire-resistant. For further finishing, tiles are used. This is the best way to close the riser. The tiles are easy to keep clean.
Several types of boxes are made from plasterboard sheets. Each option has its own installation features. Thus, a blank wall is used for communications located behind the toilet.
To close the area, sheets are mounted around the entire perimeter of the opening. The frame is first secured to dowels and screws, and then the sheathing. The final stage is plasterboard sheets.
A square box made of plasterboard is used for toilets in which communications are located in the corner or occupy only part of the wall. To hide the wiring, a metal profile is attached to the floor, walls and ceiling. Next, vertical guides are inserted. Before installing the door, a window is made from a metal profile. Now we cover the system in the toilet with a sheet of plasterboard.
In the case where the water supply is located below, the lining is carried out using a multi-level box. An oblique false wall helps to gain free space. Profiles are attached to the floor, ceiling and walls. Then a horizontal frame is made. Now the profile needs to be sheathed with sheets.
Step-by-step instructions for covering pipes in a toilet with plasterboard:
- Make markings on the floor, walls and ceiling for the future frame. Secure awnings along them. Profiles will be installed on them. Sealing should begin from the floor, slowly moving towards the walls and ceiling. The next step is to install the extension profiles. Canopies and profiles are secured using self-tapping screws.
- Now the frame is ready. It's time to start installing drywall. The sheets are attached to the profile strips. Fixation with self-tapping screws every 20 cm.
- We close the gaps between the sheets with reinforcing mesh or putty. The mesh will protect the seams from cracking.
- The covering is ready. You need to make several openings in the sheets and install inspection hatches in them.
- Additionally, it is treated with putty and the final cladding is done.
Installation of an invisible hatch
To provide access to pipes with a plasterboard structure, you can use a ready-made plastic door or make a disguised opening panel consisting of an aluminum frame, a door, a magnetic lock, and a structure of hinges and components.
An inconspicuous door (invisible hatch) installed in the wall will allow you to easily check water readings, turn off the valve, and also assess the condition of the pipes
In order to open the invisibility hatch, just press on its middle, after which the magnetic lock snaps off, releasing the door from the frame. The following article will introduce you to the details of the design of various plumbing hatches, which we recommend reading.
The hatch is installed as follows:
- At the preliminary stage, you should decide on the location of the door. Usually it is located in the center of the box or partition, which makes it possible to better maintain the symmetry of the pattern when tiling.
- When installing the frame, it is important to leave a niche (on two or four sides), the size of which corresponds to the parameters of the hatch. After its construction, the frame is attached to the profiles using long self-tapping screws (special holes are provided for them). According to the instructions included with the kit, the door and other hatch parts are attached to the frame.
- Next, the frame is covered with plasterboard sheets, which are overlapped onto the hatch frame (it should also be attached to the covering with self-tapping screws).
- Upon completion of the work stage, the drywall and door are covered with a layer of primer. After drying, the hatch and box are covered with tiles (one color or with a pattern). All seams between the tiles are covered with sealant, after which the structure is left alone for two days for final drying.
The final stage is cutting the hatch, which is done using a sharp utility knife pointed at an angle of 45 degrees.
Blinds or roller shutters
A practical way to hide communications. But it also has not only advantages, but also disadvantages. Below we will look at all the nuances in more detail.
Decorative blinds
Many pipes in the bathroom are masked with vertical or horizontal blinds. They will become a kind of curtains that can easily block an unesthetic appearance. When needed, they are simply rolled up and access to the pipes is ready.
The main advantages of blinds include:
- saving space;
- simple and quick installation without construction waste;
- work is carried out very quickly;
- strength and durability;
- affordable price;
- large selection of colors and patterns;
- If one lamella is damaged, it is easy to replace; there is no need to throw away the entire structure.
Roller shutters
It is more practical to close the area with roller shutters. Their design is more durable and reliable. But they take up significantly more space than blinds. Automatic roller shutters deserve special attention. They are easy to close and convenient to use. They come with a remote control.
Hiding the pipe using shutters will cost more and take more time. Almost any design can be applied to the panels. This is done by photo printing. We hide household items behind the panel. It is enough to additionally nail a few shelves.
Roller shutters also have disadvantages. They are equipped with a special frame. It is installed around the perimeter of the opening. Pipes need ventilation. Therefore, the structure does not reach the ceiling, that is, it cannot be completely closed.
Other materials will be required to finish the top. It will be necessary to take into account the features of the lifting mechanism. The same goes for the bottom. Due to plumbing, the roller blinds do not go down completely and cannot be hidden completely. To hide the lower section, use the second part of the canvas.
Useful tips on the device
When arranging the structure, it is important to take into account the following recommendations from experts:
- If the box is intended to mask vertical pipes, markings should be made starting from the floor.
- Be sure to provide a door or hatch at the valve and water meter.
- Regardless of the material used to construct the system, an antifungal agent must be applied to its inner surface to protect against harmful microorganisms.
- In a bathroom with a high content of vapors, it is highly advisable to avoid wooden structures: in this case, preference should be given to a metal profile.
- To construct the box, it is not advisable to use various types of chipboard, including waterproof boards, since this material swells under the influence of water vapor.
- When attaching the structure to the ceiling, the transverse parts are located at a distance of 30 centimeters from each other to ensure proper rigidity of the structure.
- With closely spaced pipes, it is better not to build separate boxes around each of them, but to create a single structure for the entire communication system.
It is important to ensure that the box does not touch the communications: the minimum distance of the casing from the pipe should be 3 centimeters.
An alternative to a partition box can be roller shutters. They give the interior a stylish look and also provide full access to the pipes.
Options for masking pipes in the toilet are given in an article entirely devoted to this issue.
Advantages of hiding communications under a box
These include:
- Attractive appearance. When made from high-quality materials, a cabinet for masking pipes will not stand out against the general background or spoil the interior.
- Easy to assemble. The structure can be assembled not only at the rough finishing stage. Often pipes are sewn up during a bathroom refurbishment. Frame and sheathing elements can be installed on top of the cladding.
- Possibility of pipeline maintenance or repair. If the box is equipped with a hatch, you can find out the readings of metering devices and monitor the condition of the pipes. If necessary, water supply or sewerage elements are replaced.
- Possibility of combination with shelves, installations and other interior details. This allows you to effectively use the space of a small bathroom.