Omsa socks set
349 ₽ More details
Omsa socks set
349 ₽ More details
Ticks
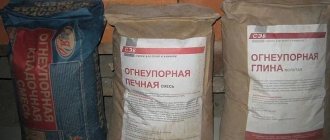
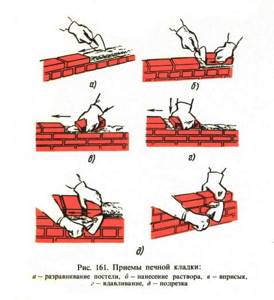
Laying a chimney is only possible with a properly prepared solution - a mixture of water, filler and binders.
Layout diagram of a smoke stove.
In a dry state, according to their density, they are divided into light (less than 1500 kg/m3) and heavy (from 1500 kg/m3). Solutions are also divided depending on their purpose:
- Finishing (for finishing the stove).
- Masonry (for laying stone, brick and stove blocks).
- Special.
The binding material, together with water and filler, creates a monolithic body and a reliable foundation for the stove and chimneys from the roof. The filler reduces the shrinkage of the solution during hardening, while maintaining its volume, and sometimes even helps to increase its heat-shielding properties (for example, slag as a filler).
Mortars for bricklaying are further divided depending on the type of binding materials:
- Calcareous.
- Cement.
- Plaster.
- Mixed (lime-slag, cement-lime, etc.).
The solution must completely fill the joints, both vertical and horizontal.
A simple mortar consists of an aggregate and one type of binder material, a mixed and complex mortar consists of two or more binders (lime and cement, clay and cement) and fillers. For example, a cement-lime mixed mortar having a ratio of 1:3:15 consists of fifteen parts sand, three parts lime mixture and one part cement.
In a complex solution, the volume of the main binder is conditionally equal to unity, the remaining components (aggregates and binders) have the expression of numbers showing the number of their volumetric parts that need to be taken per one part of the base material. The main substance always has stronger astringent properties, so it is customary to name complex solutions starting with the name of the main substance. Lime-clay, for example, contains two binders: lime and clay.
Under the influence of moisture, the clay mortar is destroyed and becomes unsuitable for laying bricks, chimney pipes above the roof and foundations. These parts of the furnace are made using cement, lime or lime-cement mortar.
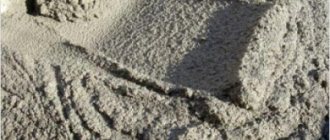
Making clay mortar for stove masonry with your own hands
Choosing the right clay for preparing the solution
Such a solution is needed when laying the main stove mass, but it turns out to be useless when constructing a foundation or laying a chimney.
Stove mortars prepared on the basis of clays can only be used when laying arrays of stoves and fireplaces indoors or under a canopy.
To lay clay mortar bricks, you need from 1/10 to 1/13 of the volume of the oven itself, if you count by the outer size, or up to 1/8 of the volume of the laid brick - 25 liters on average (2.5 buckets) per 100 bricks. The clay mortar should not differ in composition from brick and can easily withstand heating up to 900-1000º, without emitting harmful fumes and without losing strength. The higher the quality of the stove masonry, the less clay it contains. The most suitable clay is considered to be the one used for brick production. The solution must have the property of plasticity. When dry, the greasy one cracks and decreases in volume, while the thin one is not strong enough, easily crumbles in the seams and does not bind the brick well.
You can increase the strength of the clay solution by adding 100-150 g of table salt to the bottom of the bucket. Fine salt is mixed with the solution, and coarse salt must first be dissolved in water. Sometimes about a kilogram of Portland cement is added to a bucket of the mixture, mixing it dry with water. This mixture should be used no later than an hour after its preparation.
Masonry of refractory or refractory bricks is made using a mortar of fireclay and refractory clay (the proportion is 1:1).
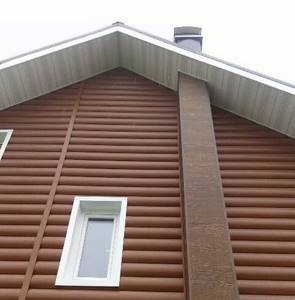
Colored painted chimneys
The Specialist company offers to buy colored double-circuit chimneys (modular, insulated, sandwich chimneys). The outer pipe of such a chimney can be painted any color you desire. To ensure that the new chimney is harmoniously combined with the finishing elements of the facade of your house and the surrounding landscape, our company offers a choice of colors according to samples of the RAL (Classic) standard, which includes more than 200 different shades:
The color coating is applied not only to the pipes, but also to all other components of the chimney (tees, elbows, caps, etc.), as well as to fasteners, supporting, insulating and fire protection elements and other configuration elements of your chimney to achieve an ideal appearance finished product:
The coating of a colored chimney is a durable polymer composition that fulfills all the tasks of protecting the structure from destructive atmospheric influences. It does not fade, does not emit toxic substances, does not become thin, does not crumble, and retains its protective and aesthetic properties for many years, not being inferior in strength characteristics to external stainless steel pipes.
Painted sandwich pipes are suitable not only for the actual chimneys of heating systems, they are excellent for installing natural ventilation in a building (cottage, country house, utility house or bathhouse). Also for natural ventilation, colored single-circuit pipes are offered, which will continue the selected color scheme indoors or in places that do not require insulated elements.
The lead time for production and assembly of colored chimneys is 7-14 days, depending on the workload of the line, the chosen color, and the seasonality of the order. By ordering chimneys before the main season (before June), you will receive a chimney in a shorter time.
We can also offer you delivery options and professional chimney installation. (For more details, please call).
The cost of colored sandwich chimneys largely depends on the material and thickness of the inner pipe, however, a colored sandwich is significantly cheaper than chimneys with an outer stainless pipe, and differs from a sandwich with a galvanized outer pipe by less than 20%.
For more detailed prices for all products, see the full price list. Marking of colored chimneys in the price list is Ral or Ral p/o.
Thus, at a very affordable price you get not only a reliable and durable chimney, but also the opportunity to further decorate your home, emphasizing its modernity and novelty.
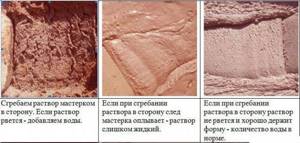
Checking the clay before preparing the solution
If the solution has normal fat content, the trowel is removed from the batch clean or almost clean.
To properly prepare a clay solution, you need to test the clay: add a little water to half a kilogram and knead it well with your hands until it completely absorbs the water and begins to stick to your hands. Having made a stiff dough, they form a ball with a diameter of 40-50 mm, and from another similar ball they flatten a cake with a diameter of 100 mm and dry both products for 2-3 days. If during this time cracks form on the cake or on the ball, it means that the clay is too greasy and you need to add sand to it. And if there are no cracks on the ball and cake after drying and they can withstand a fall from a height of 1 m, it means that the clay can be used in preparing a solution. Skinny clays do not crack, but they are not strong, so they need to be mixed with fatter clays. Clay or sand is added in several stages until the solution is ready.
To prepare the solution, use different clays, mixing them dry and then mixing them with water. Add 0.5-5 parts volume of sand to the fatty clay. It must be sifted through a fine sieve with 1.5×1.5 mm holes. Very thin clay is washed out - excess sand is removed from it by washing with water.
Stages of work
Having chosen what to paint the pipe with, you should not immediately apply the paint. It is necessary to carry out preparatory work and select the necessary materials. You may need:
- brush (if the pipe size is large, you can use a roller);
- metal hard brush;
- acetone or other degreaser;
- primer;
- selected paint composition.
Further work will vary depending on what the chimney is made of. Chimneys are made from:
- metal;
- bricks;
- ceramics;
- reinforced concrete.
Before starting work, it is recommended, if possible, to stop the gas supply to the chimney and allow the pipe to cool to ambient temperature. This will not only reduce injuries (the risk of getting burned on a hot surface) and the toxicity of the paint and varnish composition, but will also allow the dye to form a more durable film when it hardens.
Metal surfaces
Pipes are made mainly of stainless steel and have recently become the most popular in private homes. They are installed not only on gas boilers and water heaters, but also on brick-built stoves. Stainless steel chimneys are durable and comfortable. Their main advantage is ease of installation. But before painting stainless steel, the surface must be prepared. To do this, do the following:
- clean the metal from traces of old coating, dust and other contaminants using a metal brush;
- wash and dry thoroughly;
- treated with a degreaser;
- apply an anti-corrosion mixture (if the soil contains anti-corrosion additives, then this step can be omitted);
- after drying, the chimney is covered with 2-3 layers of primer.
When the primer is dry, you can start painting. Painting is carried out along the perimeter and starts from the top.
Anti-corrosion protection is of great importance for the service life of the chimney. At high operating temperatures and aggressive environments, the protective paint layer must be resistant to these harmful factors. Therefore, painting chimneys is a necessity.
Brick chimneys
Nowadays brick is less popular, but until recently chimneys were made mainly of it. But how to paint brick? First of all, the structure must be prepared:
- tighten loose bolts on the connecting clamps;
- remove old paint or lime;
- wash away soot, soot and dirt;
- restore the damaged layer of plaster (it is not necessary to completely change it, just apply the mixture to the damaged areas and wait for it to dry);
- Apply at least 2 coats of primer (more is allowed).
After the primer has dried, you can paint. It is recommended to apply paint on brick in 2 layers to ensure greater strength and color saturation.
Ceramic pipes
This is a construction novelty consisting of a ceramic pipe, a layer of insulation and finishing made of foam concrete or metal. It is considered the most heat-saving.
The painting method depends on what the insulating layer is covered with:
- foam concrete is processed using the same technology as brick;
- the metal is painted in accordance with the rules for painting a metal base described above.
When choosing dyes for ceramic pipes, heat resistance does not play a big role, because the insulation layer reduces the heating of the outer surface.
Reinforced concrete
In private houses, reinforced concrete structures are extremely rare; most likely, this will be an industrial pipeline running through the site, delivering gas or water to the house. You will have to choose a color for it not according to your taste, but in accordance with the requirements of the marking color.
The process of protection and finishing is carried out in the same way as when processing and applying paints and varnishes to a metal chimney. The main thing is not to forget about anti-corrosion treatment and degreasing, because the uninterrupted supply of utilities depends on the safety of the pipeline.
If the paint is selected in accordance with all requirements and all processing steps are followed, then after the composition dries, a durable non-toxic film will be obtained that will protect the structure for 5-15 years. The period of protection depends on atmospheric influences, the internal temperature of the chimney and the quality of the purchased paint and varnish.
The actual preparation of the clay solution
Vent in the chimney above the roof.
If the clay is normal, there is no need to add sand to it. To prepare a clay solution, you need to prepare a flooring of boards measuring 1.5 × 1.5 m, on which you need to lay out the clay in layers and dip it in water. When the clay gets wet, it needs to be shoveled several times and raked into one pile in the form of a narrow bed 300-350 mm high. After this, using the edge of a wooden shovel, the clay is cut into thin plates, breaking and crushing the edges. Foreign particles (stones, impurities) must be removed. Shovel the mass again, rake it into one bed and crush it with a shovel 3-5 times until all the edges are broken.
The optimal ratio of sand and clay in a clay solution is 1:1 or 1:2. The volume of water is equal to a quarter of the volume of clay.
Preparation of lime mortar for stove masonry
Lime mortar is used when laying the foundations of pipes and furnaces located above the roof level. It is prepared from lime dough, water and sand. It is used for laying bricks for chimneys and stove foundations. To give greater strength to the solution, cement is added to it, and for greater setting speed, gypsum is added (for plastering work).
To prepare the solution with your own hands, you need to strain the lime dough through a sieve with 3x3 mm cells, and sift the sand through it. If the dough is too thick, it needs to be stirred with water. Then add sand and mix the whole mass well until smooth. The amount of sand depends on the quality of the lime: for one part of the volume of lime add from 0.5 to 5 parts of the volume of sand (on average 2-3 parts).
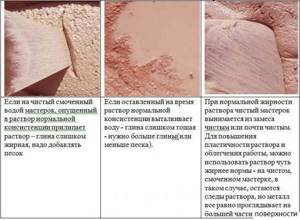
Determining the fat content of a solution using a paddle.
To determine the correct quality of the lime mortar, it must be mixed with a wooden paddle (board, plank) for 2-3 minutes. If the solution does not stick to the oar, it means it is skinny; if in some places it sticks in the form of separate lumps or covers the surface with a layer of 2-3 mm, this solution is normal; if it sticks in a thick layer, then this solution is greasy. A thin solution requires the addition of lime paste, a fat solution requires the addition of sand. Lime mortar can be stored for several days.
The better the lime paste, the better the quality of the lime mortar. Therefore, it is necessary to extinguish the lump lime-boiling liquid by filling it with water and keeping it in the creative boxes until completely extinguished. The quality of the lime itself and the highest yield of lime paste depend on this manipulation. It is best to pour the lime into a creative pit dug in the ground and lined with boards. Lime can be stored in it for a long time if it is covered with a layer of earth no thinner than 50 cm. The longer it is stored under anaerobic conditions, the higher its quality.
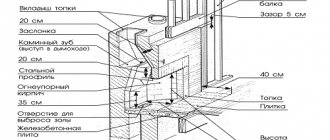
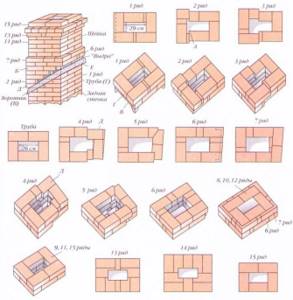
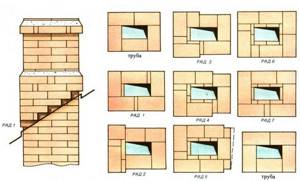
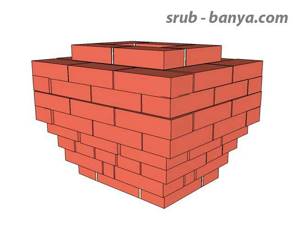
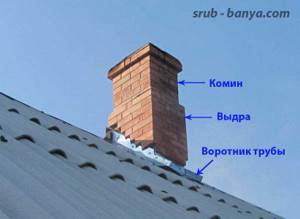
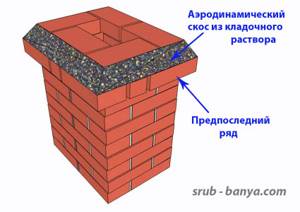
Components of a brick chimney.
Pipe parts. A brick chimney consists of the following main parts: 1. Fluff 2. Chimney in the attic. 3. Otter. 4. COmin. |
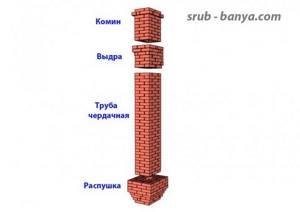
Fluff.
Fluff. The fluff is designed to provide fire safety when passing pipes through combustible ceiling materials. The fluff is placed on the solution. All parts of the pipe that are higher than the fluff are laid on (masonry) mortar. |
The order of the fluff. The fluff can be considered both part of the stove and part of the chimney. I mention it here to show the order of the fluff. |

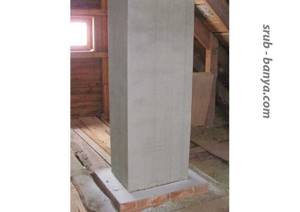
Chimney in the attic.
Chimney in the attic.
Plastered chimney in the attic. Photo. An attic chimney is a pipe that runs through the attic. Placed on (masonry) mortar. To prevent sparks from penetrating through the looseness of the masonry, the pipe in the attic must be plastered and covered with whitewash. I plastered the pipe with a plaster mixture for exterior use, to which I added 30% crushed basalt wool. |
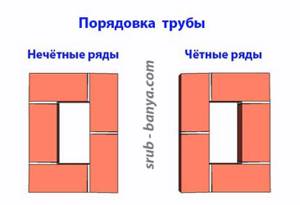
Chimney order. The chimney arrangement consists of alternating two layers. |
Otter.
Otter.
Otter and Comin. Photo. The otter is part of the chimney above the roof. It is a protrusion from which precipitation water rolls onto the pipe collar without penetrating into the attic. The pipe collar is made of galvanized iron. |
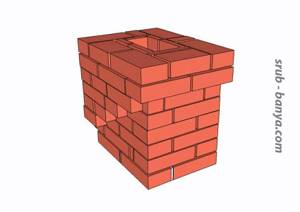
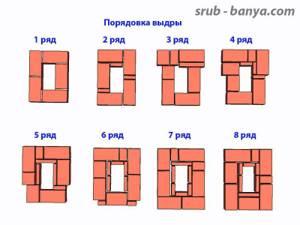
Otter order. Otter order. |
Slope on the otter for water drainage. In order to prevent the protruding top row of the otter from getting wet from precipitation, we use masonry mortar to make a bevel for water drainage. |

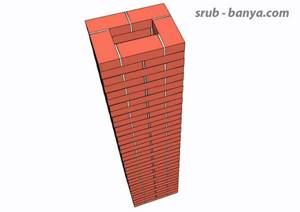
Comin.
Comin - part of the chimney above the otter. The higher the pipe, the better the traction.
In accordance with fire safety requirements: The elevation of the top of the chimney above the roof ridge must be at least 50 cm, with the distance of the pipe to the ridge being less than 3 m. If the distance from the pipe to the roof ridge is more than 3 m, then the top of the pipe should be located in relation to the roof ridge at an angle of no more than 10 degrees to the horizontal (See the diagram in the topic
Fireproof oven).
The height of the fireplace is regulated by the number of rows of masonry. In my case, 7 rows were enough to meet the height requirements.
Order of the top of the fireplace. Order of the top of the fireplace. |
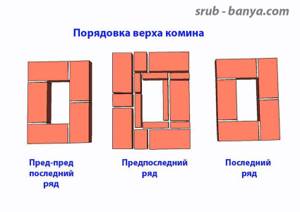
Comin. The penultimate row extends a quarter of a brick beyond the dimensions of the pipe. We make a bevel with cement mortar to give the top of the pipe the aerodynamic properties of the wing. The wind blowing from the side creates a vacuum above the top of the pipe, which improves traction. |
As I already said, the fluff lies on a clay-sand solution. It is also advisable to lay the first two layers of the pipe above the fluff on a clay-sand mortar. This may be necessary if you have to hang up the chimney to repair the furnace.
We place all other overlying layers on cement - masonry mortar.
Advice for novice stove makers:
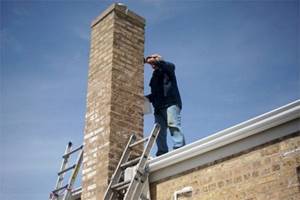
Don't bother with various kinds of round pipes and sandwiches - leave them to the metalheads. A brick chimney provides excellent draft, is very easily connected to the stove, and, with careful laying and plastering, is absolutely fireproof.
Remember that if you use a pipe made of a different material with a brick stove, then the junction of the pipe and the stove will always be a source of increased fire hazard!
It is much easier and faster to lay a chimney than a stove, since the operation of grinding the brick is eliminated and only the internal channel needs to be ensured to be smooth and even.
Methods for slaking different types of lime
To prepare quick-quenching lime, pour water into the slaking box up to half of its walls. Then lime is added in several additions, distributing it evenly. When steam occurs, the lime is intensively mixed, breaking up large pieces and pouring water until the steam stops being released. Add water to the slaked lime to obtain a homogeneous milk of lime, and leave for a while to slak out the remaining pieces. Then the whole mass is mixed and passed through a sieve.
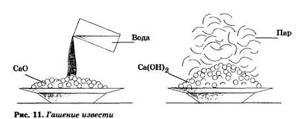
Water is added in small portions - this is necessary to prevent burnout and drying out of the lime.
To extinguish medium-slaking lime, you need to put boiling lime in the extinguishing box to a quarter of its height and pour water to half the layer. When steam appears, the lime is stirred and the pieces are broken. Add water in small portions - this is necessary to prevent burnout and drying out of the lime. When the steam emission ends, you need to add water, mix everything and after a while pour the milk of lime through a sieve into a creative pit or container.
Slow-slaking lime is poured into the slaking box up to a quarter of the height of its walls, moistened with a small amount of water and kept until signs of slaking appear (cracks, etc.). After this, small portions of water are carefully added to the lime so that the lime that has begun to slak does not cool. After slaking, the lime is diluted with water to obtain lime milk, kept for a short time and drained through a sieve for storage. In the cold season, to speed up slaking, slowly slaking lime is poured with hot water.
Preparation of cement mortar for furnace masonry
The strongest is cement mortar, which hardens in both water and air. It is made from cement, water and sand. It is used for laying bricks in soil or damp places, as well as for building pipes located above the roof level. This solution sets quickly. It should be used no later than an hour after preparation; if you wait longer, it loses its strength. The compressive strength of a mortar varies and depends on the proportions of the constituent materials and the brand of cement itself. Proportions – from 1:1 to 1:6.
Metal chimneys
This option is most often installed in buildings and boiler rooms, as it is relatively lightweight. In production, the product is less common, since its cost is high, and the height of industrial pipes can be very significant.

Metal chimney
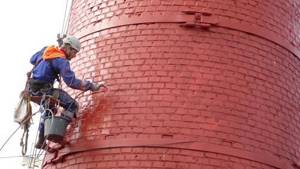
- The boiler room chimney is painted by climbers. For repair work, the product is equipped with brackets according to the standards, but given the height of the structure, only a specially trained person can carry out painting. The photo shows climbers painting a chimney.
- Compositions that can provide corrosion protection are used for work. Organosilicon paint and varnish coatings are most suitable for this. This option has a noticeable impact on the overall repair cost, but can withstand very high temperatures - from 330 to 700 C, and is absolutely insensitive to moisture and the action of acids and alkalis. The coating is smooth, so it even has a dirt-repellent effect.
- Painting of metal chimneys is carried out in accordance with GOST standards established for a boiler room or enterprise.
Painting an industrial chimney
Painting a concrete chimney
This structure consists of an inner pipe made of galvanized or stainless steel and a thick concrete outer pipe.
Steel chimney on a brick base
Structures of this type are usually found in industrial boiler houses, since they are designed for a monstrous load and a large volume of exhaust gases, as well as for a very complex and aggressive composition of the exhaust gas.
- Painting of concrete structures according to SNiP standards is also necessary, and is also carried out by climbers - here the height is usually very high.
- The estimate for painting a concrete pipe includes not only the work itself and the cost of paint, but also the price of additional funds. Concrete is a complex material. After a long period of use, its strength and hardness become uneven, the outer layer begins to peel, so when painting it is necessary to take into account the material’s tendency to deform.
- Heat-resistant enamels are used for coloring; the best option is silicone. However, here it is necessary to include primers in the estimate. This is a necessary element when working with concrete: the material is too porous, instead of ensuring good adhesion, the top layer simply absorbs the coloring composition, and this will lead to the need for re-painting, and, therefore, increased costs.
The standards for painting chimneys according to GOST do not regulate the composition and quantity of enamel. The only requirement is that it must be fireproof and heat resistant.
Two methods for preparing cement mortar
To prepare the solution yourself, sand and cement are sifted through a sieve with 3x3 mm cells. The required amount of sand is poured in a thin layer, covered with cement on top, then mixed until smooth. Water is poured into this mixture to the desired thickness.
A complex mortar is prepared from a pair of binders and one aggregate: lime paste, cement and sand. For one part of cement there are up to three parts of lime paste and sand in an amount of 6 to 15 parts.
There are two ways to prepare the solution. A dry mixture is made from sand and cement, then the lime dough is diluted with water until it becomes thick like sour cream. Add the prepared portion of the cement mixture to the latter and mix everything well. Add water to obtain the desired thickness of the solution and mix again.
Second method of preparation: prepare a solution from a measured amount of sand and lime paste, pour the cement part into it and mix everything well. You can pre-mix cement with water until it becomes creamy thick. This solution is more plastic, but not as strong as cement. It must be accumulated in such quantities that it can be used within an hour from the moment of preparation.
Freshly laid concrete should be covered with shavings or matting and well moistened with water, especially in the first 3-5 days. It is convenient to use plastic film for these purposes.
Components of mixtures and their types
Depending on the type and method of use of the structure, a binding solution is selected. During operation of the furnace, smoke, evaporation and chemical acids act inside the pipe. Therefore, it is important to properly prepare the solution for the chimney. Typically, it consists of a solvent (i.e. water), binders and aggregate. When hardened, the volume decreases, and the filler does not allow it to crumble and retains its original size. The binder component performs an important function - when it transforms into a solid state, it forms a strong bond between the masonry material.
The mixtures differ in some characteristics:
- By dry density: light;
- heavy.
- lime;
When facing stove structures with bricks, the appropriate type of mortar is used.
Mortars are also divided into masonry (laying foundations, bricks, stones, chimneys), finishing (lining furnace structures with bricks) and special ones. A simple mixture consists of only a filler and one viscous component, a mixed and complex mixture consists of several binder components and fillers. In a complex composition, the name is determined by the main component with a strong astringent effect.
If you choose the right thickness of the mixture, it will turn out homogeneous, without unnecessary compounds and will be easily squeezed onto the brick with light pressure.
Lime mixture
The preparation method depends on the properties of the lime:
- When quenching slowly, pour the component into a quarter of the volume and add water. After cracks form, carefully stir, adding water little by little in small doses until a liquid state is obtained (milk of lime).
- For medium slaking, add ¼ of the lime and fill half with water. After steam has formed, stir thoroughly and add water until it is completely extinguished.
- For quickly slaking lime, pour ½ water and add lime. After steam appears, mix thoroughly until the quenching process is complete and rub through a sieve. If the solution turns out thick, add more water until smooth.
Return to contents
Clay mortar
To obtain the mixture correctly, clay is placed on the prepared boards. Place in layers, wetting each layer with water until softened. A layer of sand is placed on top. Its proportion with clay is 1:1 or 1:2, and the amount of water is a quarter of the volume of clay. After this, the solution is mixed and divided into layers with a shovel, collected into lumps, removing unnecessary particles, and mixed again until a homogeneous mass without clots is obtained. The finished solution should not be liquid or spread.
Cement mixture
This composition is the most durable. There are two ways to receive:
- A dry mixture of sand and cement is mixed, at the same time lime is prepared to the state of sour cream, then the compositions are combined and thoroughly mixed. To obtain the required thickness, add liquid and stir to the desired consistency.
- Mix cement with water and add to the prepared solution of lime and sand. This mixture is more plastic, sets quickly, but is less durable than with the first preparation method. The ratio of materials ranges from 1:1 to 1:6.
Return to contents
Lime-gypsum composition
To plaster a brick oven, use this mixture. It is inexpensive, and with the addition of cement and lime it can be used for laying a brick chimney. This composition is easy to work with and hardens quickly. The main thing is to correctly calculate the proportions and obtain the required homogeneous consistency.