If the boiler room is operating as usual, but the house is cold. What to do in such a situation? A possible cause could be problems with cast iron batteries. Indeed, in severe frosts the load increases, which radiators cannot always cope with. The only way out of this situation is to increase the efficiency of the heating radiator. You can increase efficiency by moving heating batteries or expanding them. You can do without replacing radiators. In many cases, it will be enough to move the batteries to the optimal location, and you can also increase the required number of sections.
In our article we will tell you how to correctly move and expand heating radiators.
When is the best time to extend radiators?
The time it takes to build up radiators depends on the material from which the device is made. If the battery is made of cast iron, then expansion can be done after the end of the heating season. This is due to the fact that sections can be increased after complete disassembly of the cast iron battery. Naturally, in winter there is no way to turn off the heating system and disassemble the radiators. Moreover, if you live in a multi-storey building, it is unlikely that your neighbors will agree to be left without heating. Therefore, radiator sections can be expanded only after the end of the heating season.
Connection steps
The operating technology depends on the selected set of fittings and pipe material.
If pipes are laid along the surface of the walls in a room, then the best option is classic metal pipes. If heating lines are laid in advance under the plaster, or in specially designed channels, then a more modern option can be used. For example, polypropylene heat-resistant pipes.
Work with steel pipes is carried out with a standard plumbing tool kit. Plastic pipes and fittings require specialized crimping tools. They are not needed for all fittings. Many systems have a threaded crimp system.
Extension of radiators
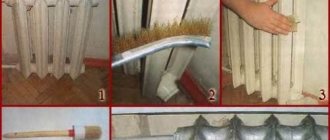
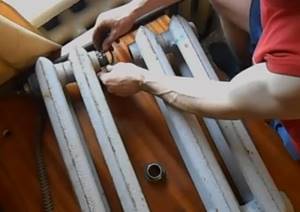
To increase the heating radiator, you must wait until the end of the heating season. Before proceeding with the procedure, you need to remove the battery and then disassemble it. But before these actions it is necessary to turn off the water.
Old radiators often develop dirt and rust between sections. Naturally they will need to be removed. This can be done using a wire brush or sandpaper. After this, you can put on the gasket and connect the radiator sections.
Before extending the radiator, it is necessary to place the heating battery on the floor along with the new sections. Next we proceed to attach the nipple. But be sure to monitor the position of the thread. It is recommended to start turning the nipple on the left. In this case, you need to bait it 1 turn to the left of the battery. Then we carry out the same actions with the right side of the heating radiator.
It is necessary to control the position of the intersection gasket. It should be located strictly in the middle of the nipple. The battery section should be firmly attached to the nipple. After this, you can insert the radiator key into the radiator, and screw the nipple into the battery section with an adjustable wrench.
For high-quality extension of heating radiators, it is necessary to tighten the nipple 3-4 turns. Then you can go to the other side of the radiator and also tighten the nipple 3-4 turns. This procedure must be repeated until the sections fit tightly to each other.
After the sections have been built up, it is necessary to install side plugs, which are available for cast iron radiators. You also need to install special gaskets. They are made from paronite. You should check the surface where the gasket will be laid. If there is rust or other defects on it, they must be removed with sandpaper. After this, you can install the plugs. They must be tightened tightly using a pipe wrench.
How to connect an aluminum radiator?
Design features of aluminum radiators
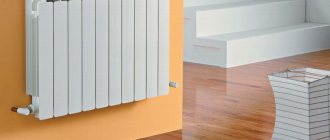
Aluminum radiators are used quite often as heating devices in private houses and apartments.
The material of the device has high thermal conductivity, and they are produced in a wide range of overall dimensions and thermal power, respectively. These heating devices have two types of design: cast and sectional. The former are more durable because they do not have welds that weaken the structure and allow the possibility of coolant leakage. The cost of such products is higher, which affects the price of finished products.
Sections of sectional-type aluminum radiators can be connected in several ways:
- Using glue;
- Welded connection;
- Special fasteners.
The disadvantages of sectional devices are poor resistance to water hammer and the ability to withstand relatively low pressures.
Aluminum alloy has increased sensitivity to the quality of the coolant in the network. The walls of the pipes become thinner when using a working substance with a pH value exceeding 7-8.
You can check this parameter for an autonomous heating system. If the radiator is connected to a centralized system, this option is not available.
Connection options
The type of heating system and the way the radiator is connected to it affect the amount of heat that the device will emit. Let's consider the types of systems and options for connecting heating devices to them.
Single-pipe connection diagram
In multi-storey buildings, single-pipe heating systems are most often used. Their installation requires less costs than two-pipe ones. The radiators are connected to each other in series, the coolant moves in one direction: from the output of the first device to the input of the second, etc.
The outlet pipe of the last radiator in the network is connected to the riser (in multi-storey buildings) or to the inlet of the heating boiler.
This connection method has the following disadvantages:
- Lack of ability to adjust device performance. If the regulator is installed on one of the devices in the network, it will regulate the thermal performance of the entire network.
- High heat loss of the working substance.
- Different value of the amount of heat given off by each of the radiators in the network. The last device in the chain receives cooled coolant.
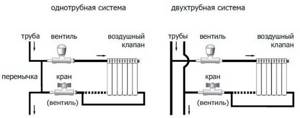
Two-pipe connection diagram
Two-pipe heating systems have two pipelines: supply coolant and return. Each radiator is connected to two pipes at once. This connection scheme is also called parallel. The temperature of the coolant entering each device has the same value.
Adjustment of the amount of heat given off by radiators can be done separately without affecting the entire system as a whole. The resulting system is more balanced, but its installation requires more pipes, so its cost also increases.
Which coolant to choose
Most often, ordinary water is used in heating systems, but it leads to corrosion of the metal elements, blocking the passage with scale and sludge.
If the system needs to be shut down during the winter, the water must be drained from the system. During the transition from the liquid phase to the solid, this substance increases in volume, which leads to the destruction of the main elements of the heating system.
Therefore, when designing a heating system, attention is paid not only to the power of the radiators, but also to the type of coolant, which must be chemically neutral and have a low freezing point.
Is it possible to pour antifreeze into aluminum radiators?
Liquids that have a sufficiently low freezing point are called antifreeze. These coolants acquire this property due to special additives that simultaneously serve as inhibitors of the corrosive activity of the liquid, scale and deposits.
There are three main disadvantages characteristic of aluminum devices:
Aluminum radiators require the use of special compounds in order to extend their service life.
You can give preference to antifreeze, but it has some disadvantages:
- Specific heat capacity is 115% lower than that of ordinary water;
- Has the property of greatly increasing in volume under the influence of high temperatures;
- It has a high viscosity and requires a pump to be connected for normal circulation;
- The fluidity of antifreeze is 50% higher than that of ordinary water; welds and other connecting elements must be sealed.
- Some antifreezes are only suitable for heating systems due to their toxicity. Their use for hot water supply systems is excluded.
Installation stages
The installation of an aluminum battery can be divided into three main blocks: preparation for installation, assembly of the radiator and connection to the water supply system.
Preparatory work
Before connecting the radiator to the system, you must do the following:
- Determine the required power of the device. The characteristics declared by the manufacturer may not correspond to reality if the coolant temperature is insufficient. To obtain the required amount of heat, a recalculation is made taking into account the temperature of the working substance and the required number of sections is selected.
- Select the optimal location for installation. Radiators give off heat to the environment in two ways: convective and thermal radiation. A window sill that is too close is unacceptable.
- Select the optimal fasteners. For thick walls, standard fasteners supplied with the radiator are suitable. Brackets will need to be purchased if mounted on a thin partition.
Radiator assembly
The device is assembled before its installation. Its sequence is as follows:
- Assembly of the required number of sections;
- Installation of plugs and plugs;
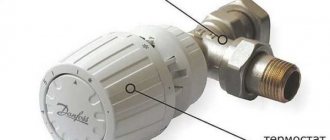
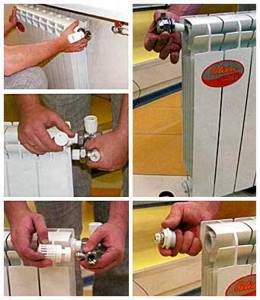
- Installation of thermostatic and shut-off valves;
- Installation of an air valve necessary to release accumulated air from the system.
The valve should be installed with the head facing upwards with a tightening torque not exceeding 12 kg. If this element is installed correctly, it is closed immediately after air is bled from the system.
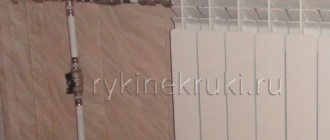
Installation and connection to the riser
Immediately before installing the radiator, it is necessary to mark the brackets and install them. In this case, you need to take into account:
- The optimal distance of the radiator from the window sill, floor and walls (10 cm, 12 cm and 3-5 cm, respectively);
- Method of supplying the working substance;
- Installation option - special niche;
- The presence of a heat reflector (screen).
Holes are drilled according to the markings, the brackets are secured with dowels, and the radiator is installed on them. Use a level to ensure that the device is installed exactly horizontally. Next, the pipelines are connected to the device, at the inlet of which a thermostat, tap or shut-off valve is installed.
It should be remembered that with a rapid intake of coolant, the risk of water hammer increases. Therefore, the shut-off valves open smoothly.
Is it possible to install aluminum radiators on central heating?
Due to the poor quality of the working environment of a centralized heating system, the service life of aluminum appliances is shorter than that of other types of devices. This is due to the physical characteristics of aluminum, which is exposed to the coolant.
- Increased gas formation, which can raise the pressure inside the device to critical levels and cause a leak. (To avoid this, do not turn off both taps at the same time, and you can install an automatic air vent).
- Wear of pipes due to the high coefficient of thermal expansion of aluminum.
- Weak corrosion resistance of the material, which reduces its service life.
The conclusion is the following: it is possible to connect aluminum appliances to central heating, but their service life will be slightly shorter than when connected to individual heating.
How to add sections to aluminum radiators
If the actual thermal power of the installed and connected device is insufficient, it may be necessary to install additional sections. Let's look at how this can be done.
How to disassemble an aluminum radiator
Sequence of actions when disassembling the device:
- Shut off coolant circulation, relieve pressure;
- Unscrew and remove the connecting couplings at the inlet and outlet of the device;
- Remove the radiator from the fasteners;
- Drain the working substance and place it face up on a flat surface;
- Remove the filter and wash it;
- Separate the sections, which are most often connected to each other with a special nipple nut.
- Replace deformed metal gaskets (silicone gaskets must be replaced).
How to connect aluminum radiators to each other
To connect two sections of the device to each other, you must perform the following steps:
- The end holes for connection must be freed from plugs;
- In the place where there is no thread on the nipple nut, install a gasket;
- Align the sections so that the nipple nut fits into the hole;
- Tighten the fastener.
Painting the battery and installing taps
Now you know how you can add sections of a cast iron radiator yourself. If desired, you can additionally install taps on the batteries. But there are other reasons for the cold to enter the room. The reason is not always a large load that heating radiators cannot cope with. A mistake many people make is incorrectly painting radiators. Every year, when painting radiators, we don’t think about the fact that we need to first remove the old layer of paint and then apply a new one. Several layers of paint have a bad effect on heating a room. The efficiency of radiators is significantly reduced.
To ensure that the efficiency of heating radiators does not decrease, and the characteristics of the device do not deteriorate, it is necessary to remove the old layer of paint.
To paint heating radiators, you must choose a special paint that can withstand high temperatures. Regular enamel is not suitable for painting batteries. Since at high temperatures it will heat up and turn yellow over time.
If, nevertheless, the problem of poor-quality heating is a large load, then we have already considered ways to increase the efficiency of heating radiators. But in order not to carry out such complex work, it is better to first correctly calculate the required number of heating radiator sections when replacing an old heating system with a new one.
To improve the heat transfer of heating batteries, it is advisable to choose high-quality materials. After all, a large percentage of heat transfer depends on the characteristics of the material. And, consequently, heating efficiency will increase significantly when using high-quality materials.
After studying our article, you can easily expand sections of your heating radiator. The main thing is to use high-quality materials and be careful when carrying out work. By following simple rules, you can set up your heating system and create a comfortable atmosphere in your home.
General information about heating systems
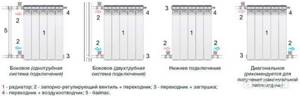
It is important to initially decide how to connect heating radiators to each other. In the language of specialists, you should decide which method of piping heating devices to use. For all types of heating systems, two methods of laying pipelines are used:
For all types of heating systems, two methods of laying pipelines are used:
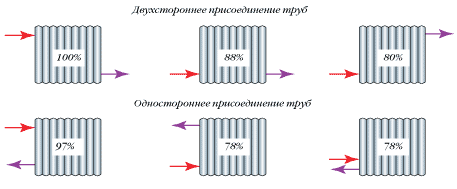
Two options: double-sided and one-sided arrangement of the heating pipeline
Single-pipe scheme
Systems in which hot water is transported as a coolant through one line are less efficient for the following reasons:
A useful formula for those who are just planning to “warm up”
- They practically do not allow you to regulate the heating of a separate device;
- As you move away from the coolant source, its temperature gradually drops and the last radiator in the chain may turn out to be barely warm, or even completely cold;
- In the event of an emergency on any part of the network, the heating must be completely turned off.
For your information! The only advantage of this type of heating pipe layout compared to two-pipe is its low price.
Such single-pipe heating systems are used mainly in high-rise buildings with a centralized supply of heat to consumers.
Two-pipe scheme
In the private sector, to create autonomous (loop-circuited to one consumer) heating systems, a two-pipe radiator piping scheme is most often used:
- One of the pipes supplying coolant to the device;
- The other is for the reverse movement to the source of heating of the coolant (boiler).
A simple two-pipe system looks like this
All batteries in the system are connected in parallel, so that the two lines operate completely separately and are connected only at the end radiator.
The two-pipe radiator connection scheme provides the following advantages:
- The ability to regulate the heating of each device in the circuit, which ensures the creation of the most comfortable conditions in various rooms;
- Regardless of the distance between the boiler and the battery, each of the devices heats up equally;
- If repairs or replacement are necessary in any part of the system, it does not require a complete shutdown.
Now we’ll talk about how to properly connect a heating radiator with your own hands.
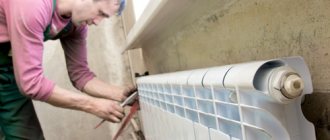
How do you add sections?
After you have experimentally determined that the reason for the cool temperature in the house is not a clogged radiator, you should find a store near your home (so that you don’t have to travel far away and thereby waste your time) that sells heating equipment. You need to buy the same sections that your radiator is equipped with - made of cast iron, aluminum, or bimetallic .
It should not happen that you select inappropriate sections - because of such an error, you simply will not be able to add them, that is, the money spent will be thrown away, so be careful. The procedure for increasing sections is carried out in the same sequence of actions for all types of heating radiators.
Read more: Cash loan repayment between legal entities
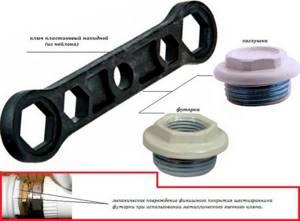
To join sections, you need a connecting nut - nipple
Let's proceed directly to increasing the number of sections. The first step is to unscrew the fitting using a radiator wrench on the side to which you plan to add one or more elements. After you have unscrewed the fitting, a nipple (connecting nut) is placed in the area where the sections join. The following important feature must be taken into account: the threads at different ends of the nipple are different, and in order to correctly install new sections you must follow the following rules:
- The right side of the nipple should be directed towards the direction where the connection to the new element will be made;
- Accordingly, the left one is towards the already present sections of the heating radiator.
In order to prevent further leakage of the battery, you should put intersection gaskets on the nipple (they can be rubber, paranitic, or gel). At the same time, they must be put on carefully and carefully - this will guarantee that the gasket will be positioned as evenly as possible, without unwanted distortions. Next you need to tighten the thread. This action should also be carried out without sudden movements, in a leisurely rhythm, and carefully. If you want to build a high-quality heating radiator, then there can be no rush.
To prevent leakage, an intersection gasket is required
Damage to metal threads is extremely undesirable - this may result in not the most harmless problems, the solution of which will require you to additionally spend your own time and financial resources.
The enlarged radiator must be placed back on the bracket and the connection to the central heating pipe restored. To do this, you need to arm yourself with a wrench of the appropriate diameter and tow, which is necessary for wrapping the pipe threads when screwing the radiator.
It’s not difficult to add sections to a heating radiator; you don’t need to work in a team of heating installers for 10 years. But this process cannot be done without a serious approach, the availability of basic tools and the removal of your personal time. However, you can resort to the second option for solving the problem of insufficient heating of the room - becoming a client of a company providing such services, whose employees will do everything themselves, quickly and efficiently.
The boiler room smokes from the heat, but the house is still cold? What is the reason for this situation? Perhaps your cast iron batteries are simply not able to cope with the load, which especially increases during severe frosts? How to increase the efficiency of a heating battery? In this case, there is a way out - moving the heating radiators and expanding them. After all, it is not necessary to replace radiators; you can simply move them to more optimal conditions and increase the missing number of sections.
Necessary tool
Before adding sections to an aluminum radiator, you must prepare the following tools and materials:
- The radiator section itself.
- Special seals.
- Gas key No. 2.
- Heating nipples.
- Radiator key.
- Sandpaper.
- Battery plugs with right-hand and left-hand threads.
- Paronite gaskets.
How to make a T-key yourself
The radiator key cannot be found in stores, so you will have to borrow it from friends or make it yourself.
Electricity consumption
This indicator should be considered in two groups. The power of liquid heating devices does not exceed 1 kW. Most often, manufacturers offer radiators of 500-800 W. This means that such a device will consume 20 kW of electricity per day. But if you configure it correctly, you can get a reduction of up to 12 kW.
With liquid-free ones it’s a little more difficult. Here the consumption per section is taken into account, which means that everything will depend on the number of sections present in the battery. Based on the fact that each section consumes 150-200 W, you can calculate the consumption of the radiator. Again, with the right setup, you can achieve a 40% reduction in consumption.
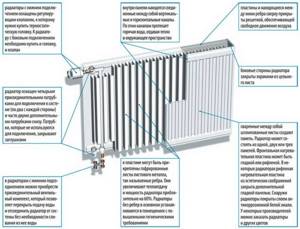
What is needed for installation
Installation of heating radiators of any type requires devices and consumables. The set of necessary materials is almost the same, but for cast iron batteries, for example, the plugs are large, and they do not install a Mayevsky valve, but instead, somewhere at the highest point of the system, they install an automatic air vent. But the installation of aluminum and bimetallic heating radiators is absolutely the same.
Steel panel ones also have some differences, but only in terms of hanging - they come with brackets, and on the back panel there are special arms cast from metal, with which the heater clings to the hooks of the brackets.
These are the arms that hook the hooks
Mayevsky crane or automatic air vent
This is a small device for releasing air that may accumulate in the radiator. Placed on the free upper outlet (collector). It must be on every heating device when installing aluminum and bimetallic radiators. The size of this device is significantly smaller than the diameter of the manifold, so you will also need an adapter, but Mayevsky taps usually come complete with adapters, you just need to know the diameter of the manifold (connection dimensions).
Mayevsky crane and method of its installation
In addition to the Mayevsky crane, there are also automatic air vents. They can also be installed on radiators, but they are slightly larger in size and for some reason are only available in a brass or nickel-plated case. Not in white enamel. In general, the picture is unattractive and, although they deflate automatically, they are rarely installed.
This is what a compact automatic air vent looks like (there are more bulky models)
The side-connected radiator has four outputs. Two of them are occupied by the supply and return pipelines, on the third they install a Mayevsky valve. The fourth entrance is closed with a plug. It, like most modern batteries, is most often painted with white enamel and does not spoil the appearance at all.
Where to install the Mayevsky plug and tap for different connection methods
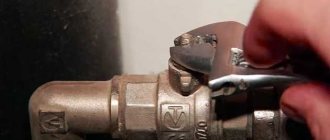
Shut-off valves
You will need two more ball valves or shut-off valves that can be adjusted. They are placed on each battery at the input and output. If these are ordinary ball valves, they are needed so that, if necessary, you can turn off the radiator and remove it (emergency repairs, replacement during the heating season). In this case, even if something happens to the radiator, you will cut it off, and the rest of the system will work. The advantage of this solution is the low price of ball valves, the disadvantage is the impossibility of adjusting heat transfer.
Radiator taps
Almost the same tasks, but with the ability to change the intensity of the coolant flow, are performed by shut-off control valves. They are more expensive, but they also allow you to adjust the heat transfer (make it less), and they look better externally; they are available in straight and angular versions, so the piping itself is more accurate.
If desired, you can install a thermostat on the coolant supply after the ball valve. This is a relatively small device that allows you to change the heat output of a heating device. If the radiator does not heat well, you cannot install them - it will be even worse, since they can only reduce the flow. There are different thermostats for batteries - automatic electronic ones, but more often they use the simplest one - mechanical.
Related materials and tools
You will also need hooks or brackets for hanging on walls. Their number depends on the size of the batteries:
- if there are no more than 8 sections or the length of the radiator is no more than 1.2 m, two mounting points on top and one on the bottom are sufficient;
- For every next 50 cm or 5-6 sections, add one fastener at the top and bottom.
You also need fum tape or linen winding and plumbing paste to seal the joints. You will also need a drill with drills, a level (preferably a level, but a regular bubble one will do), and a number of dowels. You will also need equipment for connecting pipes and fittings, but it depends on the type of pipes. That's all.
https://youtube.com/watch?v=nnQz2VA7C_M