Do-it-yourself heating. What is the danger of the classical scheme?
For those who are accustomed to doing their own heating, the technology described below is a new outlook on life.
In one of the previous articles, I told you about the possible hidden danger posed by batteries with the plugs removed. So, it turns out that the matter does not end there. My friend has found new troubles that we can face.
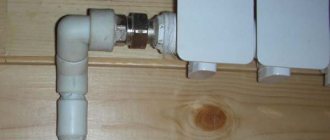
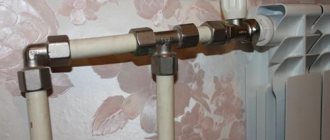
We will talk about piping the batteries. Let's consider the classic modern radiator piping with metal-plastic pipes, which contains 3 valves:
Two valves shut off the radiator and one is on the bypass and can direct the flow either through the radiator or bypass. The transition from a steel pipe to a metal-plastic one is also clearly visible.
Now the most important thing is - what is the hidden danger here? Here's the thing! If something happens to the radiator: it leaks on its own or the seal of the fitting is broken, then we will calmly turn it off with the valves.
What to do if something happens to the bypass? Nothing canbe done! Turn off the lights and drain the water (both literally and figuratively).
Can you imagine the danger of flooding all the lower floors with hot water? I think they haven't presented it yet. Everyone will say that metal-plastic pipes are used everywhere, but here I dug into some kind of jumper on the battery. I’ll try to explain - all the metal-plastic pipes that we install in the bathroom, toilet and kitchen are hidden from direct access. They are either in boxes or inside cabinets. Well, the battery jumper is always open and is located, most importantly, in places where people constantly stay!
Now let's see how it can be damaged using several examples:
- You move the sofa, look at the radiator and the surrounding furniture and forget about the jumper. By forcefully pushing the back of the sofa against the wall and touching the jumper, you will definitely tear it out of the fittings.
- Your little child played with something heavy (for example, with his dad's hammer) and, hitting the lintel, broke it. (when my friend was 4 years old, he broke his mother's toe when he got a hammer in his hand. Really, really...).
- The neighbor above or below, envious of your renovation, also began changing the batteries in the apartment. When unscrewing old couplings with great force, the pipe (riser) may begin to rotate due to poor fastening in the ceiling. This can lead to depressurization of the metal-plastic fastening to the fitting.
These are just a few examples that come to mind.
How does the bypass work under normal conditions?
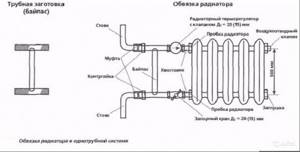
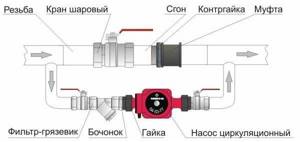
So, if we discard the subtleties of calculations and formulas, we can imagine the operation of this unit of the heating system as follows. From the top floor, coolant is supplied through the supply pipe to the bypass installation point. As we know from physics courses, both electric current and liquid always move in the direction of least resistance. If water gets from a 3/4-inch diameter pipe into the section leading to the battery, it will be easier for water to penetrate into the larger diameter pipe. Therefore, only a small part of the coolant enters the bypass with a diameter of ½ inch, the rest of the pressure moves into the battery through a pipe with a diameter of ¾ inch, then it passes through the taps and thermostat and goes into the battery registers. After passing through and partially cooling, the water again exits through the ¾-inch pipe into the main line, and passing through the shut-off valve, it connects with the flow from the bypass and moves further in the general flow.
At normal pressure and high temperature, the temperature loss in this area will be insignificant, unless the apartment owner has installed an additional three-meter air-flow battery.
In the event of an emergency situation, for example, depressurization of the radiator for repair work, an emergency shutdown of the branch to the battery is performed - the taps on the supply and outlet pipes are closed. This is where the bypass comes into play. The coolant, coming from the upper floor, moves along the only possible route - through the jumper and further along the pipe to the lower floor. Thus, the jumper allows you not to disconnect the entire riser from the coolant supply, which allows you to correct the situation with the least losses and in the shortest possible time.
How big should the bypass be to make it super reliable?
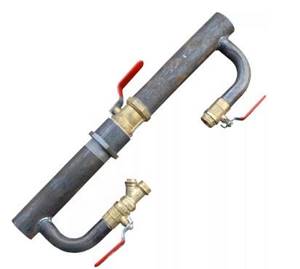
The only way to avoid possible causes of breakage of the jumper is to make it from a steel pipe. Then the metal-plastic will only be between the battery and the valves. You just need to find a plumber with an informal approach to his work who will agree to make a bypass from a piece of steel pipe. In this case, installing a heating radiator with such an unusual jumper will save you two extra fittings.
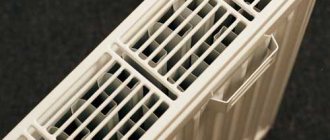
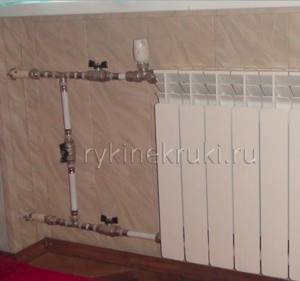
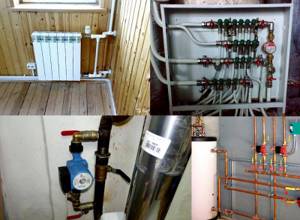
This is what I saw in my friend’s room - this is the final version of the work done:
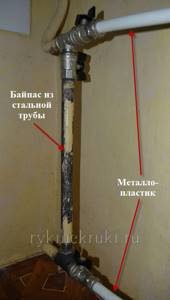
I’ll tell you right away that for this job you need a plumber in any case, since there will be installation nuances when you can’t handle it alone. The second point is to try to talk the plumber into doing such an unusual job for him, since he knows how to install the jumper, fittings and battery, but your steel pipe will clearly surprise him.
A total of 4 difficulties await you, each of which will be discussed in order.
Installing a bypass on a radiator in single-pipe heating
High-rise buildings, inhabited since Soviet times, have single-pipe heating based on vertical risers, present in all apartments. Here, the distribution of the coolant is ensured due to high pressure and increased flow rate of the medium.

Connecting radiators with bypass in a one-pipe heating system
In this scenario, both connections are elements connecting the radiator to a single line, and the bypass fits between them. The jumper has a slight offset relative to the axis of the riser, due to which water enters the battery rather than flowing along an easy path. The solution works like this:
- The flow of hot water on approach to the first heating element is divided into two parts - the first enters the radiator, the second flows into the bypass.
- After the first flow has cooled by a couple of degrees, both parts are mixed, then half is sent to the main line. As a result, the resulting mixture has a temperature approximately one degree lower than it was initially.
- This process occurs consistently in all heating devices. All consumers of the network receive a given amount of thermal energy (ideally in equal measure), because pumps drive large volumes of water through the mains, leveling temperature differences between the first and last links.
A similar solution is usually used in two-story residential construction. Despite the fact that the vertical riser serves only a pair of radiators, it is advisable to equip the top one with a bypass. The reason is the disproportion between the performance of household and industrial circulation pumps.
This is why the bypass is so important when installing a vertical single-pipe heat supply. Two-pipe distributions are based on independent lines for cooled and hot media; a jumper is not needed here.
Difficulty 1. Where to find a steel water pipe?
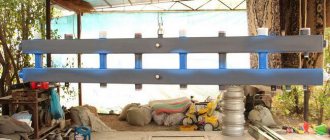
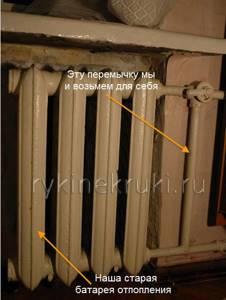
So let's begin. We have to replace the heating pipes - that's all! My friend asked in many stores that sell plumbing fittings and plastic pipes - there is no steel pipe anywhere! But the problem, in fact, can be solved very simply - there is a jumper on your old battery, so we will use it:
So, we found a pipe for the jumper. If we rearrange it, then we need to mount it somehow. All steel pipes, as is known, are connected using threaded connections. Let's look at our pipe. On one side it has a thread:

On the other side there is no thread, since our pipe is welded to another pipe from below:
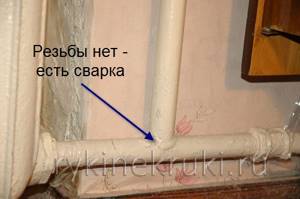
It turns out that we will need to cut a thread on the bottom side of this steel pipe.
But first you need to remove the jumper.

- ATTENTION! Make sure that we have turned off the water in the heating radiator!
- We saw off the bottom of the pipe under the T-shaped crosshair itself in order to have the longest possible pipe. You can saw it off either with a hacksaw or with a grinder.
- Bend the bottom of the pipe slightly to the side.
- Using Swedish tools, unscrew the pipe from the upper threaded connection.
Tips and tricks
Before proceeding with the installation of a bypass in the heating system of an apartment building, first of all, you should notify representatives of the local housing and communal services in writing about your decision in order to agree on the issue of temporarily shutting off the coolant supply from the boiler room. After that, follow these recommendations:
In order for water to flow normally into the heating device, it is necessary that the diameter of the pipe in the bypass section be one size smaller than in the general circuit. When purchasing a ready-made bypass unit, it is necessary to require a quality certificate, which will serve as a guarantee of durable and normal operation of the device. When purchasing elements of the bypass section, you should check the threaded connections - they should be easy to unscrew and not twist when tightened. When deciding to install a bypass, use only ball valves, since they not only have low hydraulic resistance, but are also easy to open and close. It doesn’t matter whether the bypass is working or not, it is necessary to open and close all the valves from time to time to avoid sticking of the ball and will significantly increase the service life of all elements of the assembly. Before putting the heating into operation after a long period of inactivity, it is imperative to ventilate the area with the circulation pump. Throughout the heating season, preventive cleaning of filters installed in the bypass system should be carried out. To avoid mistakes and to ensure that the heating works efficiently, it is advisable to entrust all work to an experienced specialist.
Bypass installation examples
Difficulty 2. How to cut a thread on a pipe (the other end of the bypass)?
So, we sawed off the jumper on one side, and unscrewed it on the other, and now we hold the jumper in our hands. Attention question! How do we cut a thread at the second end of the jumper?
Plumbers have long forgotten how to work with steel, and if you need to change batteries in an apartment, give them metal-plastic, plastic, or, at worst, copper. But they will definitely have a tool for cutting ¾ inches (a tool is a special tool for cutting threads). The biggest difficulty is that when cutting a thread, the pipe must be fixed: you cannot hold it with your hands, because the pipe will rotate in any case. Ideally, it is best to cut threads on a steel pipe on a lathe; if you don’t have a machine, then in a vice. But no one has a vice of this size in their apartments, and if you find one, there is nowhere to fasten it, because not a single table can withstand such force, one hundred percent! How to be? I’ll tell you a secret - this is the so-called Know How of my friend.
First, you need to assemble the entire structure without the jumper, accurately measure the length of the new jumper, and then you need to saw it off from the second edge and cut the thread.
So:
- We saw off the jumper in accordance with the measurements from the side where there is no thread.
- Where there is an old carving, we go over it with a pencil to update it. No serious effort is required here, and the pipe can be held with Swedish feet.
- Now we take our old battery and unscrew the old pipe from its casing.
- We remove the battery.
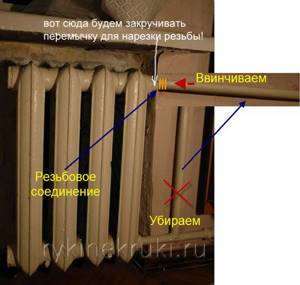
- We screw the future jumper with the threaded end into the foot of the old battery until it stops. Point 5 is essentially Know How. An old battery is essentially a vice that cannot be found in the house. The figure below shows where the jumper should be screwed. The only thing is that you should already have the battery removed and a jumper screwed into it on the side:
How to cut the thread at the jumper from the second end.
This is done like this: the battery is placed on the floor (so that the screwed jumper is parallel to the floor) and one person sits astride it. The second one takes a crank with a lever and a lever and begins to cut the thread. This method has been tested, holding the battery in this way and cutting the thread is quite easy! Don't forget to place a sheet of plywood under the radiator if you don't want to ruin the floor.
Use Cases
Bypasses have several purposes.
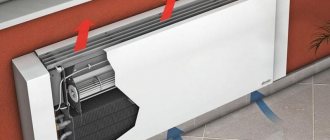
Radiator temperature adjustment
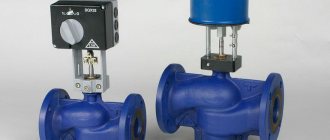
To regulate the temperature in a system with a bypass, the following elements are installed on the heating device (after the shut-off valve):
Both elements regulate the flow of coolant through the heating device , directing its excess bypassing the radiator through a shunt jumper.
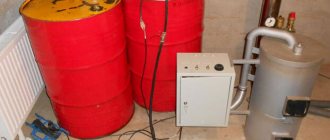
Work without power supply
If the gravity heating system is equipped with a central heating system with a bypass, then during a power outage the circulation of the heating pump continues through the bypass . With a check valve on the bypass, this happens automatically; the ball valve must be opened manually.
Attention! If the ball valve is not opened in time when the pump is stopped (while the solid fuel boiler is running), this can lead to disruption of circulation and damage to the boiler equipment.
Difficulty 3. How to mount a finished jumper?
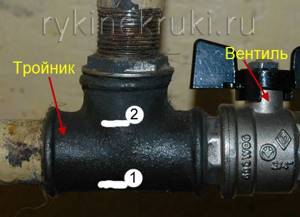
This is the technology here. First, two tees are screwed in, then three valves are installed - two to the battery and one on the bypass, then we mount a jumper - one end is attached to the lower tee, the other to the internal thread of the bypass valve. This is where the problem awaits! In order to identify it, let’s take a closer look at the installation of the jumper. At its lower end, the thread must be cut so that it can be screwed into the tee to its full depth (the threaded part will block the flow area of the tee), while the upper cut of the jumper must touch the edge of the bypass valve, so that it can be wound in into the thread. You need to tighten it approximately to the white line “1”:
Next, flax is wound onto the upper thread and we begin to screw the jumper into the upper valve. At the same time, it is unscrewed from the lower tee. The length of the jumper should be such that it can be screwed all the way with force into the upper bypass valve, but it should unscrew from the lower tee so that the cross-section (passage) in the tee is completely cleared, but it should not unscrew too much! Therefore, even before cutting the thread, the jumper must be accurately measured in length!
In this case, from the lower tee, the jumper is unscrewed approximately to the white line “2”.
After this, flax and paste are screwed onto the thread unscrewed from the lower tee and tightened with a lock nut, which, by the way, must not be forgotten to screw onto the jumper before installation.
What is bypass
The bypass system is a section of the pipeline connecting the inlet and outlet coolant of the main system. The device is installed near any equipment included in the room heating system. The bypass is installed in conjunction with the installation of shut-off valves on all lines. An additional tap is also mounted directly on the lintel.
Jumper with shut-off valves
Why is bypass needed? Main functions of the device:
- adjusting the volume of coolant supplied to heating equipment (radiator, boiler, etc.);
- changing the standard route of coolant movement in the system.
Using a bypass, you can shut off the coolant supply to any element of the heating system and turn off the equipment for the purpose of repair or complete replacement without the need to completely shut down the heating main.
Difficulty 4. You'll have to look for the right tee in the store!
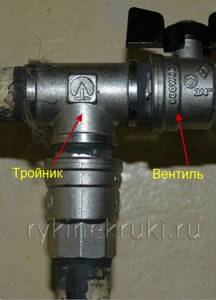
To answer the question of how to connect pipes, you need to take the appropriate tee! Any plumber knows how to assemble parts, but there is one more nuance here! All modern tees look something like this:
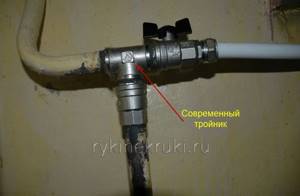
The pipe can only be screwed into these tees at the top! The pipe will not be screwed in any further. Tees that made it possible to screw in pipes with an overlapping section were produced, as far as I know, only in Soviet times. Nowadays they are quite difficult to find. My friend went to quite a few stores before he found one that sold them. In some cases, the sellers didn’t even understand what he was asking them about.
Such a tee looks like this - completely ugly and black:
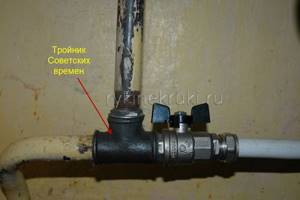
But the domestic industry still produces such tees. You just need to immediately set a task for the plumber - a good plumber will definitely know where you can buy the required tee.
Thus, my friend made the heating with his own hands, using a completely non-trivial approach, but, to be honest, I was impressed by this design. I'm interested to hear your opinion on this matter?
Laws of physics
Let's look at the laws of physics first!
Water always follows the path of least resistance. There is less resistance where the pipe diameter is larger. When water comes to your apartment, it is divided into 2 streams: through the jumper and through the battery. According to the rules, the diameter of the jumper should be one caliber less than the diameter of the forward and return pipes. For example, if the diameter of the pipe from the wall is 1 inch, then the diameter of the header should be 3/4 inch.
Why is this being done? So that the main flow of water still passes through the battery, and not through the jumper. If the diameter of all pipes is the same, then it will be much easier for water to pass only through the jumper. Now imagine that the water pressure is weak or insufficient. In this case, if you have many bends in the battery, then only the first ones will be hot, and the last ones will be barely warm, haven’t you noticed?
So, by reducing the diameter of the jumper (increasing the resistance to water flow in it), a greater flow through the battery is achieved. Now look at my second picture where there is no tap on the lintel. You see, all the pipes are the same, which means that the master did not do his job well here too.
Why is this happening? Probably the masters are lazy, and there’s more fuss. It is necessary to purchase pipes of different diameters and install them.
One of my reader's reviews on this topic
Everything was assembled correctly, and if the master was not too lazy to test it 20 times, then this is his personal business. You may have a lot of fittings on hand. I wouldn’t waste time on crimping and would assemble it using a couple of cranes and a couple of American ones in a rigid assembly. But the man tried and the result was simply a cosmic structure. If everything is compressed correctly it will work. Unfortunately, this connection diagram requires press pliers, which not everyone has, and most importantly you need experience, otherwise everything will leak. And I was personally impressed! Unfortunately, to imitate such a scheme takes a long time to complete, and it turns out to be quite expensive. At a construction site or hack job, they will also hit you in the head for wasting materials and time for assembly. And so everything is correct and a clear example of how, if you have time and a lot of materials, you can collect from the heart. I give it a 5 for the original assembly and give it a C for the assembly time and the high consumption of materials both in terms of money and quantity. Many thanks to the author.
/Andrey/
The need for a bypass for the circulation pump
A circulation pump can improve the heating system even with natural circulation. During its installation, a bypass is required. Although the circulation pump increases heating efficiency, it makes it dependent on electricity.
The need for a device for a circulation pump:
- Setting heating performance;
- Disconnection from the pump operating circuit;
- Repair of the circulation unit without disconnecting from the autonomous heating;
- Idle mode prevention
When the power is turned off, it interferes with the natural circulation of hot streams. Bypass solves this problem. By closing the jumper, physical movement of fluid occurs in the circuit. When heated, the water rises to the top and flows naturally along the circuit, delivering the coolant to the heating elements. As it cools, it sinks and flows in the opposite direction to the boiler.
To adjust the performance of the circulation pump, you need to install a bypass
A bypass will help completely get rid of this problem. Modern bypass models are equipped with an automatic valve. Such designs are indispensable in a system with a turbo pump. When there is water pressure, it opens and the coolant moves along the circuit without obstacles.