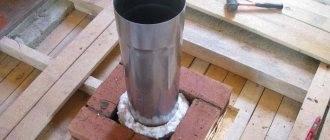
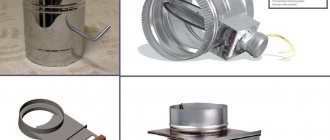
What materials are used to make caps and fasteners?
Chimney caps are made from materials that are resistant to corrosion, withstand high temperatures and have a long service life. The temperature requirement applies only if the device will be closing the chimney. For ventilation ducts, a product made of polyester, pural, etc. is quite suitable. In all other cases use:
- Galvanized steel
- Stainless steel
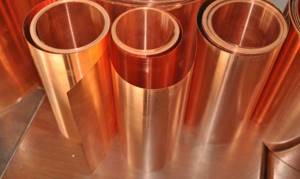
- Copper
- Zinc-titanium alloy
Copper weathercocks (smoke boxes) last a long time, from 50 to 100 years. This is one of the most durable materials, but when installing it, it is necessary to use copper hardware. Otherwise, active corrosion processes will begin, which will significantly shorten the life of the device. The installation of a zinc-titanium cap on a chimney requires, for the same reasons, the use of only galvanized hardware. Zinc-titanium is a new alloy that has recently been used only for the manufacture of roofing materials, but today many companies have begun to produce chimney caps from it. They have a half-century warranty and a much lower price than copper ones. You can install caps made of other materials on the pipe using ordinary hardware, although it is still better to take those that are not susceptible to oxidation and destruction: most weather vanes can serve for decades, but climbing onto the roof because it was torn off by the wind due to a broken fastening is not the best good time. If we talk about a brick pipe, then you can use either ordinary long nails or threaded ones (but it is almost impossible to dismantle them), you can use dowels. In each specific case, the fastening system is selected based on the shape and material of the pipe, available holes for fastening, etc.
Forged chimney caps
The most popular type of this product is a stainless steel chimney with or without a polymer coating. The service life in this case is 20 years, but the price is much lower. The option with a polymer coating is especially popular - the color can be matched to the color of the roof, and if the design is in the style of the roof, this option looks great.
Materials and tools used
Among people, the cap is called a visor, a chimney, a fungus. Its scientific name is deflector.
Forged deflectors are very original, but their price is not always justified. After all, you can make a cheaper structure from the following metal material:
- galvanizing;
- stainless steel;
- steel with paint and varnish coatings;
- aluminum;
- copper
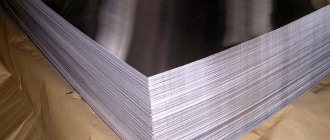
The most convenient, practical and cheapest is galvanized sheet.
You need to have the right tool. List of what you may need during work:
- rubber or wooden hammer;
- small iron hammer;
- screwdriver;
- electric drill;
- drills of the required fastener diameter;
- rivets;
- fastenings;
- roulette;
- marker;
- construction corner;
- bends;
- special clamps;
- metal scissors;
- metal ruler;
- iron corner up to 1 meter in size.
Covering device
The design is extremely simple: it consists of an umbrella that protects the chimney pipe from precipitation, and a drip - a device that drains water. Thanks to the use of a cap, the formation of ice in winter is minimized. If we talk about the principle of operation, then it can be described approximately as follows:
- Air flows that rise through the pipe encounter an obstacle - a deflector on the chimney.
- The air stream sliding along the cylinder turns upward, as a result of which the smoke coming out of the pipe is, as it were, sucked in.
- This leads to an increase in the speed of movement of heated air through the chimney duct.
- At this time, the cap protects the chimney channel even during air movement due to the fact that it has small gaps.
- If the wind moves downwards, then air vortices are formed under the chimney (they slow down the exit of smoke). To eliminate this, the cap design has a reverse cone.
Cap design
There are a huge number of different models of caps; they differ in functionality, geometric dimensions, materials of manufacture and appearance. But they all have mandatory elements that ensure stability and performance.
Standard hood design
- Umbrella (cap). This is a kind of chimney roof that protects it from precipitation. In addition, the roof must protect the chimney due to the decrease in draft when the strength and direction of the wind changes.
- Drip apron. Mounted only on brick chimneys, the cement-sand mixture for masonry and the brick itself react negatively to increased humidity - the smoke of heating stoves, especially wood-burning ones, has a large amount of steam. When it comes into contact with the cap, it condenses and gets onto the masonry; during cyclic freezing/freezing, it crumbles very quickly. The drip tray receives condensate and removes it to the side, due to which the structure remains dry at all times.
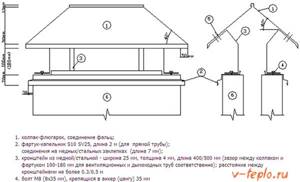
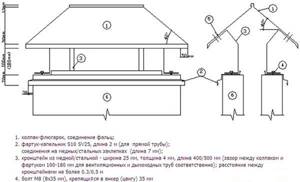
Drawing of a drip apron with markings - Brackets. They lift and hold the cap over the chimney, changing their parameters depending on the size of the shelter, its weight and design appearance. The main technical requirement is to ensure the stability of the structure when exposed to maximum wind and snow forces.
- Stingrays. Available only in complex designs, they increase the size and improve the appearance of the product.
Options for chimneys with slopes
As for the appearance, here each master can be a personal designer. But we do not recommend starting the design and manufacture of a cap from scratch. It is necessary to carefully study the available information, understand the purpose and influence of each element on the performance characteristics of the hood. Only then will you be able to not only make your own changes to the design, but also understand the consequences of your actions. In this article we will provide step-by-step instructions for making a cap. But first you need to get acquainted with the theory a little.
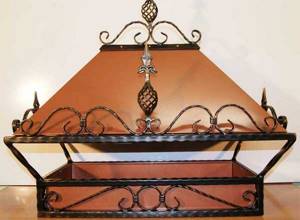
Decorative copper cap
Simple chimney cap
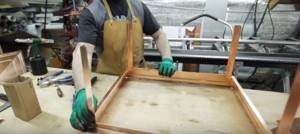
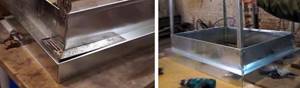
How to make it yourself
In fact, such a structure is not the height of engineering, and is quite accessible to independent construction even by an ordinary person who has ever held a ruler and metal scissors in his hands.
Among the various tips and recommendations for constructing such a device, you should listen to many, but you should start with the simplest thing - make a working drawing and preferably a paper model.
Blueprints
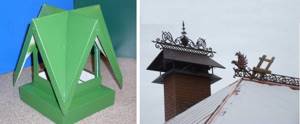
The simplest and most reliable option for self-production is a cap in the form of a mushroom with four sides - this design is quite simple and does not require large costs both during manufacture and installation.
The main element here is the plane of the sides. Most often, measurements are taken of the outer size of the chimney.
The main data for developing a drawing is:
- Mushroom height.
- The length of the edge connecting the sides of the pyramid.
- Length of the side at the base.
- The perimeter of the chimney according to external measurements.
In essence, such a cap is a pyramid with four sides, set on a base - a rectangle equal to the cross-sectional area of the pipe and with a perimeter corresponding to the perimeter of the pipe.
The sequence of developing a working drawing can be as follows:
- Taking dimensions from the chimney pipe.
- Determining the size of the cap.
- Making a working sketch of the product.
- Creation of a working drawing.
- Gluing a large-scale visual model from paper.
When calculating, it is mandatory to check all data before transferring it to metal.
As a basis, you can choose options for do-it-yourself caps, which are presented on various websites for home craftsmen. But it’s also worth making a scale model.
Step-by-step instruction
To make a simple chimney you will need:
- Sheet metal 0.5-0.8 mm thick.
- Rivets for the riveter.
- Riveter.
- Metal scissors.
- Drill with a set of drills.
- Hammer.
- Wooden bars for bending metal.
- Clamps or other clamps.
The stages of practical work will be as follows:
- The working drawing is transferred to sheet metal.
- Metal cutting is carried out.
- The edges are folded along the fold lines and mounting holes are made.
- The parts are fastened with rivets.
- The top is placed on racks and connected to the pipe contour.
- The resulting structure is attached to the chimney.
When making this structure, the best option is a painted metal or galvanized sheet. After connecting all the parts, to improve the anti-corrosion properties of the coating, it is recommended to additionally paint the internal surfaces of the cap with a metal primer.
It is also recommended that when installing on a chimney pipe, cover the chimney channel with a rag to prevent particles of debris and broken bricks from getting inside the channel.
Step-by-step instructions for making a cap
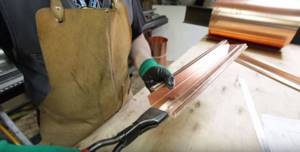
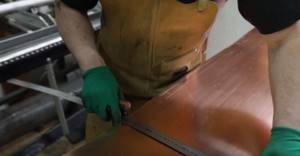
We will make the cap from copper sheet: this metal is quickly covered with a thin film of oxides and in the future is not afraid of the harmful effects of aggressive chemical compounds, and they are always present in smoke. The thickness of the sheet is 0.6 mm, do not use anything thinner, it is easier to work with, but it does not have sufficient mechanical strength, it can be deformed, bent, etc. The process will be much faster and its quality will improve if you have access to a cutting machine and bending machine car.
To make the cap you will need copper sheet 0.6 mm thick
Copper sheet prices
Copper sheet
To perform the work, you need to prepare a metal ruler, square, and awl.
Step 1 . Draw a sketch of the planned cap. We recommend choosing a basic model online and making adjustments to the linear dimensions. If desired, add original decorative elements.

The drawing can be done on a computer or drawn by hand
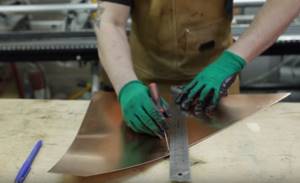
Step 2 . Transfer the details of the cap onto a sheet of copper. Mark the outline of the structure. You can increase its scale, so all the nuances are easier to see. When transferring dimensions, you should always leave 0.5 cm for rolling.
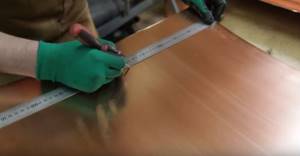
All measurements are transferred from the drawing to the copper sheet
Practical advice. It is much easier to work not on a whole sheet, but on separate blanks for each element. To do this, you need to first cut them according to the available sizes, and then make markings on each one separately.
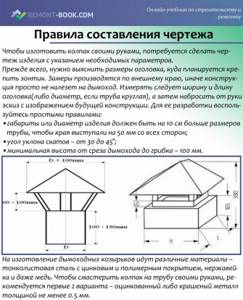
Rules for drawing up a drawing
Experienced craftsmen strongly recommend detailing each element; they once again check all the nuances and only after that transfer the image to the metal surface. You can draw on copper with special felt-tip pens or an ordinary awl. The second option is much better, it has thinner lines. In addition, you will not have to clean the product from felt-tip pen marks later.
The most convenient way to mark the contours of workpieces on a copper sheet is with the tip of an awl
Step 3 . Use metal scissors to cut out the part. If you have a plasma cutting machine, then cutting can be done with this unit. Short cuts should be made with right and left scissors. Pay attention to which direction you then need to bend the metal and, depending on this feature, choose one or another scissors. Then it will be easier to make various folds and connections.
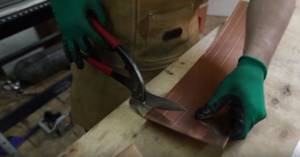
Cutting of blanks is carried out using metal scissors
Prices for metal scissors
Metal scissors
Using the same algorithm, cut out all the remaining blanks.
Bending and assembling the cap
If you have a minimum of knowledge and skills, then these operations do not pose much difficulty. If the work is being done for the first time, then it is recommended to practice some operations on unnecessary pieces of metal in order to practically master some operations. It doesn't have to be copper, use cheap sheet metal.
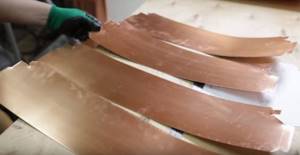
Cut blanks for the cap
Step 1 . Bending of base blanks begins with rolling the edges. The workpiece is precisely positioned on the machine and the metal is bent by lifting the table. Such operations can be done manually using a mallet, but the quality will be much worse. In addition, it only takes a few seconds to bend all the elements on the machine; the manual method will require much more time and effort.
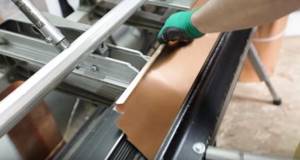
The process of rolling edges using a machine
Prices for sheet metal bending machines
Plate bending machine
Step 2 . Make the first part of the base, the additional bottom bend provides increased strength, it is always recommended to provide it. The angles are indicated on the drawing and controlled with a protractor during bending. Some machines have fixed templates; the specific mechanical bending technology has almost no effect on the algorithm of actions. It is recommended to roll the bases; the convex line controls the location of the element’s fixation on the chimney wall and increases its stability.
To increase the strength of the base of the cap, a bend is added at the bottom
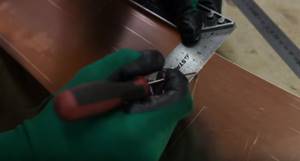
Step 3 . Begin assembling the base of the hood. The work requires special pliers; with this tool, move the fastening parts of individual elements into a single structure in different directions.
The edges on the sides of the workpieces must be bent using special pliers.
Step 4 . Lay out all the workpieces on a flat surface, check the dimensions and correct bends of the connecting ends. Using pliers, bend the ends and assemble the elements together. Don’t close the locks yet, just prepare them. The work requires skill, do not rush, do not damage the front surfaces. You need to know that fixing dents will always be noticeable, and such marks indicate low qualifications of the technician.

All blanks are assembled into one structure
Step 5 . Close the locks with blows of a mallet, the lower table should only be made of shaped metal, the dimensions are selected depending on the parameters of the product. An experienced craftsman has many different profiled sections for such purposes, which he uses while performing the work.
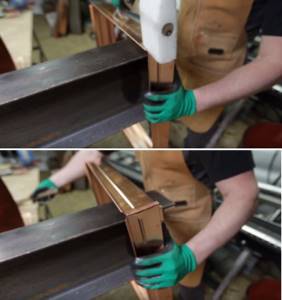
Using a mallet, connect all the joints on the sides of the base
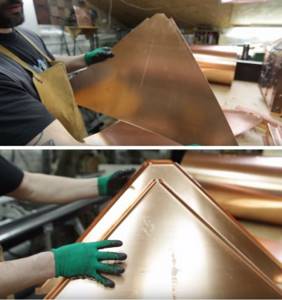
At this point, the assembly of the base for the cap on the brick chimney is completed; you can begin making a cover, or umbrella, that protects the chimney pipe from above.
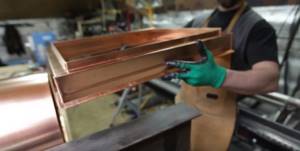
Ready chimney cap base
Making a hood roof
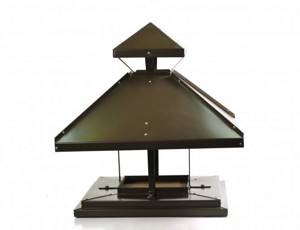
First, the drawing is carefully studied and, if necessary, each element is detailed on an enlarged scale. In our case, the roof resembles a complex hip-hipped structure, consisting of two trapezoids and two triangles. This option is most suitable for rectangular chimneys.
Drawing of an umbrella for a chimney
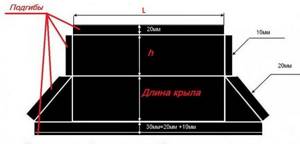
Step 1 . Transfer the dimensions of the slopes to the metal, as always, use a metal ruler and an awl. Don’t forget to draw a hem tail at each corner of the element. The length can be arbitrary, each master gets used to his own. The parameters are given in the range of 5–15 mm; there are no strict restrictions. Remember that the length of the top hem should be twice as long as the fixed bottom one. The decision should be made in such a way as to minimize the amount of unproductive waste. It is enough to draw one element, check that all dimensions are correct, cut it out, and then use it as a template for the second. On triangular slopes, the outlets are 30 mm, on trapezoidal slopes, 15 mm.
Marking the workpiece on a copper sheet
Step 2 . Use metal scissors to cut out the blanks. Do not forget that for small elements, depending on the side of the bend, a left or right tool is selected.

Cutting blanks for an umbrella
Step 3 . Start bending parts. After everything is prepared for connection, lay them out again on a flat table and check the position. There is still time to correct minor errors. Roll the stiffening ribs in the middle of the plane and make a bend at the bottom; it further increases the bending resistance. We have already mentioned above that the structure will be affected by large snow and wind forces; measures must be taken to increase the strength of the elements.
Bends are made along the intended lines
Step 4 . Assemble the umbrella; this is done in several stages.
- Insert the ridge connectors, align them exactly along the line.
- Place triangular slopes on the trapezoidal slopes and connect them into a fold. All connections should fit without much effort, there is no need to rivet anything, just use the hooks. Connect the bend with maximum force; the elements should not move after the assembly is completed.

Assembling a smoke umbrella
Once the roof is completely ready, you can begin making the legs.
Step 5 . Draw the details on a piece of copper of suitable size. It is not necessary to cut a new sheet; you can use waste; there is enough of it to prepare small elements. The total width of the blanks is approximately 110 mm, the width for rolling is approximately 25 mm. Dimensions may vary depending on the parameters of the segments.
Scraps of material are suitable for making legs.
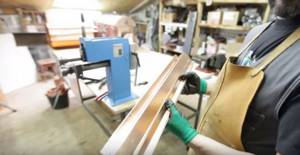
Step 6 . Cut the blanks for the legs, bend the folds. The rivet will be made through two layers of metal, increasing strength by rolling. Drill holes for rivets.
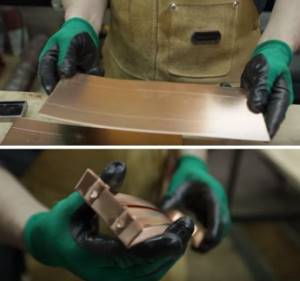
Leg blanks are passed through a bending machine and drilled for fasteners
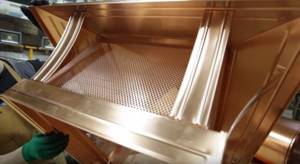
Now all that remains is to assemble the roof, legs and body. If you plan to protect the chimney from birds, then you need to attach a copper mesh around the perimeter. Remember that it can create many problems in winter. The mesh is additionally fixed with specially prepared corners. Secure the roof with rivets.
The legs are attached to the base with rivets
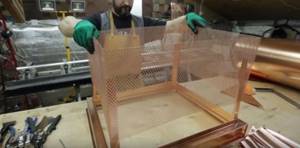
A mesh is put on the frame
The roof is attached last
The structure is completely ready, climb onto the roof and install it on a brick chimney.
How to make a chimney canopy
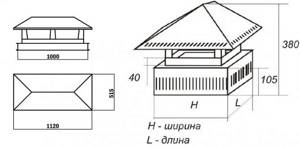
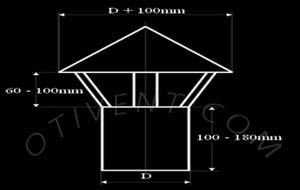
First of all, you need to find out the external dimensions of the head where you plan to attach the umbrella, and then sketch out a hand-drawn sketch depicting the future structure. To develop it, use simple rules:
- the dimensions or diameter of the product must be 10 cm larger than the dimensions of the pipe, so that the edges protrude 50 mm on all sides;
- slope angle of the slopes – from 30 to 45°;
- the minimum height from the chimney cut to the fungus is 100 mm, as shown in the drawing.
In addition to the traditional umbrella, there are other design options - a deflector and a rotating weather vane - “sycophant”. The first allows you to actually increase traction due to wind pressure, which creates a vacuum inside the cylindrical body, where the smoke channel exits. But in calm weather, this device not only loses its advantages, but also worsens the traction force in the pipe, creating increased resistance at the exit of combustion products.
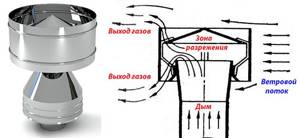
Diagram of the deflector operation - the wind creates a vacuum inside the hood
The attachment is beautiful, but not very effective or reliable
A semi-cylindrical weather vane, assembled from several segments and rotating on a special bearing, was called a “sycophant” due to its ability to turn with the wind. If it were not for the high price and dubious reliability of the bearing, it would be an ideal cap for any round chimney, since it successfully protects the mouth from blowing and precipitation.

The weather vane helps well against being blown by the wind, but it can break due to strong gusts
Various materials are used to make chimney canopies - thin sheet steel with zinc and polymer coating, stainless steel and even copper. To make a pipe cap with your own hands, we recommend the first 2 options - galvanized or painted metal with a thickness of at least 0.5 mm.
Making a simple round mushroom
To perform this work, you will need the usual tools - metal scissors, a drill, a hammer and a device for setting rivets. Having determined the required size of the fungus, proceed in this order:
- Screw 2 screws into the wooden strip at a distance equal to the radius of the product plus 15 mm. Get an improvised compass, with whose help mark the center of the circle on the metal and draw its outline.
- Cut the workpiece with scissors, and then draw a sector with an arc length of approximately 120 mm (the figure resembles the first piece of a round cake).
- Cut out this wedge, then forcefully align the outer edges of the circle and secure them in a vice.
- Drill 3 holes along the resulting seam and connect the ends of the part with rivets or M4 screws with nuts. The upper part of the weather vane is ready.

Drawing a circle on a galvanized sheet (left) and joining the edges of the fungus (photo on the right)
The legs for the fungus and the clamp surrounding the pipe are made of steel strips made by bending a thin sheet 2-3 times. These parts are also attached to the umbrella with rivets, which is clearly demonstrated by the master in the video:
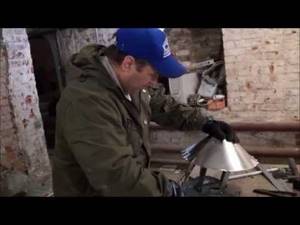
Watch this video on YouTube
Rectangular gable umbrella
To make this type of cap, it is advisable to use a sheet bending machine or contact the appropriate workshop for this service. In extreme cases, you will have to bend the elements manually along the line, carefully tapping the metal with a rubber hammer on a wooden block.
As in the previous version, the first step is to take the external dimensions of the brick chimney, and then calculate and sketch the pattern, as shown in the drawing. Formulas for determining the length of the sides of the elements depending on the initial dimensions of the pipe and the height of the wind vane are also given here.
Assembling the frame and installing the racks in the corners, fastening is done with rivets
Making a pipe cap with your own hands is relatively simple - you need to cut the metal according to the drawing, bend it along the dashed lines and connect the parts with rivets. It is proposed to take ready-made corners made of painted metal with a thickness of 0.5-0.7 mm as rigid racks. How to assemble a gable weather vane and a canopy in the form of a cover with a pipe passage is clearly shown in the video:
Watch this video on YouTube
European cap
This model is more designed to prevent the formation of condensation and has a rounded appearance. A chimney of this type can be made independently using a steel sheet and hand-made holders.
How to make a European cap:
- Take a standard metal sheet and carefully bend it around the pipe, or directly along the contour of the chimney.
- They remake the spoons that will hold the cap directly on the pipe. It is best to do this with a special machine or ask a welder you know. You can also make transverse cuts that do not go all the way and carefully bend the strips using pliers.
- These cuts do not have to be transverse. It is permissible to use longitudinal strips if the piece of metal is quite long. A rectangle is cut out along the edges and the tails are left in the center. After this, roll the sheet in the shape of a semicircle and press the tails with a clamp.
- Gently bend the legs.
It is permissible to use a regular chimney pipe clamp to mount such a cap on the pipe.
To make a European cap, all you need is a piece of sheet metal and a grinder disc.
Which cap should I choose?
The choice of hood design directly depends on the type of heating device - boiler or stove, as well as on the material from which the chimney is made. A suitable chimney for a brick kiln and a cap for the chimney of a gas boiler are different, this is due to the different efficiency of these devices and the temperature of the flue gases.
Deflector for brick oven
The design of the chimney in a brick oven can be different, but traditionally a chimney and pipe made of square or rectangular brick are used. From an aerodynamic point of view, this pipe design is not very good - turbulence is formed in it, which causes traction to deteriorate. In windy weather with low atmospheric pressure, the draft can completely turn over, and all the smoke will go into the room.
The rough surface of the brick creates excellent conditions for the deposition of soot, soot and dust; in addition, in the summer, leaves and debris can accumulate in the pipe; birds can choose them to build a nest. All this contributes to the rapid overgrowing of the pipe lumen, deterioration of draft up to its complete cessation, and an attempt to melt the stove can lead to a fire.
Considering all the above reasons, it is recommended to equip brick pipes with a cap that protects it from foreign objects and water. In addition, the special design of the cap improves traction and ensures its stability. Such caps are called deflectors. Thanks to their design, they create a vacuum in the upper part of the pipe and air leaks from the combustion chamber.
Video: purpose of the deflector
There are several modifications of deflectors that have been tested by time and operation, for example, the TsAGI or Grigorovich deflector. More information about making them yourself is described below.
For solid fuel boilers
Solid fuel boilers - coal, wood and pellet - are quite often used for heating houses. The chimney of a solid fuel boiler is usually made of a stainless double sandwich pipe or ceramic. Their surface is smoother than brick, and their traction is stable. Condensate and sediments in a properly installed pipe flow into the condensate collector, without interfering with flue gases passing through the chimney.
In this case, the greatest influence on stability and traction force is exerted by the correctly selected pipe height. For coal boiler models without forced draft, the required chimney height can reach 8 meters, and the installation of such a pipe is often difficult.
Installing a deflector allows you to reduce the required height by 15-25%, so boilers using anthracite or brown coal as the main fuel require the installation of a deflector cap on the pipe. Wood and pellet boilers operate similarly to coal boilers; you can also install a cap or deflector on them, closed with a lid on top.
The exception is pyrolysis boilers with high efficiency - up to 92%. Due to the almost complete combustion of fuel and afterburning of the combustible elements of the flue gases, the smoke temperature at the outlet is 120-180 degrees, which can cause the appearance of a large amount of condensate. Soot quickly settles on it, and in frosty conditions ice may form. Due to the narrowing of the lumen, some of the smoke may enter the room, which will cause carbon monoxide poisoning.
For this reason, for solid fuel boilers using the principle of pyrolysis, it is recommended to install a cap with an open nozzle of industrial manufacture. Its design protects against dust and precipitation, but does not interfere with the release of low-temperature smoke.
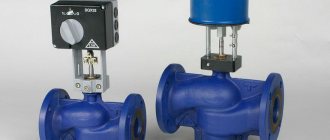
Caps for gas and diesel boilers
Similar to pyrolysis boilers, gas and diesel boilers burn fuel almost completely; as a result, the output smoke consists of carbon dioxide and carbon monoxide, sulfur compounds and water vapor. The smoke temperature is also low - 120-150 degrees. The condensate formed during the operation of gas boilers is acidic and very aggressive. During long-term operation, such condensate can cause rapid corrosion of boiler and chimney elements.
Taking this feature into account, hoods with an open nozzle are also used for gas and diesel boilers. The use of smoke deflectors in this case is impractical, since all gas equipment is equipped with forced draft, and an artificially created vacuum in the pipe is not necessary.
Types of exhaust hood
The types of exhaust hood also have a variety, but the most popular are:
- tsags are a simple model that can be made in a workshop;
- Grigorovich;
- It is difficult for a beginner to make a spherical “Volper” with his own hands, since machines are required;
- H-shaped;
- star shape "Shenar";
- ASTATO open.
You can find plastic hoods on sale; they are best used for basements and garages; for high-rise structures they are fragile and do not last long.
How to choose
The question of choosing the material and shape of the cap, as a rule, comes first for the potential owner of such an accessory. This is understandable, appearance and the desire to be different from others do their job, but whether these criteria are so important when choosing is something that needs to be sorted out.
Considering all the types and forms in the booklet of manufacturers, it is worth asking about the functionality of the device. After all, not only the correct operation of heating or heating devices, but also the safety of the home owners themselves largely depends on the functionality of the hood.
For example, for certain types of heating installations, installing such devices on chimneys is not only not recommended, but is also strictly prohibited.
For example, according to the regulatory framework of the Russian Federation, the installation of such caps on chimney pipes serving gas boilers is prohibited; for chimneys of such heating devices, it is provided only in the form of a nozzle with a necessarily open top.
This ban is due to the fact that when the temperature drops, the metal chimney freezes and becomes covered with ice, preventing the removal of combustion products, which can lead to the release of carbon monoxide in the combustion chamber and possible poisoning of people.
The fact is that the temperature of the smoke from gas boilers is slightly lower than that coming out of heating devices operating on solid fuel. If the temperature of the smoke from gas boilers varies from 70 to 100 degrees, then the smoke from a solid fuel boiler using conventional fuel or a simple heating stove is already 150-250 degrees.
Thus, the most ideal option for installing a canopy are pipes from conventional solid fuel boilers or stoves.
The next important issue is the installation of such an accessory, because the chimney pipe is not the most easily accessible place in the house. And the chimney, like the pipe, will have to be cleaned periodically, because combustion products contain, in addition to smoke, a lot of impurities that very quickly settle on the surface of the visor. Therefore, when choosing, you should also take into account the fact that quite quickly the cap will be covered with a layer of soot.
In the case where the chimney pipe is not too high and does not provide sufficient draft, it is recommended to pay attention to caps such as deflector or deflector-vane. Such special devices will not only provide protection to the chimney, but will also significantly increase draft by almost 20%, and this is a very important fact.
How to choose the shape and material for a chimney cap?
They came up with a cap for a pipe a long time ago. This solution allows not only to give the chimney decorative properties, but also important practical ones:
The most important and first task of a chimney cap is to protect the chimney from external natural phenomena: snow, rain, strong wind and excessive ventilation. Secondary - serve as an additional decoration for the roof. Believe me, the imagination of modern designers is as amazing as ever! And some masterpieces of home and industrial craftsmanship attract the eye from afar.
Moreover, each detail can have its own shape, giving the chimney a particularly decorative, original look. But, no matter what shape you make the cap, the main thing is that it protects the chimney from precipitation and wind, preventing weather conditions from destroying its walls. And at the same time it turned out to be durable in practice, because the conditions of its operation are simply extreme!
You need to select a cap for the chimney in accordance with the diameter of the hole and the type of channel:
- if the stove in the house is heated with gas, then the cap should be made of chromium-nickel acid-resistant sheet metal;
- if a fireplace, boiler or stove is heated with solid fuel or wood, then it is better to install not a stationary cap, but a removable one, so that it is then easy to carry out an inspection.
The overall classification of chimney caps is simple: with a square base or round, made of black or chromium-nickel sheet, stationary or folding. Also, many today are made only of caps without a base at all - they are fixed directly on the chimney duct. In Russia, the most popular forms of caps are:
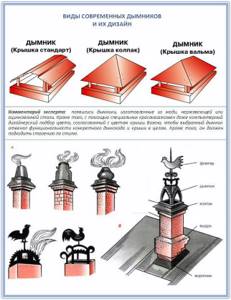
The architectural shape of the cap also matters:
- The multi-slope weather vane has excellent protection against snow and other precipitation getting into the chimney.
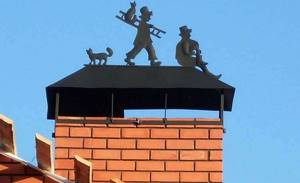
- A chimney with a weather vane looks especially impressive; metal figurines of objects for animals are specially installed on this one.
- A flat surface cap is most often installed on European style buildings.
- A hood with an opening lid is also becoming popular, which helps to carry out unhindered maintenance and maintenance of the chimney.
- Finally, the deflector, which is equipped with opening ventilation holes, is designed to significantly improve traction.
If you noticed, chimney caps are not always used. For example, in areas where there is almost no wind and there is rarely precipitation, there is no cap on the chimney at all. But for Russian latitudes with the appropriate climate, such a roofing element is necessary.
Basic materials
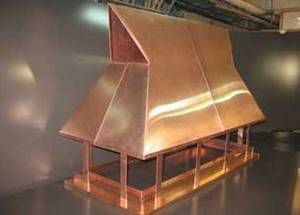
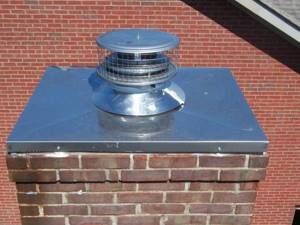
Copper caps are the most durable
Different metals are used to create protection for the pipe. They must be reliable, strong, not react to external environmental influences and not reduce the traction force. These materials include galvanized steel, stainless steel and copper.
Protection made of galvanized steel withstands aggressive environmental influences well and is distinguished by its practicality. Galvanized steel does not lose color when exposed to direct sunlight. It can additionally be coated with a colored polymer – polyester. If a cap made of galvanized steel with a small thickness is installed, it can burn out after 3-5 years of constant use. High temperature gases destroy it, so it is recommended to install a stainless steel reflector. The cost of the device will be higher, but the service life will increase by several decades.
Higher grade materials include stainless steel. It is durable and highly durable. Its cost is higher than galvanized steel. Can be used as an additional protective element of the cap.
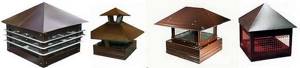
Types of chimney caps
The shape of the chimney must correspond to the cross-section of the pipe.
Thus, chimney caps can be:
- round;
- square;
- rectangular.
Main design options for chimneys:
- cap-house with a hipped roof;
- house with gable roof;
- chimney with a semicircular roof;
- cap with a cone-shaped umbrella;
- with a flat umbrella.
Smokers can be equipped with additional elements:
- spark arrester;
- forged ornament;
- weather vane and so on.
If the spark arrester is a purely functional element, then openwork forging is necessary to give the cap an original and attractive look. It also serves as protection from debris and birds, but a regular grill will cope with these tasks. The weather vane not only shows the direction of the wind and acts as a decoration - thanks to its presence, the draft in the pipe increases.
Manufacturing materials
For the manufacture of chimney caps the following are used:
- galvanized sheet steel;
- stainless steel;
- copper.
Galvanized steel pipe heads withstand aggressive environmental influences well, they are practical and do not lose their color for a long time under sunlight. They can be additionally coated with colored polymer material (polyester).
You can find such caps on sale in any color, this allows you to choose a shade that will harmoniously match the color of the pipe and roof. Stainless steel is a higher-class material; products made from it will be more durable.
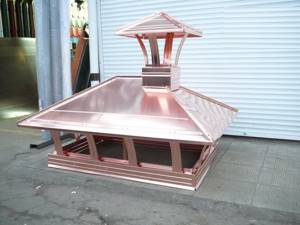
Copper is the most durable material for a chimney cap. If installed correctly, such a chimney will last more than a hundred years. Copper caps go well with gutters and other elements made of this metal, as well as with roofing made of natural tiles.
Over time, a head made of this metal will not only not lose its appearance - on the contrary, it will become covered with a noble patina.
Types of deflectors
Simple heads work worst when air flows from bottom to top. Hitting the hood, they are repelled and move towards the streams of smoke rising from the chimney. The pressure at the top of the chimney increases and the draft overturns. Deflectors are more effective in this case.
These are structures with a diffuser designed to capture the wind, disperse its currents and remove it. This creates a vacuum inside the deflector, which causes streams of hot air from the chimney to rush upward. Conventional caps provide some stabilization of the pressure at the top of the chimney. But if they increase draft by 15 - 20% compared to an open pipe, then diffusers increase this percentage to 30 - 40%.
There are several types of deflectors:
- TsAGI.
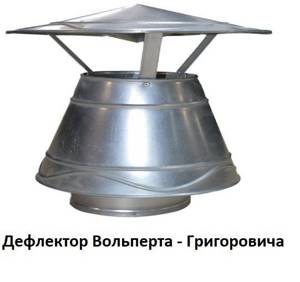
- Volpert - Grigorovich.
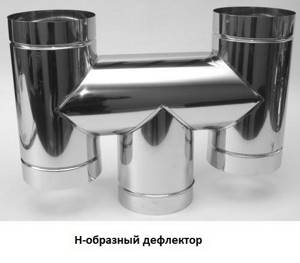
- H-shaped deflector.
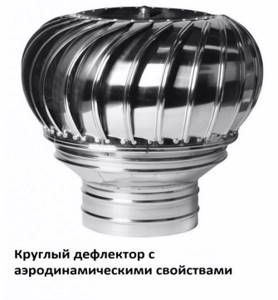
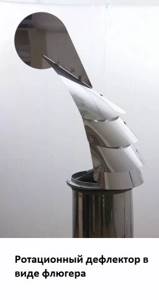
- Rotary: spherical, weather vane.
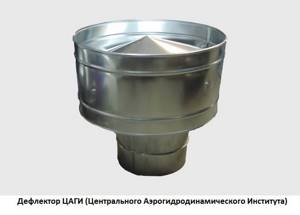
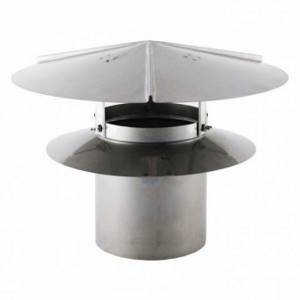
The Central Aerohydrodynamic Institute has developed a universal deflector model. It consists of a ring fixed to the chimney and an umbrella with a cylindrical screen connected to it. Wind flows entering the structure from below are dissipated, hitting the umbrella cover and the walls of the cylinder, then exit through the gaps between them. The chimney is protected from precipitation and strong directional wind.
Has disadvantages:
- In calm weather, traction worsens.
- In severe frosts, the small distance between the umbrella and the cylindrical screen may become covered with ice, preventing the passage of smoke.
The Volpert-Grigorovich deflector looks like a two-tier “skirt”. Its lower part is a truncated cone or cylinder, the upper part is 2 cones, direct and reverse. The curved surface of the diffuser is effective in low winds.
The H-shaped deflector is similar in outline to the letter N. The smoke channel is connected to a transverse pipe of the same diameter, at both ends of which there are two pipes parallel to the chimney. Wind flows can only enter the side channels. Most of them immediately go up, without interfering with the waste combustion products. The remaining part, entering the transverse channel, is not capable of creating serious pressure and is discharged along with the smoke. No smoke. A canopy is not required in this design, since the mouth is protected by a transverse pipe.
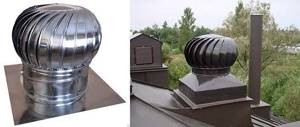
The round turbine stands still in calm weather, without preventing smoke from escaping from its openings. Under the influence of the wind, it rotates, creating a reduced pressure inside and increasing traction. Deflectors, which have aerodynamic properties, rotate around their axis under the influence of air flows. A weather vane or weather vane protects the mouth of the smoke channel from wind flows, which are forced to bypass it, creating a vacuum.
Rotary deflectors are usually installed where gas heating equipment is used. For TT boilers with high flue waste temperatures, it is not recommended to install them.
From all that has been said, we can draw conclusions:
- If the head is mounted on the chimney of a TT boiler, then a simple cap made of copper, zinc-titanium or stainless steel will be sufficient. It is better not to install nets in areas with very frosty winters to avoid icing.
- For gas heating boilers, deflectors that improve draft are acceptable. In areas with frequent winds at higher elevations, their susceptibility to air currents will come in handy.
- It is advisable to make the caps for brick chimney pipes with side air ducts, especially from equipment with high efficiency, gable or hip, which do not block the passage of exhaust gases.
Installing the hood
Here you should focus on safety and practicality. The last thing you need to think about is the external attractiveness of the structure. It is important to consider the following recommendations:
- Round steel pipes cannot be covered with traditional shaped structures. They remove smoke from highly efficient boilers whose efficiency exceeds 85%. It is better to use conical nozzles made in the form of an open nozzle. They will not become covered with a crust of ice in freezing temperatures.
- A brick chimney, devoid of inserts, connected to a high-efficiency heat generator, can be equipped with a cap-shaped nozzle. A pipe passes through it.
- It is advisable to install an umbrella on stoves with vertical channels. This shape performs a protective function on the chimney. But to make this possible, it is advisable to place a stainless steel plate inside.
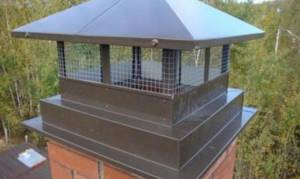
It is recommended to install hip or gable hoods on smoke exhaust blocks made of brick and equipped with side vents. Due to this, the upper part of the masonry will be protected from precipitation and wind. In this case, contact with the gas duct openings on the sides will be excluded.
To protect a brick block, where chimney and exhaust pipes are open at the top, you can make a box with several through pipes. They, in turn, are inserted into the specified channels. Conventional mushroom-shaped caps are installed on top of the ventilation terminals, while conical nozzles must be installed on gas terminals.
Purpose of the pipe cap
- The cap is called by different expressions: weather vane or Dymnik.
- The cap is needed for better traction.
- And also, it prevents snow from getting into the chimney pipe, as well as rain when it rains slantingly.
- When installing a mesh in the weather vane, dirt and birds, which like to nest in the chimney, will not get into the chimney.
- If the wind vane is performed by a professional, then noise and vibration are prevented.
Functions performed by a weather vane
- Traction increases three times.
- The efficiency of the chimney pipe increases by 30%.
- Keeps rain and snow out.
- The appearance of the roof becomes more presentable.
- Brickwork becomes many times better and stronger.
- Adds aesthetics to chimney pipes.
- Retains heat in the house and creates a bright flame.
- Each weather vane is art.
- With the help of a weather vane, the house will have the comfort and warmth that a fireplace or stove produces.
- When it is winter, precipitation and melted snow do not flow into the pipe and do not cause destruction.
- The chimney will prevent the top row of bricks from collapsing
Deflector shapes
The shapes of the deflector or head can be striking in their diversity.
Therefore, you need to decide which shape of the deflector will be ideal for the ventilation pipe, while still looking neat.
- round,
- square;
- hip;
- conical;
- tent;
- standard hipped;
- with a flat umbrella;
- with a semicircular umbrella;
- gabled with four slopes and a high roof;
- with weather vanes.
Recommendations for selection
The choice of design is influenced by the design of the roof, the diameter and materials of the chimney. Brick chimneys of standard furnaces are equipped with standard caps that will protect against precipitation and dust and prevent air flows from blowing out. Complicated smoke removal systems require hoods with lids and built-in deflectors.
The configuration and design of the product must match the style of the building. When selecting an element, it is necessary to take into account the methods of attaching the structure to the roof and the technology of installation work.
The structure is located in a hard-to-reach place, so it is recommended to use durable compounds for the caps. Models can be supplemented with a mosquito net, however, during installation it is necessary to take into account the weakening of the draft from the stove structure.
Form and function
The main tasks of the chimney cap:
- Increased air draft;
- Protection against birds accidentally flying into the pipe;
- Preservation of the chimney masonry;
- Protection from snow and rain.
Please note: the use of a hood increases the efficiency of the chimney by almost 20 percent.
The pommels differ in geometry, shapes and sizes. Their varieties are determined by the style of the facade of the house and the peculiarities of the weather vagaries of the area.
- Umbrella (cover) – protects the pipe from rain and snow. Can be made in the form of a weather vane, flat cover or gable cover.
- Drip cap - removes moisture from the pipe walls and stops the formation of ice.
Caps are made from materials that are resistant to the destructive effects of weather conditions. This product is fixed in a very hard-to-reach place, so it is better not to save money and purchase stainless steel or sheet copper.
Some features of the use of caps:
- The semi-circle shaped deflector is more suitable for European design;
- An umbrella with a flat top will look natural on a cottage in the Art Nouveau style;
- A wind vane with a weather vane installed can be equipped with a damper, which will make the pipe work effectively even in the absence of wind;
- A weather vane with a gabled top promotes intensive ventilation;
- Hoods with a movable roof make it easy to clean the chimney.
Materials for production
The characteristics of the raw materials from which the structure is made affect the durability and functionality of the element.
The chimney for the pipe is made from:
- copper alloys;
- become;
- zinc titanium;
- polymer compounds;
- galvanized metal, etc.
Copper products are popular, aesthetically pleasing, durable (last about 50 years)
During installation, it is important to take into account the incompatibility of the alloy with other compositions. It is recommended to make fastening elements of structures from copper to prevent oxidation
Long-term operation depends on compliance with installation standards.
Galvanized metal is popular for the manufacture of protective structures. Painting raw materials is not recommended for buildings heated with wood. During operation, surfaces become coated with exhaust fumes and lose color due to changes in temperature conditions.
Zinc-titanium plates used in the creation of protective structures are similar in terms of wear resistance and strength to copper alloys. The service life of the products reaches 50 years, because the material is resistant to corrosion processes.
Protective caps made of steel are inexpensive, durable, and have an average service life (15-20 years).
Budget cap models are made of durable plastic (polyester) and galvanized steel. The performance characteristics of the products are maintained for up to 10 years. The materials are resistant to temperature changes and high humidity.
Vanes are also made using artistic forging from hardened iron. The products are durable, aesthetically pleasing, but have a high price.
Related Posts
- Coaxial chimney for gas boiler
- What sizes of sandwich pipes are best to use for a chimney?
- Dimensions and installation of pipes for a bath
- How to assemble a simple stainless steel chimney
- The optimal height of the chimney relative to the roof ridge
- Chimney in the garage through the wall: stages of arrangement
- Chimney through the wall: features, rules of calculation and installation. chimney device and its installation (125 photos)
- Types of Kuznetsov furnaces and their order
- How to make and install a draft stabilizer for a chimney yourself
- Stainless steel chimneys: types and installation principles
- Corrugated Stainless Steel Pipe
- Using ventilation turbo deflectors
- Backdraft in the chimney
- Instructions for inserting into a sewer pipe with your own hands
- Why chimneys become contaminated with soot and how to get rid of it yourself
- Disadvantages of polypropylene pipes in home heating
- How to insulate an outdoor water pipe
- DIY metal rocket oven
- How to line a chimney with your own hands
- Which pipes are best to choose for a water well?
- Which chimney is most suitable for a solid fuel boiler?
- How to properly install a hood for a geyser
- How to make a potbelly stove in the garage with your own hands
- How to pull a pipe out of a well and how best to get a casing link: we study in general terms
- Which pipes for heated floors to choose: characteristics and installation methods
Read with this
- Coaxial chimney for gas boiler
- What sizes of sandwich pipes are best to use for a chimney?
- Dimensions and installation of pipes for a bath
- How to assemble a simple stainless steel chimney
- The optimal height of the chimney relative to the roof ridge
- Chimney in the garage through the wall: stages of arrangement
- Chimney through the wall: features, rules of calculation and installation. chimney device and its installation (125 photos)
- Types of Kuznetsov furnaces and their order
- How to make and install a draft stabilizer for a chimney yourself
- Stainless steel chimneys: types and installation principles
Materials
The material from which the head is made affects the durability of the structure. Common samples made of steel, copper and zinc-titanium alloy:
- Steel canopies for chimneys are the cheapest. But they have a short service life. After 5 - 10 years, this additional element will need to be changed. When operating TT boilers, the service life of steel caps is even shorter (3 – 5 years). Galvanized iron is even less durable. It burns out quickly. Using stainless steel will extend the life of the head up to 30 years. This material is resistant to corrosion and high temperatures. But its price is higher.
- Copper caps are leaders in quality and aesthetics. The high cost of copper products is justified by their durability (from 50 years). The only caveat is that for their installation you will need copper fasteners and hardware. Copper will react with other metals and oxidize, which will lead to wear of the head at the attachment points.
- Zinc-titanium structures also perform well at a similarly high price.
Not long ago, additional roofing elements made from polymers appeared on the market. The relatively low price of such visors did not justify itself. The polymer is not sufficiently heat-resistant, weather-resistant, and is also fragile. Time-tested options made of copper, zinc-titanium and stainless steel are worth the money spent on them.
Pipe umbrella - why is it needed and what materials is it made from?
A chimney cap (also known as an umbrella, visor, fungus) gives an aesthetic appearance to the outer part of the chimney, increases the time of its trouble-free operation, and protects its internal cavity from a variety of small objects and debris. In addition, the umbrella provides better traction, which improves the operation of the entire heating system of a private home. Nowadays, the canopy for the pipe is made from different materials. Most often they use:
- zinc alloy with titanium;
- roofing galvanized steel;
- copper;
- stainless steel;
- metal with zinc and an additional powder layer.
Pipe cap
The easiest to manufacture and the cheapest in terms of cost is an umbrella for a pipe made of 0.8 mm roofing steel. There are drawings online that allow home craftsmen to make such a product in just a couple of hours. A galvanized canopy lasts about 20 years. But, unfortunately, it very quickly loses its visual appeal. Under the influence of weather conditions, roofing steel begins to fade. Its surface literally becomes unaesthetic after just a couple of years of use.
Copper structures retain their beautiful appearance longer. They last up to 45–50 years. It is noteworthy that after some time the copper surface becomes covered with patina - a special coating. It not only does not spoil the appearance of the cap, but, on the contrary, makes it more ancient and noble. The copper umbrella is fixed with special fasteners. For these purposes, copper-plated (or pure copper) hardware is usually used. Ordinary metal parts cannot be used for fastening. They will be very dissonant with the visor. Stainless steel is often used to manufacture the pipe products we describe. Their guaranteed service life is about 20 years. But purely outwardly they do not always look attractive. Especially when the exterior of the house and its roof are made in some modern style.
A fungus made of an alloy of zinc and titanium, as well as steel with a special zinc-powder coating, will last for more than half a century. Externally, such umbrellas look great, and the product practically does not lose this wonderful appearance over time. But they have a serious drawback - an objectively high cost.
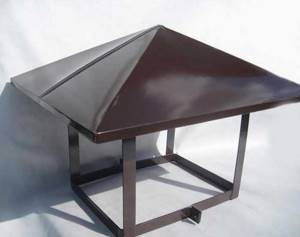
Fungus on the chimney - design features and differences
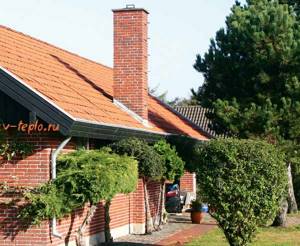
An ordinary pipe cover, as a rule, has a simple design. In configuration, it is similar to a small house with a pitched roof. There are a number of other forms of caps. And here it is important to know that the umbrella must correspond to the design features of the roof over which it will rise. Flat caps look great on flat roofs built with the latest modern materials. But on houses in Scandinavian and European styles that are popular these days, you can often see umbrellas with a hemispherical top.
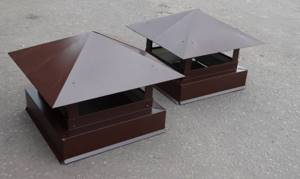
Chimney fungi
For roofs with a classic, inexpensive coating, the simplest fungus design is ideal. If your house itself is a real architectural work, the cap on its chimney should be appropriate. In such situations, it is recommended to choose an original umbrella with decorative (for example, forged) elements - with images of fairy-tale animals or heroes, with any symbols. Note! It is not advisable to install a canopy made of painted metal on the chimneys of wood-burning heating boilers. Such steel caps quickly become covered with soot and become completely unpresentable.
Experts advise equipping the design of fungi on the pipe with some additional elements:
- Spark arrester. This device must be placed on the umbrella in cases where the house has a homemade solid fuel boiler or stove heated with peat or wood.
- Hole for ventilation. It provides combustion products with free release into the air.
- A lid that can be opened at any time. This part makes it possible to carry out regular maintenance of the canopy and the chimney itself efficiently and without difficulty.
All of these elements make the operation of the hoods more convenient and safe.
Why doesn't the chimney work?
There are several reasons why a homemade smoker may not work effectively. The most common one is too much wind. Having a high speed, such a wind can enter the chimney channel and put pressure on combustion products moving through it, thereby preventing their exit to the outside. As a result, the draft worsens, and all the smoke simply does not have time to exit the system. In this case, all that remains is to install a high-quality cap, which can correct the situation.
Another reason may be incorrect calculations of the dimensions of the structure or a smaller/larger chimney diameter than required by the circumstances. Often the smoke does not have time to leave the system due to the chimney being too high or improperly installed.
Now you know what a chimney pipe cap is, what it is needed for and how you can make it at home. Good luck with your work!
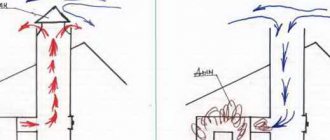
Principle of operation
Installing a cap on the chimney will not only protect against water and debris getting into the chimney pipe, but also allows you to optimize the draft in the heating device. This happens as follows:
- the air flow rests against the wall of the upper cylinder and is forced to go around it from all sides;
- sliding along the surface of the cylinder, the air stream turns upward, at this time the smoke coming out of the channel is sucked in;
- the air movement inside the chimney becomes more intense, a zone with reduced pressure is created at the top of the chimney, where smoke from the combustion chamber rushes;
- if the wind jets are directed vertically or at an angle, they penetrate into the upper cylinder through the gap and suck gaseous combustion products into the pipe.
The main mistakes when installing a cap on a chimney
The most common mistake when installing an umbrella on a chimney lies in the use of bird netting around the perimeter. The problem is that even without it, condensation appears along the contour of the visor during the cold period, which freezes in winter, turning into thick ice. As soon as the ice blocks the access of air to the pipe, the release of combustion products will stop, smoke will begin to enter the room, and the draft will disappear. If the roof is additionally framed with bird netting, the formation of ice will occur faster than it can melt and the owner will have to regularly climb onto the roof to clear the ice deposits.
Most likely, the head will have to be cleaned regularly Source myguru.ru
The second mistake is failure to comply with the dimensions for the chimney head. It can be neither larger nor smaller than the diameter of the pipe. Its height will also affect the traction force, which is due to the specifics of the movement of air flows. The fact is that the wind cannot rise up a smooth roof, and the canopy rising above it serves as a divider, affecting the process of air movement in the channels of the heating system.
And finally, you can’t choose a pipe cover at the last moment.
If you plan to purchase a complex, multi-level option, especially one equipped with forced ventilation or a spark arrester, it is necessary to provide an umbrella at the design stage so that the engineer and the technical supervision service, when coordinating the project, take into account the technical characteristics of each element of the system. If during operation the stove heating is dismantled and replaced by a boiler, the design of the visor should be reconsidered, as it may no longer meet the technical parameters
When changing the stove and chimney, the head must also be changed. Source idachi.ru
Umbrella or deflector
Building codes indicate that installing baffles on pipes from gas boilers is strictly prohibited. The reason is the possible formation of ice on horizontal sections of the pipe, which will lead to deterioration in traction. The deflector is an aggravating factor due to which the freezing process will occur faster. For exits from gas boilers, only primitive umbrellas can be used to prevent the entry of debris and precipitation.
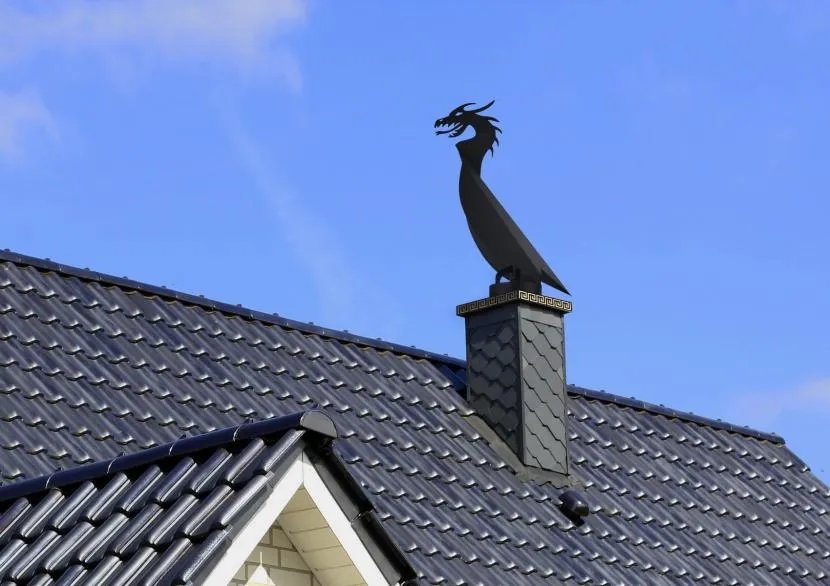
A weather vane with an interesting design that can destroy the chimney Source kaminych.rf
The shape of the installed cap depends on the shape of the chimney. If the house uses a sandwich chimney system, then the chimneys are equipped with a special skirt to ensure thermal insulation. In brick pipes, it is enough to equip the cap with a base to protect the bricks from the effects of precipitation. Deflectors are allowed for installation on metal pipes of boilers that operate on solid fuel.
It is worth abandoning weather vanes. Such structures are constantly exposed to wind pressure, which creates vibration that gradually destroys the brick pipes. As a result, not only the cap, but also the chimney itself quickly wears out.
How to place a roof cap?
When designing a heating system with a chimney, it is very important to follow safety precautions. In such projects, neglecting the rules is dangerous not only for your own life, but also for the lives of all residents of the premises
When designing, it is important to consider the weight of the system. This is necessary so that the foundation of the room can withstand the load. The characteristics of the fuel and chimney, the outlet of the latter and the placement of the head on the roof of the house are taken into account. It is important to know these points:
- If the roof ridges are made of fire hazardous materials, be sure to extend the chimney at least one and a half meters.
- If the distance of the chimney from the roof ridge is one and a half meters or less, the head must be installed higher, at least 50 centimeters.
- If the chimney pipe is on a roof higher than a meter, it is necessary to install guy ropes. Otherwise, the chimney will be unstable.
There are many rules, but they must be followed for the safety of yourself and your family.
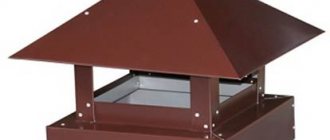
How is the cap for the chimney pipe constructed?
- Lid.
- Net.
- A drain of water or otherwise called a drip.
- The angle of inclination of the roof should be 45 - 50 degrees, but you can make the inclination angle larger or smaller, or make the height of the lid.
- The net will make it possible for birds not to settle and make nests. This will solve many problems in the future.
- The cover is designed to prevent precipitation from entering the pipe.
- The water drain or drip is designed to allow water to flow down from the hood.
Operating principles of a chimney cap
- Does not allow water to drain.
- It prevents the formation of ice, which contributes to the durability of the masonry and the entire structure as a whole.
- Air currents hit the walls and go around from all sides.
- A stream of air picks up the smoke and lifts it higher.
- Because the air moves, it becomes stronger and the draft becomes greater.
- If the chimney is made by professionals, then this will easily allow the house to remain warm when you heat the house.
Classification of visors by shape
- In the form of a tent.
- Four-slope visor.
- Gable visor.
- In the form of a flat sheet.
- In the form of a spire.
- Vaulted canopy.
- In the form of four tongs.
- The visor is in the form of a flat sheet, made of copper sheet. They do it on houses in the Art Nouveau style.
- If the house is built, as in Europe, then a semicircular canopy is installed on such a house.
- When installing a four-gable visor, the chimney will not fill with snow.
Classification of visors by metal type
The service life of the visor depends on the material
You should pay attention to the material from which it is made. Since the visor is in an inaccessible place, there is no way to constantly monitor it. If the cap does not withstand weather conditions, the system will not work stably.
- The most popular materials are copper alloys and copper itself. Copper canopies are the most reliable. If a copper canopy is installed correctly, the canopy will last 70 years.
- In second place is galvanized iron steel. In terms of durability quality, it is on par with copper and copper alloys.
- In third place is a canopy made of steel sheets. They are inferior to copper in terms of operating time. They will last about 40 years.
- Stainless steel iron.
- Alloys made of titanium and titanium itself. They have proven themselves well. Durability is guaranteed, soft, durable.
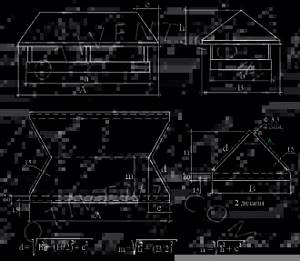
Manufacturing technology of the Tsaga deflector with drawing
Manufacturing drawing of the Tsaga deflector. (Click to enlarge)
First you need to decide on the dimensions of the external and internal pipes. Measurements must be accurate.
The outer diameter of the stove hood fits tightly onto the chimney pipe.
The main parts are made in proportion to the internal diameter:
- the inlet pipe is placed on the pipe;
- the outer cylinder is a diffuser, its size should be approximately 30% larger than the internal diameter of the pipe;
- cover, its size should be about 90% of the pipe diameter.
In order to correctly calculate the dimensions of the deflector, a table is provided.
- A drawing is made on paper to match the shape and dimensions of the cap.
- The patterns are applied to a metal surface and cut out with metal scissors.
- The resulting parts must be bent according to the design and connected with rivets.
- The finished parts of the deflector are assembled in the workshop, and at a height they are only fixed above the pipeline.