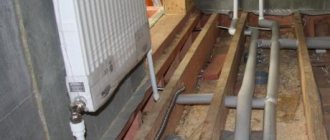
Water heating in a modern home is a complex system that must work reliably and uninterruptedly. However, there are a number of reasons why a failure occurs, such as installation errors, equipment wear and tear over time, etc. All these factors can affect the tightness of the circuits and cause malfunctions. To find the damaged area, a pressure test of the entire water heating system is required. How is this manipulation performed in a private (country) house and is it possible to do it with your own strength and hands? What level of pressure should it be? You can read about all this and watch the video.
Pressure testing - what is it?
Pressure testing of a finished water heating system is a test of tightness and assembly quality.
Whether the system can be put into operation or not depends entirely on the results of such a check. This is the first procedure that needs to be carried out after installation and before turning on the heating. At its core, it is control without destruction. Air or water is pumped into the system, thereby creating increased pressure. If there are no leaks, you can safely put the system into operation.
Pressure testing is also carried out when checking an already operating system. After all, leaks often appear at the places where parts are connected using fittings, soldering or welding. The pipes themselves may also suffer, for example, from mechanical stress or corrosion. High temperature and pressure also cause gradual wear of pipes and parts of the water heating system. To detect and eliminate the location of the flaw, crimping is required.
This is a set of measures through which not only the heating system, but also the hot water supply, sewage system, and pipes in the water well can be checked in a private home.
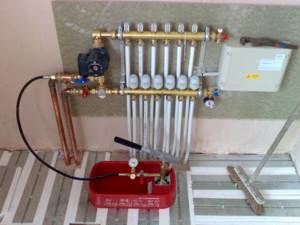
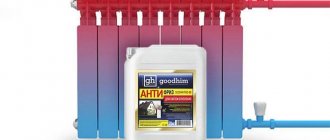
Pressure testing of a heated floor system
The crimping procedure includes:
- pipeline testing and flushing;
- checking and, if necessary, replacing parts;
- restoration of damaged insulation.
The following are tested under high pressure:
- strength of housings, as well as walls of pipes, radiators, heat exchangers and fittings;
- fastening when connecting the elements that make up the system;
- maintenance of taps, pressure gauges, as well as gate valves.
Problems Solved by Thermal Imager Inspection
The reasons for the cold in the house often lie not in the poor performance of the heating system, but in poor-quality thermal insulation. Indicators such as different temperatures in neighboring rooms, high electricity/gas bills, or drafts when the windows are completely closed may indicate this problem. How to deal with unwanted leakage?
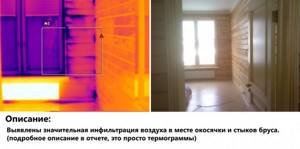
Professional inspection of houses for heat loss begins with thermal imaging diagnostics and identification of defects leading to the following problems:
- heat loss;
- rapid destruction of structural materials;
- air infiltration (drafts);
- increasing the humidity of insulation;
- mold growth;
- wood rotting;
- financial costs for additional heating.
A professional thermal imaging inspection will reveal all thermal energy leaks. After the diagnosis, we will draw up a detailed report with a plan of measures to eliminate defects and normalize the microclimate; thermograms, together with photographs, will give a visual representation of air flows and cold bridges.
Existing methods for pressure testing a heating system
Pressure testing with water . With this method, a hose running from the water supply is connected to a tap located on the collector or boiler. After filling the system with water, the pressure level should reach operating figures - 1.5 atm.
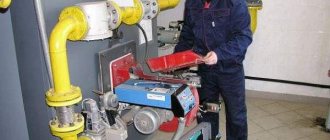
Pressure testing with air . With this method, a pressure tester is connected to the system - a compressor that pumps air. The pressure in the area being tested should become greater than the working pressure, which is usually 1.5 - 2 atm. In this case, an adapter is installed in place of the Mayevsky tap, designed to connect a compressor.
Advice. In order not to specifically purchase an expensive pressure tester, when carrying out independent work to check a small area, you can use a car pump with a pressure gauge.
Air pressure testing is carried out when it is not possible to connect to a water supply system, as well as in winter, when there is a possibility of water remaining in the pipes with subsequent freezing. When working with air, the integrity of the system is determined using pressure gauge readings. If the discharge pressure is kept at the same level, there are no leaks. To visually detect fistulas, a soap solution is applied to the suspected areas.

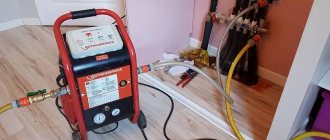
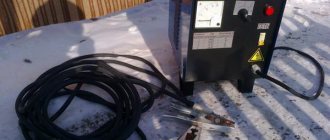
Pressure test pump for heating system
Norms and rules for testing
Pressure testing of the heating system is carried out at positive ambient temperatures; testing when the thermometer readings are below zero is allowed only in emergency situations; inside buildings the temperature should not drop below +5 C. The system successfully passes hydraulic tests if:
- No fogging of welding seams, no leaks in heat exchange radiators, boilers, pipes, fittings and other heating equipment were detected.
- The pressure drop in the heating circuit did not exceed 0.2 bar in 5 minutes.
- In panel heating, the pressure drop according to the control pressure gauge in a 15-minute time interval did not exceed 0.1 bar.
- In hot water supply systems (DHW) with metal pipes, the permissible pressure drop did not exceed 0.5 bar. in a 10 minute interval.
- For plastic pipes, the permissible pressure drop was no more than 0.6 bar in the first 30 minutes from the start of hydrotesting; during a subsequent 2-hour test, the pressure drop did not exceed 0.2 bar.
- During air tests of steam and panel heating, the pressure drop did not exceed 0.1 bar. in the first 5 minutes.
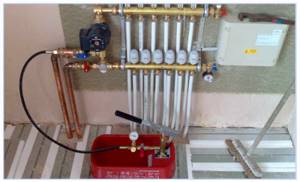
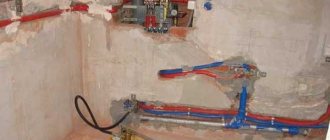
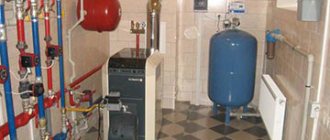
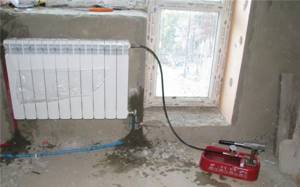
Rice. 4 Pressure testing in a private country house
How does the crimping process work?
- Preparing the system before pressure testing. If the system is autonomous, then the heat generator is turned off first. If not, then taps are used to close off the area where inspection is required. The coolant must be drained.
- The system circuit is filled with water having a temperature of no higher than 45 C. The air is gradually released.
- The compressor is connected and air begins to flow into the pipes.
- At the beginning of the procedure, the pressure is brought to the working level and the area is visually inspected for violations. Then the pressure is gradually increased to the test level - this is maintained for at least 10 minutes.
- The area or the entire system is inspected for leaks at the connections. It is mandatory to visually inspect fittings, radiators and the entire length of pipe walls for fistulas. If deviations are detected, all defects and shifts are recorded. The operation of taps and valves is checked.
- Using pressure gauge readings, the drop in pressure level is determined. If it has not decreased, the system is in normal operating condition.
- Based on the results of the inspection, a report is drawn up.
Norms in Russia
Considering the main indicators, the official temperatures of the heating radiators in the apartment are shown below. They are applicable for absolutely all existing systems in which, in direct accordance with the Decree of the Federal Agency for Construction and Housing and Communal Services No. 170 of September 27, 2003, the coolant (water) is supplied from the bottom up.
| Indoor air temperature indicators | Reverse movement | Supply pipes |
| 5°C | 39°C | 50°C |
| 4°C | 41°C | 53°C |
| 3°C | 43°C | 56°C |
| 2°C | 45°C | 59°C |
| 1°C | 46°C | 62°C |
| 0°C | 48°C | 65°C |
| -1°C | 50°C | 67°C |
| -2°C | 51°C | 70°C |
| -3°C | 53°C | 73°C |
| -4°C | 54°C | 76°C |
| -5°C | 56°C | 78°C |
In addition, it is necessary to take into account the fact that the temperature of the water that circulates in the radiator directly at the entrance to the functioning heating system must correspond to the current schedules regulated by the utility networks for a particular room. These schedules are regulated by Sanitary Standards and Rules in the sections of heating, air conditioning and ventilation (41-01-2003). Here, in particular, it is indicated that with a two-pipe heating system the maximum temperature indicators are equal to ninety-five degrees, and with a single-pipe heating system - one hundred and five degrees. These measurements must be carried out consistently in accordance with established rules, otherwise, when contacting higher authorities, the readings will not be taken into account.
Pressure in pipes during crimping process
The test pressure level, as recommended by building codes and regulations (SNiP), should be 1.5 times higher than the working pressure, but not lower than 0.6 MPa. According to the rules of technical operation of heating networks - 1.25 times higher than the working one and not lower than 0.2 MPa.
In a private house with up to three floors, the pressure usually does not exceed 2 atm. When it is exceeded, a special valve is activated and a reset occurs. In five-story buildings the pressure is 3-6 atm; in buildings from 8 floors - 7-10 atm. The maximum test pressure level depends on the characteristics of the constituent elements of the system: pipes, radiators, fittings, etc.
How to find the source of heat loss
To find where the heat is coming from in an apartment or cottage, a thermal imaging camera is used. A number of examination methodologies have been developed, but the most effective is research under conditions of altered pressure using an air door. The causes of heat loss usually lie in the following places:
- poor thermal insulation of floors;
- poor roofing, violation of vapor barrier;
- low quality or lack of external insulation;
- cracks in window or door openings;
- leaks in ventilation systems;
- foundation defects.
A powerful air door fan helps create the required pressure in the rooms under the control of a high-precision pressure gauge.
Hidden defects in houses
A prudent owner begins to prepare for the winter cold in the summer. It is especially difficult to find sources of leaks in the summer. In winter, the difference in temperature in the building and outside is expressed in the appearance of drafts, which are clearly detected by a thermal imager. In the warm season, the temperature conditions inside and outside the room are approximately the same, and there is no pressure difference.
Some problem areas in the thermal protection of a room may go unnoticed until the arrival of extreme cold. The use of an air door completely solves this dilemma - the air movement is enhanced artificially, with the help of fan blades. Atmospheric flow movements are generated. The slightest changes in pressure are recorded by the receiving device.
To effectively provide thermal imaging services, it is not enough just to have the appropriate equipment - experienced specialists must work with it.
In Moscow, these are the kind of people who work in our company, which has been engaged in thermal imaging for ten years. Order a home inspection service for heat loss at an affordable price and save hundreds of times more money. The cost of the service depends on the area of the premises being examined. Call us, we are ready to help! order a service in 1 click
Crimping: how to do it yourself
Often, when building a private house, the heating system is installed before the water is connected. Therefore, a large water container and a submersible pump are used to pump water into the pipes. During the manipulation, you need to constantly monitor the pressure using a pressure gauge and control the water level in the container, gradually adding it if necessary.
Checking the heating system before starting
When the pressure readings rise to 2-2.5 atm, the pump is turned off, and the remaining air is gradually released from the system using Mayevsky taps. Further, after the mark on the pressure gauge drops below 1 atm, filling with water continues. This is done until the water completely displaces the air and the pressure reaches a level of 1.2-1.5 atm.
If no leaks are detected, you can connect the boiler and start the system.
Advice. To perform the procedure yourself, inexpensive submersible pumps are suitable, and you can easily adapt a barrel, bucket or basin as a water container.
For such an important event as crimping, it is better to hire a team that has the appropriate license. These people are fully responsible for the actions performed. In this case, the customer receives all the necessary documents about the work performed.
Attention! The report on the pressure testing carried out must include the time during which the system was under test pressure and indicate its level.
Pressure testing of a heating system is a matter that requires a serious approach. This operation should be carried out with your own hands only in extreme cases.
Natalya Ulyanova, General Director of the RDI Urban Services Service, answers:
According to the rules for the operation of residential premises, it is not allowed to completely turn off the heating systems of residential premises during the heating season (a decrease in the internal temperature of residential premises below +10 degrees leads to freezing of external walls, joints, and junctions of window blocks). A house that has been put into operation is unlikely to be completely disconnected from heating. You can check with the management company for more details, since it is responsible for providing heating in common areas (halls, staircases, etc.).
In any case, when accepting an apartment, you need to check the integrity and operability of the equipment, the presence of individual metering devices (meters) and passports for them. Also clarify the procedure for concluding individual contracts for the maintenance of gas equipment, which is mandatory for all owners of premises with gas equipment.
Instructions: how to accept an apartment in a new building
5 rules for accepting an apartment in a new building
Verification steps
The tests themselves may include stages, of which there are usually two
- The first stage will be called a check, which is done when the liquid in the system is cooled. It will be completely filled with cold liquid. The test time will last about 30 minutes, and the interval should be 10-15 minutes. It is necessary to increase the pressure level twice to the initial value; within half an hour the pressure should not drop by more than 60 kPa. And after that, within two hours, the pressure should drop by no more than 20 kPa. After the process is completed, you must check all connections.
- The second stage will be a hot check. It is carried out after the heat source, the boiler, is connected. All parameters must be set to maximum, but they should not exceed those data called calculated values.
What to do if the batteries do not heat well?
If the radiators do not warm the room, then the water from the tap will be at a lower temperature, and residents can write an application to the DEZ requesting an inspection. After inspecting the water supply and heating system, utility workers draw up a report, one copy of which remains with the residents.
If the complaint is confirmed, specialists are obliged to correct everything within one day to a week.
Also, if the water temperature in the heating radiators was 3°C lower (during the day) and 5°C lower (at night) than the standard, then the rent is recalculated.
Radiators must warm the room to the degree specified in the sanitary norm, since deviations in air temperature are not allowed. And if this happens, then it is necessary to make a recalculation, according to which, depending on the square footage of the premises, the rent will be reduced.
Legislation
- The Housing Code of the Russian Federation establishes quality criteria for the provision of housing and communal services.
- Decree of the Government of the Russian Federation dated May 6, 2011 No. 354 “On the provision of utility services to owners and users of residential premises in apartment buildings.”
- Decree of the State Construction Committee of the Russian Federation dated September 27, 2003 No. 170 “On approval of rules and standards for the technical operation of housing stock” regulates the requirements for the maintenance of common property. Clause 4.10.2.1 makes it the responsibility of the management company to control the microclimate of residential buildings.
- GOST 30494-2011 “Residential and public buildings. Indoor microclimate parameters" describes how to measure correctly.
- SanPiN 2.1.2.2645-10 “Sanitary and epidemiological requirements for living conditions in residential buildings and premises. Sanitary and epidemiological rules and regulations.” Appendix 2 provides temperature standards for living rooms.
- SNiP 02/23/2003 “Thermal protection of buildings. The updated edition" lists the requirements for the temperature of external walls and floors.