Unlike residents of apartment buildings, where the repair of heating systems falls on the shoulders of utility services, those who prefer country cottages are forced to solve problems with communications on their own. Thus, owners of private houses have to not only maintain pipes, radiators, pumps, boilers, but also promptly repair the breakdowns associated with them. Important: since all communication systems differ in individual configuration, it is better to trust heating repairs in a private home to professionals.
Types of heating systems in a private house
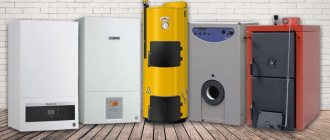
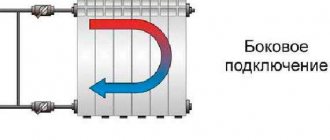
VodyanoyeA distinctive feature from the centralized one we are used to is the presence of a boiler.
|
ElectricalHeating devices use electricity to operate. Significant differences in the electrical installation of a private house:
|
Common heating problems and how to solve them
Heating problems occur for one of the following reasons:
- The system was incorrectly designed and the installed equipment did not meet the requirements.
- Heating imbalance.
- Incorrect installation and malfunction of the radiator.
- Faulty pipelines.
- Presence of air pockets.
If eliminating the first two problems from the list is the work of specialists, then the rest can and should be solved independently. Let's look at how to do this in more detail.
Air jams
Air can accumulate in different parts of the system for the following reasons:
- it enters the system when the coolant is drained and subsequently filled (especially if filling occurs quickly);
- oxygen is released when water is heated;
- a malfunction of the expansion tank also contributes to airing;
- if the tightness of communications is broken, air is sucked in from the outside.
The accumulation of air prevents the circulation of the coolant, so the system heats up unevenly. Also one of the signs of this problem is gurgling sounds in communications.
If air jams often form during the heating season, then automatic air vents must be installed in areas where air usually accumulates. The same advice can be given to residents of the top floors of apartment buildings: replace Mayevsky taps with automatic devices, this way you will get rid of problems at the beginning of each heating season.
Incorrectly installed radiators
Often, as a result of improper installation, deformation of the metal structures of the radiator occurs. For example, to secure it, the developers provided 4 brackets, but only 2 were used during installation. As a result, the heavy multi-section metal structure bends, and the coolant cannot flow freely into all sections. If such a problem is identified, it is necessary to correctly install the radiator, and if the violations are irreparable, replace it.
Attention! When installing the battery, ensure its correct location: it should be mounted at least 10 cm above the floor level, and the distance to the wall should be 2-3 cm. After installation, make sure that the radiator hangs on reliable brackets, without distortions, sagging or play .
Clogged pipes
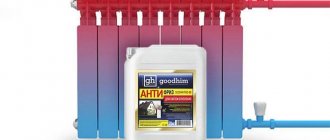
Inside pipes that have been in use for a long time, deposits of dirt, scale and calcium salts form. As a result, their clearance decreases, which leads to difficult coolant circulation. Since old pipes not only conduct heat poorly, but also often cause accidents, it is better to replace them.
To prevent this problem, owners of private houses should monitor the quality of water poured into the system, and if it is too hard, add special softening compounds.
Violation of the integrity of communications and batteries
Leaks are caused by corrosion or improper connection of communications and can be located on both pipes and batteries.
To eliminate leakage, it is better to use a clamp; you can buy it at any hardware or hardware store. If you don’t have a clamp at hand at the moment, you can put a piece of soft rubber (from a bicycle inner tube or a medical tourniquet) over the leak site and screw it tightly with wire. As a temporary measure, wrapping the damaged area with a bandage or piece of cloth soaked in epoxy glue is also suitable.
For the heating system, you can use “cold welding” - a composition reminiscent of plasticine. It is thoroughly kneaded, and then the leak site is sealed. If you decide to use a sealant to eliminate leaks, pay attention to the information indicated on its packaging: the composition must be heat-resistant, suitable for use on heating system elements.
Do not forget that all these measures are temporary and can last 1-2 seasons, so in the warm season, leaks should be sealed or the damaged section of communications should be replaced.
Advice! During the non-heating season, check all communications for leaks. These places can be identified by rust and water stains.
Repair and replacement of the heating system of a private house, types:
- Preventive . Timely replacement of poorly functioning parts.
- Partial . Requires replacement of certain elements, taking into account the above.
- Capital . Upgrading or replacing the entire system or replacing the selected type with another.
It is very important to carry out preventive maintenance work on heating system equipment on time, since failure of the entire system during the cold season is extremely undesirable. Repairing heating in a private home is a labor-intensive process that requires the necessary skills and knowledge. Therefore, it is better to entrust such work to qualified craftsmen with sufficient experience. Otherwise, you can only aggravate the situation and complicate the situation. Additional time and unplanned expenses will be required.
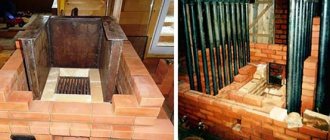
Steel pipe repair
Steel pipes are usually used in utility or technical rooms. They often have a large diameter, and this feature makes it possible to carry out repairs in unique ways. What to do if a fistula appears in a steel pipe? The following options apply:
- repair using a bolt: the fistula site is drilled out, a thread is cut and the bolt is screwed in;
- eliminating leaks using a temporary bandage or clamps with a sealing gasket (applied if the damaged area has a significant area);
- repair using an adhesive bandage - wrap the damaged area with fiberglass cloth impregnated with sealant (apply at least 6 layers);
- flange connection.
First, the system is turned off and the coolant is drained. Repair work is carried out on a dry and cooled area.
The cost of heating repairs in a private house
The cost of heating repairs will depend on the scope of work, the cost of materials and equipment and will be clear only after a specialist visits the site and draws up an estimate. To get started, you can look at the prices. Here are the prices for the main types of work. Full price list for San-Tech. work.
| type of work | units measurements | Cost, rub.) |
| dismantling water heating batteries | PC. | 400 |
| installation of water heating batteries | PC. | 2 800 |
| dismantling of water supply pipes | linear meters | 50 |
| installation of water supply pipes | linear meters | from 250 |
| dismantling electrical wiring | linear meters | 20 |
| electrical cable laying | linear meters | from 40 |
| installation of electric heated floors | sq.m. | 2 600 |
| installation of electric wall heaters | PC. | 800 |
is ready to offer you the services of highly qualified specialists, a quality guarantee for repairs of heating systems in a private country house and reasonable prices.
Make a request
Stages of work
- Primary examination and diagnosis. The arriving specialist will identify all existing damage and determine deviations from the specified parameters.
- Stopping the heating system and dismantling damaged elements. To eliminate a leak, it is necessary to replace damaged sections of the pipeline and radiators, as well as connecting fittings.
- Installing new components. We offer our clients the purchase of equipment at wholesale prices, which will significantly reduce repair costs. If necessary, air pockets are identified and removed.
- Launch and commissioning of the restored system. The repairman will make sure that everything works without deviations, and the client is provided with a guarantee after the repair.
To eliminate clogged pipes and narrowing of the lumen, cleaning is carried out using special reagents. Flushing the pipeline removes scale from the walls, after which the pressure level in the system and normal heat exchange are restored. It is recommended that this procedure be performed as part of preventive maintenance to prevent serious blockages and damage to the pipes.
www.eurostroy.ru
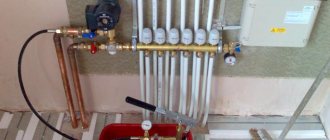
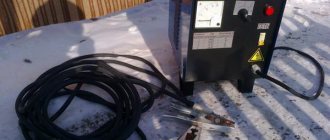
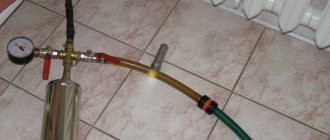
Hydraulic tests
Pressure testing is carried out within 2 - 3 days at elevated pressure.
Hydraulic tests of the heating system (pressure testing) are planned and control measures designed to check the reliability of heat exchange equipment. This action is carried out in order to detect components, equipment and communication sections that are potentially dangerous in terms of leaks. Hydraulic tests should be performed before the start of the heating season, after completion of planned or major repairs of the system.
During the inspection process, water is pumped into the pipes and air is released. Then, using a pump with a pressure gauge, a pressure of 2-6 atm is created in the circuit, which is higher than the nominal one. Signs of a malfunction are leaks and drops of water at the joints. After eliminating the defects, the test is repeated. A prerequisite is the use of hot water, the temperature of which is equal to or higher than the calculated one. The thermal test shows the true readiness of the circuit for operation.
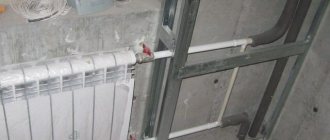
DIY heating pipe repair
You can temporarily stop the leak by applying a clamp
So, having discovered a leak in the heating system or plumbing, first of all, you need to try to stop it. This can be done by tightening the damaged section of the pipe with a clamp or covering the fistula with a special quick-curing paste directly in the place where the heating pipe is leaking. Both of these measures are temporary, that is, their use will give time to prepare for full-fledged repair work to restore the system. The complexity of the preparation depends again on what material the pipes are made of and on the location of the leak. So, if a leak occurs in a hard-to-reach place, it may be necessary to dismantle part of the floor or decorative wall covering. In addition, you will have time to prepare all the necessary materials in order to repair heating pipes as quickly as possible and not shut down the system for a long time. In the absence of a backup heating system, the time of emergency restoration work matters.
Having provided access to the repair site, turn off the heating system (or the area where the work will be carried out) and drain the coolant.
Repair of plastic heating pipes
Repair of polypropylene pipes is carried out using special “irons”, into which pipe joints are clamped, thus welding them. Therefore, if a leak appears in the body of the pipe or at the place of such a weld, then a welding iron will be required for repair. It is advisable to cut out the damaged area, and in its place put a whole piece of pipe of suitable diameter. However, if the emergency area is located in a hard-to-reach place (for example, when repairing heating risers, plumbing will have to be dismantled to access some areas), then it is better to replace a longer section of pipe. So that the soldering points are more accessible. If a leak occurs at the threaded connection, then replacing the winding is often sufficient. Typically, FUM tape (fluoroplastic sealing material) is used for these purposes. Sometimes, especially if the pipes are large in diameter, flax or asbestos strands impregnated with various sealing compounds are used.
Repair of metal-plastic pipes
On metal-plastic pipes, problems most often arise at the compression joints. This is where the fistula appears. The problem is solved by replacing the problem area. The damaged piece is cut out and a new one is installed using press fittings.
Repair of metal pipelines
Leaks on metal pipes appear as rusty spots
Metal pipes are the most susceptible to corrosion and have the shortest service life compared to more modern materials. However, due to their low cost, such pipes are still widely used. The occurrence of a leak on a metal pipe is manifested by rusty streaks, and it is quite easy to detect. You can weld a fistula in a metal pipe using gas or electrode welding. If the damaged area is large or there are several leaks nearby, then it is better to replace the entire area between the two threaded connections. If the heating pipe is leaking at the junction, then the sealing winding is replaced at the junction of the pipe sections.
Steel pipe repair
Steel pipes are usually used in utility or technical rooms. They often have a large diameter, and this feature makes it possible to carry out repairs in unique ways. What to do if a fistula appears in a steel pipe? The following options apply:
- repair using a bolt: the fistula site is drilled out, a thread is cut and the bolt is screwed in;
- eliminating leaks using a temporary bandage or clamps with a sealing gasket (applied if the damaged area has a significant area);
- repair using an adhesive bandage - wrap the damaged area with fiberglass cloth impregnated with sealant (apply at least 6 layers);
- flange connection.
First, the system is turned off and the coolant is drained. Repair work is carried out on a dry and cooled area.
Copper pipe repair
Copper pipes are repaired by soldering
Copper is not subject to corrosion and therefore copper pipelines have the longest service life. If the heating was installed with high quality, in compliance with all technological standards, then such a system can be operated for many years without any problems. However, an emergency always occurs without warning. And we must be prepared to eliminate it as soon as possible. The leak can be temporarily stopped by applying a clamp with a neoprene gasket, or by using “cold welding”. You can completely seal a hole in a copper pipe using soldering. It should be remembered that if soldering is performed poorly, a secondary leak may occur. If you do not have experience, then it is better to entrust soldering of copper pipes to specialists.
As can be seen from our review, there are quite a few options for repairing heating pipelines. In any case, when installing the system, it is necessary to take into account the possibility of access to parts of the system if such a need arises. Therefore, when choosing a hidden installation method, install decorative elements on a frame that can be dismantled, if the need arises, without damaging the decor. If the system runs under the floor, then try to make a minimum number of joints that will be difficult to access.
The choice of method for carrying out repair work is determined, first of all, by the material of the pipes. You can clearly see the solution to the question of what to do if a heating pipe is leaking in the video.
Equipment and materials for DIY work
Having decided to repair the heating yourself, you need to properly and competently prepare for this event.
To work you will need the following tools:
- grinder, hammer drill, soldering iron for plastic pipes, screwdriver, welding machine;
- tape measure, square, level;
- plumbing pliers, adjustable gas wrench, core;
- devices for cutting internal and external threads;
- hammer;
- cable with brush;
- ladder;
- marker.

Tools are selected depending on the volume of expected work.
The list may be larger or smaller depending on the type and volume of the upcoming repair. To protect the skin, vision and breathing, it is recommended to use goggles, gloves and a gauze bandage.
List of required materials:
- pipe clamps;
- sandpaper;
- cold welding;
- tow;
- FUM tape;
- acetone;
- rags.
Since some of the water in the system will remain after draining, you need to prepare buckets and basins for emptying radiators, and rags to collect spilled liquid from the floor.
Heating repair instructions
Before painting, the old layer from the radiators is removed with chemicals or a brush.
Without interfering with the overall heating system, the apartment owner can independently carry out a number of measures to improve its operation within his property.
You should start by repairing cast iron heating radiators. These products have a large volume, which is why the circulation rate in them is weak, and this leads to the formation of sediment. Over time, it becomes denser, deposited in the ribs, and blocks the channels. It's faster to change batteries, but it's quite expensive.
Restoration of old cast iron radiators is carried out in the following sequence:
- If there are taps in front of them, place them in the closed position.
- Unscrew the connecting nut. As a rule, this cannot be done right away. High heat is used to loosen the connection.
- Remove the battery from the brackets and drain the water.
- Carry out initial mechanical cleaning from the inside. After removing the hard deposits, seal the holes with plugs and pour a 10% citric acid solution inside.
- Leave for 30-40 minutes, drain the liquid, check the result. If necessary, repeat the procedure.
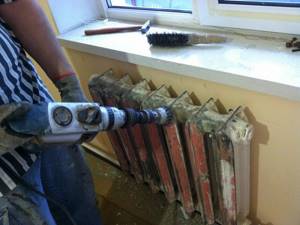
- Remove old paint from the exterior surface. To do this, use a wash, a manual sandblaster or an angle grinder with a metal brush.
- If intersection gaskets are leaking, replace them.
- Paint the radiator with acrylic heat-resistant paint and wait until it dries completely.
- Hang the battery in place and connect it to the pipes.
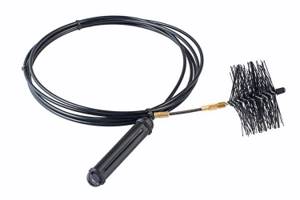
Pipes and collectors can be cleaned with a cable and a brush.
While the radiator sits with acid and dries after painting, you can start piping. Horizontal spans are often clogged with dirt and limescale. Getting rid of deposits is easy. To do this, you need to take a cable with a brush, insert it into the pipe and start moving it until the hole in the riser is reached. To achieve a better effect and speed up cleaning, add household detergent with an abrasive to the brush. The achieved result is checked visually using a flashlight for illumination.
Quite often, due to corrosion or poor-quality welding, leaks occur in pipes and radiator housings. These phenomena cannot be ignored, since the holes will constantly increase.
In such cases, you should proceed as follows:
- Turn off the water and drain the problem area. Sometimes you have to temporarily dismantle it.
- Peel the paint around the hole down to the metal. Widen the gap using a thin drill. Check that there is no rust left. Degrease the material with acetone.
- Seal the hole. To do this, you can use mastic or a rivet with a silicone washer. If there is welding, it is better to make a metal patch.
If there is no sealant or rivet at hand, the hole is closed with a clamp, under which thick rubber is placed. This method is unaesthetic, but the clamp will do its job until the end of the heating season. After draining the water from the system, you need to carry out high-quality repairs.