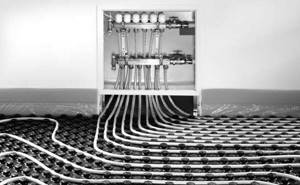
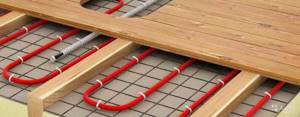
This method of heating rooms, such as water floor heating, has long been firmly established in our lives among other methods, and has gained considerable popularity. Its essence is that the coolant warms the entire area of the floor covering, thereby ensuring a comfortable temperature in the room.
There is another type of this heating method - electric heated floors, although they are less common. The reason is simple: you can heat water using different methods using different coolants, but with electric heating there is no such choice, and in the event of a power outage, the heat in the house will disappear. In any case, electric and water floor heating systems do not lose their relevance today.
Circuits with bottom wiring
As already mentioned, pipe laying can be done in two ways - vertically or horizontally.
In the first case, such wiring is called upper, and in the second - lower. Both can be used for the device. There are restrictions only for multi-storey buildings. Often the second floor heating system consists only of underfloor heating. So, all heating systems of a private house with bottom wiring can be of two types:
- Single-pipe, that is, they contain only a supply pipeline, which is also a return pipeline;
- Two-pipe - with separate supply and return lines.
Single pipe systems
All single-pipe heating schemes for a private house can have not only a lower installation, but also an upper one.
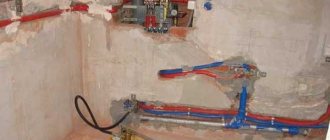
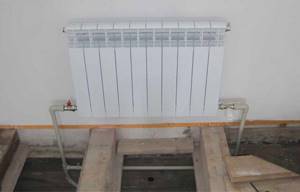
The bottom gasket for a private house is shown in the photo below:
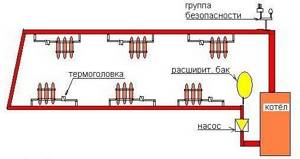
As you can see, all pipes are laid horizontally, except one. This pipe is called a riser. It is connected to the expansion tank.
Such a system has all the disadvantages that are inherent in all single-pipe schemes without exception. We are talking, first of all, about the uneven heating of rooms located at different distances from the heating element.
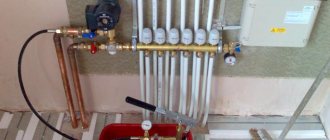
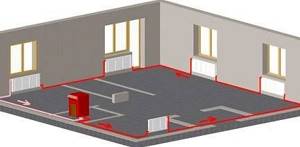
This problem is partially solved by lower wiring with bypasses, that is, additional lines. This design can be seen in the image below:
As you can see, each of the radiators has its own line of pipes, that is, a parallel line. This allows you to install a shut-off valve on each of the heating elements so that, if necessary, you can limit the access of the coolant to a given radiator, but at the same time not limit all subsequent radiators.
If we consider the general positive qualities of all single-pipe heating systems in a private house with bottom wiring, we can note the ease of their implementation, as well as the relatively low cost of the entire project.
Conditions for installing a water floor
It is recommended to include the installation of an additional heating circuit in the project even before the start of construction - this makes calculations easier.
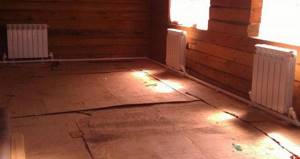
In a finished new house or building where the radiator system has been in operation for a long time, installing a water floor is also possible, but under certain conditions.

The benefits of water heating have long been appreciated by residents of Europe and Russia: it effectively heats rooms, saves expensive energy, creates the most comfortable environment in bedrooms, bathrooms and children's rooms
If the desire to insulate the floor arose after the construction of the house, you should determine whether the building is suitable for this. One of the main conditions is pre-made thermal insulation of the house, since heat losses above 100 W/m² will make the installation of the floor useless.
Pay attention to the height of the ceilings: the installation “pie” with pipes takes about 15 cm, or even more, from the total height of the room. After implementation of the system, the dimensions of doorways must be maintained, with a height of 210 cm or more.

Special requirements apply to the foundation. It should be strong, smooth, clean. An unstable base will lead to unevenness, and these will lead to deformation of pipes with coolant
If the house is new, then before starting installation it is necessary to completely complete construction - erect walls and ceilings, install windows, and plaster.
How to insulate a water pipe in the ground with your own hands
The technology for laying all types of insulation is almost the same. The choice of heat-insulating material depends on the characteristics of the passage of the water pipeline and the hydrophobicity of the insulation.
The procedure for insulating water supply pipes with your own hands:
A shell of the selected thermal insulation material is installed around the pipe and secured with construction tape. Mineral wool insulation must be covered with a sealed material - “hydrobarrier” construction film or thick film
To prevent water from getting into the mineral wool, it is important to check the butt joints carefully. At the next stage, the insulating layer is waterproofed with a denser material. Typically, soft rolled material is used for this purpose: roofing felt or roofing felt.
Waterproofing is wrapped in several layers around a pipe with insulation and secured with soft wire or tape. The rigid winding performs a dual function: it insulates the pipe from moisture penetration and protects the water supply from compression. Insulated water pipes are lowered into a pre-prepared brick channel or concrete tray and covered with sand or expanded clay.
The canal is covered from above with bricks or small concrete slabs, covered with a thick film and covered with earth.
Installation
Installation of the heating system occurs in several stages.
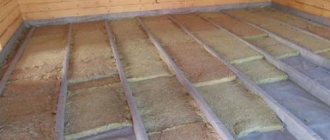
Lining
To ensure effective heating, the floor must be prepared before installation.
If there is no base as such, first make a rough screed from sand-cement mortar. If concrete slabs serve as the base, they are leveled, covering all the cracks and ensuring that there is no level difference above 1 cm.
The rough screed is cleaned of dirt and dust, after which a layer of waterproofing is laid. The material for this is usually a thick film. Experts recommend placing the film on the walls at a distance of 10–20 centimeters. In rooms with high humidity, in country houses, this is mandatory. The film is overlapped by 10–20 centimeters and taped at the joints with mounting tape.
Damper tape is glued around the perimeter of the room. Its edges should be approximately 20 mm higher than the future screed. After the screed has dried, the edges of the tape are usually cut off.
Then thermal insulation is laid so that the warm floors heat the room most efficiently. There are different heat-insulating materials, both rolled and in the form of plates; the choice of coating depends on personal preferences, price, thickness. All cracks between them should be sealed with polyurethane foam to eliminate the possibility of heat leakage. The thickness of the thermal insulation when installed on a cold floor or ground should be from 5 centimeters, otherwise 3 centimeters is sufficient.
If the thermal insulation material is not foil-coated, a foil film is placed on top of it. At the joints it should be taped with aluminum tape.
We recommend that you read: How to properly bend a copper pipe with your own hands?
Once completed, the floor is ready for installation of the heating circuit.
Pipe laying
When working with polypropylene indoors, it is necessary to maintain the operating temperature above 5°C.
There are two ways to fasten the pipe: using dowels through thermal insulation and fastening to a reinforced mesh. The preferred option is to attach it to a grid as it is more reliable. Plus, the mesh allows you to strengthen the layer of screed that will cover the heating system.
The mesh for fastening is placed on a heat-insulating substrate. Then pipes for a warm water floor are laid along it according to the previously chosen scheme and secured with plastic clamps or wire. The fastening should not be over-tightened - this can lead to deformation of the pipes during operation and reduce their service life. At the junctions they are fastened together using a special welding machine. It comes in several variants and is easy to work with.
Testing
After laying and securing the pipes, they are connected to the collector and tested. To test heating equipment, water is supplied while simultaneously removing air. In this case, the water pressure should be higher than the working one, but not more than 6 bar.
After a day, the pressure is checked, and if it has dropped by no more than 2 Bar, then you can start coating. If the pressure is less, then there is an error in the gasket.
Final stage
After successful testing, they begin laying the concrete screed. If the room is small, you can additionally use another reinforcing mesh, which is placed on top.
For concrete screed, a special mixture with a plasticizer is prepared; in the absence of additional reinforcing mesh, it is also recommended to add fiber from polypropylene fibers. The screed is laid at a temperature of 5C. It is worth remembering that the screed needs 28 days to dry completely.
After the screed has dried, you can begin laying the flooring. The choice of floor covering is made among materials with special markings. Tile is considered the ideal material for heated floors.
Technical standards for buried systems
You can find out information about how deep a water supply pipe should run in the ground from a special document - SNiP. All the subtleties and characteristics for pipes made of various materials are spelled out there, and it also describes at what depth one or another type of product can be laid. In essence, this document contains a lot of varied information, most of which will be, if not entirely interesting to you, then at least useful, because it will remove many related questions.
According to the regulations, the minimum depth for laying any pipe is a distance of 1.5 meters, since, often in winter, the soil freezes to about 1.4 meters. If you do not maintain such a depth, you may encounter damage to the water supply lines, which will significantly complicate, if not make it completely impossible, the further operation of the system.
It is worth noting that the depth of freezing largely depends on the type of soil in a particular region. To find out exactly this indicator, it is worth consulting with specialists who will tell you all the necessary information that you need to know. Armed with information, you can avoid many possible problems associated with temperature changes and soil freezing.
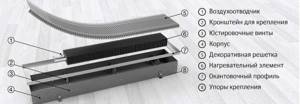
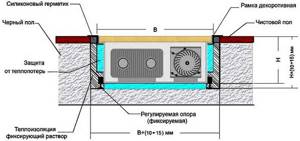
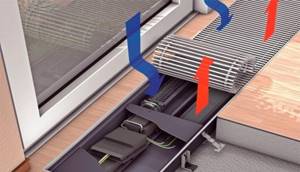
Convector device
Strictly speaking, there are only three main parts of a floor convector: a housing, a heating element with fins, and a decorative and protective grille. For more efficient heat transfer, a fan is built in - this is the fourth part. Fans usually run on reduced voltage - 24 V or 12 V, so they need a step-down transformer to operate. Pay attention to this. In most cases, it comes “built-in” into the case, but there are those that must have an external voltage converter and to which a reduced voltage must be supplied.
Radiator installation in the floor
Let's briefly look at the main components. They determine the main cost of a built-in convector. If your budget is unlimited, you can simply choose the most expensive German equipment. If you need to choose good quality radiators and have a reasonable budget, you will have to understand the details.
Frame
The body of the in-floor heating radiator is a rectangular metal box. It could be from:
- aluminum;
- of stainless steel;
- galvanized steel.
The best choice is galvanized steel, although sellers claim that stainless steel is better. She's better, of course. Nobody argues. But heating with convectors with a stainless steel body will be very expensive. Good galvanization does its job perfectly. Yes, cement is an active substance that accelerates the oxidation of metals. But during installation, the housing is usually protected with a film or other type of waterproofing, which at the same time protects against the action of cement. So this is not a problem at all.
Installation diagram for a floor-mounted radiator
And one more point - aesthetic. Many people install heating in the floor because it is invisible. So here it is. Devices whose bodies are coated with black paint on the inside attract less attention. All other parts of the convector are also painted black or covered with black shields.
A heating element
In water convectors, the heating element is presented in the form of a copper tube with plates attached to it to increase heat transfer. The tube is bent in the shape of a U. The plates are most often made of aluminum. They are pressed around the pipe. The more tightly they “sit”, the better the heat will be dissipated.
The heating element looks almost the same for everyone: it is a copper tube with heat-dissipating plates
The plates and the method of connection with the copper tube are subject to improvement by each manufacturer. Some make the plates ribbed. This increases the heat exchange area. The direction and shape of the grooves - even these little things become the target of research.
There is one catch in the way the plates are attached. Sometimes the plates are simply installed and then painted. It turns out that the paint is the binder between the tube through which the coolant flows and the fins. But this contact becomes worse over time, which leads to a drop in thermal capacity. How to determine how the plates are attached? Try to loosen them. If you manage to move it, don’t take it. Normally fixed ones do not move even with considerable effort.
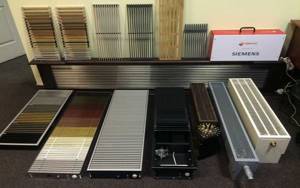
Decorative lattice
In principle, the grille is not only decorative, but also functional. Can be made of metal, wood. When calculating heating costs, keep in mind that prices for imported convectors are usually given without taking into account the cost of grilles. That is, you buy additional grilles separately. This seems to be not bad - you can buy it at any company, but the price for them is very high - from $80 per meter of length. What if you need three meters, and what if there is more than one such convector?
It is the grille that defines the appearance. Many manufacturers sell the device without it
Batteries for installation in the floor of domestic manufacturers include the cost of the grille as standard. If you want to replace it, you need to negotiate.
In an attempt to save money, we are looking for cheaper grilles. But they usually come with strips that are installed at significant intervals. The view is no longer the same. It's cheaper though. Yes.
Installation recommendations
When arranging a single-pipe heating system, despite its simplicity, it is necessary to carry out all stages of work carefully and competently, taking into account all the nuances and design features.
To ensure everything is done correctly, you should use the following recommendations:
Conclusion
As a result, we can say that a single-pipe heating system, with all its advantages, is completely unsuitable for large and multi-story buildings. In addition, despite its simplicity and low cost, such a system causes many problems and requires a careful approach when arranging.
Varieties
Batteries installed in the floor can be water or electric. The first ones are designed for connection to the central heating system with special elements - pipes. They are made of metals - aluminum, copper or stainless steel.

Water batteries
Electrical designs differ in that they have closed-type tubular electric heaters with plates (steel or copper). Such models are manufactured in accordance with safety requirements. In addition, they have protective fuses. These installations are used in those rooms that are not connected to a centralized heating system.

Rules for laying heating pipes
Water heated floors as an alternative to the classic heating scheme in a wooden house
During the design process of the system, it is necessary to take into account the rules for laying heating pipelines. They describe in detail the characteristics of transport lines, both intra-house and for centralized heating.
The main regulatory document currently is SNiP for laying heating pipelines. It is best to use the current edition, and in particular SNiP 41-01-2003. In addition to the requirements for organizing centralized heat supply, it provides recommendations for laying autonomous heating pipelines.
Regardless of whether heating pipes are laid in a wooden house or one built of brick, the following rules must be observed:
- The coolant temperature should not exceed 95°C, and the nominal pressure should not exceed 1 MPa;
- It is impossible to lay pipes in unheated attics, cellars and undergrounds if the design temperature in winter is below -40°C;
- Maintaining the optimal speed of coolant movement, depending on the noise level. The average for autonomous systems is 0.5-0.7 m/s. It directly depends on the diameter of the pipeline, the power of the circulation pump and the heating boiler;
- Hidden installation of heating pipes in baseboards or wall grooves is carried out taking into account the properties of building materials. The temperature effect from the surface of the line should not change the appearance or affect safety;
- Pipe material: metal, plastic or metal-plastic. In this case, only steel pipes must be installed at the boiler outlet and inlet. Their length must be at least 0.5 m.
These are general recommendations, compliance with which is mandatory for any method of organizing transport heat mains.
But it is important for the consumer to know the intricacies of the technology used to lay heating pipes in the floor or walls
DIY installation
Installation of a heated floor system is quite simple and can be done independently.
Required tools and materials
For installation you will need:
- A container and mixer for mixing the solution, buckets, shovels, a crowbar, usually a trowel, a long trowel.
- Drill, pliers, construction knife, glue, construction tape.
- Grinder, discs, calibrator, round file.
- Fittings, pipes, reinforcement mesh 50×50 mm, pipe fastenings, pipe cutter, insulation, cement mixture, waterproofing film, press pliers.
- For wooden floors - joists, saws, pipes, pipe cutters, fittings.
Leveling the surface
It is very important to level the surface of the ceiling. There are two reasons:
- Thermal insulation boards will not adhere firmly to the ceiling and may sag during operation - this will lead to cracking of the screed and may lead to a violation of the tightness of the pipes.
- If the difference in the base is more than half the height of the pipe, then there is a high probability of air pockets in the raised parts of the pipe, interfering with the movement of warm water and reducing the efficiency of the system.
Most often, the surface of the subfloor is quite flat, but in some cases it is necessary to repair the surface with mortar or install a new leveling screed.
Preparation of the thermal insulation layer
Insulation must be installed under the heating pipelines - usually slabs of dense extruded polystyrene foam (not expanded polystyrene) of high density with a thickness of at least 35 mm (preferably 50 mm). Sometimes hard slabs of mineral wool are used, but this is not the best way. You can use a cork. It’s good if the insulation is foil. You can lay a foil waterproofing film. Do not lay penofol.
The thermal insulation is protected from above with a waterproofing film. There are films with markings, heat-insulating boards with clamps and markings.
A damper tape is fixed along the wall. Sometimes it is recommended to lay a strip of insulation along the wall.
Pipe laying and fastening
Pipes are laid on the waterproofing according to the design. The length of one circuit should not exceed 150 m - otherwise the hydraulic resistance of the pipes simply will not allow the pump to push water through the pipe. The contours should be approximately equal in length.
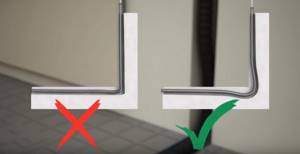
If pipes need to be bent, do it carefully, preferably using a template so that folds do not form on the pipes at the bending points. If there are no fasteners on the thermal insulation, then special plastic strips (mounting rails) with locks are installed to secure the pipes at the required distance from each other. You can secure pipes with U-shaped anchor brackets (clips). It is necessary to secure the pipe so that it does not “float” when pouring the screed.
Rules for assembling heated floors
After laying, the pipes are connected to the collector using fittings. Each circuit must be able to be switched off using taps at the inlet and outlet.
Then the system is tested, filled with water and heated. Test technology: pressure and temperature are gradually increased over several hours. If possible, the pressure is adjusted to 0.6 MPa (6 bar, 6 atmospheres). Test the system for at least 24 hours, bleeding the air several times.
Then the temperature and pressure are reduced, but the system is left filled with water - the screed is poured when the system is full.
Creating a reinforcement mesh
Then the reinforcing mesh is laid - for this, a mesh with a cell of 50x50 mm is used.
Installing reinforcing mesh and pouring screed
The system is then filled with solution. The pipeline should be filled with water at room temperature - 20-23°C, the pressure should be 0.3 MPa. It is better to use a ready-made cement dry mixture marked “for water-heated floors.” You can add plasticizers for heated floors to ordinary cement mortar.
The screed is poured from the walls. It’s a good idea to cover it with polyethylene - this improves the maturation process of the solution and improves its quality. Drying out the surface for the solution is undesirable, and it is impossible to moisten a large area. The screed completely hardens after 20 days, but you can walk on it a couple of times after 10 days, not earlier.
Local treatment plants (VOC or AC)
During normal operation, autonomous sewerage installations are capable of producing fairly clean water. It cannot be used as drinking water or for watering the garden, but as a technical one it is very possible. The basis of cleansing is the work of aerobic bacteria (they live in the presence of oxygen). The waste they process turns into sludge, settles to the bottom of a special tank, from where it is then pumped out. Pumping frequency is 1-4 times a year, depending on the intensity of use.
In general, an autonomous wastewater treatment plant is a good thing, but it has certain operational features that you must know before deciding what is better for the sewage system of a private house - a septic tank or an AC.
This is roughly what installations for an autonomous sewer system in a private house look like. This is AU Topas
At the outlet, the ACs have water purified by 90-95%. With this quality, it can be poured onto the ground, however, for this you must have laboratory tests on hand. Therefore, many still prefer to use an intermediate settling well from which the water is then used for technical purposes. The second option is to divert the wastewater to filter devices. This, of course, is reinsurance, but in emergency situations it saves.
What is used to clean wastewater?
Waste is processed by anaerobic bacteria (they live only in the presence of air). To provide them with air in the VOC, aerators are constantly running. In addition, during cleaning, the contents are pumped from one compartment to another using built-in pumps. So without electricity, these installations are inoperable.
Inside the AU is also divided into chambers (this is Topas)
If the electricity is turned off, bacteria can survive without air for no more than 4 hours, after which they die, and the wastewater ceases to be processed. To start the system, it needs to be populated with new bacteria, and reaching a working state is possible only after 2-3 weeks. All this time, the wastewater will flow, at best, semi-purified. This is where a sump well or filter unit comes in handy. It will improve the situation at least a little.
Features of operation
Since the volume of autonomous treatment plants is small, they need constant feeding: bacteria need nutrients for normal life. Therefore, this type of device is suitable for private homes of permanent residence - regular receipts are needed. In principle, preservation for a certain period is possible, but the procedure is not pleasant, and it will take a long time to return to the installation mode.
Bacteria that process waste in automatic wastewater treatment plants are also sensitive to active chemicals. Since the chamber volumes are smaller, the release of detergents or disinfectants can significantly damage the recycling process. Moreover, cleaning and antibiotic treatment can negatively affect.
Station after operation 3-6 months
VOCs are much smaller in size than septic tanks. They are calculated depending on daily water consumption, but there is such an indicator as salvo discharge. This is the amount of waste that an autonomous sewer installation can accept at one time. If this value is exceeded, untreated wastewater flows into other chambers, which significantly reduces the degree of purification. So, in this situation, you have to decide which plumbing fixtures and household appliances work at the same time. And if the bathtub is drained, no other devices should work for some time.
Briefly: advantages and disadvantages
Autonomous sewerage treatment plants are certainly convenient; with them, sewerage for a private home is implemented quickly - installation takes 10-12 hours. Pumping out excess sludge is necessary several times a year (1-4 times depending on the intensity of use, but maybe less or more often). The amount of sludge pumped out is very small (5-10 buckets depending on the model) and maintenance can be carried out independently, although the procedure is not the most pleasant. But they are doing this, since the visit of a specialist is not cheap at all.
This is what it looks like on the site
These home treatment plants have some disadvantages: the high cost of the equipment, dependence on the availability of electricity and the need to monitor the condition of the equipment.
Scheme 1.
Based on the thermostatic installation kit VT.ICBOX
This scheme (see Fig. 4) is used when the coolant in the supply pipeline has a temperature of up to 60°C. At higher coolant temperatures, it is necessary to use special technical solutions (partial use of a “warm wall”; use of fine-pored screeds, thermal insulation of pipes). The advantages of this scheme include its simplicity and cost-effectiveness.
Table 2. Specification* of “warm floor” materials for “Scheme No. 1” (floor area 15 m2)
* Materials for cement-sand screed with plasticizer are not taken into account by the specification.
It is recommended to use it when laying heated floors in small rooms, given that one VT.ICBOX installation unit can serve only one heated floor loop with a length of no more than 100 m. A manifold and pumping-mixing unit are not required for such a scheme. The temperature of the coolant in the heated floor circuit is regulated by a built-in thermostat, which is part of the VT.ICBOX unit.
When the coolant temperature rises above the set value, the thermostat reduces the flow rate, thereby reducing the floor temperature. For underfloor heating installations, installation kits VT.ICBOX 1.0 and VT.ICBOX 2.0 are available. Automatic maintenance of room temperature in the VT.ICBOX-1.0 unit is carried out using a servo drive or a thermostatic head with an external temperature-sensitive element, and in the VT.ICBOX-2.0 unit. – only using a thermal head.
The disadvantage of systems with VT.ICBOX units when connecting them to a high-temperature heating system is the uneven distribution of coolant temperature along the length of the pipe, which leads to significant differences in floor temperature above adjacent pipes. Therefore, when using heated floors based on VT.ICBOX kits, it is recommended: as a finishing floor covering, use materials that are resistant to high temperatures, for example, ceramic tiles; use a screed thickness above the pipe of at least 50 mm, which will eliminate abrupt unevenness of temperatures on the surface floor. The greater the thickness of the screed, the smaller the difference in floor temperatures between adjacent pipes; lay pipes in a “snail” pattern. In this case, “hot” pipes evenly alternate with “cold” ones, which will avoid the presence of overheated areas of the floor.
Methods for installing heating pipes in the floor
In this block we will look at two options:
- installation for pouring;
- installation under wooden covering.
Pouring installation
The method is suitable for both apartments and houses, even with wooden floors. The screed can also be poured onto a wooden subfloor. In both cases, the algorithm of actions is the same:
- waterproofing is spread;
- insulation is installed;
- reinforcement mesh is laid;
- pipes are separated and secured;
- damper tape is glued;
- everything is filled with a layer of solution.
Now let's talk about everything in order. Waterproofing is spread on the floor to prevent moisture from entering from below, and also to avoid contact of wet mortar with the wooden subfloor. Then the working surface is insulated. The best insulation option is polystyrene foam and its derivatives, such as penoflex. A steel mesh is laid on the insulation, which will distribute the load in the layer of hardened mortar. Without reinforcement, the screed will crack.
There are special foam mats that have bumps on the surface. They are arranged in rows at regular intervals, like grid cells. Such mats are simply placed on the floor, routing is carried out along them and the whole thing is filled with mortar. Easy, fast and high quality. New technologies, however.
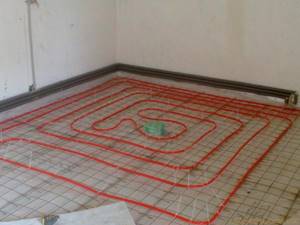
Layout diagram of heating pipes in the “snail” floor
The distribution of heating pipes in the floor is carried out according to one of two schemes:
- snail;
- snake
The snail pattern involves a circular laying of the contour from the walls to the center of the room. There are no sharp turns in the direction of circulation. The snake passes from one wall to the opposite and at each segment the direction of water movement changes by 180 degrees. Not to say that this is very bad, but the first scheme is more preferable.
The contour must be fixed to the surface, and it must be remembered that it increases in length. Therefore, the fastening should not be rigid; the line should be able to slide in it. Alternatively, you can use plastic clips that are drilled to the floor. It is easier to use ordinary clamps that secure the pipes to the mesh.
In fact, a warm floor is a layer of hardened mortar in which heating pipes are hidden. At the same time, the cement slab does not have a rigid connection either with the subfloor or with the walls. This large rectangular parallelepiped simply lies on the floor, periodically increasing and decreasing in volume.
Under no circumstances should you forget about the damper tape. This is a strip of foamed polymer that is glued along the entire perimeter of the room to the wall. The bottom edge should run along the floor. The damper tape compensates for the expansion of the screed and prevents the mortar from sticking to the walls when pouring. The thickness of the screed above the heating pipes should be at least three centimeters, and in total - about seven centimeters. If the layer thickness is insufficient, it will crack; if it is too thick, the temperature on the surface will be lower than expected.
Installation under wood flooring
Heating pipes in a wooden floor
This method is not as effective as installing pipes in a screed, but is sometimes used. First you need to create a buffer zone for laying heating pipes in a wooden floor. To do this, logs (bars) are laid. Then pipes are laid between the lags. At the intersection of the contour and the bars, grooves are cut out in the wooden logs so that the entire highway is in the same plane. Naturally, it is necessary to provide insulation and waterproofing so that all the heat goes up. The finished floor is carefully pricked onto the joists so as not to pierce the main line.
Now let's summarize. For installation of heating pipes under screed, products made of cross-linked polyethylene reinforced with ethylene vinyl alcohol, marked PEX/EVON/PEX, are best suited. There should be no breaks in the line; everything is done from one piece. The floor must be insulated and waterproofed before pouring. The thickness of the heating pipe screed must be at least three centimeters and no more than seven. Damper tape is glued around the perimeter of the room. The temperature in the heated floor system is about 40 degrees, and on the surface of the finished floor - about 30 degrees.
Pipes for heating in the floor (in the interfloor or basement ceiling) are installed either during the hidden installation of the heating system, or during the installation of the “warm floor” structure. It is worth noting that in these cases, pipes are used in principle and various pipeline assembly technologies are used.
Therefore, in this article we will describe the installation of heating pipes in the floor, placing emphasis on all the details of the technological process. In addition, we will say a few words about the “warm floor” technology itself.
Heated floor pipes
The best options are considered to be seamless metal-plastic pipes, polyethylene pipes or copper water pipes.
A metal-plastic pipe is a multilayer structure with a smooth polymer inner layer. The inner layer is aluminum, which is protected by polymer PR layers.
A polyethylene pipe is a product made of plain or cross-linked polyethylene that can withstand temperatures up to 100-110˚ and pressure up to 10 bar.
Copper water pipes are an ideal, but expensive option for underfloor heating pipes.
The principle of operation of “warm floor”
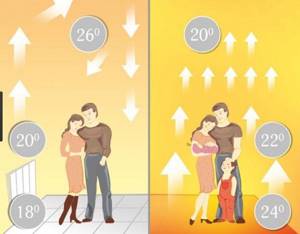
Why is laying heating pipes in a screed called the right choice? After all, there is an easier way out - replacing the batteries. Yes, this is easier to do, but it does not mean it is more effective than this installation, because no one has yet canceled the laws of physics. The operating principle of heating systems is completely different. Traditional heating radiators give off heat. It then passes along the walls to the ceiling area. It turns out that it is the ceiling zone that warms up first.
Afterwards, the air moves to the lower region, but it gets here already cold. Thus, the following situation arises - in the ceiling area it is warmer, but below the temperature is much lower. The same applies to the convection principle.
Is it possible to abandon radiators and heat the house only with heated floors?
From the legal side
Answer: No, you can't. If you contact a large construction company with such an idea, they will refuse you. There are 3 reasons for this:
1) The heating system is designed for the lowest temperature. For Moscow this is –25°C for 5 days. If the average temperature stays at -25°C for 5 days, no heated floors will cope. More details: SP60.13330.2016 clause 5.13.

Minimum winter temperatures in Moscow
2) The temperature of the floor surface should be no more than 26°C, and for children's institutions 23°C. This is too low a temperature to heat a room. Radiators heat up to 80°C. I will tell you further what overheating of the surface leads to. More details: SP60.13330.2016 clause 6.4.8
3) Cold convection currents always come from the window. Radiators cover 50% of the window width, which helps reduce the cold air flow from the window. More details: SP60.13330.2016 clause 6.4.4.
From a practical point of view
Answer: Yes, it is possible, but is it convenient? Unfortunately, neither customers nor builders see all the consequences. The customer relies on the experience of the builder. The builder relies on the experience of past projects. That’s why there are so many speculations and fantasies on the topic of heated floors.
I will share these consequences with you.
Sealing and thermal insulation
Only metal connections have to be sealed. The fact is that when working with HDPE pipes, they are soldered, which does not require additional sealing. For metal-to-metal joints, plumbing linen must be used. This is the most inexpensive method, which, together with the paste, allows you to achieve 100% tightness.
It is necessary to wind the flax in the direction of movement of the object that will be screwed onto the thread, so that when screwing the flax does not turn. Instead of flax and paste, you can use fum tape, as well as other means.
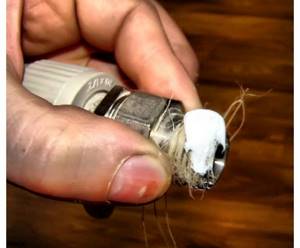
An example of applying plumbing flax with paste for additional protection against leaks of threaded connections
As for thermal insulation, there is a special insulation on sale that is made to fit the diameter of the pipe. It is recommended to isolate the coolant supplied from the boiler to the heating radiators. This especially needs to be done if the pipes lie against the wall under the floor, since this is where the maximum level of heat loss is observed. As a thermal insulation material, you can choose basalt wool, glass wool, polystyrene foam and other insulation.
Pros and cons of methods for hiding heating pipes
Plasterboard and laminate structures
Many people choose this method of hiding heating pipes in a new building with laminate, making a box out of it.
In this case, the structure turns out to be designed like the floor. If, in addition to heating pipes, there are other communications in the house, it is best to hide them using a false wall made of gypsum plasterboard. The considered method has a number of disadvantages, for example:
- not suitable for metal-plastic and polypropylene pipes. which are connected by collapsible fittings;
- if the pipe is old, putting the pipe into the box is very risky: a leak that occurs can cause a lot of trouble;
- before hiding stainless, copper and steel pipes behind a decorative box, it is better to cover them with heat-insulating material;
- false wall equipment reduces the space of the room.
But the niche created as a result of the construction of a false wall can be used to advantage. For example, by laying a layer of insulation, you can improve light and sound insulation. You can use this place for a night light or place a stereo system. Using a niche to your advantage, false wall equipment will be a completely justified option for hiding heating pipes.
Hiding highways in the wall, floor
This method of hiding heating pipes in a floor screed or in a wall is not suitable for all pipelines.
Heating pipes in the wall have pros and cons that you need to know before choosing this method of masking the line. The main advantage of the method is that the design of the room will not be disrupted or overloaded with additional details. True, there are also disadvantages. For example, the complexity of installation. If the pipe leaks, the wall will have to be demolished to make repairs.
Application of decorative elements
Decorative rosettes for heating pipes are an excellent option for hiding pipes.
Thus, today there are many ways to hide heating pipes in a private house. It is advisable to close the highways at the construction stage. But even after construction you can decorate the pipes. Each method has its own advantages and disadvantages. And which one to give preference depends on the type of pipeline, operating conditions and the chosen room design.
Why isolate?
When laying a pipe outside a building, it (and the environment flowing inside) can be adversely affected by moisture and low temperatures. In addition, some materials (polymers) deteriorate faster and lose their quality when directly exposed to sunlight.
The pipeline can also be damaged by human actions (intentional or unintentional).
It is preferable to lay pipes in the ground for the following reasons:
- To prevent the negative factors mentioned above.
- In order not to create a network of communications (which will take up space and interfere with passage/travel) on the surface.
When laying a line underground, the following dangerous factors remain relevant:
- Possibility of freezing of the liquid flowing inside.
- The possibility of corrosion of the pipe itself is due to exposure to moisture.
The first factor is relevant in winter: the depth of soil freezing in most Russian regions reaches (or exceeds) 1 meter. That is, in order to prevent the flowing medium from freezing in cold weather, the pipes should be laid in the ground deeper than this indicator.
This is often inconvenient: it complicates further maintenance of the line (if inspection or repair is necessary, you will have to dig a deep trench), and increases the cost and time of excavation work during installation.
About the danger of lack of insulation
Water supply and sewerage pipes are laid in the ground - both municipal (going from and to multi-apartment residential buildings), and for private houses and various industrial buildings. Insulation must be used in both cases - since water flows inside these lines.
Moreover, it freezes very quickly - in less than an hour an ice plug will form inside.
Since the pipeline is laid in the ground, to remove it you will have to dig a trench, look for a frozen place and warm it up. And all this - in the cold. Moreover, the sewerage or water supply will not work in the house (depending on which line “runs down”).
In addition to the troubles that the sewer or water supply in the house stops working, when an ice jam occurs, there is also the possibility that the pipe will burst. This happens because when moisture freezes, it expands, meaning ice will take up more space than water. As a result, the pipe walls may not withstand it.
Fixing this problem is an even more difficult and less pleasant task than steaming a frozen area. In winter, in the cold, you will have to not only dig a trench (and not a small one, but along the entire line of the pipe - in order to find the damaged part) - but also repair the pipe itself. Often this can only be done by completely replacing the cracked segment.
Is it possible to hide polypropylene pipes in the wall Construction and repair
Self-installation of plumbing and heating systems is no longer uncommon: with the advent of accessible and inexpensive materials on sale that do not require cutting and joining equipment, many craftsmen take on such work without fear.
Numerous master classes and video lessons are ready to clearly demonstrate all the stages from scratch to putting the system into operation.
And yet, some moments sometimes remain outside the frame: the question of whether polypropylene pipes can be hidden in the wall in order to effectively complete the decorative finish often remains open.
Hidden heating system
Modern technologies make it possible to improve the aesthetic appearance of a room in various ways. The method of placing heating pipes in the room was no exception.
It becomes possible to place them in the wall, thanks to the durability of the material used in their production.
Advantages and disadvantages
It is most convenient to place communications in the wall at the construction stage in a private house according to a previously created drawing. You can hide pipes in the wall in an apartment building if you are planning a major renovation of the premises or the entire building.
By placing the heating in the wall, the room certainly looks more prestigious, and the freed-up space can be decorated.
Pros:
- heat transfer increases, since building materials have an increased level of heat transfer, unlike air;
- the service life of the polypropylene from which the pipes are made reaches up to 50 years, ensuring the reliability of the design while observing technical standards during their installation;
- the space increases by several centimeters.
However, difficulties must be overcome in obtaining the right to permit changes in the position of communications in the premises or their so-called redevelopment.
Minuses:
- low-quality propylene increases in volume when heated;
- ordering a project to change the location of communications;
- coordination of the project with supervisory authorities. Alteration of engineering systems in an apartment building will require a special permit;
- joints may lose their sealing, which can only be determined using a device that measures water pressure;
- risks associated with preparedness for wall destruction in the event of a possible leak.
A break in the heating system pipes in the wall in the event of a leak will cause water to enter the adjacent lower apartment, since it will not be possible to quickly eliminate the leak.
How to brick up heating pipes in a wall
To disguise the pipes of the heating system in the wall, you need to find out what material the wall is made of, and select the method and sequence of work, as well as the necessary materials.
Before laying heating pipes, it is necessary to test them for strength and visually carefully check for possible damage.
Concrete
In an apartment in a panel apartment building, there are two ways to lay heating system pipes: using grooves - specially created channels for laying heating pipes in them, or creating a false wall.
How to remove heating in a wall in a panel house step by step using grooves:
- You need to start by de-energizing the common building heating riser. You should make sure that the desired riser is turned off;
- The grooves should not be located end to end. The contour should not be infringed. The recess is calculated based on the parameters of the fasteners, their quantity and the layer of prepared insulation;
- directly covering heating pipes with an insulating layer. Insulation is used to prevent condensation;
- Next, they calculate the places for fastening and mark the locations of the fasteners.
The work is carried out with a grinder. It allows you to perform high-quality actions in automatic mode and facilitates wall slitting.
When erecting a false wall, it should be taken into account that the space of the room will decrease.
Brick
Strobes are made in a brick wall in the same way as in a panel wall.
The procedure for laying part of the heating system into a brick wall:
- the depth or width of the channel is determined taking into account the amount of insulation wound on the surface of the pipe;
- after which they are placed in the marked places and secured with clamps pre-fixed with self-tapping screws.
It is necessary to test the system by running water at excess pressure for several days. After making sure that there are no leaks, the wall with communications is covered with mortar and putty.
Single pipe heating system
This option for routing heating pipes is also called sequential.
Peculiarities:
- You can make a self-flowing circuit;
- A fairly economical option, its implementation requires a minimum of materials;
- Compatible with open systems;
- Depending on the distance of the sources, the temperature of the radiators changes, the closest one will be the warmest, the furthest one will be the coldest;
- It is necessary to install bypasses, otherwise if any battery is clogged, the system stops working;
- For forced fluid flow, a powerful pump is required;
- Strict restrictions on the number of radiators in the riser.
In a horizontal system, the main pipe is usually masked in a screed, and pipes to the batteries extend from it. The coolant is supplied from above and leaves from below.
Features of installation of single-pipe wiring:
- In any case, the boiler is installed from the very beginning.
- If you are using a vertical design with natural circulation, then you must choose a large diameter supply pipe. This approach will allow the hot flow to create the required pressure passing along the entire line.
- If you are using a horizontal design, be sure to not forget about the circulation pump when making calculations. It must be installed in the return pipe. The pump can also be used in a vertical version, but the connection must be via a bypass. Otherwise, when there is no power, it will interfere with natural circulation.
- We must not forget about the slope of the supply pipe leading to the radiators or from the main boiler. It is advisable to leave 3-5 degrees per meter of length.
- It is preferable to locate the boiler at the lowest point of the line.
- It is recommended to use “Leningradka” - a system of jumpers and bypasses with thermoregulation. This approach will allow you to set the temperature on each radiator separately.
- Don't forget about the thermostatic heads on the batteries.
- Experts advise using a Mayevsky tap for each battery. This approach will prevent airing from occurring, which could interfere with the circulation of the coolant.
- In a vertical system, the use of an expansion tank is necessary.
- At the lowest point of the wiring there must be a tap designed to fill and empty the system.
- It is recommended to purchase a boiler with a small power reserve. In this case, the system will be able to effectively heat the room even in severe frosts.
When can you heat a house without radiators?
For this article, I analyzed the heating calculations of 20 cottages. For Moscow, the heating system is calculated according to standards for –25°C, St. Petersburg –24°C, Kazan –31°C, and only in the Krasnodar and Stavropol Territories, Rostov-on-Don and Crimea can it be heated with heated floors without radiators.
You can heat your house with underfloor heating when the outside temperature is not lower than -18°C.
Special construction region. Krasnodar region, Stavropol region, Rostov-on-Don and Crimea.
You do not plan to live in the house in winter. In the fall, you drain the water supply system and heated floors and close the house until spring.
Additional heat sources. Do you have a fireplace, stove or electric heaters?
Building with temporary use. Garage, covered gazebo, separate bathhouse. There is no point in maintaining a temperature of +23°C. In the most extreme cold, you will not be in the building, and the standby temperature of +15°C is sufficient. Warm floors will do.
Heat pump. Heating with heated floors is recommended by sellers of heat pumps. The heat pump does not prepare water at 80 °C - as needed for heating, but only 55 °C, which is optimal for a heated floor system. Radiators on water at 55°C will turn out to be huge.
Materials for thermal insulation of pipelines
Rigid pipe insulation
Their choice depends on the conditions under which the water supply will operate in cold weather. The following parameters must be taken into account:
- location of external pipes - underground or outdoors;
- operating conditions - constant or periodic;
- the material of the pipeline itself is metal or plastic;
- complexity of installation;
- estimated cost of materials and labor.
Passive protection allows you to reliably insulate country water pipes in the ground. And there is a wide selection of materials - choose the most suitable ones in terms of cost.
Rigid insulation
This category includes polystyrene foam and polystyrene foam. They have low thermal conductivity and their cost is low. But sheets of this material are not suitable for wrapping round pipes. But they are good to use when insulating underground pipelines installed inside a protective box. Polystyrene foam will provide thermal insulation for the internal walls of the casing itself.
Roll materials
You can insulate water pipes by wrapping them with polyethylene, penofol or various types of mineral wool. The only difficulty during installation is to choose a reliable way to secure the flexible sheets to the pipe.
The disadvantage is that most of these materials are highly hygroscopic, and when wet they lose their heat-shielding properties. You can galvanize them yourself using flexible metal sheets or foil. But rolls are also produced, already foil-coated on one side.
Segmental insulation
These are ready-made casings of different diameters, tightly fitted onto the pipe. As a rule, they are already covered with a protective layer against moisture penetration.
Options for such insulating structures:
- Hard segments called the shell. They are made from polyurethane foam (PPU) or durable foam.
- Soft elements made of foamed polyethylene.
- Long cylinders made of stone wool.
Sprayed materials
Liquid polyurethane foam can be applied in a layer of any thickness to the surface of pipes and fittings. This method of thermal insulation ensures complete tightness of the protection, since it does not form cold bridges at the joints.
But spraying requires specialized equipment. And companies involved in the creation of such insulation prefer to work with long pipelines. Therefore, it will be problematic to insulate a private water supply of 10–20 m by applying liquid polyurethane foam.
You can cover the pipes yourself with a layer of liquid insulation and then allow it to harden using thermal insulation paint. It is available in both aerosol and liquid form for application with a brush. In terms of protection against cold, it surpasses even stone wool.
But it is expensive, so it is advisable to use it on pipelines of complex configurations or where the pipeline exits to the surface.
Finished products with thermal insulation
In order not to bother with applying protection to the country water supply yourself, when laying, you can use pipes with thermal insulation already applied to them. The insulating layer often has a groove for installing a heating cable system. Such pipes are produced both in a straight long version and in the form of flexible polymer or metal-plastic products.
One bay may be enough to lay the entire country water supply system with ready-made thermal insulation.
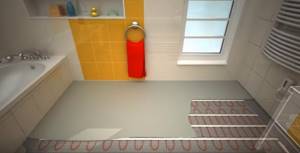
Electric floor heating for home
Electric heated floors are no less popular and occupy their own niche. In apartment buildings it is not always possible and necessary to install a water floor, but electric flooring in all its varieties is used quite often, primarily for additional heating of the floor surface in the bathroom, hallway or kitchen. Electric floors on the modern market are presented in several varieties, each of which has its own characteristics.
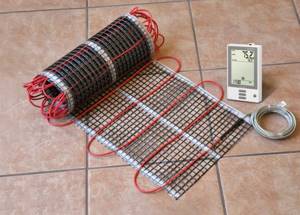
Ready-made electric floor kit
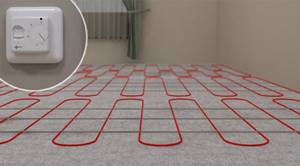
Cable floor
A cable is used as a heating element; when connected to electricity, the floor structure is heated.
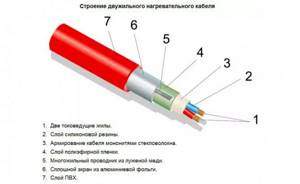
Cable structure
There are several varieties:
- A single-core cable is a thermal conductor and a heating element rolled into one. When installing a heated floor using this method, it is necessary to take into account that the ends of the cable were brought to the location of the control unit.
- Twin-core wire is more common in use. There are two wires inside it, one for closing the circuit, the second performs the heating function.
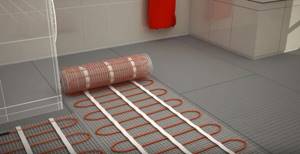
- One type of cable floor is a heating mat (a two-core cable is fixed on a mesh, which greatly simplifies the installation process). In this case, the power of the product has already been calculated by the manufacturer.
Single-core heating
Infrared floor
This variety is divided into two categories.
To heat a rod-based heated floor, special heating elements fixed with polymers are used.
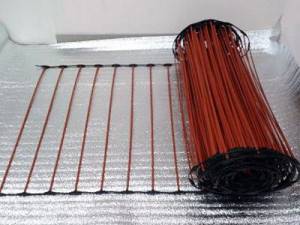
Rod type floor
The film infrared floor is equipped with elements made of carbon paste, which are heated by copper wires inside the film. The thermal signal is distributed to objects located in close proximity. Laying such a floor is the simplest. The advantage of such a floor is its insignificant thickness, due to which its installation does not affect the height of the room.
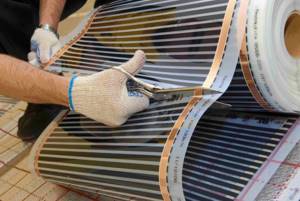
Infrared flooring is easy to cut using regular scissors
Video - Features of electric heaters
Additional items
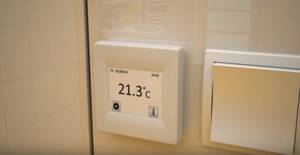
The electric heating system is controlled using a temperature sensor that controls the heating temperature and a thermostat - a device for controlling the heating of the system. These elements have a direct connection with each other - the sensor is mounted directly inside the structure and transmits data to the thermostat, which is installed on the wall in a place convenient for use. When the optimal floor temperature is reached, the thermostat automatically stops heating.
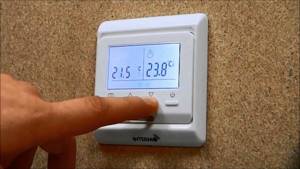
Floor heating control panel
Today, manufacturers offer devices from the simplest to multifunctional ones with remote control.
Laying nuances
Before you begin laying an electric heating system, you should study some rules, compliance with which will allow you to carry out the work correctly and ensure the uninterrupted functioning of the system:
- To prevent heat loss through the base and speed up heating, it is imperative to lay a layer of thermal insulation material. This will improve the profitability of an electrically powered system.
- The heating cable or mats should not be subject to point loads from furniture and equipment.
- Heating elements should be placed at a distance of at least 10 cm from heating radiators, and the distance from the walls should be 5 cm.
- It is important that during the installation process the cables do not intersect and that the step of their laying is observed.
- If possible, it is necessary to avoid the formation of cable cuts and strive to lay a solid cable. If this is unavoidable, the cut sites are carefully isolated to prevent loss of power from the system and the occurrence of a short circuit.
Laying under screed
Important! Electrical work should be carried out by a professional electrician.
Installation of heated electric floor
Table 3. Laying heating mats in the bathroom under tiles
| Illustration | Description |
| To begin with, insulation boards (F-Board) are laid on the solution in the room, having a monolithic fiberglass-reinforced protective layer on both sides. Further work can begin in 24 hours. |
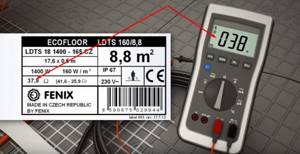
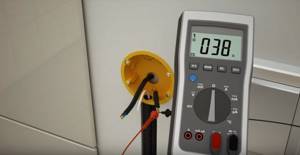
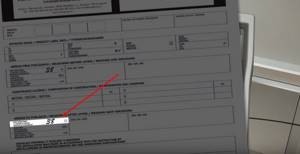
| After this, it is necessary to measure the resistance of the electromat - the value must correspond to what is indicated on the product label. |
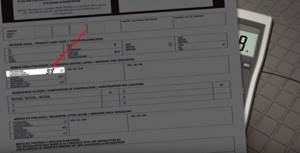
| The value is entered in the passport, which is attached to the product by the manufacturer. |
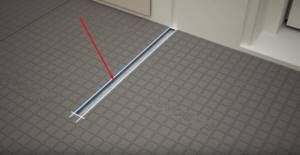
| A place for laying the temperature sensor is marked and prepared on the floor and wall. |
| A corrugated tube is placed in the resulting groove, in which the temperature sensor will be located. In this case, it is recommended to make a recess at the junction of the floor and the wall, as shown in the photo, so that you can easily insert the temperature sensor into it. |
| The tube is brought to the place where the thermostat is attached and the temperature sensor is immersed in it. On the floor, the hole in the tube is closed with a sealed cap. | |
| The power wire from the mat is connected to the thermostat through a groove in the wall. From below, the tube with the temperature sensor is filled with solution. |
| After this, they begin laying the mats. |
| For continuous installation, if there is an obstacle in the way in the form of plumbing equipment, you must follow the instructions shown in the photo. | |
| When making a turn, you must follow the instructions given in the photo. | |
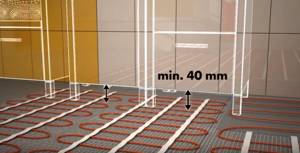
| The distance from the heating mat to the surface of the furniture should be at least 4 cm. |
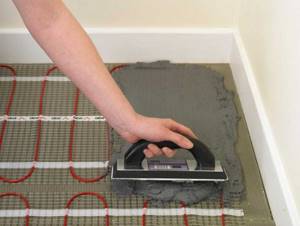
| After the mats are laid, the screed is poured. |
| Before pouring the screed and after it has dried, it is recommended to check the performance of the mats. How to check heated floors, sensor and thermostat? Read in the special article. |
| The resistance value is also recorded in the passport. |
| After this, the tiles are laid. |
| At the final stage, connect the thermostat and configure it. It is important to take into account that if the screed has been poured, then it will be possible to use the heated floor only after at least 10 days, when the screed has completely dried. |

Prices for heated floors Caleo
warm floor caleo
Factors affecting heating pipes in the ground
A heating pipe buried in the ground is subject to the same influences as an external pipeline, plus factors caused by burial:
- internal pressure of the coolant, causing circumferential and longitudinal tensile stresses in the pipe section;
- coolant temperature is a factor, in addition to thermal effects, also causing pipeline stress;
- soil temperature - in winter, taking this factor into account is especially important;
- soil deformations - the pipe is affected by any of its displacements (settlement, shear, etc.);
- pre-bending stress of the pipeline - the trench profile often follows the terrain;
- vertical load - the effect of the weight of the trench backfill layer;
- the resistive action of the soil on the walls and bottom of the pipeline - counteracting the vertical load;
- vibration loads - from passing vehicles, excavation work in the neighborhood, etc.;
- moisture – precipitation and groundwater;
- exposure to chemicals - compounds in the soil and coolant;
- biological factor - bacteria, decomposition.
Thus, laying a pipeline in the ground should be done taking into account all of the above factors and solving the question of how to insulate heating pipes in the ground.
Operating principle
The radiators built into the floor heat the room using the convective principle. They themselves are also convectors by design. This system heats the room more efficiently than any wall-mounted radiator model. The heated air rises to the ceiling, the cooled air remains below and is heated, i.e. active circulation and uniform heating of the room occurs. It maintains a constant temperature. Heating costs are reduced.
Schemes for installing heated floors where its use is prohibited
Let's take a little look at the schemes that make it possible to install heated floors directly in the apartment.
Cheap and cheerful
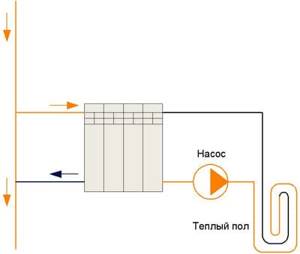
Scheme of an unregulated heated water floor
Here we will consider the option of installing heated floors, where it is prohibited to install water heated floors. To use this scheme, it is necessary to use a very weak pump (Flow rate - 5-10 l/min, pipeline - 16mm, pipeline length - no more than 70 meters). This scheme has one drawback - such floors are practically not adjustable. Also, if there are small heat losses from the floor, you can end up with very cold radiators.
Scheme with balancing adjustment
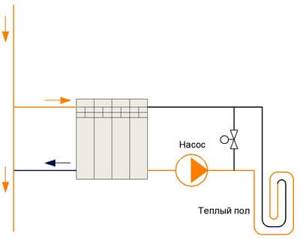
Scheme of a heated water floor manually regulated by a balancing valve.
The installation diagram of a heated water floor shows a balancing valve, thanks to which the flow rate in the heated water floor is reduced, which means it is possible to reduce the temperature of these floors. In order to reduce the temperature of the water heated floor, you need to open the balancing valve to the appropriate pass.
Reducing the influence of heat consumption
“K2” is a three-way valve with a temperature-sensitive mechanism. It gives a constantly unchanged temperature at point “3”. In other words, if your hydronic floor heating consumes a large amount of energy, then it creates a greater likelihood of causing almost cold water to flow into the riser. Which, in turn, can cool the radiators along the riser in neighboring apartments.
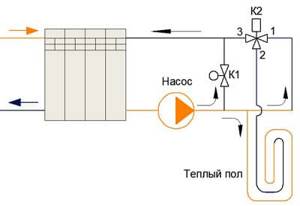
Scheme of a warm water floor with a three-way valve
Such a three-way valve can be purchased at specialized plumbing supply stores. It is called: “Mechanical 3-way mixing valve for water supply with thermostat.” That is, we need the presented valve in automatic mode in order to regulate the temperature regime of the hot water flow in the warm water floor circuit of the apartment.
Three-way valve
In the presented diagram, you need to adjust the tap so that at point “3” there is a warm, very high temperature. But if the warm floor from central heating heats very little, you can lower the temperature of the valve, thereby increasing heat loss in the warm floor. Here, to regulate the floor temperature, you can use balancing valves “K1” and “K2”. If it suddenly turns out that the radiator begins to cool below the set temperature, then the temperature will not penetrate your heated floor. The circulation in the warm floor will simply stop.
Scheme for discerning consumers
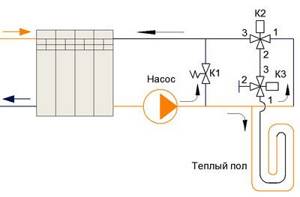
Diagram of a water heated floor with a three-way valve and bypass balancing unit
K1” - bypass balancing valve. “K2” and “K3” are three-way valves connected differently. The “KZ” valve is used to stabilize the temperature of underfloor heating from central heating using the return temperature method from the circuit. It is this scheme that allows you to make the so-called “climate control”. If your room gets hot, it will reduce the flow of hot water in the floor heating circuit, accordingly reducing the release of heat energy into the room. The warmer the room, the faster the hot water passes through the circuit and cools less and reaches the temperature-sensitive element - the three-way valve, which, in turn, does not allow liquid to flow at a very significant pace.
Installation of floor heating convectors
Correct installation of duct convectors is preceded by preparatory work with the floor. It is necessary to make a niche where the heating devices will be installed. It is best to do this at the repair stage.
Built-in convector
The dimensions of the niche should be 5-10 cm larger than the dimensions of the heating device. This is necessary for the normal connection of the heating radiator after it is installed in the floor. An additional layer of thermal insulation is installed. To protect the decorative surface, it is recommended to form a niche using concrete pouring.
At this stage, pipes should be installed in order to later connect to the radiator. They are installed on the floor, taking into account possible thermal expansion. For extended sections of the main line, it is necessary to install compensation thermal loops.
The further installation steps are as follows.
- Installation of heat-reflecting material. This will help improve convection and reduce heat loss.
- Installing the heating convector tray into the floor. If there is none, a substrate made of heat-resistant material is installed. The radiator should not hang.
- Connecting pipes to the heating system. It is important to select the correct adapters to ensure a reliable and durable connection.
- Installation of decorative grille.
After the final installation of the heating in the floor, a test run of the system is performed. It is first necessary to perform pressure testing. The coolant temperature should be increased gradually. The same applies to pressure. At this stage, the absence of leaks in the water heat supply to the floor is checked with your own hands, and the operating modes of the thermostats are set.
One of the common mistakes when installing convectors without a tray is filling the niche with construction foam. Its pressure can lead to deformation of the structure.
Advantages of closed installation
There are many advantages to a closed floor heating system:
- The main advantage is that a correctly installed and well-functioning system creates ideally comfortable conditions in the room: the air above the floor is very warm, the air near the head is warm, and cooler near the ceiling. Parents of small children will especially appreciate this method of heating their homes.
- The second advantage is efficiency - the coolant temperature is lower, heat is consumed more efficiently, the living area of the room is heated - windows, walls, ceilings, air under the ceiling, and the floor under the furniture do not heat up. With a ceiling height of 2.5 m, the savings are about 15-20%, with higher ceilings or second light – sometimes reaching 50%. Quite expensive installation of pipelines pays for itself in several years.
- Durability - a water heated floor system will last about 30-40-50 years (depending on the material. Copper structures will last 100 years). Floor heating operates at a low temperature and low pressure - therefore, all pipelines and collectors operate in a gentle mode and wear out less.
- Easy to install. The only difficulty is in the design work.
- Easy to use.
- The screed has a high thermal inertia - the room slowly cools down when the heating is turned off.
- Saves space indoors.
- Saves the housewife's cleaning efforts.
- The warm floor is not noticeable - and radiators with wiring usually disrupt the design of the room.
- The system is quite easy to combine with an existing radiator system.
- You can only heat floors in separate rooms - children's rooms, bathrooms.
- In the presence of radiators and constant convection, there is quite a lot of suspended dust in the air; when heated from below, such strong convection does not occur, there is less dust in the air - this is especially important for allergy sufferers and asthmatics.
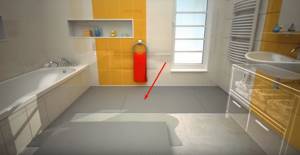
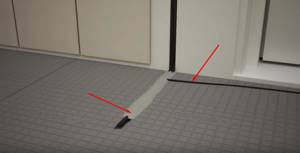
How to fit a pie into a room with low thresholds
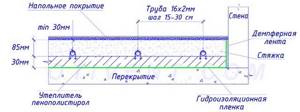
Almost all homeowners who decide to install underfloor heating in a habitable house or city apartment face this problem. The bottom line: the height of the thresholds of entrance or interior doors is not enough to install a full-fledged “pie” of heated floors with screed, shown below in the drawing.
Let's consider the composition of a monolithic heating circuit located on an interfloor or basement floor:
- Waterproofing - coating, more often - polyethylene film.
- Insulation – extruded polystyrene foam with a minimum thickness of 30 mm or polystyrene foam 5 cm.
- Damper tape around the perimeter of the room.
- A heating pipe (usually metal-plastic or cross-linked polyethylene with a diameter of 16 x 2 mm), laid in a snail or snake pattern.
- Cement-sand screed 8.5 cm thick.
- Floor covering (sometimes a vapor barrier layer is placed underneath it). The thickness depends on the material - laminate and linoleum will take up to 1 cm, ceramic tiles with an adhesive mixture - about 20 mm.
The traditional surface heating scheme is done without reinforcement
. An important nuance. If a monolithic heated floor (abbreviated as TP) is installed above the ground, the thickness of the insulation increases to at least 100 mm of polystyrene foam or 60 mm of extruded foam. The density of both materials is 35 kg/m³.
In total, the total height of the “pie” with a laminate coating will be 85 + 30 + 10 = 125 mm. No normal owner envisages such high thresholds. How to solve the problem and implement underfloor heating in a similar situation:
- Dismantle the existing screed to the very foundation - the ground or floor slab.
This is what multifoil looks like - a durable material with closed air chambers - Instead of a heat-insulating polystyrene layer, use multifoil up to 1 cm thick.
- Reduce the power of the tie to 60 mm. The structure will have to be reinforced with masonry or road mesh with dimensions of 150 x 150 x 4 and 100 x 100 x 5 mm, respectively.
- Use flooring systems - “dry” heated floors installed in wooden houses without screed. The total thickness of the “pie” is 6-10 cm.
- Heat the flooring with electric carbon film instead of a water pipe system.
Reference. The only room in the apartment where the thresholds remain high is the balcony and loggia. There is no need to reinvent the wheel - usually the monolith fits freely along with thermal insulation.
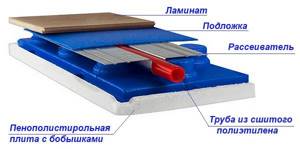
Dry laid surface heating system
Some home-grown craftsmen do not install insulation at all or reduce the thickness of the screed to 4 cm. In the first case, half of the generated heat will go into the basement, soil or to neighbors below, in the second, the monolith expanding from heating will soon crack.
An expert will tell you in more detail and clearly in the video how best to make a heated floor in an apartment building: