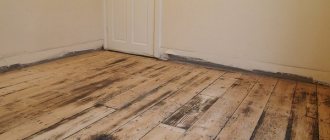
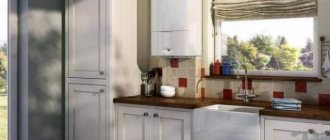
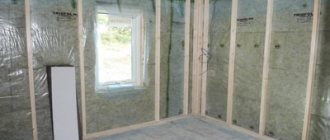
The floor in a wooden house is always a risk area for high humidity, since it is the lowest part of the structure, which is closest to the underground. Due to the temperature difference in the basement and in the house, condensation often accumulates under the wooden floor, which leads to an increase in humidity levels. And, as you know, moisture is detrimental to wood; damp wood is a potential source for the development of microorganisms, mold and fungi. A vapor barrier for the floor in a wooden house will help prevent such a scenario and extend the life of the structure. In this review, we will look at what materials are suitable for this work, and how to do it correctly.
Why is vapor barrier so important?
The floors of the basement and first floor are especially affected by moisture. Basement floors are often laid directly above the earthen floor, and therefore, during high water periods, they very often end up under water. Floors located on the first and basement floors of the house are exposed to condensation and water vapor coming from the basement. In addition, they are adversely affected by all household operations that increase the concentration of moisture in the indoor air: wet cleaning, washing, showering, etc.
This problem can be solved by laying a vapor barrier, which is a key layer in arranging and insulating the floor. It ensures optimal air exchange and protects the insulation and the floor itself from high humidity and water vapor. Vapor barrier will extend the life of not only the floor, but also the entire log house, but for this you need to choose the right material and do the correct installation.
Types of waterproofing
Floor waterproofing is the process of applying protective materials to form an impermeable layer.
Depending on the application technology, this procedure can be divided into several types:
- Coating. The best option for a concrete floor base. Construction technology involves applying solutions to surfaces that need to be protected. It is relatively rare for horizontal bases.
- Pasting. This type of waterproofing is the most common and universal. It is used not only in the construction of floors, but also to protect walls. This approach involves gluing rolled waterproofing materials (polyethylene film, etc.) to the base using special adhesives.
- Tough. Waterproofing of this type involves the use of special plasters. Apply them in thin layers on rough substrates. This approach is rarely used, since it is the most difficult and time-consuming.
Vapor barrier materials
The market for vapor barrier materials is quite wide. All of them are divided into three main types:
- Vapor-permeable protective films, which, in turn, can be reinforced or not, anti-condensation and regular, with or without perforation.
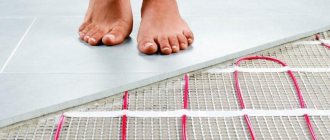
- Films with a reflective layer are well suited for wet rooms, basement and attic floors.
- Vapor-permeable membranes that provide effective protection of the floor from moisture and condensation, and do not interfere with air exchange taking place in the wood.
It is necessary to choose a vapor barrier for the floor taking into account the design and location of the floor, as well as the characteristics of the log house.
So, the vapor barrier of a wooden floor can be done with the following materials:
- plastic film;
- polypropylene film;
- glassine;
- diffuse membrane.
Polyethylene film
This is the most budget option.
The polyethylene film itself is fragile and breaks very easily. Therefore, to increase its strength characteristics, it is additionally reinforced with fabric or mesh. But even mesh-reinforced polyethylene film can be deformed during operation. One of the main disadvantages of polyethylene film is that it does not allow air to pass through, which creates a greenhouse effect in the room. Another disadvantage of such a vapor barrier is the flow of condensate drops along the film, due to which moisture accumulates on the floor.
Perforated and non-perforated polyethylene film is available. The first type has small holes through which steam passes; most often this type of film is used for waterproofing. Non-perforated film has low vapor permeability and is a good barrier to water vapor.
One type of material is polyethylene film with a foil layer that reflects infrared rays. This film provides good vapor barrier and can be used even in damp rooms.
Polypropylene film
This is a stronger and more durable material, which is easy to install and resistant to atmospheric factors.
Modern polypropylene films have an additional anti-condensation layer of cellulose and viscose, which absorbs and retains large volumes of moisture. Due to the good absorbency of the material, condensation does not form drops, and the absorbed moisture gradually dries out. There are polypropylene films on sale that do not have an anti-condensation layer. When they are used, condensation forms on the surface located on the insulation side, so they are not recommended for use on wooden floors.
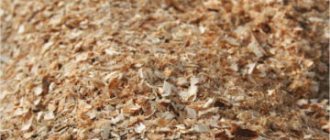
Glassine
The material is thick paper impregnated with bitumen. Thanks to this impregnation, glassine retains moisture well. The vapor barrier does not interfere with air exchange processes and tolerates low temperatures well. If you are looking for an inexpensive vapor barrier material, you can take glassine into service.
It should be noted that this material is flammable and short-lived, so experts do not recommend laying it near wooden structures.
Diffusion membrane
Without exaggeration, this material can be called a new word in vapor barrier. It is easy to install, has a long service life, high strength and good vapor barrier properties. The membrane is made of non-woven artificial material.
There are two types of membranes:
- one-way, which discharge steam in one direction;
- double-sided, discharging steam in both directions;
Each type can consist of one or several layers, and the more layers, the greater the volume of moisture the material can retain. One of the disadvantages of a membrane vapor barrier is the high cost of the material, which will cost 3-4 times more than polypropylene film.
There are also smart membranes that independently regulate humidity and temperature, and in addition, are a waterproofing agent.
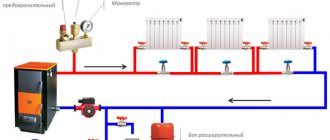
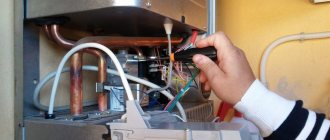
Installation technology
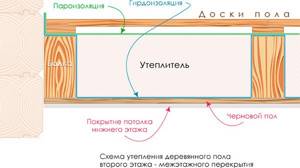
Installation of Izospan V involves a number of preparatory works. In general, the floor pie in a wooden house is the following design:
- rough base;
- wooden logs;
- thermal insulation layer;
- waterproofing;
- finishing floor;
- finishing coating.
You should not violate the technology for installing a wooden floor, because otherwise the structure will turn out to be unreliable. The entire pie should ideally rest on brick or concrete supports, with a small ventilated area between the soil and the wood floor. The vapor barrier should be installed immediately during the construction of the house; there is no need to postpone this stage “for later”.
Vapor barrier will reliably protect against moisture and condensation
Preparations before laying the vapor barrier membrane are as follows. To begin with, all wooden parts of the floor pie are treated with a special protective compound, which will allow the tree to acquire immunity to rot and fungus for the longest possible period. Particular attention should be paid to wooden joists and the rough floor, on which the membrane material will be laid.
Connecting tape (adhesive tape) Izospan FL
Vapor barrier of a wooden or concrete floor consists of three important stages: preparation of the surface before installation, installation of the material and its final fixation. There is no need to confuse the installation of vapor and waterproofing. The second is performed according to a similar algorithm, but its installation should be performed before installing the log.
If you are laying a vapor barrier layer when installing the floor in a newly built building, then the preparatory measures are limited to treating the subfloor joists with a compound that prevents them from rotting. If you are renovating the home where you live, you will have to do a lot more work on preparation.
Vapor barrier is laid on the subfloor joists
To do this, it is necessary to repair the existing screed. Any large cracks and holes in it must be filled with cement mortar. If the screed cannot be repaired, then you need to make it again. If there are small cracks in the screed, then there is no need to fill them with mortar. Immediately apply a waterproofing mixture on top of it, after which you need to wait for it to dry completely.
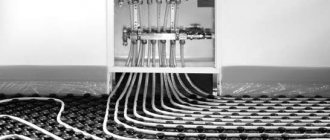
The vapor barrier of the subfloor is laid along the joists, so there is no need to make markings. Thus, the subfloor design must include insulation, joists and vapor barrier material.
Usually, on the first floor of a wooden house, the floors are laid directly on the ground. As a rule, a rather primitive design is used, which involves laying a subfloor, joists, heat, hydro, vapor barriers, a finished floor and the floor covering itself. The entire structure rests on supporting pillars made of concrete, stone or brick.
The space between the ground and the wooden floor, otherwise called the underground, must be equipped with its own ventilation. As a rule, vapor barrier of the floor in a wooden house must be done during the construction process. Obviously, after long-term operation it is necessary to do a major overhaul, during which it will be necessary to rebuild the vapor barrier, the installation of which must begin with preparation.
When building a new house, there are much fewer problems due to the fact that the treatment of wooden boards with compounds against pests, fungi and rot can be done even before installation. This primarily applies to the subfloor, since it is located in close proximity to the ground. After processing the subfloor, you can begin laying vapor and thermal insulation, and then installing joists.
When installing insulation in the case of a finished wooden floor, proceed as follows. First of all, you will have to remove the covering, disassemble the finished floor and remove the remaining thermal insulation, then check the condition of the joists and subfloor, assessing the condition of the wood.
We invite you to familiarize yourself with the heated swimming pool, buy polypropylene Moscow price
When laying a vapor barrier, no special skills or special tools are required, you just need to follow a certain procedure. Typically, film materials are used for vapor barriers, one of the most common of which is Izospan.
It should be laid on the supporting frame of the subfloor, at this point it is necessary to ensure that the laying is carried out with an overlap of at least 0.15-0.20 m wide. Galvanized nails can be used as fastening or a construction stapler can be used.
The main advantage of the tape is the creation of a solid coating without joints and cracks
A layer of insulation must be laid on top of the vapor barrier, which can be polystyrene foam, mineral wool, polystyrene foam or other heat-insulating material. It is necessary to ensure a good fit of the insulation to the joists; a layer of vapor barrier must again be laid on top of the insulation, ensuring overlapping laying. Upon completion of the work, the joints should be glued again, after which you can begin installing the finished floor, and then the floor covering.
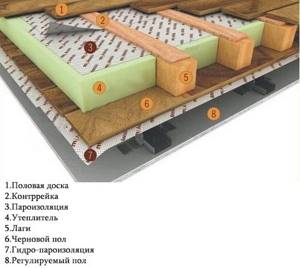
Vapor barrier installation diagram: 1. Floor 2. Izospan vapor barrier 3. Insulation 4. Counter lath 5. Beam 6. Subfloor 7. Izospan D hydro-vapor barrier
For reliable and durable operation of a wooden floor, it is necessary to properly protect it from the effects of various negative factors. First of all, this relates to high levels of humidity, which is one of the main enemies of wood. Modern advanced technologies, as well as highly effective hydro and vapor barrier materials, make it possible to ensure the longevity of any wooden structure.
When using foil insulation, it should be noted that installation should be done with the metallized side facing up so that heat is reflected into the room. The flooring should not be overlapped, but joint to joint. Upon completion of work, all joints should be taped with aluminum tape.
Work begins with chalking the starting markings, according to the chosen direction of the stripes.
If the material is laid as a flooring, then special fastening screws are used, or the covering is not fixed to the floor at all
| Flooring | Permissible percentage of residual humidity for floors without heating | Permissible percentage of residual humidity for heated floors |
| Laminate, parquet, parquet board | Up to 2% | Up to 1.5% |
| Plastic panels, linoleum | Up to 3.4% | Up to 1.5% |
| Carpet on a moisture-proof basis | Until 3% | Up to 1.5% |
| Jute backed carpet | Up to 2.5% | Up to 1.5% |
When gluing waterproofing coatings to the floor, adhesive mixtures and mastics on a polymer-bitumen basis are used, although most often the sticky layer is already applied to one of the surfaces of the insulate, which significantly reduces the work time. If the manufacturer does not provide an adhesive layer on the coating, then the required area of the floor and the edges of the panel are treated with mastic heated to a temperature 20-25 °C higher than the room temperature, after which the material is laid on the base and rolled out with pressure rollers. The joints of adjacent strips are additionally glued with mastic.
Ruberoid is the most common waterproofing option
When laying panels using the fusing method, you should try to maintain a burner flame temperature of about 145-160 °C, which ensures optimal adhesion of the coating to the base. Deviation from the recommended range by even a few degrees can subsequently lead to detachment. When installing the covering using a gas burner, the unrolled material and the floor are gradually heated, and the canvas itself is fixed to the floor. Upon completion of installation, the joints are heated with a burner and pressed to the base.
Fusing waterproofing
The waterproofing is rolled out along the “circle”, extending 5-7 cm onto the wall.

If during rolling the roll “goes to the side”, forming waves, then it needs to be cut and, having aligned the direction, continue working with an interception of 25 cm along the cutting line.
Experts recommend rolling out at least two layers of waterproofing coating on the floor, preferably changing the direction of placement of the sheets (one layer perpendicular to the other), waiting for the previous one to be completely fixed.
Laying a layer of vapor barrier in a private wooden house is a very simple process. The installation of protective material can be done by hand, the main thing is to follow the correct procedure and take into account all the nuances. The vapor barrier is installed on the subfloor in one layer. All joints that are formed during the process must be covered with a special construction tape, this will ensure a high level of reliability and, accordingly, quality. You can overlap the material.
To make the fastening even more reliable, in addition to tape, experts recommend using nails or a stapler with medium staples. Correctly installing a vapor barrier means following this procedure:
- be sure to prepare the subfloor - to do this, treat all the material with an antiseptic;
- lay the vapor barrier layer - the roll is laid on the frame, individual sheets are mounted overlapping;
- secure the material around the perimeter, carefully close all joints and gaps;
- then we move on to installing insulation;
- after the insulation has been laid, it is better to install another layer of vapor barrier;
- at the end the finishing floor is laid.
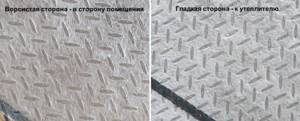
Which side to lay the vapor barrier
When installing a vapor barrier, it is necessary to strictly adhere to the technology, otherwise the system will not function effectively. And here one of the important points is which side the vapor barrier sheet will be laid in relation to the insulation.
Which side to lay the vapor barrier
Not all manufacturers indicate this on the film or indicate this in the instructions, so you should adhere to the basic rules for installing vapor barriers:
- The smooth side of the double-sided film is always placed on the insulation, and the rough side is on the outside. The fleecy surface absorbs and retains steam and moisture well inside, preventing it from passing to the heat insulator.
- Single-sided laminated polypropylene film is also laid with the smooth side inward and the woven side outward.
- Films with foil coating are placed with the aluminum side facing the room.
- When rolling out any rolled vapor barrier, the outer part is inside the roll, and the inner part is on top.
- If the two sides of the film are different colors, the outer surface will be the one that is darker.
- Conventional polyethylene films have two identical surfaces, so they can be laid on either side.
Choosing a vapor barrier
In the process of arranging floors and other enclosing structures of a wooden house, it is necessary to select and buy one or another type of vapor barrier film. Considering the variety of types and offers on the market, a logical question arises: “which vapor barrier is better?” The answer to this cannot be unambiguous, since the correct choice is made only based on compliance with the following requirements:
- Firstly, the technical characteristics of the vapor barrier itself.
- Secondly, the operational characteristics of the room or fence where the vapor barrier will be installed, and their compliance with the previous paragraph.
- Thirdly, the cost of the film itself.
- Fourthly, the volume and price of installation work (it was previously mentioned that polyethylene/propylene films, according to the manual, require a ventilation gap, which complicates the installation of a wooden floor).
Practical installation recommendations
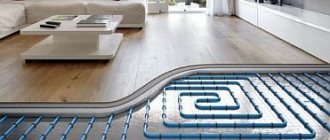
It is better to lay the floor on transverse beams - logs. In this case, the ceiling itself will have a spherical structure - a kind of motley “Napoleon pie”. The layer diagram looks like this:
1. Logs and cranial bars. The former are used as support and fastening beams for the main covering, as well as providing the required rigidity. The second is laid on both sides of each joist to ensure clearance of the subfloor boards or slabs from the ground/foundation.
2. Primary floor layer. Placed on the previously mentioned bars. It can be organized from boards or slabs (for example, OSB).
3. Waterproofing. The first barrier layer that prevents water from penetrating into the “pie” from below. The individual elements of the roll are laid with an overlap (150–200 mm), and the connection is made using double-sided tape.
4. Insulation. The most commonly used materials are mineral wool, fiberglass or polystyrene foam of the required thickness. Individual sheets are placed in such a way that there is no gap left between them and the joists.
5. Vapor barrier. The installation principle is the same as in the case of a hydraulic barrier.
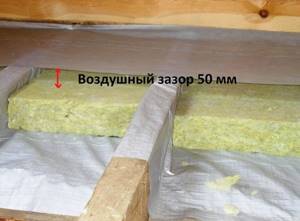
6. Counter rails. Longitudinal wooden blocks 10–20 mm high, which provide a guaranteed ventilation gap. If a diffuse membrane film is used as the latter, then they do not need to be installed.
7. Wooden floor. This stage can be final or intermediate, if, for example, laying laminate flooring is planned.
Prices
The price of vapor barrier on the Russian market depends on its type, characteristics and regional features/rates:
| Manufacturer/region | Brand | Barrier type | Price, rubles |
| AMK-GROUP, Novosibirsk | TYVEK AIRGUARD REFLECTIVE | Membrane | 11 860 |
| ISOFLEX SOUTH, Sochi | NANOIZOL V | 1 000 | |
| KREPEZhCITY, Kazan | ONDUTIS R TERMO 25 | Reflective | 600 |
| LTK, St. Petersburg | MEGAIZOL V | Laminated polypropylene | 770 |
| GRATA, Kazan | ISOVEK AT 70 | 720 | |
| MTK, Novosibirsk | ROKWOOL | 920 | |
| RSL-INVEST, Novosibirsk | ISOSPAN V | Rough polypropylene | 1 000 |
Vapor barrier layout diagram
Vapor barrier layout diagram
The main function of the vapor barrier film is to protect the wooden floor of the log house and insulation from the penetration of steam and condensation. In this regard, the vapor barrier must be located between the insulation layer and the finished floor.
As a rule, two layers of vapor barrier are laid, the second layer is placed between the heat insulator and the subfloor. The bottom layer prevents moisture from the soil from penetrating into the structure. Often, instead of a second layer of vapor barrier, a waterproofing film is laid.
A lower vapor barrier must be done when the subfloor is located in close proximity to the ground or is located above a damp basement.
Recommendations from experts
High-quality vapor barrier is twisted in such a way that when unwinding it is laid with the desired side to the insulation
To summarize, the main recommendations can be identified:
- It is recommended to use materials from trusted manufacturers.
- You should not skimp on vapor barrier material. The correct operation and durability of the entire floor structure depends on its quality.
- A mandatory step is to seal all overlaps, tears and other damage to the film.
- It is necessary to install a ventilation gap between the vapor barrier and the finishing material.
- The use of a vapor barrier with an aluminum layer will help retain heat in the house.
- The functional use of any vapor barrier is possible only in combination with a good superdiffusion membrane, which ensures the removal of moisture from the insulation if it does penetrate there.
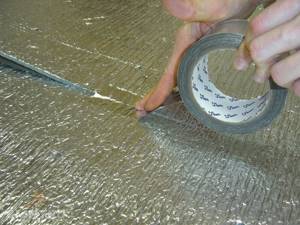
When using foil vapor barrier, it is recommended to glue the joints with the same tape
It is worth remembering that not a single film, even the most expensive and high-quality one, will work correctly if the house does not have high-quality ventilation - only its presence will ensure comfortable, healthy microclimatic conditions in residential premises.
Prices for vapor barrier "Izovek V"
Izovek B Vapor barrier
Materials and tools for work
In addition to the vapor barrier film, the following materials will be needed to install a vapor barrier:
- double-sided adhesive tape for fixing the film;
- insulation, usually mineral wool is used for wooden floors;
- wooden slats for mounting the counter-lattice on top of the film;
- self-tapping screws for fastening the slats.
To perform the work you will also need tools:
- screwdriver for flooring and installation of sheathing;
- construction stapler for securing film.
Video description
This video explains in detail which side to lay the film on. General tips for installing it are also given:
As mentioned above, the overlap should in any case be at least 15 cm. Sealants and glue should never be used: diffusion film, as well as alternative materials, contains acrylic components. They are destroyed when using glue.
However, tape is acceptable for use. It not only glues parts of the film, but also eliminates defects that appeared during its installation.
There has long been a debate among repairmen about whether it is worth installing a vapor barrier. Some argue that this should never be done - if it does not sag, the degree of steam evaporation will drop many times. For others, on the contrary, it seems that tensioning the vapor barrier is a necessity. As they say, sagging film deteriorates very quickly.
General advice on how to properly install a vapor barrier ends here. During operation, some other nuances may arise, but their number is small.
As well as their degree of importance
Instructions for laying vapor barrier on the floor
Surface preparation
Before laying a vapor barrier on the floor, all wooden structural elements (joists, boards, bars) must be treated with antiseptic agents that will protect the wood from rotting.
If a vapor barrier is laid on an existing floor, you must first remove the finished floor boards and also remove all layers of previously made heat and vapor barrier. Then they remove debris, dirt and dust, carry out an antiseptic treatment of the wooden parts of the subfloor and install them in place.
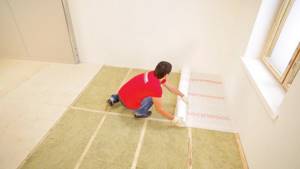
Laying vapor barrier
Laying vapor barrier
The vapor barrier is placed in the gap between the joists. Before laying, the film must be cut into pieces so that it completely covers the vertical surfaces of the beam.
- The material is secured using a stapler in vertical sections in increments of 30-40 cm.
- Mineral wool or other selected insulation is laid on top of the film on the floor. We place the material very tightly so that there are no gaps between the slabs and at the junctions with the joists. The width of the insulation should be 20-50 mm less than the height of the log. This creates a ventilation gap between the heat insulator and the vapor barrier film.
- Double-sided tape is glued along the entire perimeter at a height of 2-3 cm from the floor. The protective layer is removed only from the side on which it is glued to the wall.
- A vapor barrier film is laid on top of the insulation. It is necessary that the pieces of material are approximately 5-6 cm larger than the space they cover.
- The top layer of vapor barrier must be laid across the joists. The edge of the film is fixed to the wall with tape, and the protective layer is removed from it.
- The film is stapled to the joists; it should sag slightly between the beams.
- The second sheet of vapor barrier is laid overlappingly on top of the laid film and glued with double-sided tape. All other sheets are laid similarly.
A counter-lattice is mounted on top of the vapor barrier, on which the finished floor is then laid.
By consistently following the instructions, you can install a vapor barrier yourself, but there are a number of nuances in this work that are known only to professionals.
carries out work on internal and external thermal insulation and vapor barrier of wooden houses. We accept applications from residents of Moscow and the region. The quality of our work has been tested over the years and is confirmed by positive customer reviews.
We are always in touch and waiting for your messages and calls, you will find our contact information on the “Contacts” page.
Calculate the cost of painting and insulating your home right now
Select types of work:
Select materials:
Options for fixing film for vapor insulation
You can record the material like this:
- using a stapler for construction;
- using special tape or adhesive tape.
Often these two options are combined. Most adhesive tapes are made from virtually the same components as vapor insulation. Reinforcement occurs using spunbond technology, since it is believed that the material will be under constant load.
Secure the vapor barrier material with a stapler or special adhesive tape
Let's look at the types of adhesives used for the types of membranes under consideration.
There are several types of adhesive tapes for different types of materials
Characteristics of Izospan
It belongs to the group of construction films designed to protect against moisture. Such a membrane for the floor in a wooden house will serve as waterproofing for the floor, as well as a vapor barrier material. This will stop the processes of rotting and corrosion in the structure of the wood and thus significantly extend the service life of the base of the wooden structure.
Here are some advantages of this material:
- High strength.
- Absolute water repellency, which is not lost over time.
- Possibility of use both at low temperatures (-60ºС) and at high (+80ºС).
- Easy to install.
- Long service life (50 years warranty).
- Environmentally friendly.
- Protection from dampness and fungus.
- Acceptable price.
The disadvantages include:
- Low fire resistance.
- You need to be careful during installation, as due to inaccurate and sudden movements, the membrane may break.
Video description
This video explains why a vapor barrier is needed and how to determine the external and internal sides. General installation tips are provided:
Advice from professionals
To avoid “excruciating pain” for wasted effort and money, professionals advise adhering to the following simple rules:
- when starting to implement a construction project, carefully read its graphic part and explanatory note;
- do not hesitate to ask questions to the designers, foreman and workers at all stages of work, be meticulous until the situation is completely clarified, remembering that they will go to the next projects, and you will live here;
- do not oppress the contractor with petty quibbles, but strictly control each stage of the work, sign acceptance certificates only after all comments have been eliminated.
The given “professional advice” is universal in nature and applies not only to laying vapor barriers on the floor, but also to all types and stages of construction work.