Creating an optimal ambient temperature for living is simply necessary for comfortable living in the house. Today there are many ways to heat a living space.
One of the most effective and economical installations is the installation of a wall-mounted gas boiler. Gas heating will significantly save the family budget. Its installation will not require much labor or special equipment, and the use of such equipment does not cause any great difficulties.
Is it possible to install the equipment yourself?
Installing a wall-mounted gas boiler is not the easiest task. The safety of the residents of the house directly depends on the correctness and quality of the settings. Therefore, the requirements for the installation of a gas heat generator are regulated by strict standards, in accordance with the legislative framework of Russia.
As a result, installing a wall-mounted gas boiler is a very difficult task, and often beyond the capabilities of a beginner. Special knowledge is required on how to properly install and connect the equipment so that it works properly and is safe.
Selection and equipment of premises for installation
In many ways, the choice of equipment and accessories depends on SNiP 42-01-2002 “Gas distribution systems”. This significantly narrows the range of choices, since a particular boiler may not be suitable for the selected room due to a discrepancy between the area and specific power.
IMPORTANT! SNiPs are regularly updated, and current laws amend them. It is necessary to check the legal framework immediately before installation.
Previously, for example, it was impossible to install a boiler in the basement of a house, but now it is possible if the house is single-family.
General requirements:
- The room should be well ventilated;
- The room should have window openings;
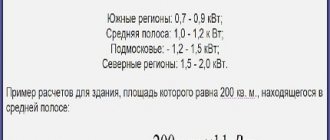
- The larger the boiler power, the larger the area.
Initial work
Before starting repair work to put the equipment into operation, it is necessary to collect a number of documents allowing such work to be carried out:
- Contract for gas supply at home.
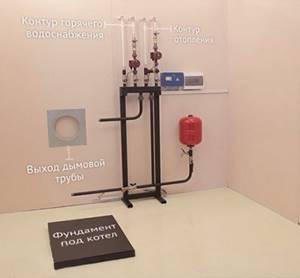
- A diagram of the heating system and technical specifications with equipment settings, approved by the relevant authorities.
- Official consent of the gas inspector to carry out the work.
It often happens that setting up a gas boiler in a private house takes less time and effort than preparing documentation and putting it into operation.
Floor-standing
In order to save money, the owners themselves are trying to figure out how to install a floor-standing gas heating boiler in a one-story wooden house. Basic requirements include the following points:
- Strengthening the place where the boiler will be located. It is best to make a screed or carefully lay concrete slabs.
- A gap of at least 15 cm is left between the boiler and the wall surface.
- If the base of the house is not fireproof, then additional cladding with metal sheets is necessary. It is best to insulate the walls with roofing steel, which is laid on an asbestos sheet at least 30 mm wide.
- Using a building level, the condition of the floor is assessed, since the surface under the boiler must be perfectly flat.
- Connecting the chimney is prohibited without first checking the draft.
- Filters are installed that do not trap debris at the entrance to the heat exchanger.
- At the final stage, the prepared double-circuit boiler is connected to the water pipes.
The video provides up-to-date information about installing the boiler:
Step-by-step installation of equipment
Before starting installation work, you should remove all packaging elements and check that the unit is complete. The presence of all necessary parts can be checked according to the list in the attached operating instructions.
If any elements are missing, you should immediately replace the heat generator from the supplier.
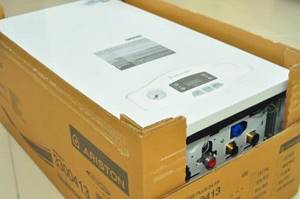
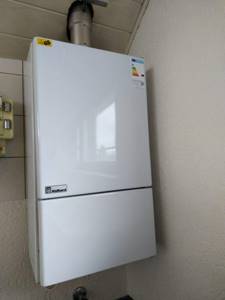
Photo from source https://avtovelomoto.by
- Carefully inspect the appearance of the boiler itself, as well as each element for installing the system. There should be no dents or signs of ongoing repair work on the equipment.
- Check all the performance characteristics specified in the data sheet with those on the unit itself.
- Before installation, it is worth flushing all existing pipes, since debris, dust or packaging elements may remain in them. Heating lines should also be cleaned.
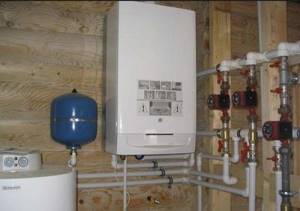
To install a wall-mounted boiler in a wooden house, double-circuit appliances with a closed heating system are most often used. Therefore, it is worth describing in detail the installation work of just such equipment.
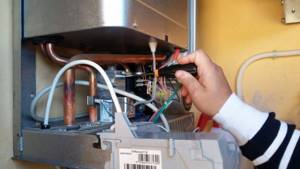
Stage 1. Installation of the wall mounting system
To properly hang the unit on the wall, you must use special brackets. They must support the weight of the boiler and its equipment, and, at the same time, keep it in one level position, avoiding tilts and distortions. Usually they are already included with the heating heat generator. Fasteners for strengthening them must be selected in accordance with the characteristics of the wall material.
Special markings must be applied to the wall, which will indicate the exact location of each element of heating equipment. This is done using a special paper stencil, which should be included with the equipment. It will help you mark the exact locations for the holes for the fasteners.
After the brackets are securely fastened to the wall, the boiler itself can be hung on them. For heating, in addition to the gas boiler itself, you will need to install pipes for supplying coolant.
Stage 2. Installation of pipes for the heating system
Since the heating system may vary, the number of connected pipes may vary. But, in any case, you first need to remove the plugs from the heating pipes.
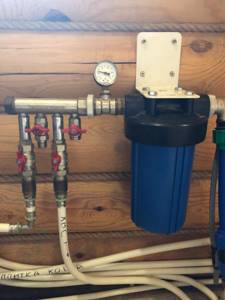
To protect the boiler from dirt particles getting inside along with the water coming from the well (from the central water supply), it is worth connecting the return inlet with a strainer. If the tap water is too hard, you need to consider additional equipment to prevent scale from accumulating on the walls of the heating system. Otherwise, the heating boiler will serve for a much shorter period.
All connections must be made in strict accordance with all rules and regulations. It is imperative to reliably seal each fastener, not only for safety, but also to save gas. The sealant can be paint, tow, or modern materials for sealing threads.
Experts also advise installing shut-off valves, both on the supply and return side.
This will greatly simplify equipment repair if any malfunction occurs. Also, the presence of taps will help correct the airing of radiator batteries.
Stage 3. Connection to the water circuit
Work on connecting water is the same as when installing heating pipes. They differ only in the diameter of the pipes and the use of taps.
The cold water supply must be equipped with a filter to prevent excess particles from entering the heat generator, which can damage all equipment.
Stage 4. Launch of the gas pipeline
The launch of a wall-mounted heat generator can only be carried out by an inspector from a gas supply organization with permission, because any mistake at this stage can turn out to be very disastrous. Before setting up the gas line and putting the boiler into operation, the correct connection is checked again by a specialist.
Before starting the boiler, he will make sure that the installation standards for the gas boiler are met. The first launch is also carried out with it.
Stage 5. Connecting to the electricity network
This is only relevant for units with a closed chamber, since they run on electricity. Usually a standard three-wire circuit is sufficient. Experts advise connecting the boiler to electricity only with the help of a stabilizer, which will protect the system from power surges and will not allow the equipment to fail.
We recommend: How to choose a stabilizer and what it is needed for
Stage 6. Connection to the chimney
It is quite simple to connect equipment with a closed combustion chamber to the chimney. For this purpose, special coaxial pipes are prepared. If the boiler is installed in an apartment building, it must be connected to a common chimney.
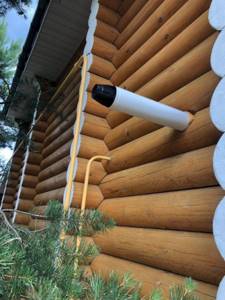
When installing an open gas boiler in a private house, it is necessary to have an individual chimney. The device is connected to it using a pipe of a certain cross-section. If the chimney has been previously used, it must be thoroughly cleaned of soot and possible debris. The pipe should be installed at a slight angle towards the boiler.
Where to start the installation?
- First you need to mark the installation location on the wall or on the floor, depending on the type of boiler.
- Check whether there are enough parts and other auxiliary elements. In general, we mentally install the boiler at its future place of operation.
- View installation instructions.
IMPORTANT! Alone, you can only install a small-sized or floor-standing boiler (and even then not always). In most cases, you will need the help of one or two people.
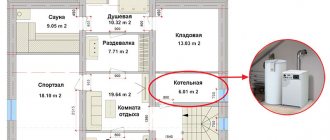
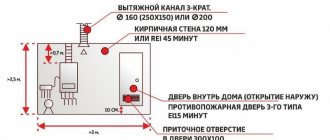
Premises requirements
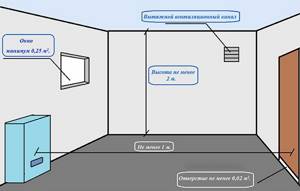
The size of the installation room depends on the power of the boiler. The minimum area is 4 square meters, and the ceiling height is 2-2.5 meters.
- The doorway is at least 80 centimeters wide.
- Windows are a must. The minimum requirement for a 4 square room is a small window measuring 0.15 square meters.
- For every kilowatt of device power there should be 8 cubic centimeters of ventilation.
- Gas pipes must be metal, no other material is allowed.
- The diameter of the chimney should depend on the power. The minimum diameter is 13 cm, and it should not taper towards the top and should protrude above the roof surface by at least half a meter.
There should be gas sensors , and a gas stop valve on the boiler itself.
- The boiler must be equipped with a fuel flow sensor.
- In an apartment building, you can install the boiler everywhere except the basement, and in a single-apartment building it is recommended to install it in the basement.
- The boiler power supply (for autonomous boilers) and the electricity supply system must have thermal insulation and electrical insulation screens.
How to install equipment correctly
Strictly follow all the rules and regulations of SNiP 42-01-2002 “Gas distribution systems” without deviating from them.

Any attempt to improvise or change classical technology may be noticed by inspectors.
And if this causes an accident or losses to other residents of the house, the owner faces administrative, and, in some cases, criminal penalties.
- If the boiler is wall-mounted, the floor under it must be perfectly level , since the pump pumping water can cause vibration and displacement of the boiler. If the vibration is strong, the gas pipes or water supply system may become disconnected from the boiler, leading to a gas leak or flood.
- If it is possible to make a stand for the boiler, this will secure the structure and increase the adhesion strength to the floor.
- If you install the boiler near a stove, boiler or other heating elements, then the total power of the thermal field between them will be higher than what the sensors show, since they measure this only inside the system itself. This rule is not specified in SNiP, but is often the cause of premature wear of the mechanism or failure.
Documentation
Required documents:
- A summary of the fuel consumption of a specific device. This can be done both by the workers who install the boiler and by the owner-installer himself. The technical data sheet of the device must indicate data on the consumption of electricity, gas and water. Within 14 days, a gas service employee must issue preliminary consent to install the unit.
- Installation project , which indicates all the installation points and steps, a diagram for connecting communications and the chimney outlet.
- Technical specifications , which indicate data on the installation and conduct of communications to the boiler.
- Device certificate , reviewed and certified by gas workers. Certificate of standardization of the boiler.
Once the project has been approved, installation can begin. Professionals typically maintain an installation protocol that outlines basic steps to protect themselves in the event of equipment failure or an accident that results in damages.
The protocol is signed by the customer (boiler owner). If you are installing it yourself , the protocol should indicate the main steps specified in the instructions for the boiler. If an accident occurs during installation or the boiler does not function properly, the protocol will serve as legal protection .
ATTENTION! In the case when the installation is carried out by specialists, and the protocol is signed by the customer, it has legal force, and if the installation is performed by the customer himself, the protocol is a regular description of the actions.
Placement of the heat generator, room requirements
For the room in which gas equipment will be located, there are strict requirements :
- It is not permitted to install a gas-fired heating unit in the bathroom or living area of the house. It is allowed to place the equipment in the kitchen or other non-residential premises. Installation on any floor of the building is allowed. But an external extension or even a separate boiler room is best suited for gas equipment.
- It is allowed to install a heating system only in rooms with a ceiling height of at least two meters and an area of at least 7.5 sq.m.
- Be sure to have windows facing the street.
- It is necessary to consider the supply and exhaust ventilation of the room. If the heat generator is installed in the kitchen, then a window for ventilation is suitable.
- The panel of the suspended boiler must be located at a distance of at least 125 cm from walls or other objects.
- In the kitchen it is allowed to install a gas unit with a power of up to 60 kW, in extensions and corridors - up to 150 kW. There is no maximum power for an outdoor boiler room.
Grounding of gas boilers
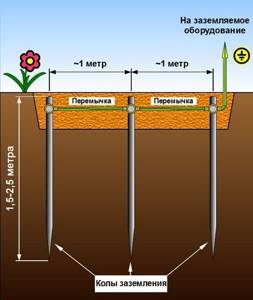
How to make grounding:
- You need to take as a basis a contour in the shape of an isosceles triangle made of 3 metal rods 3 meters long.
- The conductors need to be connected.
- Using an ohmmeter, measure the resistance inside the circuit (should be a value close to 4 ohms). If the value is higher, you can add another element to the contour.
- You need to continue until the port value is as close as possible to 4 ohms.
For grounding, rods and tubes are used, which are connected by metal strips. They are installed vertically in the ground so that the system works even in winter. It is recommended to coat metal elements with an anti-corrosion solution.
Norms and rules for installing a wall-mounted gas boiler
Since any little things during the installation of a heating system can lead to serious consequences, the law prescribes strict rules for the installation of gas equipment. They relate to the location of the boiler indoors, the decoration of the walls and the installation of the heating system itself.
At what height should a gas boiler be hung on the wall?
There are also instructions on what height to hang a gas boiler on the wall. The minimum installation height for the boiler is 80 cm from the floor. The optimal height of the structure is 1 - 1.2 m above the floor surface.

Fire safety when installing a mounted boiler
Installation of a wall-mounted gas boiler in a wooden house requires compliance with strict fire safety rules:
It is prohibited to install a gas system with an open combustion chamber in the basement of a house.
- Closed heat generators can be installed in any non-residential room of the house.
- To install a boiler in an attic, good thermal insulation is necessary.
- The boiler room must be fenced with fireproof partitions.
- Doors must open outwards.
- It is advisable to equip the premises with a fire alarm.
How and with what to finish the walls behind a gas boiler
All surfaces, including the floor, ceiling and walls, must be lined with non-combustible materials. These can be asbestos slabs covered with stainless or galvanized steel. The same rules apply to floor-standing heat generators.
In a wooden house, the wall must be covered with a basalt seal, the thickness of which must be at least 50 mm. From the outside, such insulation is covered with steel sheets.
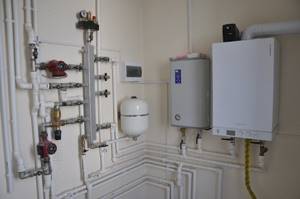
Where to put
It is allowed to install a wall-mounted gas boiler in non-residential rooms of the house or in a separate boiler room. Usually a corridor or kitchen is chosen for this. Only a heat generator with a closed combustion chamber can be installed in the basement.
The safest option is to install a gas wall-mounted boiler in an extension or a separate boiler room.
Requirements for kitchens in which a gas-fired boiler is installed
If the boiler is installed in the kitchen, then a prerequisite is the presence of a large window facing the street, as well as a ventilation system.
The area of the room must exceed 7.5 sq.m. The kitchen should not be used as a living room. A door is required.
The boiler can be mounted in a special box, which will be disguised as one of the cabinets. But this option is not possible in all cases. Another installation option is to decorate the boiler with a decorative panel made of non-combustible materials.
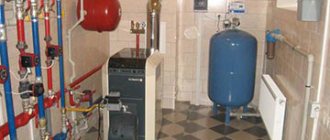
How to attach boiler rooms
Attached boiler rooms are usually located in an isolated room in a separate extension to the house or even stand-alone. This option for arranging gas equipment is the safest. In addition, in a separate extension it is allowed to install a boiler of any power, while inside a residential building the power of gas equipment is strictly limited.
A separate boiler room is connected to the living quarters using utilities. They are connected to heating mains, gas and water supply, and electricity.
Read more: Outdoor gas boilers, installation requirements
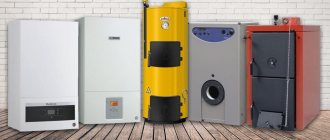
Types of wall devices
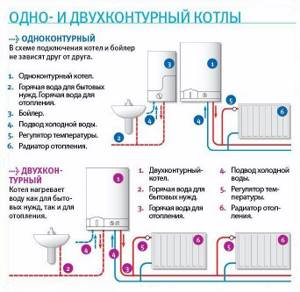
According to their functional purpose, gas heating units are divided into two groups:
- Single-circuit. Intended for heating only. They are connected to the heating circuit and heat the coolant. The organization of hot water supply in this case is carried out by installing an electric or gas water heater of any type.
- Dual-circuit. They heat the room and provide hot water. An additional circuit for heating water is built into the boiler. The technological feature of the device is that it is impossible to simultaneously heat water and heat the room.
The priority action of dual-circuit units is to heat the water; heating operation stops at this time. Considering that water can be heated quickly, the boiler heats the building quite effectively.
If the tasks of the gas unit are planned to include both heating the coolant and supplying hot water, then it is better to purchase a double-circuit boiler. They come with one or two heat exchangers. When equipped with two, two circuits can be served simultaneously
According to the method of fuel combustion, all devices are divided into the following two groups.
Group #1 - devices with an open combustion chamber
Such devices are also called natural draft heating devices. They take the oxygen necessary for combustion from the room in which the device is located.
To remove combustion products, they need a traditional type chimney. Thus, a mandatory requirement for installing such a boiler is the provision of good ventilation.
If the heating device is installed in a residential area, it must be equipped with high-performance supply ventilation.
The best option for installing a heating device with an open firebox is the presence of a separate room, the so-called firebox, where it is placed.
Systems with natural ventilation are quite popular due to their low cost and energy independence.
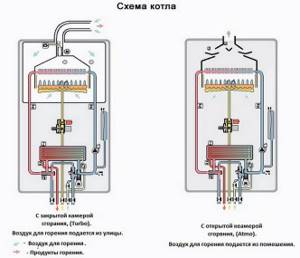
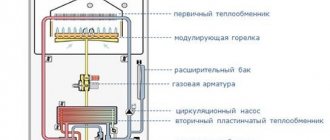
The figure schematically shows boilers with open and closed type burners
Group #2 - devices with a closed combustion chamber
Turbocharged devices are equipped with a closed combustion chamber. They take the air, without which the combustion process is impossible, from the street. For this purpose, the devices are equipped with coaxial type chimneys.
Such a chimney is made in the form of a structure of two pipes, one of which is nested inside the other. The combustion products are discharged outside through the inner pipe.
At the same time, street air flows in the opposite direction through the gap between the two pipes. It is clear that boilers with a closed firebox do not in any way affect the composition of the indoor air, which makes it possible to install them even in living rooms.
In this case, it is necessary to equip a coaxial chimney system, which is higher cost and more complex installation compared to a separate traditional chimney.