An electric boiler is an effective solution to the problem of hot water supply for a private home. Such equipment, however, like any other, periodically breaks down.
If you wish, you can repair the water heater yourself, provided that the breakdown is simple. But serious damage will have to be repaired at a service center.
In this article, we will analyze common types of breakdowns and provide recommendations for eliminating them, which will allow any more or less experienced technician to cope with the repair.
Operating principle of a water heater
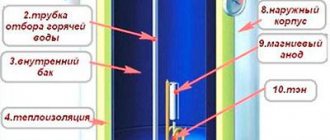
To minimize problems with the device, you should study its structure and operating principles. Typically, private households use storage models rather than flow-through ones, which allow them to use electricity more efficiently. Such a device consists of a heat exchanger tank, inside of which a heating element is installed - a heating element, connected to the power supply.
An important part of the device is the thermostat. This element allows you to maintain a constant temperature of the water inside the storage tank. Water flows through pipes into the heat exchanger. If its temperature is too low (and this is usually the case), then the thermostat sends a signal and turns on the heating element.
The water is heated until it reaches the required temperature. After this, the thermostat operates again and turns off the heating element. Hot water is taken from the tank and replaced with cold water, the heating process is repeated again and again. This is a general diagram of the design and operation of a conventional storage water heater.
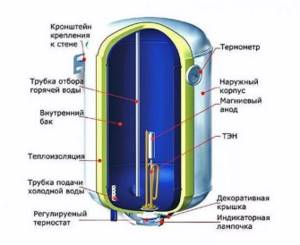
The design of a storage water heater is not too complicated. The most vulnerable elements of such a device are the tank, heating element, thermal relay and gasket
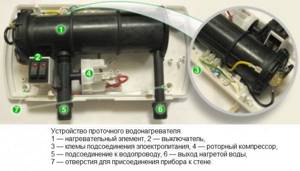
Also popular among consumers are instantaneous water heaters, which are available on the market in a wide range. Such models are arranged somewhat differently. They heat not a static volume of water, but a flow. They use more powerful heating elements that start when the water is turned on and stop when it is turned off.
To study the operation and design of a particular model in more detail, you need to carefully read the technical documentation accompanying it.
The heater tank is a durable stainless steel container, one or two millimeters thick. No matter how resistant this material is to corrosion, these processes still periodically arise and develop, which leads to water leaking from the device. One of the common causes of such breakdowns is electrocorrosion.
Flow-through heaters usually break down for the same reasons as storage models. Diagnostics and repair of such devices are carried out using similar methods.
To prevent it, you need to regularly, i.e. annually replace the magnesium anode installed inside. This element is designed specifically to prevent electrocorrosion. Over time, it wears out, and storage tank owners neglect to replace this important part.
As a result, the tank, which has been serving well for some time, suddenly begins to leak. The incorrect condition of the magnesium anode can also affect the condition of the heating element. On the outside, the storage tank is usually enclosed in a metal or plastic housing, and it also has an insulating shell that prevents heat loss.

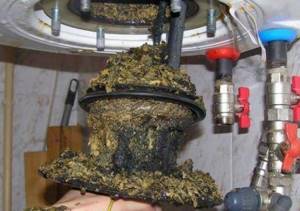
Regular cleaning of the insides and heating elements of the water heater from dirt and scale, as well as replacing the magnesium anode will reduce the likelihood of breakdowns
Damage to the outer shell and insulation occurs rarely, usually due to careless handling of the device. Cracks and chips on the body of the water heater may not disrupt its operation, but this will lead to a deterioration in the properties of the heat insulator and will negatively affect the functioning of the device as a whole.
Inlet and outlet pipes for cold water and outlet pipes for hot water usually do not cause any problems if the installation of a storage or flow-through heater is done correctly.
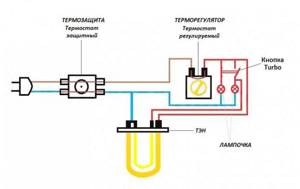
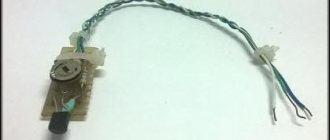
An electrical diagram of a household water heater will help you correctly repair it, which usually consists of replacing damaged elements
Typically, a water heater is equipped with two thermostats, one of which is designed to control the water temperature, and the second monitors the condition of the first device.
Sometimes a third thermostat is used, which determines the working condition of the heating element. In any case, a broken thermostat will have to be completely replaced. There are capillary, rod and electronic types of thermostats. Their design is different, but the principle of their operation is similar.
The insulating gasket not only serves to seal the connection between the elements of the water heater, it is also necessary as an electrical insulator. It is recommended to replace this element regularly during each maintenance of the water heater.
The thermostat shows to what temperature the water inside the device is heated. If this element breaks, the water heater will still perform its functions, although data on the degree of heating will not be received.
The main causes of leaks and methods for eliminating them
In the process of leaking the device, it is first necessary to establish the source of the negative factor. They can differ significantly in characteristics, so they can be identified quickly and without professional skills. It is best to study the water heater according to the instructions included with the unit. Most models have a warranty card designed for such situations. To avoid aggravating the problem, the device must not be opened.
Hull deformation
The outer shell of the equipment may become deformed after installation. The cause of the unfavorable behavior of the device is considered to be incorrect installation of the unit. Often the consumer forgets to connect the safety valve. The product is located on the main liquid supply between the shut-off valve and the valve element. This part is designed to protect the tank from overfilling; it is during this process that deformation occurs.
Often the consumer forgets to connect the safety valve
If the valve is installed, but water also flows through the supply pipe, this fuse should be removed and a new one installed. Repairs will not take much time and do not require professional knowledge of the device.
Another reason for deformation is the use of low-quality pipes during installation. Powerful hydraulic shock with pressure changes slowly destroys the structure of the product.
Healthy! If the body is deformed, the boiler cannot be repaired; it must be replaced with a new model, while observing the correct connection technology.
Manufacturing defects
The leakage may be from the top of the housing; if in this situation there are no visual deformations of the unit, and the magnesium rod was mounted during connection, then a manufacturing defect of the equipment is possible. During warranty service, it can be returned back to the supplier.
Modern models are designed with designs in which the tank cannot be repaired. The container cannot be welded, because during the welding process, a layer of enamel breaks off, after which corrosion forms, spreading over the entire surface of the device.
Spent heating element
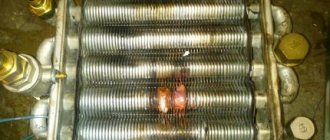
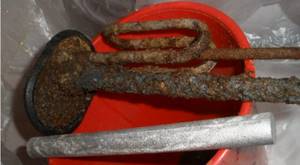
A leak may form under the tank cap, which indicates scale accumulation on the heating element. If this symptom is detected, it is necessary to replace this part with a new one. The purchase of a heating element should be similar to the outdated one; such a part can be purchased at a spare parts store for water heating devices. Before dismantling, you must thoroughly clean the inside of the device with a solution of vinegar and salt. This mixture quickly corrodes salt deposits without damaging the surface of the tank.
If there is scale on the heating element, the element must be replaced. Important! The heating element is replaced together with a special magnesium rod for long-term operation of the water heater
Poor installation of the device
Liquid leakage is possible from under the sealing ring of the heating element. To eliminate this problem, simply tighten the nuts more tightly. In some cases, leakage occurs under the mounting bolts of the heating element. It is impossible to eliminate this unpleasant factor; you will have to purchase a new unit, because the walls of the water heater will begin to warp during the welding process.
Leakage under the heating element mounting bolts requires installation of a new unit
Another reason that occurs quite often is a loose connection to the cold water inlet and hot water outlet pipes. Such signs may appear when installing the device yourself, when low-quality fittings or incorrect materials for seals are used.
Gasket wear
A leak in the inspection hole located in the plastic cover at the bottom of the equipment indicates a loss of elasticity of the rubber gasket on the flange. An accurate determination of this cause can be carried out after turning off the equipment: the lower cap is removed and the problem area is visually examined.
Replacement of the sealing gasket must be carried out strictly in accordance with the boiler model number, so that the product fits tightly to the working parts.
Replacement of the gasket must be carried out in accordance with the boiler model number
Common breakdowns and repair methods
Next, we will consider the most common problems with a water heater and provide repair methods for each of the breakdowns.
Problem #1 - heating element malfunction
Failure of the heating element is a typical problem for both instantaneous and storage water heaters. This element works under high load and therefore wears out quickly. If the power supply is connected, but the water in the tank does not heat up, most likely the problem has arisen with the heating element.
The heating element should be removed from the tank carefully, especially if a significant amount of scale has accumulated on its surface. Sudden movements can lead to deformation and breakage of some elements
First, you should check whether electricity is flowing to the heating element and thermostat. At the cable connection points, check the presence of voltage with a tester.
If there is no power, you may need to replace the cable itself or check to see if there is a power outage throughout the house.
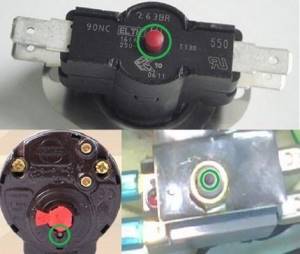
Regardless of the model type, each thermostat has a power button. When you press it, the device turns on, and when you turn it off, the button returns to its original position.
If there is electricity and the cable is working properly, then problems have arisen with the heating element, which will have to be replaced, or with the thermostat. To figure out what exactly is broken, you need to remove the thermostat and check it with a tester.
Testing the serviceability of the heating element is carried out as follows. First, the measuring scale of the device is set to 220-250 V. Then the resistance is measured at the terminals connecting the heating element to the electrical network.
If there is voltage, you should disconnect the heating element from the network and check the potential at the terminals of the heating element. The lack of response from the tester will indicate that the device is faulty. If there is a reaction, you need to continue the diagnosis.
First, disconnect the water heater from the power supply. Then the heating element is disconnected from the thermostat so that the contacts of the heating element remain uninsulated.
The contacts of the tester are applied to them and the reaction is observed. If it is, the heating element is working, but if not, the heating element needs to be replaced. In this case, it does not matter what numbers the tester produces, only the presence or absence of a reaction is important.
These fault detection methods are suitable for both storage electric water heaters and instantaneous models.
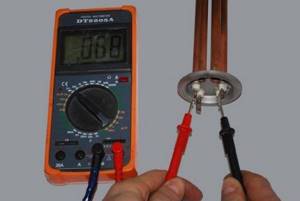
To determine the serviceability of the heating element and thermal relay, an electrical tester is used. Typically, the presence of voltage on the contacts indicates the serviceability of the element, and its absence indicates the need for repair
Problem #2 - thermostat failure
To check the serviceability of the thermostat removed from the water heater, you need to set the adjustment knob to maximum and take measurements at the inlet and outlet of the device. If the tester's needle remains calm, i.e. its position does not change, which means the thermostat is faulty and needs to be replaced.
If the arrow deviates, then you need to continue testing. Now you should set the thermostat to the minimum position and apply the tester's measuring probes to the contacts. It will not be easy to continue the diagnosis alone; you will have to fix the probes or ask someone to hold them for some time in the correct position.
After this, you need to take a lighter and heat the tip of the temperature sensor. If the thermal relay works, the circuit opens, and the resistance on the tester scale goes down sharply, then the thermal relay can also be considered working. If the system does not respond to heating, then this element is damaged and needs to be completely replaced.
Sometimes a water heater may stop working due to the safety valve tripping, causing the unit to dangerously overheat. It is enough to correctly adjust the operation of the device so that it starts working as usual.
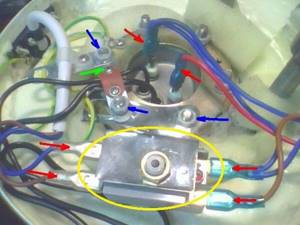
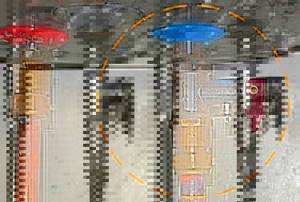
First you need to unfasten the fasteners of the heating elements and the thermostat (red arrows), then unscrew the screw (green arrow) and nuts (blue arrows. The thermostat is circled with a yellow line
Problem #3 - control board malfunction
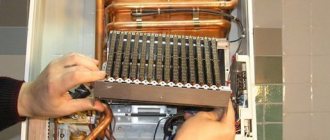
If the check shows that both the heating element and the thermostat are working, most likely the problem has arisen with the control board. It is almost impossible to repair such an element at home.
You will have to replace it with a new one, and you will have to use the help of a specialist who will help you set up the electronic equipment. Most often, you just need to contact a service center, where the required element will be selected and installed correctly.
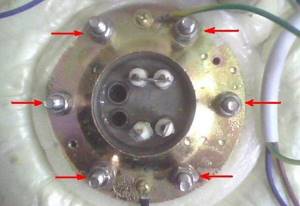
Typically, the heating element is secured with six bolts and nuts (marked with red indicators). When reassembling, it is recommended to tighten them evenly
Problem #4 - tank leaking
A tank leak is a serious problem that you cannot always fix on your own. In some models, either the tank or the entire heater will have to be replaced.
Sometimes the leak can be sealed, but care must be taken to restore the integrity of the outer casing and the thermal insulation layer. Usually such measures are insufficient and short-lived, and soon the leak will occur again.
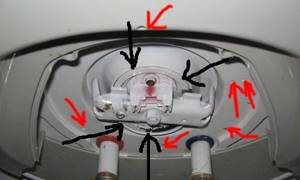
If water leaks from places marked with black indicators, it is likely that the gasket or heating element needs to be replaced; red indicators mark places of leaks if the internal tank is damaged
A water heater tank is most likely to leak if:
- damage to the internal tank has occurred;
- the heating element has deteriorated;
- the gasket has leaked.
If water flows at the place where the heating element is attached, it may not be necessary to repair the tank itself. A special gasket is installed in this place; a leak may be caused by its damage. The gasket is replaced and this solves the problem.
A leaking water heater tank is usually caused by neglect or late maintenance, which also includes replacing the magnesium anode. Another common problem is lack of grounding. This can also lead to the development of corrosion processes and leakage.

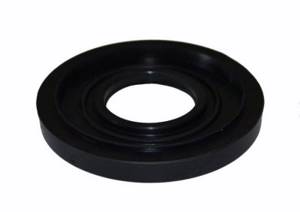
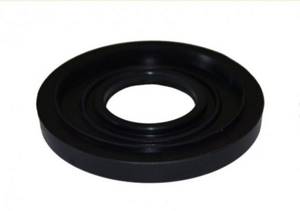
If it is necessary to replace the gasket, you should select a new one of exactly the same size and shape and made of suitable materials
If you need to replace a gasket or heating element, it is best to first dismantle the faulty element in order to take it with you and select an exact analogue. Purchasing parts by eye can lead to unnecessary expenses. Making such a replacement is relatively easy.
But if problems arise with the tank, you will have to at least contact a service center. You must immediately find documents for the water heater and clarify the warranty periods and service conditions.

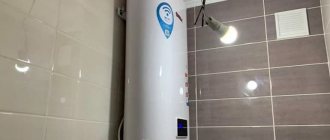
Before repairing or cleaning the water heater, you must remove the protective cover, which can be located at the bottom, center or side
What else can break down in an indirect heating boiler?
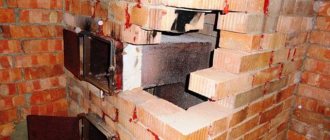
Self-repair of a boiler can hardly affect the integrity of the tank. There is thermal insulation inside, installing a new one will be quite expensive, and the work itself is also not simple. In the general case, you will have to dismantle the outer casing (which the developer does not provide for), localize the leak, separate the thermal insulation, and weld a thin sheet of stainless steel. If the garage has an argon inverter, then there will be no special problems with the last part. The difficulty is that many factories apply thermal insulation as follows:
The tank is placed in the housing and centered.
A technological or permanent cover is placed on top.
Through the hole between the walls it is filled, for example, with polyurethane foam.
Boiler repairs are more about fittings. If hot water recirculation does not work, then the corresponding pump has broken down. Any boiler repair technician will fix the problem in a matter of minutes. In this case, water from the tap can flow (under system pressure). If heating has stopped, then the problem may be the thermostat or the serviceability of the corresponding pump, which is controlled by a signal from the boiler. Geographically, the unit can be located in the boiler or next to the tank.
The most difficult thing to repair a boiler with your own hands is if the coil is broken. It is usually bent from copper or steel. Without a technological hatch, we do not see any chance of success for this event. If repair of the Gorenje boiler is really unavoidable, then you can boil the top part, perform all the necessary operations, at the same time clean the container and coil, and then put everything back together. In this case, reliable work depends largely on the experience of the master. He shouldn’t be frightened by all this - the boiler, repairs, plasma combustion. In any case, the tank is assembled from steel, but sometimes it is also covered with enamel. If you don't know how to weld sheet metal, there's nothing to do inside.
We said almost nothing about the cold water inlet path, but the pump usually breaks down there, which has nothing to do with the topic. And the bypass valve simply needs to be periodically cleaned by bleeding the water. It wouldn't hurt to have a pressure gauge nearby to make sure everything is working properly.
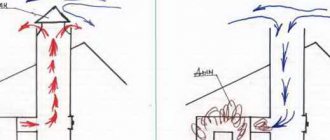
What is indirect heating, and how to implement it yourself? The operating concept is the same as that of thermal power plants (CHP). In the process of solving the main problem (operating steam generators), “extra” thermal energy appears. It can be irresponsibly released into the atmosphere, or used to organize heating for the neighborhood.
The indirect heating unit works the same way. We take a heat source (which exists regardless of your need to extract additional benefit from it), and “take away” part of the thermal energy from it.
In this way, residents of communal apartments without hot water supply obtained hot water (mainly for washing dishes, sometimes for taking a shower). To do this, in collaboration with neighbors, we made an indirect heating boiler with our own hands. The solution is simple, but requires at least a gas torch for welding pipes. Or the unit was manufactured using the “left” method at the main place of work (usually a factory or repair shop).
Recommendations for home repairs
Regardless of the nature of the breakdown, before starting repair work, you first need to turn off the power supply, remove the protective cover, disconnect the wires, pipes and drain the water.
Wall-mounted models are usually removed from their brackets. The protective cover, which hides the connection point for electrical wires and the mounting of heating elements, may have a different position depending on the model.
On horizontal devices, this element is usually located on the left, on vertical heaters - at the bottom, and on small models - in front. In some devices, you first need to unscrew the main mounting bolt located in the center. Sometimes this element is hidden under a decorative sticker.
After this, you need to carefully remove the thermostat, and then remove the temperature sensor tubes. They must be handled very carefully. If the integrity of the temperature sensor tube is damaged, liquid filler will leak out of them. As a result, you will simply have to throw away the water heater and buy a new device.
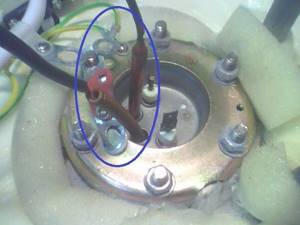
The temperature sensor tubes highlighted in blue should be protected from any deforming influence; if they break, the entire device will have to be completely replaced
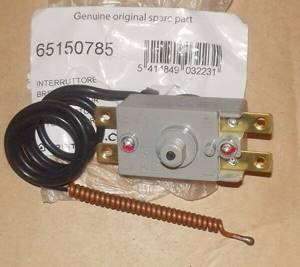
If the thermostat of a household water heater has become unusable, it will have to be completely replaced. The models of such devices are varied; it is best to choose an analogue with a similar device and characteristics
If there are stickers on the case that indicate the serial number, they must be preserved, even if they interfere with the maintenance and repair of the product. This may affect the manufacturer's fulfillment of warranty obligations, as well as make the work of service center employees easier.
Causes of leaks and what to do?
In the process of leaking the device, it is first necessary to establish the source of the negative factor. They can differ significantly in characteristics, so they can be identified quickly and without professional skills.
It is best to study the water heater according to the instructions included with the unit.
Most models have a warranty card designed for such situations. To avoid aggravating the problem, the device must not be opened.
Hull deformation
Safety valve
The outer shell of the equipment may become deformed after installation. The cause of the unfavorable behavior of the device is considered to be incorrect installation of the unit.
Often the consumer forgets to connect the safety valve.
The product is located on the main liquid supply between the shut-off valve and the valve element.
This part is designed to protect the tank from overfilling; it is during this process that deformation occurs.
If the valve is installed, but water also flows through the supply pipe, this fuse should be removed and a new one installed. Repairs will not take much time and do not require professional knowledge of the device.
Another reason for deformation is the use of low-quality pipes during installation. Powerful hydraulic shock with pressure changes slowly destroys the structure of the product.
Healthy! If the body is deformed, the boiler cannot be repaired; it must be replaced with a new model, while observing the correct connection technology.
Manufacturing defects
The leakage may be from the top of the housing; if in this situation there are no visual deformations of the unit, and the magnesium rod was mounted during connection, then a manufacturing defect of the equipment is possible.
During warranty service, it can be returned back to the supplier.
Modern models are designed with designs in which the tank cannot be repaired.
The container cannot be welded, because during the welding process, a layer of enamel breaks off, after which corrosion forms, spreading over the entire surface of the device.
Spent heating element
A leak may form under the tank cap, which indicates scale accumulation on the heating element. If this symptom is detected, it is necessary to replace this part with a new one.
The purchase of a heating element should be similar to the outdated one; such a part can be purchased at a spare parts store for water heating devices.
Before dismantling, you must thoroughly clean the inside of the device with a solution of vinegar and salt. This mixture quickly corrodes salt deposits without damaging the surface of the tank.
Poor installation of the device

Liquid leakage is possible from under the sealing ring of the heating element. To eliminate this problem, simply tighten the nuts more tightly. In some cases, leakage occurs under the mounting bolts of the heating element.
It is impossible to eliminate this unpleasant factor; you will have to purchase a new unit, because the walls of the water heater will begin to warp during the welding process.
Another reason that occurs quite often is a loose connection to the cold water inlet and hot water outlet pipes.
Such signs may appear when installing the device yourself, when low-quality fittings or incorrect materials for seals are used.
Gasket wear
A leak in the inspection hole located in the plastic cover at the bottom of the equipment indicates a loss of elasticity of the rubber gasket on the flange.
An accurate determination of this cause can be carried out after turning off the equipment: the lower cap is removed and the problem area is visually examined.
Replacement of the sealing gasket must be carried out strictly in accordance with the boiler model number, so that the product fits tightly to the working parts.
Water runs in the upper area without external damage
First you need to check the following conditions:
- no problems were found when studying the boiler elements;
- installation/connection of the water heating system was carried out without violations;
- The magnesium rod was checked at least twice a year. If necessary, a new one was installed.
If the boiler is still leaking, it is better to return it to the store under warranty. Leakage is eliminated only when the boiler tank is made of stainless steel.
Basic rules for servicing the device
For long-term and trouble-free operation of the water heater, it is important to follow the rules of its operation and maintenance. Otherwise, breakdowns are inevitable.
The fact that problems have arisen in the operation of the device may be indicated by some changes in its operating mode:
- increasing the time for heating water to a given temperature;
- the appearance of unusual sounds accompanying the operation of the device;
- the appearance of foreign impurities in tap water, changes in its color, smell or taste.
If at least one of these signs is observed, you should immediately clean the water heater.
To do this you will have to perform the following operations:
- Disconnect the device from the power supply.
- Remove the protective cover.
- Disconnect the contacts of the electrical wires.
- Shut off the cold water supply.
- Use a hose to remove any remaining water from the tank.
- Unscrew the bolts that hold the heating element.
- Remove the heating element and descale it.
- Clean the inside of the drive from dirt and scale particles.
- Rinse the device thoroughly.
- Check the serviceability of the magnesium anode.
- If necessary, replace this element immediately.
- Wait for the cleaned tank to dry completely.
- Reinstall the heating element.
- Reassemble the device.
- Check the reliability of all fastenings.
- Connect the water heater to the power supply.
- Check for grounding.
The heating element should be removed from the tank carefully; the bolts may be too stubborn; sometimes the heating element is difficult to remove due to too much scale.
The heating element is cleaned by mechanical or chemical means, as is the removal of contaminants from the tank. If a large amount of scale is found inside the device, you should consider reviewing the operating mode of the water heater.
This phenomenon is often observed when the device operates at maximum power for a long time. It is recommended to set the maximum heating temperature no higher than 60 degrees to increase the life of the device and reduce the number of breakdowns.
If the body of the heating device receives an electric current, the heating element may be deformed and ruptured, or there may be a breakdown in the control system.
Boiler design
Malfunctions in the operation of Ariston water heaters are most often associated with the failure of certain elements located inside the housing. To repair a device with your own hands, you first need to be able to properly disassemble the device in order to gain access to broken parts.
Ariston electric boilers come in two types: flow-through and storage. Cumulative models have a tank with a volume of 10 liters or more, into which water flows. Once the water in the container has warmed up to the required temperature, you can begin to use it. Flow-through models provide instant heating of water and its uninterrupted supply through the tap when it is already hot. Such devices are not equipped with water storage tanks.
Conclusions and useful video on the topic
A detailed video on diagnosing the condition, maintenance and self-repair of household water heaters can be viewed here:
Repairing a water heater is not so difficult if we are talking about replacing some of its elements. In the event of a serious breakdown, it would be wiser to contact a specialized service center. Proper operation of the device and its timely maintenance will save you from many problems and expenses.
Have you been repairing water heaters for a long time and want to supplement our material with useful tips and professional secrets for eliminating various types of breakdowns? Or is this the first time you’ve encountered a malfunction and can’t find its cause? Write your comments, ask questions, share your opinion below the article.
What other malfunctions can occur in cases where the boiler does not heat the water well?
We have listed the most common problems encountered when the boiler does not heat well. Naturally, sometimes there are unusual situations, and in order to reliably determine the problem, boiler diagnostics are necessary. The service company has been working in Kyiv for several years, and cleans and repairs the boiler not only promptly, but also at affordable prices. Boiler diagnostics cost only 150 hryvnia. We are a leader in providing repair and maintenance services for household appliances. Contact truly trusted specialists!
Who else needs boiler repair from real professionals? Call the service!
Do-it-yourself repair of Termex water heaters
At this temperature, magnesium and calcium salts do not boil. It should be remembered that the service life of the magnesium anode will be significantly extended if it is cleaned in a timely manner and, if necessary, replaced. Moreover, replacement should be done once every six months. It is also necessary to ensure that there is water in it before turning on the boiler. When the device is plugged in, the protective cover must not be removed. It is not recommended to use a water heater without grounding.
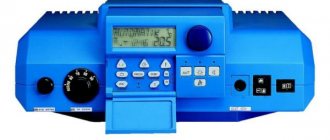
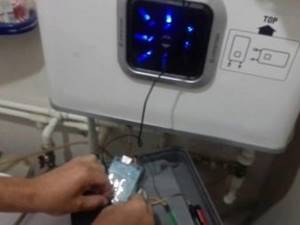
It is also necessary to take into account that water heaters are not suitable for water supply systems in which the pressure exceeds 0.6 MPa. If the water heater has an electronic display, then it may display basic error codes, which are best familiarized with, as sometimes they can allow you to significantly save on boiler repairs. To hang the heater on the wall with your own hands, carefully read the instructions.
Different modifications of the device use three or five anchor-type hooks for fastening. The storage tank must be hung strictly vertically; distortions are not allowed. The construction level marks the mounting points on the wall, the main thing is that it can withstand the weight of a heavy tank.
Most often the heating element fails. The tank shows no signs of life, the indicator light does not turn on and, although the thermostat characteristically clicks, giving the command to turn on, the water remains cold. The most dangerous is the failure of the thermostat, which is why the water heater simply refuses to turn on or, worse, does not turn off when the set temperature is reached. With proper hydraulic piping of the boiler, this possibility is always provided.
If you are not sure of the reliability of your walls, then proceed as follows: punch through the wall and secure the tank on the back side using metal plates or make a welded frame and weld the hooks of the unit to it.
The boiler must be hung so that there is easy access to the emergency power switch. Before we begin the repair, we need to understand what exactly we need to replace. To do this, we will perform a preliminary inspection to look for the failed part. Below are the main signs by which you can understand that the heating element has burned out:. Also, the fact that the heating element is not functioning can be determined by visual inspection. If the integrity of the shell is lost, periclase is visible, looks like white powder and a nichrome spiral, which means the element has burned out.
But sometimes there are cases when a nichrome spiral burns out inside the shell, in this case the reason will not be so obvious and you can check the integrity of the spiral with a tester. In any case, the heating element will need to be replaced.
We will also list the main reasons for the failure of the heating element below:. Whatever the reasons, the need for repairs is obvious, since it is much cheaper than buying a new boiler. Of course, it is easier and sometimes better to turn to the services of professionals. But this is not always possible, so we will consider the option of replacing the heating element with our own hands.
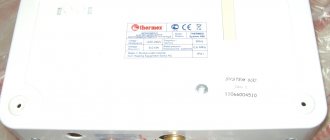
Before starting any repair, it is necessary to purchase a failed part, in our case it is a heating element. Our company offers only high-quality Termex heating elements made in Italy by Thermowatt, one of the best manufacturers of heating elements today. By purchasing a heating element manufactured by Thermowatt, you will be sure that with proper use it will serve its intended life.
We would like to note right away that consistency is extremely important in work; this is one of the secrets of successful repairs. Complete all the stages one after another, without jumping from one to another, and then everything will go quickly and smoothly. So, we have determined the cause, let's begin the repair. At power 1. The second clamp sets the required temperature, the upper bracket in the direction of increasing, the lower bracket in the direction of decreasing.
If the brackets are held for some time, the characteristic will change quickly.
Today’s article will be about how to clean an Ariston boiler with a capacity of 10 liters. The fact is that during operation, scale and decomposition products of the magnesium anode form in the tank. In the photo at the end of the article you can see how much has accumulated in our water heater over 3 years of operation. I, of course, expected to see something like this, but what will happen... Naturally, in order to clean the boiler, you can call a specialist.
The degree of temperature change is equal to one degree. To set the timer, hold the left clamp on the control panel. The device is now in standby mode until the set time. The third press of the right bracket sets the time, the fourth you set the minutes. With the fifth press you will set the hour timer and the sixth, the minutes timer. The seventh clamp returns the system to operating mode. On the monitor of the Stainless G device. Thermex water heaters What should you do if the Thermex boiler starts to leak?
In each model, the causes of leakage may be different. Ariston water heaters Malfunctions that you may encounter when using an Ariston storage water heater: The heater may not start; Water intake valve….
Edisson water heaters The set temperature is 70 degrees, it also shows about When the flow rate on the display the temperature drops, the heating is turned on. That is, as a full-time job. And the real one... Haier water heater When supplying hot water that was previously turned off, hot water flowed through the blast valve, practically in a stream.
The secant valve on the main line was opened and... Zanussi water heatersElectric water heater Zanussi 80 liters. Does low inlet water pressure or low electrical voltage affect operation?
EWH can perform…. What affects the heating temperature of water? Which one is better to exhibit? The first thing that will be affected by…. Electrolux water heatersI installed and connected the electrolux ewh 80 Royal Flash electric water heater; the last time the heating element was changed was more than three years ago. Overall, we've been using it for about five years.
Polaris water heater I start the Polaris Ultra IMF 50 V storage water heater, it heats up to a certain temperature and turns off completely.
Previously everything was fine, it warmed up…. Designed to reduce electrochemical corrosion of the internal tank.