The manufacturer of household appliances Thermex attracts users not only with the quality and durability of its products, but also with affordable prices. Therefore, the number of buyers is increasing every day. Unfortunately, even the most reliable equipment cannot be operated completely without breakdowns - Thermex water heaters also require periodic intervention by human hands. And if a reliable device has stopped working, then read on, since this article contains all possible malfunctions of Termex water heaters and methods for eliminating them.
Finding the cause of the breakdown
Before you begin repairs, you need to find out what is causing the problem.
This can be understood in advance without disassembling the device itself.
The main malfunctions of electric water heaters are:
- the device does not turn on;
- short circuit protection (RCD) is triggered;
- the water heater does not heat water or does not comply with heating standards;
- boiler leaked.
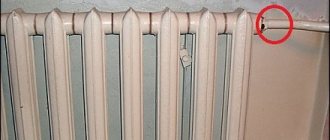
If a leak appears, you need to find out where the leak is.
If it is the heating element gasket that has leaked, then such a defect can be easily eliminated. You just need to replace it with a new one, especially since they cost pennies. It is worth noting: if water drips from the body of the water heater itself, then it will probably be easier to buy a new device, because such a defect is practically irreparable. In water heaters, the water heating elements - heating elements - are the first to fail, since they are the main working element of the structure.
You can find out how to make the right choice of water heater and not make a mistake here:
You can first understand that it is the heating element that has failed by the following indirect signs:
- automatic protection is triggered;
- knocks out the machine on the meter;
- the water does not heat up, or the device does not heat well;
- the hissing of the water heater and the release of water with a cloudy consistency and an unpleasant odor.
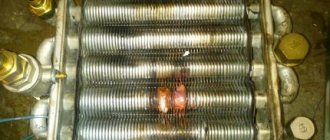
With such symptoms, the heating element is most likely to fail. This can also be determined by the appearance of the heating element itself - the shell is damaged.
Sometimes heating elements burn out without visible damage to the shell, then this can be determined using a tester.
If the ohmmeter shows infinity at the terminals, then the nichrome spiral is broken.
If it is zero, then there is a short circuit somewhere. In any case, such an element needs replacement.
In some cases, the heating element fails for the following reasons:
- The heating element has served its term;
- the unit was turned on without water;
- the water heater was turned off for a long time, but the water was not drained;
- sudden changes in voltage in the network.
In any case, the heating element needs to be changed. Of course, the easiest way is to use the services of a specialist, but it is quite possible to change the heating element yourself. It is necessary to warn that repairs must be done in a certain sequence to avoid confusion. This is an important key to successful repairs.
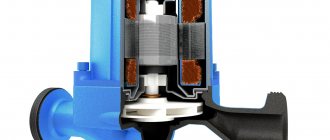
Device structure
Before you begin to independently repair the Thermex water heater at home, you need to understand its design. When studying it, it is discovered that its structure is not too complicated, since it consists of a small number of components, presented below:
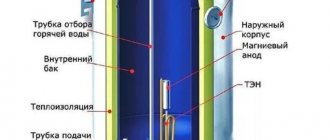
- supporting body, made on the basis of a steel sheet with a stainless protective coating;
- internal working tank, for welding of which alloy steels are used.
Due to them, it is possible to obtain a structure that is durable and resistant to destruction from corrosion.
- a metal base on which the main elements of the device are installed (magnesium anode, heating element and thermostat);
- the anode itself is a metal rod with a surface treated with a magnesium alloy. Due to this element, it is possible to reduce the corrosive properties of water, that is, to protect the tank from rapid destruction;
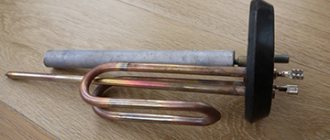
- electric heating device or heating element.
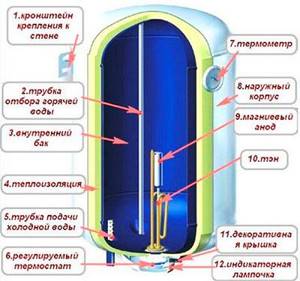
In addition to the above, the design of the unit includes a set of stainless steel tubes for supplying and discharging cold and hot water, and a thermostat that controls the operating modes of the boiler.
Preliminary preparation
Preparations before repair are as follows:
- Disconnecting the water heater from the network. Unplug the plug from the socket.
- Close the check valve and water supply valves.
- The cold water hose is disconnected and the liquid is drained. There will be a small amount of it, only residues in the system.
- The hot water hose is disconnected and the water in the tank is drained. If there is no separate pipe for draining water, a check valve is used as one, although in this case the water takes quite a long time to drain.
- It is necessary to completely drain the water, after which the water heater is removed. It is best to do this together, because the weight of the water heater is quite large without water.
You may be interested in an article about Termex storage water heaters. Read the article on how to properly replace the heating element in a Thermex water heater here.
Classification and design features
Knowledge of the water heater structure will help to carry out high-quality diagnostics and quickly determine the malfunction. Thermex electric water heaters are divided into 3 main types:
Storage boilers
The main feature of such household appliances with capacity of 100 or 80 liters is the presence of an internal and external tank. The internal tank, as a part that is constantly in contact with water, is covered with a layer of glass porcelain. This technological solution eliminates the occurrence of corrosion. Polyurethane foam is poured between the outer and inner tanks - a material that prevents heat loss.
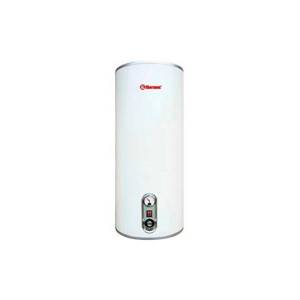
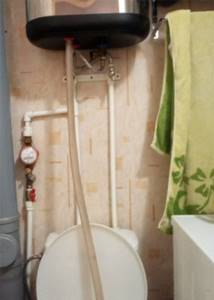
Thermex storage water heater
At the bottom of the device there are water supply and drainage tubes, as well as all electrical components: thermostat, temperature relay and heating element - the main heating element. The heating element is a hollow metal tube with a spiral located inside, made of a material with high resistivity. Water is supplied to the boiler and heated by the heating element when it turns on.
The main disadvantage of Termex storage boilers is the high corrosion of the internal cavity of the tank, due to the exchange of ions between the heating element and the walls of the boiler. To minimize this effect, a magnesium electrode is installed, which supplies the water with the necessary ions.
Termex instantaneous water heaters
They differ from storage boilers in their smaller size and different operating principle. The design of instantaneous water heaters includes several heating elements - usually 2, but models with three or more heating elements are also available.
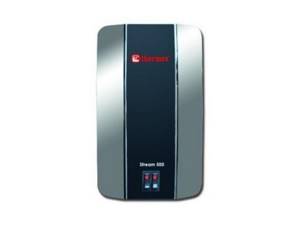
Thermex instantaneous water heater
The heating elements are made of ceramic materials and are usually placed in a special copper cylinder. The installed power regulator allows you to control the temperature of the liquid passing through the boiler. Also, in addition to the regulator, a pressure sensor and a temperature sensor are installed. The pressure sensor turns off the water supply if the permissible quantity in the water heater is exceeded. And the temperature sensor is set to certain values, if exceeded, it turns off the heating elements.
Combined type
Such water heaters include a small-volume tank from flow-through devices and a storage principle from simple boilers. The heating element has a different design, which is why it can operate in two modes: both a storage and a flow device.
Termex combined water heaters have received universal recognition due to their positive qualities:
- Compact size, does not take up much space.
- They are practically not subject to corrosion, which means they have a long service life.
- Combined operating mode.
- Average power, which is usually 2.5 kW. High-quality heating and low energy consumption.
Troubleshooting and disassembly
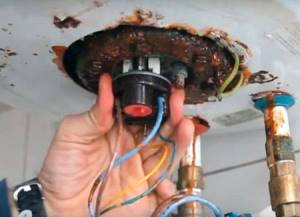
Then the bottom cover is removed to access the heating elements.
You need to be careful here because the entire electrical part of the water heater is hidden under the cover. It should be noted that sometimes the screws are covered with a label on top. Before you start dismantling the thermostat, it is better if you take a photo or sketch the connections.
The following sequence follows:
- the contacts of the heating element are disconnected;
- the fastons are released from the thermostat contacts;
- the nut holding the thermostat is dismantled and it is put away;
- the thermostat sensors are removed from the heating element tubes;
- unscrew the nuts of the heating element fastening strip;
- The heating element is carefully removed from the unit body;
- The heating element is checked by external inspection for the integrity of the shell;
- The heating element is called by a tester for open and short circuit.
Specialist's note: in case of a break, the tester will show infinite resistance, in case of a short circuit - zero.
Preventing the life of the boiler
You can extend the service life of the device and ensure proper maintenance of the equipment by following the following recommendations:
- the internal water pressure must be below 3 atmospheres, otherwise a reduction reducer should be installed, which will be placed between the supply pipe and the inlet branch of the device. The optimal gearbox setting corresponds to 2 atmospheres;
- The tank located inside and the heating element must be cleaned frequently to remove scale and salt deposits. This will increase the service life of the unit;
There are many reasons that influence the leakage of the device, however, if any of them occurs, you should immediately disconnect the device from the electrical network, and then carry out a visual inspection. Without accurately determining the cause of the problem, it is prohibited to open the equipment so as not to aggravate the situation, which could get out of control.
Only compliance with the rules of use and proper maintenance of the water heater will help extend its service life. If problems arise with self-inspection of the unit, you should seek the help of professional specialists. They will quickly determine the cause of the failure and notify you about the possibility of repairing the boiler.
The presence of a reliable and high-quality Termex water heater provides the owners of an apartment or house with hot water at any time. Cost-effectiveness, fast heating, reliability and long service life distinguish the equipment from competing products. Malfunctions and defects of boilers are recorded very rarely, so detection of tank leaks is always a nuisance and requires prompt elimination.
Each owner of a water heater, when leaks appear on the floor, can independently try to determine the cause of the defect. To do this, it is often sufficient to perform a visual inspection of the device. Depending on the location of the leak, you can try to perform the repair yourself. Otherwise, it is best to use the services of qualified engineers working in our service center.
Boiler treatment before assembly
After the cause of the heater malfunction has been determined, the necessary spare parts are purchased.
Before installing a new heating element, thorough cleaning of the water heater tank is highly recommended.
This must be done as carefully as possible so as not to damage the inner surface. It is also necessary to inspect the magnesium anode; most likely it will also have to be replaced. In general, there is a recommendation that the anode needs to be replaced annually.
You may also be interested in an article about Termex instantaneous water heaters. Read the article about installing and connecting a Thermex water heater yourself here.
After reading this article, you will learn how to properly disassemble a Thermex water heater.
Typical malfunctions of the Thermex heater
The wide range of Thermex models allows you to choose a 100-liter boiler for a large family, a 10-15-liter boiler for use in a small kitchen, etc. The device is a metal heating tank, inside of which a heating element is located. The operation of the heater is controlled by a relay, as well as a thermostat. The magnesium anode helps to “soften” tap water.
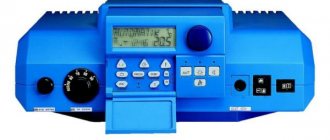
It is worth noting that modern water heaters are equipped with a control unit that has a self-diagnosis function. The system detects the faulty unit and displays an error code. Having deciphered the meaning, you can understand where to look for a breakdown and how to fix it yourself.
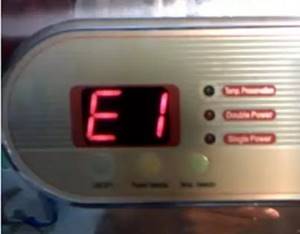
Error table for Thermex water heaters
| Error codes | What does it mean | How to fix it yourself |
| E1 (Vacuum) | Insufficient filling of the tank with water. Premature switching on. | This can lead to combustion of the heating element. To correct the situation, turn off the device and wait for normal filling. After this, reconnect. |
| E2 (Sensor) | There are problems with the temperature sensor. | Try disconnecting the boiler from the network by rebooting. If after this the code is displayed again, then test the sensor with a multimeter, and if there is a malfunction, replace it. |
| E3 (Over Heat) | This error indicates that the water has heated to a critical temperature (95 degrees). | The thermostat is probably broken. Replace it. |
The video will help you deal with error E1:
Other problems with an electric water heater include:
- The appliance does not heat the water or takes too long to do so.
- Noise is heard during operation.
- Runs only for a short time.
- Doesn't work, won't turn on.
- The tank leaked.
- Unpleasant odor and color of water.
If you notice one of the signs, then proceed with inspection and repair.
Why are Ariston water heaters created?
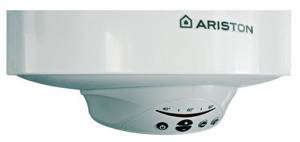
Household water heating appliances that run on electricity are most often used during hot water outages.
As a rule, compact models are purchased. When professionally installed, the water heater provides warm water for daily household needs: washing, cleaning or showering. In private sectors, larger volume gas and electric heaters with storage are used with all communications. In this case, household appliances from the famous Italian company are used all year round.
On this topic:
Equipment for tillage - MasterYard cultivators
Apr 16, 2017
Garden battery technology
Apr 16, 2017
BACK FORWARD 1 of 31
How to care for your water heater
The quality of main water allows for an increased content of hardness salts. A concentration of magnesium and calcium salts that is harmless to humans precipitates on the surface of the heating element. The same layer of salts on the inner surface of the tank is not dangerous. It increases the protective layer and becomes additional insulation. And the heating element must be cleaned annually, since the sediment does not conduct heat, the element overheats and fails. In an acidic solution of acetic or citric acid, the precipitate is destroyed and the element becomes pure.
As a preventive against scale, you can use preliminary softening of water before supplying it to the water heater. There are special water purification filters for this. Be sure to install a filter on the water supply line to remove suspended substances from the water and direct them into the sump.
Sources
- https://remont-system.ru/vodonagrevateli/remont-vodonagrevateley-termeks-samostoyatelno
- https://TechnoSova.ru/klimaticheskaja-tehnika/vodonagrevatel/ne-rabotaet-termeks-prichiny-i-remont-svoimi-rukami/
- https://vannayaa.ru/tehnika-v-vannoj/remont-vodonagrevatelej-termeks.html
- https://tehnika.expert/klimaticheskaya/vodonagrevatel/termeks-remont.html
- https://StrojVannu.ru/texnika/vodonagrevateli/remontiruem-svoimi-rukami-vodonagrevatel-termeks.html
- https://kvanta.ru/vodonagrevateli/tehnicheskie-harakteristiki-vodonagrevatelya-termeks-na-50-litrov
- https://glav-dacha.ru/remont-vodonagrevateley-termeks/
Do-it-yourself Termex boiler repair
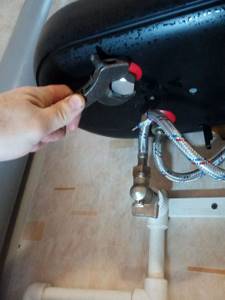
Before you begin the repair, first gather the necessary tools: a set of wrenches, an adjustable wrench, electrical tape, various screwdrivers, pliers.
After this, turn off the water by closing the inlet and outlet valves to the water heater. Then drain the water from the boiler tank and disconnect it from the power supply. The next step is to remove the protective cover. If you have a vertically located boiler, then the lid is located at the bottom, and in the case of a horizontally located one, it is on the left or in front.
When removing the cover, pay attention to the stickers. Often the screws for fastening it are located under these stickers
If you have unscrewed all the screws and the cover still does not come off easily, check the stickers again.
Replacing the heating element
First, perform all of the above steps and remove the tank cap.
To make it more convenient to work, you can even remove the tank from the wall.
It is worth noting that most Thermex models have not one, but two heating elements. Therefore, it is imperative to remember how and in what sequence the parts need to be connected. It’s better to photograph the whole process.
To remove the heating elements from the Thermex water heater, remove the top cover by unscrewing the bolt; disconnect all plugs and unscrew the bolts securing the heating elements.
The heating element itself is turned off as follows:
- After removing the cover, find the protective thermostat, remove the tips from it;
- also remove the tips (3 pieces) from the heating element;
- cut the plastic clamp;
- Unscrew the screws, removing the sensor;
- now disconnect the cable and unscrew the four screws;
- then you need to dismantle the nut on the clamping bar and pull out the heating element.
After dismantling the heating element, it is necessary to clean the surface of the tank from dirt and scale. Only after this can you install a new heating element and put everything back together.
Do not forget that the heating element does not always need to be changed. If the water in the tank still heats up, but it happens slowly, then, most likely, scale has formed on the heating element. Then dismantle it and descale it. Then install. The problem should go away. Also, do not forget that it is advisable to clean the heating element with chemicals rather than scrape off the dirt. In the latter case, there is a possibility of damage to the part.
To clean the heating element, you can use a solution of citric acid or vinegar (its percentage in the solution should be about 5%). The part must be immersed in liquid and wait until the scale falls off. Then you need to wash the heating element.
Faulty thermostat
The thermostat in Termex water heaters is located under the cover, next to one of the heating elements, and its sensor is located inside the tank.
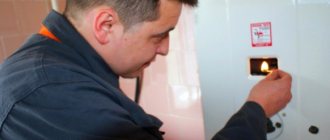
Sometimes the thermostat fails. This element cannot be repaired; it must be replaced. To perform the replacement, you need to do all the preparatory steps, remove the cover, then remove the thermostat. But before dismantling, we recommend checking this part. To do this, use a lighter to heat the tip of the sensor (copper). If the thermostat is working properly, you will hear a characteristic click, which means that the protection mechanism has activated and the circuit has opened. Otherwise, you will have to replace the part.
Tank leak
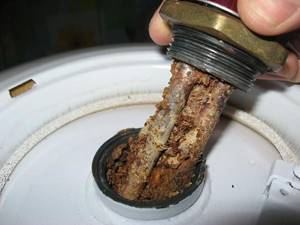
No matter how trivial it may sound, but first you need to find where the water is coming from. A lot depends on this, since if the tank is rotten, you will have to buy a new water heater. So:
- if water oozes from the side seam, then the container is rusty and repairs will not be possible;
- If water comes out from under the lid at the bottom, then you need to disassemble the tank.
If traces of leakage are found in the places where the heating elements are attached, then your water heater is not hopeless and can be saved by replacing the gasket.
In the case of the second option, complete all preparatory steps, then remove the plastic cover. Next, take a close look at where the water is leaking. If it comes out near the flange, then the rubber gasket has deteriorated (less often this is a problem with the heating element). Otherwise, the tank is rusty and the boiler can be thrown away. To replace the gaskets, you need to remove the heating element. But it is necessary to carefully examine the heating element itself. If it is cracked, it is also better to replace it.
Other faults
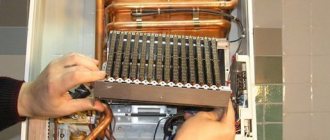
If you have checked and replaced all the parts, but the boiler still does not work, then it is quite possible that the electronics have failed. The control board cannot be repaired, and it will be extremely difficult to find a similar one in a store. Therefore, in this case, we recommend contacting specialists.
What you need for work
Before you begin solving the problem, you need to acquire a tool. If you do not want to start repairing water heaters, then it is better to purchase inexpensive tools. Chinese manufacturers are ideal for small household solutions.
List of necessary tools for repairing Termex boilers:
- Pliers. The most common ones, without ergonomic handles, made of environmentally friendly material.
- Flat and figured screwdriver of medium length. It will come in handy more than once in the future for housework.
- Multimeter. Probably the most expensive device on the entire list. Allows you to measure electrical network voltage, current, resistance and test wires for integrity.
- Spanners. In order not to waste time, it is better to purchase a small set, which will also be useful in the future.
The above tools are quite enough to troubleshoot water heaters. But besides this, some consumables are also required:
- Insulating tape. Adhesive tape with high electrical insulating properties. Necessary when restoring the integrity of wires. The insulating tape can be replaced with a more convenient heat shrink tube.
Heat shrink tubing in different colors
- Plumbing sealant. Liquid sealant, used when replacing gaskets; when hardened, it forms a layer that prevents liquid leakage. If desired, you can replace it with a more expensive automotive sealant.
Questions about repairing water heaters with “Termex error codes” malfunction
Our technicians answer a large number of questions about water heater repair every day. Check out the questions that concern you below, or ask your own question, which we will be happy to answer!
Was the article useful to you?
Leave your questions and feedback on water heater repair.
We are happy to answer all your questions and will definitely take your feedback into account in the future work of the Umedia Service. Leave your first question or review about Yumedia for water heater repair!
Have you already repaired your device with us? Leave your rating!
Your rating: Current rating: 4.17 (Votes: 24)
Basic operating rules
The equipment requires regular maintenance. The main reason for appliance failure is scale, so you need to install a water filter. The boiler is placed as close as possible to the points of consumption. When operating, follow these recommendations:
- You can turn on the device only after filling the tank;
- Before dismantling and repairing, the device is de-energized;
- connection is made according to the diagram attached to the instructions;
- Before draining the water, turn off the device;
- connection to the water supply system is carried out only with shut-off valves.
Ariston water heater repair
Ariston water heaters have vulnerable parts:
- thermostat;
- sensors;
- switches;
- heating elements.
The most common repairs are valves and insulation gaskets. The integrity of the tank is compromised less frequently. This breakdown occurs due to corrosion or careless handling. The tank needs to be repaired only by a service center.
Do-it-yourself repairs involve timely preventative cleaning. Every six months it is recommended to clean the heating element for the Ariston water heater.
How to determine the malfunction?
Everything is simple, with obvious changes in work:
- Strange hissing during operation.
- The standard heating period increases.
- Switching on and off has become noticeably more frequent.
Any high-quality Ariston device is easy to handle when repairing it yourself. But it is better to follow these instructions:
- Disconnect the room and device from power.
- Drain the water. Drainage must be ensured using a hose with a diameter slightly smaller than the hole for discharging liquid.
- Place the flush hose in the toilet.
- Shut off the cold water supply.
- Disconnect the hose from the cold water valve.
- Connect this hose to the tap and lower it into the toilet.
- Remove the heating element. Its fastening is always on a nut with a washer or plate.
- Having pulled out the heating element, carefully examine all places with scale and try to remove everything without harm to the tank.
- After removing the scale, pour clean water over the tank.
- If the heating element itself is in working order, then you can clean it in the same way.
- Install all hoses and parts of the heater in the same order.
The cheapest and best way to remove scale is citric acid diluted in water. This solution is poured into the tank and left for 24 hours.
With an independent approach, you can and should only replace parts with original ones. Spare parts for Ariston water heaters from the manufacturer guarantee quality, money invested in repairs and stable operation of the devices.
Modern water heating devices are classified primarily by displacement. The selection of a water heater also begins with the volume of the tank. Each of the Ariston models is designed for specific rooms and frequency of activation. What is the difference between the models?
Correcting Common Water Heater Errors
Elimination of common errors of Ariston water heaters:
- E1 - to correct the system error, you need to reboot the control system and turn off the device for 5 - 10 minutes. If the error appears again, inspect and dry the board.
- E2 – before turning on, you need to draw water until a steady stream appears in the tap.
- E3 – diagnose the cause of the malfunction, check the wiring. Replace temperature sensor.
- E4 – in case of malfunction, replace the thermostat.
- E10 - check the integrity of the wiring, loose contacts. Make sure the temperature sensor is working properly. Correct the problem.
- E11 – replace the temperature sensor. If the heating element overheats, clean the heating element from scale. The storage water heater must be regularly cleared of precipitation. Replace the heating element.
- E12 - check the serviceability of sensors, heating elements, drain sediment, clean or replace heating elements.
- E13 – reboot the control system, diagnostics of temperature sensors and control system boards. Replace if necessary.
- E14 – check the network voltage. Take out the heating element, clean it from scale and deposits, and drain the sediment. Check for serviceability. Perform replacement.
- E15 - check the presence of water in the water supply, the condition of the safety valve. If faulty, replace the part.

Remember! Independent repair of equipment under warranty entails a complete waiver of warranty obligations on the part of the manufacturer.
Correcting errors in Termex water heaters:
- e1 – disconnect the device from the network, fill with water, turn on again;
- e2 – replace the thermostat;
- e3 – you need to turn on the thermal switch by pressing the button inside the sensor body.
There are models with a self-resetting thermal fuse. After the water in the boiler has cooled, it will return to operating mode on its own. To speed up the self-healing process, it is necessary to completely change the entire volume of water in the device.
Vakum, Over-heat, Demo lights up on the display - this is not a breakdown:
- disconnect the device from the network;
- fill the boiler with water;
- turn on the device;
- On the touch differential, press “^” up and, without releasing, press “v” down.
The controls are touch sensitive, you don’t need to press too hard. If after several attempts nothing happens, look carefully, the “Timer” sign should be on. You must turn off the inscription by pressing "
Good day, dear readers. Many owners of Termex storage water heaters, after some time has passed after putting the device into operation, find error code E 1 on the display. According to the instructions, it means that the tank is not sufficiently filled with water. I don’t know how correct this is, in my case everything looks a little different. In this article I will tell you how I deal with this trouble.
I'll start from the beginning. After purchasing and installing the “THERMEX IF LT 50V” water heater for three months, no problems arose until the sign E 1 started flashing. First of all, I opened the operating instructions and read: “E1 (Vacuum) means that there is no water inside the tank, and the heating item included. Remedy: you need to fill the tank with water to capacity, and then turn on the power.” Not really understanding why this was happening, I decided to open the hot water tap and drain a certain amount, while slightly shaking the heater itself (suddenly an air lock had formed in it). After these manipulations, I plugged it in and adjusted the temperature. Oddly enough, everything worked. But the joy was short-lived; the next day the error appeared again. Confident that the water heater was airy again, I carried out the already familiar actions. Again everything returned to normal, but an hour later a squeak was heard, signaling a problem. I tried again, it didn't help. After wandering around the Internet, I found only standard answers, approximately as in the instructions. Well, I think, since the problem is insufficient filling, why not drain everything completely and refill it. That's what I did.
To drain water from a Termex-50 water heater you must:
- Disconnect it from power.
- Close the supply valve (connects to the fitting marked in blue).
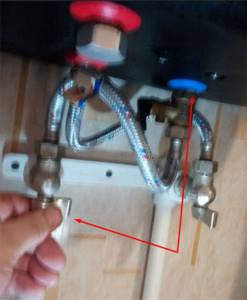
- Place the mixer in the open hot water position. Some part of it will leak out and stop, and excess pressure in the heater will be released.
- Unscrew the drain plug, being careful not to lose the plastic ring. It may remain inside the fitting. Then pry it off with a screwdriver.
- Place a suitable sized hose onto the drain fitting to ensure that water is drained into the sewer.
During the flush, I noticed that in the toilet bowl, where the water went, some kind of excess substance accumulated, which, after a complete flush, accumulated in a good handful. Once all the water had drained out, I briefly opened the inlet tap to better rinse the tank. Next, I removed the hose, tightened the drain plug and opened the tap again until the tank was completely filled. The signal that the tank is full is a constant stream of water from the mixer. You can connect the water heater to the network and program the operating mode.
This whole operation saves us from the flashing E1 error for about 2-3 months, and when it occurs, I drain, rinse and fill again. During one such maintenance, I wrapped gauze around the hose and collected all the excess crap. You can admire what flows through our pipes.
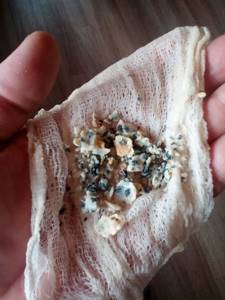
And finally, a piece of advice: use filters to further purify your drinking water. With that, I say goodbye, all the best.
Also visit the “Useful Tips” section
Additional reasons for device malfunction.
Other malfunctions of the Thermex water heater can also cause electronic failure. The presence of a malfunction in the water heater may be indicated by prolonged heating of the water, unusual noise during operation, unexpected shutdown of the equipment, changes in the color and odor of the water leaving the boiler.
Faulty heating elements must be repaired or replaced if they become deformed and a large amount of scale accumulates on the surface. Longer operation is facilitated by turning on two heating elements simultaneously to reduce their wear. Regular preventative maintenance of equipment with the removal of salt deposits and timely replacement of the magnesium anode will extend the life of the heater. With significant water hardness, sediment forms faster; it reduces the thermal conductivity of parts, contributing to their overheating and failure. In this case, you may notice an increase in the noise of the operating boiler and the activation of thermal protective elements.
Parts are descaled using mechanical or chemical methods. The presence of scale on the walls of the water heater does not pose a danger and prevents metal corrosion. When contacting a service center in the event of a malfunction of the electronic equipment, the sensor or board is replaced. Proper operation, regular preventive maintenance and timely qualified repairs will allow your water heater to operate for a long time without failure.