It often happens that in a private house there is no possibility of connecting to central communications due to the great distance from them. This problem is especially relevant for new cottage villages that are actively populated, but communications are planned to be completed in the next couple of years. If you find yourself in such a situation and want to live in your own home this coming winter, the best solution for you is to install an autonomous heating system with your own boiler room.
In most cases, cottage owners prefer solid fuel boiler models that burn wood, coal, and pellets. Solid fuel is familiar, effectively copes with its task and is inexpensive.
In this article, we will analyze the advantages and disadvantages of different connection schemes for boiler equipment operating on solid fuels, and tell you how to properly install a boiler so that the building’s heating system functions smoothly, efficiently and safely.
The procedure for installing a solid fuel boiler in a private house
The installation procedure traditionally includes 3 stages, including:
- Preparation of premises for a boiler room or construction of a separate building.
This stage involves finishing surfaces with non-flammable material, providing ventilation, and installing windows. It is also necessary to provide electricity to organize lighting and connect to the power supply of the heating boiler. It is advisable to entrust the last task to specialists with appropriate qualifications and experience in electrical installation work. - Installation of the boiler on a pre-prepared foundation.
The equipment must be located strictly vertically, stable, on a rigid foundation. A smooth cement screed should be made on the floor, the thickness of which should not be less than five centimeters. In this case, a bedding of the same thickness is first created. It is recommended to install the expansion tank not in the boiler room, but at the highest point of the house. The optimal place is an unheated attic. In this case, it is recommended to additionally carefully insulate the tank to avoid freezing of the coolant during the winter months.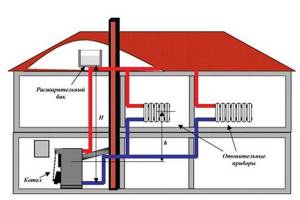
- Piping
- connecting a solid fuel boiler directly to the heating system itself.
There are several strapping options, below we will talk about them in detail.
Installation rules and features
To install an electric heating boiler with your own hands, you must carefully study the instructions that come with the product. Installation involves several stages:
- preparation of the installation site and installation of fasteners. The surface on which the thermal power unit is installed must be finished with a fire-resistant panel. To prevent distortions, the brackets are adjusted using a construction level;
- grounding For electrical safety purposes, the electric boiler installation diagram provides for connecting the power device to the grounding bus. Copper wire with a cross section of 4 mm is used. The conductor is connected to the neutral terminal at the bottom of the housing;
- install a circulation pump and an expansion tank if they are not provided for in the design of the heating boiler.
During commissioning, special attention is paid to such points as the tightness of the entire system and the removal of excess air. Next, the equipment is tested in various operating modes.
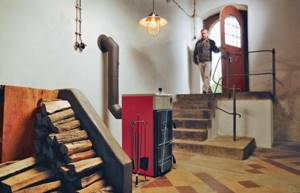
Boiler room arrangement
One of the most important stages that should be taken as seriously as possible is the arrangement of the boiler room (furnace room) - the room in which the boiler is supposed to be installed. The boiler room must be equipped in accordance with all fire safety requirements, including:
- The solid fuel boiler must be installed in a separate non-residential premises, the area of which must be at least 7 m2. Please be aware that when using solid fuels, some dust and smoke will be generated. The optimal places to place a solid fuel boiler if you do not want or do not have the opportunity to equip a separate boiler room are a garage or basement. A window is required.
- For the smooth and efficient operation of heating equipment, it is necessary to have high-quality supply and exhaust ventilation. This is primarily due to the fact that normal combustion of fuel requires a large amount of oxygen. Experts recommend choosing a combined type of ventilation system, which involves organizing a natural flow of outside air through a ventilation hole and forcing it out into the street through a special outlet equipped with an electric fan.
- The floor, ceiling and walls of the boiler room must be finished with fire-resistant materials. The best option is ceramic tiles. A concrete screed with a thickness of at least 5 cm should be made on the floor. In an emergency, these measures will prevent the spread of flame to other rooms of the house and generally increase the safety of using a solid fuel boiler.
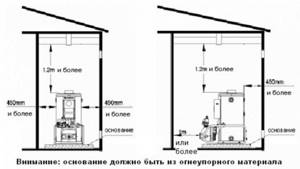
Also, in order to ensure fire safety, it is necessary to leave as much free space around the boiler as possible and not install it close to the wall.
Read more about the boiler room in a private house on our Zen channel.
Recommendations for choosing and connecting radiators
An ordinary homeowner, going to a heating equipment store and seeing a wide selection of different radiators there, can conclude that choosing batteries for his home is not so easy. But this is the first impression; in fact, there are not so many varieties of them:
- aluminum;
- bimetallic;
- steel panel and tubular;
- cast iron
Sectional batteries made of aluminum alloy have the best heat transfer rates; bimetallic heaters are not far behind them. The difference between the two is that the former are made entirely of alloy, while the latter have a tubular steel frame inside. This was done for the purpose of using the devices in centralized heat supply systems of high-rise buildings, where the pressure can be quite high. Therefore, installing bimetallic radiators in a private cottage makes no sense at all.
It should be noted that heating installation in a private home will be cheaper if you purchase steel panel radiators. Yes, their heat transfer rates are lower than those of aluminum ones, but in practice you are unlikely to feel the difference. As for reliability and durability, the devices will successfully serve you for at least 20 years, or even more. In turn, tubular batteries are much more expensive, in this respect they are closer to designer ones.
Steel and aluminum heating devices have one useful quality in common: they lend themselves well to automatic control using thermostatic valves. The same cannot be said about massive cast iron batteries, on which it is pointless to install such valves. This is due to the ability of cast iron to heat up for a long time and then retain heat for some time. Also because of this, the rate of heating of the premises is reduced.
If we touch on the issue of appearance aesthetics, then the cast-iron retro radiators currently offered are much more beautiful than any other batteries. But they also cost incredible amounts of money, and inexpensive Soviet-style accordions MS-140 are only suitable for a one-story country house. From the above, the conclusion suggests itself:
Boiler piping diagrams
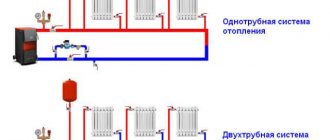
Owners of private houses who install their own heating system, as a rule, choose the simplest piping scheme. This option involves connecting boiler equipment to the heating system on both sides - to the supply pipeline and to the return pipeline - through a pair of pipes.
This wiring scheme is good because it is completely autonomous in relation to the power grid. Even in the event of power outages, the system will function properly.
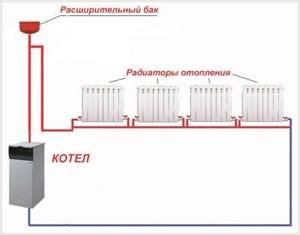
The main and very significant drawback is that it is not possible to regulate the temperature of the coolant at the outlet of the heating equipment, which can ultimately lead to such adverse consequences as the appearance of rust on the surface of the pipes and boiler.
This connection option is quite popular due to the fact that even a non-specialist can do it. At the same time, there are more complex piping schemes that require the possibility of adjusting the temperature of the coolant, which should not fall below 60 °C, and, at the same time, boiling is also extremely undesirable. Compliance with this condition allows us to eliminate the following adverse events:
- a regularly occurring large temperature difference in the heat exchanger, which contributes to a reduction in the service life of the equipment and its maintenance-free operation;
- condensate formed on the inner surface of the combustion chamber.
The latter is especially important, since condensate is nothing more than weak solutions of low concentration acids that can corrode the walls of the boiler.
Selecting the power of the heating boiler
A heating boiler piping is a system of pipelines and equipment designed to provide radiators with coolant. Simply put, it's everything except the batteries.
The first step is choosing a heating boiler, the performance of which must be determined in advance.
The calculation of the required power of the heating unit is influenced by many factors, these are:
- volume of the building;
- number of windows and total glazing area;
- number and area of doorways;
- thermal conductivity of materials used in the construction of walls;
- degree of insulation of load-bearing structures;
- average annual temperature in the construction region;
- location of the building, i.e. Which side of the world faces the main, traditionally most glazed, façade?
However, there is an average indicator that, without in-depth calculations, allows you to determine the required performance.
For the middle zone, 1 kW per 10 m² of heated area can be taken as a starting point (but not a guide to action!). It is imperative to add a reserve of at least 20% to the design power of the heating boiler.
Next, you need to decide on the type of heating boiler: autonomous or manual loading.
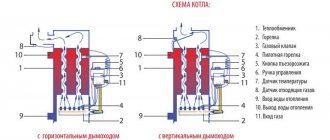
Heat for heating buildings is obtained by processing fuel in boilers that heat the coolant
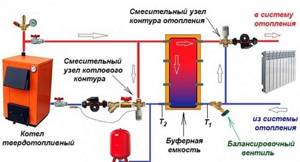
Basic strapping scheme
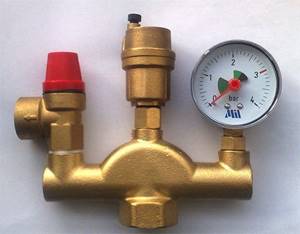
When choosing a method for connecting a solid fuel boiler to the heating system, special attention should be paid to the installation of the mixing unit, as well as the safety group. The latter is the first element of the system encountered on the path of the heated coolant. The security group includes:
- a pressure gauge that monitors the pressure in the system;
- safety valve - discharge of excess coolant and steam;
- an air vent that eliminates the occurrence of air jams;
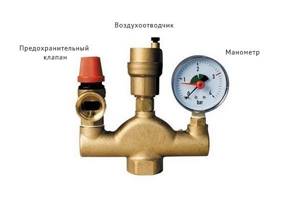
Such equipment is presented in the “Related Products” section of our online store under the name “Security Group”. Its main purpose is to ensure trouble-free operation of the heating system. The pressure gauge, air vent and valve are mounted on a single manifold made of stainless steel. It allows you to reduce the pressure in the system automatically.
We recommend reading our article Types of safety automation for gas boilers on our Zen channel.
Installation of the mixing unit
After completing the installation of the safety group, you can begin installing the mixing unit - a return jumper that connects the supply circuit of the heating system with the return circuit. During operation of the system, the liquid, bypassing the heating devices, gives off heat and returns to the boiler for heating.
If this circuit operates correctly, when the coolant temperature drops below 60 °C, the jumper will open automatically, a small volume of hot water will enter the return circuit and the temperature will return to the desired value.

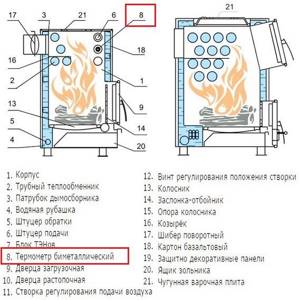
Solid fuel boilers "Kupper" are universal heating equipment capable of operating in open and closed systems, where forced or natural coolant circulation is provided. Such a boiler can act either as an independent source of heat energy, or as an additional one - as part of an existing heating circuit, in tandem with another boiler running on gas, electricity or liquid fuel.
An additional advantage of purchasing a Kupper boiler is that a thermometer for temperature control is included with the heating equipment.
Implementation of a heating system
Armed with the necessary knowledge about the principles and advantages of each heating scheme, you can create a procedure:
- selection of heating scheme;
- choice of heating boiler;
- acquisition of necessary equipment;
- installation.
To install an open, single-pipe heating circuit, it is enough to have a thermometer (in the vast majority of cases, it comes with the boiler) and an expansion tank, usually homemade.
For closed systems, the minimum required equipment is similar and is discussed below.
Step #1 - purchasing the necessary equipment
The mandatory list of equipment for closed heating systems includes:
- expansion tank;
- overpressure relief valve;
- circulation pump;
- automatic air vent valve;
- in the case of a two-pipe system, collectors (another name is combs);
- pipes.
When purchasing a heating boiler for autonomous water supply, some of the equipment may not be purchased. Equipment offered for sale, as a rule, is already equipped with a circulation pump, safety valve, expansion tank, and pressure gauge.
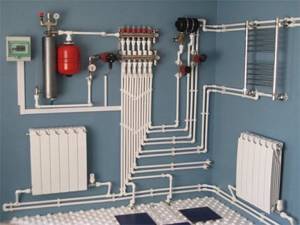
Before choosing the necessary equipment, you should draw a diagram to scale and make a list of required elements
Step #2 - installation of heating boilers
Heating boilers are available in floor-mounted and wall-mounted versions. They are mounted depending on the version.
Among the wall-mounted boilers there are turbocharged ones. These are boilers that forcibly remove exhaust gases and supply air to the combustion chamber.
In such boilers, ultra-efficient fuel processing occurs, as a result of which the exhaust gases have a low temperature.
Gas removal and air supply are carried out using a special coaxial pipe. The pipe is laid out horizontally with a slight slope to the street. The slope is necessary to allow the resulting condensate to drain outside and not inside the boiler.
The choice of piping scheme for a wall-mounted boiler can only be of a closed type, since all wall-mounted boilers are autonomous.
In all other boilers, including floor-mounted manual loading ones, exhaust gases are discharged into a vertical chimney. The part of the chimney facing the street must be insulated to prevent the formation of condensation.
For a floor-standing, solid fuel heating boiler, you need a solid base and a platform made of fireproof material (iron sheet, ceramic tile). The piping scheme for a floor-mounted manual loading boiler can be open and closed, single-pipe and double-pipe.
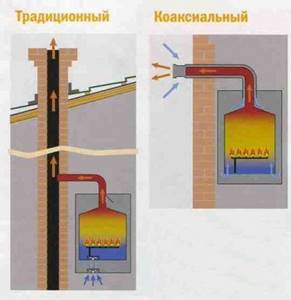
When installing a wall-mounted boiler with a coaxial pipe. The best place is the outer wall of the boiler room, so the length of the pipe will be minimal
Step #3 - selection and installation of an expansion tank
Even if an expansion tank is already installed in the heating boiler, it is strongly recommended to install an additional one. The volume of the expansion tank is selected based on the volume of coolant.
A good option for installing an expansion tank would be to install it on a standard comb, along with an automatic vent valve and a pressure gauge.
Before installing the expansion tank, it must be pumped with air to the recommended pressure, usually 1.5-2.0 Atm. It is better to install the expansion tank next to the boiler.
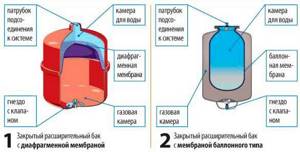
For reliable operation of the device, it is necessary to check the air pressure at least once a year using a special device for measuring it
Step #4 - installing a circulation pump
The need to use an additional circulation pump, its parameters are determined by hydraulic calculations. There are a few general comments.
Operation of the circulation pump is designed for temperatures of about 60 °C. Therefore, it is advisable to install the pump on a return pipe with a colder coolant.
Also, for safety reasons, if the coolant overheats to the point of steam formation, when installing the pump on a straight pipe, the pump impeller will stop working, which will lead to even greater overheating.
The direction of movement of the coolant is clearly marked on the body of the circulation pump. The circulation pump can have any orientation, but the rotor must always remain in a horizontal plane.
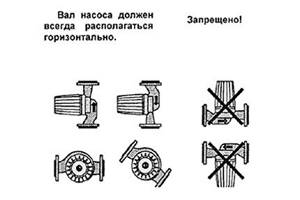
It is possible to mount the pump so that the shaft rotates in sliding bushings. Otherwise, the pump will quickly fail
Step #5 - Automatic Vent Valves
Even if air pockets form, one valve will be sufficient to remove gases. Sooner or later, the air, dissolving in the coolant, will come out through the valve. However, the dissolution rate is low and such gas removal can take up to several months.
Correct adjustment is only possible on a completely de-aerated system. To avoid waiting several months, it is necessary to install several automatic valves.
A good place to install automatic valves is on manifolds and manifolds.
It makes sense to install a safety valve, a pressure gauge, and an automatic air vent valve together - in a safety unit
Step #6 - choosing a location and installing the collector
The purpose of the collector is to distribute coolant to consumers. Consumers can be heated floors, heating radiators, and coils in bathrooms.
Structurally, the collector is a section of pipe with several bends. The number of taps must correspond to the number of consumers.
For a two-pipe system, the number of collectors is at least two. For each outlet, adjustment of the volume of supplied coolant is provided.
When organizing heating for a two-story or more house, each floor has its own pair of collectors. If there are heated floors, a separate collector must be allocated for them.
Separate collectors are required for the following reasons:
- due to the difference in the hydrodynamic resistance of pipelines between the nearest and distant heating radiators;
- with different characteristics of consumers;
- for reliable configuration of the entire system.
Due to different hydrodynamic resistance, it may be necessary to install an additional circulation pump in the heating boiler piping circuit, for example, on a heated floor manifold.
For ease of adjustment, the collectors are mounted in one place, in a special cabinet.
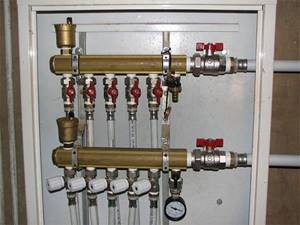
The manifold is an excellent place for mounting auxiliary equipment: pressure gauges, safety valves, flow meters
Step #7—installation of the pipeline
The next stage of arrangement is the installation of heating pipes. Depending on the type of system, this stage of work will differ slightly. We propose below to consider the features of pipeline assembly for a one- and two-pipe system.
Pipes for one-pipe system
For single-pipe systems, steel pipes are the most common. A large selection of diameters and low cost make this a preferable choice.
When installing pipes, a slope of at least 5 mm per linear meter must be observed. Aesthetically, inclined pipes look worse, but ensure reliable circulation of coolant, even if the circulation pump is turned off.
Heating radiators are connected in an open system using a pipe with a minimum diameter of 32 mm. The forward and return lines are made of pipes of larger diameter, at least 50 mm.
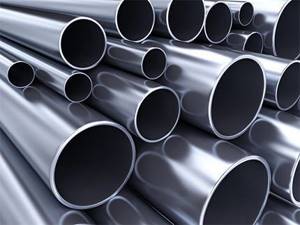
Steel pipes are a practical material, but are susceptible to corrosion and require painting. Polymer pipes have lower hydraulic resistance and therefore can be used with smaller diameters
Pipes for a two-pipe system
The two-pipe system does not require large diameters. The material of the pipes can be varied: polypropylene, metal-plastic, etc.
The main thing is that the pipes can withstand pressure and temperature. Since a two-pipe system does not require natural circulation, the pipes are hidden in the underground space or in the walls. All pipes must be insulated to prevent heat loss.
The pipes connecting the collector have a diameter of 20-25 mm, connecting heating devices 16-20 mm. respectively.
The use of modern materials and installation techniques will not require welding. All installation is carried out as in the designer
Each bend in the pipe adds flow resistance and should be avoided whenever possible. A large difference in the hydrodynamic resistance of the branches of one collector will make regulation difficult or impossible.
After installation of all components, high-pressure testing must be performed. The pressure should remain constant for at least 24 hours.
If the heating system has successfully passed the tests, the heating boiler piping can be considered complete.
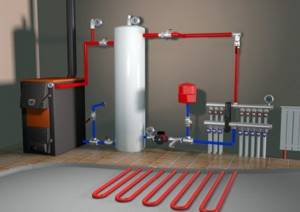
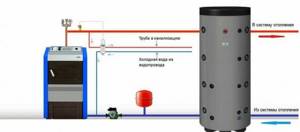
Connecting a solid fuel boiler with a heat accumulator
If the boiler does not have the option of automatic fuel supply, you will have to monitor the amount of fuel in the firebox yourself and periodically load a new portion into the flame. The more actively the boiler is heated, the more intensively the heating system works. This is not very convenient, because a lot of time is spent on the above manipulations to maintain the desired temperature in the room.
This inconvenience can be partially overcome by a buffer tank - a kind of heat accumulator, which is a tank of water, the heating of which occurs from the supply circuit of the heating system. The list of advantages of installing it is:
- the ability to reduce the elevated coolant temperature at the peak of boiler operation;
- heat transfer to the cooled coolant when the temperature of the liquid in the system decreases.
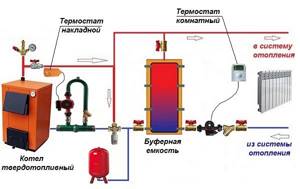
It takes quite a long time for such a heat accumulator to cool down. When choosing a buffer tank, assume that for a house with an area of 150 m2 or more you will need a tank with a volume of at least 1 m3.
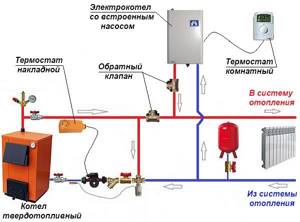
Electrical connection
When connecting an electric boiler with your own hands, follow a number of rules:
- Devices with a power of up to 3.5 kW are connected to the outlet;
- power devices with a power of up to 7 kW are connected to the distribution panel;
- Boiler equipment with a power of up to 12 kW is connected to a single-phase 220 V network; for units with a power of more than 12 kW, a three-phase 380 V network is used.
Materials required for installation:
- Power cable brand VVG with copper conductors. The number of cores depends on the number of phases - 3 or 5, the cross-section must correspond to the power of the boiler unit, this parameter is indicated in the product data sheet.
- A bunch of RCDs complete with a circuit breaker or a differential circuit breaker. The rating of the latter depends on the power of the heating boiler. The triggering voltage of the difavtomat is 30 mA.
- Ground loop. To lay a grounding loop near a private house, you can use a strip with a cross section of 40x5 mm + 3 steel rods d16 mm 2 m long with a sharp end.
In order to independently connect an electric boiler, you should remove the front panel of the case, connect the cores of the power cable of the corresponding colors to the terminal block contacts. When installing an electric heating boiler with your own hands, it is worth remembering that such voltage is a source of increased danger.
Previously, we told you how not to make a mistake when choosing a boiler for a private home. If you decided on appliances powered by electricity, then our topic today about how to install an electric boiler in a heating system will be very interesting to you. There are two aspects that need to be taken into account - the interaction of the boiler with the circuit and its electrification. Each of them needs to be given due attention. We will help you figure out how to install an electric boiler with one or two circuits, operating from one or three phases, into the heating system.
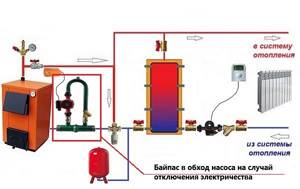
Additional mixing unit
An additional mixing unit is mounted in the area between the buffer tank and the heating radiators. This element of the system connects the return and supply circuits and allows you to avoid strong temperature differences when the coolant almost begins to boil at the peak of the boiler operation.
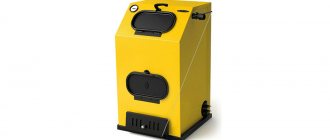
By the way, for solid fuel boilers “Kupper” with an automatic pellet burner, an additional mixing unit is not needed and when installing them, you can safely limit yourself to the most primitive piping scheme.
In the Kupper OVK 10 model, an automatic pellet burner (APG) is installed in place of the ash door of the boiler, and the container into which pellets are loaded and the built-in control panel are installed on the boiler itself, which saves space in the room. Before starting the work process, the operating parameters of the heating system are set on the remote control. Using an automatic remote control, you can control the ignition, combustion process and maintain a balanced temperature of the coolant without the participation of additional mixing units that complicate installation. Another advantage of this model is that the ash is partially removed under the influence of a built-in high-power fan.
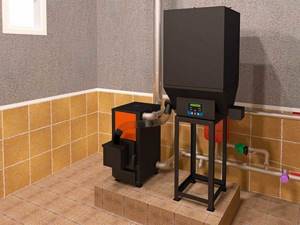
This boiler is suitable for installation in rooms up to 100 m² and can be used in a residential building, country house, garage, and other places. The equipment can be easily integrated into different types of heating systems. A nice bonus is the presence of a stove with a hob.
How to connect to the mains
Your home may have one or three phases. The difference in the number of phases allows you to evenly distribute the total load across individual threads. There is no such possibility in a single-phase line. Before powering the boiler, you need to take care of the quality of the wiring, because the power of the heaters reaches a significant 32 kW. The selection of power is carried out based on the area of the heated room and the amount of heat loss in the house.
The heater's passport indicates the parameters of the wires that are used to install an electric heating boiler with your own hands. It is worth noting that due to the high load, manufacturers recommend using copper wires. In a single-phase and three-phase line, the number of wires differs accordingly. In single-phase there are three (phase, zero, ground), and in three-phase there are five (three phases, zero, ground). The number of phases does not in any way affect the number of heating elements. A heater with three heating elements can be either single-phase or three-phase. The difference lies in the way the heating elements are connected into one network.
Boilers come in different prices and configurations. The simplest of them are equipped with:
- tank with heating element;
- heating element on/off relay;
- heat sensor.
Such primitive automation allows you to regulate the temperature of the coolant, preventing it from overheating. Cheap models do not have a pump or a complex control unit, just all the essentials. Typically such units are single-phase. Installing an electric heating boiler operating from a single phase is quite simple. To connect it to the electrical unit, two wires are supplied (phase and neutral). The ground connection can be screwed onto the housing if there is no contact provided for it on the block. At the same time, it is always possible to assemble a separate control with numerous sensors.
Phases are indicated in Latin letters
More expensive models are equipped with a circulation pump and an expansion tank. The pump also needs electricity. In addition, the heater is equipped with a lot of sensors with the ability to configure them. To do this, complex programmable control units are installed, which are responsible for the operation of both the boiler and the pump. To supply current, the block has terminals with markings on them. Phases are designated by letters:
- A or L1;
- B or L2;
- C or L3.
It doesn’t matter in what order you connect the wires when installing an electric heating boiler; you can do this in any order. We are talking only about the phases in three-phase boilers; zero and grounding must be in place.
For such boilers, additional electronic units are also installed, which can both expand the functionality of the device, for example, work only at night, and secure the entire network.
A fuse installed on each phase in front of the boiler itself will cut off the power to the heater in the event of any malfunction. There are also fuses at the entrance to the house. The boiler is powered in three phases at once; different separate flows are used for lighting and sockets. It turns out that if you do not install a fuse in front of the boiler, when the fuse trips, the entire house will be de-energized, which is very inconvenient.
The installation of an electric heating boiler is accompanied by the installation of meters with the ability to count the number of kilowatts used during the day and night. Electricity is cheaper at night, so it makes more sense to run the boiler more at night than during the day. A time relay is installed in tandem with such a counter.
Despite the wide range of various circuit diagrams for heating, houses with stove heating are still successfully operated by their owners.
You can read about the types of water heating in a private home here.
Emergency circuit connection diagram
One of the obvious and most common problems that occur in heating systems with solid fuel boilers is overheating of the coolant. It is extremely undesirable to allow hot water to be converted into steam and to cool it down to the required levels in a timely manner.
What to do if the boiler gets very hot - read on our Zen channel.
There are three simple and effective methods of cooling the coolant:
- In addition to the main one, an additional heat exchanger is installed in the firebox. The first will work to heat the coolant, the second will provide cooling of the liquid. The inlet pipe connects to the water supply, and the opposite pipe connects to the sewer. If you urgently need to cool the coolant, simply unscrew the valve on the pipe and cold water will flow into the second heat exchanger.
- During the process of arranging the system, one heat exchanger is mounted inside another, which ensures a rapid decrease in the temperature of the working fluid if necessary.
- Two pipes are connected to the heat exchanger pipes, the first is connected to the water supply system, and the second to the sewerage system. Next, a valve is installed to supply cold water to the system. Excess coolant is discharged into the sewer.
All three methods are equally effective and achieve the same results.
Additional connection diagrams for a solid fuel heating boiler
We recommend that you pay attention to such an important circumstance that directly affects the choice of piping scheme for solid fuel boilers, such as interruptions in the electrical network that occur from time to time. This is fraught with a sudden boiling of the coolant with all the ensuing consequences. This problem can be solved by installing a bypass, which will isolate the circulation pump from the heating circuit.
Bypass (emergency path) is a backup pipeline through which coolant can be supplied bypassing some section of the main pipe or in parallel. One end of it is connected to the inlet pipe, the other to the outlet pipe. A bypass is often used to install additional devices on it, for example, shut-off valves, with the help of which, if necessary, they block the water flow in the main line, redirecting it to the spare one. To completely shut off the system, the outlet pipe is equipped with a tap. Shut-off valves can also be mounted on the bypass, on the inlet pipe.
Read more about bypasses on our Zen channel.
Single-pipe scheme with top wiring
It is possible to provide a building with gravity heating by distribution along the top, which uses one pipe.
Supply and return are located horizontally. Vertically - connecting risers. The top row is provided with a branch from the supply, a riser to the bottom. It turns out that the bottom row receives an indirect connection, connected to the return line.
The heating on the lower floor is slightly worse than on the upper floor. Related to pipe cutting.
The boiler is located below the supply, diverting the accelerating riser upward. At the highest point is the expansion tank.
The slope of the highways is required. From the tank, the angle should not be more than 10 degrees. The return line is with a maximum slope of 5.
Combination boilers
Recently, combination boilers, which provide continuous heating of the coolant regardless of external circumstances, are gaining increasing popularity. The system can be supplemented with another boiler, gas or electric. The connection diagram for an electric boiler to a solid fuel boiler is carried out in a parallel way. Equipment with insertion into the supply and return circuits is added to the piping. Shut-off valves must be installed at the junction of two connections. In the case of an automated system, a 3-way valve with a thermal head is used.
The assortment of our online store includes boiler models that can be used in similar schemes, for example, “Kupper Praktik 20”. This equipment is designed to heat rooms with an area of 130-200 m2 and can operate on both coal and wood. Thanks to its compact size, it takes up little space. Another option, “Kupper Praktik 8”, is intended for small rooms from 40 to 80 m2. Thanks to the presence of a heating element block, the coolant temperature is maintained for some time after the fuel has burned out.