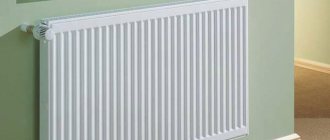
Everyone knows what cast iron radiators look like. They are rightfully considered long-livers in the heating market. Invented back in 1855, they are still popular among buyers. Despite the huge selection of imported and domestic radiators of various shapes and designs, many still settle on cast iron models. After serving for some time, the batteries begin to leak and heat up worse. What is better - to change them or repair them? Experts believe that repairing cast iron batteries makes sense. If they are put in order, replacement can be delayed for several more years.
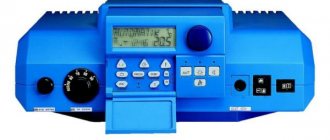
Design and principle of operation of cast iron radiators
Radiators have a sectional design. In appearance, the sections resemble metal columns, inside of which there are channels for coolant. These elements are connected to each other using a nipple system. The joints are sealed with paronite or rubber gaskets. The height of the devices is 350-1500 mm, the depth reaches 65-500 mm. The power of radiators depends on the number of sections and heat transfer area. Indoors, cast iron batteries are placed under window sills. Usually wall mounts are brackets, but there are floor models with legs.
Depending on the model, cast iron radiators have a power of 100-300 W. Approximately 25-35% of heat is transferred by radiation (radiation), part by convection. Thanks to radiation, heating is better: the radiator heats objects, not just air. Warm layers of air rise upward, and radiation provides heating to the lower part of the room. This creates the most comfortable temperature conditions.
Restoration of cast iron batteries using improvised means
How to repair it depends on where the cast iron battery is leaking. If a small gap has formed at the junction of the sections, then this can be corrected using an ordinary clamp, which is sold on the market and in any hardware store. The clamp has the appearance of a metal structure with two rubberized plates on the inside, which are connected by two bolts to each other. Careful fixation occurs with the help of nuts tightened to the required density.
The rubber gasket is the main element for blocking leaks. By the way, clamps come in all sizes, so it won’t be difficult to choose the right one.
There is another method to repair cast iron batteries at the junction of sections if you do not have such a clamp at hand. You can use a simple piece of rubber cut from an elastic medical tourniquet or a bicycle inner tube. The leakage area must be wrapped in several layers of rubber. You can secure it with wire, wrapping it on top.
What and why can break in the radiator
Cast iron tolerates the alkaline coolant environment well, is slightly susceptible to corrosion and has high mechanical strength. Heating devices have a simple design and are very durable, so breakdowns due to simple metal wear are a rare occurrence. A striking example of a potentially possible service life is working pre-revolutionary batteries that have been preserved in the homes of some St. Petersburg residents. But cast iron batteries also have weak points; it is in them that the “root of evil” lies.
The most common causes of battery problems
- Heavy weight, bulky
Cast iron batteries are large and heavy, which becomes a problem during installation. The slightest flaws in the installation can lead to malfunctions during operation. If you do not take care of a sufficient number of powerful brackets, the batteries may become distorted over time, which will also lead to negative consequences.
- Insufficient resistance to high pressure and water hammer
Cast iron has good technical and operational characteristics, but the load that domestic heating networks can create may be too great. Due to water hammer, leaks are possible at the junctions of sections.
Along with hot water, foreign impurities, small particles of dirt and rust circulate through the pipes, which leads to blockages in the internal channels. Batteries must be washed promptly, otherwise malfunctions in their operation are inevitable.
- Wear of intersection gaskets and threaded nipples
Joints are always a “risk factor”. Nipples and gaskets last much less than cast iron. They need to be replaced periodically. After this, you can forget about heating problems for a long time.
Signs of a broken cast iron radiator
- The room doesn't warm up well
If during the heating season the room temperature is lower than usual, check how things are with your neighbors. If they have no complaints, it's time to tackle the heating. Perhaps regular flushing of the channels will solve the problem.
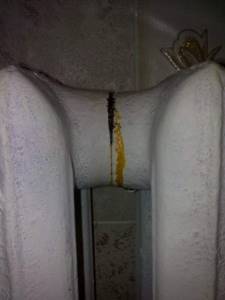
- There is a coating on the radiator
It usually forms at joints. The reason is the low quality of the coolant. When the gaskets wear out, they leak fluid. After drying, a residue similar to scale remains.
The most obvious sign of malfunction is the appearance of leaks. Repair involves sealing and applying a metal clamp. If there are several leaks in the radiator, it is better to replace the device.
What to do from the very beginning
If the damage is serious enough, you must immediately call an emergency team. In any case, professional plumbers will at least have all the necessary tools and materials to localize the accident.
If boiling water is pouring out of the battery in all directions, then it is better to throw something like a blanket over it. This will not eliminate the leak, but it will allow you to approach the heating device without the risk of thermal injury.
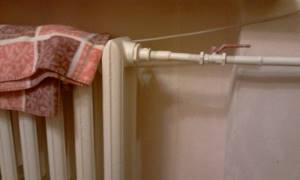
Throwing a blanket over the radiator
Shutting off the water
Remember, is it possible to shut off the water supply to the heating system in the apartment? If the water can be turned off with a tap or valve, then this makes it possible to at least save property.
Typically, the valve for shutting off the coolant into the heating system is located on the main pipe near the entrance of this pipe to the basement.
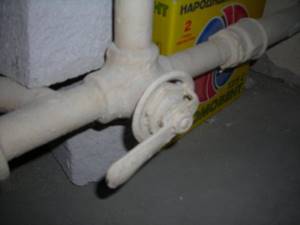
Typical view of a tap on a heating system pipe
If the leak is not very strong, you can fix it yourself.
Fixing a leak using a self-tapping bolt
If a leak has formed on a cast iron radiator, it can be eliminated using a self-tapping bolt, which is fixed in a hole on the battery section or on a section of heating pipe.
Repairing a minor leak with a cement-plaster cast
Before fixing a leak in a heating radiator, you need to prepare.
In order to “defeat” a minor leak, you will need the following materials and tools:
- ordinary medical bandage;
- cement;
- plaster (alabaster);
- salt;
- container with water.
The leak is eliminated by applying a special bandage to the damaged area.
If you manage to turn off the water, then the next steps are as follows:
- Cement is diluted in a container with water to the consistency of thin sour cream;
- The bandage is cut into strips about 25-30 cm in length;
- The bandage strips are thoroughly soaked in the cement mixture;
- Impregnated strips are wrapped around the damaged area;
- The process is repeated until a strong bandage is formed.
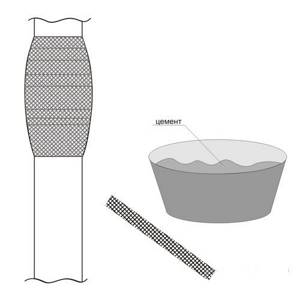
Repairing a leak with a cement bandage
Important! If you cannot turn off the water, then instead of cement you should use alabaster, which dries quickly. A cement bandage should be applied on top of the plaster cast.
If a leak has formed at the threaded connection, then regular table salt should be used as follows:
- Soak strips of bandage or cloth in water;
- Roll the soaked strips generously in salt;
- Wrap the leak area.
Salt, dissolving in water, cokes the gap. A cement dressing should be applied on top as described in the instructions above.
Leak elimination scheme
Fixing a leak using a clamp or rubber
If the location of the damage is at the connection between the radiator and the main pipe, then it is possible to stop the leak for some time if you use a rubber band and wire (a car clamp). A piece of rubber is wrapped around the damaged area and secured with wire.
Pieces of rubber can be cut from a bicycle inner tube. To do this, you need to prepare strips 4-5 cm wide and 30-35 cm long.
If there is a clamp, the leak can be completely stopped for some time. Therefore, it is useful to have a couple of clamps on hand at home just in case, especially since their price is low.
Photo of the applied clamp
Repairing leaks with moisture-resistant glue
If the battery leaks at the junction between the sections, then the problem can be eliminated using a cloth soaked in moisture-resistant and heat-resistant glue. After the glue dries, the leak will at least be reliably sealed.
A two-component epoxy adhesive is suitable for eliminating leaks.
Repairing leaks with a sealed seal
For minor damage, you can use a special polymer or powder-based sealant. Such compounds are sold in hardware stores, and they are intended specifically for such repairs.
Upon contact with air, the material polymerizes. When cured, it creates a strong filling that will allow time for more significant repairs.
Some types of such compositions are two-component polymers that harden when the two components of this product are mixed. Other products harden through a chemical reaction with oxygen in the air.
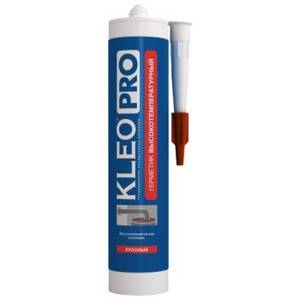
Heating system sealant
The technology for eliminating leaks using a polymer composition is shown in the video:
Fixing leaks using welding
If you have the skills to work with welding equipment, such damage can be easily repaired.
Important! Before welding work, the heating system must be emptied of coolant.
It is worth noting that welding is only applicable to steel radiators and when welding, care must be taken to ground the device.
Do-it-yourself repair of cast iron radiators
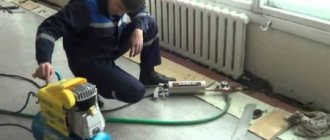
Usually the location of the leak is easily determined. If difficulties arise with diagnostics, remove the radiator, immerse it in a bath of water and monitor the appearance of air bubbles. The place from which they rise is not airtight. When the leaking area is identified, materials and tools should be prepared:
- thin metal cable;
- putty;
- a piece of fabric;
- a metal clamp or something that can replace it: electrical tape, wire, etc.
Work order
- Cover the floor with oilcloth and place a rag on top to absorb excess moisture.
- Using a thin cable, clean the leaking area of the radiator down to the metal, degrease it with any solvent or gasoline.
- Seal the leak. Apply the putty to a strip of fabric and wrap it tightly around the damaged area in several layers. If metal powder or epoxy resin is used as putty, then 2-3 layers are enough. If zinc white is 4-5. Cold welding is also used as a putty. It doesn't need fabric.
- Place a metal clamp over the putty and tighten with bolts and nuts. Make sure that the connection is on the side opposite the leak. If electrical tape is used instead of a clamp, wrap it in several layers and secure with wire.
Repairing cast iron batteries is not difficult and does not require special knowledge and skills, but if you have doubts about your abilities or the leak is really serious, it is better to contact specialists. It makes sense to replace old radiators that have leaked more than once, otherwise their repair will become a constant task during each heating season.
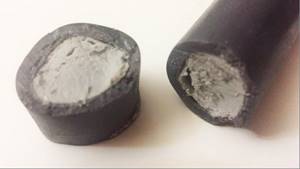
Cold welding - what is it, application for heating system
For gluing various materials, adhesives of different compositions and purposes are used.
Thus, for paper, office glue and PVA are used, in construction, synthetic glue with vinyl fillers is used for wallpapering, and rubber glue is used for shoe repair. Unfortunately, universal adhesives have not yet been invented, but there are already compounds that can reliably glue metal. An example of such a composition is cold welding.
Cold welding technology is based on epoxy adhesive, consisting of epoxy resin and a hardener. In its normal state, it is a substance reminiscent of thick sour cream, only yellow in color, but when mixed with a hardener, epoxy resin becomes more liquid and is suitable for application to even the most complex surfaces. This moment lasts relatively short - only 10-15 minutes, after which the resin begins to harden, forming a durable coating.
The advantage of this technology is the high strength of the connection due to the high adhesion of the substance to the surface of the metal being bonded and resistance to aggressive chemical materials. Unfortunately, there are also disadvantages: the glue itself can withstand high pressure, but under mechanical stress there is a high probability of breaking the strength of the connection.
In cold welding compositions offered on the market for gluing metal, the hardener and resin are not in a liquid, but in a paste state. The glue is in a stable state and can be stored in packaging for a long time. It consists of an inner layer - consisting of a hardener, and an outer layer, which includes a resin. The third component included in the adhesive for gluing metals is sulfur or aluminum powder; these substances play the role of a reaction catalyst - when mixed, they heat up, as a result of which the hardening process accelerates, so that a welding effect is obtained.
The second option for cold welding is a traditional two-component adhesive based on epoxy resin - the resin and hardener are stored in tubes. To obtain the required amount, you must mix the components according to the instructions and apply to the surfaces to be bonded. To obtain a more durable connection, aluminum powder or bronze powder is added to the composition.
Video: heating battery repair
I begin preparing for the new heating season as soon as the previous one ends. First, I inspect the radiators for rust and leaks. In the summer I will begin repairs, if any are required. I usually make do with my own resources, and the work is limited only to cold welding and touch-up. There was a case when a rubber gasket came out at the connection of two sections of a new battery, then they called a technician to replace it. But I consider clamps to be a temporary measure, which is used when it is impossible to turn off the heating and replace a section or the entire battery. In the summer I always change the problem area so that I don’t inadvertently flood my neighbors during the next heating season.
Thank you very much for the useful site!)
what is the size of the gaskets? (internal diameter and outer diameter? what is the thickness of the gaskets separately from rubber and separately from paranit? I tried to find gaskets for repair and did not find them. Neither in our village nor in the regional center. Now I have made a die cut and will try to make them from car inner tubes .
To prevent repairs from becoming force majeure, it is better to carry out diagnostics and maintenance of the system before the heating season begins
The optimal time to start repairing heating radiators in an apartment is the warm season. The heating season has already ended, the new one has not yet begun, and you can restore the damaged appliance without haste. However, troubles often happen when you least expect them. So, the battery can break through in winter. It’s good if someone is at home at this time, then you can quickly react and prevent the neighbors below from flooding. If a breakdown occurs during the heating season, it will take a lot of effort and patience to restore. For some time you will have to turn off the heat supply and live in a somewhat uncomfortable environment. It is also important to warn your neighbors about the upcoming work and ask them to be more tolerant, because you all want to quickly get the same comfort and coziness.
If the repair of heating batteries cannot be delayed, do not hesitate and start repairing. The amount of effort and money spent depends on the efficiency and thoughtfulness of actions.
If you are not very agile and do not know how to repair a heating battery yourself, it is better to seek the help of a professional. However, if you have the necessary set of tools and the desire to repair the damage yourself, get down to business. First you just need to understand the features of different types of radiators.
What does the battery consist of?
If we are talking about old-type radiators, then in appearance they resemble accordions, while modern models are flat, due to which they heat up more evenly. Cast iron is a very strong material, but even it is not eternal, it has a limit of stability.
So the service life varies from 20 to 30 years, depending on operating conditions. If maintenance is carried out in a timely manner, the service life increases several times and the battery will last almost a hundred years.
Unfortunately, problems often arise in the places where the sections are fastened to each other; they wobble due to water or crack due to age. This is where the leak begins, which is best localized as soon as possible.
Placing a basin or saucepan under a dripping radiator is not a solution, as the crack tends to grow, so that one day a flood may occur! If we are talking about the winter period, then there is generally boiling water in the pipes, which poses a serious danger to the life and health of people.
Types of radiators
The material from which the radiator is made affects the methods of repair and maintenance
We present the main types of radiators and describe their features.
Cast iron sectional batteries are a durable and well-known type. They are durable, reliable and heat-intensive. Not subject to corrosion. The quality of the water circulating through them does not matter. Due to their heavy weight, such heating devices are difficult to install and maintain. In such batteries, the intersection gaskets often wear out, resulting in a leak.
Aluminum batteries are characterized by an aesthetic appearance, low weight and high heat transfer. However, they have characteristic disadvantages: water quality matters and damage is possible due to pressure surges. If chemical impurities in the heating fluid have accumulated, repairing aluminum heating radiators is impossible. When the water quality in the room is constantly monitored, then it is possible to install aluminum models.
Steel batteries are characterized by low weight and high heat transfer. It is not recommended to install such models in houses with centralized heat supply, since they are susceptible to corrosion and have a short service life.
Bimetallic radiators are characterized by a pleasant appearance and corrosion resistance. They provide a high level of heat transfer and are designed for high pressure (up to 40 atmospheres). Repairing bimetallic heating radiators with your own hands allows you to eliminate leaks, replace gaskets, adjust or replace regulators, and flush/clean pipes.
Repair of polymer pipes
Polymer pipes require specialized compounds.
Regardless of the chemical composition of the material being processed and the nature of the welding used, it is imperative to comply with the conditions and recommendations specified in the instructions.
Cold welding for plastic heating pipes proceeds according to the following scheme:
- An obligatory step is to prepare the surface of the material being repaired. To do this, the surface of the pipe ends is treated with sandpaper and then degreased. Roughness on the pipe will increase the degree of adhesion with the adhesive. Greasey contaminants can react chemically with cold weld components and degrade their performance;
- determine the correct perpendicularity tolerance of the ends. In the case of pipes with a diameter of 20...40 mm, it should be no more than 2 mm;
- measure half the length of the coupling at the ends of the pipes to determine the area of the surface to be treated;
- the marks are scraped, that is, a thin layer of material (0.1...0.2 mm) is removed from the pipes, burrs are also removed;
- Direct preparation of the adhesive composition consists of mixing the components until a homogeneous mass is formed. In the case of plasticine welding, hands are moistened with water before mixing. The paste will not stick to the skin. The shelf life of liquid formulations lasts no longer than 3 minutes, so you need to act quickly;
- the prepared mixture is applied to the surface of the material being repaired or joined. Everything is put under pressure. What force should be exerted on the seam is indicated in the instructions for cold welding.
Selecting a heating device
The selection is made based on the following factors:
- number of floors and room location;
- the need for shut-off and control elements is determined;
- pipe material;
- temperature regime of the system;
- selection of installation scheme;
- heating system wiring;
- region of residence.
In addition, when choosing, you need to take into account the dimensions of the batteries. Having counted the number of sections, you can begin installing the heating device. The sales consultant, based on the size of the room, will suggest the required number of sections. However, you can perform such calculations yourself. If the apartment's ceiling height is no more than 3 m, then 1 section will heat 2 square meters. m. If during the calculations you get a non-integer number, round it up.
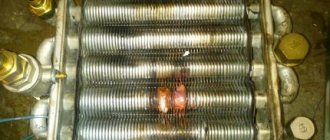
Eliminating leaks at the joints of radiator sections
Sometimes it is quite difficult to determine the location of a radiator leak, as water begins to curl over the entire surface of the battery. To find a place where the material could not withstand the pressure of water, you should completely wipe the surface of all sections and carefully inspect them. When you see where water appears, you should turn off the shut-off valves so that there is no liquid left in the radiator. After this, use the Mayevsky tap to reduce the pressure.
You should begin eliminating the leak only after water has stopped dripping from the rusted area. To eliminate intersectional leaks in the radiator, cold welding can be used. The most common type is epoxy mastic with various additives.
But first you need to clean the junction of the sections. The first step is to clean the surface of paint, and you can use a steel cable to remove rust and dirt. The reliability of the patch made will depend on the quality of cleaning of the joint.
After purchasing a specific product, you should carefully read the instructions, since some types of such compounds are not intended for a certain type of pipe. Usually, to create the desired composition, it is necessary to combine several components and apply it to the damaged area using a syringe. The mastic dries in about 3 hours, after which the battery can be used again. One-component compounds are also often used, which must be kneaded before applying to the battery.
Common causes of radiator failures
- Incorrect selection of model. The choice of battery type depends on the diameter of the pipes, pressure and temperature of the coolant.
- Repair of heating radiators may result from incorrect connection to the pipes.
- If the coolant contains a large amount of chemical impurities or pressure changes occur too often, the battery metal will corrode.
- Low-quality water contributes to the formation of plaque at the joints of radiator sections and also clogs the pipes, which entails the need for cleaning.
- Repair of heating batteries is often necessary due to the destruction of threaded nipples. To prevent a leak from catching you by surprise, it is important to systematically change the gaskets.
- Battery noise - if you hear clicks, this does not always indicate a malfunction. However, it is better to call a team of plumbers who will carry out soundproofing.
- Air locks are formed due to low pressure or due to leaking pipes.
- Due to scale in the boiler and leaks at the pipe junction, the pressure drops.
Types and causes of leaks
As a rule, a leak occurs in the off-season, when the heating is turned off, as the metal cools down, the metal narrows and water begins to seep into the threaded joints.
If the heating radiator is leaking, then it is necessary to determine the cause and location of the breakdown. Each plumbing point consists of a heating radiator and an adjacent pipeline. The connections of these elements can be disrupted under the influence of the following factors:
- Long service life as a cause of wear;
- Poor installation of the heating system;
- Mechanical impact, brute force;
- Corroded metal.
Depending on which elements the coolant leak occurred between, the following types of failures are distinguished:
- Violations of the seal between the riser pipes and the battery pipes;
- Partial destruction of the main pipes that connect the radiator and the riser;
- Leakage in the area of intersection connections;
- Formation of a fistula or crack in one of the radiator sections.
For each of these cases there is a different way to eliminate the accident. If the battery is dripping, don’t rush to find out what to cover it with. You may not need to smear at all.
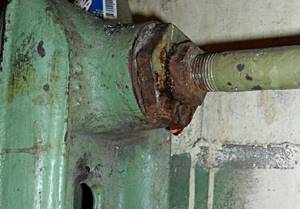
Dripping between the nozzle and the main pipe
A leak at the junction is often the result of improper installation, or a domestic situation where the batteries were used as a support for heavy objects or residents. To complete the repair you will need:
- Car clamp or wire;
- A piece of thin and flexible rubber.
Procedure:
- Cut strips of rubber measuring 5x35 cm or use a rubber bandage from a pharmacy;
- Wrap the strip around the damaged area;
- Secure the rubber with wire or a zip tie.
In this situation, a clamp will be a more suitable option, since it is inexpensive and fixes the damaged joint reliably, evenly, without the risk of overtightening.
Main pipe leaks
There are always two such pipes. One for supplying coolant to the radiator, and the second for discharging cooled water. They are made of steel and tend to corrode and wear out from the inside over time for two reasons:
- Filling with water in the off-season;
- Impurities in water supplied through heating mains.
Most often, the question of what to do if the heating radiator is leaking arises at the height of the heating season. In the event of an accident, a cement-plaster bandage is used on a straight section of pipe. To prepare it you will need:
- Non-sterile bandage;
- Cement;
- Alabaster;
- Container for mixing the mixture.
Important! Alabaster is required when there is no way to turn off the water. It is applied as the first layer, as it dries faster than cement and adds reliability to the dressing.
- Mix cement with water to the consistency of liquid sour cream;
- Prepare strips 25-30 cm long;
- Soak the bandage strips in the mixture;
- Wrap them around the damaged area layer by layer;
- Continue until a tight bandage is obtained.
If a stream of water gushes like a fountain
If a fistula has formed and water flows in a stream, then you can hammer in a wooden wedge before the mechanics arrive. The wood gets wet and holds water well.
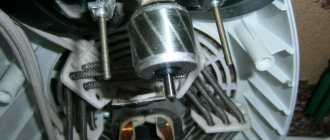
Repair of cast iron heating radiators
Repair of cast iron heating radiators has features
There is a peculiarity in repairing cast iron radiators. Most of them were installed in Soviet times, so unscrewing their plugs is a difficult task. In those days, ropes soaked in oil paint were used for sealing. Over time, they hardened, so the joint must first be heated in order to disassemble the connection.
If a puddle of water has formed under the battery and the humidity level in the room has increased, then it’s time to fix the leak. If the breakthrough is small, a clamp is used, which is fixed to the required density. If you don’t have one at hand, use a rubber gasket and wrap it around the leakage area several times.
Cold welding also works great on small holes. Cut a small piece of “plasticine”, knead it with your hands to a homogeneous consistency and stick it to the leak site.
Another “chemical” method is to apply epoxy glue to the bandage. The battery will stop leaking once the glue sets.
Quick repair of a heating battery with your own hands is also possible using sealant. It is resistant to elevated temperatures and does not evaporate.
All of the restoration methods listed are not long-term. In any case, you should contact specialists who will either replace the old device with a new one or carry out welding work.
What breaks most often
Although cast iron is a great conductor of heat, batteries have wide channels which minimize the risk of the battery clogging. In this case, it will heat the room worse. So why might the battery burst?
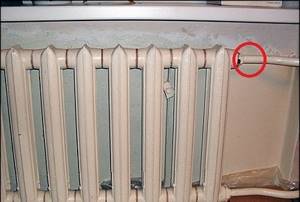
The radiator is too heavy , if the brackets are installed weakly or not deep enough (and it also happens that they are completely forgotten about and the battery hangs on the pipe), over time it sags under its own weight and tilts.
It would seem that this is not the case, but the slightest deviation is fraught with a decrease in the efficiency of the device. If no one paid attention to this and did not correct it, corrosion appears and leaks begin. Initially, corrosion damage appears as a small brown spot that gets larger.
Many people mistakenly believe that older radiators last much longer and work better, but there are also those who prefer newer models. Both will work properly if they are located no higher than the 6th floor.
Provided the water flow is stable and there are no water hammers, in this case the battery will heat and operate at least on the 10th or 20th floor. Otherwise, a leak may form at the joints . Any hardware store has a lot of sealants that will help correct the situation or prevent it altogether.
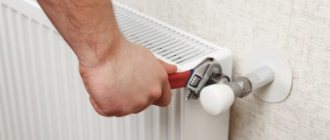
Battery input
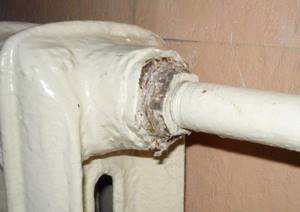
One of the problem areas where leaks often occur is the junction of the battery with the pipe from the riser. Typically, the appearance of such a leak is not caused by damage to the area, but by a leaky seal on the thread. To eliminate such a leak in the heating battery, it is necessary to close the riser as quickly as possible. After this, the pressure in the battery is reduced using a Mayevsky tap or another method. Using an adjustable wrench, unscrew the nut or coupling that makes the connection. Next, the rust at the leak site is cleaned, and the old sealant in the form of flax fiber is removed.
In case of such leak repair work, it is advisable to acquire a new nut or coupling. If they have been used for a long time and have not been changed, then they can easily burst while eliminating the leak. When the threads on a pipe are damaged, you can use a die to fix them. Several turns of tow are wound around the joint and it is covered with Unipak paste. After these steps, the assembly is reassembled and the supply tap is gradually opened. This will allow you to timely determine whether the leak has been completely eliminated.