Cast iron batteries: do-it-yourself repairs, causes of breakdowns
Repair of cast iron heating radiators can be superficial or major. In the first case, they try to eliminate the leak using the simplest methods in order to “hold out” until the end of the heating period. In the second option, the battery is completely disassembled, the sections are unscrewed, and washed.
- Features of cast iron battery repair
- Why can a cast iron battery break?
- Methods for repairing cast iron heating radiators
- How to repair a cast iron radiator
- Advice from professionals
- Conclusion
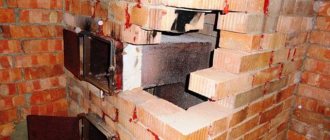
How to fix a cast iron radiator?
The service life of cast iron heating radiators is so long that residents take their work for granted, so if a leak or fistula appears in the wall of the device, they do not know what to do. It is especially unpleasant if the breakdown occurred in the midst of cold weather, but even in the off-season you cannot leave heating elements unattended. As a rule, preventive maintenance carried out by heating network workers can reveal the presence of contamination or leaks in the device.
In this case, there are simple ways to eliminate a leak in a cast iron heating battery.
Construction of cast iron radiators
This type of heating device consists of sections. Models of the old type, even today, are produced in the form of “accordions”, while the new generation has a flat outer panel, which provides better heating of its entire area.
When operating, these devices use two types of heat transfer:
- Radiation, or as professionals call it, radiation accounts for up to 25-30% of heat. It not only heats the air, but is transferred to nearby objects, providing better heating of the room.
- Convection produced by the heating battery ensures constant movement of air masses around the room and accounts for about 75% of the heat transfer.
The structure of the cast iron battery, despite all the external changes, remained the same. It consists of sections equipped with:
- plugs;
- locking devices;
- traffic jams;
- shank and thermostat;
- locknuts;
- nipples and gaskets.
No matter how strong cast iron is, even it has its limits. As a rule, the service life of cast iron radiators is 25-30 years, and with proper care and optimal operating conditions they can operate without interruption for 50 to 100 years.
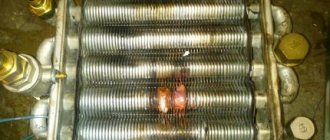
The same cannot be said for the parts that hold the sections together, such as spacers. With frequent water hammer, they can “sway” or crack over time. In this case, a leak appears between the sections of the cast iron battery, which, if not eliminated in time, can cause a serious accident and a threat to human health and life.
To avoid this, you need to check the condition of cast iron radiators after the end of the heating season. In this case, you can detect completely different problems in the heating system.
The most common problems and their symptoms
Although cast iron perfectly tolerates the imperfections of the central heating coolant, and the radiators made from it have wide enough channels so that debris does not accumulate in them, problems can arise even with them. And this despite the fact that there is no wear to this metal. The following factors may be to blame for a cast iron battery bursting or a fistula appearing in its walls:
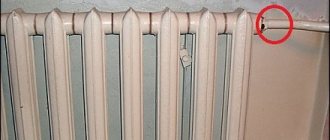
- Everyone knows the heavy weight of radiators made of this metal. If during installation of the structure, insufficiently strong brackets were used, or there were not enough of them, over time it may sag under its own weight and tilt. Even a slight deviation of just a couple of millimeters will reduce the efficiency of the device, and if the distortion is not corrected, then after a few years corrosion will appear in the place where the coolant is missing. At first it will look like a small brown spot, which will grow with each heating season until a fistula forms in its place.
- The reputation of “long-living” is characteristic of both old and new models of cast iron radiators, but provided that they are installed in the contour of an apartment building no higher than six floors. If the heating network is reliable and does not suffer from strong water hammer, then they can be installed in nine-story buildings. Otherwise, under strong water pressure, the cast iron battery may leak at the joints of the sections. In the event that a cast iron battery leaks during the heating season, you need to know in advance how to repair it. Today there are a lot of sealants that will help the device “hold out” until warm days.
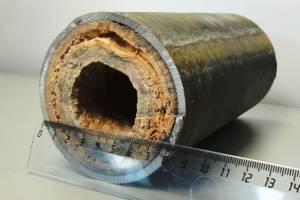
- The internal structure of domestic batteries is such that the cast iron from which they are made has roughness that is completely absent in imported analogues. That is why a lot of debris is deposited on the walls over time, which fills the water in the heating network. Suspensions, particles of rust and metals, all settle and make the wide channel so narrow that it is no longer able to easily pass coolant under high pressure. In this case, the structure may burst anywhere, and then you will have to urgently decide how to eliminate the leak in the cast iron battery.
- Nipple gaskets and threads are the weak “link” of heating devices . If cast iron does not have a statute of limitations, then the same cannot be said about the parts that make up the battery. In order not to lead the situation to the point where repair of the cast iron battery is required, the connections must be checked after each heating season and the gaskets on them must be periodically changed.
Common causes of radiator failures
The urban system also has its advantages - by simply paying for utilities, during the heating season, the owners receive hot coolant in the apartment. No special care is required, but over time the pipes become clogged or leaks appear.
The main causes of problems associated with the need to improve the quality of heat supply, update the appearance or completely replace batteries:
- Reduced thermal output (batteries are barely warm and pipes are hot).
- Deterioration in appearance (peeling paint, chips, rusty stains).
- The radiator model does not match the closed loop circuit.
- Numerous traces of hastily repaired batteries (clamps, windings, inept welding of seams with beads), inherited from the previous owners in the purchased apartment.
- Clogging of pipes with low-quality coolant (organic sediment, rust, calcium deposits), due to which the batteries are cold, practically do not warm up, and require cleaning or purging.
- The need for repairs due to noticeable destruction of threaded connections and the Mayevsky tap.
- The battery is noisy - rattling, clicking, crackling (the reasons are different, only specialists can diagnose and eliminate them). If pipes and radiators are made of different metals, they have different heat capacity coefficients, heating and expansion rates. In some cases, noise and crackling is a warning of an impending connection break.
- Air pockets are a sign of improper installation of batteries and the absence of an air vent. Gas is gradually released from the water; at low pressure, airing occurs at the top point of the circuit or at turns.
- Gradual destruction of aluminum batteries (due to electrochemical corrosion from incompatibility with copper in boiler parts or due to high acidity of the coolant).
Uneven heating of the radiator may indicate clogging of some sections
Helpful advice! It is better to start scheduled repairs of cast iron batteries (or made of other metal) at the end of the heating season or the day before.
How to solder an aluminum radiator: 3 ways to solve the problem
So, let's figure out what the rear circuit is, why it is needed and what cars it is used on?!
The front circuit is a standard air conditioning system. A two-circuit air conditioning system is an enlarged car air conditioning system, with a larger volume and greater cooling capacity.
Designed to cool the interior of a large car; in simple terms, this is a second car air conditioner. With its own evaporator, fan, control panel, or separate power button. In this case, there is one condenser and compressor. That is, the rear circuit is connected (embedded) into the front circuit. Aluminum tubes stretch from the front circuit, along the entire bottom of the car to the rear evaporator (second radiator).
The rear circuit of the car air conditioner is installed at the factory on cars with a large interior volume, such as minibuses, large and medium-sized jeeps, and some crossovers.
(For example: Volkswagen T5 (Transporter), Hyundai Starex/H1, Mazda MPV, Mitsubishi Pajero, Chevrolet Tahoe, Lexux LX470)
The rear circuit of the car air conditioner is necessary for better cooling of the interior of large cars.
And as long as the rear circuit of the car air conditioner is sealed. It does not cause any trouble; many car owners do not even realize that their car has such a device, but when they find out they are faced with problems.
Reasons for failure
Perhaps one of the most popular problems is the aluminum tubes of the rear circuit. They become unusable due to our weather conditions, dirt, dust, sand, the worst enemies of aluminum are reagent and salt. In regions, the problem of a rotten rear circuit of a car air conditioner is less common.
And so, when the rear circuit of the car air conditioner rots or depressurizes, all the freon comes out. After which, the car air conditioner itself does not work.
Four ways to solve the back loop problem
1. The simplest and cheapest option for repairing the rear contour of a car, but not the most effective. You can turn off the rear circuit, that is, disconnect the rear circuit of the car air conditioner from the front, check the front circuit for leaks, and if there is no leak, refill the car air conditioner and use the front circuit alone. But let's face it, in hot weather, a car air conditioner is not enough.
2. The most reliable, most profitable and rational. We propose to manufacture high-pressure rubber hoses (hoses specifically for freon) to replace the aluminum tubes of the rear circuit. Accordingly, this will eliminate their rotting and moreover, you will not have problems with replacing or repairing the rear circuit of the car air conditioner.
3. The most expensive and perhaps the most irrational method, but there are no comrades according to taste. This is the purchase of new, original aluminum tubes, since there are no other tube manufacturers. Tubes cost from 20,000 rubles, plus replacement. But even after replacing the rear circuit tubes with new ones, the original ones remain aluminum, and they also begin to rot. And anticorrosive doesn’t help in any way, tested from personal experience.
4. Not expensive, but not a very rational way. This is trying to solder the rear circuit tubes of the car and repair it. As a rule, this repair lasts for a week, and no one has canceled the cost of refilling the car air conditioner. The charging rate for a two-circuit car air conditioning system is usually twice as much as for a conventional car air conditioner.
Cleaning methods
Radiator cleaning work can be classified into 2 types: contact cleaning and non-contact cleaning.
In the first case, you should wipe the product with a long-handled brush or a damp or dry cloth. It is not uncommon for a radiator to be immediately supplied with a special kit containing various care products.
Be careful not to use products that may contain abrasives. After cleaning, you need to thoroughly dry the product.
Non-contact cleaning uses a spray. The spray bottle must be filled with a solution (water and shampoo) or with a solution of laundry soap. Then, under the pressure of water, the dirt will be knocked off and dust will be removed from the radiator. At the end of the work, you should also wipe the product with a dry cloth.
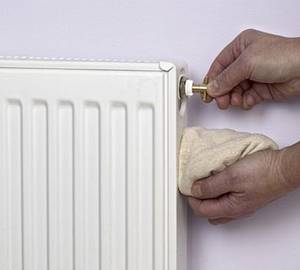
Dismantling the heating radiator
Checking, cleaning and repairing the battery is possible only after removing the product from the wall .
The low weight of aluminum radiators allows even one person to easily, but carefully, disconnect the structure from the pipes and remove it from the brackets . But this needs to be done step by step:
- Stop coolant circulation and relieve pressure.
- During the heating season, wait until the radiator cools down completely. The structure is disconnected from the pipe system by removing the couplings at the inlet and outlet.
- The coupling is moved away from the section along the pipe, and the battery is removed from the holders.
- Completely drain the water remaining inside. The structure is placed on the prepared fabric with the outer side up.
- Take out the filter and wash it with water and soapy water.
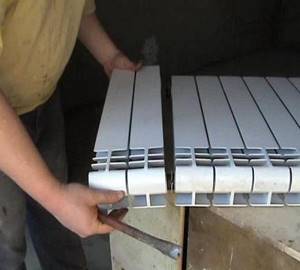
The next stage of installation will be disassembling the radiator into its components . The most important point is the correct disconnection of the nipple. When the part is unscrewed, the section for which it is responsible begins to smoothly move apart.
Often the manufacturer indicates the direction of the thread - D (right side) or S (left side) . You need to start unscrewing it with a key carefully and slowly. If the torsion is too strong and incorrect, it is easy to break the thread not only on the nipple, but also on the battery itself.
Attention! As soon as the nipple has turned half a turn , you need to move to the nut on the other side of the section. Gradual weakening on both sides will protect the section from failure and possible mechanical damage.
After disassembling the sections, you need to remove and wash the metal gaskets . In case of severe damage, it is recommended to purchase spare parts. Silicone gaskets must be changed after disassembling the battery.
Cleaning at home
Clean the radiator from accumulated dirt after the end of the heating season.
Professional cleaning devices are not easy to obtain, and they are expensive.
In the bathtub, the structure is washed as follows:
- Using hot water. From one side, pour water using a funnel, or by unscrewing the nozzle from the shower hose. When the battery is full, shake it. If it is too heavy, then the structure is slowly turned over. Both plugs must be open to allow dirty water to flow out freely. You need to repeat the procedure several times.
- Using a cleaning product. The radiator is filled with a solution from a cleaning agent, after installing the plugs. For the procedure, use citric acid diluted in water. Leave the device for several hours so that the cleaning solution removes all dirt. If there is no citric acid, use a universal cleaner or liquid to remove rust and heavy dirt.
- Final rinse. After 2 - 3 hours, knock on the battery with a plastic or rubber hammer to remove large pieces of rust and other dirt from the inner walls. After this, wash out the cleaning agent until its traces are completely eliminated (if a soap composition is used, wash until any remaining foam disappears).
When choosing a cleaning agent, you should remember that aluminum “does not tolerate” alkaline compounds , but reacts well to acids.
What to do during assembly
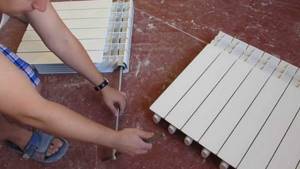
The radiator is assembled starting with checking all the parts . Particular attention must be paid to this, since missing one small element can lead to malfunction of the entire structure.
Photo 1. The process of assembling an aluminum radiator. In order to assemble the device, a special key is required.
How do bimetallic radiators work?
The most important quality of this design is the bimetallic alloy, that is, the combination of two different metals. Each metal seems to replace each other's weaknesses.

Bimetallic radiators
Availability of species:
- The radiator wrap is made of aluminum, and the inside is made of stainless steel. This combination leads to the addition of the following:
- The heat transfer of steel is much less than that of aluminum. If for the first it is about 46 W, then for the second it is already 180 W. But steel transfers temperature well to aluminum, and it, in turn, distributes heat into the room;
- Highly acidic water has a bad effect on the condition of aluminum. It causes an increased degree of rust formation. It is clear from the name of stainless steel that it is not afraid of corrosion. Thus, steel acts as a protector, protecting aluminum from contact with the coolant. Thanks to this solution, it was possible to increase the battery life to 25 years. When compared with models made of solid aluminum, their lifespan does not exceed ten years;
- Due to the fact that the steel core is more durable, bimetallic radiators withstand water hammer quite well. Therefore, they can be placed in rooms with central heating.
Location of bimetallic radiator
The combination of such completely different materials gives strength and reliability to the radiators. Although in terms of heat transfer they are significantly inferior to their aluminum counterparts:
- The wrapper is similar, the inner part is made of copper. This combination of materials gives the highest heat transfer. Together they form a strong and durable structure;
- There are also semi-bimetallic structures in which the vertical collectors are steel and the horizontal collectors are aluminum. Such radiators are cheap, durable and have good heat dissipation, but they are not durable.
We recommend: What is the normal temperature of water in central heating radiators?
These are the main features of the design of bimetallic radiators. If breakdowns do occur in such reliable structures, it means that errors were made during installation.
Repair of an aluminum heating radiator using soldering
In some cases, damaged areas of an aluminum radiator need to be soldered. If you have the skills to work with a soldering iron, it is not difficult to carry out such repairs. However, keep in mind that aluminum and its alloys are difficult to solder, so such work must be carried out extremely carefully. So:
- prepare the surface for soldering and apply iron-rosin flux to it;
- Use a heated soldering iron to wipe the damaged area;
- when the rosin spreads over the surface, introduce tin-lead solder mixed with iron filings.
It is recommended to repaint the sealed aluminum radiator. For this:
- Wipe off the old layer of paint with a special remover.
- Carefully sand the radiator with sandpaper.
- Apply heat-resistant paint or enamel in an even layer from top to bottom. If the radiator is sectional, start painting from the areas between the sections. Please note that the radiator must be cold when painting.
Repair of bimetal batteries
If you decide to repair bimetallic heating radiators yourself, then follow the recommendations of specialists. Despite the strength, quality and durability of bimetal heating devices, they also fail due to the low quality of the coolant in centralized heating networks.
If the heat transfer of a bimetallic device decreases, the cause may be clogged pipes. To solve the problem, you need to clean the device and pipelines.
When cleaning bimetallic radiators, follow a certain sequence of actions:
- If the radiator is mounted on bypasses, then disconnect the battery circuit from the heating system. Otherwise, you will have to block off the entire riser or the entire house. Move furniture if it is in the way and cover the floor with plastic sheeting.
- Use a pipe wrench to disconnect the heater from the main pipeline. Place the basin and drain the water from the device by tilting it over the container. After this, take the radiator to the bathroom. It is much more convenient to clean it here. Place a wooden pallet or rags on the bottom of the bathroom to avoid scratching the plumbing.
- Remove all existing plugs from the battery and supply it with high pressure water. It is necessary to flush the radiator until various contaminants are no longer washed out. If the scale is so dense that a stream of water cannot penetrate it, special chemical compounds will be needed. You can use “Mole” or pour vinegar into the battery overnight. After the scale has dissolved, the unit is washed again with clean water.
- Then all the plugs are returned to their original place and the battery is installed in the circuit, connecting it to the main line.
We repair cracks in bimetallic radiators
If a crack appears in a bimetal device, then simply welding it will not work, because an oxide film will appear in this place on the aluminum body. Its appearance is associated with the interaction of aluminum with oxygen. To solve the problem of film appearance, flux is used. A special composition for soldering aluminum is sold in stores. If you wish, you can do it yourself.
When the problem of oxide formation is solved, traditional soldering is carried out with solder from an iron-rosin mixture. Soldering can be used to repair small damage (cracks or small holes). If you decide to contact a specialist, then cold welding or epoxy glue is used to temporarily eliminate the leak.
Preparing for disassembly
At this stage, you need to prepare all the necessary tools and remove the battery from its mounting location. For work, depending on the type and condition of the radiator, you may need the following tools:
- radiator (nipple) key;
- an adjustable wrench or a set of wrenches with different head sizes;
- autogen or grinder;
- construction hair dryer;
- hammer, sledgehammer;
- chisel.
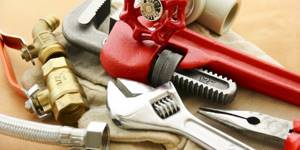
Tools for disassembling radiators
A nipple wrench is an iron rod with a spade-shaped head at one end, and a hole or bent “ear” at the other. A tool purchased in a store has serifs, the distance between which is equal to the width of the heating radiator sections. They will help you find the location of the required nipple nut.
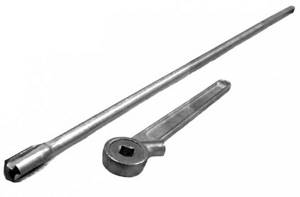
Nipple key
After preparing the tools, it is necessary to arrange a place for disassembling the radiator. A floor or a sturdy table will do. It is necessary to take into account that dirty water will flow out of the battery, and do not forget to place a waterproof cloth under it.
The main signs of a radiator failure
- The apartment became very cold at the height of the heating season due to the fact that the radiator simply did not heat.
- The presence of plaque at the joints and fastenings can cause serious problems with the operation of the equipment in the future.
- The battery is leaking or has burst.
Slagging of heating pipes
Remember that heating radiators also have a certain service life. That is why it is advisable to replace all old radiators that are older than you. Otherwise, the house will be quite cold and you will often have to invite a specialist to repair the heating radiators.
It is best to give preference to modern models of heating radiators, which are characterized by efficiency and a high level of thermal conductivity. Thanks to this, you will notice how the house has become warmer, and such modern battery models always look more attractive in appearance. Thanks to their replacement with new devices, you can forget for the next few years about the need to call a technician to eliminate the main signs of a breakdown, and the house will always be warm, and heating costs will be much lower.
If this is not yet possible, then you should quickly start repairing your heating equipment. In this case, it is advisable to immediately contact a professional specialist. It is he who will carry out diagnostics and determine the main problem in the operation of the heating system, and will also eliminate it efficiently and as quickly as possible. But such diagnostics, as well as preventive inspections, are best carried out after the end of the heating season or before it begins.
Some tips and tricks for increasing heat in your home
Finally, a few tips to improve the performance of heating radiators and the heating system as a whole:
- Painting a radiator (particularly cast iron) in a dark color increases the proportion of heat removed by radiation.
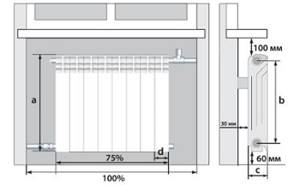
- The recommended distance from the radiator to the window sill is 100 mm, and from the wall to the battery - 20 mm. Otherwise, the heat flow is disrupted and the efficiency of the heating system decreases;
- To increase thermal radiation directed into the room, attach a heat-insulating film with a foil surface to the wall behind the radiator.
- The optimal distance from the floor surface to the battery is 120-150 mm. If this rule is not followed, sudden changes in temperature will cause drafts in the house;
- With a reverse connection (when hot water is supplied to the radiator from below), the total power of the system is reduced by about seven percent.
- The efficiency of the heating system is also significantly affected by the location of the radiator. The maximum effect is achieved by placement under the windowsill - 96-97%. If the battery is open in a niche, the efficiency decreases to 93%; if the radiator is partially closed - up to 88-93%, if completely - up to 75-80%.
Battery repair methods depending on the type of fault
- Quick repair of a leak at a joint
The leak is repaired using a regular bandage or strip of fabric and epoxy glue. The bandage is impregnated with glue and tightly wrapped around the leak site. After the glue has dried, the repaired area is painted the same color as the battery. This “ambulance” ensures tightness for 1-2 years.
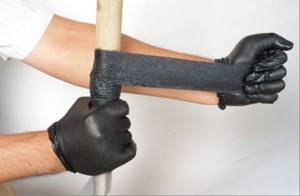
- Applying a temporary clamp to the leak site
If the bandage is not suitable for urgent repairs, then you can cut out a small piece of thick rubber and tighten it at the leak site.
- Installing a metal clamp
A clamp is a metal ring with sealing plates secured with two bolts. Next we will take a closer look at this repair method.
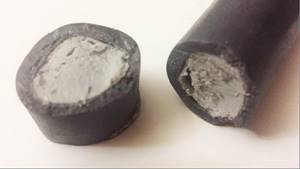
- Cold welding
This is a sealing compound that resembles plasticine. The technology of application is simple: the weld is kneaded to a homogeneous mass and glued to the site of damage. Cold welding tolerates high temperatures well, so it is suitable for repairing small leaks.
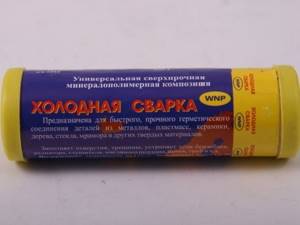
Cold welding - what is it, application for heating system
For gluing various materials, adhesives of different compositions and purposes are used. Thus, for paper, office glue and PVA are used, in construction, synthetic glue with vinyl fillers is used for wallpapering, and rubber glue is used for shoe repair.
Unfortunately, universal adhesives have not yet been invented, but there are already compounds that can reliably glue metal. An example of such a composition is cold welding.
Cold welding technology is based on epoxy adhesive, consisting of epoxy resin and a hardener. In its normal state, it is a substance reminiscent of thick sour cream, only yellow in color, but when mixed with a hardener, epoxy resin becomes more liquid and is suitable for application to even the most complex surfaces. This moment lasts relatively short - only 10-15 minutes, after which the resin begins to harden, forming a durable coating.
The advantage of this technology is the high strength of the connection due to the high adhesion of the substance to the surface of the metal being bonded and resistance to aggressive chemical materials. Unfortunately, there are also disadvantages: the glue itself can withstand high pressure, but under mechanical stress there is a high probability of breaking the strength of the connection.
In cold welding compositions offered on the market for gluing metal, the hardener and resin are not in a liquid, but in a paste state. The glue is in a stable state and can be stored in packaging for a long time. It consists of an inner layer - consisting of a hardener, and an outer layer, which includes a resin. The third component included in the adhesive for gluing metals is sulfur or aluminum powder; these substances play the role of a reaction catalyst - when mixed, they heat up, as a result of which the hardening process accelerates, so that a welding effect is obtained.
The second option for cold welding is a traditional two-component adhesive based on epoxy resin - the resin and hardener are stored in tubes. To obtain the required amount, you must mix the components according to the instructions and apply to the surfaces to be bonded. To obtain a more durable connection, aluminum powder or bronze powder is added to the composition.
Methods for repairing cast iron radiators using cold welding
Before starting to describe methods for repairing a battery using cold welding, it should be noted that cold welding is a temporary remedy for eliminating an individual leak.
A repaired welding leak can last for several seasons with normal handling, but the battery can only be properly repaired by disassembling it and replacing the broken section with a new one. Another point that you need to pay attention to is the size of the patch and the possibility of repairing various damages. If a small leak has formed in a section, then cold welding will cope with this task quickly and efficiently. Another thing is when a large gap has formed in the metal, you will have to use additional reinforcement - in addition to the first layer applied by cold welding, you will have to use liquid glue and make a bandage. And the most difficult case is when an entire fragment of metal breaks off due to an impact. Cold welding cannot handle such repairs; here you must immediately shut off the coolant supply and call a repair team.
Repair of small leaks on the vertical surface of the section
If a leak has formed on the outer or inner surface of a section and the size of the crack does not exceed 1-2 cm in length, in addition to cold welding, you will also need a metal brush, 100 and 200 grit sandpaper and paint solvent or alcohol.
Before starting work, the supply and drainage of coolant to the battery is shut off and, if possible, water is drained from it.
Use a metal brush to remove the paint at a distance of 1-1.5 cm on both sides of the crack. After this, first with 100-grit sandpaper, and after 200, sanding is done so that the spot at the site of the future patch is sanded down to bare metal.
After this, glue is prepared and the surface of the radiator is degreased. Cold welding for a heating battery is applied to the surface of the patch so that there is a gap of 1-2 mm between the cleaned metal and the paint on the surface of the battery.
After applying the glue, it is actively pressed and left to crystallize for the time specified in the instructions.
Repairing leaks at the joints of radiator sections
This repair case allows for higher quality leak sealing.
The fact is that repairing pipes and cylindrical surfaces is easier than repairing a crack on a flat surface. In this case, in addition to the usual plastic mass, you can later use two-component glue with an additional bandage to increase the strength of the connection. When repairing the junction of sections, not only the leak site is cleaned, but the entire circumference of the junction. The fact is that an incorrectly made connection of sections with an existing leak will subsequently allow coolant to flow around the entire circumference, since the mechanical tightness in it is broken.
The sequence of actions here is as follows:
- The battery is disconnected from the coolant supply;
- The entire surface around the circumference of the joint is cleaned;
- An adhesive composition is being prepared;
- The area where the glue is applied is degreased;
- A layer of cold welding is applied along the entire circumference of the joint of the sections;
- After the first layer has dried, a liquid glue composition is prepared;
- A layer of liquid adhesive is applied to the area, followed by a fiberglass strip and another layer of adhesive applied over it.
- To consolidate the result, 3-4 turns are made with mandatory glue impregnation;
- After this, a metal clamp is placed on top and secured with a screw.
Do-it-yourself heating radiator repair, leaks, clicks, noise
Sometimes situations arise when heating radiators need to be repaired immediately. What to do in this case? Should I run and call specialists or try to do something myself? Let's try to figure it out.
Heating radiator repair
- Signs of damage or “I didn’t touch anything”
- We repair sectional batteries
Signs of damage or “I didn’t touch anything”
Let us note several possible reasons for the failure of heating radiators:
- The radiator was chosen incorrectly from the very beginning. Depending on the diameter of the pipes, the pressure and temperature of the water in the system, different types of radiators are installed.
- Repair of a heating battery can also be caused by the fact that it was incorrectly connected to the pipes of the heating system.
- If the central heating system creates harsh working conditions. For example, if the coolant has increased acidity and sharp pressure changes are observed, this leads to the metal experiencing electrostatic or electrochemical corrosion.
- If the coolant is of poor quality, it will form deposits at the joints of the battery sections and in the places where the pipes are attached.
- Poor quality coolant will also clog radiators and pipes - this will entail the frequent need to flush them.
Plaque in heating system pipes
- Intersectional gaskets can wear out and threaded nipples can be destroyed. Therefore, you need to regularly change the gaskets between sections.
- Clicking noises in the heating radiator are not necessarily a breakdown, but if they appear, you need to call a specialist; you may need to soundproof the heating radiators. Since the heating radiator makes noise, it can cause discomfort or cause its breakdown.
Now let’s outline the main signs that your batteries require careful inspection and repair in the future or urgently:
- When the heating season is in full swing in the literal sense of the word, the rooms suddenly become noticeably colder, that is, the heating radiator does not heat.
- Plaque has appeared at the joints and fastening points; this may cause the heating radiator to not work in the future.
- The heating battery has leaked or the heating radiator has burst.
If your batteries are already older than you, it is better to replace them, because, most likely, you are guaranteed to permanently repair the heating battery yourself. After all, modern models will be more efficient, since their thermal conductivity is higher: the rooms will become warmer, and heating costs will be lower. In addition, the new batteries will be more beautiful.
Sometimes it's easier to replace an old battery than to repair it
If it is not possible to replace the batteries, then you will have to repair the heating radiator yourself, and as soon as possible. It’s best - whether it’s a problem of how to fix a leaking heating battery, or you just hear noise in the heating batteries, immediately contact specialists who will carry out professional diagnostics.
We repair sectional batteries
Many heating radiators are of the sectional type. And first of all, these are batteries made of cast iron and bimetallic. Of course, it is best to carry out a preventive inspection before it gets cold outside, or when it is already warmer. But very often, the most proactive action begins after the problem becomes critically urgent.
The main problem is a leaking heating battery.
This is what most often causes repairs. Here are instructions on how to fix a leaking radiator yourself:
- We check whether the heating battery is actually leaking. Usually the location of the leak is immediately visible. But it happens that it is very difficult to find it. If this is the case, then the radiator is removed and then immersed in a container of water. And where there is a hole, air bubbles will begin to appear. But often, in order to identify where the heating radiator is leaking, it is not difficult anyway.
- We are preparing the tools. When you have already identified the place where the heating battery is leaking, we will repair it. To do this, we will prepare a thin steel cable, putty (a mixture of epoxy resin and metal powder, thickly ground zinc white, powder or polymer sealant, cold welding - your choice), cloth (or other fabric or bandage to apply putty), a metal clamp (you can take electrical tape or rubber with wire).
“Cold welding” is a means for emergency sealing of pipes and heating radiators
- When we have identified a break in the heating battery and collected the tools, we will set up a repair site. Under the radiator we place an oilcloth, a blotting cloth or a piece of film. Place a large rag on top to absorb water. If necessary, place a basin or bucket nearby.
- Now the place where the heating battery is leaking needs to be cleaned. Often this place is at the junction of sections. You need to remove the old winding, remove parts of the gasket and paint. Take the string and strip the joint down to metal. The cleaned area is washed with gasoline so that the new winding fits well in the future.
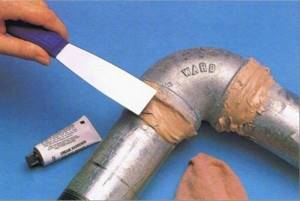
- The place where the radiator leaked needs to be sealed. Apply the putty composition to a fabric ribbon, wrap it as tightly as possible around the joint, making 2-3 layers - the amount depends on the composition.
- We will secure the smeared area, where previously there was such a problem as the radiator dripping, with a clamp. The clamp is placed on the putty, pulled together and secured with bolts and nuts.
When the heating season is over, it is recommended to replace this radiator with a solid and new one, or at least its sections that are damaged. In addition to leaks, a common problem is air in the heating radiator. Air in radiators should best be removed by specialists, so as not to cause more serious repair work in the future.
Help us become better! Evaluate the quality of the material presented Loading... Tell your friends and colleagues on social networks