One of the most important stages in organizing gasification of a private home is pressure testing of the gas pipeline, which makes it possible to ensure that the system is done correctly even before it is connected to the main gas main.
Control tests are carried out by representatives of the gas service. However, it wouldn’t hurt for the home owner to know the procedure and rules for carrying out the work, don’t you agree? The information will help to better understand the design features of the gas pipeline, timely identify weaknesses and possible failures in the operation of the pipeline.
The article describes in detail the procedure for conducting a technical inspection, the requirements for documenting the connection of a gas pipeline and the nuances of pressure testing a private gas network.
A few significant points
The air pressure in the gas system must remain constant until the system is connected to the main gas pipeline.
Air is usually used for pressure testing, but the procedure can also be carried out using inert gas. If a gas pipeline is connected at an enterprise, the procedure must be documented with relevant documents, such as an acceptance certificate, an order appointing a person responsible for the procedure, operating instructions for the network and equipment, safety instructions, etc.
In some cases, it is considered advisable to split a gas pipeline that is undergoing pressure testing into several sections, which are checked separately. For this purpose, special plugs are installed. You can use linear fittings in combination with shut-off devices for the same purposes.
Although the procedure for performing crimping does not seem too complicated, it may take several days to complete all the necessary procedures
In this case, it is necessary to correlate the type of selected fittings and the pressure drop that is permissible for it. If this value is lower than required for testing, plugs should be used. The network in residential buildings, as well as in administrative premises, boiler rooms, change houses and other similar facilities is checked along its entire length: from the shut-off device at the network input of the building to the point of connection to the equipment that uses gas.
To carry out work on testing the tightness of gas pipelines, the optimal accuracy of pressure gauges is 0.15, although the use of devices with an accuracy of 0.4-0.6 is allowed. If the test is to be carried out at pressures less than 0.01 MPa, V-type liquid devices are recommended.
The part of the gas pipeline located underground should be pressurized after the structures are laid in the trench and buried. If complete backfilling is considered impractical for some reason, then the pipes should be covered with a layer of soil of at least 20 cm. Welded joints of steel communications should be carefully insulated.
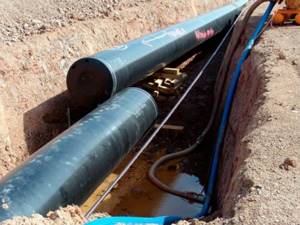
Pressure testing of gas pipes located underground is carried out only after the trench is completely backfilled, or if the soil layer is at least 20 cm
Before starting pressure testing, you need to wait until the air inside the structure under test pressure reaches the same temperature as the surrounding soil.
If it is necessary to check the tightness of a network laid in cases through obstacles of various origins, then this must be done three times: immediately after welding the communications, after it is laid in the case and completely backfilled with soil, and also after this section is connected to the general gas pipeline system.
If, after unsuccessful pressure testing of the gas pipeline, metal pipes were welded, then all places of such connections should be checked for leaks using soap emulsion
Sometimes the last step can be abandoned if there are no objections from the operating company. If the transition was made using directional drilling, or if there are no welds under the transition, pressure testing of this section can be carried out after connecting to the main gas pipeline.
Crimping is performed in the same way if high-precision automatic equipment or a system of embedded heaters was used to weld polyethylene pipes in the transition section.
What is pressure testing of a heating system?
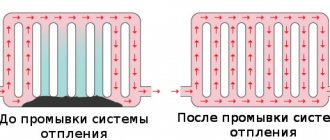
Pressure testing performs equipment control. Air or water is pumped into the heating system, thereby increasing the pressure. Thanks to high pressure, pipelines and equipment are tested. In other words, tests are carried out for density and strength.
If the heating system does not leak at elevated pressure, it will work efficiently.
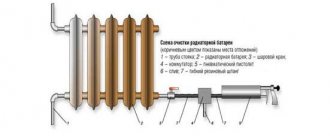
When pressure testing a building, pipes are tested and flushed, as well as individual elements are replaced if necessary. The heating system is pressure tested to check: the connections of system elements, the strength of the housing, radiators, heat exchangers and fittings, as well as the operation of valves, valves and taps.
Pipelines are destroyed due to corrosion and often suffer mechanical damage. There are rarely factory defects in pipes during manufacturing. Most often, leaks occur at the connections and piping of boilers.
A few significant points
Plumbing in a private house: step-by-step description of the installation process
The air pressure in the gas system must remain constant until the system is connected to the main gas pipeline. Air is usually used for pressure testing, but the procedure can also be carried out using inert gas.
If a gas pipeline is connected at an enterprise, the procedure must be documented with relevant documents, such as an acceptance certificate, an order appointing a person responsible for the procedure, operating instructions for the network and equipment, safety instructions, etc.
In some cases, it is considered advisable to split a gas pipeline that is undergoing pressure testing into several sections, which are checked separately. For this purpose, special plugs are installed. You can use linear fittings in combination with shut-off devices for the same purposes.
In this case, it is necessary to correlate the type of selected fittings and the pressure drop that is permissible for it. If this value is lower than required for testing, plugs should be used.
The network in residential buildings, as well as in administrative premises, boiler rooms, change houses and other similar facilities is checked along its entire length: from the shut-off device at the network input of the building to the point of connection to the equipment that uses gas.
To carry out work on testing the tightness of gas pipelines, the optimal accuracy of pressure gauges is 0.15, although the use of devices with an accuracy of 0.4-0.6 is allowed. If the test is to be carried out at pressures less than 0.01 MPa, V-type liquid devices are recommended.
The part of the gas pipeline located underground should be pressurized after the structures are laid in the trench and buried. If complete backfilling is considered impractical for some reason, then the pipes should be covered with a layer of soil of at least 20 cm. Welded joints of steel communications should be carefully insulated.
Before starting pressure testing, you need to wait until the air inside the structure under test pressure reaches the same temperature as the surrounding soil.
If it is necessary to check the tightness of a network laid in cases through obstacles of various origins, then this must be done three times: immediately after welding the communications, after it is laid in the case and completely backfilled with soil, and also after this section is connected to the general gas pipeline system.
Sometimes the last step can be abandoned if there are no objections from the operating company. If the transition was made using directional drilling, or if there are no welds under the transition, pressure testing of this section can be carried out after connecting to the main gas pipeline.
Crimping is performed in the same way if high-precision automatic equipment or a system of embedded heaters was used to weld polyethylene pipes in the transition section.
Additional requirements, features, methods and procedures for tapping into a gas pipeline are described in the articles:
Possible connection methods
Connecting the new blue fuel supply network to the existing one is carried out using tapping or welding.
In the first case, the operation of the main pipeline does not undergo fundamental changes, since the process of cold tapping into a gas pipe is carried out without the use of welding. The volume of the pumped substance and its pressure do not change and are still kept within the operating range of the network.
This method is used to connect new consumers. To perform work related to the central network, you must have permission and permission to carry out gas hazardous activities.
Without special training, it is absolutely forbidden to interfere with the functioning of the main pipeline. Violation can result in tragic consequences, resulting in death or imprisonment.
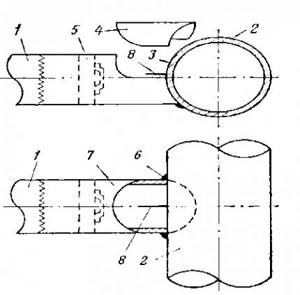
In some cases, tapping into a gas pipeline should be done with the intersection of the axes of the networks. Explanations for the diagram: 1 – attached pipe, 2 – working gas pipeline, 3 – “window” (cut-out wall), 4 – visor, 5 – wooden disk, 6 – welded shock, 7 connecting pipe, 8 – extraction rod, 9 – cover (+)
The second connection option is more familiar to most ordinary people. It is reliable and has stood the test of time. However, a specialist who carries out insertion in this way must have a high level of professional qualifications and also have a special permit.
The methods of joining themselves are:
- insertion into a gas pipeline under low pressure;
- under medium and high pressure gas, when special devices are used;
- with the gas turned off and the pipes completely freed from it.
The choice of connection method to the gas pipeline depends on a number of factors. Therefore, the decision must be made by the people making the connection on a case-by-case basis.
As for the contractor, there may be 2 options: representatives of the gas service or employees of a private company who have the legal right to carry out actions, as well as the necessary equipment and permission to carry out gas-hazardous work.
Moreover, in the second case, the office can undertake obligations to prepare and execute a package of documents for legal connection to the main gas network. However, all additional services will affect the final cost of connection.
Not only the flawless performance of the gas pipeline, but also the safe operation of the entire gas transportation system depends on the correct choice of pipes.
Laying external and internal gas pipelines
VGP pipe: decoding, description, advantages and scope
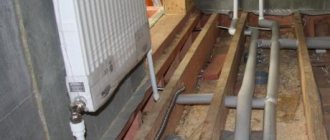
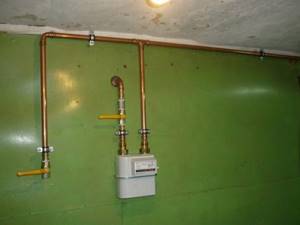
An internal gas pipeline is a system of pipes and communications located inside buildings. In this case, the pipe routing should not be covered with any additional covers or hidden in the wall; there should be free access for regular preventive inspection and repair work.
When gas communications are located externally, access to it by strangers should be limited as much as possible. To achieve this, the structural elements are mounted at a sufficiently high height. The fixation of pipes to the facade walls must be reliable to prevent the gas pipe from falling.
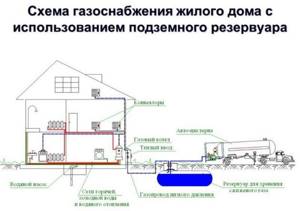
Gas supply system diagram
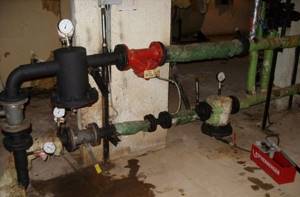
Carrying out crimp testing
Which pipes are best to choose for water supply in a private house?
Now let's look at what manipulations need to be carried out when carrying out crimping work:
- To disconnect the area that will be subjected to the procedure from the main line, it is necessary to close the valve and tap. If work is carried out on the internal gas pipeline of the boiler room, then the high pressure valve and the low pressure valve must be closed.
- After closing the area, you need to install plugs.
- If the flange ruptures, then shunt type jumpers must be used.
- To bleed the gas that is inside the system, you need to use a specially designed hose. It is made of fabric with rubber. The operation can also be performed using a candle installed on the condensate collector.
- Gas must be liquefied; if it is not possible to do this as safely as possible, it must be moved for storage.
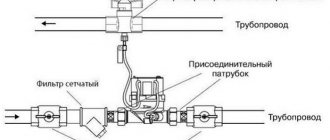
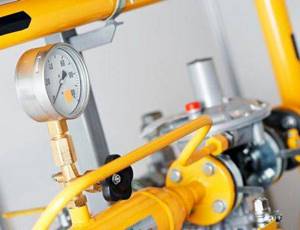
- Install devices for connecting pressure gauges and a compressor.
- If the system has an increased length, then it is best to use additional hand pumps.
Control pressure testing of external and internal gas pipelines is carried out under a pressure of 0.2 MPa. In this case, it is recommended that the pressure limit be no more than 10 daPa/h. These are the optimal parameters, but they can change - it all depends on where the work is being carried out.
It is worth noting that when performing some work on pressure testing of internal gas pipelines, it is best to use a pressure of no more than 0.1 MPa. As for non-industrial facilities, as well as gas pipelines in residential buildings, control pressure testing should be carried out at a pressure of 500 daPa/h.
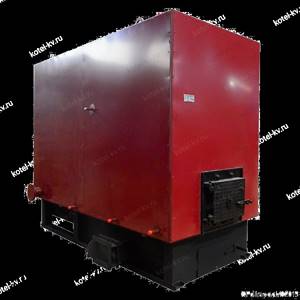
What pressure is the boiler tested under?
In domestic conditions, the operating mode occurs at a coolant pressure of 2 atmospheres. If a newly installed system is tested, the nominal pressure is increased from 1.5 to 2 times. For a routine check, it is enough to set a limit that exceeds the nominal parameter from 1.15 to 1.5 times.
If the equipment includes cast iron radiators, the test pressure should not exceed 6 atmospheres. When using convectors, the permissible pressure is 10 atmospheres. The boiler, depending on its power, can also withstand different pressures.
Before carrying out the pressure testing procedure, it is necessary to take into account the technical characteristics of all included equipment: convectors, radiators, gas or solid fuel boiler. The test pressure should not exceed the permissible value of the weakest link.
Procedure for performing crimping
The compression that is created in the pressure line is supplied to the return or drain line. Since the pressure line will be very high in the discharge line compared to the return and drain lines, the pressure line is checked first. To do this, isolate the return and drain lines.
Once the pressure line is checked, the compression of the pipes of the tested line is gradually increased until the required value is reached. The pressure test is then held in line for the required period of time, during which time a leak test is performed.
If the duration of crimping exceeds the duration of the work shift, multi-shift maintenance of all components of the circuit being tested is organized.
For hydraulic testing of pipes under pressure, there are two methods for checking leaks in connections - visual inspection of flanges and fittings, as well as recording the results using a pressure gauge. The compression of the return and drain pipes is checked using pressure gauges on the manifold and at the extreme section of the discharge line. This is due to the fact that the pressure, return and drain lines are connected into a single system. Thus, the readings on the pressure gauge will be the same as the pressure readings in the return pipeline.
If the pressure testing of the pipes is successful, then the compression of the pipes in the pressure line is released using check/drain valves into the drainage line.
Hydraulic test of hot water boiler
Hydraulic testing of hot water boilers is carried out to check the strength of the boiler elements and the tightness of their connections.
The procedure for testing boilers is given in paragraphs. 3.16 and 3.17 “Rules for the design and safe operation of steam boilers with a steam pressure of no more than 0.07 MPa (0.7 kgf/cm2), hot water boilers and water heaters with a water heating temperature not higher than 388 K (115 °C)” approved by the Ministry of Construction of Russia 08/28/92
When it is necessary to carry out hydraulic tests of boilers and boiler room pipelines:
- before putting into operation;
- after repairs related to welding of joints;
- when putting the boiler into operation after they have been in storage for more than a year;
- after all types of inspection and after eliminating detected defects.
The procedure for conducting hydraulic tests of hot water boilers:
The pressure at which hydraulic tests of hot water boilers are carried out is 1.25 of the working pressure, but not less than 0.2 MPa. At the manufacturing plant, water heating boilers are tested at a pressure of 0.9 MPa.
If the heating surfaces of the boiler and pipelines have insulation or a protective coating, work is carried out before applying the insulation.
Before internal inspection and hydraulic testing, the hot water boiler must be:
- stopped;
- cooled (warmed up);
- freed from the working environment that fills it;
- steamed;
- disconnected by plugs from all pipelines connecting the vessel with the pressure source;
- cleared;
- the anti-corrosion coating of the vessel in places where there are signs indicating the possibility of metal defects must be partially removed.
Requirements for hydraulic testing of hot water boilers:
- use water with a temperature not lower than 5°C and not higher than 40°C, unless the technical specifications indicate a specific temperature value allowed to prevent brittle fracture;
- the temperature difference between the vessel wall and the surrounding air during testing should not cause moisture condensation on the surface of the vessel walls;
- by agreement with the boiler designer, another liquid can be used instead of water;
- during hydraulic testing of hot water boilers, the upper limit of water temperature can be increased by agreement with the design organization to 80°C;
- the water used for hydraulic testing should not contaminate the boiler and pipelines;
- pressure testing of the boiler is carried out with water at the test pressure specified in the passport, installing plugs under the safety valves and supply pipelines during pressure testing;
- completely remove air when filling the boiler with water;
- produce a gradual increase in pressure in the boiler;
- control the pressure in the vessel with two pressure gauges;
- both pressure gauges must be of the same type, measurement limit, identical accuracy classes, and division values;
- pressure gauges must be verified;
- The hot water boiler must be under test pressure for a certain time. The holding time is set in the equipment passport. The average time is usually at least 10 minutes;
- after holding the boiler under test pressure, it is reduced to the design pressure and the outer surface of the hot water boiler and all its detachable and welded connections are inspected;
- During external, internal inspections and hydraulic testing of a hot water boiler, all defects that reduce the strength of the vessel must be identified and eliminated.
The hot water boiler is considered to have passed the hydraulic test:
if the tests do not reveal:
- leaks, cracks, tears, sweating in welded joints and on the base metal;
- leaks in detachable connections;
- visible residual deformations, pressure drop on the pressure gauge.
The results of the technical examination are recorded in the water heating boiler passport by the person who carried out the examination, indicating the permitted operating parameters of the vessel and the timing of the next examinations.
Extraordinary hydraulic tests of hot water boilers
Hot water boilers are subject to extraordinary inspection in the following cases:
- if the boiler has not been used for more than 12 months;
- if the boiler has been demonstrated and installed in a new location;
- if repairs were made using welding;
- before applying a protective coating to the boiler walls;
- after completing the design service life established by the manufacturer, project or other regulatory and technical documentation;
- after an accident, the boiler or elements operating under pressure, if the scope of restoration work requires such an examination;
- at the request of the Rostechnadzor inspector or the person responsible for supervising the technical condition and operation of the boiler.
Gas pipeline installation standards
The gas pipeline is one of the most important parts of the house. Thanks to it, heating appears in the room; using gas appliances, you can cook food and heat water for hot water. But if used incorrectly, gas can become a serious problem leading to tragedy. To avoid this, standards were invented that were used when installing a gas pipeline. They ensure the safety and correct operation of devices.
Basic Rules:
- The intersection of the gas main and window openings, doors and ventilation is not allowed.
- The distance from the pipe to the electrical panel should be at least half a meter.
- There must be a minimum of 25 cm between the gas system and electrical communications.
- The gas pipeline should be located at a height of 220 mm from the floor; in rooms with a sloping ceiling, this distance is 200 mm.
- A flexible hose with a diameter of 10 mm can be connected to gas equipment.
- Water heaters cannot be installed in the bathroom.
- High humidity creates reverse draft, which fills the room with carbon monoxide and can cause poisoning.
- The distance between the stove and the pipe must be maintained; it must exceed 80 cm.
- After the metering devices, the pipe slope should begin at 3%.
- The metering device should be located at a height of 1600 mm from the floor.
- The meter should be located at a distance of 80 cm from the heating equipment or stove.
- To install a gas pipeline in the wall, it is necessary to make a hole in the wall separate from the ventilation.
- Access to communications must be ensured. You can place them in a box, but it must be equipped with a lid for access.
Preparatory work
Before control pressure testing of the internal gas pipeline, certain preparatory work is carried out:
- checking the actual layout of the gas pipeline and its compliance with the technical documentation;
- selection of installation location for all plugs, sensors, meters and compressor;
- employees undergo additional or repeated training on compliance with TB and examination regulations.
Pressure testing of gas pipelines and gas is carried out not only when a system is put into operation in an apartment building or at an enterprise. The test is also performed when connecting new equipment, after repairing and replacing part of the pipes.
In what cases is gas release prohibited?
Starting gas is prohibited in the following cases:
Gas start ban
- a visual inspection revealed defects in pipes and equipment;
- the actual laying of the pipeline does not correspond to the routing provided for by the project;
- the gas pipeline has not passed the control pneumatic pressure testing or the results of the test are unsatisfactory;
- There are no qualified specialists and performers with the necessary approvals and permits to carry out gas hazardous work.
Implementation of tightness control
As soon as a satisfactory result is obtained from the procedures described above, crimping work can begin. To do this, the entire system must be connected to a compressor. All pipes are filled with air under a certain pressure. After this, the design must be examined for flaws. If any are identified, they must be eliminated immediately. In the same case, if the system is sealed, it can be connected to the gas main. During preparation, it is necessary to remove and install plugs. All rotating elements can be replaced with threaded connections.
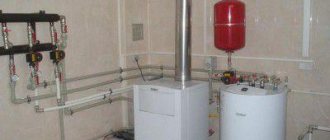
How to pressurize heating boilers
At the last stage of installation of the heating system, commissioning and commissioning is necessary to obtain confirmation that the equipment is ready for operation. These tests are carried out every time, without exception, in order to identify deficiencies in the operation of individual components and check the overall tightness of the system.
The primary element during this testing is the pressure testing of the heating boiler, which checks the system for leaks. The technology for carrying out this procedure is presented in the form of a simple process. For the information of heating boiler owners, a consistent overview of the work performed and acceptable parameters for commissioning the system are offered.
Pressure testing of low pressure gas pipeline SNP table
/ / 10.5.3 To test gas pipelines, pressure gauges of accuracy class 0.15 should be used.
It is allowed to use pressure gauges with an accuracy class of 0.40, as well as with an accuracy class of 0.6. At test pressures up to 0.01 MPa, V-shaped liquid pressure gauges (with water filling) should be used. 10.5.6 Leak testing of gas pipelines is carried out by supplying compressed air to the gas pipeline and creating test pressure in the gas pipeline.
The test pressure values and holding time for steel underground gas pipelines under pressure are taken in accordance with Table 16. Gas pipelines must be purged with gas before starting gas until all air is displaced. The end of purging is determined by analyzing or burning the samples taken, while the volume fraction of oxygen in the gas sample should not exceed 1% by volume, and gas combustion should occur quietly, without popping. If it is necessary to clear gas, gas pipelines should be purged with air or inert gas until complete gas displacement. The end of the purge is determined by analysis, and the residual volume fraction of gas in the purge air should not exceed 20% of the lower flammability limit.
When purging gas pipelines, the gas-air mixture must be released to places where there is no possibility of it entering buildings or igniting from fire. 10.5.3. To test gas pipelines, pressure gauges with an accuracy class of 0.15 are used.
It is allowed to use pressure gauges with an accuracy class of 0.40, as well as with an accuracy class of 0.6. At test pressures up to 0.01 MPa, V-shaped liquid pressure gauges (with water filling) are used. 10.5.6. Leak testing of gas pipelines is carried out by supplying compressed air to the gas pipeline and creating a test pressure in the gas pipeline.
If the pipe section is small, a hand pump is used. The gas pipeline is checked for leaks.
The required air pressure is ensured using a blow-off pipe. Agricultural work is permitted in the protected zone, but construction is prohibited. Work on the reconstruction of existing buildings, structures and networks must be coordinated with the organization that maintains and operates the gas pipeline.
Work that is prohibited from being carried out in the security zone also includes the arrangement of basements, compost pits, welding work, installation of fences that prevent free
Basic safety provisions when introducing gas into the system
Gas start-up process
The gas start-up process must be performed at low flow rates. The feed speed should be in the range of 15–25 m/s. This is necessary to prevent an explosion of the gas-air mixture from the possible formation of sparks when metal objects rub against the inner surface of gas pipelines. The pressure during the filling process should not exceed 0.1 MPa.
All workers involved in gas-hazardous work are required to wear protective tarpaulin suits, helmets and rubber dielectric shoes, and also carry insulating gas masks, safety glasses and special gloves. In addition, the work team must have a first aid kit equipped with all the necessary medications to provide first aid.
The place where pressure testing of the gas pipeline and other work along the pipeline is carried out must be fenced and equipped, if necessary, with special posts in order to prevent unauthorized people from being in the high-risk zone. During the release of gas into the system, it is prohibited to smoke, conduct hot work and use open flames.
Gas pipeline tightness control
Only after obtaining a satisfactory result from the procedures described above can you begin to carry out crimping work. To do this, the system is connected to a special compressor and the pipes are filled with air under pressure. The structure is then examined to identify any deficiencies.
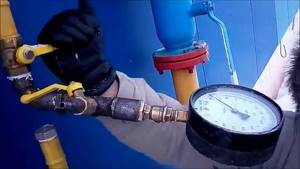
To perform pressure testing, air is pumped into the system. If the required pressure level is maintained for a certain time, the test result can be considered positive
If deficiencies are identified, they are eliminated, but if the system is completely sealed, it is connected to a common gas main. During the preparation process, you will have to remove and install special plugs; the rotating elements can be replaced with threaded connections. In general, the procedure for carrying out crimping work should consist of the following operations:
- To disconnect the area that will be subjected to the procedure from the main line, you need to close the high pressure valve and the low pressure network tap.
- After this, the plugs are inserted.
- If the flange ruptures, shunt bridges are used.
- To bleed the gas present inside the system, it is necessary to use a special sleeve made of rubberized fabric or perform this operation through a candle, which is usually installed on the condensate collector.
- The gas is flared, and if this cannot be done safely, it is moved for safe storage.
- Now you need to install adapters to connect pressure gauges and a compressor.
- For pressure testing of extended systems, it is recommended to additionally use hand pumps.
Typically, control pressure testing is carried out under a working pressure of 0.2 MPa. The recommended pressure limit is 10 daPa/h. In some industries, it is recommended to use a pressure of 0.1 mPa for crimping an internal gas pipeline, and the permissible level of drop in the indicator is 60 daPa/h or less.
Pressure testing of gas pipes inside the house is carried out along the entire length of the system, from the valve at the entrance to the house, to the connection to gas consumers, for example, to a boiler.
At non-industrial facilities, including when installing gas pipelines in residential premises, control pressure testing is performed at a pressure of 500 daPa/h. The permissible pressure drop in these cases is 20 daPa in five minutes. Tanks intended for storing liquefied gas are pressure tested at 0.3 MPa/h.
If the pressure inside the system remains stable during the control time, then the test result is considered positive. If this situation is achieved, then specialists remove the hoses connecting the system to the air duct. In this case, it is necessary to check the condition of the shut-off communications installed in the area between the air duct and the gas pipeline. After this, install plugs on the fittings.
If during pressure testing it was not possible to achieve stable pressure levels in the system, the result of the procedure is considered negative. In this case, a technical inspection of the system is performed to identify deficiencies and eliminate them. After this, the procedure is repeated to ensure the quality of the work performed.
Only after stable pressure has been established in the system can pressure testing be considered complete. If the system status check is unsatisfactory, permission to connect to the trunk will not be issued. The reason for refusal to put a gas pipeline into operation may also be violations committed during pressure testing.
After the pressure testing is completed, the pressure inside the structure is reduced to atmospheric level. Then install the necessary fittings and equipment, after which you need to keep the system under operating pressure for another 10 minutes. To check the tightness of the detachable joints at this stage, use a soap emulsion.
To eliminate identified defects, in accordance with the rules, you must first reduce the pressure in the system to atmospheric pressure. If welding work was performed after unsuccessful crimping, its quality should be checked by physical methods.
After completing the pressure testing work, a corresponding certificate is issued, on the basis of which gas specialists make a connection to the main gas pipeline
The procedure is recorded in a journal with operational documentation. Upon completion of the inspection and pressure testing, the results of the work are reflected in the acceptance certificate. This document should be kept together with other technical documentation related to the gas pipeline. In addition, the results of crimping are recorded in the construction passport.
Performing a technical check
Control pressure testing of gas networks is carried out not only before the launch of a new branch, but also after its repair. Scheduled pressure testing is carried out before putting the gas pipeline into operation.
The same procedure is repeated during scheduled checks of the system condition. During its implementation, it is possible to detect defects that already existed in the pipes and flaws made during welding work. Only after all deficiencies have been completely eliminated is the use of the gas system allowed.
Before starting the procedure, it is recommended to perform a technical check of the condition of the gas pipeline. There are instructions and instruments that allow such an examination to be carried out using technical means.
The inspection is carried out by a team, two operators examine and evaluate the condition of the insulating coating, and another specialist records areas of possible leaks.
In this case, it is necessary to inspect not only pipes and fittings, but also wells and gas pipes, to ensure that there is no gas contamination. If even the slightest leak is detected, the condition of the structure is declared emergency and the problem is immediately fixed.
Operators who inspect main pipes must follow certain safety rules:
- inspectors should wear special vests, especially when working near highways;
- scheduled inspections near roads are carried out during periods when traffic volume is minimal;
- If destruction of the insulating layer is detected, the damaged area should be immediately inspected, paying attention not only to the condition of the insulation, but also to the integrity of the gas pipe.
For a detailed examination, it may be necessary to dig a pit. In some places, infrastructure may make it difficult to use research equipment. In such a situation, the creation of a pit will be necessary to ensure the integrity of the insulating coating or to identify places of its destruction.
Before starting pressure testing, it is necessary to check the condition of the gas pipeline and equipment using technical means in order to preliminarily identify areas of possible damage.
Another way to study the condition of a gas pipeline is to drill a well. Instruments are inserted into such a hole, which analyze the state of the air and make it possible to detect a possible gas leak.
When carrying out this kind of procedure, it should be remembered that the use of open fire closer than three meters from gas-filled communications is unacceptable.
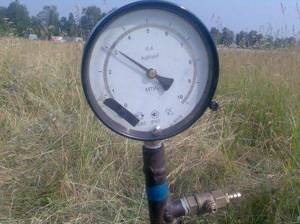
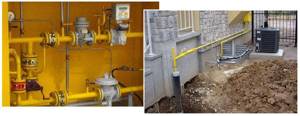
An example of pressure testing of a private gas pipeline
The working documentation indicates the diameter and design features of the gas pipeline, in accordance with which the fittings necessary for inserting control equipment are selected. The part of the pipe located underground is cut so that some reserve remains.
After this, a compressor is connected to the pipe and the gas pipeline is first purged. A powerful air flow blows debris, remaining water and other foreign contents out of the system. After this, you need to install plugs at the ends of the gas system. At one end of the pipe, where there is a base input, a special adapter should be installed, which allows metal equipment to be connected to the plastic structure.
Pressure testing makes it possible to verify the tightness of the gas pipeline system and ensure its trouble-free operation for a long time
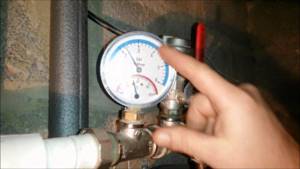
A pressure gauge and tap are installed here. After all the necessary devices are installed, air is supplied to the system so that the pressure inside reaches the desired limit. Now you need to maintain a control time to make sure that the pressure remains stable. The pressure gauge readings are recorded.
This is the simplest version of the procedure for checking a private gas pipeline for leaks. To perform such operations on high- and medium-pressure communications, it is necessary to use special high-precision equipment and invite specialists with appropriate qualifications.
Conclusions and useful video on the topic
Detailed information on this type of procedure is presented here:
Pressure testing is a necessary measure before starting a gas pipeline system, as well as after its repair. It must be carried out in accordance with the instructions and requirements to ensure a sufficient level of safety and reliability of the gas pipeline.
Do you have anything to add or do you have any questions about gas pipeline pressure testing? Please leave comments on the post and participate in discussions. The contact form is located in the lower block.
Norms and rules for crimp testing
Control testing of internal gas pipelines is regulated by GOST R 54983 2012. The general rules are the same for testing any part of the circuit under high and low pressure.
- Pressure testing of gas equipment and pipelines with air is carried out before the line is cut into the central main.
- To check, air is pumped into the cut-in section of the gas pipeline under a pressure of 100 kPa and held for at least 60 minutes. Measure the pressure in the circuit with a pressure gauge. The accuracy class of the device must be less than 0.6.
- If the circuit is sealed, the excess pressure indicator remains until the end of the pressure test. If the pressure gauge records a decrease in pressure, there is a leak in the pipe. According to SP 62.13330.2011, the pressure test is repeated six months after the control test.
In an apartment building
Pressure testing of the internal gas pipeline inside the house is carried out after an external inspection. After servicing, the gas pipeline is checked for strength. Air is pumped into the circuit at a pressure of 1 kgm/sq. see. This is how they check the pipeline from the switch at the entrance to the house or to the landing to the taps at the outlets to the devices. A complex gas pipeline is checked by dividing it into separate sections.
If gas meters are installed in the building, during pressure testing they are turned off and the sections are connected by a jumper. The test begins 3 hours after the pressure rises. The possibility of leakage is checked with a soap solution. If defects are identified, the commission records them.
Pressure testing of internal gas pipes includes a density test.
- The gas pipeline is filled with air under a pressure of 400 mm water column. with running meters and gas appliances. If there are no meters in the circuit, air is pumped under a pressure of 500 mm of water. Art. The gas supply system has passed the test if within 5 minutes the pressure drop does not exceed 20 mm of water. Art.
- When connecting new gas equipment to a gas pipeline already operating in an apartment building, pressure testing is carried out with gas. The emulsion is applied to all broken and threaded connections to check for leaks.
- Automation devices are checked only for density. The air pressure during pressure testing reaches 500 m of water. Art.
Underground gas pipeline
Pressure testing of an underground gas pipeline is carried out after installation in trenches and full or partial backfilling - at least 20 cm. Each section of the line, from plug to plug, is checked separately.
- Tests begin with air injection under test pressure. Maintain the time required to equalize temperatures.
- Measurements are performed with pressure gauges with an accuracy class of 0.4 or 0.6.
- A section of steel and polyethylene gas pipelines is pressurized separately.
- Pressure testing of underground external gas pipelines placed in cases is carried out three times. For the first time immediately after welding and before laying. Then after backfilling in the trench and finally along with the entire gas pipeline.
- Inspection of multilayer pipes is carried out in 2 stages. First, they are tested for strength by pumping air for 10 minutes at a pressure of 0.1 MPa, and then tested for tightness under a pressure of 0.015 MPa.
Testing of special technical devices is carried out according to the standards for lines with the same pressure.
Internal low pressure gas pipeline
Pressure testing of equipment and internal gas pipelines is carried out with an air mixture under a pressure of 1000 mm of water. Art. The area to be examined is from the main tap to the switch in front of the burners. Testing lasts 1 hour. During this time, a pressure reduction of 60 mm of water is allowed. Art.
Pressure testing in an apartment building includes inspection and testing of household equipment.
- A pressure-vacuum gauge and any device with a variable volume will be connected to the nozzle of the gas stove. With its help, an excess pressure of up to 5 kPa is created.
- Open the tap of the burner being tested and fill the tank with gas.
- Close the valve on the gas pipe. Gas is squeezed out of the container to create pressure.
- Close the burner valve and check the tightness with a vacuum gauge: in 5 minutes the pressure can drop by no more than 0.3 kPa.
- If the pressure drops faster, there is a leak. It is detected by applying a soap solution to joints and threaded connections. Once a leak is detected, turn the valve on the burner so that the gas pressure on it drops. Then light one of the burners, carefully squeeze the gas out of the container and disconnect the pressure gauge and device.
Great Encyclopedia of Oil and Gas
Gas inlets into buildings from the yard line or street network are laid in stairwells or basements. In residential buildings, inputs are arranged separately for each section. When laying pipes through the foundation masonry, measures are taken to protect them from destruction during settlement of the building. The pipe located in the wall is wrapped with resin rope and placed in a case - a pipe of larger diameter.
It is preferable to make gas inlets into houses in the basement. Entering gas pipelines into basements and semi-basements and laying gas pipelines along them (if there are no special technical corridors) is prohibited. It is not allowed to install plugs on basement and intra-house gas pipelines.
The gas inlet can be made not only into the stairwell, but also into the non-residential basement of the building.
Gas inlets of gas tanks are passed through special chambers in which shut-off valves, gas protection, valves for manual discharge and control valves for releasing gas into the atmosphere when gas tanks overflow are placed, as well as heating system control units and non-flammable gas pipeline valves for purging gas tanks and gas inlets.
Recessed steel gas inlets installed under buildings must be enclosed in a gas-tight cartridge. The latter must be located in an accessible and commonly used part of the building. Where the cartridge ends, the annular space between the cartridge and the inlet pipe must be sealed to prevent gas leakage.
Low-pressure gas inlets of short length (up to 25 m) are allowed to be put into operation without testing them for density under air pressure. In this case, the density of the gas pipeline (input) is checked in an unfilled trench under operating gas pressure by coating the connections with soap emulsion or another equivalent method.
| Yard gas pipeline diagram. /, 2, 3, 4, 5, 6, 7 and 8 – gas risers. |
A gas inlet is a gas pipeline running from the distribution (street) network to the riser of the intra-house gas network.
| Yard gas pipeline diagram. 1, 2, h, 4, 5, v, 7 8 – gas risers. |
A gas inlet is a gas pipeline that runs from the distribution (street) network to the riser of the indoor gas network.
| Yard gas pipeline diagram. |
A gas inlet is a gas pipeline running from the distribution (street) network to the riser of the indoor gas network.
Gas inlets and risers are purged sequentially, starting with the most distant inlet and riser.
Since there are gas inlets into the building on each of the two staircases, and the gas pipeline layout in the left half of the building completely coincides with the distribution in its right half, the gas pipeline diagram can only be drawn up for half of the building.
Pages: 1 2 3 4 5
The essence of crimp tests
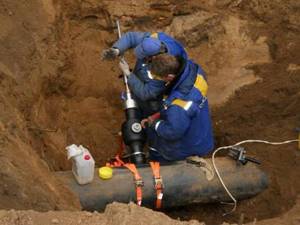
Pressure testing of a water pipeline (as well as any other systems for pumping liquid or gaseous media) is the most important in the pipeline construction process, especially in such industries as the chemical or oil and gas industry, hydraulic engineering, and housing and communal services. Along with checking the value of permissible compression in pipes, an analysis of the stress-strain state of pipes is also carried out, which makes it possible to assess their service life.
Some pipe manufacturers - for example, the Rehau brand - are developing their own original methods for crimping their products. For these purposes, Rehau sells a special electro-hydraulic tool, with which you can test the pipeline immediately after its installation. The verification method is local: a pressure testing pump is connected to the sealed area, creating the necessary internal air pressure. The stability of the indicators is established by a pressure gauge.