Size calculation
Making your own pipe heating device is not very difficult. But there is one important point here - to correctly calculate the dimensions of the device. After all, such an indicator as heat transfer will depend on them.
Required indicators
The calculation is not easy, because it requires some criteria for the premises itself. For example: glazing area, number of entrance doors, what windows are installed, whether the floor, walls and ceiling are thermally insulated.
It’s difficult to take all this into account, so there is a simpler option that takes into account only two indicators:
The heating radiator is selected based on the heat transfer per 10 m² equal to 1 kW of thermal energy. The ceiling height should not exceed 2.8 m.
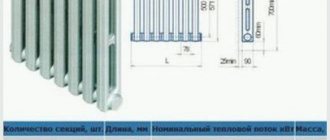
How can this help when assembling a homemade heating device? To do this, you will have to compare it with a conventional cast iron radiator of the MS-140-500 brand. The heat output of one section is 160 W, volume is 1.45 liters. What does this give us?
You can determine exactly how many sections will be needed if you use a cast iron device. The total volume of coolant that will fit in one battery is determined from the number of sections. And knowing this number, you can approximately determine the volume of the pipe radiator.
The thing is that the thermal conductivity of steel is 54 W/m*K, and that of cast iron is 46 W/m*K. That is, a small downward error will not have any effect on the quality of heat transfer.
Calculation example
Conventionally, we will assume that an eight-section cast-iron heating device corresponds to the above-described ratio. Its volume is 8x1.45=11.6 liters.
Now we can calculate the length of a pipe with a diameter of 100 mm, which we will use to assemble a homemade battery. The standard cross-sectional area of the pipes is 708.5 mm². We divide the volume by the cross-section, we get the length (we convert liters to mm³): 116000:708.5= 1640 mm. Or 1.64 m.
A slight deviation in both directions will not greatly affect the heat transfer. Therefore, you can choose either 1.6 or 1.7 m.
Basic heating register calculation
If the level of heat transfer of a purchased battery can be found out from its passport, then in the case of homemade heaters you have to calculate everything yourself. Otherwise, it will not be possible to heat the room effectively and evenly.
Calculating the required radiator power to heat a room
For calculations, they use formulas that may be simple, but require certain mathematical skills. Another option is online calculators, of which there are now more than enough on the Internet. Strictly speaking, the topic is quite extensive and deserves a separate article, so we will use simple calculation methods. In any case, this issue should be given close attention, otherwise your family will complain that the radiators do not heat well and the room is cold.
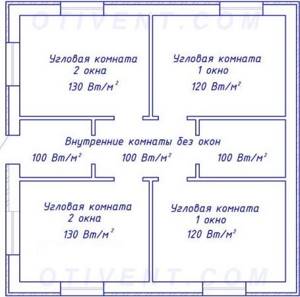
A simplified method for calculating the required thermal energy is to calculate the heating area and then multiply by 100. Why is this so? Because for comfortable living per square meter you need 100 W of heat. To be more precise in the calculations, let’s take into account the number of window openings and walls:
- A room with one window and one external wall – 100 W per 1 m² of area.
- A room with one window and two external walls - 120 W per 1 m².
- A room with two windows and two external walls - 130 W per 1 m².
Important! The calculations are suitable for rooms with ceilings of no more than 3 meters, when the house is located in a moderate climate in the middle zone. If the building is located in the northern regions, then the result must be multiplied by a factor of 1.2-2.0, and if in southern latitudes - by 0.7-0.8.
Simple calculation of the thermal power of a radiator made of steel pipes
Knowing what to strive for, all that remains is to choose the design of the heating device that would satisfy your needs. How to do this?
Build process
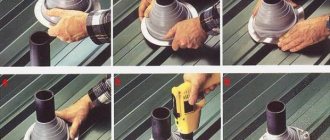
First of all, you need to prepare, i.e. purchase all necessary materials. We cut a pipe with a diameter of 100 mm into two halves 80 cm long; for this you can use a grinder.
Next, we cut 2 pieces of 100 mm length from pipes with a diameter of 25 mm, and 4 pancakes are cut from a steel sheet for an outer diameter of pipes of 100 mm.
Then two holes with a diameter of 25 mm are cut out in 100 mm pipes - their location from the edges should be at a distance of 50 mm on diametrically opposite sides.
After this, you can assemble the structure. First, pancakes cut from sheet iron are welded. Then two 100 mm pipes are connected to each other with a 25 mm pipe, exactly along the cut holes.
The second piece of 25 mm pipe is welded on the opposite side; it will serve as a reinforcing element, after which two bends are welded: top and bottom.
Subtleties of installing homemade registers
Actually, the procedure is not much different from installing factory heating devices. The only difference here is the weight and dimensions of the structure. However, keep in mind a few simple rules:
- The distance between the battery and the wall should be at least 25 mm, and the same to the floor. From top to window sill - at least 50 mm.
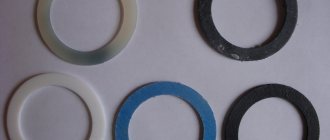
- When assembling threaded connections for sealing, use paronite gaskets, FUM tape or tow with sealant.
- The slope of the underwater pipes in relation to the register should be 5-10 mm per meter in the direction of the coolant movement. When the line length is less than 500 mm, it is not necessary to make a slope.
- The installation part of the work should be carried out before the onset of the heating season - this way you can do a test run of the heating system, check its tightness and design power.
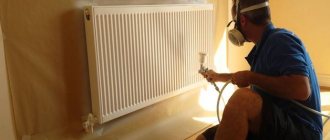
Checking the device
The homemade radiator is ready. As you can see, it is not very difficult to make. All that remains is to check it for the tightness of the welded joints. To do this, one of the drains is closed with a plug, and water is poured into the battery through the second.
Now you need to examine the weld seams. If there are no wet smudges, then all the work was carried out efficiently. If stains do appear, you will have to mark the leaks with a marker, drain the water from the radiator and re-steam the seam.
How to calculate heat transfer?
The required amount of material can be calculated based on the temperature parameters that need to be obtained in the room. At the household level, this step is usually skipped - they make heating registers with their own hands “by eye” according to the principle “the more, the better.”
But it is better to make simple calculations of heat transfer, for which you do not need to be a mathematician. All you need is:
- Calculate the area of the room.
- Learn about the heat transfer properties of steel.
- Select the optimal pipe diameter.
The area of a room is calculated by multiplying its length by its width (S = L*W). However, for more accurate calculations, it is recommended to calculate the volumetric parameter by adding the height (H) value to the calculations.
So, the final calculation formula takes the form:
V = L*W*H
For example, you need to calculate V of a room where the length is 5 m, width is 3 m, height is 2.15 m. The volume of the room is obtained: V = 5*3*2.15 = 30.25 m3. Based on this basic value, further calculations should be made to determine the amount of heat, the size and number of heating registers to make with your own hands.
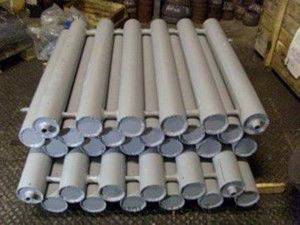
Self-welded heating registers are blocks consisting of six steel pipes with a diameter of over 100 mm. Such batteries, made without proper calculations, can overheat the room being served.
First of all, the required amount of heat per calculated volume of the room is calculated to achieve the required internal temperature (W):
Qп.т = V * k (Tin – Tout),
where V is the volume of the room; k – heat transfer coefficient of the building walls; Tin – temperature inside; Tout – outside temperature.
The amount of heat generated by one register can be calculated using the formula:
Qр = q * L * (1-n),
where: q – heat flow from each horizontal and vertical pipe of the register (approximately 20-30 W/m); L – length of vertical and horizontal pipes of the register (m); n – coefficient of unaccounted heat flows (for metal pipes – 0.1).
The category of unaccounted heat loss also includes the hood in the garage. If the mechanical type is installed, the coefficient n must be increased to at least 0.2.
The number of registers, accordingly, is determined by the formula:
Nр = Qп.т. / Qр
Such a calculation method will most likely be assessed by design specialists as a simplified and crude form. However, this approach still seems to be a more rational action than calculating and making registers with your own hands by eye, without any calculations.
Useful tips
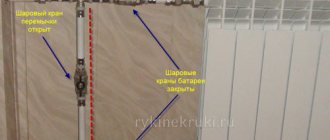
If the heating system of the house was assembled taking into account the use of forced movement of the coolant, that is, a circulation pump is installed in it, then the home-made device can be installed as desired (vertically or horizontally).
If the coolant in the heating system moves according to natural laws, then the battery must be mounted only horizontally. In this case, there is no need to install an air vent on it (Maevsky tap).
It is impossible to make a high-quality radiator from pipes if you have the skills to operate a welding machine at the beginner level. The seams must be welded well; the safe operation of the device and the entire heating system depends on this.
The thickness of a 100 mm pipe must be at least 3.5 mm.
Two bends can be welded to the ends of the pipes where the metal pancakes were welded. In this case, the holes in the ends are made not in the middle, but with an offset: the input bend (upper) is closer to the upper edge of the pipe, the outlet (lower) closer to the lower edge. It is better to make holes in the pancakes in advance, before welding them to the pipes.
When calculating heat transfer, there is no need to pay attention to the transfer area. It is clear that this figure will be higher for a cast iron radiator. All this is compensated by the high thermal conductivity of steel.
Welding seams need to be cleaned and given a presentable appearance. To do this, scale and smudges are knocked off with a hammer, and the entire surface of the seams is sanded with a grinder.
Types and characteristics of tubular radiators
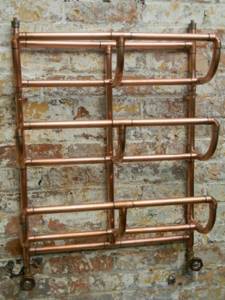
From all of the above, it becomes clear that in this case there is practically no alternative to steel pipes. Although the appearance of structures welded by yourself is very mediocre, they are quite suitable for a garage, greenhouse or cottage, plus the instructions for self-assembly are not complicated.
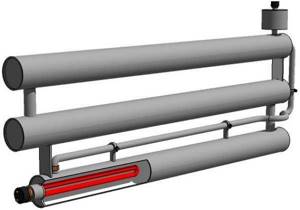
Battery diagram with electric heating element.
Types of homemade tubular radiators
Homemade designs of this kind are often made serpentine or register. The configuration of the first is included in the name. The metal pipe is bent in the form of a snake, after which connecting pipes and, in some cases, fastening strips are welded to it.
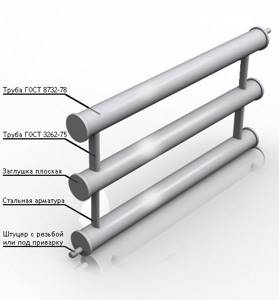
Standards for the production of registers.
A one-piece bent radiator naturally has significant advantages over welded structures. But to bend a steel pipe, you need a special pipe bender or at least a gas torch. Plus the pipe diameter, as a rule, does not exceed 50 mm. Therefore, for more powerful systems it is common to use register constructs.
There are no restrictions on the diameter of the radiator tube in the register system. Most often, smooth round pipes from 32 to 150 mm in diameter are used here.
Sections can be connected in two ways - in a thread or in the form of a column. A thread connection, in fact, differs from a coil only in the presence of connecting pipes. Otherwise, it's still the same consistent snake.
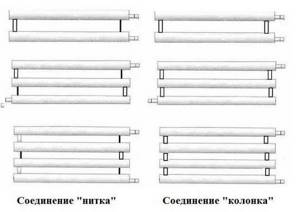
The pipes in the column are connected in parallel. That is, horizontally mounted sections of larger diameter are connected to each other by vertical couplers on both sides. This is somewhat reminiscent of a standard factory radiator, only turned on its side.
Such homemade registers can be connected to both one-pipe and two-pipe systems. The type of system is not reflected in the technical characteristics. Due to their large diameter and minimal hydraulic resistance, such registers work best in heating systems with natural coolant flow.
Error correction
Sometimes, incorrect measurements of a room lead to incorrect calculations. The installed heating radiator does not work efficiently and the room is cool. You should not immediately rush and make a new device, spending both time and money. There is a way to increase thermal output.
To do this, it is necessary to increase the heating area. The only option in this case is to weld ribs made of a metal sheet 1.0-2.0 mm thick to the pipe structure. The shape of the ribs can be different, the main thing is their area.
Therefore, for example, rectangular pieces with a length greater than the height of the radiator and a width of 100-150 mm are cut out of a sheet of iron. Semicircles with a diameter of 100 mm are cut into them on one side. On each piece of sheet there are two semicircles, the distance between which is determined by the gap between the two pipes in the battery.
The finished forms are welded to the heating structure. The more there are, the higher the heat transfer of the device.
Manufacturing technology
If you want to make a homemade heating radiator, then a two-meter steel pipe should be cut into three equal parts. In each, two holes are made for throughput tubes. They should be removed from the ends by 5 cm, positioned at different ends at an angle of 180˚ relative to each other.
Next, round blanks for the ends should be cut from sheets of steel. The diameter of the covers must be equal to the size of the pipe holes. These elements are welded to the ends. Water supply pipes are welded to the holes. This will provide a contour for the movement of water.
To make the structure more durable, the pipes should be connected to each other with fittings. In large registers, safety jumpers should be provided. The distance between sections should be 0.5 cm larger than the size of the main pipe.
How to make your own heating radiator from pipes
Reliable and high-quality heating radiators can be purchased at almost any hardware store. But sometimes situations arise in which the only correct solution is homemade heating radiators made from pipes. Of course, such radiators cannot be used on a permanent basis in a residential area, but, for example, they are quite suitable for heating a garage.
Do-it-yourself heating battery made from pipes
Design features of a homemade battery
We will make the battery from a 2-meter steel pipe with a diameter of 100 millimeters. Both ends of the product must be welded, and a pair of squeegees must be welded directly on its plane, through which the working fluid will be supplied and discharged from the heating network.
What will the job require?
To make a homemade heating radiator, we will need the following equipment and consumables.
Having prepared everything necessary, we proceed directly to the manufacture of the battery.
Selecting a heating device configuration
Homemade radiator designs are mainly made on the basis of metal pipes with a diameter of 80 - 150 mm.
Design features are limited to two versions:
- Lattice.
- Snake.
The lattice design of the heating battery differs from the “snake” in a slightly different circuit design, and, depending on the variations in such batteries, the distribution of the coolant may be different.
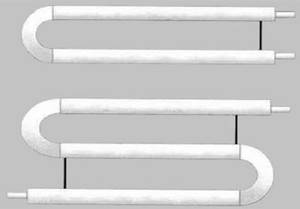
Coil structures actually have a monotonous design, implying strictly sequential movement of the coolant.
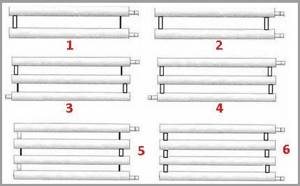
Lattice registers are constructed according to different schematics:
- with one or two jumpers and one-way power supply;
- with one or two jumpers and versatile power supply;
- parallel connection of pipes;
- sequential connection of pipes.
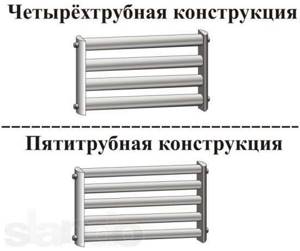
The number of pipes in one assembly can range from two to four or more. Rarely, there is also the practice of making single-pipe registers.
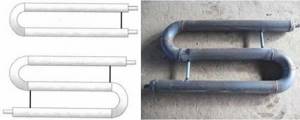
A coil assembly usually contains at least two pipes connected on one side by a blind jumper and on the other by a through jumper, which are made from two pipe bends (2x45º). It should be noted that the design of heating registers in the form of a coil is used much less frequently than “grid” designs.
Both manufacturing options - lattice and coil - can be made not only on the basis of classic round pipes, but also on the basis of profile pipes.
Instructions for making a heating radiator
In order to obtain an effective and high-quality product as a result, everything must be done strictly according to the technological instructions. Of course, we start by cutting a large steel pipe using a grinder.
- First, let's clarify the basic provisions. The pipe must be cut into three equal parts. Therefore, we take a grinder and, guided by the markings made earlier, begin cutting.
- After cutting is completed, we take a welding machine and use it to make two holes with a diameter of about 25 millimeters in each of the pipe sections. These holes should be located 5 centimeters from the ends of the products at an angle of 180 degrees relative to each other.
- Next, we clean three sections of the molten metal remaining after welding.
- We take a steel sheet and cut out six round blanks from it. Typically, the diameter of the workpieces should be equal to the diameter of the large pipe.
- We take the blanks and, using the same welding machine, weld the ends of all three pipes with their help.
- We take a pipe of smaller diameter and cut it in half so that we end up with two identical pieces. We weld these sections to pipes of larger diameter in the places where we previously made 2.5 centimeter holes.
- We continue to make a homemade heating radiator from pipes. We take two 10-centimeter pieces of reinforcement and weld them to pipes of a smaller diameter. As a result, the strength and reliability of the finished structure should increase significantly.
- All that remains is to weld the two bends that we prepared in advance. That's it, the work is almost finished!
Upon completion of all preparatory activities, we check the finished structure for strength and tightness. In order to check whether the radiator is leaking, we close one of its flows, and fill the second with the required amount of liquid. In this simple way we can identify even the most minor leaks in the battery. And if they - leaks - are detected, then we drain the water from the product and re-weld all its areas that were welded poorly.
Note! The cost of such a homemade battery is measured in several hundred rubles, while a store-bought equivalent will cost at least three times more.
Before you begin production, you should understand a number of important points regarding this important procedure. So, first you need to make a list of the necessary materials and decide on the configuration of the future battery. As a rule, there are no difficulties with materials: the most suitable option for making a radiator is metal pipes with the largest possible diameter.
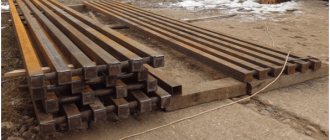
But in order to save on this vital material, we recommend going to the nearest scrap metal collection point - there are more than enough different pipes there. This simple maneuver will allow you to save a lot.
Note! The most important characteristic of any heating equipment is its power (in terms of heat transfer). However, it is impossible to find out the technical parameters of each material. That is why in our calculations we will proceed from the general parameters of standard cast iron radiators.
It is worth noting that to calculate power, the following points must be taken into account:
- battery weight;
- the weight of the working fluid that will be in it;
- total area of the heating device;
- thermal conductivity.
If we compare the thermal parameters of steel and cast iron, there are practically no differences. Therefore, regardless of which material was chosen, we will build on the general characteristics of both materials.
The most important difference between a factory battery and a homemade one is the total area. For self-made devices it is usually less. Although this point is not particularly important, since the thermal conductivity of steel exceeds that of cast iron. Consequently, the difference in area is compensated.
Example of calculations.
For informational purposes, here is one simple example. Let's say we have a factory cast-iron radiator with ten registers, and each of them holds about 1.5 liters of working fluid. The thermal power of one register is 160 watts. What is all this for? And in order for us to find out during a comparative analysis that a homemade battery must hold at least 14.5 liters of working fluid.
To make a homemade heating radiator from pipes, you need to use an ordinary steel pipe with a diameter of about 10 centimeters. As for the thickness of the walls of the product, it should be 0.35 centimeters. It turns out that the internal diameter of such a pipe will be equal to 9.5 centimeters. Next, we calculate the total cross-sectional area of the product - it turns out to be almost 71 centimeters.
After this, we make the simplest division of the total capacity by the cross-sectional area (71 centimeters) - this will allow us to determine the required length of the pipe. In this case it is 2 meters 5 centimeters. A product of this exact length will be required in the manufacture of one heating battery.
Factory-produced heating batteries
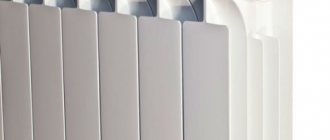
Radiators made from pipes are also produced by industry. These products are heating devices that consist of upper/lower manifolds. Both elements are connected by vertical tubes arranged in two or three rows. But fins, which often increase the usable area, are absent in this case. For heat exchangers, products with a diameter of 2.5 centimeters are used, and for collectors - 5 centimeters.
The maximum permissible pressure for such radiators is 12 atmospheres, and due to the fact that the surfaces of the pipes are galvanized, the products are more resistant to rust. The rolled steel used for this has a thickness of 0.15 centimeters. As for the layout in relation to collectors, it can be:
- with perpendicular heat exchanger;
- parallel.
If we take into account all the technical parameters, then tubular radiators must be used in public facilities and small-apartment urban buildings. Thanks to their attractive design, such products will easily fit into any interior, and since they do not have any sharp corners, they can be installed even in preschool/school institutions, as well as in medical institutions. Finally, thanks to the absence of fins, the procedure for cleaning surfaces from dust takes a matter of seconds.
That's all. Good luck with making the radiator and, of course, warm winters!
Advantages of homemade radiators
The main advantages of do-it-yourself radiators:
- An opportunity to express yourself, your imagination and give the room an interesting look.
- Independent assessment of heat loss or heat transfer, drawing up an individual installation plan, according to the characteristics and purposes of operation of the residential premises.
- Use of available materials, spare parts and equipment.
In order to make a battery with your own hands, you will need:
- welding machine (not necessarily powerful);
- electrodes;
- sheet of stainless steel of special strength (from 3 mm), size 100x500 mm;
- steel pipes: grade VGP Du-25, 20 cm long; length 2 m, diameter 100x3 mm;
- squeegee brand Du-25, length 100mm x 2 pcs.;
- plug brand DN -25 x 1 pc.;
- grinder with a circle for metal (grinding machine).
How to make a register with your own hands
To make a homemade heating register from pipes, you will need 3 profile pipes of rectangular section 60x80 mm and a wall thickness of 3 mm, as well as 4 round pipes with a diameter of 25 mm, plugs made of sheet material with a wall thickness of 3 mm.
- Holes for jumpers are measured and cut at the ends of the pipes. The central pipe is cut through on both sides.
- Lay out the profile pipes horizontally, lay jumpers between them strictly along the holes, then weld them.
- Now the product is installed vertically.
- Welded seams create tightness at pressures up to 13 atm.
Video: register installation procedure
Heat exchanger for bath
In the sauna, the energy of the stove is transferred to water. The curved pipe is placed inside the firebox, while the coil does not come into contact with the fire. As hot water rises, cold water replaces it. In a closed water circuit, a cycle occurs that increases the temperature in the entire system. The bath coil is made of stainless steel; other materials do not withstand such harsh operating conditions.
Craftsmen lay out the furnace, building a heat exchanger (register) inside it, which is then connected to a water tank. The optimal way to place the heat exchanger is opposite the opening through which flue gases flow into the smoke duct. The register design is U-shaped and welded from pipes. Sometimes a finished section of a cast iron battery is used. Due to the low natural pressure, pipes with a diameter of 25 mm and a length of no more than 2.5-3 m are used.
The register dimensions are selected depending on the furnace power. To heat 100 liters of water, you will need a pipe 2 m long and 40 mm in diameter. The thermal power of such a heat exchanger will be equal to 2 kW.
- It is better to install the heat exchanger simultaneously with the laying of the furnace after the foundation has been erected. In this case, the size of the firebox is easy to match with the size of the register.
- A distance of 10-15 mm is maintained between the heat exchanger pipes and the firebox. The coil does not come into contact with the flame; it is heated by the hot air. The curved pipe is connected to the tank through threaded connections.
- A curved pipe wound around a metal chimney can also heat water (the outlet temperature reaches 500 C).
- Experts use heat-resistant seals at the junction of the heat exchanger and water pipes.
- Heavy welded structures are installed in brick kilns (it is difficult to find a place for it in an iron kiln).
- The chimney of a stove with a heat exchanger is cleaned more often, since an order of magnitude more soot is formed in it due to incomplete combustion of fuel.
- To heat the liquid even faster, a circulation pump is introduced into the system to artificially move water.
- The heat exchanger is filled with cold water before the oven heats up.
- In order to prevent pipes from bursting at sub-zero temperatures, it is necessary to provide for the possibility of completely draining water from the system.
A self-made register is a good opportunity to save money. Heat exchangers made of smooth or profiled products can withstand pressure and temperature surges, and their high heat transfer allows them to be used for heating large rooms.
Installation: step by step instructions
• The required connection diagram for heating radiators is selected in advance. • Their future location is thought out to the smallest detail. • The heating system of a private house or high-rise building is shut down. • The water is poured out of it, the remainder is pumped out - a pump is needed for this. • The battery is hung on special supports, a building level is taken, vertical and horizontal are checked to ensure correct placement of the radiator. • All possible plugs are removed from it. • If the circuit is single-pipe, a pre-purchased bypass is connected - with its help, this battery can be shut off at any desired time. • With a two-pipe circuit, the radiator is connected to the heating system pipe only with the help of a drain (a valve is attached to it). • The rivets are threaded, and to completely seal the resulting joints, sealants or tow are used. Or welding, if the installer is experienced in this. • At the last stage of installation, according to the rules, the installed batteries must be tested using crimp testing. This requires special equipment, but it is much wiser to invite a plumber to do this.
conclusions
To install heating radiators yourself, you should have sufficient information, know all possible connection methods, and purchase the necessary elements and tools. This type of installation work should be carried out only in the summer - in winter it can develop certain problems. But in general, with some skills, every owner can install a new heating system for his own home with his own hands.
https://youtube.com/watch?v=3BaaUUG4JZE
https://youtube.com/watch?v=3BaaUUG4JZE
Radiator connection diagrams
How well the radiators will heat depends on how the coolant is supplied to them. There are more and less effective options.
Radiators with bottom connection
All heating radiators have two types of connection - side and bottom. There can be no discrepancies with the bottom connection. There are only two pipes - inlet and outlet. Accordingly, coolant is supplied to the radiator on one side and removed from the other.
Bottom connection of heating radiators for single-pipe and two-pipe heating systems
Specifically, where to connect the supply and where the return is connected is written in the installation instructions, which must be available.
Heating radiators with side connection
With a lateral connection, there are many more options: here the supply and return pipelines can be connected into two pipes, respectively, there are four options.
Option #1. Diagonal connection
This connection of heating radiators is considered the most effective, it is taken as a standard and this is how manufacturers test their heating devices and the data in the thermal power passport for such a connection. All other connection types transfer heat less efficiently.
Diagonal diagram for connecting heating radiators with a two-pipe and one-pipe system
This is because when the batteries are connected diagonally, the hot coolant is supplied to the upper inlet on one side, passes through the entire radiator and exits from the opposite, lower side.
Option #2. Unilateral
As the name implies, pipelines are connected on one side - supply from above, return from below. This option is convenient when the riser runs on the side of the heating device, which often happens in apartments, because this type of connection usually predominates. When the coolant is supplied from below, this scheme is used infrequently - it is not very convenient to position the pipes.
Lateral connection for two-pipe and one-pipe systems
With this connection of radiators, the heating efficiency is only slightly lower - by 2%. But this is only if there are few sections in the radiators - no more than 10. With a longer battery, its farthest edge will not heat up well or will remain cold at all. In panel radiators, to solve the problem, flow extenders are installed - tubes that bring the coolant a little further than the middle. The same devices can be installed in aluminum or bimetallic radiators, thereby improving heat transfer.
Option #3. Bottom or saddle connection
Of all the options, saddle connections for heating radiators are the least effective. Losses are approximately 12-14%. But this option is the most inconspicuous - pipes are usually laid on the floor or under it, and this method is the most optimal from an aesthetic point of view. And so that losses do not affect the temperature in the room, you can take a radiator a little more powerful than required.
Saddle connection of heating radiators
In systems with natural circulation, this type of connection should not be made, but if there is a pump, it works well. In some cases, it’s not even worse than the side one. It’s just that at a certain speed of movement of the coolant, vortex flows arise, the entire surface heats up, and heat transfer increases. These phenomena have not yet been fully studied, therefore it is not yet possible to predict the behavior of the coolant.
Heating system design
In a private house, the heating system can be one- or two-pipe. In the first case, all radiators are connected to one collector. It performs the role of supply and return. As a result, it is possible to obtain a circuit in the form of a closed ring.
When laying heating pipes in a private house, you can install them using a two-pipe scheme. It provides for the supply of coolant to the radiators through one pipe. In this case, the return is carried out differently. The two-pipe system is more reliable and progressive. But there is a misconception that the installation of a single-pipe system requires less material. However, such a system is more complex and expensive. This is explained by the fact that when installing heating in a private house with your own hands using a single-pipe system, you create a scheme in which the water from the radiators will cool down more the further it goes. Therefore, it will be necessary to increase the power of heating devices by adding sections. In addition, the distribution manifold must have a larger diameter compared to the two-pipe distribution main.