Open and closed heating systems: filling principle
The open system is equipped with an expansion tank at its highest point. The surface of the coolant fluid in it is in direct contact with atmospheric air. The closed system is equipped with a membrane expansion tank, hermetically sealed from the atmosphere.
Heating systems of any type can be filled as follows:
- tap water supplied to the lowest point of the system - through the make-up valve;
- water (distilled) or antifreeze, supplying liquid from a container (well, reservoir):
- by pouring manually and/or using a pump to the top point (fitting under the air vent or through an open expansion tank);
- pumping through the lowest point - the make-up inlet.
Many homeowners know the simplest (and worst!) way to fill open systems through an expansion tank. Water/antifreeze is poured inside with breaks to release air. It is not recommended to repeat this method in closed systems using the pipes of the upper air vents. The air that initially fills the system passes up through the layer of water being poured, dissolving in it. Air locks that prevent the flow of water through pipes and radiators will be guaranteed.
Then how to fill a closed heating system? The recommended method of filling any heating systems is to supply fluid under pressure (from a water supply or container via a pump) through the bottom fill valve.
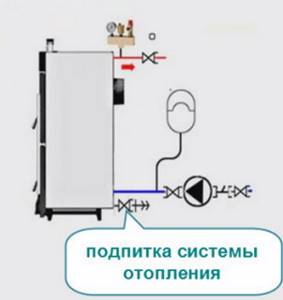
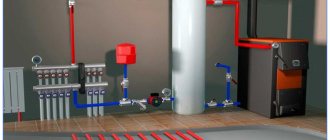
Location of the heating system make-up unit.
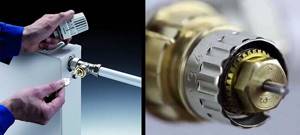
What to do with a stuck ball valve
If the ball valve is stuck, you can try to repair it yourself. For this:
Unscrew the fixing nut and remove the handle. Below it is the upper part of the rod. If there is a hexagon clamping sleeve, you can loosen it a little. Using an adjustable wrench, turn the rod from side to side
Attention! You need to act slowly and smoothly. If you apply too much force or turn the key too quickly, you can deform the ball or the entire mechanism.
Check the system. If the mechanism works normally and there are no leaks, you can install the adjusting knob. To do this, rotate it to the protrusions of the permitted degree of opening to determine whether it is possible to clamp the clamping sleeve all the way.
To avoid damage to the ball valve, it is necessary to use only high-quality products. It is not recommended to purchase silumin devices with pipe wall thicknesses less than 2.8 mm. It is better to give preference to taps from European or Turkish manufacturers.
To prevent breakdowns, it is necessary to periodically change the position of the mechanism in order to develop the crane. It is recommended to do this at least once a month.
When filling with coolant
There are only two known situations that require this technological operation:
- putting heating into operation (at the beginning of the heating season);
- restart after repair work.
Typically, coolant water is drained in late spring for two reasons:
- Water inevitably becomes contaminated with corrosion products (inside radiators, metal-plastic and polypropylene pipes are not susceptible to it). If you leave old water for the new season, you risk breaking the circulation pump with solid contaminants.
- Flooded systems of country houses that have not been started can “defrost” during a sudden cold snap - such cases are not uncommon. In this sense, antifreeze coolant is preferable. The high-quality composition has high anti-corrosion properties, increasing the drain interval to 5-6 years. There are known cases of uninterrupted heating operation with the same volume of antifreeze for 15-17 years. It is recommended to drain low-quality antifreeze after 2-3 years.
Pumping antifreeze into the heating system.
Additional regulation methods
When dissatisfaction with the quality of services from the heating network becomes large, people begin to look for opportunities, ways to regulate the heating system in an apartment building, how to correct the situation, and what to install to make the apartment warm and pay less for it.
In this case, errors are possible that can lead to a breakdown of the entire home network. For example, adjusting the heating system of an apartment building using valves is strictly prohibited.
They belong to the category of shut-off valves, therefore they can operate only in two positions: “open” and “closed”. Residents, not knowing this, try to leave the valves ajar, which disables them.
A weather control system for heating in an apartment building will be useful if a common building meter is installed in it. Only in this case, such a device saves up to 35% of heat consumption. At the heart of the weather heating controller for an apartment building is a sensor that detects temperature changes outside and reacts to them by changing the temperature in the network. Such a device, together with installation, will cost residents of the house more than 500,000 rubles.
Adjusting heating radiators using Mayevsky taps helps when the system is airy, which is sometimes enough for the radiators to become warm.
Drawing conclusions, we can say that today the question of who regulates the heating temperature in an apartment building is especially relevant. Residents want to participate in this process, and if the heating system allows it, they contact the management office with applications to install thermostats on their radiators.
The choice of devices for this is quite large on the domestic market and their installation does not take much time, but gives tangible results, both in terms of heat quality and its savings. Therefore, it is worth studying the principles of operation of thermostats, applying for its installation, and then enjoying comfortable warmth in your apartment.
Filling technology: where to supply coolant
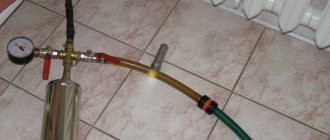
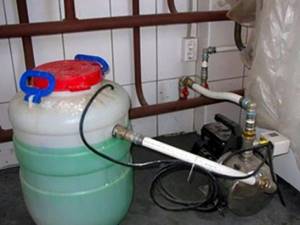
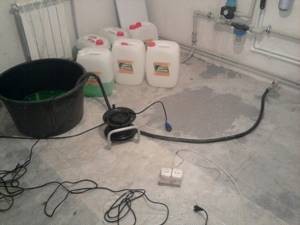
The necessary means are a container and a pump that creates the required pressure of the coolant liquid. Submersible type “Gnome” or “Kid” are quite suitable (popular with gardeners who use them for watering areas located above the levels of reservoirs). There is evidence of successful filling of closed systems using hand pumps - from those used for spraying protective solutions on garden crops, to specialized hand pumps used for pumping motor fuels or liquid chemicals from drums. Any heating circuit can be successfully filled by monitoring the pressure using a pressure gauge.
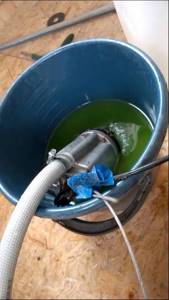
Filling the system with antifreeze using a submersible vibration pump.
The first step is to select the fluid entry point. If the pressure created by the pump raises the liquid to the top of the system, it should be connected at the lowest point of the boiler room - the coolant make-up pipe, cut into the “return” in front of the boiler. In addition to the make-up inlet, a structurally separate drain outlet is required (two different system components). The first is equipped with a valve (ball valve) and a check valve, the second - only with a valve (ball valve). If the lowest point of the system is the water drain fitting from the boiler, then you can drain/fill the system with water through it. Since a check valve is not installed behind the boiler drain (behind the drain at all), any shutdown of the pump will cause the pumped liquid to leak out - you need to quickly turn off the tap in front of the fitting.
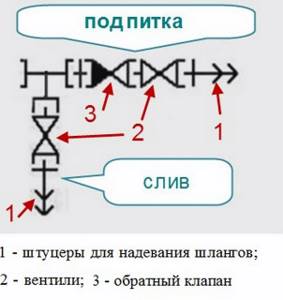
Design of a typical drain/recharge unit.
Filling the system from below
So, let's get back to pumping fluid into the system. We use a container of suitable volume (a 200-liter plastic barrel works well). We lower a pump into it, creating the pressure required for pumping liquid no higher than 1.5 atm (typical value in the range of 1-1.2 atm). Such pressure requires the pump to create a pressure of 15 m (for the submersible “Malysh” it reaches 40 m).
Having filled the barrel with water, we start the pump, monitoring the liquid level, which should be located above its inlet pipe to prevent “airing”. The level drops - add water. Antifreeze should be pumped from a smaller container (bucket) so as not to immerse the submersible pump housing in the liquid (and then wash it) - just immerse the inlet pipe. You will have to add antifreeze frequently, turning off the pump periodically.
Filling the system is carried out with Mayevsky taps open on installed heating radiators with substitute containers for collecting water. When liquid comes out of all air vents, close the taps and continue the injection process.
We control the pressure using a pressure gauge (a boiler gauge will do). When its value exceeds the hydrostatic pressure, equal to the pressure in the liquid column height from the bottom to the top point of the system (a height of 5 m gives a static pressure of 0.5 atm), we continue to fill the system, monitoring with a pressure gauge the moment the pressure reaches the required value.
Pumping antifreeze with the “Malysh” pump.
Having filled the system, turn off the pump, open the air valves (the pressure will inevitably drop), and then pump up the water. We repeat the process several times, displacing air bubbles.
We complete the filling by inspecting the system for leaks. After the pump is turned off, the liquid in the hose connected to the outlet pipe is under pressure. If antifreeze was pumped in, first disconnect the hose from the pump inlet pipe and drain the liquid into a container, being careful not to drench the mechanism body.
How to properly fill a closed heating system from above
If there is no electric pump, then filling the system, which has a height difference between the lower and upper points of 10 m, using a hand pump is a rather tedious procedure. In this case, the closed system can be filled through the upper point (for example, the connection fitting of an automatic air vent) by gravity with the drain valve open at the lower point until water begins to flow out of it. The drain valve closes, and at the bottom point of the system we have static pressure equal to the pressure in the liquid column up to the top point (at 10 m the pressure will be 1 atm).
Now you need to increase the pressure to a design level of no higher than 1.5 atm. We connect a regular watering hose about 1.5 meters long to any fitting of the system via a ball valve. We are coming up with an easily removable adapter for it to the hose of a regular car pump with a pressure gauge. We fill the vertically straightened hose with water, attach a pump through the adapter and pump water from the hose into the system with air. Close the ball valve. 3-5 repetitions of the process are enough to increase the initial static pressure at any point in the system by 0.5 atm. Avoid pumping air into it.

Injecting antifreeze with a hand pump.
Selecting pressure values in the system and expansion tank
The higher the operating pressure of the coolant, the less likely it is that air will enter the system. It is necessary to remember that the operating pressure is limited to the maximum permissible value for the heating boiler. If, when filling the system, a static pressure of 1.5 atm (15 m of water column) was reached, then the circulation pump with a pressure of 6 m of water. Art. will create a pressure of 15 + 6 = 21 m of water column at the entrance to the boiler.
Some types of boilers have a working pressure of about 2 atm = 20 m water column. Be careful not to overload the boiler heat exchanger with unacceptably high coolant pressure!
The membrane expansion tank is supplied with a factory set pressure of inert gas (nitrogen) in the gas cavity. Its common value is 1.5 atm (or bar, which is almost the same). This level can be raised by pumping air into the gas cavity with a hand pump.
Initially, the internal volume of the tank is completely occupied by nitrogen, the membrane is pressed against the body by the gas. That is why closed systems are usually filled to a pressure level of no higher than 1.5 atm (maximum 1.6 atm). Then, by installing the expansion tank on the “return” in front of the circulation pump, we will not get a change in its internal volume - the membrane will remain motionless. Heating the coolant will lead to an increase in its pressure, the membrane will move away from the tank body and compress the nitrogen. The gas pressure will increase, balancing the coolant pressure at a new static level.
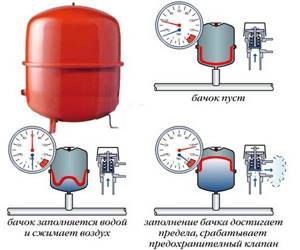
Pressure levels in the expansion tank.
Filling the system to a pressure of 2 atm will allow the cold coolant to immediately press the membrane, which will also compress the nitrogen to a pressure of 2 atm. Heating water from 0 °C to 100 °C increases its volume by 4.33%. The additional volume of liquid must enter the expansion tank. The large volume of coolant in the system gives a large increase in its growth when heated. Too much initial pressure of the cold coolant will immediately use up the capacity of the expansion tank; it will not be enough to receive excess heated water (antifreeze). Therefore, it is important to fill the system to the correctly determined coolant pressure level. When filling the system with antifreeze, you need to remember that its coefficient of thermal expansion is greater than that of water, which requires the installation of a larger capacity expansion tank.
Conclusion
Filling closed heating systems is not just a standard final step before commissioning. Correct or incorrect execution of this step can seriously affect the performance of the system, in the worst case, even destroy it. Compliance with filling technology is the key to obtaining stable heating.
Radiator network adjustment
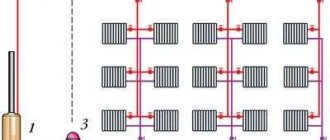
The balancing method practiced by our expert is equally suitable for closed single-pipe and two-pipe heating systems of country cottages. Manifold wiring and heated floors are regulated in a different way, which we will discuss in the next section.
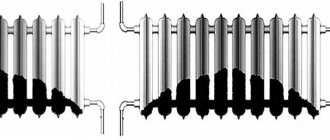
The essence of the technique is to measure the surface temperature of all radiators and eliminate the difference by limiting the coolant flow with balancing valves. How to adjust radiators using a thermometer:
- Warm up the coolant to 70-80 °C, fully open all control valves. If the boiler does not show the actual supply water temperature, determine it yourself by placing a meter on the metal outlet pipe.
Initially, the valve preset ring is adjusted to maximum flow - Measure the surface temperature of the first radiator supply in two places - near the supply and return connections. If the difference is within 10 degrees, the battery warms up normally.
- Repeat the operation on all heating devices, recording the readings. Move along each heating branch, one by one recording the temperature of the batteries up to the last one.
- If the temperature difference between the supply of the first and last radiator does not exceed 2 °C, close the valves of the first two batteries by 0.5-1 turn and repeat the measurements.

The measurement is taken at the supply and return pipes, the maximum permissible difference is 10 degrees - When the difference reaches 3-7 degrees, the control valves of the first heaters close by 50-70% (calculated by valve rotations), the middle ones - by 30-40%, the last devices remain completely open.
- Wait 20-30 minutes to allow the batteries to warm up after the new settings, then repeat the measurements. The goal is to achieve a normal difference of 2 °C (3 degrees is allowed for long highways) between the last and first device.
- Repeat the adjustment procedure, turning the balance valves a quarter or half a turn, until you achieve the same heating of all batteries. “Listen” to each radiator for noise indicating increased coolant consumption.
Important point. Don’t get carried away by excessively tightening the taps; you won’t get any savings this way. Compare the temperature at the inlet and outlet of the heater - if the difference exceeds 10 °C, the valve must be released. Due to too little coolant flow, the room will become cold.
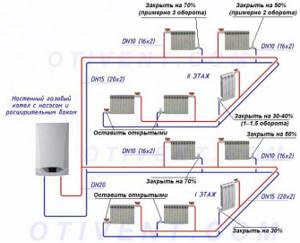
Approximate adjustment of the batteries of a closed two-pipe system is shown using the example of a heating circuit for a two-story house. Why is it approximate: the number of batteries to be closed and the number of turns of the tap are purely individual for each wiring; it is necessary to understand it locally. If you doubt the correctness of your actions, press down the coolant gradually, making half a turn of the valve and repeating the measurements.
As a rule, a single-pipe “Leningrad” of 3-4 batteries does not need balancing; it is enough to lightly “press” the first radiator. In the associated wiring (Tichelman loop), you need to limit the first and last device. An expert will show you the adjustment procedure more clearly in the video: