What is a Dutch oven
The first Dutch ovens appeared in the 15th century. The appearance and size have changed a little, but the concept remains the same: this is a compact heating and cooking device that can fit into a room of any size and will do its job perfectly.
The small dimensions of the structure are explained by the small size of houses in the Netherlands. Sometimes it was necessary to install a stove in rooms up to 10 square meters. m. Cities in northern Holland are densely populated, the local climate is cold and harsh. Therefore, the stoves here were of the highest quality.
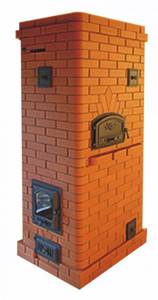
High taxes on land plots forced local residents to build narrow and tall houses. Such projects require special furnace designs. This is exactly what Dutch women look like: stretched upward to a great height. One stove can heat two or three floors of a household. The main thing is to correctly draw up or choose a project for a house with a stove. The very first models did not yet have a grate and ash pan, and they did not install hobs either. All these attributes appeared over time. Thus, the efficiency has become significantly higher.
Hot gases in a Dutch oven flow through six lines: three up and three down. The bell system accumulates hot air and increases heat transfer.
A distinctive feature of the first designs was the arched vault, which was then replaced by the standard rectangular shape of the firebox.
There are many varieties of Dutch oven designs with a stove, which are equipped with chambers for baking bread, benches, a tank for heating water and other useful attributes.
But the most popular are Dutch ovens with a stove.
Preparatory stage - arrangement of the foundation
Despite the relatively light weight of the Dutch oven with stove, the stove requires preliminary equipment of the foundation. It can be made in two ways - from bricks or cement mortar. Each option has its own characteristics:
- If you have free components in the form of sand and gravel, filling with a cement mixture will cost less. Although the process is characterized by increased labor intensity, even when using a concrete mixer.
- A brick foundation for a Dutch house will cost more, but it is much easier to make.
Let's take a closer look at the method of forming a foundation for a furnace with a slab based on concrete mortar. The following steps must be taken:
- Prepare a pit with a depth of at least 0.5 m. The area of the base should be slightly larger than the size of the future Dutch oven .
- Make a cushion of gravel 10-15 cm thick, which will need to be carefully compacted.
- Install the formwork and make a reinforcing frame from metal rods 1 cm thick.
- Prepare a cement-sand mortar and gradually fill the reinforcing structure.
- At the end of the process, the Dutch foundation is coated with cement powder.
Depending on the region and weather conditions, the foundation for a stove stove may need to be strengthened. The period can last from one to four weeks.
The history of its appearance
As the name suggests, the country where this type of stove was invented is Holland.
The design of these stoves, which appeared about 600 years ago, was influenced by two main factors:
- Dutch houses of that time were very modest in size
- taxes that the state took were calculated based on the number of pipes in the house.
Therefore, stoves were small enough to save space, and pipes were often shared with neighbors to pay less taxes.
Dutch design features
The Dutch chimney has 6 channels for the circulation of hot air - 3 up and 3 down. Coming out of the firebox, the smoke rises through the first channel, heating the walls of the furnace. Having lost its temperature, it goes down where it heats up again and rises up, but through the second channel. Heating and cooling, the smoke alternately passes through all the channels of the stove until it enters the last one, from where it is discharged outside the room through the chimney. The six-channel Dutch oven system lengthens the path of hot smoke, which ensures uniform heating of the oven walls without sudden changes and allows them to retain heat for a long time.
Thus, the main elements of the Dutch woman are:
- firebox;
- smoke ducts;
- chimney.
In its original form, the Dutch oven was used only for heating the room and did not have a blower or grate. These elements were added over time, greatly increasing the efficiency of the stove. The functionality of the design was also expanded by adding a hob, oven and stove bench. Modern Dutch women are equipped with a container for heating water or a tank for a water heating system.
A Dutch oven can have a variety of geometric shapes, but regardless of the configuration, the combustion chamber always has a large volume and a rectangular shape, which increases heating efficiency and makes it possible to modernize the Dutch oven design in the future by adding a water tank.
In a traditional Dutch oven, the smoke channel has a side exit - this is due to the fact that in medieval Holland, residents paid a tax on pipes and, in order to save money, put several stoves into one chimney. At the top of the structure there is a damper that allows you to regulate the heating temperature of the furnace.
Advantages of a brick Dutch
Fans of this popular fireplace will without hesitation name a dozen advantages that distinguish their favorite model from other stoves. Here is just a short list of good reasons to choose a Dutch oven for your home:
- compact dimensions - if desired, you can find a Dutch heating stove arrangement measuring 0.5 * 0.5 meters;
- savings in building materials - for a large structure, 650 bricks are enough, which is half as much as for laying a small Russian stove;
- Only the firebox is made of fireclay brick; red brick is suitable for the remaining parts;
- light weight, simplifying installation of the foundation;
- the ability to build a fireplace on two floors (there are craftsmen who can build stoves onto 3 and 4 floors);
- high heat transfer, while the walls of the fireplace do not heat above 70 degrees;
- simplicity of masonry, which can be easily handled by a novice self-taught stove maker;
- Dutch ovens for the home do not require regular heating and “overclocking” after a long period of inactivity - an excellent choice for a seasonal cottage.
Among the disadvantages of this overseas favorite, it is worth noting its high requirements for the choice of fuel. Slowly smoldering fuel that produces a minimum of ash is more suitable for the firebox. The low efficiency of channel furnace equipment is annoying due to frequent fires - to maintain a comfortable temperature in the house you will need at least two fires per day.
Advantages and disadvantages of the Dutch woman
In terms of efficiency, a Dutch stove with a hob compares favorably with a classic Russian stove - the walls, folded into half a brick, warm up faster, and the small dimensions and elongated shape of the structure allow it to be placed in a fairly cramped room. As for the consumption of building materials, the construction of a Russian stove requires approximately 1,400 bricks, while the construction of a Dutch oven of quite impressive size requires only 650-700 bricks.
A Dutch oven is better suited for those people who do not permanently live in a country house, but visit it from time to time. Warming up a room with a Russian stove takes several hours, but with a Dutch stove it will take no more than 30 minutes - the large firebox can be immediately tightly loaded with fuel and the stove can be given maximum heat.
Other advantages of the Dutch oven:
- The process of constructing a Dutch stove takes 2 times less time than a similar Russian stove.
- Economical consumption of building materials and, as a result, low weight of the Dutch structure, which can withstand most types of floors.
- The possibility of improving the stove by adding a stove or a container for heating water, while design changes have virtually no effect on the heating efficiency.
- The design of the Dutch oven can be adjusted to any size - even a stove measuring 0.5 x 0.5 m will effectively perform its function. Increasing the firebox part does not reduce the efficiency of the Dutch oven, which makes it possible to extend the stove to several floors. There are 2, 3 and even 4-story structures.
- Thin half-brick walls and the perfect design of the stove make it resistant to temperature changes, which eliminates the possibility of deformation.
- High-quality refractory bricks are needed only for laying the combustion chamber; for the construction of other structural elements, ordinary hollow bricks, or even used ones, are suitable.
- High heat transfer from the walls of the Dutch oven allows minimizing fuel consumption. After a long period of inactivity, the stove does not require long heating - it quickly heats up and cools down for a long time, and there is no need to worry about the possibility of cracks appearing.
- A large Dutch oven can handle heating a room up to 65 m², while a traditional Russian oven cannot do this.
- Even a novice stove maker can assemble a Dutch oven with a stove.
Despite the impressive list of advantages, the Dutch woman has a number of significant disadvantages:
- The efficiency of a Dutch oven does not exceed 45%, which is incomparable to that of a Russian oven. To maintain a comfortable microclimate in the room, the stove must be heated at least 2 times a day.
- The Dutch type is a long-burning design and is demanding on fuel quality. Quickly burning brushwood or straw is not suitable for the firebox; it is also not recommended to use wet fuel - this leads to soot settling in the chimney ducts and the risk of fire.
- The Dutch oven's channel system is designed in such a way that it can work like a siphon, drawing in cold air from the street - if the damper is not closed after heating, the stove will cool down very quickly.
- The Dutch oven is afraid of overheating. In this case, carbon monoxide is released and enters the room. The optimal temperature of the walls of the Dutch oven is 60°C.
In most cases, the Dutch oven is used to heat rooms with limited space. If the house is spacious and has many windows, then it is better to use other types of heating structures.
Let's take up the trowel! Layout and ordering schemes
Such a simple stove as a Dutch oven can be built without any experience in stove work. All you need to do is choose a location and decide on the design and functionality. It is impossible to consider all the options for placing a heating device in a short article, so we will present one interesting sketch that can help you understand what can be achieved if you approach the issues of location and practicality correctly at the initial stage.
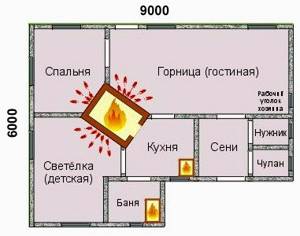
If placed skillfully, one Dutch oven will heat all rooms in the house
Of course, the figure shows a non-canonical situation, since work in this case should be carried out “from the stove”, however, it costs nothing to put in a little effort and change the internal partitions to achieve maximum convenience over many years of operation.
For experienced stove makers, the Dutch oven does not present any difficulties. Any village craftsman will build such a structure right on site, without using any drawings or drawings. For beginners in their work, it is better to use schemes of row masonry, which, if necessary, can be adapted to their conditions, proportionally changing the dimensions of all parts of the furnace.
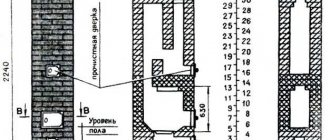
Large stove for heating rooms up to 50 m2
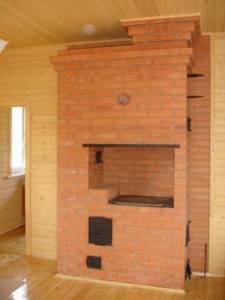
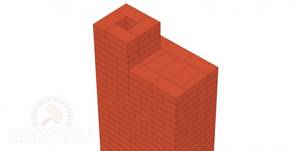
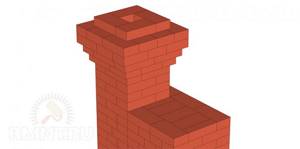
Built according to these procedures, the heating unit has a traditional rectangular shape, with proportions that make it look like a small cabinet. This way you can save a lot of space with high performance.
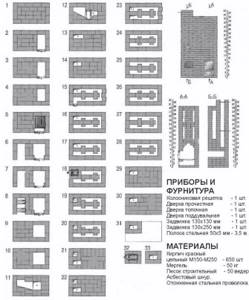
Layout diagram of a large Dutch oven
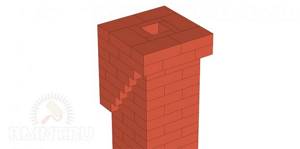
Small Dutch for rooms up to 20 m2
A small heating device is ideal for installation in a country house, and the design allows you to increase the height in accordance with the dimensions of the room. The stove is also compact due to the interesting design of the gas duct - it is rolled into a ring. In plan, the structure occupies only 0.52x0.52 m.
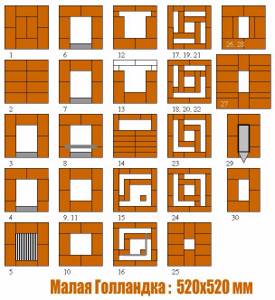
Ordering a small Dutch oven
Heating and cooking country house "Dutch"
The diagrams presented below allow you to build a country stove with a hob without burners.
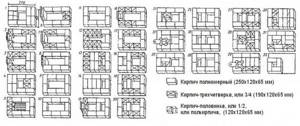
Arrangement of a small heating and cooking Dutch oven for a summer residence
Materials and tools
The choice of location and design of the furnace will make it completely clear how much and what materials will be needed during construction. Most likely, to make a Dutchwoman, you will have to prepare:
- refractory brick - since pyrolysis combustion zones are not provided for in the gallanka design, fireclay of any brand is suitable;
- red brick - any, even used;
- coarse river sand, which will need to be sifted;
- steel wire for fastening furnace castings and strengthening masonry joints;
- roofing felt for waterproofing the base;
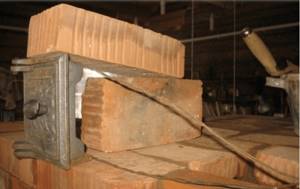
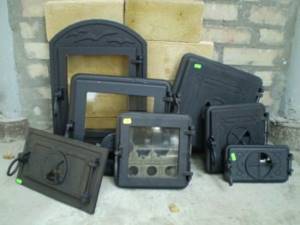
- cast iron firebox door;
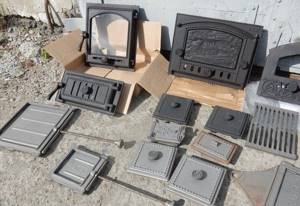
Modern furnace casting is in no way inferior to the products of factories in Tsarist Russia
- hatches for cleaning;
- cement;
- crushed stone;
- steel corner with a shelf width of at least 50 mm;
- construction mesh;
- clay.
The cross-section of the stove in the light is a narrow, high rectangle, so some perfectionists may be confused by the apparent instability of the structure, made on a simple clay mixture. They may be advised to strengthen the masonry seams. For this purpose, the solution is made from special adhesive compositions, which are found in abundance on the shelves of hardware stores.
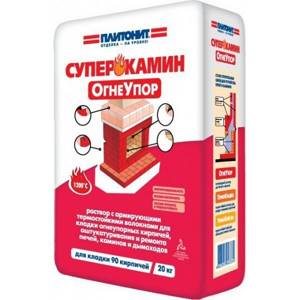
Special adhesive for masonry stoves and fireplaces
And of course, building a stove with bare hands will not be very convenient, so you will need the most simple tools:
- Master OK;
- roulette
- shovel;
- bubble level;
- container for preparing the solution;
- wire cutters;
- bushhammer;
- rule;
- tamper
If the design of the stove requires trimming the facing brick, then, among other things, you will also need to prepare a grinder with a stone disc - it will allow you to do the work more accurately.
Preliminary work
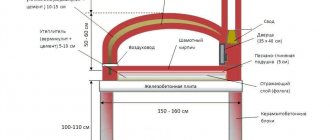
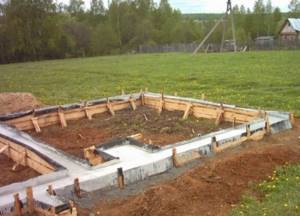
Like any other capital structure, a Dutch oven is demanding in terms of preparing the base. Of course, if the heat generator is being built during the construction of a house, then pouring a small slab along with a strip foundation will not be difficult. The main thing is not to tie them into a single structure, but to separate them with a sand cushion. In the case where the heating unit is installed in a residential area, work may be hampered by the presence of a plank floor. It is cut out at the place where the stove is installed, 15–25 cm away from its outer contours.
Further, work is carried out according to the following scheme:
- They dig a pit 25–30 cm deep, the bottom of which is covered with sand 10 cm deep.
- The sand is poured with water and compacted using a hand tamper.
- Formwork with a height of 15–20 cm is installed along the perimeter of the future foundation. Be sure to control the level of the installed boards.
- Reinforcement mesh is laid at a height of 5–7 cm from the bottom of the pit. To do this, use supports made of wooden blocks or pins driven into the ground, to which the armored belt is attached with knitting wire.
- A concrete solution is prepared by mixing cement M-400, sand and crushed stone in a ratio of 1:3:6. Add enough water so that the mixture is fluid and at the same time not too liquid.
- Concrete is poured into the prepared formwork and left for several days until it sets completely.
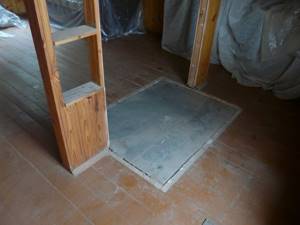
Prepared foundation
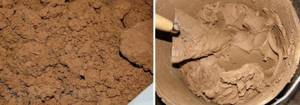
Before starting construction of the furnace, a clay solution is prepared. Its composition depends on the fat content of the clay - the higher this indicator, the more sand is required. Most often, stove makers take components in the proportion of 3 parts clay to 1 part sand, but sometimes the amount of the latter is increased to 2 parts. Before mixing bulk materials, the clay is kneaded and soaked in water for several hours, and the sand is sifted. The resulting solution should have the fluidity of thick sour cream - in this case, the seams will be completely filled with the clay composition. I would like to warn against preparing a large amount of working solution at once. There is absolutely no need for this, since when standing, the mixture will separate into components and will have to be constantly stirred.
How to prepare a clay solution
Let's start laying with our own hands: step-by-step instructions
The Dutch oven that we propose to build is medium in size and is intended for heating a small country house. Its design does not provide a hob, so the unit can be installed in the hallway or living room.
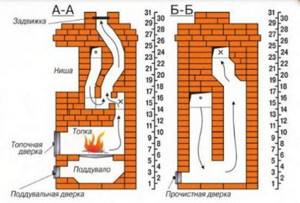
Diagram of a large Dutch oven
Setting up a large Dutch oven

The short instructions we have prepared will help you understand all stages of construction and will allow you to avoid mistakes when laying the stove.
1. A completely dry foundation is covered with several strips of roofing material, which is needed as waterproofing. A thin layer of sand is poured on top of it, which is sprinkled with water.
2. The first row of bricks is laid dry, and only after the level of the bed and the correctness of laying have been checked, the brick base is filled with mortar on top.
The first row of bricks is laid flush
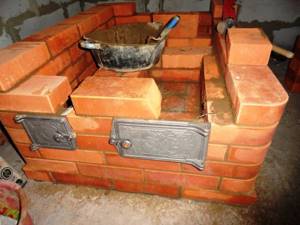
3. The second row begins to form an ash pit and a vertical flue. To maintain it from soot during operation, install a cleaning door. Some stove makers in this situation refuse to cast stoves, covering the channel with half a brick - this way, they say, there will be less heat loss. We recommend not doing this, since heat will still be lost through the metal to heat the room.

The asbestos seal will not allow the junction of the door to the oven body to crack
4. Starting from row No. 3, install the blower door. For additional strength, its frame is attached to the walls using wire, which is placed in the seams. Furnace cast iron is isolated from the masonry using a basalt sealant or asbestos cord. This is necessary due to the different thermal expansion of brick and metal, which leads to the appearance of cracks in the places where they are mutually adjacent.
Method of fastening the oven door
5. After laying row No. 5, install transverse elements from a metal corner that will hold the roof of the ash pit.
6. The sixth row is needed to cover the ash chamber. A grate is also installed here.

View of the grate
7. Rows 7–11 form the firebox. The door for storing fuel is mounted in the same order as when arranging the blower.
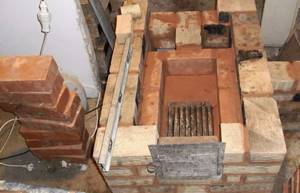
The firebox of the Dutch oven is made of refractory bricks
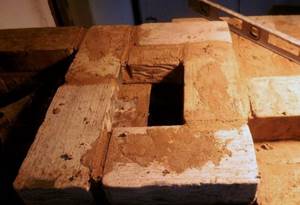
8. Rows 12 to 14 are needed to cover the firebox and build up the body of the stove.
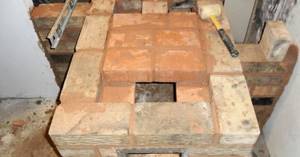
Firebox overlap
9. In rows No. 15–16, another door is installed for cleaning the furnace channels, and a bypass is also installed for the flow of hot gases from the central channel to the rear during kindling.
10. By laying the 18th row, the central gas duct is divided into two channels. At the same level, the heat exchanger located at the rear of the furnace is closed.

Increasing the furnace array at the same time allows you to create channels of the required length
11. Rows 18–25 are needed to build up the heat exchange array. They also form a niche located on the front wall of the Dutch woman.
12. Rows 26–29 are needed for arranging the floor. Starting from the 27th tier, the open area of the stove is reduced in order to make the connection of the heating device to the chimney organic.
Upper ceiling with a channel for discharging combustion products into the chimney
13. Immediately in front of the smoke duct (row 30), a metal valve is installed, which is used to block the gas duct to prevent the furnace from cooling down.
Often, to avoid carbon monoxide poisoning, drilling with a diameter of 10–15 mm is performed in the chimney damper. It will allow you to block the smoke channel without waiting for the coals to completely burn out.
14. The finishing row 31 secures the damper frame.
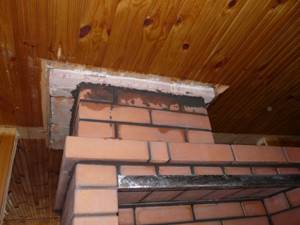
The chimney outlet through the ceiling must be fireproof
The construction of the Dutchwoman can be considered completed. After this, according to fire safety rules, a metal sheet with a width of at least 0.5 m is attached to the floor in front of the ash pit, under which asbestos or basalt cardboard is laid.
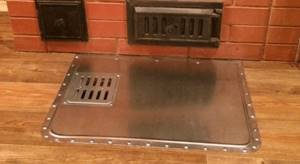
The flood sheet will protect the floor in case of accidental rolling out of coals from the ash pan
The last thing left to do before the first kindling is to arrange the chimney, which, depending on the design, can be either brick or metal.
The length and location of the chimney above the roof depends on the characteristics of the building. The main thing is that fire safety standards are not violated.
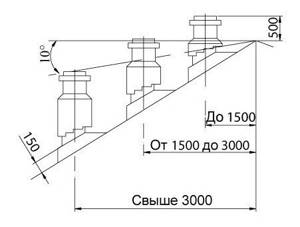
Rules for installing chimneys
The places where the smoke duct comes into contact with the ceiling are best insulated using non-combustible materials - basalt wool, asbestos, etc. Closer to the ceiling, fluffs are made - thickenings on the body of the pipe, which will not allow precipitation and condensate to flow down its surface. When building a chimney, up to 1/10 of the cement is added to the solution. In addition, the masonry joints on the outside are sealed with a regular cement-sand mixture, after which decorative jointing is performed.
Chimney design for a Dutch oven
The first kindling of the “Dutch” is carried out using wood chips. The fire must gradually warm up the walls of the oven, otherwise there is a danger of cracking. Only after the temperature of the external surfaces reaches 30–40 °C can thicker logs be added. The furnace is fired at low flame intensity for 4–5 hours. At the same time, they carefully observe whether there are any smoke leaks between individual bricks and in the places where the furnace casting is adjacent.
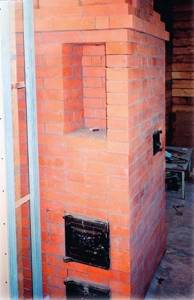
Our Dutch girl is ready to dress in a beautiful tiled outfit
In the future, when igniting a cold stove, slight smoke may occur due to the formation of air pockets in the flue ducts. A little trick will help you avoid this kind of trouble. To do this, before lighting the bulk of the fuel, throw a piece of tow or cotton wool soaked in kerosene into the depths of the firebox. Intense combustion will instantly make its way through the channels of the stove, due to which further ignition of the wood will take place without emitting smoke into the room.
Basic rules for constructing a Dutch oven with a stove
Regardless of the size and shape of the furnace, during its construction there are several rules that always remain the same:
- The structure is always built on a separate foundation. It is advisable to think about its design at the stage of building a house - in this case it will be easier to determine the exit point of the Dutch chimney pipe and avoid it getting on the elements of the roofing system.
- The foundation is covered with waterproofing material.
- To construct the combustion chamber, high-quality fireclay bricks are used, which are not combined with ordinary bricks.
- Due to its low heat resistance, cement mortar is not suitable for laying a furnace. The brick is laid on a heat-resistant clay mixture. You can purchase it ready-made or prepare it yourself.
- When laying the firebox, the seams should be no more than 5 mm, on other elements - no more than 8 mm. This can be achieved by using a suitable wooden batten.
If the decision to build a Dutch house was made already in a finished house, then in this case it will be necessary to dismantle a section of the floor covering and construct a foundation without connecting it to the main one. Neglecting this rule can lead to dire consequences, since during operation the structure shrinks and the furnace built on the main foundation can become deformed. As a result, the tightness of the seams will be broken and carbon monoxide will inevitably penetrate into the room.
In terms of fire safety, the Dutch oven is quite reliable, but during its construction several basic rules should still be followed:
- An asbestos board laid in front of the stove will help to avoid accidental fire from sparks and coals falling from the firebox;
- the Dutch channels should be regularly cleaned of settled soot;
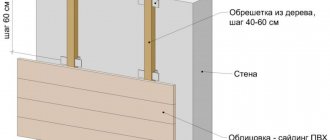
- wooden walls must be protected from the stove with fireproof material;
- it is prohibited to place pieces of furniture closer than 0.5 m to the stove;
- it is necessary to minimize the number of metal elements when constructing a structure.
All iron parts should not be in direct contact with the brick. In places where such a connection is provided, a 5 mm layer of mortar and an asbestos cord are laid - this will protect the masonry from heating.
Furnaces Grum-Grzhimailo
The principle of constructing the Grum-Grzhimailo stove includes: constructing the stove with belts; therefore, its casing is, as it were, divided into compartments. Rows of bricks are laid out in a finished casing, using it as formwork; as they are laid out, the casing is simply increased, and so on until the end. The casing itself is made of durable iron; after installing the casing, it is covered with bricks. If the casing is installed crookedly, it may fall and the entire stove may collapse.
It must be remembered that Grum-Grzhimailo stoves have a rather serious drawback, this is a horseshoe-shaped channel for smoke, it constantly needs cleaning. Therefore, it is necessary to provide two cleaning flaps for this.
Varieties and modifications
There are several common modifications of Dutch ovens:
- Heating (classic) . Optimal for heating small .
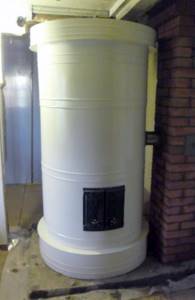
- Bell bells . They are distinguished by the most compact dimensions; existing laying schemes allow the construction of miniature Dutch ovens with a triangular cross-section for corner placement.
- Caloriferous . The action is based on the principle of forced air circulation. Optimal for buildings with high ceilings .
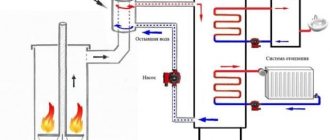
- Heating rooms with water heating boilers . They are used when it is impossible to place the stove in the central part of the house. The installation of a Dutch oven with a built-in heating boiler is carried out in the kitchen or in the hallway , after which the heating circuit is installed.
Important!
The operation of Dutch ovens with built-in boilers for heating large areas requires the use
of coal as fuel.
In addition to using the Dutch oven as a purely heating structure, there are possibilities for additionally equipping the stove with a hob, fireplace or stove bench. To do this, at the preparatory stage, it is important to make the required amendments to the selected installation scheme. It is possible to use ready-made schemes available in the public domain.
Heating Dutch oven
The principle of operation of the classic Dutch oven is to increase the circulation time of smoke inside the housing due to the construction of winding smoke circulation channels. Before exiting into the chimney, the smoke from the burned fuel transfers its own thermal energy to the body. The stove acts as a heat accumulator : heat accumulates in the housing and is systematically used to heat the premises.
Reference.
Classic Dutch ovens
do not require constant heating and warm up quickly after long periods of inactivity.
In addition to the general design features, the differences between Dutch stoves and other types of stoves vary depending on the installation pattern and the presence of additional equipment. The difference lies both in efficiency and in the set of functions.
With water heating boiler
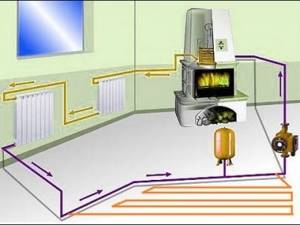
The operating principle of Dutch ovens with a built-in water heating boiler is similar to the classic version.
The presence of a heating circuit increases the efficiency of the furnace by ensuring uniform distribution of thermal energy within the heated premises.
The stove is transformed from a heat source that implements the principle of air heating into the central element of a liquid heating system .
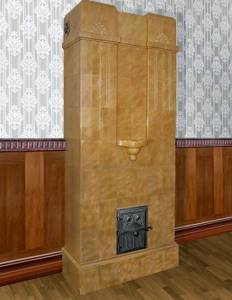
On wall decoration issues, photos
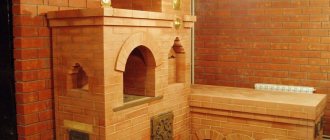
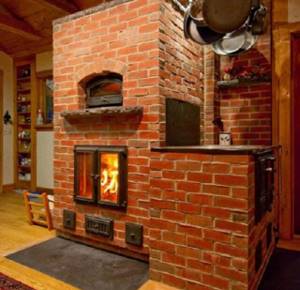
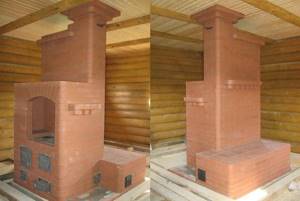
We have already mentioned that along with the Dutch women, the traditions of tiled architecture came to our world. And although the stove copes well with its duties even without being plastered, previously the “naked” brick gallanka was more or less appropriate only in the kitchen or in auxiliary rooms. If the stove was part of the interior of a living room or large hall, then its unlined walls indicated a complete lack of taste on the part of the owner.
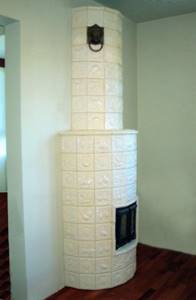
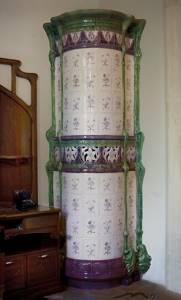
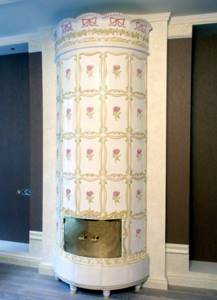
Nowadays, a neatly folded Dutch oven serves as a decoration for any home, regardless of how its walls are decorated. Not only those tiled or plastered with decorative compounds look great, but also “bare” stoves built from red facing bricks with rounded edges. If you plan to cover a Dutch house built according to all the canons with real tiles, then thoroughly study this type of finishing or entrust the work to a specialist. Please note that ceramic tiles of this type must be laid using a special technology. Compliance with it will not only make the coating more aesthetically pleasing, but also increase the heat transfer of the heating device.
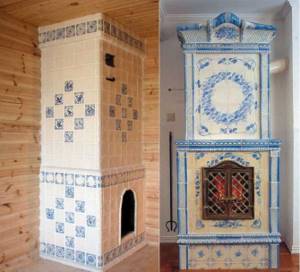
Finishing with Gzhel tiles is an option suitable for a private home
Such a stove wouldn’t hurt in an apartment either.
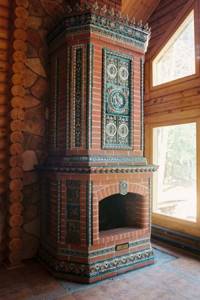
Option for a private house
Minimalistic finishing will not prevent the stove from standing out among the interior
An option for those who maintain a home style in brown tones
This stove would look good in an apartment.
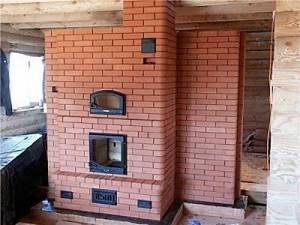
It’s not a shame to install such a structure in a wooden house
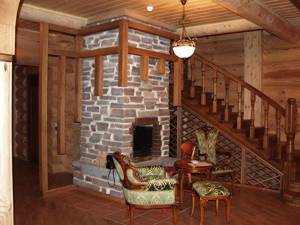
The design option of brick or stone will allow the stove to look more natural
A small selection of photographs, of course, will not be able to show all the splendor and versatility of the finishing of Dutch ovens. However, we hope that the examples provided will give you new ideas and stimulate your personal creativity.
Fire safety measures
Dutch is considered a fire-resistant structure.
However, as with the construction of any furnace, certain rules must be followed:
- An asbestos sheet is placed in front of the stove to protect against accidental ignition of fallen coals or sparks from the firebox.
- Systematic cleaning of the chimney to remove soot accumulation is required.
- There should be no furniture or household items within half a meter from the stove.
- The fewer metal elements used in the construction of the Dutch house, the safer it will be. However, when constructing an arch, the opening above the cooking zone must be blocked with a steel corner.
- At the junctions of metal elements with brick, a 0.5 cm layer of building mixture and an asbestos cord are laid.
- When laying a hob on a brick, you need to apply a clay layer to protect it from overheating.
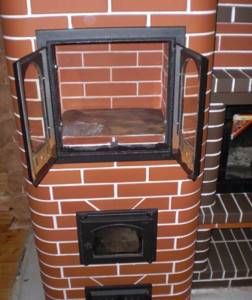
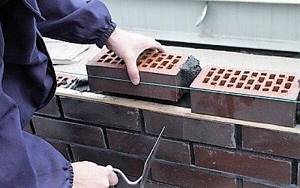
Door installation
During installation, the main door is lined with asbestos cord. It will allow the temperature expansion of materials to be absorbed without harm and will ensure tightness around the perimeter. The same as for the bottom door, wire fasteners are placed in the seams, and if the wire harness is thick, grooves are cut into the bricks. When covering the door, half a brick is laid over it or a locking connection is made by cutting the bricks with a wedge.
The subsequent number of rows depends on the estimated volume of the firebox. There can be 3 or 4 of them, based on the required height. As a result, when the fuel chamber is formed, a ceiling is laid on metal supports, with an opening for a continuing chimney.
Materials and tools for construction
Before laying out the Dutch oven, you need to select a good clay solution. The mixture includes sand, red clay and plain water. The ratio is selected for the specific quality of the clay.
The fewer grains of sand natural clay contains, the less of it goes into the solution:
- 1:2.5 - clay to sand ratio for oily clay;
- 1:1.5 - ratio of components for clay of medium fat content;
- 1:1 - equal proportions for thin clay.
On a note. Cement should not be used for laying the furnace; such a solution will crack due to temperature changes, and cracks will appear along the walls of the furnace.
In order to lay out a Dutch oven for a brick cottage, you should stock up on the following materials:
- fireclay brick for firebox;
- ordinary ceramic brick;
- concrete mortar for the foundation made of cement, sand, gravel and water;
- mortar for laying the main part of the furnace;
- the required amount of roofing felt for waterproofing the foundation;
- boards (boards) for formwork;
- grate;
- blower;
- steel firebox door;
- gate;
- steel rods and reinforcing wire;
- steel wire for dressing;
- asbestos cord;
- hob.
You will need the following tools:
- construction trowel;
- level, corner, plumb line, tape measure);
- construction stapler;
- rule;
- Bulgarian;
- two shovels - scoop and bayonet;
- construction trough for mixing mortar;
- bucket;
- rubber hammer for bricklaying;
- an ordinary hammer and nails for constructing formwork.
Heating and cooking Dutch ovens
The operating principle of all Dutch stoves is elementary - heated air travels along an artificially elongated path to the chimney , but the design schemes differ:
- Shapes : rectangle, circle.
- Dimensions.
- The presence of additional equipment (stove, oven, stove bench).
- Gas distribution systems : multi-channel and bell-type . The latter is more efficient, as it has high efficiency - when fuel burns, heat remains in the chambers. Cold air entering the heated oven passes through, bypassing the chambers. A multi-channel system, in turn, is easier to construct; the number of channels can reach six.
With stove
This design differs from the standard one in that it is equipped with a hob on the 3rd-5th row from the firebox . The best material for such a part is a cast iron plate 5-8 mm thick .
The stove can be solid, only for heating food, or with burners installed in it for cooking. There may be several burners .
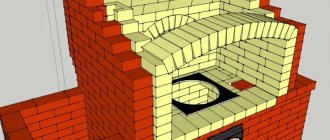
With hob and oven
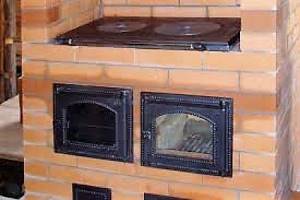
This Dutch design is also equipped with an oven . The oven can be installed above the stove or on the side of the firebox .
The first position is preferable, since the hot air in this case evenly flows around the entire area of the oven. Being located on the side of the firebox, the structure heats up mainly on one side.
Basic rules for arrangement
Unlike the Russian stove, which is very multifunctional, being both a source of heat, a stove bench, and a place for cooking, the Dutch stove was originally created only as a means of heating.
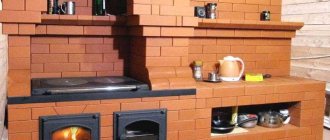
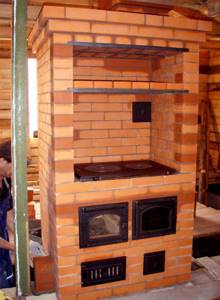
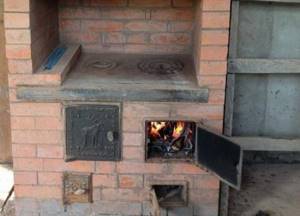
To maximize the functionality of an overseas hearth, domestic stove makers added a hob to it. This Dutch oven with stove and oven is ideal for a small home, and also if you do not want to clutter the room with a large oven.
The manufacturing technology of the unit is quite simple. The stove is placed in a niche of the structure, just above the firebox, approximately the third - fifth row. The oven is built parallel to the firebox.
Expert opinion
Nikolay Davydov
Stove maker with 15 years of experience
If a hob is not needed, then the oven is placed directly above the firebox, but we still advise you not to ignore the stove: firstly, it will never be superfluous, and secondly, there are excellent design solutions for arranging the oven, where the hob perfectly complements the appearance Dutch women
Photo of Dutch ovens with stove and oven (located on the same level as the firebox):
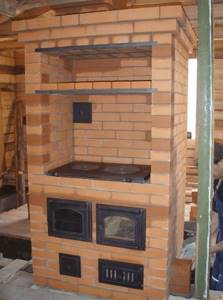
Photo 1
Photo 2
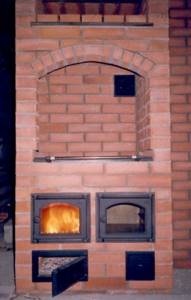
Photo 3
Chimney
A pipe is being erected from the thirty-fifth row.
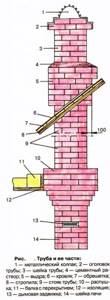
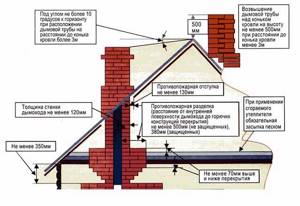
Not reaching three rows to the ceiling, they make a fluff. It is necessary as a fire prevention measure. The thickness of the pipe walls where the ceiling of combustible materials passes must be at least 380 mm.
Fluff
When the pipe exits above the roof, a hole is made on it to protect the roof from water penetration.
Otter
The height of the pipe for better traction above the roof depends on the distance to the ridge.
Possible errors and their correction
In order for the stove to look beautiful and last a long time, the seams must be smooth, approximately 5 mm thick .
wooden slats or square metal rods are placed on the bricks : brick row - slats - mortar - brick row, then the slats are removed.
Even experienced stove makers make mistakes in masonry that are difficult to correct later. Therefore, it is recommended to first put the oven on dry according to the scheme , and then only carry out the laying with mortar. This will help determine if the material quantities are calculated correctly.
Immediately before laying, the brick is completely soaked for some time in water. This will prevent it from subsequently drawing water from the solution. Fireclay brick can simply be sprinkled with water.
Whatever the design of the stove, it is important to observe fire safety measures .
Summarize
So, making a Dutch oven with your own hands is not some kind of fantastic project.
With good preparation and planning, it can be put together within a few days. Of course, bringing beauty may take much longer, but already at this time the oven can be used.
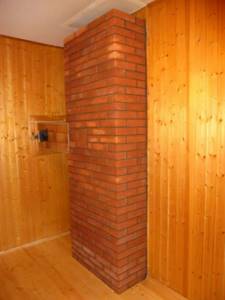
Photo of a Dutch oven
Furnace manufacturing stages
Now let's look at the main stages of laying a furnace from laying the foundation to testing the firebox.
Making the foundation
Here we will talk about a concrete foundation:
- To cast, you first need to dig a pit 60 cm deep. We fill it a quarter full with crushed stone.
- Next, the reinforcing mesh is laid. The diameter of the reinforcement is about 16 millimeters. The laying step is fifteen centimeters. The reinforcement is knitted with wire. Where the reinforcement bars intersect, make vertical reinforcement.
- The next step is to install the wooden formwork. It is done around the entire perimeter. We cover the walls with roofing felt. We pour sand into the bottom of the pit; the thickness of the filled sand should be approximately 5 centimeters. For waterproofing, it is necessary to put roofing material on top, preferably in several layers.
- Pay attention to the quality of the sand. It should not contain clay particles, it should be crumbly.
- Mixing concrete. It is advisable to use a concrete mixer - this will improve the quality of the mix. We pour concrete into the bottom of the pit and give it time to settle for strength. The period is approximately two weeks to a month.
- After pouring the concrete, it should be sprinkled with cement chips to strengthen the foundation.
Preparing the solution
To prepare a simple solution, you only need water, clay and sand.
First you need to check the quality of the clay:
- Half a liter of clay is diluted with a small amount of water and stirred well until smooth. The consistency should resemble dough. From the resulting mass roll two balls with a diameter of five centimeters. One of them is slightly flattened.
- The balls are left to dry for two days at normal room temperature. If, after drying, no cracks have formed on them, then the clay is suitable for further use.
- If cracks form, you should reduce the fat content of the clay by adding a little sand to it.
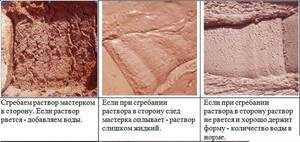
Option 3 - good quality
There are several ways to prepare clay mortar for masonry. We offer you a choice of a couple of the simplest and most common:
- Method number 1.
The clay is soaked for a couple of days, then mixed well while gradually adding sand. It is important to stir the solution thoroughly so that there are no clay lumps. You can check how correct the ratio of sand and clay is in the following way: apply a small layer of mortar to the brick and press it with another brick. If everything is done correctly, then after five minutes the bricks should not come apart from each other.
Preparation of the solution
- Method number 2.
- Sand is poured into which small holes are made. Clay is poured on top, a little water is added, the whole thing is again covered with sand and left for a while to soften.
- Next, the whole mass is thoroughly mixed, again there should be no lumps.
Preparing a brick
Brick preparation is necessary if it is rough. Teska is used to make the brick look aesthetically pleasing, as well as to give it uniformity, since asymmetrical bars will eventually lead to the fact that the oven will sooner or later skewer.
Teska is a rather labor-intensive process. For uniformity, first a line is drawn on the brick using a square, or, more simply, using another brick that has the correct shape. Next, the cutting or chipping is done.
Order
Next, it will be described how to install a Dutch oven with your own hands, the order is given in detail, with some effort you can do all the work yourself.
Arranging a Dutch oven with a stove and oven
We propose to make a Dutch oven according to the above drawing. The laying diagram of a Dutch oven with a stove and oven will help you in your work.
And one more ordering option
Furnace laying
You saw the order above (see photo).
- Roofing felt or any material that has waterproofing properties is laid on top of the frozen foundation.
- Now let's lay the base.
The bricks are placed evenly in a row; a level is used to determine uniformity. The surface is thoroughly coated with the solution. Start of masonry - On the next row we begin installing the door for the blower. It must be wrapped with asbestos cord and attached to the bricks with wire.
- Next, we continue to lay a row of bricks, ensuring uniformity and using a level. To ensure that the masonry is uniform vertically, we use plumb lines.
- Starting from the third row of masonry, we use refractory bricks, since the firebox will be located at this and subsequent levels. We install a grate between the rows of bricks. We fix the firebox door according to the same principle as the ash door.
- If we want our stove to have a hob and an oven, then the latter must be installed at the same level as the firebox.
For the oven, leave space at the firebox level
Building a chimney
The pipe for removing combustion products is laid half a brick thick, starting from the 36th tier of the furnace, which is the ceiling. In the masonry of the chimney duct, it is allowed to use a solution with the addition of M400 cement.
To meet fire safety requirements, the passage through the wooden ceiling and roof must be made with a pipe with thickened walls. A so-called groove is formed in the ceiling, and an otter is formed on the roof. The purpose of strengthening the walls is to ensure a standard distance of 38 cm between the flue and roof structures made of combustible materials, as shown in the diagram.
Upon completion of construction, give the Dutch 5-10 days for the mortar to dry completely, then carefully inspect all seams for cracks. If any are found, carefully fill them with clay mortar, after expanding them with a trowel. At the end, check the draft and perform initial heating, as the master advises in the video:
DIY Dutch oven construction
The construction of the stove is carried out in the following sequence:
- preparatory work (arrangement of the foundation and preparation of materials for masonry);
- furnace masonry;
- chimney masonry;
- cladding of the structure.
Now let's take a closer look at each item separately.
Preparation
At the preparatory stage, the foundation is constructed and the walls are protected from heat. Since the oven is heavy, formwork will be needed.
When cooking, it is important to maintain the proportion of ingredients
Execution of the foundation
Work at this stage is carried out according to the following step-by-step instructions:
- mark the floor taking into account the location of window and door openings;
- using a grinder, cut and dismantle the boards at the marked place;
- build a foundation and fill the mortar;
- lay roofing felt.
After this, a short break is taken until the solution completely hardens.
Substrate preparation and waterproofing
The height of the foundation is such that it is possible to lay two rows of bricks. He lies down side by side. At the same time, do not forget about bandaging. Waterproofing is laid on top, which consists of several layers. It is securely attached to the base.
Since most of the heat goes down, you need to approach waterproofing very carefully. Experts additionally recommend laying a layer of thermal insulation. Basalt cardboard can be used together with roofing felt.
Before starting laying, you need to pull plumb lines from a strong thread. Thanks to such plumbs, it is possible to prevent the rows from moving during laying. Otherwise, you need to periodically check the evenness of the structure. Any deviations will cause the stove to work ineffectively.
Several continuous rows of bricks are laid in the base
After laying
Drying
Drying a brick heating device is one of the mandatory measures that is carried out before the active operation of the device begins. Dry the oven in two stages:
- in natural conditions. The period for this type of oven drying after completion of masonry work is approximately 6 - 8 days. At this time, all doors and valves must be open to ensure natural circulation of air flow, which, passing through the channels of the device, removes moist vapor through the chimney to the street. This ensures only drying of the surface of the masonry layers;
- forced drying. It is carried out using dry small firewood every day for a week during the warm season. In the autumn-winter season, the time for forced drying should be extended by 1 - 2 weeks.
The end of drying can be signaled by the absence of condensation products on the doors and valves of a closed device.
Finishing and cladding
The finishing of a Dutch oven can be done in different ways: covered with a layer of decorative plaster and whitewashed, faced with tiles, tiles or flat stones.
First test firebox
When all parts of the stove and the chimney are completely dry, you need to test fire the stove.
Basic moments:
- It is better to carry out short-term ignition in the late evening, when the temperature outside is lower than inside the room. The fuel load during the first fire should be minimal. If the ignition was successful, you need to add some damp wood, which smokes more.
- If the chimney is of sufficient height and well insulated, then smoke will not penetrate into the room. If the opposite situation occurs, then you need to check the channels for inaccurate installation and damage.
- The last stage of the first combustion is the maximum heating of the unit for several hours. During this period, check whether cracks have appeared in the seams on the front surface of the device.
Cladding works
At the final stage, the furnace is lined. For this, clinker, decorative plaster and other materials are used. If the masonry is done with high-quality ceramic bricks, then you can do without cladding.
To give the stove a design, it is recommended to use doors with glass and patterns.
2 weeks after lining, you can test the stove for functionality. During the first week, you should not heat the structure higher than 600 0C.
Sources
- https://teplospec.com/pechi-kaminy/kak-ustroena-pech-gollandka-s-plitoy-printsip-raboty-i-rukovodstvo-po-stroitelstvu.html
- https://otopleniehouse.ru/pech-gollandka/
- https://2proraba.com/teplo-ventilyaciya/sxema-kladki-pechi-gollandki-s-plitoj.html
- https://ogon.guru/stroitelstvo-svoimi-rukami/pech/vidi-pechey/otopitelnaya-gollandka/
- https://ogon.guru/stroitelstvo-svoimi-rukami/pech/vidi-pechey/otopitelnaya-gollandka/otopitelno-varochnaya.html
- https://www.rmnt.ru/story/fireplaces/pech-iz-kirpicha-svoimi-rukami-gollandka-porjadovka-i-sxema.1120174/
- https://pechnoy.guru/pechi/otopitelnye/gollandka/gl-svoimi-rukami/gollandka-s-plitoj-i-duhovkoj-svoimi-rukami.html
- https://qustu.com/kak-samostoyatelno-slozhit-pechku-gollandku/
- https://pechnoy.guru/pechi/otopitelnye/gollandka/gl-svoimi-rukami/bolshaya-gollandka-svoimi.html
- https://laminatepol.ru/29520-pechku-gollandku.html
Share link:
- Click to share on Twitter (Opens in new window)
- Click here to share content on Facebook. (Opens in a new window)