How does a potbelly stove with a water circuit work?
If you are considering buying a ready-made potbelly stove, you need to prepare for quite significant costs. But you can save a lot of money if you make it yourself. In this case, before starting work, you need to study several theoretical issues.
What is a potbelly stove with a water circuit?
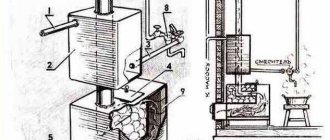
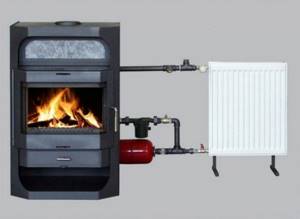
In fact, a potbelly stove equipped with a water circuit works by heating the liquid. More precisely, water evaporation washes the boiler from all sides. It turns out that the walls of the heating chamber warm up and a comfortable temperature is maintained much longer. The system, due to the water jacket and radiators, is capable of heating a small residential building or cottage.

Water, heated by hot flue gases, is supplied to the radiators, gives off its heat to them and returns to the tank
Advantages and disadvantages of a potbelly stove with a water heater
If you decide to build a potbelly stove with a water circuit, you should know about its main advantages:
- High efficiency. The cost of such a unit is significantly lower than that of similar devices. And when using available materials, the cost is completely minimized. At the same time, the oven heats up quickly and retains heat for a long time.
- Available types of fuel: coal, peat, firewood and other plant waste.
- No connection to the power grid. The work is based on the natural circulation of the coolant.
Disadvantages common to any wood-burning stove:
- Metal stoves, even with a water circuit, are inferior to modern heating in terms of efficiency, because some of the heat still escapes along with the smoke into the atmosphere.
- A house heated by a potbelly stove may warm up unevenly.
The stove can only heat those rooms that are directly adjacent to it. Therefore, it was often necessary to install an additional stove in parts of the building remote from it.
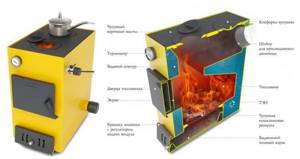
Furnace and heat exchanger design
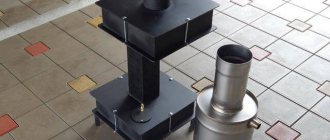
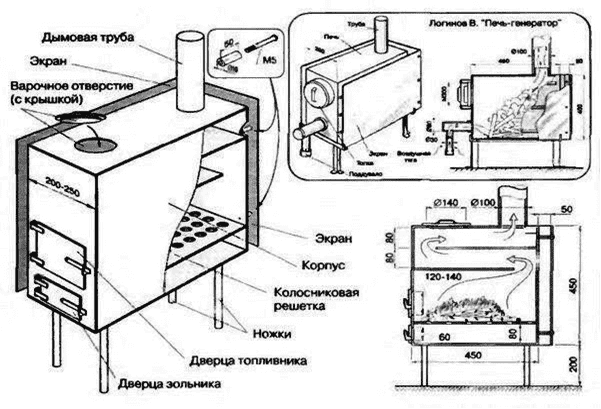
The main component of this furnace is the heat exchanger. It is located in the combustion chamber and connected to the heating network. To create a heat exchanger, hollow steel pipes and sheet steel 5 mm thick can be used.
A furnace with a water circuit can be created on the basis of an already existing thermal unit. In other words, the water circuit is introduced into an already existing furnace. The main problem with this solution is related to the limited volume of the combustion chamber. In addition, there is a threat of overheating of the circuit, so when performing installation work it is important to comply with certain requirements for all components of the system:
- Circuit. The best option is to purchase a ready-made register or order it from a special workshop. The technician will take the correct measurements and make a suitable circuit for your stove.
- Pipes. For the heat exchanger, it is better to use pipes with a thickness of at least 3–5 mm. This size is optimal in terms of strength and durability and prevents the system from overheating.
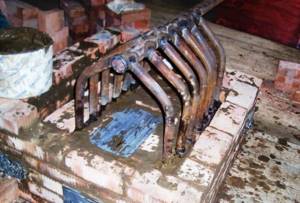
The water circuit is made of thick-walled steel pipes and is erected directly above the firebox
- Gap. It must be left between the wall and the working register. This will also protect the circuit from overheating and provide it with the proper amount of air. The optimal gap thickness is 1 cm. The same size is observed when integrating the heat exchanger into the furnace.
When a heat exchanger is installed in the firebox, it reduces its working volume. This is not so critical if the furnace is being built from scratch. And when a wood-burning stove is converted to water heating equipment, this factor must be taken into account in all calculations, because it dramatically affects the total volume of fuel contained during one load and the overall performance of the system.
Advantages and disadvantages
Like any heating device, a wood stove has its advantages and disadvantages.
Let's look at some of the benefits:
- Relatively low price of fuel.
- The versatility of the device during operation. You can use the heater to heat the room, cook and heat food.
- Installation and installation of a garage stove is very simple and does not require large expenses.
- For the manufacture of the unit, scrap materials can be used.
- During operation, the use of additional installations and devices is not required.
- The small overall dimensions of the unit make it universal for use in garages.
- The operation of such a device does not require the use of an additional type of energy (electricity).
The disadvantages of this design include:
- Such furnaces have a high heat output, as a result of which they heat up quickly and cool down quickly.
- To maintain a high temperature in the oven, it is necessary to periodically add firewood.
- Constant monitoring of the heating process is necessary to ensure safety.
Selection of shape and components
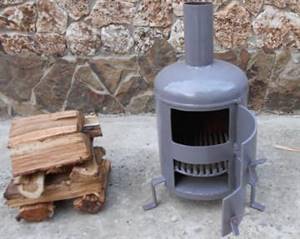
A potbelly stove is usually made of steel sheets in the form of a rectangular box. You can use a gas cylinder, but not a narrow industrial one, but a wide household one. The cylinder should be placed vertically, since the potbelly stove is designed for flat arches and under .
With a horizontal orientation, the rounded surfaces will collect flue gases into a bundle, for afterburning of which the length of the “hog” (see below) will have to be increased to 12 m.
In addition, to ensure normal operation of the potbelly stove, you will need a chimney and a screen.
Chimney
The throughput capacity is slightly less than the furnace productivity in terms of combustion products. Thanks to this, gases are retained, circulating in the firebox.
Double effect:
- combustion products give off more heat;
- Due to their circulation, air is sucked in and this ensures complete combustion of the fuel.
Calculations of potbelly stove indicators
Thermal engineering calculations of furnaces are the most complex. In construction and manufacturing, such operations are performed by specialized laboratories. For domestic use, they are significantly simplified, leaving only the key indicators of thermal units for independent determination:
- Calculation of the thermal resistance of a room, in other words, the designation of its ability to retain heat. This indicator depends on the material and thickness of the floor and walls, its thermal conductivity, the structural properties of window and door structures. But in any case, heat resistance also depends on the quality of all components.
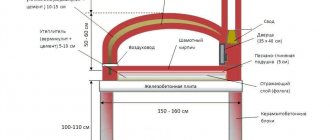
- Calculation of the cross-section of smoke exhaust channels, since the quality and rate of fuel combustion in the furnace depends specifically on this parameter. If the diameter is larger than good, then most of the heat will be lost without return, reducing the efficiency of the device. On the contrary, an insufficient cross-section can lead to incomplete combustion of fuel and gas pollution in the room. To determine the size of the chimney pipe, an indicator of 2.7 is used in relation to the volume of the furnace firebox. If this figure is 40 liters, then the suitable chimney size will be 40 / 2.7 = 14.8 cm.
The classic size of a metal chimney pipe is 150 mm. In most cases, 15–20% is added to the calculated value. The final adjustment of the draft in the furnace is carried out using a damper, which makes it possible to perfectly adjust the cross-section of the chimney. It must be said that the amount of thrust will depend not only on the diameter, but also on the weather, so the use of a gate is considered necessary.
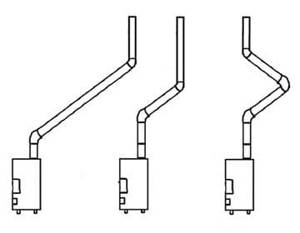
The height of the chimney is of priority. There is a limiting parameter - its total height should not be more than 5 meters counting from the point of exit from the combustion chamber. The level of elevation above the roof depends on the location in relation to the ridge.
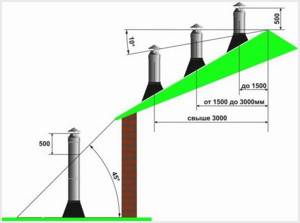
It is fundamentally important to determine the dimensions of the chimney correctly
Material selection and tool preparation
The following materials are required to make a potbelly stove:
- body: steel sheets 5 mm thick;
- chimney: pipe with a wall thickness of 3 mm;
- legs: any rolled metal, for example, corner, profiled or round pipe, etc.;
- container for heating water: steel sheets 3 mm thick;
- oven doors with hinges.
A set of tools required:
- grinder with several cutting discs for metal (diameter of the working part - 125 mm);
- a welding machine designed for a welding current of 200 A;
- hammer;
- pliers;
- metal brush.
Preparation work
At this step you need:
- Make a preliminary design of the furnace with details.
- Prepare financial statements for the purchase.
- Buy materials and missing tools.
- Make all the parts for the stove.
The final point is the most time-consuming and serious.
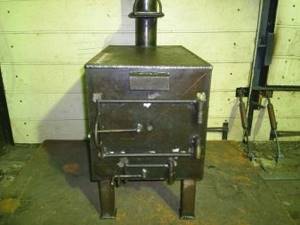
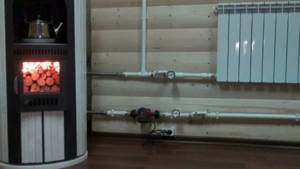
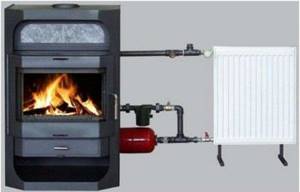
The potbelly stove can be connected to traditional heating
How to make a potbelly stove with a water circuit with your own hands
Before the manufacture of such a structure, a sketch plan is developed, on the basis of which the calculation of structural materials, pipes and fittings will be carried out. It must be taken into account that with such a boiler system it is possible to install only a gravity heating system.
Do-it-yourself potbelly stove with a water circuit: finished drawing, diagram
During the preparatory stages, all parts and assemblies are manufactured according to existing drawings and then proceed to installation. This technological process is carried out in the following order:
- The furnace is assembled using the clamping method.
- After checking the structural units, the final connection of the stuck elements is carried out, so that there are no even the smallest gaps or unwelded seams.
- Install internal elements.
- Assemble the water heating circuit. All welds are checked with kerosene. To achieve the desired result, the outer surface is treated with chalk, and kerosene is applied to the inner surface with a brush. In the area of poor quality welding, greasy areas are formed on the chalk cover. These zones are marked and boiled again.
- Install the coolant outlet/inlet pipe according to the drawing.
- Place the potbelly stove in the place prepared for it. The gap to the walls must be at least 1.0 m. In cases where the above cannot be done, it is necessary to sheathe the walls with metal with an asbestos lining.
- A heat supply system is assembled, equipped with pressure and temperature protection equipment, and connected to the heat exchanger of the stove.
- Fill the system with water and perform a pressure test to check for leaks.
- Install the chimney and perform a test ignition.
Arrangement of the water circuit
The water circuit of a potbelly stove increases the overall heat removal due to an increase in the heating surface. This allows you to maintain a sanitary air temperature in a garage or other heated facility for a long time and, as a result, less frequently heat the stove.
There are several design solutions for arranging a water heat exchanger for a heating circuit:
- Installation of “pockets” on the side walls of the boiler filled with coolant.
- Installation of a coolant collector with connections to the heating system.
- Installing a manifold around the chimney close to the top surface of the stove.
- Installation of an internal boiler in the firebox.
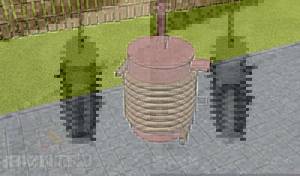
Installation of a capacitive heat exchanger on the chimney of a potbelly stove
All water heat exchangers are divided into 2 types - volumetric and tubular type.
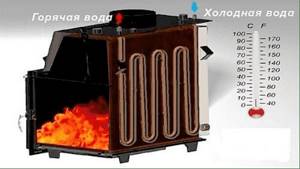
Volumetric - the heat exchanger for a potbelly stove is made in the form of a tank built directly into the design of the heater. There are varieties of such tanks with built-in coils through which the heating circuit coolant circulates. In this case, the heat from the hot flue gases is first transferred to the water in the tank, and then from it through the walls of the coil it passes to the heating coolant.
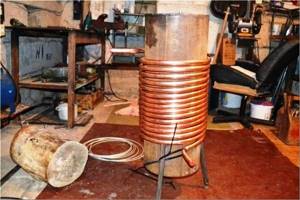
Tubular-type heat exchange systems or coils, made of a solid pipe 16-25 mm with a significant length of 10 m, which is wound around a stove, flue or storage tank with hot water. The continuous circulation of liquid through the pipe allows it to increase the temperature to 90 C.
Power calculations
It is almost impossible to independently calculate the power of a recuperator in the absence of initial data (furnace power, temperature and amount of exhaust gases per unit of time, contact area between the heat exchanger and the metal of the chimney, the speed of passage of air or water through the device). You can measure the power of an already installed heat exchanger.
Roughly, you should expect that the heat exchanger on the chimney of a solid fuel stove or fireplace will warm up a couple of small radiators, increase the temperature in the garage, or make a room in the attic or a dressing room in a bathhouse warmer.
Peculiarities
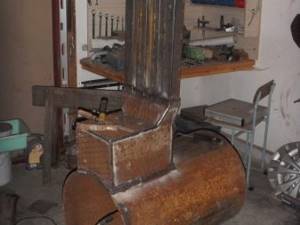
If a lot of car repair work accumulates during the winter, then it is almost impossible to stay in a cold garage for a long time. Traditionally, it has happened that garages are most often heated with a “stove” stove, which is simple to install.
It is done as follows: holes are cut in a steel barrel, pipes and corresponding fittings are welded to them. The important thing in such designs is that the body does not need to be made, it is already ready, all that remains is to implement minor modifications.
Heating with a stove-stove can be quite acceptable: it quickly heats up and gives off heat. The bulk of the work on installing the stove can be done using a small welding machine.
Sometimes brick stoves are built in garages, but they take up a lot of space and do not heat the room as quickly. Therefore, wood-burning stoves are most often used. The name is quite arbitrary, because almost any flammable material can be placed in such structures.
Buy or make it yourself
If you want to increase the heat transfer from an expensive purchased boiler, it is better to buy ready-made high-quality devices - the industry produces them in a sufficient range. But if you want to modernize a potbelly stove in a bathhouse or garage, or increase the efficiency of a fireplace with a steel pipe in the country, you can save a lot of money by making and installing a heat exchanger on the chimney yourself. Installing a heat exchanger by a hired specialist will cost the same as the structure itself.
The simplest option - a coil - can easily be made by a home hobbyist even without much experience, but a home craftsman with at least some welding skills can handle more complex designs.
approximate price
The cost of industrially manufactured chimney heat exchangers varies depending on the design and manufacturer.
Advantages and disadvantages
Advantages of potbelly stoves in the garage:
- fast heating
- versatility of the material for combustion.
These two decisive factors allow potbelly stoves to hold the “palm” in popularity among car enthusiasts. One of the disadvantages is that the material in such units quickly burns out, and the stove itself cools down within a short time.
Today, a new generation of “potbelly stoves” has appeared, in which heat does not evaporate so quickly: if you use a 50-liter propane cylinder, then such a device can function effectively for a long time. This allows you to reliably heat the room.
The furnaces undergoing development stand apart. Questions arise here because the waste contains heavy metals, and these substances should under no circumstances enter the human body. Such stoves should be provided with strong draft, they should be made as airtight as possible.
Operation of a water-cooled potbelly stove
It should be noted that when installing a heat exchanger in a furnace in a water circuit, the liquid may boil directly during the process of heating the room. To prevent this, circulation equipment must be installed. Thanks to it, heat will be distributed evenly throughout the house. In addition, you will need to install two additional devices:
- Uninterruptable power source. It is needed to power the pump during a power outage.
- Bypass. This is a piece of pipe that allows water to flow directly, bypassing the heat exchanger. If there is an electrical outlet next to the stove, you can use an automation system that will turn the flow through the bypass on and off depending on the temperature of the coolant. Otherwise, they install shut-off valves and operate them manually.
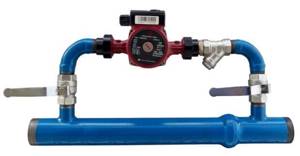
The bypass allows you to switch the coolant flow to direct supply to the radiators when it is heated to the desired temperature
When handling a potbelly stove, you must follow certain operating rules.
- Do not fire the stove when the heat exchangers are empty. With such use they will quickly burn out.
- While the oven is operating, do not separate the heat exchanger from the heating network. When water heats up, its volume and pressure increase, which can cause the stove to explode. Therefore, no fittings should be installed at the outlets of the heat exchanger.
- If the stove is hot, do not add cold water to the heat exchanger. Temperature differences may interfere with its operation and break the device. The most vulnerable areas of the heat exchanger are the welds.
- Increase equipment efficiency with a circulation pump with bypass.
Stove cleaning and repair
Don’t forget about cleaning the stove. Since it has a compartment for collecting ash, cleaning the firebox is quite easy. Pay special attention to pipes. They can be cleaned of soot with a stiff brush or using traditional methods: burning potato peelings along with firewood. The peel will soften and displace soot from the walls, and it will fall to the bottom. You can remove it carefully with a broom and dustpan.
When you manage to create a potbelly stove on your own and equip it with a water circuit, you will receive an excellent and economical heating device, and your country house will always be warm and cozy.
Types of furnaces
It is possible to equip any wood-burning brick stove with a water circuit. It is possible to place a combustion chamber in the container itself; it can also be arranged before the water heat exchanger exits the chimney.
Heat exchangers can be:
- in the form of a coil;
- made up of pipes;
- built-in containers;
- convection – attached to the wall of the oven;
- mounted near the chimney.
Butakov stove with boiler and water circuit
- pipes are located along the furnace body;
- active heat exchange occurs;
- the water circuit is independent of the combustion process.
The convection type is inherent in almost all wood-burning stoves. This option is the most rational; it requires natural circulation of water.
The convection heating system was invented in Canada. The models are mobile convection ovens that heat up in a short time, providing the room with a flow of warm air. Sometimes they have a fan, which helps heat the room even faster.
A garage stove is a hollow metal cylinder with a built-in pipe directed vertically. The air comes from below and rises, heating, inside the housing. Thus, there is a constant circulation of cold and warm air masses in the garage.
Air heat exchanger
In the case where the primary heat exchanger is a firebox (steel stoves, long-burning stoves - PDG, waste oil stoves - POM), the following measures can be taken to increase the efficiency of “dry” heat transfer.
Through vertical and horizontal straight channels (pipes)
Steel pipes are welded directly onto the firebox. It is better to install them vertically - this will improve air flow. Suitable if you have available material - pipe scraps (the cross-sectional shape does not matter). Diameter 50–200 mm. The original solution for the firebox would be to weld the walls from equal sections of pipe.

Curved and rounded channels
The ideal option is to “wrap” the entire firebox in 1-2 turns. This will require skill and time, but the effect will be much higher than from simple direct channels. The greater the difference between the levels of air intake and outlet, the better the channel will work. If you take the fence outside, the effect will be maximum, because when the firebox is heated, due to the temperature difference, a draft will arise, which will ensure a constant flow in “automatic” mode.
Labyrinths with bulkheads in containers
To implement such a heat exchanger, you need to install an additional steel box on the top wall with a height of about 100 mm and thick walls. In this box, steel 5–8 mm bulkheads should be placed in such a way as to create a “labyrinth”. At the beginning and end of it there should be inlet openings for the cross-section of the air duct. The top of the “labyrinth” is also covered with a lid. In this embodiment, the heat exchanger is the space between the firebox wall and the walls of the box. Such heat exchangers can also be installed on the side walls of a steel reactor.

Through channels in the reactor, integrated into the furnace
Such channels are included in the design when creating the furnace, then welded into the walls. They can be located side by side at the top of the firebox. Diameter from 50 mm.

In any type of VT, the phenomenon of convection* is used, but in most cases, due to the high temperature in the reactor, the natural movement of air is not enough and it is forced in by fans. This method is also called injection.
* Convection is a method of transferring heat by flows or jets.
Injection can be done in any available way - by building an air pump into the channel or simply directing it to the heat exchanger. “Dry” heat exchangers are the simplest and most affordable heating devices.
Advantages of air heat exchangers:
- Tightness of connections is not required.
- Can work without injectors.
- Ease of installation and availability of available materials.
Disadvantages of air heat exchangers (HE):
- A significant (from 100 mm) diameter of the air duct is required.
- Low heat capacity of the medium (air).
- Short range of temperature transfer.
Methods for water heating of a garage
The choice of fuel significantly influences the heating scheme in the room. The frequency of operation of the circuit should be taken into account. If the garage is located far from the house and is not heated daily, then during severe frosts the pipes and radiator may rupture. At the design stage, you should carefully consider the type of boiler and type of fuel.
There are several types of fuel:
- gas;
- solid fuel (coal, firewood);
- liquid fuel (used technical oil);
- electricity.
Attention! Solid and liquid fuels require additional storage facilities for storage.
The choice is made based on the cost of fuel and autonomy.
Water heating in a garage without electricity
The most common fuel in the private sector is gas. The advantage of this type is its low cost and availability. Gas heating does not require constant monitoring. With an uninterrupted gas supply, continuous heating is ensured.
However, if the gas pipeline does not pass through the area in which the building is located, they choose a different type of fuel, since it is very expensive to install a gas line.
A gas boiler for autonomous heating is not a cheap pleasure, especially when it comes to heating a garage
Liquid fuel is a low-budget type. The big disadvantage of this heating option is the need for a place to store used oil. You will need a large number of barrels or canisters and a place where you can store all the supplies. This is a fire hazard.
If you have a boiler for liquid fuel, you must constantly monitor its filling level, so you will have to visit the garage often to prevent the heating pipes from bursting
A solid fuel boiler will help you set up water heating in your garage using wood, coal, garbage or pressed briquettes. This option is suitable if the owner can visit the hangar every day and throw a portion into the firebox. After all, in the garage it is enough to ensure a positive temperature; there is no need to warm up the room too much. If a new portion of fuel is not added in a timely manner, the system may freeze and the pipes may burst.
A solid fuel boiler requires a constant portion of fuel, otherwise the system will cool down
For the hangar, you can install water heating using a potbelly stove. This oven is designed for a room up to 30 m2.
Water heating in the garage from electricity
An electric boiler is the most optimal option for a water heating scheme in a room. There is no need for an additional pipeline or storage area to store fuel.
An electric boiler provides reliability and comfort and does not require additional installation of a chimney or supply
Advantages of an electric boiler:
- compactness;
- reliability;
- does not require installation of a supply line;
- does not require the construction of a chimney;
- the device is equipped with a safety system: in case of overheating, the system will turn off;
- can operate on battery power during an emergency shutdown;
- In the event of an emergency power outage, the boiler will start working on its own.
Despite the high cost of electricity, the choice of this heating scheme is optimal, since it is enough to warm the air in the room to positive temperatures, and little fuel is required.
Long-burning furnaces with a water circuit
Long-burning heating stoves with a water circuit will be the best heating option for a home if it is not possible to supply gas to it, and electric heating is too expensive.
Such heating devices not only allow you to increase the interval between fuel loads, but also make it possible to heat several rooms or the entire house at once.
Heating stoves with a water circuit are universal devices for heating rooms, combining the functions of a boiler and titanium. These stoves are the optimal choice for heating country houses and cottages.
In heating stoves with a water circuit, the heat exchanger is built into the chimney duct or firebox. Some types of furnaces operate in hot steam circulation mode, which is not available in a standard hot water circulation system.
This design is designed to solve problems with providing heat in houses that require autonomous heating. Due to the fact that water actively circulates in various heat exchange systems, for example, in radiators, several rooms can be heated at once.
As a result, the entire house is heated. In addition, using a stove with water heating allows you to significantly save on wood, and the room warms up very quickly.
It is worth remembering that if you do not heat this stove in severe frosts, then there is a high probability of the coolant freezing, and this can happen very quickly.
Therefore, if no one lives in a house with such a design on a permanent basis, experts advise adding special additives to distilled water. Thanks to them, the system will not freeze.
Such heating stoves may differ in the material they are made of. So they could be:
- metal - steel or cast iron;
- brick;
- combined - when a ready-made metal firebox with a heat exchanger for the water circuit is used as a basis, and the outer casing is made of brick.
Advantages and disadvantages of water-heated furnaces
Main advantages:
- Available fuel. If necessary, firewood can be collected on your country plot.
- Small sizes.
- Easy to operate and maintain.
- Firewood is considered an environmentally friendly raw material that is not capable of causing harm to the human body. When they are burned, a minimal amount of harmful substances is produced and released into the environment.
- Relative autonomy. In the absence of electricity, a water-heated structure will heat the room for a long time with its hot body.
- For the manufacture of wood-burning stoves, materials are used that are characterized by increased strength. This allows the structure to serve for a very long time, practically without undergoing repair.
- In addition, such a design for the home may have a hob on which it is easy to prepare any dish. It heats up from a direct burning flame.
Disadvantages of water-heated stoves:
- Low efficiency. This design will be inferior in efficiency to diesel and gas boilers.
- Manual control. There is no automatic adjustment of the fuel supply and maintenance of normal control of its operation.
When purchasing a stove with a water circuit, you need to pay attention to the power of the stove and the number of additional kilowatts from the heat exchanger. For example, for 25 cu. m. of room requires a 1 kW oven.
Analogues of furnaces with a water circuit
Solid fuel boilers with a water circuit - the use of a combined or solid fuel boiler makes it possible to heat a room with an area of up to 170 square meters. m. The boiler runs on wood or electricity. Made from strong steel. Equipped with a built-in electrical unit.
Fireplaces with water circuit and stove/oven. Solid fuel thermofireplaces can be connected to solar collectors and other heating systems. A device that combines the qualities of a traditional fireplace and the functional properties of a solid fuel boiler. Designed for heating water using circulation pumps in all types of heating systems.
Peculiarities
For the furnace to operate efficiently, its design must have certain qualities. Since the garage room is small, the stove should, first of all, be compact. Operating efficiency for a heating device is also important. In addition, the cost of manufacturing the unit should be minimal.
It is necessary to provide for the possibility of firing different types of fuel. This will make the unit cost-effective. By making a stove with your own hands, you can make it as convenient to use as possible. Taking into account all your needs, you will create a unique and inimitable heating device.

First you need to choose the material from which you will make the wood-burning stove. This is where your skills in working with brick or metal will come into play. But in both cases, it must be remembered that the heating device should not reduce the amount of oxygen in the room. It must release heat for as long as possible to warm the room.
The basic rule when operating the stove is the absence of release of harmful substances.
When choosing the design of a heating device, remember that it should not be a fire hazard.
Often, garages and garage cooperatives do not have central communal heating. On the one hand, this state of affairs seems to be an acceptable option, because housing and communal services tariffs are steadily rising. However, garages must be heated for repair work to be carried out in them.
Each owner independently comes up with a way out of the situation. Heating stoves are most often made by hand - they are cheap and effective. Such units can heat the garage room to an acceptable temperature in a short time.
Installation
It is most convenient to install the heat exchanger at the masonry stage. This helps to build it more correctly with strict adherence to dimensions and gaps. This makes it much easier to fit the given dimensions. After installing the heat exchanger on the stove foundation, it is covered with bricks. This is easier than disassembling the existing structure, although this approach is not excluded.
To increase operating time, you need to pay attention to the following nuances:
- do not fix pipes with metal fasteners;
- do not fill the system with too cold water, otherwise strong condensation will form;
- observe the ratio of the sizes of the furnace and heat exchanger, the difference should not be large;
- use seals with good fire resistance;
- compliance with fire safety measures.
These simple settings will help prevent the occurrence of situations dangerous to the life and health of people, increase service time, and remember safety.
Heating requirements
When organizing water heating, you need to take into account the following points directly related to the building:
- Thermal insulation. Heating is useless if the walls of the building are cold. Warm air will not be retained inside.
- Tightness. Eliminating drafts significantly improves heating efficiency. Too intense circulation of air masses leads to rapid cooling of the garage and increased fuel consumption.
- Reliability of the foundation. The building must be located on a foundation or at least on a screed. In winter, the cold also comes from the ground; the cement layer reduces freezing.
These requirements should be taken into account at the stage of constructing the garage. If heating is planned to be organized for an already finished object, then it is necessary to make every effort to insulate the structure.
The heating circuit is designed in accordance with the following requirements:
- Safety. It is imperative that there is no open flame, minimizing the risk of explosion or carbon monoxide entering the room.
- Automation. For safe and convenient use, the circuit must provide a function for automatically supporting operating parameters.
- Independence. The requirement applies to systems that use electricity to heat water. Power surges in the network should not cause equipment malfunctions.
- Economical. Even the most reliable heating system cannot be considered successful if its operation leads to high fuel consumption. In the garage, the air does not need to be heated to the temperatures accepted for a residential building. 8-12°C is enough.
Pedigree with history
The potbelly stove was invented by the bourgeoisie who had not been beaten by the revolution; in the terminology of the victorious proletariat - “former”. Just not speculators-exploiters. Even during the years of Stolypin’s rise before the World War, they transferred capital to the then offshore companies, and when Brusilov’s breakthrough (“Cossacks are five steps from Berlin!”), with the gentle but strong assistance of the agents of the Tsarina and Grishka Rasputin, choked, they rushed en masse to Paris, London, Brooklyn.
The remaining “formers” were, for the most part, highly qualified specialists in various industries and deeply decent people. For this, the proletarians commended them no more than Polygraph Poligraphych Sharikov commended Professor Preobrazhensky. They used it, but under war communism, food and fuel were allocated only according to a mandate signed personally by Lenin.
Fortunately, students and younger colleagues of suitable origin did not let the “former” die. In the film about A. N. Tupolev there is a very truthful episode: the future great aircraft designer, and then still a student, sawing for firewood with another future great aviator - N. N. Polikarpov - in the apartment of the father of aerodynamics N. E Zhukovsky, a tree stolen in the park , and immediately the potbelly stove bursts with heat.
But the potbelly stove was not invented by aviators, but by heating engineers. Russia has long been famous for its stove making. The foreigners who visited it, as one, admired the perfection of Russian stoves, Olearius and Casanova, and climbed into them to examine the device. Casanova writes in his memoirs: “The skill of the Russians in constructing stoves surpasses the skill of the Venetians in constructing artificial reservoirs.” Coming from a Venetian, this is extraordinary praise.
From here it immediately becomes clear that the gluttony of potbelly stoves is simply a consequence of improper design and/or operation. You can’t just steal a tree or a fence; the Cheka doesn’t sleep until they are shot on the spot. The stove had to be created so that the Viennese set would last at least for the winter. And the “former” ones knew a lot about heat engineering and other sciences necessary for the furnace business.
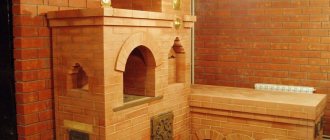
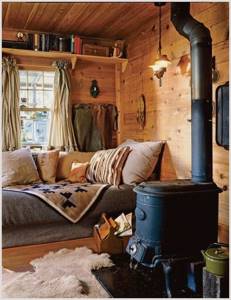
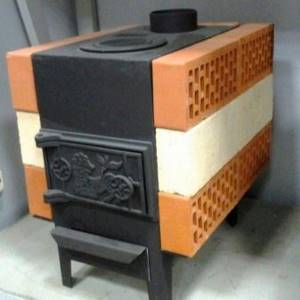
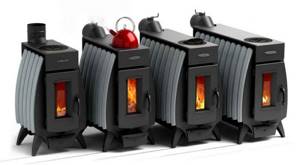
Modern potbelly stove in artistic design
With the beginning of the NEP and the rise of the USSR, the attitude towards the “former”, at least at the top, changed radically. But the potbelly stove did not disappear as unnecessary. Even under Lenin, workers began to be given plots of land in the suburbs for what they called then suburban vegetable gardens. Which are nothing more than the current dachas. And the potbelly stove, economical, simply simple and unpretentious, was just right for the dacha. In what capacity is it most used today?
It was then that the industrial production of potbelly stoves began. True, not for the working class, but for the defenders of the revolution - the Red Army. At the same time, its design was brought to complete perfection, and turned out to be so successful that artistically designed potbelly stoves were exported in large quantities, delivering foreign currency to the USSR, bypassing the sanctions of that time.
Far from the homeland, the potbelly stove did not go unnoticed by the local bourgeoisie. The Finns were the first to begin its industrial production abroad, back in the 20s. And now Canadian, Swedish, Finnish stoves are holding confidently on the stove market, see fig. on right. First of all, thanks to the very moderate, compared to comparable stoves of other designs, price and ease of use.
Advantages and disadvantages
The oven, which has a heating cavity, is designed in such a way that flammable vapors envelop the container on each side. This helps maintain consistently high temperatures. In addition, the distinctive features of the potbelly stove are:
- good performance;
- the price of construction and use is much more affordable compared to other heating systems;
- It is permissible to create a stove from waste materials - this helps to save money;
- Suitable for ignition: coal, various vegetable waste, firewood;
- no connection to a power source required;
- functioning thanks to natural circulation.
Pros of having a circuit
Basic models of homemade potbelly stoves
According to its principles, a potbelly stove is practically no different from models of a special solid fuel device. This is a certain type of very simple stove in the fireplace category. There are also special models that are equipped with hobs and special bath devices.
Material used to make the stove Often, a potbelly stove is made of high-quality steel, but in some cases cast iron can be used. For different types of metal, elements made of natural stone are often used. If cast iron is used, then you should count on low heat capacity parameters; it is very difficult to find and it is not easy to cook. Many people prefer steel for this very reason; it is much easier to work with. Moreover, the thicker the material, the longer it will last. If you plan to make a device for rare use, for example, for emergency situations with the heating system, then make it from simple iron, whose thickness is 1 mm. In the process of making a stove, all factory fittings may well be used. This applies to elements such as grates, the necessary doors, burners and valves. Many craftsmen make them with their own hands using steel.
Shape and material for the body If you want to make a potbelly stove using drawings or photos, you must use the method of cutting a metal sheet.
- In addition, the following elements are used:
- Molding profiles;
- Square shaped pipe;
- Special corners;
- Fittings;
- Rod.

All this is required to make the furnace body rectangular in shape.
Due to the presence of special planes, the case will have ideal ergonomic properties. In other words, the potbelly stove will be as stable as possible, it will be easy to process and cover. The stove can be easily and simply docked with a wide variety of structures, objects and parts. Various metal cabinets and boxes can be used as a base. Often these are cylindrical elements, for example, large-diameter pipes, cans, gas cylinders.
In the process of making a stove with your own hands, you will definitely need to use welding
If the metal is not very thick, the furnace can be made using bolts, screws and a drill. Regardless of the chosen model, it is important to use drawings as the basis for manufacturing, because Despite its relative simplicity, certain instructions for implementing the heating device must be followed.
Care and maintenance of the potbelly stove
The stove will serve you for a long time if you follow the rules for caring for it:
- The condensate collector installed on the chimney must be opened weekly to drain the water.
- at the beginning of the heating period, the chimney must be cleaned of soot with a specialized tool.
- During operation, the stove body and pipe must be constantly monitored for smoke penetration into the room.
- Monitor the condition of supply and exhaust ventilation.
Self-made iron wood stoves can not only be spectacular, but also become a real interior decoration of the room. But do not forget about the need to follow all installation and operation rules.