Advantages and disadvantages of the "potbelly stove"
Such ovens have a number of advantages:
- With the help of a potbelly stove, you can not only warm up the room, but also cook food on it.
- The main advantage of a potbelly stove is the speed of heating the garage. Once lit, it only takes half an hour to warm up the entire garage, while brick ovens require several hours.
- The heat in the garage is distributed evenly, regardless of where the stove is located in the room.
- When lighting the stove, you can use absolutely any combustible materials (wood, coal, waste, machine oil, etc.), which makes the potbelly stove a fairly economical heating option, unlike electric heaters.
- You can make such a stove with your own hands from scrap materials, without much effort or time.
- A simple and uncomplicated device.
- The cost of this is several times less than installing a fireplace or stone stove.
Disadvantages of a potbelly stove:
- When placing a potbelly stove in a garage, you need to think about venting the chimney system.
- You will have to clean the chimney sometimes.
- To maintain heat, you need to have a certain supply of heating materials.
- A metal stove-stove is not able to retain heat in a room for a long time, since metal tends to cool quickly.
Safety rules and structural measurements
If you plan to install the stove outdoors, then installing a chimney will not cause much difficulty, the main thing is to choose a suitable location
It is important to remember that the stove structure should be located away from flammable objects and active recreation areas
Constructing a chimney indoors will require knowledge of safety rules that will help avoid fire. The material from which the pipe is made must have increased heat resistance and can easily withstand temperatures above 1 thousand degrees. If you plan to install a potbelly stove near walls lined with clapboard or plastic, then the part of the wall located in close proximity to the stove is sheathed with fireproof material.

Don't forget to decide on the pipe size
The hole through which the chimney will enter the ceiling must also be decorated with non-combustible materials, since the entire structure becomes very hot when the stove is operating. For these purposes, a special glass is used to prevent contact of the hot pipe with the edges of the hole. If there is more than one potbelly stove installed in a building, then a separate smoke exhaust system is made for each of them.
After calculating the diameter of the pipe for the potbelly stove, you will need to calculate the total length of the pipeline, but first you need to accurately determine the location of the stove in the room. Then determine the specific location where the chimney will be vented outside. When measuring the length of the pipeline outdoors, you need to take into account that the height of the pipe above the ridge should be 1.3-1.7 meters.
It is more difficult to carry out installation work indoors
Popular models
| Model | Characteristics | Description | Price |
| Stoker 100-C (Ermak) | Efficiency: 75% Room: 100 sq.m. Power: 6 kW Composition: steel Materials: firewood, pellets On: up to 12 hours Additionally: hob, ash pan | Produced in Russia, it is distinguished by its aesthetic qualities, the ability to cook, the presence of a transparent door, and quick cooling. Long-burning potbelly stove. | 14,000 rubles |
| MBS Vesta | Efficiency: 85% Room: 60 sq.m. Power: 9 kW Composition: steel, cast iron Materials: firewood, briquettes On: up to 12 hours Additionally: hob, ash pan | Fireplace stove, made in Serbia, type – long burning. Decorative potbelly stove with high technical characteristics. Features a stylish design and is available in different colors | 32,000 rubles |
| Termofor 5 | Efficiency: 85% Room: 100 sq.m. Power: 6 kW Composition: cast iron Materials: firewood, solid fuel On: up to 8 hours | Manufacturer Russia. Capacious firebox, convenient design, thoughtful design. The series represents several models that differ in size, capacity, heat transfer, and power. | 15,000 rubles |
| Canada 85 | Efficiency: 85% Room: 85 sq.m. Power: 6 kW Composition: steel Materials: firewood On: up to 8 hours Additionally: hob | Regulation of the intensity of air flow and heat release by the ash box. Compact size, weight 34 kg. The service life declared by the manufacturer is 10 years. The brand's cheap potbelly stoves come in several models. | 5,500 rubles |
| Duval EYC 303 | Efficiency: 70% Room: 30 sq.m. Power: 4 kW Composition: steel Materials: firewood, sawdust On: up to 4 hours | Brand Erendemir (Türkiye). A simple, inexpensive potbelly stove for a wood-burning cottage, the price of which is minimal. | 2,300 rubles |
| Dream 15 | Efficiency: up to 85% Room: 50 sq.m. Power: 5 kW Composition: steel Materials: firewood On: up to 6 hours Additionally: hob | Wood-burning potbelly stoves from the Mechta brand are offered for different areas. Model “15” is the simplest and least expensive. There is a hob. The height is small. | 6,000 rubles |
| Buran Heater | Efficiency: up to 75% Room: 100 sq.m. Power: 6 kW Composition: steel Materials: firewood On: up to 10 hours Additionally: hob | Quickly heats the air, connects to the chimney in two ways, has a cooking surface (high heating rate), high efficiency, no smoke, no smog. Production: Ukraine. | 6,000 rubles |
| Met-Spos dwarf | Efficiency: up to 65% Room: 70 sq.m. Power: 6 kW Composition: cast iron Materials: firewood On: up to 10 hours | Convenient shape, high legs, ease of loading firewood, original design, ability to measure indicators. | 5,300 rubles |
| Army POV 57 | Efficiency: up to 80% Room: 50 sq.m. Power: 6 kW Composition: cast iron Materials: firewood, solid fuel On: up to 10 hours Additionally: hob | Cheap potbelly stove with hob. Due to its all-cast iron construction, it weighs 50 kg, is easy to install, and is easy to load fuel. The model is old, produced since Soviet times. | 5,500 rubles |
The presented models are a small part of the range offered by global manufacturers. Today, domestically produced potbelly stoves (including the USSR potbelly stove, Loginov stove, PCh-2) are in demand for long-burning cottages; imported ones are considered more expensive. There are expensive variations that are distinguished by aesthetic qualities, the highest performance indicators, expensive finishes, and maximum reduction of fire risks.
Some models are presented by brands in different power options. Designed for heating houses of different cubic capacity. Depending on the power level, the final price is determined. Variants of potbelly stoves are presented for clarity. You can choose from those offered and evaluate the assortment in stores, including online ones.
Assembling a potbelly stove
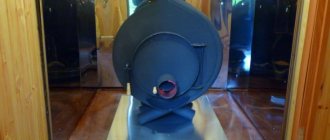
Installing a potbelly stove begins with its purchase or self-assembly. When choosing a purchase option, pay attention to the Soviet-style cast iron model.
They began to be produced in 1955 and are still stored in army warehouses. We won’t go into where they came from for sale. But let's say that these are excellent stoves. Judge for yourself:
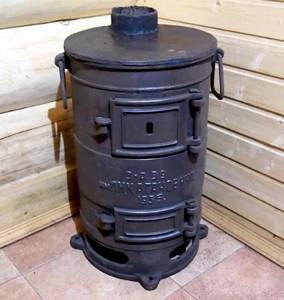
A cast iron potbelly stove has a very impressive appearance and, due to its thickness, can last for decades.
- Thermal power is about 4-5 kW, which is enough to heat a garage of up to 40 square meters. m;
- Reliable cast iron - its thickness is 10 mm;
- Soviet assembly - no comments here, back then they knew how to make quality things;
- Omnivorous - works on coal, wood, sawdust;
- Suitable for installing a cauldron instead of a top lid.
The cost of the unit is between 4-5 thousand rubles. The thing is really cool, but it’s hellishly heavy, its weight is about 60 kg.
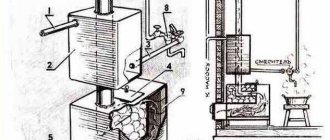
You can also assemble a potbelly stove for your garage yourself. For example, according to this scheme:

The assembly diagram of one of the simplest and yet quite effective and reliable potbelly stoves.
It is assembled from sheet steel. The recommended thickness is 4-5 mm. This is enough to prevent the steel from burning out in the next few years. The statement is most relevant when using coal, which burns at a higher temperature. For assembly, you need to cut the metal on a machine or using a powerful grinder. Legs may or may not be made - in this case, the potbelly stove is installed on a stone base.
To assemble the stove, you will need additional materials - a metal pipe, doors and fittings for assembling the grate. The pipe is necessary to create a chimney pipe - the chimney is connected to it. You need two doors - one large, the other small. The large one is welded opposite the combustion chamber (furnace), the small one is welded between the bottom and the grate . If you are making legs for floor installation, take strong metal corners or fittings with a thickness of at least 15 mm.
The diameter of the chimney according to this scheme is 100 mm - this is quite enough (for this drawing). The potbelly stove is assembled using a welding machine. Special attention is paid to the welds so that they can withstand heat and do not allow smoke into the garage itself. When assembling the housing, do not forget to install the grate and smoke circuits.
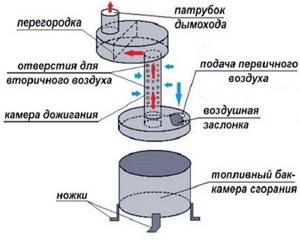
Smoke circulations improve heat transfer and are the basis for pyrolysis combustion - in this case, a tube for supplying secondary air is welded into the rear wall above the level of the first revolution.
Design
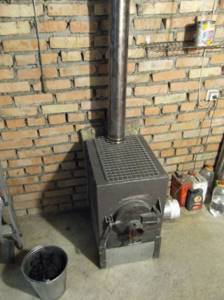
The design of a potbelly stove is extremely simple. Such a stove does not require the construction of a foundation, and there are no major difficulties with arranging a chimney exhaust system. The standard stove-stove system consists of the stove itself, which is an iron box with an opening door, and a pipe that leads outside.
To increase the efficiency of the furnace, it is worth increasing the area of the heat-conducting surface. For this purpose, it is best to make a heat exchanger.
This design is placed in the place of greatest heat and will help to significantly increase the efficiency of the stove.
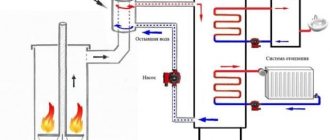
Slightly less popular are potbelly stoves with a water circuit, which include radiator batteries in their device.
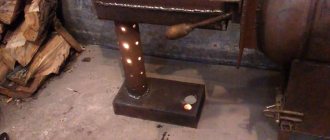
And among most garage owners, a stove made with the use of rims is very popular.
Making a garage stove from old rims
This method is quite popular among motorists, since old unnecessary wheel rims can be found at any car depot or garage cooperative. The undoubted advantage of such designs is the large thickness of the metal of car wheels; such a design will not burn out for a long time and will serve its owner for many years.
Below is a photo of a DIY garage stove made from wheel rims:
Materials
Only disks of substantial diameters will be used, for example, from trucks or special equipment with large wheels - tractors, graders, etc. How to weld a stove for a garage from rims and what materials you need for this:
- Two or three car rims. It is better to use stamped ones, as they are made of thicker metal. But light alloy wheels with an admixture of aluminum cannot be used; such a furnace will simply melt during operation.
- Corners or channels for legs, 4 or 6 pieces, 25 - 30 centimeters each.
- Hinges for the door.
- Bolts and nuts.
- Sheets of metal 4 - 5 millimeters thick.
- Two circles, with a diameter the size of the edge of the disk rim (for the bottom and roof).
- A pipe with a diameter of 125 - 150 millimeters for the chimney outlet.
- Round grate.
Tools
The tools used to create a stove from disks are almost the same as those used to create a stove from a pipe, but there are some differences. List of what you will need during assembly:
- Electric welding machine;
- Cutting torch (if available), but you can do without it;
- Angle grinder or grinder;
- Electric drill;
- Hand hacksaw for metal;
- Hammer or sledgehammer;
- Set of files;
- Pliers or pliers;
- Marking tool – ruler, core, marker;
- Building level;
- Roulette;
- Paint brush.
Manufacturing schemes
A do-it-yourself garage oven made of iron, made from wheel rims, and various options for its design are presented in the diagram:
Assembly order
A vertical stove made from old wheel disks can work on the principle of a Buleryan stove or a stove for long-term combustion of wood fuel. Only the homemade version will be much cheaper for the owner. A do-it-yourself metal stove for the garage is a good saving.
To do this, the furnace space is divided into two chambers, the chimney pipe comes out of the second, and the combustion itself occurs in the first chamber. You can also make a simple single-chamber stove, like a stove from a pipe or a gas cylinder, but the consumption of burned wood will be much higher.
- First, the internal parts of the disks are cut out, that is, the rims with holes with which the car wheel is attached to the hub. For this work, it is best to use a gas cutter, but in the absence of one, you can do this work using an angle grinder or grinder. True, the work will be painstaking and long, since you will have to work with internal steel surfaces of great thickness.
- Then the grate is installed by welding at the junction of the disks. If the oven consists of three parts, then the grate is welded between the first and second disks from the bottom.
- After the main part of the work, the lower and upper covers are fixed. A hole is cut in the upper part for the chimney pipe, then it is welded to it. This must be done from the side opposite the main firebox, otherwise the buleryan effect will not work.
- Rack legs are installed on the lower disk. A fire door is cut out in the center, then secured with hinges and a latch. A hole is cut in the lower disk to allow air to enter the firebox and remove ash; its cover is cut out of a piece of thick metal and fixed with bolts.
- After this, the disks themselves are welded to each other. The work should be carried out with special care and the seams should be well welded to avoid the entry of carbon monoxide into the heated room. The final stage of the main part will be the installation of a partition in the middle to achieve the effect of long-term burning of fuel.
- The disk stove is almost ready; all that remains is to weld the decorative elements, handles, or paint the stove with heat-resistant paint. Do not forget about test kindling and checking welds for leaks; this procedure should only be performed outdoors.
Calculation of basic parameters (with drawings and dimensions)
Despite its simplicity, for high-quality operation of a potbelly stove, you need to make some calculations. All structural elements are calculated.
Pipe
The main thing is to calculate the diameter of the pipe. If this diameter is too large, then all the heat will escape into the atmosphere. If it is small, there will be no draft, the stove will smoke. The diameter (in mm) should be 2.7 times the volume of the potbelly stove in liters. The capacity is determined without the volume of space below the grate (the height is equal to the distance from the top to the grate).
Example: height from the top wall to the grate is 25 cm, width is 40 cm, length is 50 cm, then the total volume in liters is 50 liters. The diameter of the pipe will be 50 x 2.7 = 135 mm.
There are several options for making potbelly stoves for the garage
Screen
The main task of the screen is to reflect heat inward to increase the combustion temperature. Then the gases will not cool down, but will completely burn out. The fuel must be burned by partial pyrolysis. The screen is installed at a distance of 50-70 mm from the walls on three sides. It is good to make a screen from red brick. It heats up and then gives off heat for a long time and gradually.
You can also make a water heating system throughout the garage using a potbelly stove.
Litter
Due to the fact that part of the heat is radiated downwards, the floor under the stove heats up. If it is wooden, then a fire is possible. Embers may fall out when opening the door. A bedding made of iron or other non-combustible material (for example, sheet asbestos) is required. The litter should overlap the contour of the stove at a distance of 350-600 mm.
Design and principle of operation
A solid fuel stove of the simplest design does not have any intricate elements. Essentially, it is a metal container with two main compartments.
The main material used for its manufacture is metal. Since it must provide resistance to high temperatures, the metal should be selected with a thick wall. Be it a barrel, an old gas cylinder, a piece of pipe or individual pieces of sheet metal.
Use only steel elements to make a potbelly stove. Aluminum, brass, cast iron (except for the grate) materials are not suitable. There will be a problem with their installation due to the peculiarities of welding various metals. Also, the melting point of these metals may not be suitable.
The main compartment (firebox) is the container in which the combustion process takes place, which means it must be large enough, with access to air, outflow of smoke and other volatile combustion products, but at the same time structurally suitable for the installation site.
The second main compartment is the ash pit (ash pan). The ash pan is located under the combustion compartment, connected to it by mesh-type holes or a grate made of thick metal (rod, fittings). The ash pan serves to remove ash from the combustion compartment in a natural way. The ash, under its own weight, pours into the ash pan compartment through the holes. Ashes are removed directly from the ash pan by hand.
It is advisable to install a door on the ash pan; by adjusting the gap, you can control the intensity of the air flow entering the firebox. The door in the firebox should be closed after loading and igniting firewood.
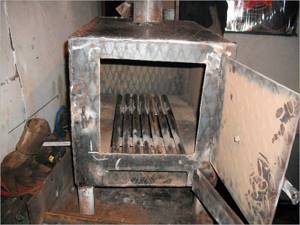
Main compartments: firebox and ash pan
A pipe is welded into the top sheet, through which the smoke flows out. A metal pipe is welded to this pipe, leading the smoke to the street.
DIY making
There are many different variations of garage stoves, which can be quite easily constructed on your own from available materials.
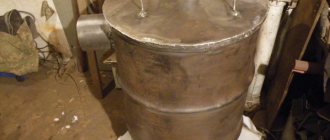
The most popular and famous model of a potbelly stove is a stove made from a metal barrel. This is an extremely simple design, consisting of a barrel on legs with a door. This oven is quite suitable for waste disposal. The main advantage of such a stove is its simple manufacture. But such a potbelly stove has several disadvantages.
The walls of the barrel are thin, and it is unlikely to last long, since the walls can quickly burn out. Another disadvantage is the bulkiness of such a design, which will take up a lot of space in the room.
You can make a stove from a metal can. There is even less work here, since the can already has a door that can be used without modification.
Another popular option for making a potbelly stove is a gas cylinder. Such cylinders have a fairly good level of heat capacity and thick walls, allowing the stove to last for a long time. It must be remembered that the gas cylinder must be prepared in accordance with fire safety rules before starting to make a potbelly stove. It is extremely important to remember that such a cylinder may contain residual explosive vapors.
For fire safety purposes, it is highly recommended that you fill this container with water and leave it overnight.
When making this stove with your own hands from a cylinder, you should weld a blowing system to it in the lower part, and drill several holes in the cylinder itself that are connected to this system.
Let's take a closer look at the stages of making a stove from a gas cylinder.
When using a potbelly stove in a garage, it is extremely important to follow fire safety regulations. Therefore, it is necessary to choose the right location for installing the stove. To install a stove, a garage corner is very suitable, which is located near the walls opposite the door of the room.
- First stage. It is best to make a preliminary drawing and calculate the dimensions of the future product. But such a stove is quite simple to make; you can do without it. Next, you should make markings on the product. Using a felt-tip pen, the contours of the future doors, blower and combustion system are applied to the cylinder body. The compartment with the firebox will be located approximately in the center of the structure, and the blower will be placed below. The distance between them should not exceed 100 mm. Next, use a marker to draw a solid line in the center between the doors, and then cut the cylinder along the intended line using a grinder.
- Second phase. It is necessary to take iron rods with a diameter of approximately 14-16 mm. Then weld them into a lattice and weld the resulting structure to the bottom of the cylinder. And then the cylinder is welded back into one structure.
- Third stage. It is necessary to cut out the holes for the combustion chamber and the pressurization holes, and then hinge the doors on them.
- Fourth stage. At the final stage, it is worthwhile to work hard on installing the chimney, since this is a very important part of the stove design. For these purposes, using a grinder, you need to cut off the valve on the cylinder, welding in its place a long metal pipe with a diameter of 9-10 cm. The chimney itself should be taken out of the garage through a hole in the wall or onto the roof. You should not connect the chimney to the general exhaust of the room, because its draft may not be enough, the ventilation will not cope, and carbon monoxide will penetrate into the garage.
And these are all fairly simple instructions for making a potbelly stove on your own from a regular gas cylinder.
Also, at the end of this work, you can apply an additional heat-resistant composition to the oven.
Making a classic stove-stove
Since you need to make a potbelly stove of a rectangular shape, you will need sheet metal with a thickness of at least 3 mm. The work is performed in the following order:
- Blanks are cut from the sheet.
- The side walls are welded to the bottom.
- Weld the back wall.
- Inside, the boundaries of the space between the ash pan, firebox, and smoke circulation are outlined. At a distance of 10 -15 cm from the bottom, 2 corners are welded to install a removable grate, which is assembled from reinforcement with a diameter of 10 - 15 mm.
- In the upper part, 2 rods are welded on which a reflector made of a metal sheet for smoke circulation will be placed. There should be a gap between it and the wall for the passage of smoke.
- Weld a lid with a hole for a sleeve with a diameter of 15 - 20 cm for installing a chimney pipe.
- For convenient removal of the grate and reflector during cleaning, the door with a latch and handle is made in a size close to the width of the potbelly stove.
- Legs from a pipe with a diameter of 20 - 50 mm and a height of 8 - 10 cm are welded to the bottom of the furnace body.
- The chimney is made from 3 pieces of pipe with a diameter of 15 - 18 cm, connected at an angle of 45°.
- A sleeve is welded into the hole in the lid.
- Before fastening, a rotary damper is installed in the chimney with a size smaller than the internal diameter of the pipe.
After installation, the potbelly stove is adjusted in height. The pipe is brought outside through a hole in the wall or roof. Simplified designs are assembled without a grate and reflector.
Features of operation
When operating a homemade potbelly stove, it is very important to follow certain rules. This is necessary not only for the safety of its use, but also for a long service life. These rules are:
- it is necessary to maintain a safe distance between the walls of the stove itself and the walls of the room (a distance of 50 cm is considered ideal);
- the chimney must be routed directly to the street; in no case should it be connected to the ventilation system of the garage (very often this desire arises when the stove is installed in the basement of the garage), since this is the only way to guarantee sufficient draft for proper combustion;
- places where the pipe is exposed to the street must be insulated with asbestos or other non-combustible material;
- You can increase the efficiency of a potbelly stove by insulating the room itself;
- It is necessary to install a box of sand and a fire extinguisher next to the potbelly stove, as this is required by fire safety regulations.
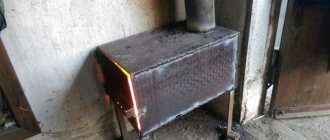
Homemade metal potbelly stove
A cast iron or steel garage stove is most common among car enthusiasts. It is made from a metal box or an unnecessary barrel/cylinder and a pipe with a diameter of at least 3 cm.
Important! The thickness of the metal should not be less than 5 mm.
Algorithm of actions:
- First of all, they make a metal box with cut out holes for the firebox.
- The stand/legs are welded to it.
- Next, a place for ash removal will be equipped. To do this, make a grid with slots (you can use reinforcement).
- A box is installed under the plate where the ash will accumulate.
- The chimney pipe is installed at an angle of 30 degrees in the side or top of the stove.
If desired, a metal potbelly stove can be coated with heat-resistant paint and connected to your own heating system
Do-it-yourself grate installation
Metals tend to expand when heated. It is for this reason that when installing grates for a fireplace or potbelly stove, it is necessary to make gaps on all sides of at least 5 mm. The ledge on which the grating will be laid must be trimmed.
For brick fireplace models, the cooled grates should be located one brick below the firebox door. This is necessary to prevent coals from falling onto the floor. Different degrees of heating affect all metals differently, precisely for this reason, in the case of monolithic fixation of elements. deformation or cracks in the masonry are possible.
After laying the grating with your own hands, the grooves are filled with sand without cement. If the base of the lattice is made up of triangular-shaped rods, the top should be directed downwards.
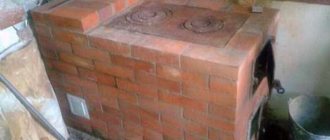
Let's build a brick oven
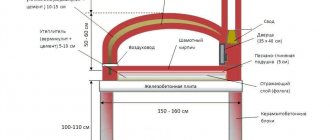
Let's consider the most labor-intensive option - how to build a brick oven. This type is not common; to make it, you need a space of 2 * 2.5 bricks. You will need bricks that can withstand fire, a mortar based on sand, fireclay powder and fireclay. The laying diagram will tell you how to do each row.
To create a chamber for the firebox on rows 2–4, take fireclay bricks. In total, the garage stove will have nine rows, which will form the height. To ensure smoke removal, install a brick chimney with a stainless steel sleeve. To eliminate furnace gases as quickly as possible, they are vented directly through the roof.
If you have just begun to delve into the essence of construction, consult with experienced stove makers. They will tell you about all the nuances of installation, and perhaps monitor the process so as not to redo the masonry due to mistakes in the future. Make it a rule not to start something without knowing how to finish it.
Required tools and materials
To make a potbelly stove you need the following tools:
- welding machine;
- hammer;
- chisel;
- rags;
- Bulgarian;
- sandpaper.
Of the materials, first of all, you need to have the basics - a barrel, or a milk flask, or a gas cylinder, or sheets of metal from which the stove will actually be made.
In addition to them you will need:
- sheet material;
- steel pipes;
- door hinges;
- grate bars or reinforcement bars;
- pipe with weather vane;
- fire brick.
This list may not be complete and some may be replaced.
Types of designs
Many designs of potbelly stoves for the garage have been invented, so choosing the appropriate option based on the available material is not difficult. The drawing is drawn up independently, taking into account the characteristics of the room, or taken ready-made from the Internet. The structure, depending on the size of the garage, is made horizontal or vertical.
A classic potbelly stove is made from sheet iron. The easiest way to make a stove is from an iron barrel, but the service life of the structure is short, since the thin walls quickly burn out. The option made from a gas cylinder or pipe will last much longer due to the greater thickness of the metal. Simple structures for garages are made from old rims and iron cans.
How to install?
Experienced experts recommend placing the potbelly stove approximately in the corners of the room, and leading the chimney pipe to the other side. Using this arrangement, you can achieve maximum heat transfer from the furnace. To prevent the heat from leaving along with the smoke, the pipe should be pulled at an angle of 30 degrees. You should also try to avoid straight sections of pipe located horizontally.
To place a potbelly stove in a garage, you need a supply ventilation system and good exhaust.
You should never place the stove close to the car. The potbelly stove should be at a distance of 1.5, or even 2 meters from it. Also, any flammable items and compositions must be moved from the potbelly stove to an approximately similar distance.
Brick walls should be installed on the sides and in front of the stove. This not only provides protection from accidental contact with a hot structure, but also ensures the accumulation of heat generated by the stove, which can significantly increase the efficiency level of the potbelly stove.
If the walls of the garage are made of wood, then there should be about 100 cm of free space between them and the stove itself. The wooden walls themselves must be covered with asbestos sheets, lined with bricks, or protected with some other fire-resistant means.
It is extremely important to place a sheet of iron up to two cm thick at the base of the potbelly stove or pour a concrete screed, which will help prevent the spread of fire in the event that sparks, coals, and so on fall out of the stove.
The potbelly stove should be used exclusively in rooms where good ventilation is provided. The main factor in fire is oxygen. Therefore, fresh air must enter the garage in good volumes, otherwise the fire simply will not ignite, and there will be a minimum of heat from such a stove. Sometimes it is enough for this purpose to leave a not very wide gap between the garage door and the ground. If there is no such gap, then you need to either make it yourself or make a supply ventilation system.
Under no circumstances should you leave flammable materials near the stove.
If there is wood, containers with gasoline and oils near the burning stove, their fire can lead to extremely negative consequences.
Fire safety rules
Many people ignore safe installation rules, thereby endangering people and property around them. To ensure safety during operation of the stove, you should strictly adhere to fire protection rules and observe the correct installation of the stove in the garage.
To avoid a possible fire, you should adhere to the rules given below:
- The floor and nearby walls must be made of non-combustible material: concrete, brick, metal or ceramics. Special heat-resistant plates made of fire-resistant material are also used.
- The stove itself must be made of reliable and proven materials.
- Under no circumstances should there be any substances or materials near the stove that are easily flammable or may explode.
- The garage must have normal ventilation to ensure removal of combustion products in case of smoke.
- You should not install the stove close to the car; the distance should be no less than 1.5 meters.
In fact, garage ventilation should be a top priority. Due to insufficient oxygen, a fire can burn weakly, causing serious carbon monoxide poisoning or other serious and tragic consequences.
Exhaust ventilation must be present and in good condition. This will protect the garage from fire and prevent people present from getting hurt.
How to properly clean a potbelly stove
The design features of this stove allow it to be cleaned quite rarely.
This is one of the advantages of a potbelly stove. However, periodically the chimney must be cleaned of soot residues. You can use a special brush for this. You can do it yourself. Attach a cylindrical brush to the rope. It is recommended to use a brush with plastic or iron bristles. In this case, you need to select it in such a way that it can easily squeeze into the narrow chimney pipe.
For a potbelly stove, it is recommended to use a brush with plastic bristles.
The cleaning process itself occurs in the following sequence:
- Close the firebox opening and plug it with a rag.
- Make several movements with the brush (you need to stop when the brush begins to move without resistance). Wait.
- Remove any food that has flowed down to the cesspool.
All this must be done extremely carefully, since the chimney pipe of potbelly stoves is not very strong. A homemade potbelly stove in the garage can become a reliable and effective assistant in the fight against winter frosts
And if you do it yourself, the efficiency of the device can be increased many times.
A homemade potbelly stove in the garage can become a reliable and effective assistant in the fight against winter frosts. And if you do it yourself, the efficiency of the device can be increased many times.
Do-it-yourself potbelly stove from a pipe or barrel
This furnace is made in a horizontal or vertical design. The diameter of the pipe or barrel is chosen depending on the size of the free space in the garage. The vertical version is assembled in the following sequence:
- 2 rectangular holes are cut out on the side surface at the locations of the firebox and blower.
- Doors are made from the cut pieces by welding a frame of metal strips. Install latches and handles.
- Inside, at a distance of 10 cm from the bottom edge of the firebox door, brackets from the corners are welded under a grate made of reinforcement.
- The ends of the pipe structure are welded.
- Legs are welded from below
- A hole for the chimney is cut out in the upper part.
- Weld the hinges and hang the doors.
- Connect the chimney pipe.
The assembly of the horizontal version is slightly different:
- The door for the firebox from a cut piece is installed at the end.
- There is no blower; instead, a hole with a diameter of 20 mm is drilled below the door.
- To install the stove, a stand is made from corners or pipes.
- The removable grate is made from a sheet of metal of such a width that the center is at a distance of 7 cm from the most distant point of the side surface of the body. To allow air to pass through the entire area of the sheet, holes are drilled.
- If the potbelly stove is made of a pipe, a pipe for the chimney is welded at the back at the top. First, a circle of the required diameter is drawn on the barrel, then radial cuts are made at an angle of 15⁰. The resulting sectors are folded upward. The pipe is attached to them with rivets.
First launch of the potbelly stove
The slide valve allows you to control the draft in the stove, thereby affecting fuel consumption and temperature.
The installation is complete - you can perform the first launch. To do this, place a small amount of wood chips and paper inside and light a fire. Next, we stack a small amount of firewood and wait for the stove to warm up. The firewood must be dry (no more than 15-20% moisture), otherwise the soot from it will quickly pollute the entire stove and chimney. We make sure that the smoke goes into the chimney properly, add more firewood, close the firebox door and open the ash pan door (it works like an ash pan).
After 20-30 minutes the temperature will rise to a comfortable level. To save fuel, close the vent and the flame will go out. This achieves temperature regulation. You can also retrofit the chimney with a damper.
Operating rules
The chimney needs to be cleaned once a year
Theoretically, you can light a stove with anything that burns. But the best option is firewood, which can often be collected for free in sufficient quantities.
The following rocks burn with minimal fuel release:
- birch;
- cherry;
- acacia;
- apricot;
- willow;
- aspen;
- oak.
It is recommended to avoid conifers such as spruce, pine and larch. When they burn, creosote is formed on the walls of the chimney, which can ignite under high heat.
Cleaning must be carried out in the firebox and chimney. This should be done monthly for constant use, and every 20 fires for periodic use. The best option is a plastic, copper or brass brush. You need to start cleaning from the top, gradually moving down as the lumen becomes clearer. If complications arise with the mechanical option, the carbon deposits can be burned off with potato peelings or aspen firewood. It’s even easier to use specialized household chemicals.
Useful tips
The main disadvantage of a potbelly stove is its rapid cooling. But this disadvantage is quite easy to fix with the help of a brick screen, which needs to be installed on three sides of the heating device. Such a screen accumulates heat and the garage will remain warm even when the stove stops burning.
It is recommended to place the brick screen at a distance of five to seven cm from the walls of the stove. Under no circumstances should it be installed close to the stove. You also need to provide holes in the screen for ventilation.
The weight of a stove with a brick screen is quite large compared to conventional stoves. In this case, it is advisable to set aside a small concrete foundation for it.
Pouring a custom foundation yourself is not that difficult.
It is recommended to perform this type of work in the following steps:
- To begin with, you should dig a recess, the depth of which will be approximately 50 cm. All other dimensions will depend on the dimensions of the potbelly stove and the brick screen.
- Next, you should fill the bottom of the recess with sand (for this you need about 3 to 4 buckets), and then the surface must be thoroughly compacted. Then the sand is covered with a layer of crushed stone and also compacted. The layer should be approximately 10-15 cm.
- The resulting surface must be leveled as much as possible, and then filled with a cement solution mixed in advance. The poured surface is left for a day to allow the solution to harden (to be safe, you can leave it for a couple of days, which will allow the foundation to completely harden).
- After the mixture has hardened, it is worth covering the foundation with several layers of roofing material.
After these steps, you can begin laying out the brick screen. It is worth remembering that the first two rows of bricks must be laid in continuous masonry directly on the roofing material layer. In the 3-4 row of bricks you can already make holes for ventilation. Then lay the bricks again in continuous masonry.
Many craftsmen advise installing a brick screen without an upper ceiling. This will help improve heat transfer.
Step-by-step instructions for making a stove
Step 1. In our example, we use a simple 250-liter barrel with thick walls - ideal for making a stove. Cut off the top of the barrel, but do not throw it away.
The top of the barrel has been cut off
Step 2. Make a kind of lid from the top - a “pancake” for oxygen supply. Adjust it to the size of the barrel - as a result, when installed, there should be 2 mm between it and the walls around the entire circumference. Weld the neck of the lid. In its center, make a hole to install a pipe through which air will be supplied. Also weld 4 channels, as in the photo below.
“Pancake” for air supplyAnother photo of the element
Step 3. Stepping back a little from the top edge, cut another hole in the barrel wall for installing a chimney. In our example, the chimney will be a pipe with a diameter of 140 mm.
Hole for chimney installation
Step 4. Start making the lid. Make it from sheet metal 4 mm thick, and weld a sealing ring at the bottom corresponding to the diameter of the barrel. In the center of the lid, make a hole for the pipe that was welded to the “pancake”.
Cover for the ovenIn the middle of the cover there is a hole for the air duct from the “pancake”
Step 5. Make simple legs at the bottom of the barrel to make the structure stable. The legs must be metal, as well as all other elements.
Making legs for the stoveThe legs must be metal
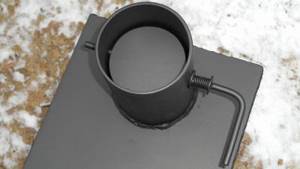
Step 6. Install the stove in the desired location and begin creating the chimney. In our example, it is of a prefabricated type. First of all, make a clamp with which the chimney will be attached to the body.
A clamp that will allow you to attach the chimney to the stove
Step 7. Make guides in the chimney, thanks to which it can be easily fixed to the body.
Guides in the chimney
Step 8. Join the barrel with the pipe, making sure to lay all the joints with asbestos fabric. Place a clamp over the fabric and tighten it.
Asbestos fabricTightening the clamp over the fabricThe finished joint between the pipe and the barrel
Step 9. That's it, the structure is assembled, you can check its functionality. Load sawdust or firewood inside.
The stove is loaded with fuel
Step 10: Add used oil to the fuel, then install the cap. As for the “pancake”, don’t use it yet. After the fuel ignites, remove the lid and place the “pancake”. To fully warm up such a structure, it takes about 10 minutes; in the future, the firewood will burn for a long time. Although exactly how long the combustion will last largely depends on the quality of the fuel.
Photo of the finished stove for the garage
Video - Homemade potbelly stove for the garage
If you wish, you can modify the design described above, although it will already cope with its functions perfectly. For example, to increase efficiency, you can increase the surface area and thereby improve heat transfer. For this purpose, weld metal plates on the sides of the body.
In addition, you can make a grate with an ash pan: cut a circle from a sheet of metal along the inner diameter of the body, drill holes with a diameter of 60-80 cm and install from below. After this, the ash will be poured down through the holes - to where the ash pan is equipped. It is believed that this will cause the fuel to burn faster, remember this point and make sure that the ash pan is sealed as much as possible.
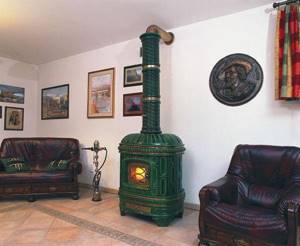
Potbelly stove as a decorative item in the interior
Despite the fact that potbelly stoves are considered relics of the past in cities where there are all modern amenities, they are still used even in modern houses with European-quality renovations and designer interiors. Some craftsmen install such units even in apartments. After all, a potbelly stove, made with your own hands, can have a decorative appearance and become a functional decoration of any room. It will be able to fill the room not only with warmth, but also with an atmosphere of comfort when the wood is crackling in the fireplace and there is a snowstorm outside the window. Now designers have begun to design various types of potbelly stoves, so today they are not just a means to help survive the cold winter, but also a beautiful-looking accessory.
It doesn’t matter whether the potbelly stove is made with your own hands or bought in a store, you should always remember about safety precautions. There must be a metal sheet near the stove in case a coal falls out when throwing firewood.
Also, do not keep flammable objects or plastics close.
Features, pros and cons of a homemade potbelly stove made from wheel rims
Nowadays it is not at all necessary to buy a home-made potbelly stove or make it yourself. You can buy it ready-made in the store. Moreover, some options look quite nice, and in the door area they have tempered glass, which allows you to turn such a stove into an impromptu fireplace and watch the flames. Yes, even ordinary potbelly stoves from the store, without glass, look quite good. But the question of quality remains open. You can buy the cheapest stove, but it will quickly burn out - a waste of money. And high-quality potbelly stoves will definitely not be sold for next to nothing.
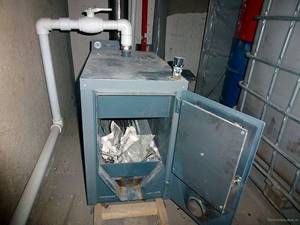
Potbelly stove from the store
In addition, a good modern potbelly stove is made as safe as possible, which also increases its cost. Previously, the combustion intensity was regulated by opening the door, now - with special valves, which increased the level of safety when using the device. In addition, good store-bought stoves are much more economical in terms of fuel consumption than homemade ones. The chimney is also designed differently: now potbelly stoves have special smoke chambers or special systems, due to which the pipes rarely burn out. In smoke chambers, the smoke has time to cool slightly before being released into the environment.
We still suggest making a potbelly stove with your own hands, but one that will be reliable and durable. It won’t take long, but you will have much more confidence in such a stove than in a cheap store-bought version. So you will not only save money, but also be able to work in a warm garage for more than one season.
Potbelly stove made from wheel rims
For example, from wheel rims you can create a high-quality and durable potbelly stove. Its advantages:
- low cost - to create such a product you will not need to purchase any special materials;
- durability - car wheels are very thick and durable;
- heat resistance - the alloy that is used to create disks can easily withstand very high temperatures;
- high heating rate - such a potbelly stove quickly warms up to the required level and quickly warms up the room (efficiency reaches 85%);
- unlimited in size - to create a stove you can use 2-4 or more disks depending on your requirements.
This design, of course, also has disadvantages. To make such a potbelly stove, you need welding skills and a welding machine. In addition, the product retains the other disadvantages of any stove of this type: fire hazard, rapid cooling.
It is also important to consider some features. Thus, the distance between the bottom of the firebox and the grate to the first barrier to smoke (the top of the firebox) should not be less than 45-50 cm
If you have to heat the stove with raw wood, then it should be even larger - 65-80 cm. The need to maintain such a distance is due to the fact that the smoke, coming out through the chimney too quickly, takes away the lion's share of the heat. The result is a decrease in efficiency. Also, because of this, a lot of carbon deposits and soot are formed inside the furnace, which also reduce the efficiency and increase the fire hazard of the furnace.
Scheme of a potbelly stove made from rims for a car
Low-quality fuel, garbage and waste are often used to fire a potbelly stove made from disks, and the optimal size of a stove for a garage is far from the largest. That is, in many cases it is simply impossible to make the combustion chamber high. In this case, it is easier to make a special grate structure assembled from thick steel or reinforcement. It is placed inside the oven, leaving a small gap of 5 mm to take into account the thermal expansion of the materials. Thanks to such a grate, you can solve the efficiency problem of a small stove.
How to make a potbelly stove in the garage with your own hands
If you have the skills to perform welding work, then installing a potbelly stove in the garage will be no problem. To do this you need:
- draw a preliminary design for yourself;
- choose a place;
- conduct an audit of available materials;
- select the required amount of materials;
- find or buy what is missing;
- mark and cut according to the sketch;
- cook the stove;
- install it in place and take the pipe out.
Do-it-yourself potbelly stove for the garage is ready!
Modernization of a potbelly stove
Installing a potbelly stove in a garage will provide warmth and comfort. But the efficiency of this furnace can be increased by 10-15%. Here is a list of technical solutions:
- Installing a brick jacket on the back and sides - we have already talked about this. The thickness is half a brick;
- Installing a chimney with a long horizontal section - it will retain some of the heat escaping into the chimney. We put the stove in one corner, extend the chimney to the other, and then take it upstairs;
- We cover the walls with steel sheets - they will reflect infrared radiation back into the room;
- Installing a steel jacket around the stove - we surround the potbelly stove with steel sheets located at a distance of 40-50 mm from its walls. This solution forms a convector that forces air to circulate throughout the garage.
This is quite enough to “squeeze” the maximum thermal energy out of the stove. When installing a furnace to heat your garage, do not forget to take care of purchasing a fire extinguisher.
Tips for proper cleaning of a potbelly stove
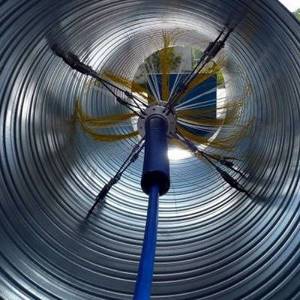
A big advantage of such a stove is that its design allows it to be cleaned not so often. Nevertheless, it is necessary to do this periodically so that soot residues do not accumulate in the chimney, and nothing interferes with the free exit of smoke through the pipe. If the potbelly stove is smoking, then you need to urgently start cleaning the pipe. For such purposes, a special pipe cleaner is best suited. By the way, you can make it yourself. You just need to attach a cylindrical brush to the end of the rope. A brush with plastic or iron bristles is best. The main thing is to choose the right size brush so that it can easily fit into the narrow chimney pipe and not get stuck in it.
The pipe cleaning activities themselves are carried out in the following steps:
- Before cleaning, the hole leading into the firebox should be closed and additionally covered with a rag.
- To begin with, you should make several forward movements with the brush.
- Then you need to remove all the debris that falls towards the cesspool.
- This work should be carried out carefully so as not to damage the integrity of the pipe.
A self-made potbelly stove is a great way to provide warmth to your garage in the winter. And making it yourself is very economical and does not require much effort.
To learn how to make a “potbelly stove” with your own hands, see the following video.
We install a chimney for a potbelly stove
Do-it-yourself installation work should begin with choosing the place where the outer and inner elements of the furnace should be connected. An attic or roof space is perfect for this purpose. The first element of the future chimney is installed on the potbelly stove itself, on which the second, third, and so on are then placed (depending on how many sections the chimney will include). Instead of thin metal, you can install a cast iron elbow up to half a meter high or even more at the outlet of the potbelly stove to extend the service life of the chimney and prevent the thin metal from burning through.
Floor preparation
The chimney pipe must be extended until it reaches the previously determined location at the junction of the two elements.
You need to make a hole in the ceiling, the diameter of which will be 5-10 cm larger than the diameter of the pipe: this will be required in order to cover the pipe where it passes through the ceiling with heat-insulating material. If there are insulating materials or other easily flammable objects in the cracks between the ceilings or near the pipe, they must be removed: when the pipe is heated by smoke and its temperature rises, the risk of fire of the insulating material will also increase.
A passage glass is inserted into the cut hole in the ceiling, through which the chimney pipe must be passed. Then you need to connect the pipe coming from inside the room to the outside of the chimney. The chimney should end above the roof level, approximately 10 cm above it. The place in which the hole for the pipe outlet will be cut is equipped according to the same principle as the place where the pipe exits inside the building:
- the hole must be larger than the chimney pipe itself;
- A layer of heat-insulating material must be placed between the roofing materials and the pipe.
Fixing the pipe
The smoke exhaust pipe is passed through a hole in the roof and fixed with a sheet of tin or other metal. As an alternative to tin, you can use another non-flammable fixative - bricks, which are installed in the gap between the chimney and the roof. However, in order for the bricks to hold the pipe tightly, a stand needs to be built for them from the inside. All cracks in this place are covered with ordinary clay.
The entire outer part of the pipe is thoroughly lubricated with bitumen resin and then wrapped in thermal insulation material. You can use mineral wool, but in the space between the pipe and the end of the chimney there should be a “saucer” that will protect the material from possible ingress of hot ash particles. A “mushroom” is mounted at the end of the chimney pipe - this is a cover that protects the pipe from any objects that could clog the chimney, cause a fire in the pipe, or allow rainwater to enter the potbelly stove.
Sealing seams
After the entire structure has been assembled, you need to take the sealant and, sparingly, lubricate all joints and seams to prevent smoke from entering the living room from the chimney
The sealant for these purposes must be selected with special attention - only one that is not afraid of high temperatures is suitable
Unfortunately, some sealants will simply “melt” on a hot pipe, while others will dry out easily. One way or another, a sealant that is unstable to high temperatures will lose its properties and will not be able to protect the room from smoke.
After the sealant has dried, the chimney for a home potbelly stove can be considered ready for use. However, first you need to check it by flooding the stove - if smoke does not come out of the cracks or joints, this means that the structure is assembled correctly and you can safely use it!
Safety precautions
The stove is considered a fire hazard, especially in a garage where fuels and lubricants are present. Anything that can quickly ignite is kept away as much as possible. It is optimal to protect the combustion area with a screen to eliminate the possibility of sparks flying out.
You can't light a stove in a garage with the doors open.
In addition to a functioning chimney, it is important to ensure good ventilation. If children fill the garage space, a person can become poisoned.
Do not dry oily clothes near the stove. It is prohibited to store rags soaked in gasoline and other petroleum products. You should not leave a burning stove unattended, especially at night.
Preparatory work before assembling the stove. Selecting a location
A simple oven for the garage.
Preparation for installation consists of selecting a location and ensuring safety precautions. Make sure that your materials are tested and of high quality. It is recommended that the floor and walls adjacent to the stove be made or treated with heat-resistant material.
Ventilation is also necessary in the garage to prevent fire or poisoning and to maintain heat.
The location of the stove should first of all be convenient and safe. You cannot install it close to the location of the car or flammable objects (minimum distance - 2-2.5 m). Most often, potbelly stoves are installed in the corner of the wall opposite the gate. This increases heat transfer.
Important criteria are ease of design and size relative to the garage area. A metal sheet 1-2 cm thick or a concrete slab is placed at the base of the potbelly stove. Brick screens on the sides will also be useful, as they will protect against fire and retain heat.
https://www.youtube.com/watch?v=u-OLlOprdtc