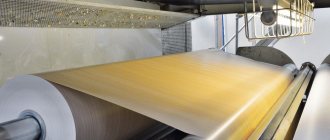
The role of underfloor heating in a residential or office space can hardly be overestimated. In winter, when there is frost outside the window, it is not very pleasant to walk on a cold surface both at home and at work. If you are faced with a similar problem, it means that the floors require insulation. The material used for this purpose must conduct heat poorly, be resistant to moisture, be lightweight and have good strength properties. It is recommended to use natural materials for thermal insulation of floors. Wood is considered one of the best. Sheets of plywood are placed on top of the wooden beams from which the logs are made, securing them with ordinary self-tapping screws. Not only high-quality timber is quite suitable for arranging the logs themselves. You can also use second-grade wood and even third-grade material. Different grades of plywood contain different marking options.
Expert opinion
Konstantin Alexandrovich
When insulating floors with plywood with a backing in premises intended for residential use, it is recommended to use plywood under the MK brand. It is resistant to moisture and does not contain compounds toxic to humans.
Plywood: advantages and disadvantages of the material
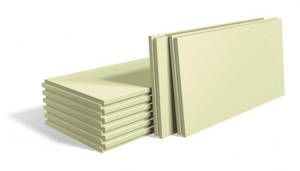
Pressed sheets are an excellent material for rough and primary work. They are inexpensive, easy to transport, easy to install and are good at eliminating small differences in floor level. Often they prefer to lay linoleum, parquet boards or laminate on plywood, since it has the following advantages:
- laying sheets significantly reduces the time of preparatory work before installing the final finishing floor covering;
- prevents rotting of the underside of floor coverings due to good ventilation between the material and the concrete screed;
- a floor lined with plywood prevents premature wear or deformation of linoleum or carpet, extending the life of the decorative coating;
- provides a smooth subfloor;
- plywood sheets are light, hard, durable, resistant to stress and abrasion;
- plywood is flexible enough and does not break during installation;
- has no pungent odor;
- has good sound and heat insulation properties;
- due to the large size of the sheets, the number of joints is minimal;
- high-quality factory grinding prevents slipping of the sheet and materials placed on it.
Popular types of plywood used for renovation
Sheets produced by industry are classified according to various criteria:
- wood used;
- presence and method of impregnation;
- variety;
- number of layers;
- surface treatment;
- moisture resistance.
| Brand | Moisture resistance level |
| FSF, FSF-TV | increased |
| FSB, BFS, BFV-1 | high |
| BP-A, BP-V, BS-1 | above average |
| FBA, FC | small |
For repair work, when the part of the structure made of plywood will be hidden from view, it is recommended to use moisture-resistant plywood of grade II or III. The sheet must be at least 10 mm thick, but the recommended value is 14-22 mm. A thinner one will not cope with the load, and a too thick one will be inconvenient to work with.
Plywood thickness and ply
The number of layers is not of fundamental importance. If possible, you should purchase sheets sanded on both sides.
- If possible, the plywood should be dried for 2-3 weeks before starting work. The sheets are dried vertically, at a temperature slightly above room temperature.
We bring plywood into the room
You can increase the strength of plywood using several layers of acrylic varnish
48 hours before the start of work, the material must be brought into the room where it will be installed and laid horizontally. There are two ways to lay plywood.
Method 1. Installation on old wood flooring
When laying plywood on a wooden floor, there are many options for fixing the sheets:
- on self-tapping screws;
- on glue;
- for liquid nails.
Adhesive compositions include water-based adhesive, two-component adhesive, assembly adhesive and bustylate. However, fastening with self-tapping screws is preferable.
Materials and tools
To successfully install plywood sheets, you will need the following tools and materials:
- plywood sheets;
- jigsaw;
- level;
- roulette;
- marker;
- self-tapping screws;
- screwdriver;
- substrate;
- construction vacuum cleaner or broom.
You may also need a sanding machine, a roller and primer, glue and sealant.
Preliminary preparation and priming of the floor
Installation of plywood on wooden floors is carried out only if the height difference when checking the level is no more than 1 cm. In this case, you will also need a substrate to compensate for unevenness and tape, which will need to be used to glue the joints of the strips of material.
Inspect the condition of the floors. Strengthen creaking and loose floorboards, replace rotten and damp floorboards. Do not try to restore boards that have traces of mold, damage, or have been attacked by rodents. They definitely need to be removed and the room ventilated.
We remove the baseboards and inspect the condition of the floor
Use a broom to sweep away dust and dirt from the floors. If desired, go over the wood surface primer twice to ensure better adhesion of the materials. And dry the base for at least 16 hours.
Marking and cutting
Only saw plywood on a rigid base
Plywood sheets are sawn so that the number of joints is minimal, taking into account damping joints of 3-4 mm between sheets and 8-10 mm between plywood and the wall. This will help avoid swelling of the sheets, since during operation, under the influence of the microclimate and temperature fluctuations, the workpieces will increase in area by several millimeters.
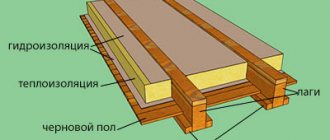
Method 2. Installation of plywood on joists
A more complex and labor-intensive method of laying plywood material along beams is justified if the height difference is more than 1 cm. Joists can be installed on an old wooden floor only if you are sure that everything is in order under it
Preparatory stage
The old floor was dismantled
Old flooring must be removed from dust and debris, paying sufficient attention to the gaps between the floorboards. The largest cracks can be filled with silicone sealant or assembly adhesive.
At this time, you should prepare the plywood - you need to saw the material, make markings on a piece of paper and number the squares, taking into account that they will be laid out in bricks.
Installation of logs and plywood sheets
Find the zero level and set the first lag
Installation of the first floor joist
Installation of subsequent joists
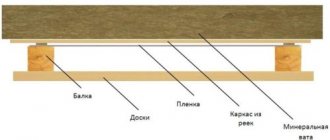
Logs laid in the form of a lattice
Logs are guides that help level the floor surface. They are slats 1.5-2 m long and 40x15 mm in cross-section, which are attached to wooden boards with dowels or self-tapping screws. The logs are positioned in such a way that their upper boundaries form a single plane, and the slats themselves form a sheathing.
We attach sheets of plywood to leveled logs
Installation of plywood on joists
The spaces between the guides must be filled with soundproofing insulation.
If necessary, cords and communication wires can be hidden in layers of insulation.
Scheme of laying plywood on logs with insulation and laying communications
According to the drawing, the plywood squares should be installed. Fastening can be done with liquid nails or self-tapping screws; in the latter case, the heads of the screws must be thoroughly recessed. The holes can be pre-marked and countersunk.
Final processing
After laying the materials, the joints of the plywood sheets should be treated with fine-grained sandpaper, this will smooth out all the unevenness and differences of the adjacent sheets. After sanding, the entire surface must be coated with several layers of varnish.
Plywood floor with an unusual color option
Advice from professionals
- If a laminate or parquet board will be installed on top of the plywood, then the thickness of the plywood should not be less than the finishing coating.
- Try not to allow 4 plywood sheets to touch at one point at once.
- The width of the log step should be 0.5 m from the side of the square.
- Plywood cannot be used in rooms with high humidity, even if it is a moisture-resistant grade of material.
- If non-moisture-resistant plywood is used in the work, then laying a layer of waterproofing will be a prerequisite at the next stage of work.
- The length of the screw should be at least 2.5-3 times the thickness of the plywood.
- When laying plywood on joists, after sealing the gaps between the boards, the base can be primed and a layer of heat and waterproofing can be applied, and only then the guides can be installed.
It is important to remember that defective plywood sheets cannot be used in the work, even if they are intended to be further covered with decorative materials.
Video - Laying plywood on a wooden floor
Video - How to lay plywood on a wooden floor
Nikolay Strelkovsky editor-in-chief
Author of publication 07/26/2015
Did you like the article? Save so you don't lose!
In order to ensure comfort in the home, it is very important to follow the necessary technologies, which are incredibly important when laying plywood floors. And in this case, it will not be superfluous to identify exactly those insulation options that will give the most beneficial effect and protect the room from the cold.
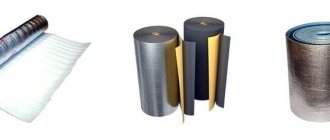
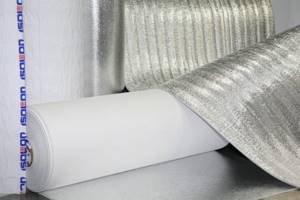
How to insulate a floor with penofol with your own hands, installation technology, video diagram
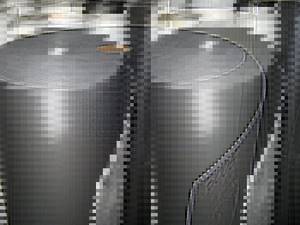
Penofol is an effective thermal insulation material that has low thermal conductivity and reliably protects homes from the cold even when laying a thin layer of material. It is often used for floor insulation, since due to its special properties, penofol increases heat transfer resistance.
Scheme of laying penofol with the reflective layer down.
Penofol can be perfectly combined with mineral wool and fiberglass when insulating floors, where it will serve as a vapor barrier. The use of this material will be appropriate in those structures that require not only thermal but also noise protection, but the thickness of the insulator should be minimal. To insulate a floor with penofol, you do not need to additionally use hydro- and vapor barrier membranes, since the material can become a replacement for them.
Penofol classification
Since the production of penofol began, its properties, scope of application and structure have undergone enormous changes. Previously, the material took the form of a roll of cross-linked polyethylene foam, one side of which was foiled with aluminum. This type of material is still used to insulate rooms, as it is highly efficient. In addition to the classic type of penofol, other types of material are produced, which are endowed with a number of useful properties:
Scheme of floor insulation with penofol with double-sided foil.
- With one-sided foil - type “A”. Used in conjunction with other materials for insulation.
- With double-sided foil - type “B”. Standalone use is allowed.
- Type “C” - one side is covered with special glue and protective film, and the other is covered with foil. Installed by gluing to a surface that requires insulation.
- Types “R” and “M” are embossed penofol with one foil side.
- Type “ALP” - has one-sided foil up to 14 microns, which is laminated with polyethylene film.
- Perforated material. It has a special structure that allows air to pass through.
The type of penofol is selected depending on the type of insulation work, i.e. walls, floor, roof.
Penofol laying technology
Penofol characteristics table.
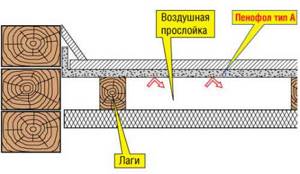
Before insulating the floor with insulating material, you need to decide on its type and installation technology. Penofol types “C” and “A” must be laid under the finished floor. The insulation process begins with a concrete screed mixed with expanded clay, or with the placement of foam plastic slabs with a thickness of 5 to 10 cm. Next, penofol is laid with an overlap of about 10 cm and all joints are taped with construction tape.
It should be noted that condensation may settle on the thermal insulation material, so measures must be taken to prevent this phenomenon. To do this, fill slats up to 2 cm thick above the foil surface, which will create a ventilated space. If a wooden floor is being insulated, then the role of slats is played by logs
It is important to remember that all slats and joists must be impregnated with antiseptic and drying oil to protect the wood from rotting
If insulation is carried out using a “warm floor” system, then penofol is laid with the foil side down on a completely dry screed, and in other cases the material must be placed with the reflective side up. A polyethylene film is spread over the heat insulator, which will act as a vapor barrier. To insulate the floor on the lower floor located above the basement, type “B” penofol should be used.
As a rule, when installing a “warm floor” system, the heating elements must be filled with screed in order to subsequently obtain a flat surface for laying, for example, laminate flooring. In such cases, the “ALP” type of penofol should be used, since its foil side is laminated with a film, and, as is known, cement is aggressive towards aluminum.
Floor insulation with penofol of this type is performed on top of the primary screed, with the reflective side being on top. The sheets are laid with a slight bend, about 10 cm, on the walls and they are glued with aluminum tape. Next, heating elements are installed, a reinforcing mesh is laid, and the entire floor area is filled with concrete screed. When the surface is completely dry, it is necessary to trim the free edges of the insulation.
Using penofol for floor insulation is the best solution. With this material, moisture will not penetrate into the room, noise will decrease and it will become much warmer, since the foil surface reflects heat, directing it back into the house.
Why is it important to pay attention to the structure of the plywood itself?
When making the final choice of insulation, you should also take into account what kind of plywood is planned for it.
This component is divided into popular brands:
- FSF has an extremely high degree of moisture resistance, so during installation it requires the use of toxic types of glue. The best options for such coverage are considered to be non-residential premises (garages, warehouses, offices). The basis is a reliable concrete screed that is not afraid of high humidity;
- FC is a material that contains special urea resins that are completely harmless to humans in terms of toxicity. For this type of plywood, wood obtained by processing coniferous or deciduous plants can be used as a base for the flooring.
Taking this into account, floor insulation is selected for the specific environment in which it will serve. And a lot depends on the type of plywood itself!
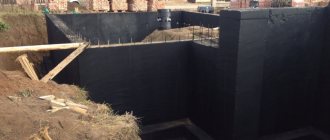
How to insulate a basement
It is extremely necessary to insulate the basement in a private house. Thanks to this, it will be possible not only to reduce heat loss, but also to protect the house from dampness and destruction in the future. To carry out thermal insulation work, you can use penoizol, polystyrene foam, but mineral wool can be used to seal the ceiling on the basement side. The floors and walls of the basement are insulated using polystyrene foam.
The first step is to prepare the surface. And to do this, remove all debris and dirt, apply an antiseptic and primer. This will protect the surface from rotting, and will also make the adhesion of the material to the surface stronger. Attaching a heat insulator is a simple matter that even a beginner can handle. You need to apply glue to the surface of the heat insulator, and then immediately apply it to the ceiling.
Video of floor insulation in a wooden house from the basement:
Insulating the floor below in a private house is a necessary measure to create a comfortable and warm environment. The main thing in this matter is to choose the right thermal insulation material. And although the choice today is very wide, you need to choose the insulation that will be convenient for installation, will suit your operating conditions and will provide reliable protection against heat loss.
Certain technological nuances
If beams are used as insulation, they should be laid so that the edges of the sheets used are located strictly in the center of the room. This action is aimed at ensuring that none of the edges is located above the air.
The boards that are placed on the base of the covering should fit very tightly to each other. But even in this case, small gaps are allowed, the size of which should not exceed 1 to 2 cm.
The ability to choose the right insulation for plywood is only half the story. Here it will still be necessary to make considerable efforts to properly arrange the floor and give it a sufficient protective effect from the negative effects of cold weather.
And if all this can be done, then it will be possible to unequivocally say that the quality of the repair work has fully justified itself, and practice can only confirm the corresponding result!
Korovin Sergey Dmitrievich
Master of Architecture, graduated from Samara State University of Architecture and Civil Engineering. 11 years of experience in design and construction.
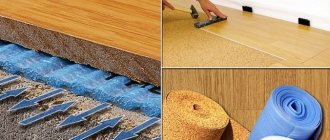
Plywood over wood floors in your home allows you to level the base without dismantling the old wood flooring. The backing in this case prevents squeaking and other problems that may arise. The technology allows you to do the installation yourself without any serious difficulties.
Types of substrates
The materials used as substrates can vary significantly. Their technical characteristics will also differ from each other:
Polyethylene foam
- High performance characteristics.
- Affordable price.
- The porous structure is characterized by a high content of air bubbles. They themselves perfectly insulate heat.
- It is easy to lay the material with your own hands.
Flaws:
- Over time, the material becomes more and more dense, which gradually leads to the loss of its original shape.
Cork tree
- Increased degree of environmental friendliness.
- Remarkable properties for muffling extraneous sounds.
- Springiness.
- Not susceptible to the development of putrefactive processes.
- Does not attract various harmful insects.
- Has excellent thermal insulation properties.
- Provides the effect of a smooth surface.
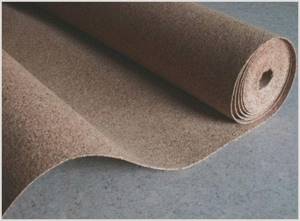
Flaws:
- Quite a high price for raw materials. This disadvantage is inherent in most materials of natural origin.
A mixture of bitumen and cork chips
- The use of the material guarantees the highest level of waterproofing. It is often used in homes located in swampy areas.
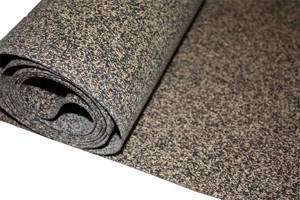
Flaws:
- Not very high thermal insulation properties.
Extruded polystyrene foam
- Increased level of moisture resistance.
- Significant service life.
- Has the property of resisting the effects of high blood pressure.
- Democratic price.
Flaws:
- Reduced strength level.
Composite
- It has some of the best performance characteristics due to its special structure, consisting of two layers of polyethylene, as well as a layer of expanded polystyrene foam in the form of granules.
Flaws:
ATTENTION! If you have difficulty choosing the material on top of which linoleum will be laid, professionals recommend using a layer based on natural cork. It is elastic and strong enough to prevent linoleum from sagging. It also has high levels of thermal insulation, which allows you to feel comfortable in the cold months.
Selection of material for work
Laying plywood on a wooden floor is an excellent solution. This DIY rough coating has the following advantages:
- low cost;
- ease of transportation;
- reduction of preparatory work time;
- good leveling of small floor defects and increasing the service life of the floor covering;
- strength and wear resistance of the material;
- flexibility, which allows it not to break or crack during operation and installation;
- minimum number of joints between sheets;
- installation is carried out without serious labor costs.
Preparatory work
Before laying plywood on a wood floor in your home, the flooring and surface must be prepared. Do-it-yourself activities are as follows:
- the base for installing plywood must be cleared of debris, dirt and treated with antiseptic compounds; when laying without logs, priming will need to be done;
- checking the condition of the floor, removing and replacing damaged elements;
- if you have time, it is recommended to arrange the sheets vertically and dry them for 2-3 weeks, the temperature should be at room temperature or slightly higher;
- after drying, the sheets are treated with antiseptic compounds;
- Next, it is necessary to ventilate the material;
- if there is a need to increase strength, it is worth treating the plywood with acrylic varnish; the coating is done in several layers;
- When laying it yourself, you need to bring the sheets into the room two days in advance and lay them out horizontally; this is done so that the material adapts to the temperature and humidity conditions of the room.
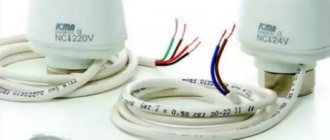
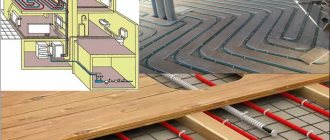
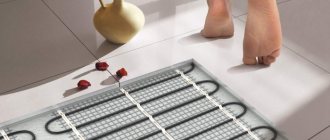
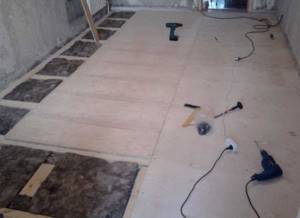
Insulation with electric cable
Heating is provided for 30% of the area, this is enough for an apartment with a centralized supply of hot water. When drawing up a cable layout, exclude places under the closet, wardrobe, bed and similar objects. More often, this type of floor heating is done in the bathroom, toilet and kitchen, with a floor covering made of tiled material.
For dry rooms, energy consumption per square meter per hour is 120 W/, with high humidity - 140 W. For example, for a room of 6 m2 you need 720 W/hour.
The thermostat is placed at a distance of 30 centimeters from the flooring. If it is electronic, then you need to install it higher.
The cable is distributed evenly on the foil-insulating material over the entire area of the site, observing a step of 20 to 40 centimeters. The brought out ends are connected to a power source. The maximum cable length should not exceed 6 meters.
After checking the functionality of the entire system, it is filled with concrete mixture. Bubbles from the inside are removed using the rules for leveling the solution (needle roller).
Note: You can use an electric floor in mats, which will significantly reduce the installation time.
Useful installation video
Methods of carrying out work
Installation in the house can be done in two ways:
- laying on an old wooden floor (suitable for small height differences);
- installation along joists (with differences of 1 cm or more).
Leveling the old floor
In this case, fastening plywood can be done in three ways:
It is worth noting that the latter option provides the most reliable fastening of sheets than laying with glue. Adhesive compositions can be water-based, two-component, mounting adhesive or bustylate are also used.
Installation with glue is carried out in the following order. After completing the preparatory work, the floors are checked with a level. If the vertical difference is less than 1 cm, then you can use the method described below. To compensate for unevenness with your own hands, use a plywood backing, the joints of which are glued with tape.
Layout options for plywood sheets
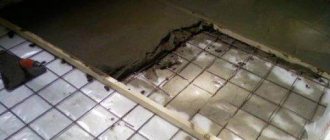
Next, you need to lay out the sheets, which will allow you to cut the source material in the most efficient way. The plywood is pre-laid out, taking into account the seams for expansion of the material under load and with temperature fluctuations (damper seams are 3-4 mm). Leave 8-10 mm between the wall and the subfloor.
Having laid out the sheets, the elements are cut with an electric jigsaw to the desired size. If you need to perform installation for a large room, use squares with a side of 50-60 cm. All parts of the coating must be numbered in the order in which they should be laid later.
When fastening with self-tapping screws, holes are drilled in the sheets, which are then countersunk using a larger drill. When laying with glue, it would also be wise to make additional fastening. The holes are located at a distance of 2 cm from the edge of the part. The pitch between fasteners is taken to be 15-20 cm.
The production of work begins with such elements as niches, ledges, raised podiums.
When attaching with glue and other methods, it is necessary to place the elements of the subfloor with a bandage. This is similar to brickwork, that is, each subsequent row is mounted offset from the previous one. The easiest way is to offset it by half a sheet. Minimum displacement – 10 cm.
The glue is applied in an even layer 2-3 mm thick to the base. After laying the sheets, they are pressed down with a roller. To ensure greater reliability when installing with glue and to prevent displacement, self-tapping screws are used.
After fixing, the sheets are sanded with a special machine with a coarse sanding attachment. The evenness of the rough coating is checked by the rule (a lathe at least 2 meters long). It is applied to the surface and the tightness of the fit is checked. The gaps between the tool and the surface when laying on glue should be no more than 2 mm.
How to insulate a floor with penofol with your own hands, installation technology, video diagram
Penofol is an effective thermal insulation material that has low thermal conductivity and reliably protects homes from the cold even when laying a thin layer of material. It is often used for floor insulation, since due to its special properties, penofol increases heat transfer resistance.
Scheme of laying penofol with the reflective layer down.
Penofol can be perfectly combined with mineral wool and fiberglass when insulating floors, where it will serve as a vapor barrier. The use of this material will be appropriate in those structures that require not only thermal but also noise protection, but the thickness of the insulator should be minimal. To insulate a floor with penofol, you do not need to additionally use hydro- and vapor barrier membranes, since the material can become a replacement for them.
Penofol classification
Since the production of penofol began, its properties, scope of application and structure have undergone enormous changes. Previously, the material took the form of a roll of cross-linked polyethylene foam, one side of which was foiled with aluminum. This type of material is still used to insulate rooms, as it is highly efficient. In addition to the classic type of penofol, other types of material are produced, which are endowed with a number of useful properties:
Scheme of floor insulation with penofol with double-sided foil.
- With one-sided foil - type “A”. Used in conjunction with other materials for insulation.
- With double-sided foil - type “B”. Standalone use is allowed.
- Type “C” - one side is covered with special glue and protective film, and the other is covered with foil. Installed by gluing to a surface that requires insulation.
- Types “R” and “M” are embossed penofol with one foil side.
- Type “ALP” - has one-sided foil up to 14 microns, which is laminated with polyethylene film.
- Perforated material. It has a special structure that allows air to pass through.
The type of penofol is selected depending on the type of insulation work, i.e. walls, floor, roof.
Penofol laying technology
Penofol characteristics table.
Before insulating the floor with insulating material, you need to decide on its type and installation technology. Penofol types “C” and “A” must be laid under the finished floor. The insulation process begins with a concrete screed mixed with expanded clay, or with the placement of foam plastic slabs with a thickness of 5 to 10 cm. Next, penofol is laid with an overlap of about 10 cm and all joints are taped with construction tape.
It should be noted that condensation may settle on the thermal insulation material, so measures must be taken to prevent this phenomenon. To do this, fill slats up to 2 cm thick above the foil surface, which will create a ventilated space. If a wooden floor is being insulated, then the role of slats is played by logs
It is important to remember that all slats and joists must be impregnated with antiseptic and drying oil to protect the wood from rotting
If insulation is carried out using a “warm floor” system, then penofol is laid with the foil side down on a completely dry screed, and in other cases the material must be placed with the reflective side up. A polyethylene film is spread over the heat insulator, which will act as a vapor barrier. To insulate the floor on the lower floor located above the basement, type “B” penofol should be used.
As a rule, when installing a “warm floor” system, the heating elements must be filled with screed in order to subsequently obtain a flat surface for laying, for example, laminate flooring. In such cases, the “ALP” type of penofol should be used, since its foil side is laminated with a film, and, as is known, cement is aggressive towards aluminum.
Floor insulation with penofol of this type is performed on top of the primary screed, with the reflective side being on top. The sheets are laid with a slight bend, about 10 cm, on the walls and they are glued with aluminum tape. Next, heating elements are installed, a reinforcing mesh is laid, and the entire floor area is filled with concrete screed. When the surface is completely dry, it is necessary to trim the free edges of the insulation.
Using penofol for floor insulation is the best solution. With this material, moisture will not penetrate into the room, noise will decrease and it will become much warmer, since the foil surface reflects heat, directing it back into the house.